- 10.1. REST
- 10.2. Keycloak SSO integration
- 10.2.1. Scenario
- 10.2.2. Install and setup a Keycloak server
- 10.2.3. Create and setup the demo realm
- 10.2.4. Install and setup jBPM Workbench
- 10.2.5. Securing workbench remote services via Keycloak
- 10.2.6. Securing workbench's file system services via Keycloak
- 10.2.7. Execution server
- 10.2.8. Consuming remote services
REST API calls to Knowledge Store allow you to manage the Knowledge Store content and manipulate the static data in the repositories of the Knowledge Store. The calls are asynchronous, that is, they continue their execution after the call was performed as a job. The job ID is returned by every calls to allow after the REST API call was performed to request the job status and verify whether the job finished successfully. Parameters of these calls are provided in the form of JSON entities.
When using Java code to interface with the REST API, the classes used in POST operations
or otherwise returned by various operations can be found in the (org.kie.workbench.services:)kie-wb-common-services JAR. All
of the classes mentioned below can be found in the org.kie.workbench.common.services.shared.rest package in that JAR.
Every Knowledge Store REST call returns its job ID after it was sent. This is necessary as the calls are asynchronous and you need to be able to reference the job to check its status as it goes through its lifecycle. During its lifecycle, a job can have the following statuses:
ACCEPTED: the job was accepted and is being processedBAD_REQUEST: the request was not accepted as it contained incorrect contentRESOURCE_NOT_EXIST: the requested resource (path) does not existDUPLICATE_RESOURCE: the resource already existsSERVER_ERROR: an error on the server occurredSUCCESS: the job finished successfullyFAIL: the job failedDENIED: the job was deniedGONE: the job ID could not be foundA job can be GONE in the following cases:
The job was explicitly removed
The job finished and has been deleted from the status cache (the job is removed from status cache after the cache has reached its maximum capacity)
The job never existed
The following job calls are provided:
- [GET] /jobs/{jobID}
Returns the job status
Returns a
JobResultinstanceExample 10.1. An example (formatted) response body to the get job call on a repository clone request
"{ "status":"SUCCESS", "jodId":"1377770574783-27", "result":"Alias: testInstallAndDeployProject, Scheme: git, Uri: git://testInstallAndDeployProject", "lastModified":1377770578194,"detailedResult":null }"- [DELETE] /jobs/{jobID}
Removes the job: If the job is not yet being processed, this will remove the job from the job queue. However, this will not cancel or stop an ongoing job
Returns a
JobResultinstance
Repository calls are calls to the Knowledge Store that allow you to manage its Git repositories and their projects.
The following repositories calls are provided:
- [GET] /repositories
Gets information about the repositories in the Knowledge Store
Returns a
Collection<Map<String, String>>orCollection<RepositoryRequest>instance, depending on the JSON serialization library being used. The keys used in theMap<String, String>instance match the fields in theRepositoryRequestclassExample 10.2. An example (formatted) response body to the get repositories call
[ { "name":"wb-assets", "description":"generic assets", "userName":null, "password":null, "requestType":null, "gitURL":"git://bpms-assets" }, { "name":"loanProject", "description":"Loan processes and rules", "userName":null, "password":null, "requestType":null, "gitURL":"git://loansProject" } ]- [GET] /repositories/{repositoryName}
Gets information about a repository
Returns a
Map<String, String>orRepositoryRequestinstance, depending on the JSON serialization library being used. The keys used in theMap<String, String>instance match the fields in theRepositoryRequestclassExample 10.3. An example (formatted) response body to the get repository call
{ "name":"wb-assets", "description":"generic assets", "userName":null, "password":null, "requestType":null, "gitURL":"git://bpms-assets" }- [POST] /repositories
Creates a new empty repository or a new repository cloned from an existing (git) repository
Consumes a
RepositoryRequestinstanceReturns a
CreateOrCloneRepositoryRequestinstanceExample 10.4. An example (formatted) response body to the create repositories call
{ "name":"new-project-repo", "description":"repo for my new project", "userName":null,"password":null, "requestType":"new", "gitURL":null }- [DELETE] /repositories/{repositoryName}
Removes the repository from the Knowledge Store
Returns a
RemoveRepositoryRequestinstance- [POST] /repositories/{repositoryName}/projects/
Creates a project in the repository
Consumes an
EntityinstanceReturns a
CreateProjectRequestinstanceExample 10.5. An example (formatted) request body that defines the project to be created
{ "name":"myProject", "description": "my project" }- [DELETE] /repositories/{repositoryName}/projects/
Deletes the project in the repository
Returns a
DeleteProjectRequestinstance- [GET] /repositories/{repositoryName}/projects/
Gets information about the projects
Returns a
Collection<Map<String, String>>orCollection<ProjectResponse>instance, depending on the JSON serialization library being used. The keys used in theMap<String, String>instance match the fields in theProjectResponseclassExample 10.6. An example (formatted) response body to the get projects call
[
  {
    "name":"wb-assets",
    "description":"generic assets",
    "groupId":"org.test",
    "version":"1.0"
 },
 {
   "name":"loanProject",
   "description":"Loan processes and rules",
    "groupId":"com.bank",
    "version":"3.7"
 }
]
Organizational unit calls are calls to the Knowledge Store that allow you to manage its organizational units, so as to organize the connected Git repositories.
The following organizationalUnits calls are provided:
- [POST] /organizationalunits
Creates an organizational unit in the Knowledge Store
Consumes an
OrganizationalUnitinstanceReturns a
CreateOrganizationalUnitRequestinstanceExample 10.7. An example (formatted) request body defining a new organizational unit to be created
{ "name":"testgroup", "description":"", "owner":"tester", "repositories":["testGroupRepository"] }- [GET] /organizationalunits/{orgUnitName}
Creates an organizational unit
Consumes an
OrganizationalUnitinstanceReturns a
CreateOrganizationalUnitRequestinstanceExample 10.8. An example (formatted) request body defining a new organizational unit to be created
{ "name":"testgroup", "description":"", "owner":"tester", "repositories":["testGroupRepository"] }- [POST] /organizationalunits/{orgUnitName}
Creates an organizational unit in the Knowledge Store
Consumes an
UpdateOrganizationalUnitinstanceReturns a
UpdateOrganizationalUnitRequestinstanceExample 10.9. An example (formatted) request body defining a new organizational unit to be created
{ "name":"testgroup", "description":"", "owner":"tester", "repositories":["testGroupRepository"] }- [DELETE] /organizationalunits/{organizationalUnitName}
Deletes a organizational unit
Returns a
RemoveOrganizationalUnitRequestinstance- [POST] /organizationalunits/{organizationalUnitName}/repositories/{repositoryName}
Adds the repository to the organizational unit
Returns a
AddRepositoryToOrganizationalUnitRequestinstance- [DELETE] /organizationalunits/{organizationalUnitName}/repositories/{repositoryName}
Removes the repository from the organizational unit
Returns a
RemoveRepositoryFromOrganizationalUnitRequestinstance
Maven calls are calls to a Project in the Knowledge Store that allow you compile and deploy the Project resources.
The following maven calls are provided:
- [POST] /repositories/{repositoryName}/projects/{projectName}/maven/compile
Compiles the project (equivalent to
mvn compile)Consumes a
BuildConfiginstance. While this must be supplied, it's not needed for the operation and may be left blank.Returns a
CompileProjectRequestinstance- [POST] /repositories/{repositoryName}/projects/{projectName}/maven/install
Installs the project (equivalent to
mvn install)Consumes a
BuildConfiginstance. While this must be supplied, it's not needed for the operation and may be left blank.Returns a
InstallProjectRequestinstance- [POST] /repositories/{repositoryName}/projects/{projectName}/maven/test
Compiles the project runs a test as part of compilation
Consumes a
BuildConfiginstanceReturns a
TestProjectRequestinstance- [POST] /repositories/{repositoryName}/projects/{projectName}/maven/deploy
Deploys the project (equivalent to
mvn deploy)Consumes a
BuildConfiginstance. While this must be supplied, it's not needed for the operation and may be left blank.Returns a
DeployProjectRequestinstance
The URL templates in the table below are relative the following URL:
http://server:port/business-central/rest
Table 10.1. Knowledge Store REST calls
| URL Template | Type | Description |
|---|---|---|
| /jobs/{jobID} | GET | return the job status |
| /jobs/{jobID} | DELETE | remove the job |
| /organizationalunits | GET | return a list of organizational units |
| /organizationalunits | POST |
create an organizational unit in the Knowledge Store described by the JSON |
| /organizationalunits/{organizationalUnitName}/repositories/{repositoryName} | POST | add a repository to an organizational unit |
| /organizationalunits/{organizationalUnitName}/repositories/{repositoryName} | DELETE | remove a repository from an organizational unit |
| /repositories/ | POST |
add the repository to the organizational unit described by the JSON |
| /repositories | GET | return the repositories in the Knowledge Store |
| /repositories/{repositoryName} | DELETE | remove the repository from the Knowledge Store |
| /repositories/ | POST | create or clone the repository defined by the JSON RepositoryRequest entity |
| /repositories/{repositoryName}/projects/ | POST | create the project defined by the JSON entity in the repository |
| /repositories/{repositoryName}/projects/{projectName}/maven/compile/ | POST | compile the project |
| /repositories/{repositoryName}/projects/{projectName}/maven/install | POST | install the project |
| /repositories/{repositoryName}/projects/{projectName}/maven/test/ | POST |
compile the project and run tests as part of compilation |
| /repositories/{repositoryName}/projects/{projectName}/maven/deploy/ | POST | deploy the project |
Single Sign On (SSO) and related token exchange mechanisms are becoming the most common scenario for the authentication and authorization in different environments on the web, specially when moving into the cloud.
This section talks about the integration of Keycloak with jBPM or Drools applications in order to use all the features provided on Keycloak. Keycloak is an integrated SSO and IDM for browser applications and RESTful web services. Lean more about it in the Keycloak's home page.
The result of the integration with Keycloak has lots of advantages such as:
Provide an integrated SSO and IDM environment for different clients, including jBPM and Drools workbenches
Social logins - use your Facebook, Google, Linkedin, etc accounts
User session management
And much more...
Next sections cover the following integration points with Keycloak:
Workbench authentication through a Keycloak server
It basically consists of securing both web client and remote service clients through the Keycloak SSO. So either web interface or remote service consumers ( whether a user or a service ) will authenticate into trough KC.
Execution server authentication through a Keycloak server
Consists of securing the remote services provided by the execution server (as it does not provides web interface). Any remote service consumer ( whether a user or a service ) will authenticate trough KC.
Consuming remote services
This section describes how a third party clients can consume the remote service endpoints provided by both Workbench and Execution Server, such as the REST API or remote file system services.
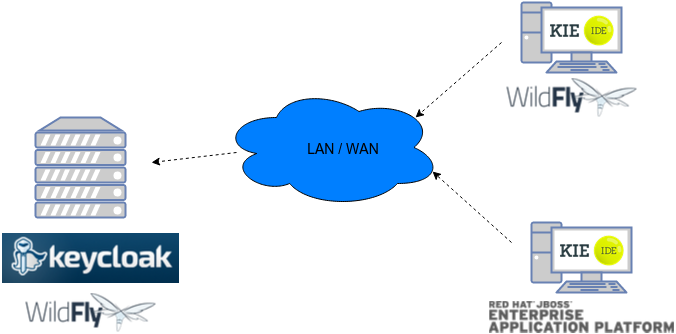
Consider the following diagram as the environment for this document's example:
Keycloak is a standalone process that provides remote authentication, authorization and administration services that can be potentially consumed by one or more jBPM applications over the network.
Consider these main steps for building this environment:
Install and setup a Keycloak server
Create and setup a Realm for this example - Configure realm's clients, users and roles
Install and setup the SSO client adapter & jBPM application
Note: The resulting environment and the different configurations for this document are based on the jBPM (KIE) Workbench, but same ones can also be applied for the KIE Drools Workbench as well.
Keycloak provides an extensive documentation and several articles about the installation on different environments. This section describes the minimal setup for being able to build the integrated environment for the example. Please refer to the Keycloak documentation if you need more information.
Here are the steps for a minimal Keycloak installation and setup:
Download latest version of Keycloak from the Downloads section. This example is based on Keycloak 1.9.0.Final
Unzip the downloaded distribution of Keycloak into a folder, let's refer it as
$KC_HOMERun the KC server - This example is based on running both Keycloak and jBPM on same host. In order to avoid port conflicts you can use a port offset for the Keycloak's server as:
$KC_HOME/bin/standalone.sh -Djboss.socket.binding.port-offset=100
Create a Keycloak's administration user - Execute the following command to create an admin user for this example:
$KC_HOME/bin/add-user.sh -r master -u 'admin' -p 'admin'
The Keycloak administration console will be available at http://localhost:8180/auth/admin (use the admin/admin for login credentials).
Security realms are used to restrict the access for the different application's resources.
Once the Keycloak server is running next step is about creating a realm. This realm will provide the different users, roles, sessions, etc for the jBPM application/s.
Keycloak provides several examples for the realm creation and management, from the official examples to different articles with more examples.
Follow these steps in order to create the demo realm used later in this document:
Go to the Keycloak administration console and click on Add realm button. Give it the name demo.
Go to the Clients section (from the main admin console menu) and create a new client for the demo realm:
Client ID: kie
Client protocol: openid-connect
Acces type: confidential
Root URL: http://localhost:8080
Base URL: /kie-wb-6.4.0.Final
Redirect URIs: /kie-wb-6.4.0.Final/*
The resulting kie client settings screen:

Note: As you can see in the above settings it's being considered the value kie-wb-6.4.0.Final for the application's context path. If your jbpm application will be deployed on a different context path, host or port, just use your concrete settings here.
Last step for being able to use the demo realm from the jBPM workbench is create the application's user and roles:
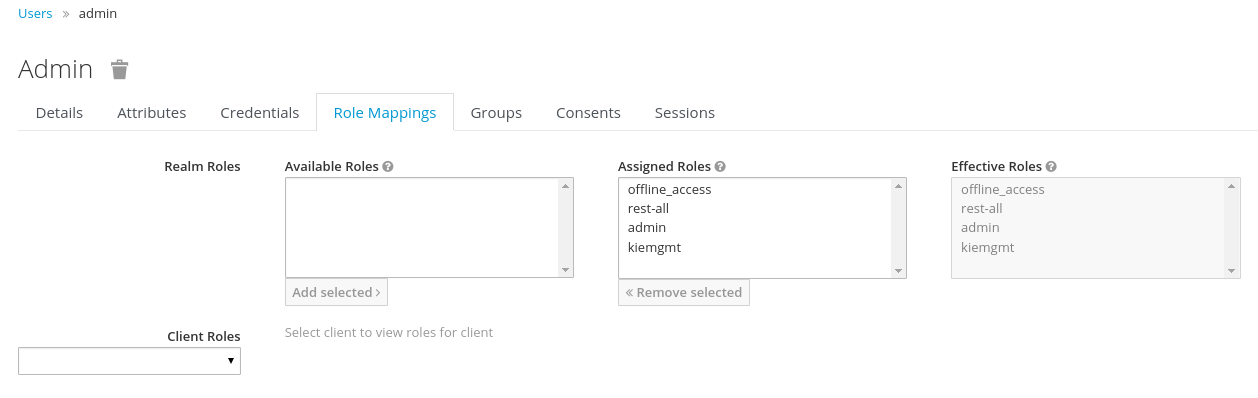
Go to the Roles section and create the roles admin, kiemgmt and rest-all
Go to the Users section and create the admin user. Set the password with value "password" in the credentials tab, unset the temporary switch.
In the Users section navigate to the Role Mappings tab and assign the admin, kiemgmt and rest-all roles to the admin user
At this point a Keycloak server is running on the host, setup with a minimal configuration set. Let's move to the jBPM workbench setup.
For this tutorial let's use a Wildfly as the application server for the jBPM workbench, as the jBPM installer does by default.
Let's assume, after running the jBPM installer, the $JBPM_HOME as the root path for the Wildfly server where the application has been deployed.
In order to use the Keycloak's authentication and authorization modules from the jBPM application, the Keycloak adapter for Wildfly must be installed on our server at $JBPM_HOME. Keycloak provides multiple adapters for different containers out of the box, if you are using another container or need to use another adapter, please take a look at the adapters configuration from Keycloak docs. Here are the steps to install and setup the adapter for Wildfly 8.2.x:
Download the adapter from here
Execute the following commands on your shell:
cd $JBPM_HOME/unzip keycloak-wf8-adapter-dist.zip // Install the KC client adapter

cd $JBPM_HOME/bin
./standalone.sh -c standalone-full.xml // Setup the KC client adapter.

// ** Once server is up, open a new command line terminal and run:
cd $JBPM_HOME/bin
./jboss-cli.sh -c --file=adapter-install.cli
Once installed the KC adapter into Wildfly, next step is to configure the adapter in order to specify different settings such as the location for the authentication server, the realm to use and so on.
Keycloak provides two ways of configuring the adapter:
Per WAR configuration
Via Keycloak subsystem
In this example let's use the second option, use the Keycloak subsystem, so our WAR is free from this kind of settings. If you want to use the per WAR approach, please take a look here.
Edit the configuration file $JBPM_HOME/standalone/configuration/standalone-full.xml and locate the subsystem configuration section. Add the following content:
<subsystem xmlns="urn:jboss:domain:keycloak:1.1">
  <secure-deployment name="kie-wb-6.4.0-Final.war">
    <realm>demo</realm>
    <realm-public-key>MIIBIjANBgkqhkiG9w0BAQEFAAOCA...</realm-public-key>
    <auth-server-url>http://localhost:8180/auth</auth-server-url>
    <ssl-required>external</ssl-required>
    <resource>kie</resource>
    <enable-basic-auth>true</enable-basic-auth>
    <credential name="secret">925f9190-a7c1-4cfd-8a3c-004f9c73dae6</credential>
    <principal-attribute>preferred_username</principal-attribute>
  </secure-deployment>
</subsystem>
If you have imported the example json files from this document in step 2, you can just use same configuration as above by using your concrete deployment name . Otherwise please use your values for these configurations:
Name for the secure deployment - Use your concrete application's WAR file name
Realm - Is the realm that the applications will use, in our example, the demo realm created the previous step.
Realm Public Key - Provide here the public key for the demo realm. It's not mandatory, if it's not specified, it will be retrieved from the server. Otherwise, you can find it in the Keycloak admin console -> Realm settings ( for demo realm ) -> Keys
Authentication server URL - The URL for the Keycloak's authentication server
Resource - The name for the client created on step 2. In our example, use the value kie.
Enable basic auth - For this example let's enable Basic authentication mechanism as well, so clients can use both Token (Baerer) and Basic approaches to perform the requests.
Credential - Use the password value for the kie client. You can find it in the Keycloak admin console -> Clients -> kie -> Credentials tab -> Copy the value for the secret.
For this example you have to take care about using your concrete values for secure-deployment name, realm-public-key and credential password. You can find detailed information about the KC adapter configurations here.
At this point a Keycloak server is up and running on the host, and the KC adapter is installed and configured for the jBPM application server. You can run the application using:
$JBPM_HOME/bin/standalone.sh -c standalone-full.xml
You can navigate into the application once the server is up at:
http://localhost:8080/kie-wb-6.4.0.Final
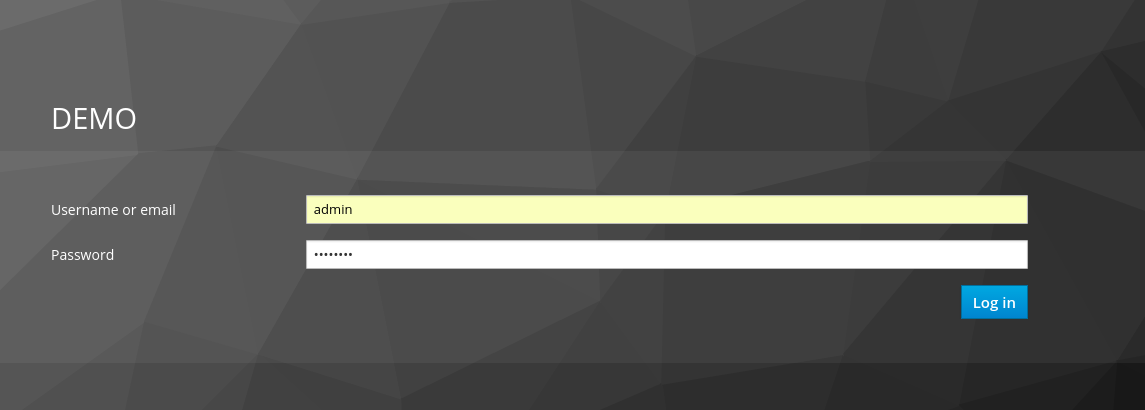
Use your Keycloak's admin user credentials to login: admin/password.
Both jBPM and Drools workbenches provides different remote service endpoints that can be consumed by third party clients using the remote API.
In order to authenticate those services thorough Keycloak the BasicAuthSecurityFilter must be disabled, apply those modifications for the the WEB-INF/web.xml file (app deployment descriptor) from jBPM's WAR file:
Remove the following filter from the deployment descriptor:
<filter>
  <filter-name>HTTP Basic Auth Filter</filter-name>
  <filter-class>org.uberfire.ext.security.server.BasicAuthSecurityFilter</filter-class>
  <init-param>
    <param-name>realmName</param-name>
    <param-value>KIE Workbench Realm</param-value>
  </init-param>
</filter>

<filter-mapping>
  <filter-name>HTTP Basic Auth Filter</filter-name>
  <url-pattern>/rest/*</url-pattern>
  <url-pattern>/maven2/*</url-pattern>
  <url-pattern>/ws/*</url-pattern>
</filter-mapping>
Constraint the remote services URL patterns as:
<security-constraint>
  <web-resource-collection>
    <web-resource-name>remote-services</web-resource-name>
    <url-pattern>/rest/*</url-pattern>
    <url-pattern>/maven2/*</url-pattern>
    <url-pattern>/ws/*</url-pattern>
  </web-resource-collection>
  <auth-constraint>
    <role-name>rest-all</role-name>
  </auth-constraint>
</security-constraint>
Important note: The user that consumes the remote services must be member of role rest-all. As on described previous steps, the admin user in this example it's already a member of the rest-all role.
In order to consume other remote services such as the file system ones (e.g. remote GIT), a specific Keycloak login module must be used for the application's security domain in the $JBPM_HOME/standalone/configuration/standalone-full.xml file. By default the workbench uses the other security domain, so the resulting configuration on the $JBPM_HOME/standalone/configuration/standalone-full.xml should be such as:
      <security-domain name="other" cache-type="default">
        <authentication>
          <login-module code="org.keycloak.adapters.jaas.DirectAccessGrantsLoginModule" flag="required">
            <!-- Parameter value can be a file system absolute path or a classpath (e.g. "classpath:/some-path/kie-git.json")-->
            <module-option name="keycloak-config-file" value="$JBPM_HOME/kie-git.json"/>
          </login-module>
        </authentication>
      </security-domain>
Note that:
The login modules on the other security domain in the $JBPM_HOME/standalone/configuration/standalone-full.xml file must be REPLACED by the above given one.
Replace $JBPM_HOME/kie-git.json by the path (on file system) or the classpath (e.g. classpath:/some-path/kie-git.json) for the json configuration file used for the remote services client. Please continue reading in order to create this Keycloak client and how to obtain this json file.
At this point, remote services that use JAAS for the authentication process, such as the file system ones ( e.g. GIT ), are secured by Keycloak using the client specified in the above json configuration file. So let's create this client on Keycloak and generate the required JSON file:
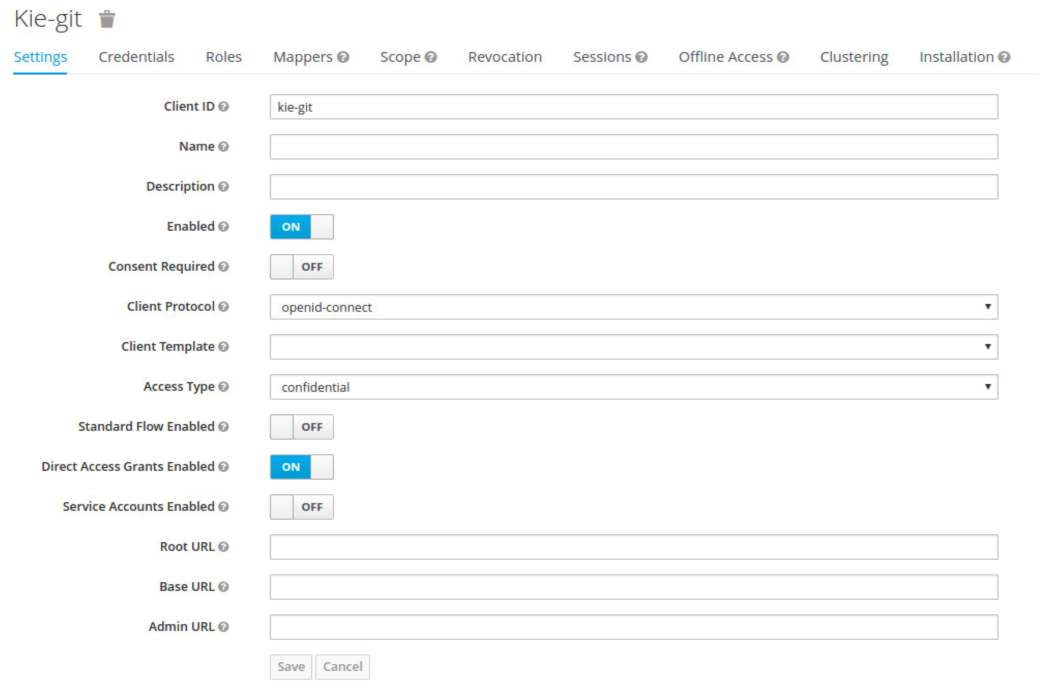
Navigate to the KC administration console and create a new client for the demo realm using kie-git as name.
Enable Direct Access Grants Enabled option, disable Standard Flow Enabled and use a confidential access type for this client. See below image as example:
Go to the Installation tab in same kie-git client configuration screen and export using the Keycloak OIDC JSON type.
Finally copy this generated JSON file into an accessible directory on the server's file system or add it in the application's classpath. Use this path value as the keycloak-config-file argument for the above configuration of the org.keycloak.adapters.jaas.DirectAccessGrantsLoginModule login module.
More information about Keycloak JAAS Login modules can be found here.
At this point, the internal Git repositories can be cloned by all users authenticated via the Keycloak server. Command example:
git clone ssh://admin@localhost:8001/system
The KIE Execution Server provides a REST API than can be consumed for any third party clients,. This this section is about how to integration the KIE Execution Server with the Keycloak SSO in order to delegate the third party clients identity management to the SSO server.
Consider the above environment running, so consider having:
A Keycloak server running and listening on http://localhost:8180/auth
A realm named demo with a client named kie for the jBPM Workbench
A jBPM Workbench running at http://localhost:8080/kie-wb-6.4.0-Final
Follow these steps in order to add an execution server into this environment:
Create the client for the execution server on Keycloak
Install setup and the Execution server ( with the KC client adapter )
As per each execution server is going to be deployed, you have to create a new client on the demo realm in Keycloak.:
Go to the KC admin console -> Clients -> New client
Name: kie-execution-server
Root URL: http://localhost:8280/
Client protocol: openid-connect
Access type: confidential ( or public if you want so, but not recommended for production environments)
Valid redirect URIs: /kie-server-6.4.0.Final/*
Base URL: /kie-server-6.4.0.Final
In this example the admin user already created on previous steps is the one used for the client requests. So ensure that the admin user is member of the role kie-server in order to use the execution server's remote services. If the role does not exist, create it.
Note: This example considers that the execution server will be configured to run using a port offset of 200, so the HTTP port will be available at localhost:8280.
At this point, a client named kie-execution-server is ready on the KC server to use from the execution server.
Let's install, setup and deploy the execution server:
Install another Wildfly server to use for the execution server and the KC client adapter as well. You can follow above instructions for the Workbench or follow the official adapters documentation
Edit the standalone-full.xml file from the Wildfly server's configuration path and configure the KC subsystem adapter as:
<secure-deployment name="kie-server-6.4.0.Final.war">
    <realm>demo</realm>
    <realm-public-key>MIGfMA0GCSqGSIb...</realm-public-key>
    <auth-server-url>http://localhost:8180/auth</auth-server-url>
    <ssl-required>external</ssl-required>
    <resource>kie-execution-server</resource>
    <enable-basic-auth>true</enable-basic-auth>
    <credential name="secret">e92ec68d-6177-4239-be05-28ef2f3460ff</credential>
    <principal-attribute>preferred_username</principal-attribute>
</secure-deployment>
Consider your concrete environment settings if different from this example:
Secure deployment name -> use the name of the execution server war file being deployed
Public key -> Use the demo realm public key or leave it blank, the server will provide one if so
Resource -> This time, instead of the kie client used in the WB configuration, use the kie-execution-server client
Enable basic auth -> Up to you. You can enable Basic auth for third party service consumers
Credential -> Use the secret key for the kie-execution-server client. You can find it in the Credentialstab of the KC admin console
Just deploy the execution server in Wildfly using any of the available mechanisms. Run the execution server using this command:
$EXEC_SERVER_HOME/bin/standalone.sh -c standalone-full.xml -Djboss.socket.binding.port-offset=200 -Dorg.kie.server.id=<ID> -Dorg.kie.server.user=<USER> -Dorg.kie.server.pwd=<PWD> -Dorg.kie.server.location=<LOCATION_URL> -Dorg.kie.server.controller=<CONTROLLER_URL> -Dorg.kie.server.controller.user=<CONTROLLER_USER> -Dorg.kie.server.controller.pwd=<CONTOLLER_PASSWORD>
Example:
$EXEC_SERVER_HOME/bin/standalone.sh -c standalone-full.xml -Djboss.socket.binding.port-offset=200 -Dorg.kie.server.id=kieserver1 -Dorg.kie.server.user=admin -Dorg.kie.server.pwd=password -Dorg.kie.server.location=http://localhost:8280/kie-server-6.4.0.Final/services/rest/server -Dorg.kie.server.controller=http://localhost:8080/kie-wb-6.4.0.Final/rest/controller -Dorg.kie.server.controller.user=admin -Dorg.kie.server.controller.pwd=password
mportant note: The users that will consume the execution server remote service endpoints must have the role kie-server assigned. So create and assign this role in the KC admin console for the users that will consume the execution server remote services.
Once up, you can check the server status as (considered using Basic authentication for this request, see nextConsuming remote services for more information):
curl http://admin:password@localhost:8280/kie-server-6.4.0.Final/services/rest/server/
In order to use the different remote services provided by the Workbench or by an Execution Server, your client must be authenticated on the KC server and have a valid token to perform the requests.
Remember that in order to use the remote services, the authenticated user must have assigned:
The role rest-all for using the WB remote services
The role kie-server for using the Execution Server remote services
Please ensure necessary roles are created and assigned to the users that will consume the remote services on the Keycloak admin console.
You have two options to consume the different remove service endpoints:
Using basic authentication, if the application's client supports it
Using Bearer ( token) based authentication
If the KC client adapter configuration has the Basic authentication enabled, as proposed in this guide for both WB (step 3.2) and Execution Server, you can avoid the token grant/refresh calls and just call the services as the following examples.
Example for a WB remote repositories endpoint:
curl http://admin:password@localhost:8080/kie-wb-6.4.0.Final/rest/repositories
Example to check the status for the Execution Server:
curl http://admin:password@localhost:8280/kie-server-6.4.0.Final/services/rest/server/
First step is to create a new client on Keycloak that allows the third party remote service clients to obtain a token. It can be done as:
Go to the KC admin console and create a new client using this configuration:
Client id: kie-remote
Client protocol: openid-connect
Access type: public
Valid redirect URIs: http://localhost/
As we are going to manually obtain a token and invoke the service let's increase the lifespan of tokens slightly. In production access tokens should have a relatively low timeout, ideally less than 5 minutes:
Go to the KC admin console
Click on your Realm Settings
Click on Tokens tab
Change the value for Access Token Lifespan to 15 minutes ( That should give us plenty of time to obtain a token and invoke the service before it expires )
Once a public client for our remote clients has been created, you can now obtain the token by performing an HTTP request to the KC server's tokens endpoint. Here is an example for command line:
RESULT=`curl --data "grant_type=password&client_id=kie-remote&username=admin&passwordpassword=<the_client_secret>" http://localhost:8180/auth/realms/demo/protocol/openid-connect/token`
TOKEN=`echo $RESULT | sed 's/.*access_token":"//g' | sed 's/".*//g'`
At this point, if you echo the $TOKEN it will output the token string obtained from the KC server, that can be now used to authorize further calls to the remote endpoints. For exmple, if you want to check the internal jBPM repositories:
curl -H "Authorization: bearer $TOKEN" http://localhost:8080/kie-wb-6.4.0.Final/rest/repositories