
Getting Started
Introduction and getting started with jBPM
1. Overview
1.1. What is jBPM?
jBPM is a flexible Business Process Management (BPM) Suite. It is light-weight, fully open-source (distributed under Apache License 2.0) and written in Java. It allows you to model, execute, and monitor business processes and cases throughout their life cycle.
A business process allows you to model your business goals by describing the steps that need to be executed to achieve those goals, and the order of those goals is depicted using a flow chart. This process greatly improves the visibility and agility of your business logic. jBPM focuses on executable business processes, which are business processes that contain enough detail so they can actually be executed on a BPM jBPM engine. Executable business processes bridge the gap between business users and developers as they are higher-level and use domain-specific concepts that are understood by business users but can also be executed directly.
Business processes need to be supported throughout their entire life cycle: authoring, deployment, process management and task lists, and dashboards and reporting.
The core of jBPM is a light-weight, extensible workflow engine written in pure Java that allows you to execute business processes using the latest BPMN 2.0 specification. It can run in any Java environment, embedded in your application or as a service.
On top of the jBPM engine, a lot of features and tools are offered to support business processes throughout their entire life cycle:
-
Pluggable human task service based on WS-HumanTask for including tasks that need to be performed by human actors.
-
Pluggable persistence and transactions (based on JPA / JTA).
-
Case management capabilities added to the jBPM engine to support more adaptive and flexible use cases
-
Web-based process designer to support the graphical creation and simulation of your business processes (drag and drop).
-
Web-based data modeler and form modeler to support the creation of data models and task forms
-
Web-based, customizable dashboards and reporting
-
All combined in one web-based Business Central application, supporting the complete BPM life cycle:
-
Modeling and deployment - author your processes, rules, data models, forms and other assets
-
Execution - execute processes, tasks, rules and events on the core runtime engine
-
Runtime Management - work on assigned task, manage process instances, etc
-
Reporting - keep track of the execution using Business Activity Monitoring capabilities
-
-
Eclipse-based developer tools to support the modeling, testing and debugging of processes
-
Remote API to jBPM engine as a service (REST, JMS, Remote Java API)
-
Integration with Maven, Spring, OSGi, etc.
BPM creates the bridge between business analysts, developers and end users by offering process management features and tools in a way that both business users and developers like. Domain-specific nodes can be plugged into the palette, making the processes more easily understood by business users.
jBPM supports case management by offering more advanced features to support adaptive and dynamic processes that require flexibility to model complex, real-life situations that cannot easily be described using a rigid process. We bring control back to the end users by allowing them to control which parts of the process should be executed; this allows dynamic deviation from the process.
jBPM is not just an isolated jBPM engine. Complex business logic can be modeled as a combination of business processes with business rules and complex event processing. jBPM can be combined with the Drools project to support one unified environment that integrates these paradigms where you model your business logic as a combination of processes, rules and events.
1.2. Overview of jBPM
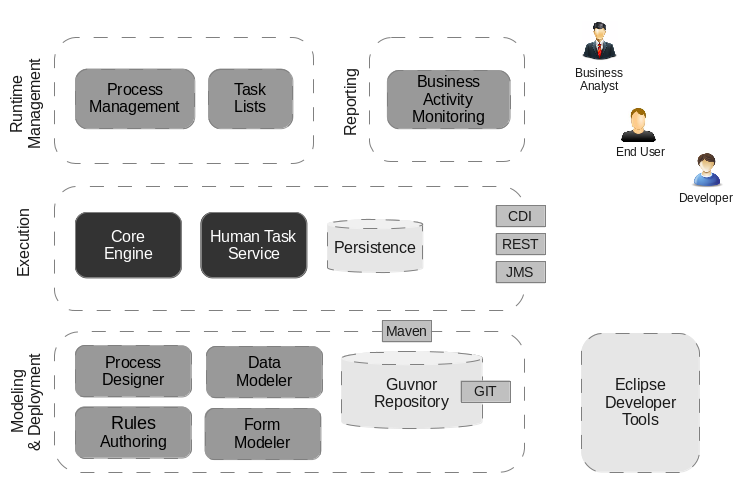
This figure gives an overview of the different components of the jBPM project.
-
The core engine is the heart of the project and allows you to execute business processes in a flexible manner. It is a pure Java component that you can choose to embed as part of your application or deploy it as a service and connect to it through the web-based UI or remote APIs.
-
An optional core service is the human task service that will take care of the human task life cycle if human actors participate in the process.
-
Another optional core service is runtime persistence; this will persist the state of all your process instances and log audit information about everything that is happening at runtime.
-
Applications can connect to the core engine through its Java API or as a set of CDI services, but also remotely through a REST and JMS API.
-
-
Web-based tools allow you to model, simulate and deploy your processes and other related artifacts (like data models, forms, rules, etc.):
-
The process designer allows business users to design and simulate business processes in a web-based environment.
-
The data modeler allows non-technical users to view, modify and create data models for use in your processes.
-
A web-based form modeler also allows you to create, generate or edit forms related to your processes (to start the process or to complete one of the user tasks).
-
Rule authoring allows you to specify different types of business rules (decision tables, guided rules, etc.) for combination with your processes.
-
All assets are stored and managed by the Guvnor repository (exposed through Git) and can be managed (versioning), built and deployed.
-
-
The web-based management console allows business users to manage their runtime (manage business processes like start new processes, inspect running instances, etc.), to manage their task list and to perform Business Activity Monitoring (BAM) and see reports.
-
The Eclipse-based developer tools are an extension to the Eclipse IDE, targeted towards developers, and allows you to create business processes using drag and drop, test and debug your processes, etc.
Each of the component is described in more detail below.
1.3. jBPM engine in jBPM
The jBPM engine implements the Business Process Management (BPM) paradigm in jBPM. BPM is a business methodology that enables modeling, measuring, and optimizing processes within an enterprise.
In BPM, a repeatable business process is represented as a workflow diagram. The Business Process Model and Notation (BPMN) specification defines the available elements of this diagram. The jBPM engine implements a large subset of the BPMN 2.0 specification.
With the jBPM engine, business analysts can develop the diagram itself. Developers can implement the business logic of every element of the flow in code, making an executable business process. Users can execute the business process and interact with it as necessary. Analysts can generate metrics that reflect the efficiency of the process.
The workflow diagram consists of a number of nodes. The BPMN specification defines many kinds of nodes, including the following principal types:
-
Event: Nodes representing something happening in the process or outside of the process. Typical events are the start and the end of a process. An event can throw messages to other processes and catch such messages. Circles on the diagram represent events.
-
Activity: Nodes representing an action that must be taken (whether automatically or with user involvement). Typical events are a task, which represents an action taken within the process, and a call to a sub-process. Rounded rectangles on the diagram represent activities.
-
Gateway: A branching or merging node. A typical gateway evaluates an expression and, depending on the result, continues to one of several execution paths. Diamond shapes on the diagram represent gateways.
When a user starts the process, a process instance is created. The process instance contains a set of data, or context, stored in process variables. The state of a process instance includes all the context data and also the current active node (or, in some cases, several active nodes).
Some of these variables can be initialized when a user starts the process. An activity can read from process variables and write to process variables. A gateway can evaluate process variables to determine the execution path.
For example, a purchase process in a shop can be a business process. The content of the user’s cart can be the initial process context. At the end of execution, the process context can contain the payment confirmation and shipment tracking details.
Optionally, you can use the BPMN data modeler in Business Central to design the model for the data in process variables.
The workflow diagram is represented in code by an XML business process definition. The logic of events, gateways, and sub-process calls are defined within the business process definition.
Some task types (for example, script tasks and the standard decision engine rule task) are implemented in the engine. For other task types, including all custom tasks, when the task must be executed the jBPM engine executes a call using the Work Item Handler API. Code external to the engine can implement this API, providing a flexible mechanism for implementing various tasks.
The jBPM engine includes a number of predefined types of tasks. These types include a script task that runs user Java code, a service task that calls a Java method or a Web Service, a decision task that calls a decision engine service, and other custom tasks (for example, REST and database calls).
Another predefined type of task is a user task, which includes interaction with a user. User tasks in the process can be assigned to users and groups.
The jBPM engine uses the KIE API to interact with other software components. You can run business processes as services on a KIE Server and interact with them using a REST implementation of the KIE API. Alternatively, you can embed business processes in your application and interact with them using KIE API Java calls. In this case, you can run the jBPM engine in any Java environment.
Business Central includes a user interface for users executing human tasks and a form modeler for creating the web forms for human tasks. However, you can also implement a custom user interface that interacts with the jBPM engine using the KIE API.
The jBPM engine supports the following additional features:
-
Support for persistence of the process information using the JPA standard. Persistence preserves the state and context (data in process variables) of every process instance, so that they are not lost in case any components are restarted or taken offline for some time. You can use an SQL database engine to store the persistence information.
-
Pluggable support for transactional execution of process elements using the JTA standard. If you use a JTA transaction manager, every element of the business process starts as a transaction. If the element does not complete, the context of the process instance is restored to the state in which it was before the element started.
-
Support for custom extension code, including new node types and other process languages.
-
Support for custom listener classes that are notified about various events.
-
Support for migrating running process instances to a new version of their process definition
The jBPM engine can also be integrated with other independent core services:
-
The human task service can manage user tasks when human actors need to participate in the process. It is fully pluggable and the default implementation is based on the WS-HumanTask specification. The human task service manages the lifecycle of the tasks, task lists, task forms, and some more advanced features like escalation, delegation, and rule-based assignments.
-
The history log can store all information about the execution of all the processes in the jBPM engine. While runtime persistence stores the current state of all active process instances, you need the history log to ensure access to historic information. The history log contains all current and historic states of all active and completed process instances. You can use the log to query for any information related to the execution of process instances for monitoring and analysis.
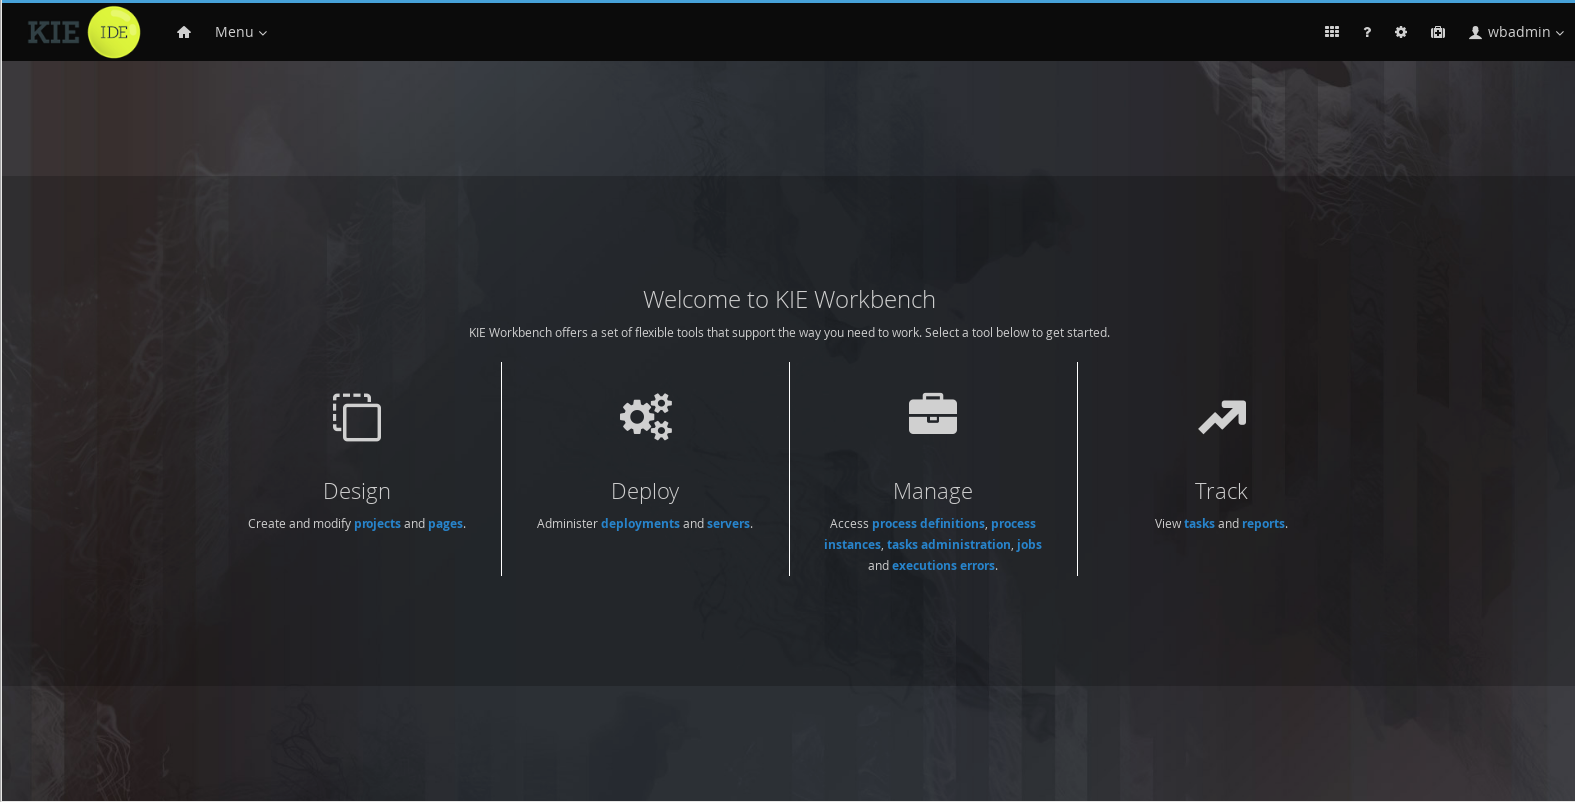
1.4. Business Central
The Business Central web-based application covers the complete life cycle of BPM projects starting at authoring phase, going through implementation, execution and monitoring. It combines a series web-based tools into one configurable solution to manage all assets and runtime data needed for the business solution.
It supports the following:
-
A repository service to store your business processes and related artifacts, using a Git repository, which supports versioning, remote Git access (as a file system) and access via REST.
-
A web-based user interface to manage your business processes, targeted towards business users; it also supports the visualization (and editing) of your artifacts (the web-based editors like designer, data and form modeler are integrated here), but also categorisation, build and deployment, etc..
-
Collaboration features which enable multiple actors (for example business users and developers) to work together on the same project.
1.4.1. Process Designer
The web-based jBPM Designer allows you to model your business processes in a web-based environment. It is targeted towards business users and offers a graphical editor for viewing and editing your business processes (using drag and drop), similar to the Eclipse plugin. It supports round-tripping between the Eclipse editor and the web-based designer. It also supports simulation of processes.
1.4.2. Data Modeler
Processes almost always have some kind of data to work with. The data modeler allows non-technical users to view, edit or create these data models.
Typically, a business process analyst or data analyst will capture the requirements for a process or application and turn these into a formal set of interrelated data structures. The new Data Modeler tool provides an easy, straightforward and visual aid for building both logical and physical data models, without the need for advanced development skills or explicit coding. The data modeler is transparently integrated into Business Central. Its main goals are to make data models first class citizens in the process improvement cycle and allow for full process automation through the integrated use of data structures (and the forms that will be used to interact with them).
1.4.3. Process Management
Business processes and all its related runtime information can be managed through Business Central. It is targeted towards process administrators users and its main features include:
-
Process definitions management: view the entire list of process currently deployed into a Kie Server and its details.
-
Process instances management: the ability to start new process instances, get a filtered list of process instances, visually inspect the state of a specific process instances.
-
Human tasks management: being able to get a list of all tasks, view details such as current assignees, comments, activity logs as well as send reminders and forward tasks to different users and more.
-
Execution Errors management: allows administrators to view any execution error reported in the Kie Server instance, inspect its details including stacktrace and perform the error acknowledgement.
-
Jobs management: possibility to view currently scheduled and schedule new Jobs to run in the Kie Server instance.

For more details around the entire management section please read the process management chapter.
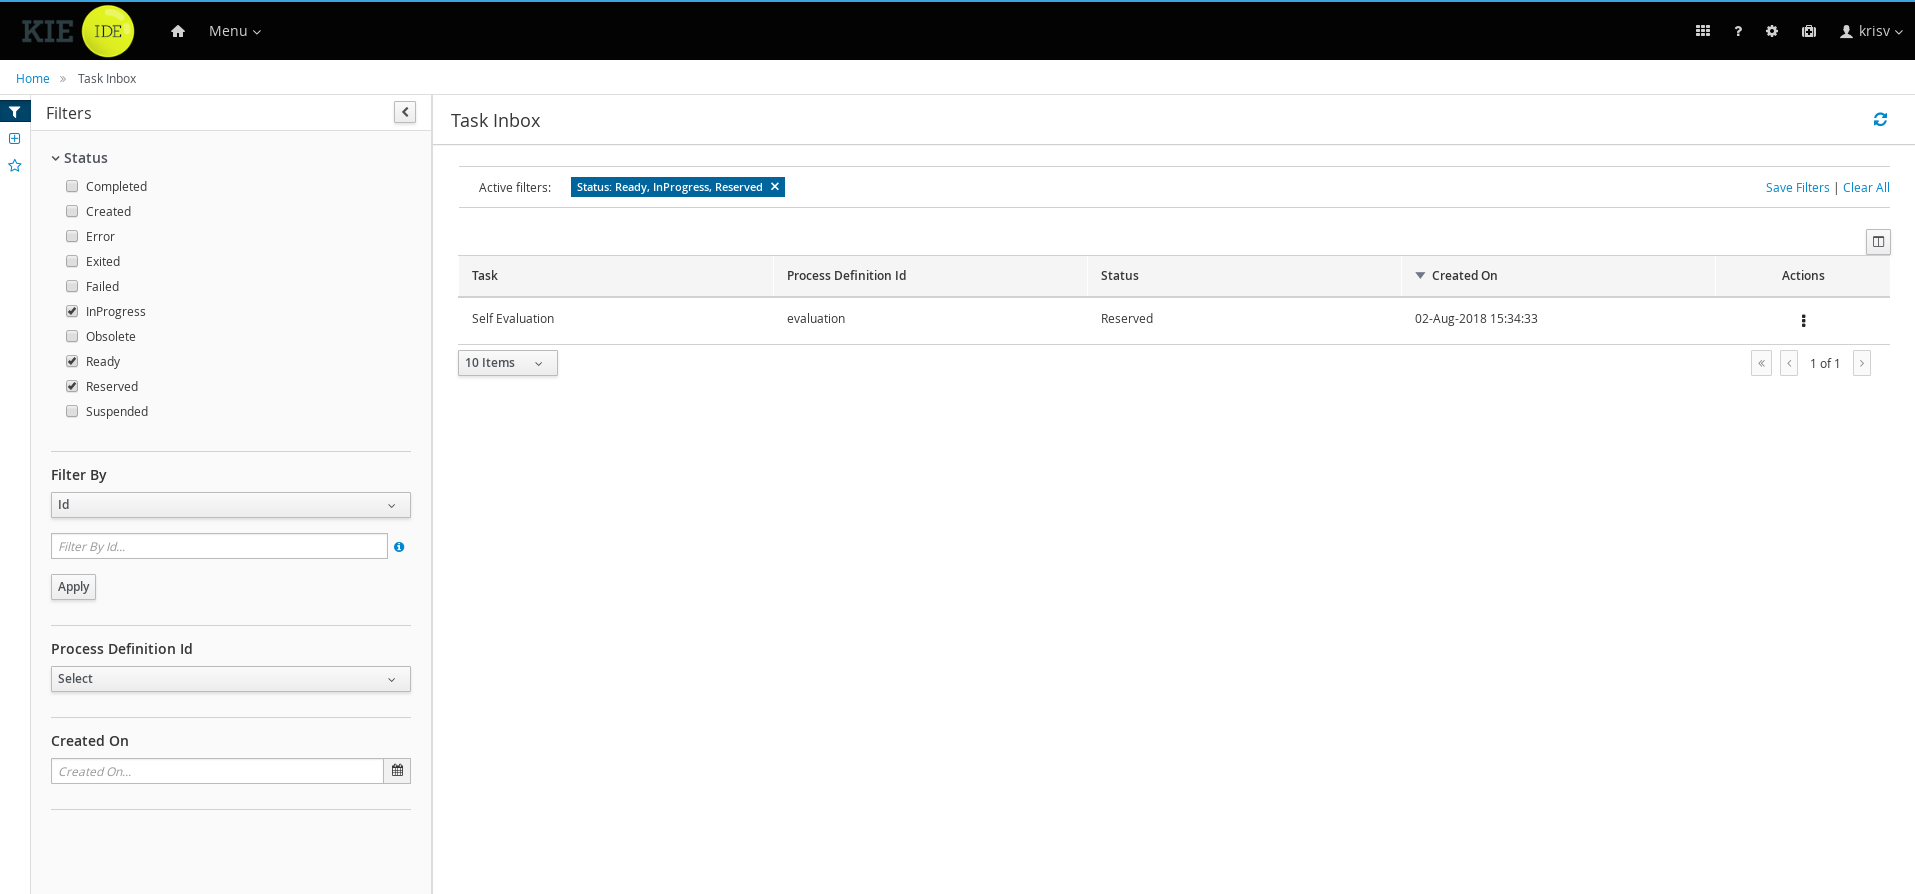
1.4.4. Task Inbox
As often part of any process execution, human involvement is needed to review, approve or provide extra information. Business Central provides a Task Inbox section where any user potentially involved with these task can manage its workload. In there, users are able to get a list of all tasks, complete tasks using customizable task forms, collaborate using comments and more.
1.4.5. Business Activity Monitoring
As of version 6.0, jBPM comes with a full-featured BAM tooling which allows non-technical users to visually compose business dashboards. With this brand new module, to develop business activity monitoring and reporting solutions on top of jBPM has never been so easy!

Key features:
-
Visual configuration of dashboards (Drag’n’drop).
-
Graphical representation of KPIs (Key Performance Indicators).
-
Configuration of interactive report tables.
-
Data export to Excel and CSV format.
-
Filtering and search, both in-memory or SQL based.
-
Data extraction from external systems, through different protocols.
-
Granular access control for different user profiles.
-
Look’n’feel customization tools.
-
Pluggable chart library architecture.
Target users:
-
Managers / Business owners. Consumer of dashboards and reports.
-
IT / System architects. Connectivity and data extraction.
-
Analysts / Developers. Dashboard composition & configuration.
To get further information about the new and noteworthy BAM capabilities of jBPM please read the chapter Business Activity Monitoring.
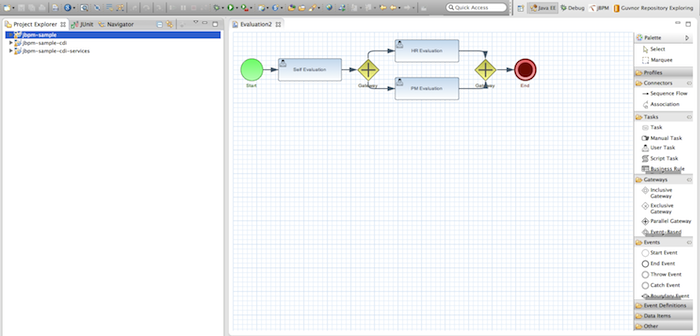
1.5. Eclipse Developer Tools
The Eclipse-based tools are a set of plugins to the Eclipse IDE and allow you to integrate your business processes in your development environment. It is targeted towards developers and has some wizards to get started, a graphical editor for creating your business processes (using drag and drop) and a lot of advanced testing and debugging capabilities.
It includes the following features:
-
Wizard for creating a new jBPM project
-
A graphical editor for BPMN 2.0 processes
-
The ability to plug in your own domain-specific nodes
-
Validation
-
Runtime support (so you can select which version of jBPM you would like to use)
-
Graphical debugging to see all running process instances of a selected session, to visualize the current state of one specific process instance, etc.
2. Getting Started
We recommend taking a look at our Getting Start page as a starting point for getting a full environment up and running with all the components you need in order to design, deploy, run and monitor a process. Alternatively, you can also take a quick tutorial that will guide you through most of the components using a simple example available in the Installer Chapter. This will teach you how to download and use the installer to create a demo setup, including most of the components. It uses a simple example to guide you through the most important features. Screencasts are available to help you out as well.
If you like to read more information first, the following chapters first focus on the core jBPM engine (API, BPMN 2.0, etc.). Further chapters will then describe the other components and other more complex topics like domain-specific processes, flexible processes, etc. After reading the core chapters, you should be able to jump to other chapters that you might find interesting.
You can also start playing around with some examples that are offered in a separate download. Check out the Examples chapter to see how to start playing with these.
After reading through these chapters, you should be ready to start creating your own processes and integrate the jBPM engine with your application. These processes can be started from the installer or be started from scratch.
2.1. Downloads
Latest releases can be downloaded from jBPM.org. Just pick the artifact you want:
-
server: single zip distribution with jBPM server (including WildFly, Business Central, jBPM case management showcase and service repository)
-
bin: all the jBPM binaries (JARs) and their transitive dependencies
-
src: the sources of the core components
-
docs: the documentation
-
examples: some jBPM examples, can be imported into Eclipse
-
installer: the jBPM Installer, downloads and installs a demo setup of jBPM
-
installer-full: full jBPM Installer, downloads and installs a demo setup of jBPM, already contains a number of dependencies prepackaged (so they don’t need to be downloaded separately)
Older releases are archived at http://downloads.jboss.org/jbpm/release/.
Alternatively, you can also use one of the many Docker images available for use at the Download section.
2.2. Community
Here are a lot of useful links part of the jBPM community:
-
jBPM Setup and jBPM Usage user forums and mailing lists
-
A JIRA bug tracking system for bugs, feature requests and roadmap
Please feel free to join us in our IRC channel at chat.freenode.net#jbpm. This is where most of the real-time discussion about the project takes place and where you can find most of the developers most of their time as well. Don’t have an IRC client installed? Simply go to http://webchat.freenode.net/, input your desired nickname, and specify #jbpm. Then click login to join the fun.
2.3. Sources
2.3.1. License
The jBPM code itself is using the Apache License v2.0.
Some other components we integrate with have their own license:
-
The new Eclipse BPMN2 plugin is Eclipse Public License (EPL) v1.0.
-
The legacy web-based designer is based on Oryx/Wapama and is MIT License
-
The Drools project is Apache License v2.0.
2.3.2. Source code
jBPM now uses git for its source code version control system. The sources of the jBPM project can be found here (including all releases starting from jBPM 5.0-CR1):
The source of some of the other components can be found here:
2.3.3. Building from source
If you’re interested in building the source code, contributing, releasing, etc. make sure to read this README.
2.4. Getting Involved
We are often asked "How do I get involved". Luckily the answer is simple, just write some code and submit it :) There are no hoops you have to jump through or secret handshakes. We have a very minimal "overhead" that we do request to allow for scalable project development. Below we provide a general overview of the tools and "workflow" we request, along with some general advice.
If you contribute some good work, don’t forget to blog about it :)
2.4.1. Sign up to jboss.org
Signing to jboss.org will give you access to the JBoss wiki, forums and JIRA. Go to https://www.jboss.org/ and click "Register".

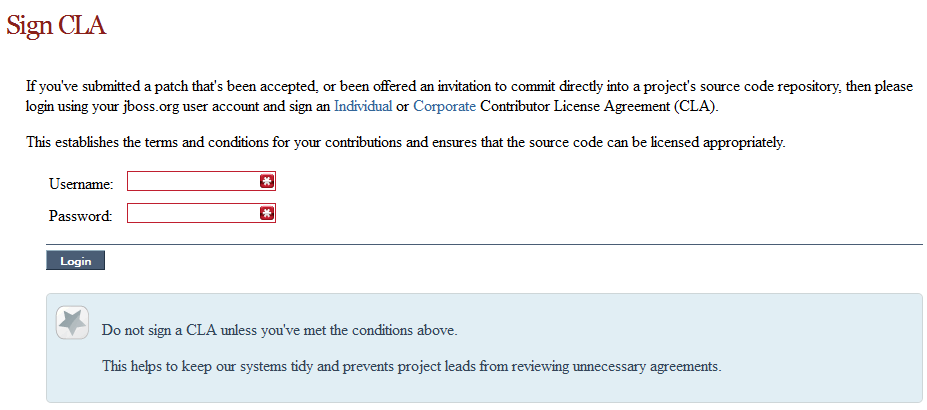
2.4.2. Sign the Contributor Agreement
The only form you need to sign is the contributor agreement, which is fully automated via the web. As the image below says "This establishes the terms and conditions for your contributions and ensures that source code can be licensed appropriately"
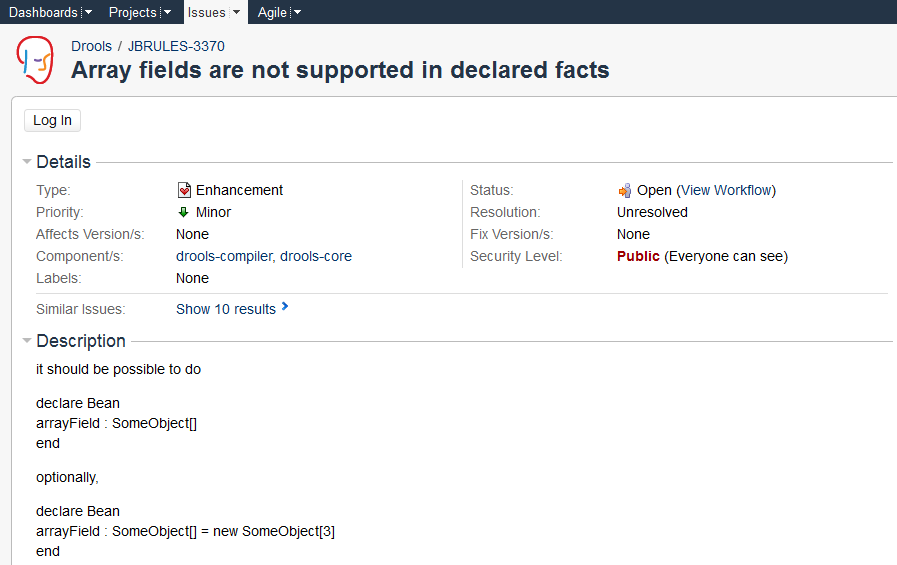
2.4.3. Submitting issues via JIRA
To be able to interact with the core development team you will need to use JIRA, the issue tracker. This ensures that all requests are logged and allocated to a release schedule and all discussions captured in one place. Bug reports, bug fixes, feature requests and feature submissions should all go here. General questions should be undertaken at the mailing lists.
Minor code submissions, like format or documentation fixes do not need an associated JIRA issue created.
2.4.4. Fork GitHub
With the contributor agreement signed and your requests submitted to JIRA you should now be ready to code :) Create a GitHub account and fork any of the Drools, jBPM or Guvnor repositories. The fork will create a copy in your own GitHub space which you can work on at your own pace. If you make a mistake, don’t worry blow it away and fork again. Note each GitHub repository provides you the clone (checkout) URL, GitHub will provide you URLs specific to your fork.
2.4.5. Writing Tests
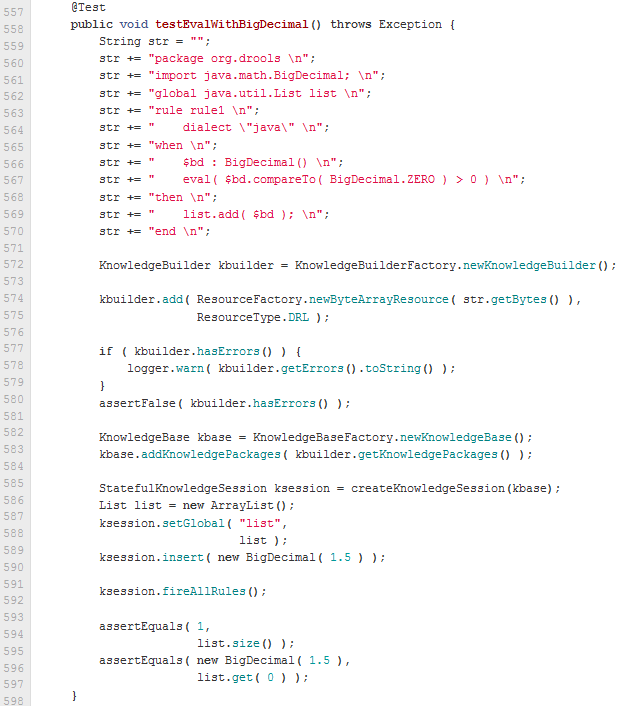
When writing tests, try and keep them minimal and self contained. We prefer to keep the DRL fragments within the test, as it makes for quicker reviewing. If there are a large number of rules then using a String is not practical so then by all means place them in separate DRL files instead to be loaded from the classpath. If your tests need to use a model, please try to use those that already exist for other unit tests; such as Person, Cheese or Order. If no classes exist that have the fields you need, try and update fields of existing classes before adding a new class.
There are a vast number of tests to look over to get an idea, MiscTest is a good place to start.
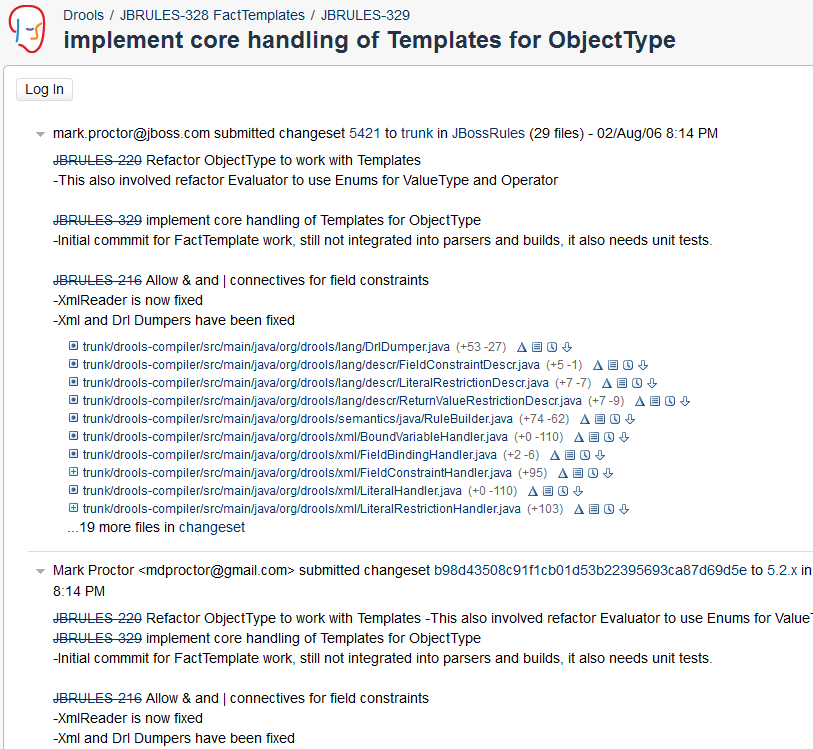
2.4.6. Commit with Correct Conventions
When you commit, make sure you use the correct conventions. The commit must start with the JIRA issue id, such as DROOLS-1946. This ensures the commits are cross referenced via JIRA, so we can see all commits for a given issue in the same place. After the id the title of the issue should come next. Then use a newline, indented with a dash, to provide additional information related to this commit. Use an additional new line and dash for each separate point you wish to make. You may add additional JIRA cross references to the same commit, if it’s appropriate. In general try to avoid combining unrelated issues in the same commit.
Don’t forget to rebase your local fork from the primary branch and then push your commits back to your fork.
2.4.7. Submit Pull Requests
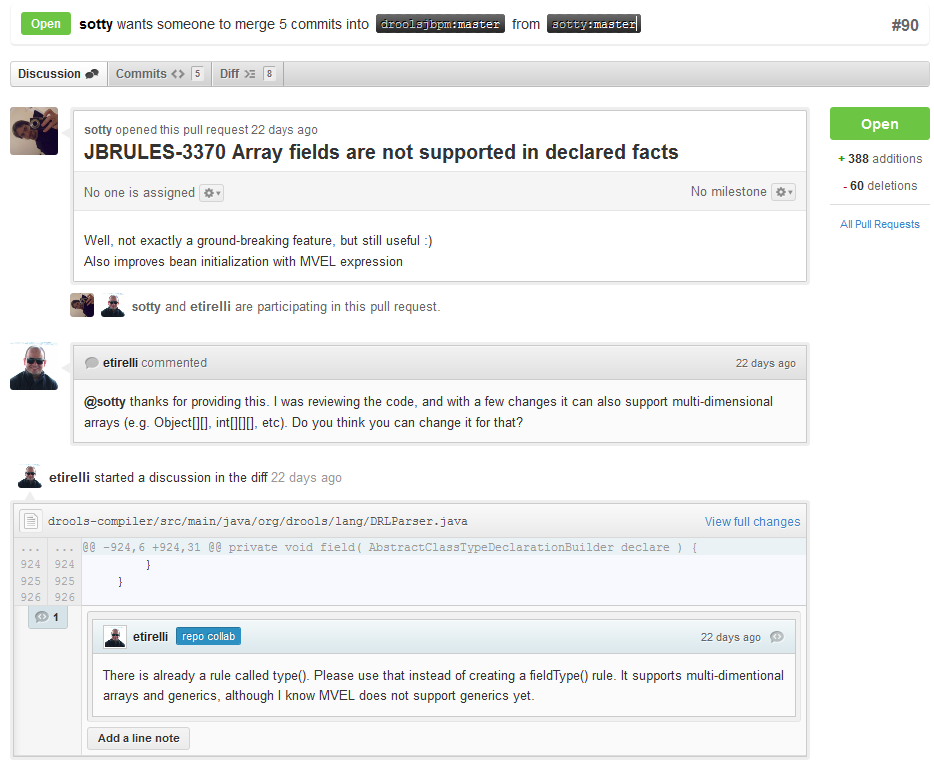
With your code rebased from primary branch and pushed to your personal GitHub area, you can now submit your work as a pull request. If you look at the top of the page in GitHub for your work area there will be a "Pull Request" button. Selecting this will then provide a gui to automate the submission of your pull request.
The pull request then goes into a queue for everyone to see and comment on. Below you can see a typical pull request. The pull requests allow for discussions and it shows all associated commits and the diffs for each commit. The discussions typically involve code reviews which provide helpful suggestions for improvements, and allows for us to leave inline comments on specific parts of the code. Don’t be disheartened if we don’t merge straight away, it can often take several revisions before we accept a pull request. Luckily GitHub makes it very trivial to go back to your code, do some more commits and then update your pull request to your latest and greatest.
It can take time for us to get round to responding to pull requests, so please be patient. Submitted tests that come with a fix will generally be applied quite quickly, where as just tests will often way until we get time to also submit that with a fix. Don’t forget to rebase and resubmit your request from time to time, otherwise over time it will have merge conflicts and core developers will general ignore those.
2.5. What to do if I encounter problems or have questions?
You can always contact the jBPM community for assistance.
IRC: #jbpm at chat.freenode.net
jBPM Setup Google Group - Installation, configuration, setup and administration discussions for Business Central, Eclipse, runtime environments and general enterprise architectures.
jBPM Usage Google Group - Authoring, executing and managing processes with jBPM. Any questions regarding the use of jBPM. General API help and best practices in building BPM systems.
Visit our website for more options on how to get help.
Legacy jBPM User Forum - serves as an archive; post new questions to one of the Google Groups above
3. Getting started with process services in jBPM
As a business rules and processes developer, you can use Business Central in jBPM to design business processes to meet specific business requirements. jBPM provides sample projects in Business Central that contain business assets for reference purposes. This document describes how to create a new mortgage process project, data objects, and business process to familiarize yourself with Business Central and the process designer.
You will then refer to the Mortgage_Process sample project included in Business Central to review the sample project’s business rules, decision tables, and forms. You will build and deploy the Mortgage_Process sample project and execute the project’s defined functionality.
-
Red Hat JBoss Enterprise Application Platform 7.3 is installed. For details, see the Red Hat JBoss Enterprise Application Platform 7.3 Installation Guide.
-
jBPM is installed and configured with KIE Server. For more information, see Installing and configuring jBPM on Red Hat JBoss EAP 7.3.
-
jBPM is running and you can log in to Business Central with the
developerrole. For more information, see Planning a jBPM installation.
3.1. Overview
Business Central enables you to automate your business processes. A business process is a diagram that describes the order in which a series of steps must be executed and consists of predefined nodes and connections. Each node represents one step in the process while the connections specify how to transition from one node to another.
For example, a bank offers a housing mortgage loan service. Using Business Central, the housing mortgage department of the bank creates a complete business process for the mortgage loan.
When a customer wants to buy a new property using credit, the following steps occur:
-
The customer contacts a broker at the bank who assists in filing for a mortgage loan.
-
The broker collects information about the property and the customer, such as the salary of the customer, social security number, the property sale price, and the requested loan amount.
-
The broker then submits a request on behalf of the customer.
Whenever a customer submits a request, a new process instance is created. This ensures consistency in the quality of evaluating each request, provides complete visibility into the status of each request, and makes the process efficient and effective.
3.2. Creating the mortgage-process project
A project is a container for assets such as data objects, business processes, guided rules, decision tables, and forms. The project that you are creating is similar to the existing Mortgage_Process sample project in Business Central.
-
In Business Central, go to Menu → Design → Projects.
jBPM provides a default space called MySpace, as shown in the following image. You can use the default space to create and test example projects.
 Figure 7. Default space
 -
Click Add Project.
-
Enter
mortgage-processin the Name field. -
Click Configure Advanced Options and modify the GAV fields with the following values:
-
Group ID:
com.myspace -
Artifact ID:
mortgage-process -
Version:
1.0.0
-
-
Click Add.
The Assets view of the project opens.
3.3. Creating users
You can create as many Business Central users as you require. User privileges and settings are controlled by the roles assigned to a user and the groups that a user belongs to. For this example, you must create two new users: Katy who will act as the bank’s loan manager and approver, and Bill who will act as the broker requesting the loan. For more information on creating users, see the Creating users chapter of Installing and configuring jBPM on Red Hat JBoss EAP 7.3.
In Business Central, you can use groups and roles to control permissions for a collection of users. You can create as many groups and roles as you want but a group must have at least one user.
-
For this example, the user or users working on the tasks must be assigned to one or more of the following groups and roles:
-
approver group: For the Qualify task
-
broker group: For the Correct Data and Increase Down Payment tasks
-
manager role: For the Final Approval task
-
-
Click the gear icon
 in the upper-right corner, and click Users.
 -
Click
 , enter
 Katy, click Next, and click Create. -
Click Yes to set a password and enter
Katyin both fields, and click Change. -
Enter
Bill, click Next, and click Create. -
Click Yes to set a password and enter
Billin both fields, and click Change. -
Click the Groups tab and click
 , enter
 approver, and click Next. -
Select
Katyfrom the user list, and click Add selected users. -
Enter
broker, and click Next. -
Select
Billfrom the user list, and click Add selected users. -
Click the Users tab, select
Katy, and click Edit → Roles → Add roles. -
Select
manager, click Add to selected roles, and click Save. -
Click the Groups tab, and click Edit → Groups → Add to groups.
-
Select
approverandkie-server, and click Add to selected groups. -
Click Save.
-
Click the Users tab, select
Billfrom the user list, click Edit → Roles → Add roles. -
Select
user, and click Add to selected roles. -
Click the Groups tab, click
, select kie-server, and click Add to selected groups. -
Click Save.
3.4. Creating the mortgage-process data objects
Data objects are the building blocks for the rule assets that you create. Data objects are custom data types implemented as Java classes in specified packages of your project. These custom data types determine what data your assets and your decision services are based on.
The mortgage process project uses the following data objects:
-
Applicant -
Property -
ValidationErrorDO -
Application
3.4.1. Creating the Applicant data object
Follow these steps to create the Applicant data object, which contains information about the applicant. This is the basic information required to apply for the loan in this tutorial.
-
In Business Central, click on the MySpace default space.
-
Click Menu → Design → Projects and click mortgage-process.
-
Click Add Asset and select Data Object.
-
Enter
Applicantin the Data Object field of the Create new Data Object window. -
Select
com.myspace.mortgage_appfrom the Package drop-down menu and click Ok. -
Enter
Applicantin the Label field of the 'Applicant'- general properties section. -
Click +add field and input the following Applicant data object values. Click Create and continue after each addition. For the last addition, click Create.
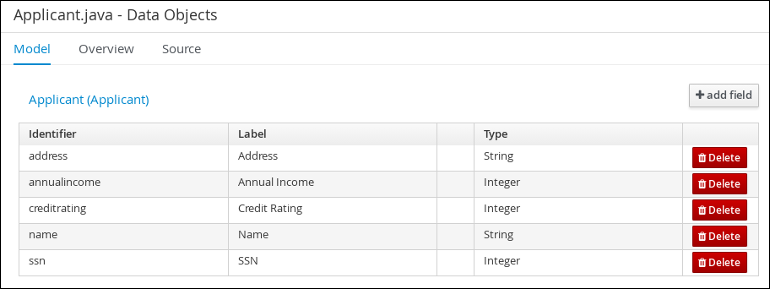 Figure 8. Applicant data object field values
 -
Click Save.
3.4.2. Creating the Property data object
Follow these steps to create the Property data object, which contains information about the property details, such as the property age and price.
-
In Business Central, click on the MySpace default space.
-
Click Menu → Design → Projects and click mortgage-process.
-
Click Add Asset and select Data Object.
-
Enter
Propertyin the Data Object field of the Create new Data Object window. -
Select
com.myspace.mortgage_appfrom the Package drop-down menu and click Ok. -
Enter
Propertyin the Label field of the 'Property'- general properties section. -
Click +add field and input the following Property data object values. Click Create and continue after each addition. For the last addition, click Create.
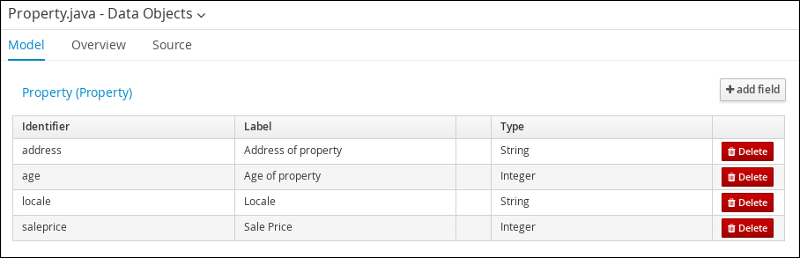 Figure 9. Property data object field values
 -
Click Save.
3.4.3. Creating the ValidationErrorDO data object
Follow these steps to create the ValidationErrorDO data object, which specifies the cause of an application error.
-
In Business Central, click on the MySpace default space.
-
Click Menu → Design → Projects and click mortgage-process.
-
Click Add Asset and select Data Object.
-
Enter
ValidationErrorDOin the Data Object field of the Create new Data Object window. -
Select
com.myspace.mortgage_appfrom the Package drop-down menu and click Ok. -
Enter
ValidationErrorDOin the Label field of the 'ValidationErrorDO'- general properties section. -
Click +add field and input the following ValidationErrorDO data object values. Click Create and continue after each addition. For the last addition, click Create.
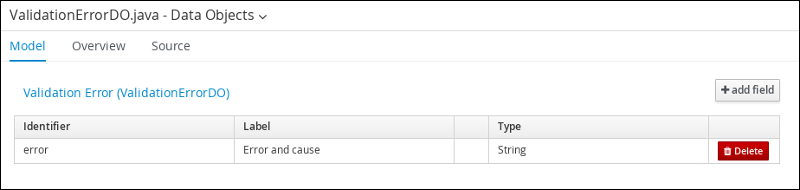 Figure 10. ValidationErrorDO data object field values
 -
Click Save.
3.4.4. Creating the Application data object
Follow these steps to create the Application data object, which contains information about the mortgage details, such as the down payment and the mortgage amount.
-
In Business Central, click on the MySpace default space.
-
Click Menu → Design → Projects and click mortgage-process.
-
Click Add Asset and select Data Object.
-
Enter
Applicationin the Data Object field of the Create new Data Object window. -
Select
com.myspace.mortgage_appfrom the Package drop-down menu and click Ok. -
Enter
Applicationin the Label field of the 'Application'- general properties section. -
Click +add field and input the following Application data object values. Click Create and continue after each addition. For the last addition, click Create.
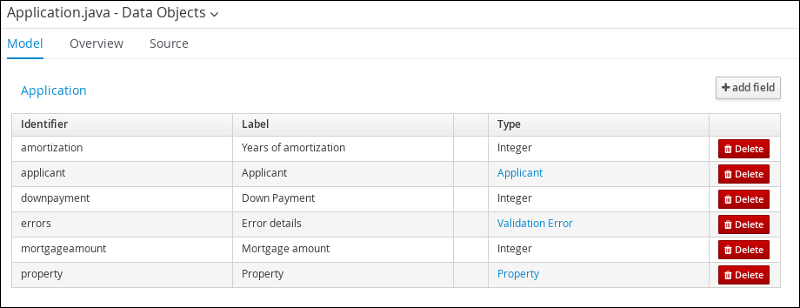 Figure 11. Application data object field values
 -
Click Save.
3.5. Business processes in Business Central
A business process is a diagram that describes the order in which a series of steps must be executed using a flow chart. A business process consists of a collection of nodes that are linked to each other using connections. Each of the nodes represents one step in the overall process while the connections specify how to transition from one node to the other.
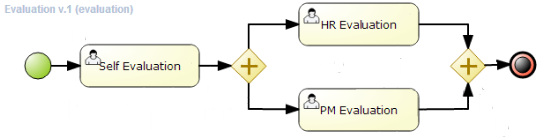
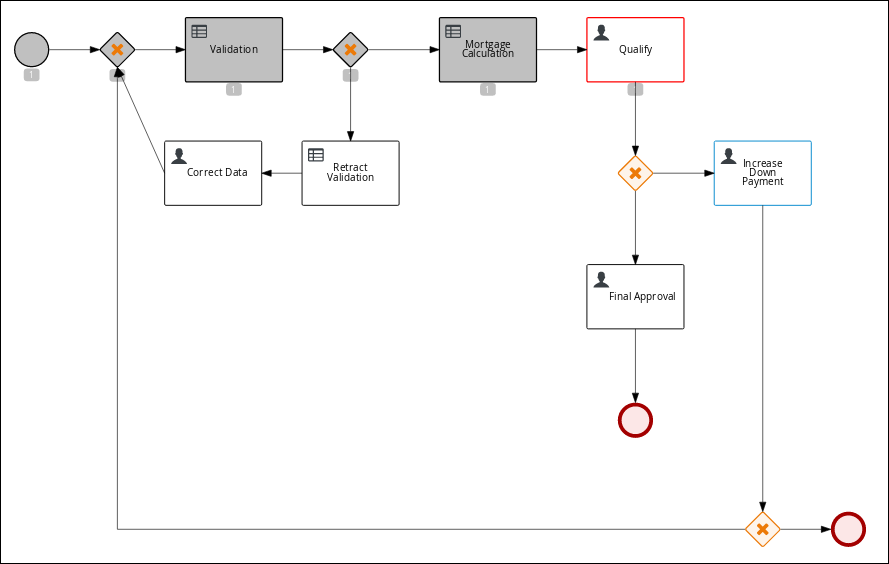
The sample Mortgage_Process contains the following predefined MortgageApprovalProcess business process.
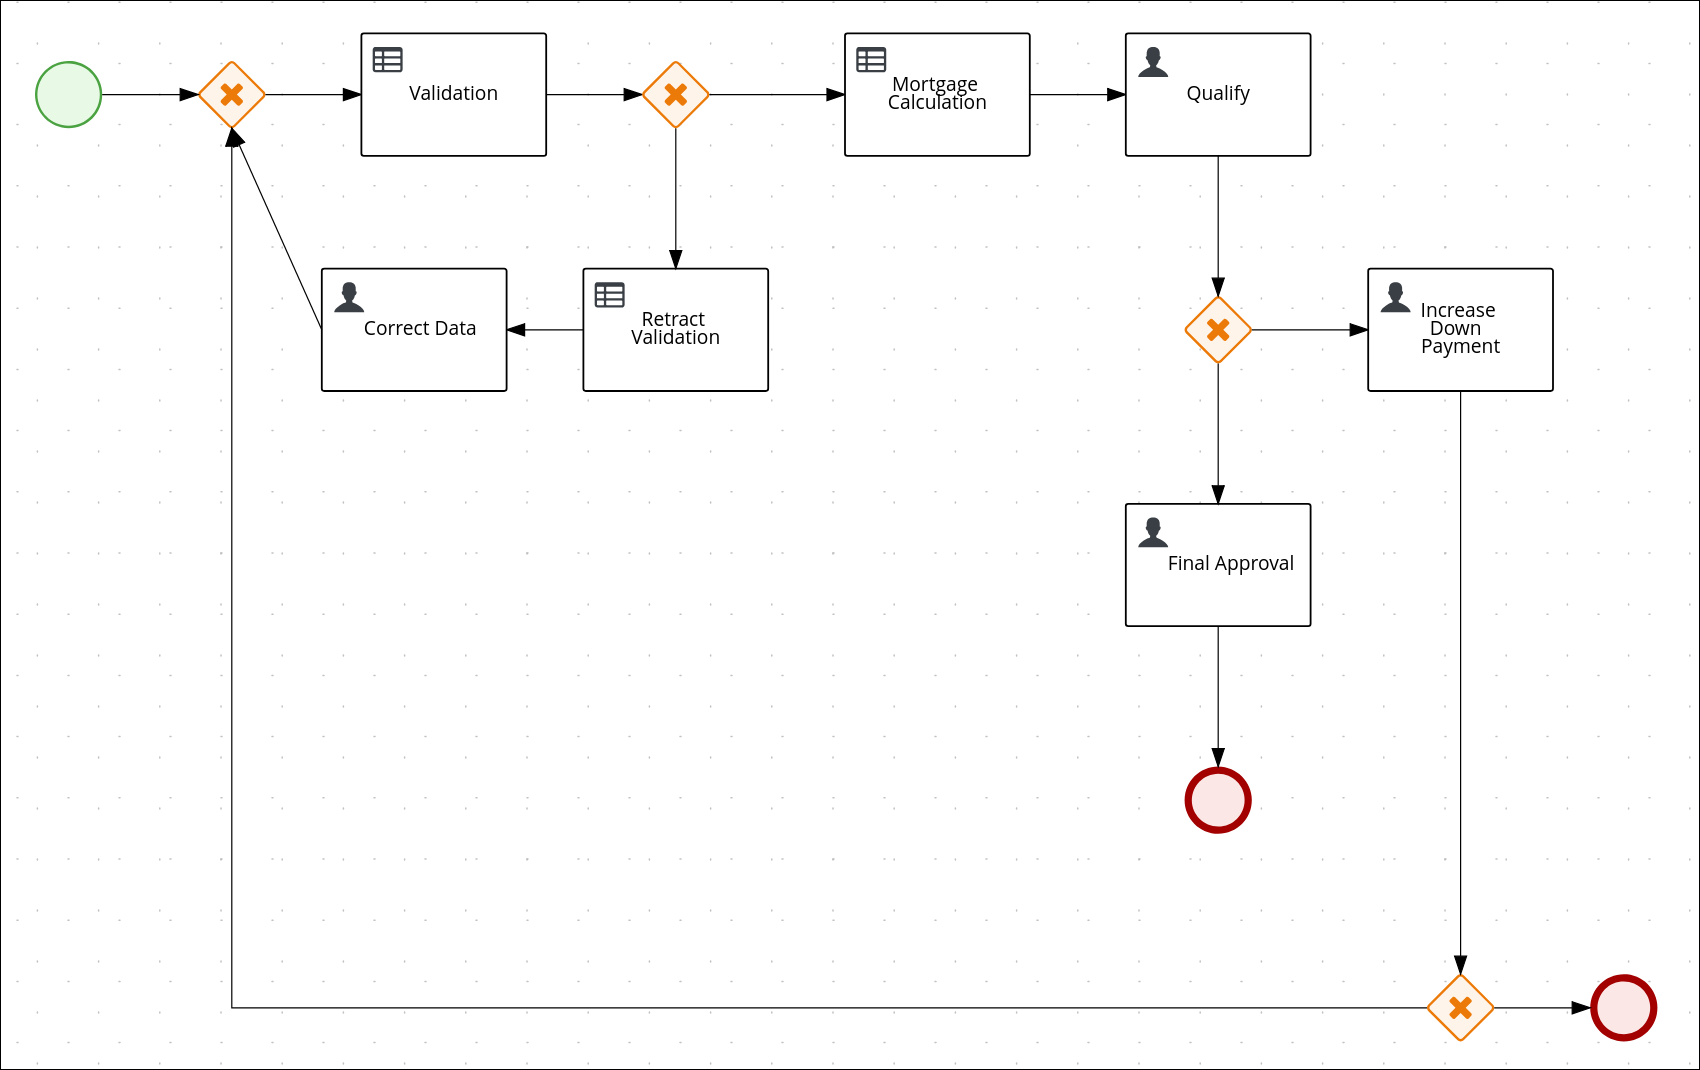
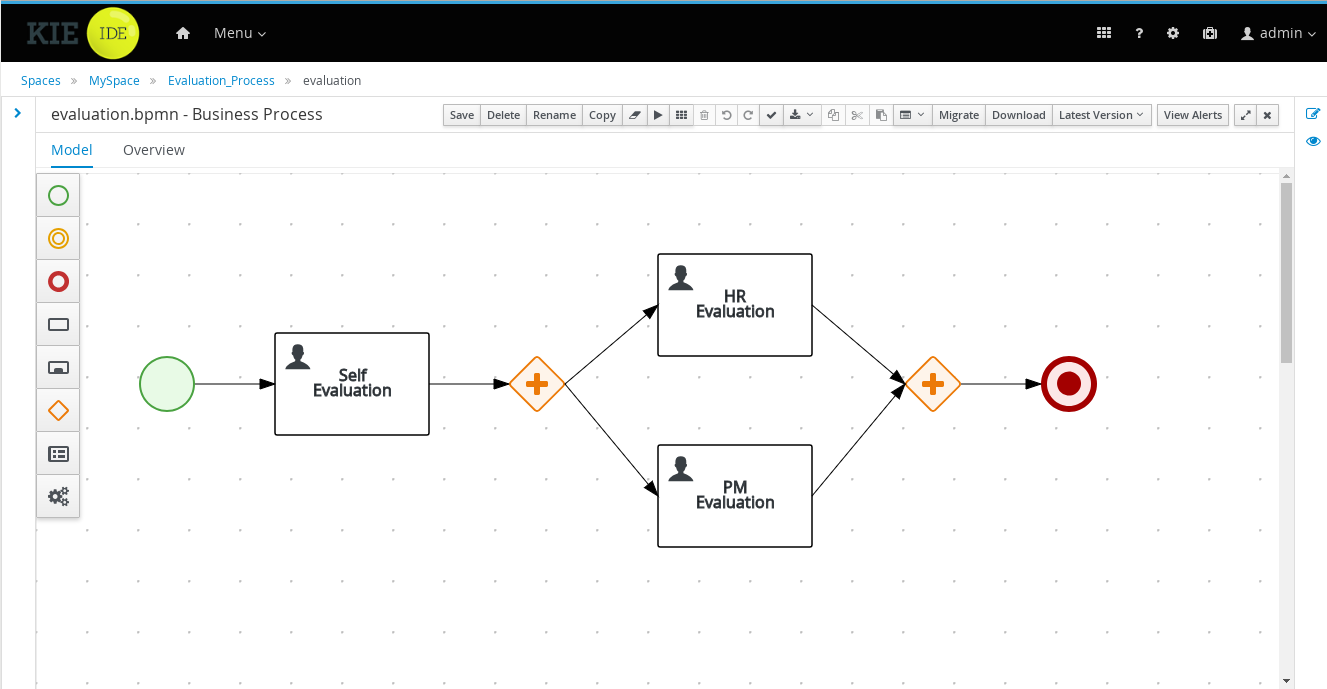
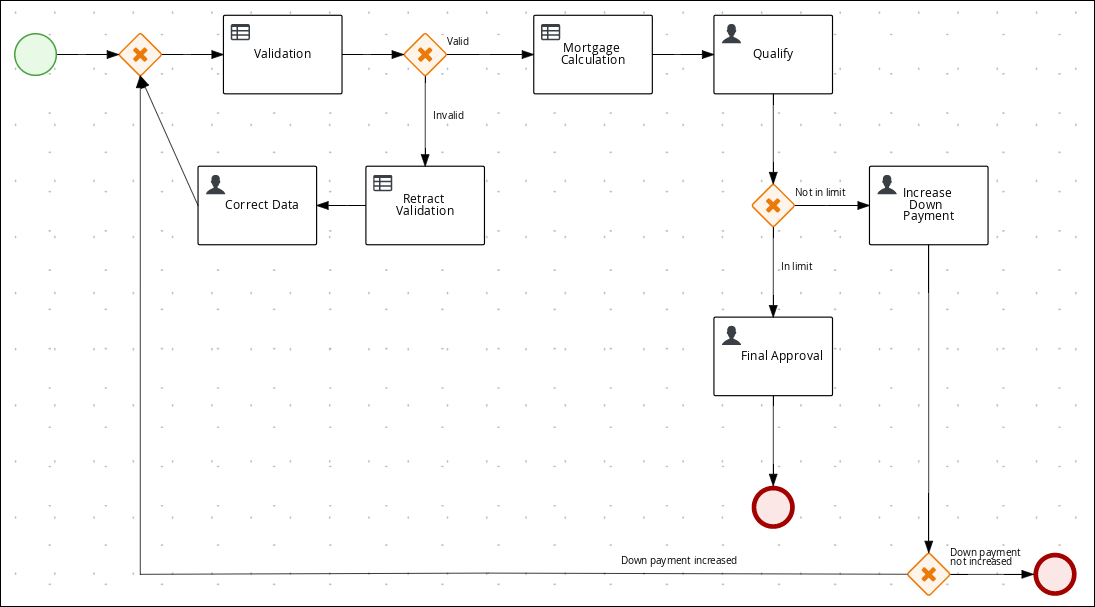
3.5.1. Creating the business process
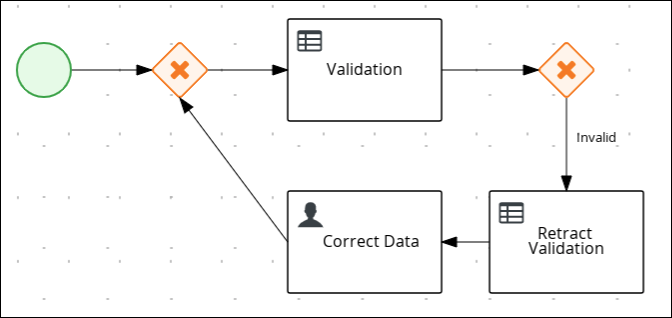
The following procedures guide you through the creation of tasks, connections, and gateways that make up the MortgageApprovalProcess business process. The mortgage validation business process determines whether a mortgage application contains all required data. If the specified data requirements are met, the application proceeds on to the mortgage calculation business process.
-
In Business Central, go to Menu → Design → Projects → Mortgage-Process.
-
Click Add Asset → Business Process.
-
Enter the following values:
-
Business Process:
MortgageApprovalProcess -
Package: Select
com.myspace.mortgage_appThe Package specifies the location inside the existing project where the asset will be created. In this example, it is created in
com/myspace/mortgage_app.
-
-
Click Ok. The diagram editor opens.
-
In the upper-right corner, click the Properties
 icon.
icon. -
Scroll down and expand Process Data and click
 in the Process Variables section.
 -
Enter the following values:
-
Name:
application -
Data Type:
Application [com.myspace.mortgage_app]
-
3.5.1.1. Creating outgoing connections and exclusive gateways
This section shows you how to create outgoing connections, exclusive gateways, and business rule tasks. Use exclusive gateways to make decisions and react to events based on the available data.
jBPM contains a predefined selection of node types to simplify business process creation. The predefined node panel is located on the left side of the diagram editor.
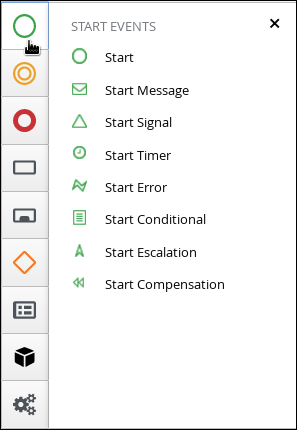
-
Drag a start event node onto the canvas.
-
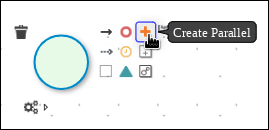
Create an outgoing connection from the start event to an exclusive gateway:
-
On the canvas, click the start event node and click the Create Parallel icon.
-
Hover over the
 icon of the parallel and click the Convert into Exclusive icon.
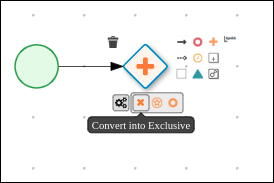
-
-
Create an outgoing connection from the exclusive gateway to a business rule task:
-
On the canvas, click the exclusive gateway and click the Create Task icon.
-
Hover over the
icon of the task and click the Convert into Business Rule icon.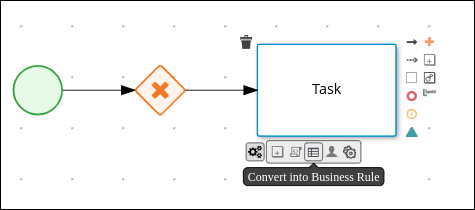
-
-
Configure the business rule task:
-
Click the business rules task.
-
If the Properties panel is not open, in the upper-right corner click the Properties
icon. -
In the Properties panel, enter
Validationin the Name field. -
Expand Implementation/Execution, select New from the Rule Flow Group menu, and input validation.
-
In the On Exit Action field, enter the following Java expression:
System.out.println(application.getProperty()); -
Expand Data Assignments and click
 next to Assignments.
 -
In the Validation Data I/O window, click Add and create the following assignments:
-
Data Inputs and Assignements
-
Name: application
-
Data Type: Application [com.myspace.mortgage_app]
-
Source: application
-
-
Data Outputs and Assignements
-
Name: application
-
Data Type: Application [com.myspace.mortgage_app]
-
Target: application
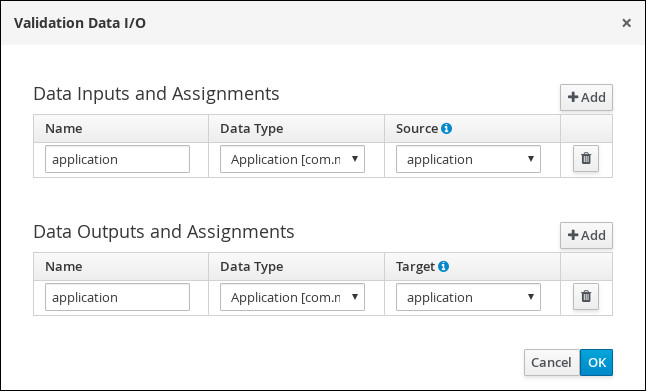 Figure 12. Validation Data I/O assignments
-
-
-
-
Click OK in the Validation Data I/O window.
-
Above the canvas, click Save to confirm your changes.
3.5.1.2. Defining the validation data
This section shows you how to define the validation data that determines whether the application data is correct, contains an error, or has missing information.
-
Create an outgoing connection from the Validation task to an exclusive gateway:
-
Click the Validation task and click the Create Parallel icon.
-
Hover over the
icon of the parallel and click the Convert into Exclusive icon.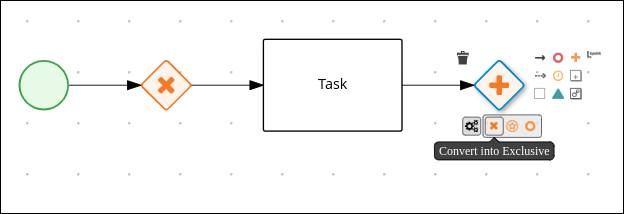
-
-
Create an outgoing connection from the exclusive gateway to a new business rule task:
-
Click the exclusive gateway and click the Create Task icon.
-
Drag the new task below the exclusive gateway as shown below.
-
Hover over the
icon of the task and click the Convert into Business Rule icon.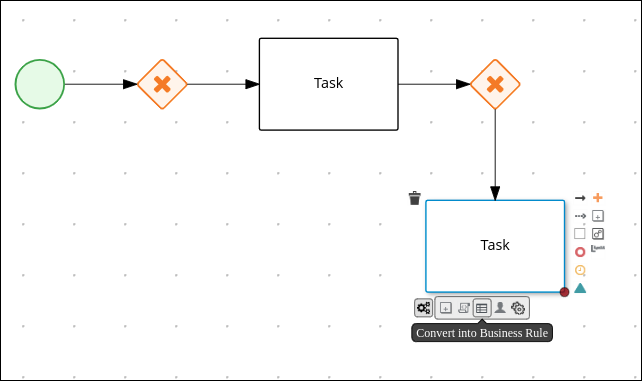
-
If the Properties panel is not open, in the upper-right corner click the Properties
icon. -
In the Properties panel, enter
Retract Validationin the Name field. -
Expand Implementation/Execution, select New from the Rule Flow Group menu, and input
error.
-
-
Configure the connection between the exclusive gateway and the business rule task:
-
Click the connection.
-
If the Properties panel is not open, in the upper-right corner click the Properties
icon. -
In the Properties panel, enter
Invalidin the Name field. -
Expand Implementation/Execution and select Expression in the Condition Expression section.
-
From the list, select drools and enter
ValidationErrorDO()in the Condition Expression field.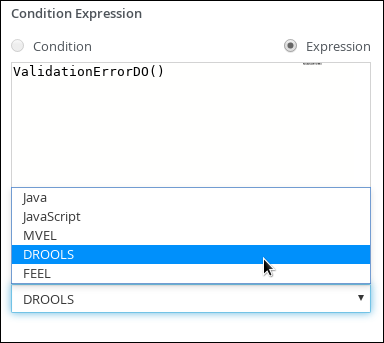
-
-
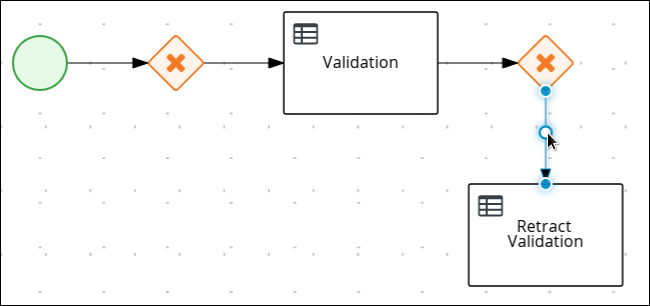
Create an outgoing connection from the Retract Validation task to a new user task:
-
Click the Retract Validation task and click the Create Task icon.
-
Drag the new task below the Validation task as shown below.
-
Hover over the
icon of the task and click the Convert into User icon.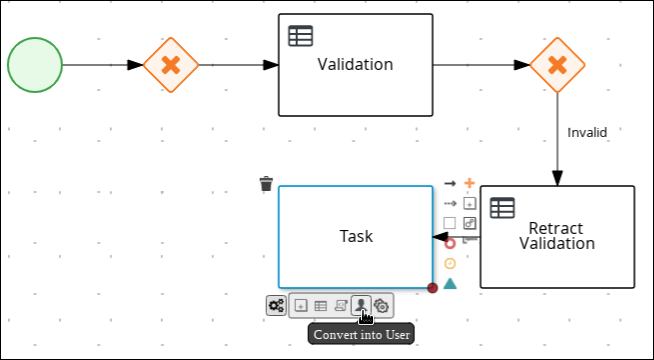
-
Click on the new user task and in the Properties panel, enter
Correct Datain the Name field. -
Expand Implementation/Execution and enter
CorrectDatain the Task Name field. -
Select New from the Groups menu, and input
broker. -
Click
next to Assignments. -
In the Correct Data Data I/O window, click Add and create the following assignments:
-
Name: application
-
Data Type: Application [com.myspace.mortgage_app]
-
Source: application
-
Data Outputs and Assignements
-
-
Name: application
-
Data Type: Application [com.myspace.mortgage_app]
-
Target: application
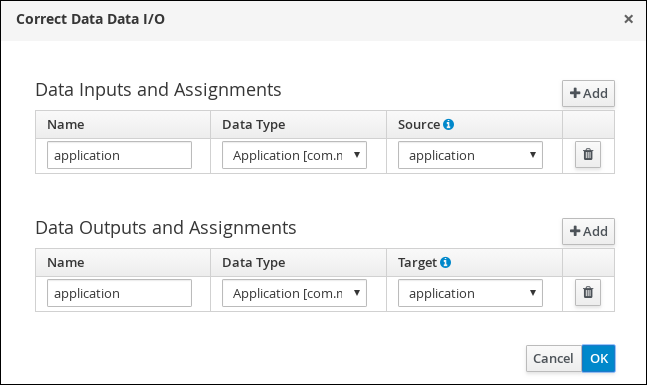 Figure 13. Correct Data Data I/O assignments
-
-
Click OK in the Correct Data Data I/O window.
-
Above the canvas, click Save to confirm your changes.
-
-
Click on the Correct Data user task, then click the Create sequence Flow icon and drag it back to the first exclusive gateway. Your workflow should look similar to the following diagram:
3.5.1.3. Calculating the mortgage
The mortgage calculation business process determines the applicant’s mortgage borrowing limit.
-
Return to the second exclusive gateway and create an outgoing connection to a new business rule task.
-
Click the created connection and in the Properties panel, input
Validin the Name field.-
Expand Implementation/Execution and select Expression in the Condition Expression section.
-
From the list, select drools and enter
not ValidationErrorDO()in the Condition Expression field.
-
-
Click the new business rule task and in the Properties panel, input
Mortgage Calculationin the Name field.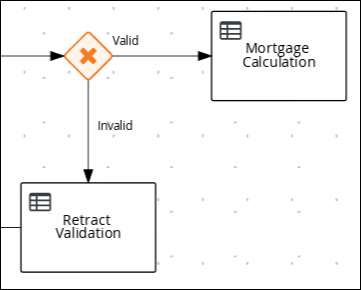
-
Expand Implementation/Execution, select New from the Rule Flow Group menu, and input
mortgagecalculation.
-
-
Expand Data Assignments and click
next to Assignments. -
In the Mortgage Calculation Data I/O window, click Add to create the following assignments and click Save.
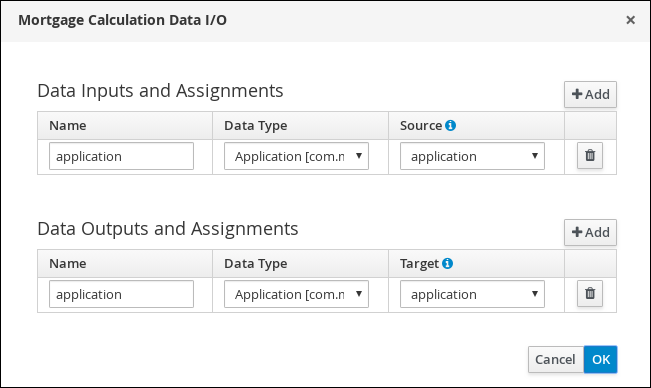 Figure 14. Mortgage Calculation Data I/O assignments
 -
Click OK in the Mortgage Calculation Data I/O window.
-
Click an empty space on the canvas, scroll down, expand Process Data, and click
next to Process Variables. Enter the following values:-
Name:
inlimit -
Data Type:
Boolean
-
-
Create an outgoing connection from the Mortgage Calculation task to a new user task.
-
Click the user task, enter
Qualifyin the Name field. -
Expand Implementation/Execution and enter
Qualifyin the Task Name field. -
Select New from the Groups menu, and input
approver. -
Click
next to Assignments. In the Qualify Data I/O window, click Add to create the following assignments: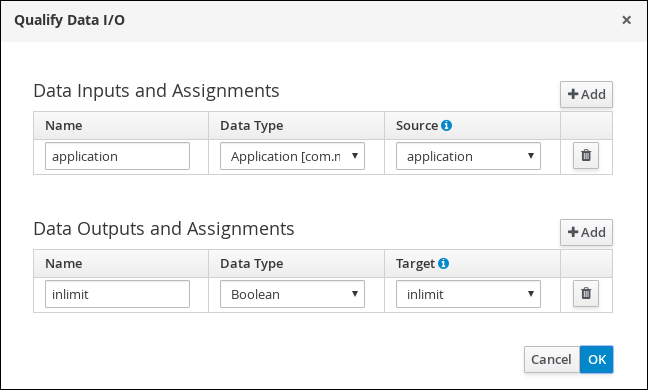 Figure 15. Qualify Data I/O assignments
 -
Click OK in the Qualify Data I/O window.
-
Above the canvas, click Save to confirm your changes.
-
Click on the Qualify user task, click on the Create parallel menu icon, and convert it to an exclusive gateway.
-
Drag the new exclusive gateway below the Qualify user task.
-
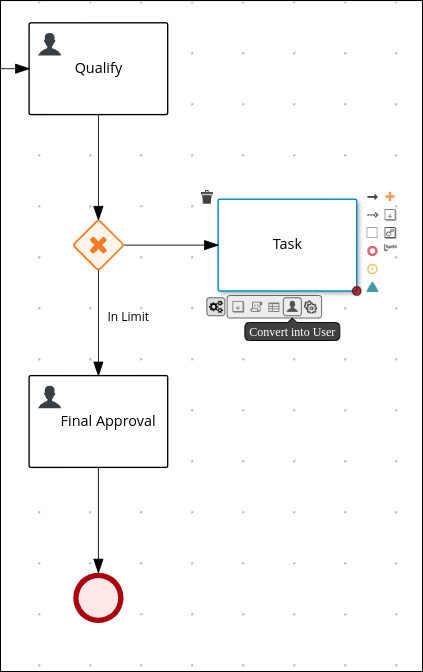
Create an outgoing connection from the exclusive gateway and connect it to a new user task.
-
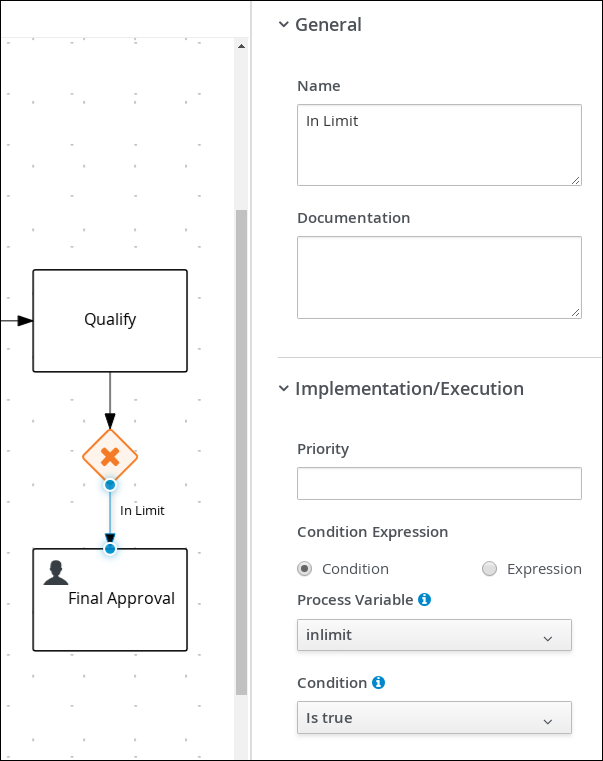
Click the connection and input
In Limitin the Name field of the Properties panel. -
Expand Implementation/Execution and select Condition in the Condition Expression section.
-
Select inlimit from the Process Variable drop-down menu and select Is true from the Condition drop-down menu.
-
Click the user task, enter
Final Approvalin the Name field. -
Expand Implementation/Execution and enter
FinalApprovalin the Task Name field. -
Select New from the Groups menu, and input
manager. -
Click
next to Assignments. In the Final Approval Data I/O window, click Add to create the following assignments: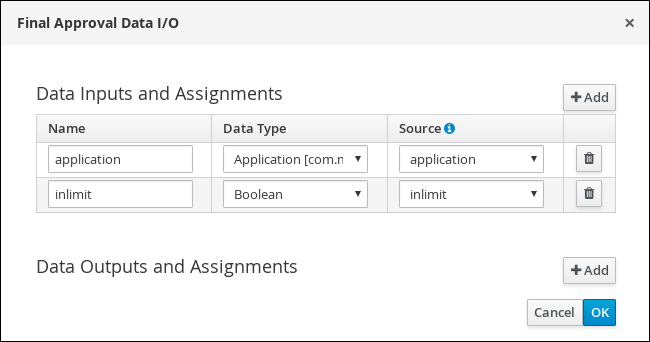 Figure 16. Final Approval Data I/O assignments
 -
Click OK in the Final Approval Data I/O window.
-
Above the canvas, click Save to confirm your changes.
3.5.1.4. Increasing the down payment
The increasing the down payment business process checks to see if the applicant qualifies for the loan by increasing their down payment. The final result is either the final loan approval, or loan denial based on the applicant’s inability to increase the down payment.
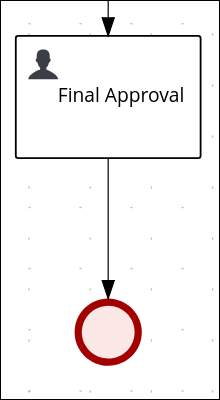
-
Click on the Final Approval user task and select Create End from the user task quick menu.
-
Move the end event below the Final Approval user task.
-
Return to the exclusive gateway that connects with the Final Approval user task. Create a second outgoing connection and connect it to a new user task.
-
Click the connection and input
Not in Limitin the Name field of the Properties panel. -
Expand Implementation/Execution and select Condition in the Condition Expression section.
-
Select inlimit from the Process Variable drop-down menu and select Is false from the Condition drop-down menu.
-
Click an empty space on the canvas, scroll down, expand Process Data, and click
next to Process Variables. Enter the following values:-
Name:
incdownpayment -
Data Type:
Boolean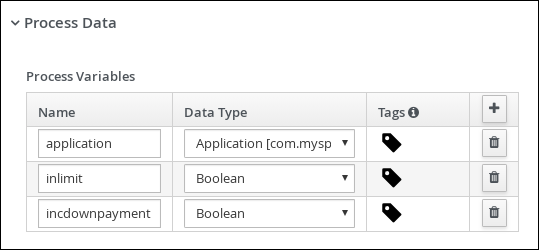
-
-
Click the new user task and in the Properties panel, input
Increase Down Paymentin the Name field. -
Expand Implementation/Execution and enter
IncreaseDownPaymentin the Task Name field. -
Select New from the Groups menu, and input
broker. -
Click
next to Assignments. In the Increase Down Payment Data I/O window, click Add to create the following assignments: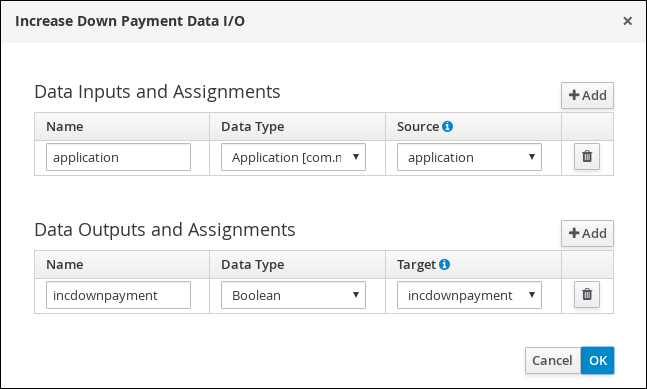 Figure 17. Increase Down Payment Data I/O assignments
 -
Click OK in the Increase Down Payment Data I/O window.
-
Above the canvas, click Save to confirm your changes.
-
Click on the Increase Down Payment user task, click on the Create parallel menu icon, and convert it to an exclusive gateway.
-
Drag the new exclusive gateway below the Increase Down Payment user task.
-
Create an outgoing connection from the exclusive gateway to an end event.
-
Click the connection and input
Down payment not increasedin the Name field of the Properties panel. -
Expand Implementation/Execution and select Expresssion in the Condition Expression section.
-
Input return !incdownpayment; and select java from the drop-down menu.
-
Create an outgoing connection from the exclusive gateway and connect it to the first exclusive gateway.
-
Click the connection and input
Down payment increasedin the Name field of the Properties panel. -
Expand Implementation/Execution and select Expresssion in the Condition Expression section.
-
Input return incdownpayment; and select java from the drop-down menu.
-
Above the canvas, click Save to confirm your changes and save the entire business process.
3.5.2. Viewing the Mortgage_Process business rules
The goal of this chapter is to introduce you to the predefined business rules for the Mortgage_Process project. For this tutorial, you do not create and define the business rules. Instead, review the WHEN and THEN rules that are already defined in the Mortgage_Process sample project’s preconfigured business rules. For information about creating guided business rules, see Designing a decision service using guided rules.
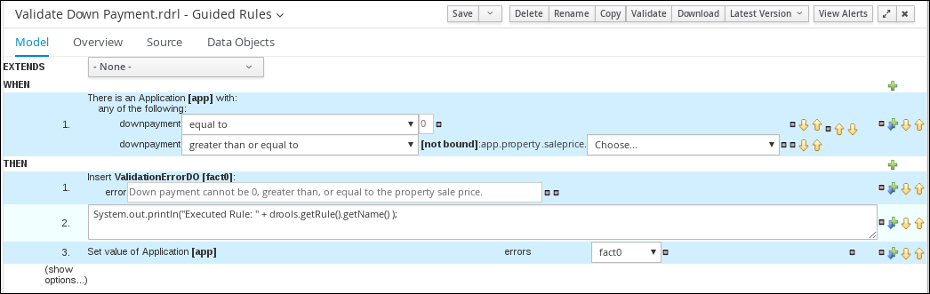
3.5.2.1. Viewing the Validate Down Payment guided rule
Review the WHEN and THEN rules so that you understand how the conditions are set and used later when you run the process.
-
Click Menu → Design → Projects, and click Mortgage_Process.
-
From the asset list, click the right arrow to view the second page of the asset list and click the Validate Down Payment guided rule.
-
Review the Validate Down Payment guided rule’s WHEN and THEN conditions and values.
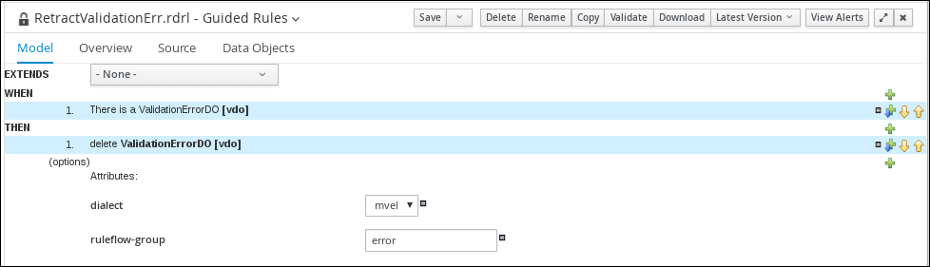
3.5.2.2. Viewing the RetractValidationErr guided rule
Review the WHEN and THEN rules so that you understand how the conditions are set and used later when you run the process.
-
Click Menu → Design → Projects, and click Mortgage_Process.
-
From the asset list, click the right arrow to view the second page of the asset list and click the RetractValidationErr guided rule.
-
Review the RetractValidationErr guided rule’s WHEN and THEN conditions and values.
3.5.3. Viewing the mortgage decision table
The goal of this chapter is to introduce you to the MortgageDecisionTable decision table. For this tutorial, you do not create and set the decision table conditions. Instead, review the values and the conditions that are already defined in the Mortgage_Process sample project’s MortgageDecisionTable Guided Decision Tables asset. For information about creating decision tables, see Designing a decision service using guided decision tables.
-
The business rules have been defined. For more information, see Viewing the Mortgage_Process business rules.
-
In Business Central, go to Menu → Design → Projects → Mortgage_Process.
-
Scroll down and click the MortgageDecisionTable Guided Decision Tables asset.

3.6. Forms in Business Central
A form is a layout definition for a page, defined as HTML, that is displayed as a dialog window to the user during process and task instantiation. Task forms acquire data from a user for both the process and task instance execution, whereas process forms take input and output from process variables.
The input is then mapped to the task using the data input assignment, which you can use inside of a task. When the task is completed, the data is mapped as a data output assignment to provide the data to the parent process instance.
3.6.1. Viewing the Mortgage_Process forms
The goal of this chapter is to introduce you to the Mortgage_Process sample project’s predefined forms which are used for collecting user data for the mortgage application business process. For this tutorial, you do not create and modify the Mortgage_Process forms. Instead, review the predefined sample forms. For information about creating forms, see Designing business processes using BPMN models.
-
In Business Central, go to Menu → Design → Projects → Mortgage_Process.
-
From the asset list, click the right arrow to view the second page of the asset list and select the Applicant form.
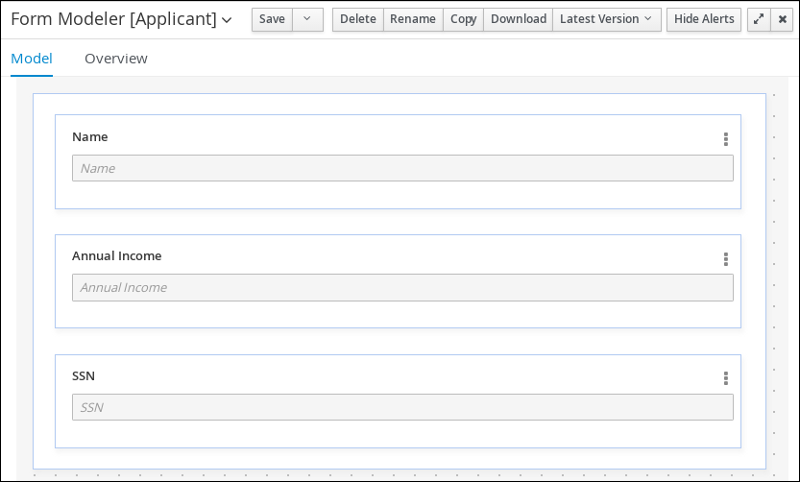 Figure 19. Applicant sample form
 -
Click Menu → Design → Projects → Mortgage_Process.
-
From the asset list, select the Property form. The Property form is shown below:
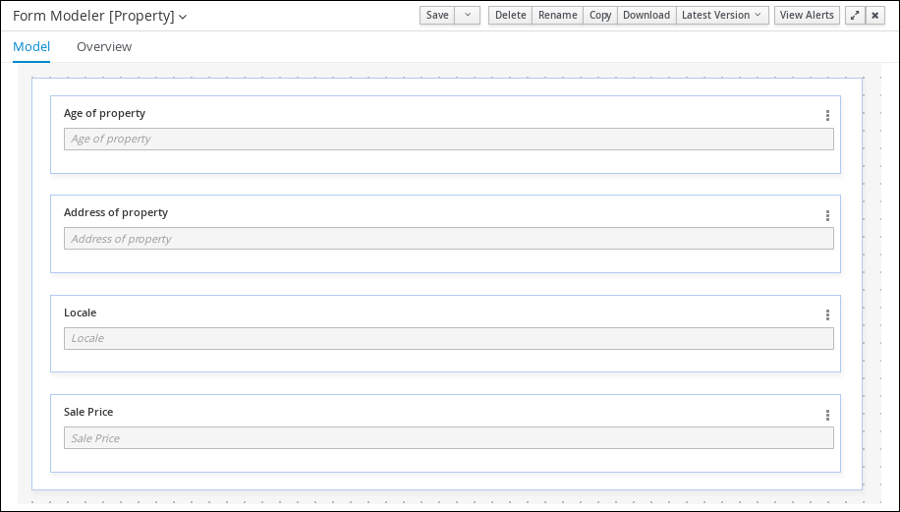 Figure 20. Property sample form
 -
Click Menu → Design → Projects → Mortgage_Process.
-
From the asset list, select the Application form. The Application form is shown below:
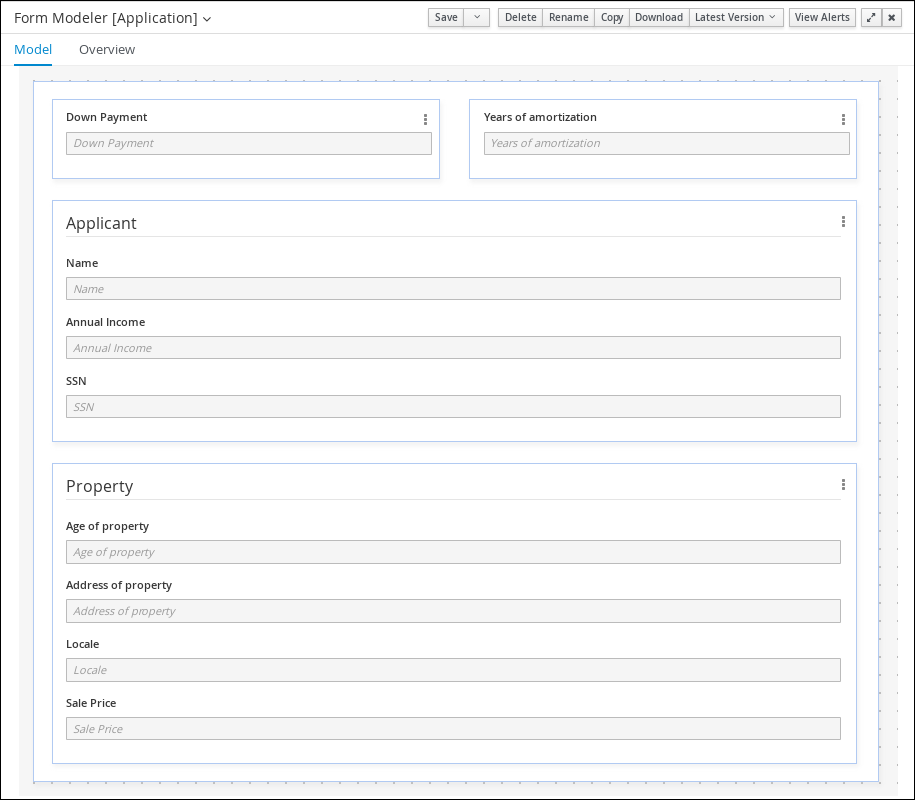 Figure 21. Application sample form
 -
Click the X icon in the upper-right corner to close the editor.
3.7. Deploying the MortgageApprovalProcess process application
The following chapter instructs you how to build and deploy a new instance of the Mortgage_Process application in jBPM.
-
KIE Server is deployed and connected to Business Central.
-
In Business Central, go to Menu → Design → Projects → Mortgage_Process.
-
Click Deploy.
-
If no KIE container (deployment unit) is included with the project name, a container with default values is automatically created.
-
If an older version of the project is already deployed, go to the project settings and change the project version. When finished, save the change and click Deploy. This deploys a new version of the same project with the latest changes in place, alongside the older version(s).
You can also select the Build & Install option to build the project and publish the KJAR file to the configured Maven repository without deploying to a KIE Server. In a development environment, you can click Deploy to deploy the built KJAR file to a KIE Server without stopping any running instances (if applicable), or click Redeploy to deploy the built KJAR file and replace all instances. The next time you deploy or redeploy the built KJAR, the previous deployment unit (KIE container) is automatically updated in the same target KIE Server. In a production environment, the Redeploy option is disabled and you can click Deploy only to deploy the built KJAR file to a new deployment unit (KIE container) on a KIE Server.
To configure the KIE Server environment mode, set the
org.kie.server.modesystem property toorg.kie.server.mode=developmentororg.kie.server.mode=production. To configure the deployment behavior for a corresponding project in Business Central, go to project Settings → General Settings → Version and toggle the Development Mode option. By default, KIE Server and all new projects in Business Central are in development mode. You cannot deploy a project with Development Mode turned on or with a manually addedSNAPSHOTversion suffix to a KIE Server that is in production mode.
-
-
To review project deployment details, click View deployment details in the deployment banner at the top of the screen or in the Deploy drop-down menu. This option directs you to the Menu → Deploy → Execution Servers page.
3.8. Executing the MortgageApprovalProcess process application
Now that you have deployed the project, you can execute the project’s defined functionality. For this tutorial you input data into a mortgage application form acting as the mortgage broker. The MortgageApprovalProcess business process runs and determines whether or not the applicant has offered an acceptable down payment based on the decision rules that you defined earlier. The business process either ends the rule testing or requests that the applicant increase the down payment to proceed. If the application passes the business rule testing, the bank’s approver reviews the application and either approve or deny the loan.
-
KIE Server is deployed and connected to Business Central.
-
The Mortgage_Process application has been deployed.
-
The users working on the tasks are members of the following groups and roles:
-
approver group: For the Qualify task
-
broker group: For the Correct Data and Increase Down Payment tasks
-
manager role: For the Final Approval task
-
-
Log in to jBPM as
Bill(the broker) and click Menu → Manage → Process Definitions. -
Click the three vertical dots in the Actions column and select Start to start to open the Application form and input the following values in to the form fields:
-
Down Payment:
30000 -
Years of amortization:
10 -
Name:
Ivo -
Annual Income:
60000 -
SSN:
123456789 -
Age of property:
8 -
Address of property:
Brno -
Locale:
Rural -
Property Sale Price:
50000
-
-
Click Submit to start a new process instance. After starting the process instance, the Instance Details view opens.
-
Click the Diagram tab to view the process flow within the process diagram. The state of the process is highlighted as it moves through each task.
-
Log out of Business Central and log back in as
Katy. -
Click Menu → Track → Task Inbox. This takes you to the Qualify form.
-
Click the three vertical dots in the Actions column and select and click Claim. The Qualify task Status is now
Reserved. -
Click the Qualify task row to open and review the task information. Click Claim and then Start at the bottom of the form.
The application form is now active for approval or denial.
-
To approve the application, select Is mortgage application in limit? and click Complete.
-
In the Task Inbox, click anywhere in the Final Approval row to open the Final Approval task.
-
In the Final Approval row, click the three vertical dots in the Actions column and click Claim.
-
Click anywhere in the Final Approval row to open the Final Approval task. Click Start at the bottom of the form.
-
Note that the Inlimit check box is selected to reflect that that application is ready for final approval. Click Complete.
| The Save and Release buttons are only used to either pause the approval process and save the instance if you are waiting on a field value, or to release the task for another user to modify. |
3.9. Monitoring the MortgageApprovalProcess process application
The following chapter shows how different bank employees, such as a system administrator or a knowledge worker, might use some of the monitoring capabilities to track an instance of the mortgage approval process.
-
KIE Server is deployed and connected to Business Central.
-
Log in to jBPM and click Menu → Manage → Process Instances.
-
In the Manage Process Instances window, you can set filters, such as State, Errors, Id, and so on.
-
Select Completed in the State filter to view all completed MortgageApprovalProcess instances.
-
Click on the completed process instance.
-
Click each of the following tabs to get a feel for what type of information is available to monitor a specific process instance:
-
Instance Details
-
Process Variables
-
Documents
-
Logs
-
Diagram
-
-
Click Menu → Track → Process Reports. This view contains a variety of charts that can help a senior process manager to gain an overview of all processes based on Type, Start Date, Running Time, and so on to assist with task reporting.
3.9.1. Filtering process instances using default or advanced filters
Business Central now provides you with default and advanced filters to help you filter and search through running process instances. You can also create custom filters using the Advanced Filters option.
3.9.1.1. Filtering process instances using default filters
Filter process instances by attributes such as State, Errors, Filter By, Name, Start Date, and Last update.
-
In Business Central, go to Menu → Manage → Process Instances.
-
On the Manage Process Instances page, click the filter icon on the left of the page to expand the Filters pane.
This pane lists the following process attributes which you can use to filter process instances:
-
State: Filter process instances based on their state (Active, Aborted, Completed, Pending, and Suspended).
-
Errors: Filter process instances by errors.
-
Filter By: Filter process instances based on Id, Initiator, Correlation Key, or Description attribute.
-
Select the required attribute.
-
Enter the search query in the text field below.
-
Click Apply.
-
-
Name: Filter process instances by definition names.
-
Definition Id: Filter process instances by process definition IDs.
-
Deployment Id: Filter process instances by process deployment IDs.
-
Parent Process Instance Id: Filter process instances by parent process instance IDs.
-
SLA Compliance: Filter process instances by SLA compliance states.
-
Start Date: Filter process instances by creation dates.
-
Last update: Filter process instances by last modified dates.
-
3.9.1.2. Filtering process instances using advanced filters
Use the Advanced Filters option to create custom process instance filters. The newly created custom filter is added to the Saved Filters pane, which is accessible by clicking on the star icon on the left of the Manage Process Instances page.
-
In Business Central, go to Menu → Manage → Process Instances.
-
On the Manage Process Instances page, on the left of the page click the Advanced Filters icon.
-
In the Advanced Filters pane, enter the name and description of the filter, and click Add New.
-
Select an attribute from the Select column drop-down list, for example, processName. The content of the drop-down changes to processName != value1.
-
Click the drop-down again and choose the required logical query. For the processName attribute, choose equals to.
-
Change the value of the text field to the name of the process you want to filter.
The name must match the value defined in the business process of the project.
-
Click Save and the processes are filtered according to the filter definition.
-
Click the star icon to open the Saved Filters pane.
In the Saved Filters pane, you can view all the saved advanced filters.
4. Getting started with case management in jBPM
As a business rules and processes developer, you can use case management assets in Business Central to create unpredictable and ad hoc case processes. Case workers or process administrators can also use Business Central for case management and execution. jBPM provides example projects with example business assets in Business Central as a reference. This document describes how to create and test an example IT orders project based on the IT_Orders sample project included in Business Central.
-
Red Hat JBoss Enterprise Application Platform 7.3 is installed. For installation information, see Red Hat JBoss Enterprise Application Platform 7.3 Installation Guide.
-
jBPM is installed and configured with KIE Server. For more information see Installing and configuring jBPM on Red Hat JBoss EAP 7.3.
-
jBPM is running and you can log in to Business Central with the
kie-server,user, andadminroles. -
You have reviewed the information in Designing and building cases for case management.
4.1. Reviewing the IT_Orders sample project
Before you create your own case management project, review the existing IT_Orders sample case management project in Business Central. This sample project contains predefined case management assets as a reference for your own case projects.
|
The business process application example includes features that are Technology Preview only. Technology Preview features are not supported with Red Hat production service level agreements (SLAs), might not be functionally complete, and are not recommended for production. These features provide early access to upcoming product features, enabling customers to test functionality and provide feedback during the development process. For more information about Red Hat Technology Preview support, see Technology Preview Features Support Scope. |
-
In Business Central, go to Menu → Design → Projects. If there are existing projects, you can access the samples by clicking the MySpace default space and selecting Try Samples from the Add Project drop-down menu. If there are no existing projects, click Try samples.
-
Select IT_Orders and click Ok.
The Assets view of the project opens. Select each example asset to explore how the project is designed to achieve the specified goal or workflow.
Review the orderhardware business process to help you understand the business process flow.
4.2. Creating a new IT_Orders case project
Create a new IT_Orders project in Business Central to gain an understanding of all of the required assets and how they are used in the project.
-
Log in to Business Central and go to Menu → Design → Projects.
Business Central provides a default space called MySpace, as shown in the following image. You can use the default space to create and test example projects.
 Figure 22. Default spaces
 -
Click the Add Project drop-down arrow and select the Case project option:
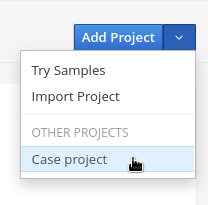 Figure 23. Case project
 -
In the Add Project window, enter
IT_Orders_Newin the Name field and enter a project Description.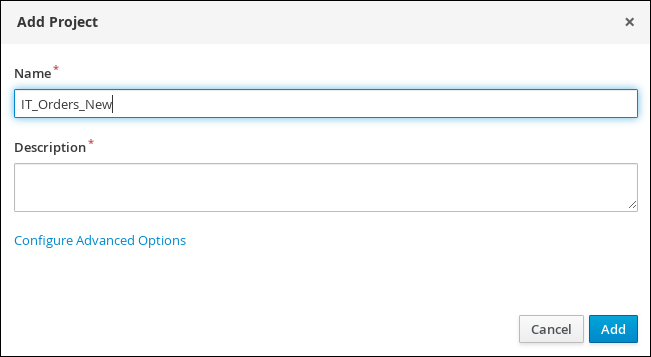 Figure 24. Add Project window
 -
Click Add to add the project.
The Assets view of the project opens.
4.3. Data objects
Data objects are the building blocks for the rule assets that you create. Data objects are custom data types implemented as Java objects in specified packages of your project. For example, you might create a Person object with data fields Name, Address, and DateOfBirth to specify personal details for loan application rules. These custom data types determine what data your assets and your decision services are based on.
4.3.1. Creating the ITOrderService data object
The ITOrderService data object specifies the data type that will be used to define the IT Orders variables.
-
The IT_Orders_New project is created.
-
Click Add Asset → Data Object.
-
In the Create new Data Object wizard, enter the following values:
-
Data Object:
ITOrderService -
Package:
com.myspace.it_orders_new
-
-
Click Ok.
-
Click
 next to the Package drop-down menu to specify a new package for the data object.
 -
Input
org.jbpm.demo.it_orders.servicesand click Add. -
Click Save, and then click Yes, Move to confirm your changes.
4.3.2. Creating the Survey data object
The Survey data object contains data fields, such as deliveredOnTime and missingEquipment. You will use the data and values when you design your case.
-
The IT_Orders_New project is created.
-
In Business Central, go to Menu → Design → Projects and click IT_Orders_New.
-
Click Add Asset → Data Object.
-
In the Create new Data Object wizard, enter the following values:
-
Data Object:
Survey -
Package:
com.myspace.it_orders_new
-
-
Click Ok.
-
Add the Survey data object constraints.
-
Click add field.
-
Enter the following values:
-
Id:
comment -
Label: Leave empty
-
Type:
String
-
-
Click Create and continue, and then enter the following values:
-
Id:
deliveredOnTime -
Label: Leave empty
-
Type:
Boolean
-
-
Click Create and continue, and then enter the following values:
-
Id:
missingEquipment -
Label: Leave empty
-
Type:
String
-
-
Click Create and continue, and then enter the following values:
-
Id:
satisfied -
Label: Leave empty
-
Type:
Boolean
-
-
Click Create.
-
-
Click Save to confirm your changes.
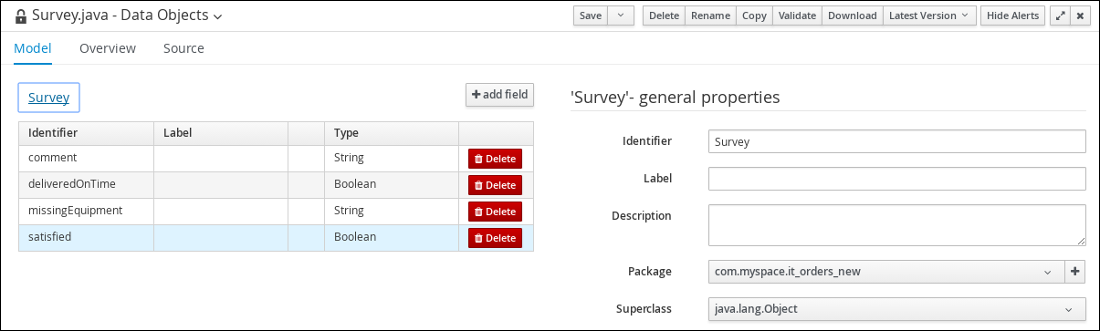 Figure 25. Survey data object details
4.4. Designing the case definition
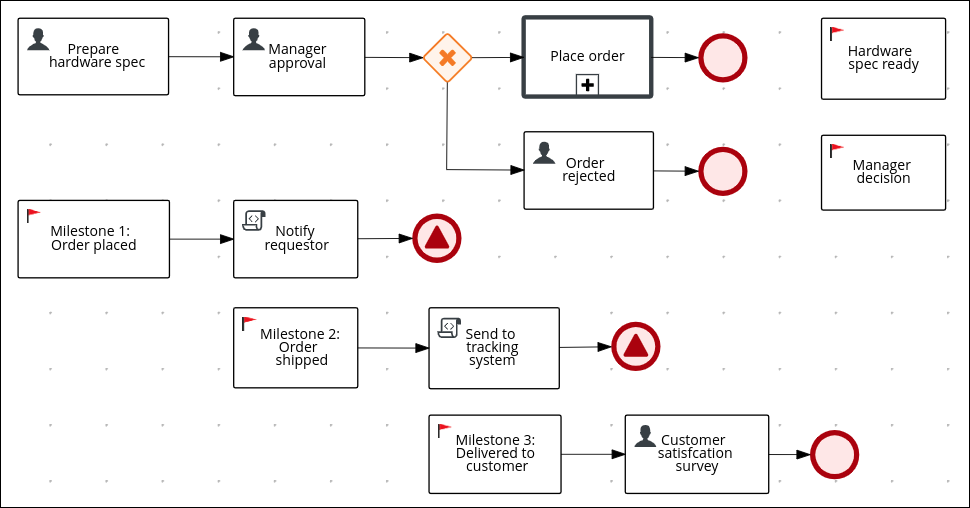
You design cases using the process designer in Business Central. Case design is the basis of case management and sets the specific goals and tasks for each case. The case flow can be modified dynamically during run time by adding dynamic tasks or processes. In this procedure, you will create this same case definition to familiarize yourself with the case definition design process.
The IT_Orders sample project in Business Central includes the following orderhardware business process case definition.
-
You have created a new case in Business Central. For more information, see Creating a new IT_Orders case project.
-
You have created the data objects. For more information, see Data objects.
-
In Business Central, go to Menu → Design → Projects and click IT_Orders_New.
-
Click Add Asset → Case Definition.
-
In the Create new Case definition window, add the following required information:
-
Case Definition: Input
orderhardware. This is usually the subject of the case or project that is being case managed. -
Package: Select com.myspace.it_orders_new to specify the location that the case file is created in.
-
-
Click Ok to open the process designer.
-
Define values for the case file variables that are accessible to the sub-processes, subcases, and business rules used in the case.
-
In the upper-right corner, click the Properties
icon. -
Scroll down and expand Case Management, click
in the Case File Variables section, and enter the following: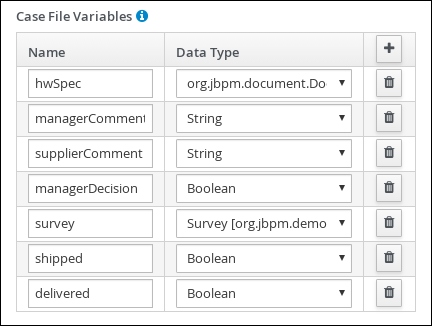 Figure 27. orderhardware case file variables
The following case file variables are custom data types:
-
hwSpec: org.jbpm.document.Document (type in this value)
-
survey: Survey [com.myspace.it_orders_new] (select this value)
-
-
Click Save.
-
Define the roles involved in the case.
-
In the upper-right corner, click the Properties
icon. -
Scroll down and expand Case Management, click
in the Case Roles section, and enter the following: Figure 28. orderhardware case roles
-
owner: The employee who is making the hardware order request. The role cardinality is set to1, which means that only one person or group can be assigned to this role. -
manager: The employee’s manager; the person who will approve or deny the requested hardware. The role cardinality is set to1, which means that only one person or group can be assigned to this role. -
supplier: The available suppliers of IT hardware in the system. The role cardinality is set to2, which means that more than one supplier can be assigned to this role.
-
-
-
Click Save.
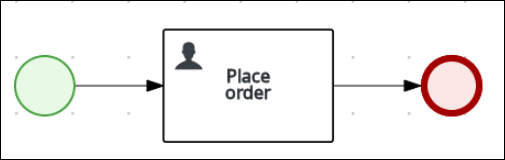
4.4.1. Creating the Place order sub-process
Create the Place order sub-process, which is a separate business process that is carried out by the supplier. This is a reusable process that occurs during the course of case execution as described in Designing the case definition.
-
You have created a new case in Business Central. For more information, see Creating a new IT_Orders case project.
-
You have created the data objects. For more information, see Data objects.
-
In Business Central, go to Menu → Design → Projects → IT_Orders_New.
-
From the project menu, click Add Asset → Business Process.
-
In the Create new Business Process wizard, enter the following values:
-
Business Process:
place-order -
Package: Select
com.myspace.it_orders_new
-
-
Click Ok. The diagram editor opens.
-
Click an empty space in the canvas, and in the upper-right corner, click the Properties
icon. -
Scroll down and expand Process Data and click
in the Process Variables section and enter the following: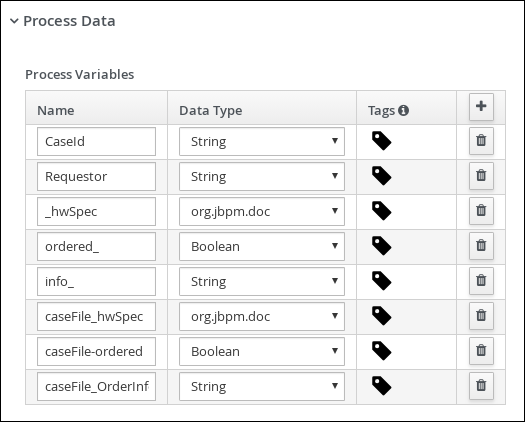
-
Click Save.
-
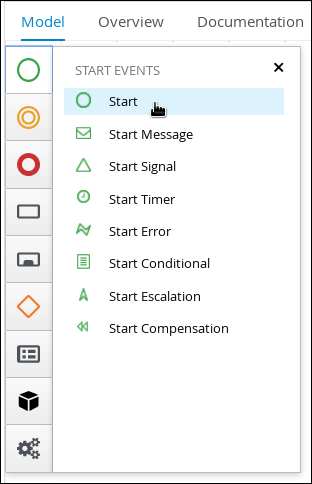
Drag a start event onto the canvas and create an outgoing connection from the start event to a task and convert the new task to a user task.
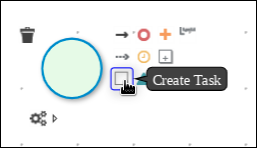
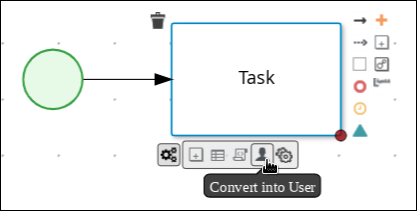
-
Click the user task and in the Properties panel, input
Place orderin the Name field. -
Expand Implementation/Execution, click Add below the Groups menu, click Select → New, and input
supplier. -
Click
in the Assignments field and add the following: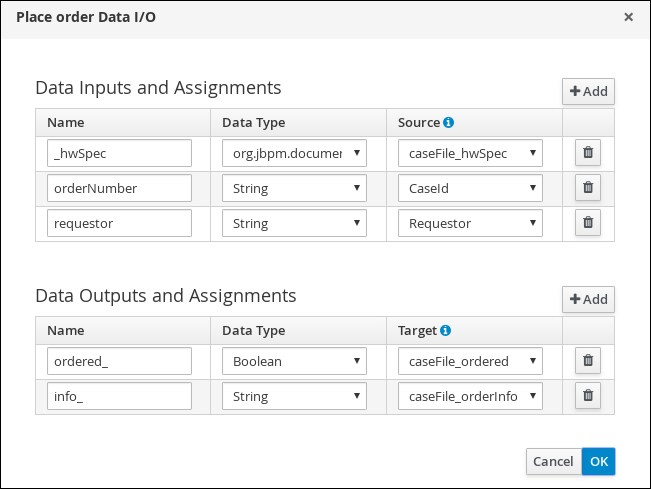
For the first input assignment, select Custom for the Data Type and input
org.jbpm.document.Document. -
Click OK.
-
Select the Skippable check box and enter the following text in the Description field:
Approved order #{CaseId} to be placed
-
Create an outgoing connection from the Place order user task and connect it to an end event.
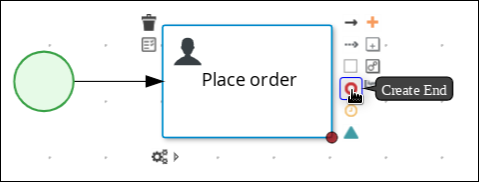
-
Click Save to confirm your changes.
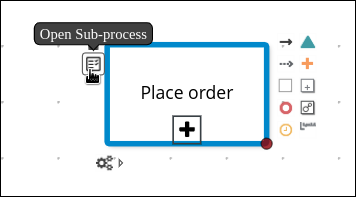
You can open the sub-process in a new editor in Business Central by clicking the Place order task in the main process and then clicking the Open Sub-process task icon.
4.4.2. Creating the Manager approval business process
The manager approval process determines whether or not the order will be placed or rejected.
-
In Business Central, go to Menu → Design → Projects → IT_Orders_New → orderhardware Business Processes.
-
Create and configure the
Prepare hardware specuser task:-
Expand Tasks in the Object Library and drag a user task onto the canvas and convert the new task to a user task.
-
Click the new user task and in the upper-right corner click the Properties
icon. -
Input
Prepare hardware specin the Name field. -
Expand Implementation/Execution, click Add below the Groups menu, click Select → New, and input
supplier. -
Input
PrepareHardwareSpecin the Task Name field. -
Select the Skippable check box and enter the following text in the Description field:
Prepare hardware specification for #{initiator} (order number #{CaseId}) -
Click
in the Assignments field and add the following: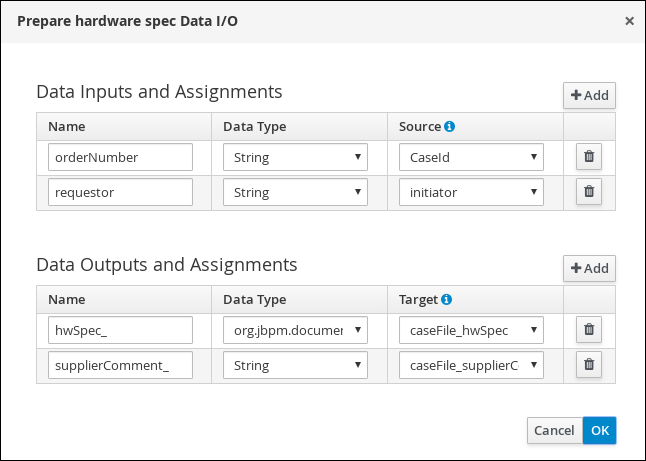
-
Click OK.
-
-
Create and configure the manager approval user task:
-
Click the Prepare hardware spec user task and create a new user task.
-
Click the new user task and in the upper-right corner click the Properties
icon. -
Click the user task and in the Properties panel input
Manager approvalin the Name field. -
Expand Implementation/Execution, click Add below the Actors menu, click Select → New, and input
manager. -
Input
ManagerApprovalin the Task Name field. -
Click
in the Assignments field and add the following: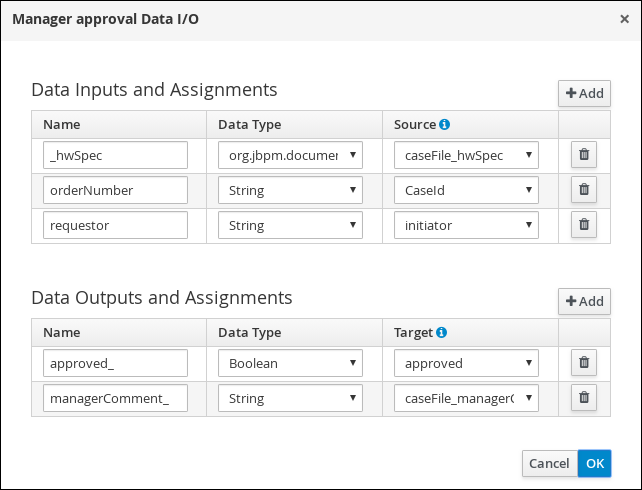
-
Click OK.
-
Select the Skippable check box and enter the following text in the Description field:
Approval request for new hardware for #{initiator} (order number #{CaseId}) -
Enter the following Java expression in the On Exit Action field:
kcontext.setVariable("caseFile_managerDecision", approved); -
Click Save.
-
-
Click the Manager approval user task and create a Data-based Exclusive (XOR) gateway.
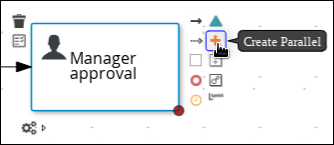
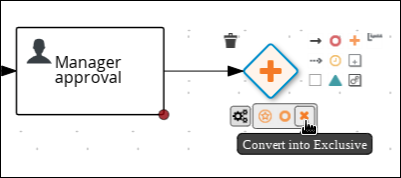
-
Create and configure the
Place orderreusable sub-process:-
From the Object Library, expand sub-processes, click Reusable, and drag the new element to the canvas on the right side of the Data-based Exclusive (XOR) gateway.
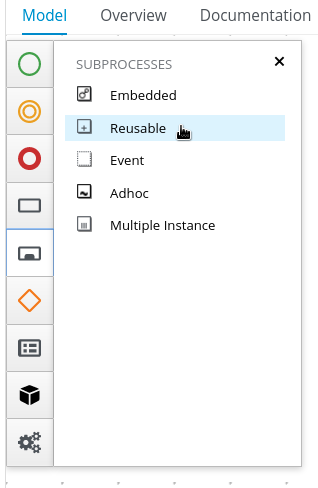
-
Connect the Data-based Exclusive (XOR) gateway to the sub-process.

-
Click the new sub task and in the upper-right corner click the Properties
icon. -
Input
Place orderin the Name field. -
Expand Data Assignments and click
in the Assignments field and add the following: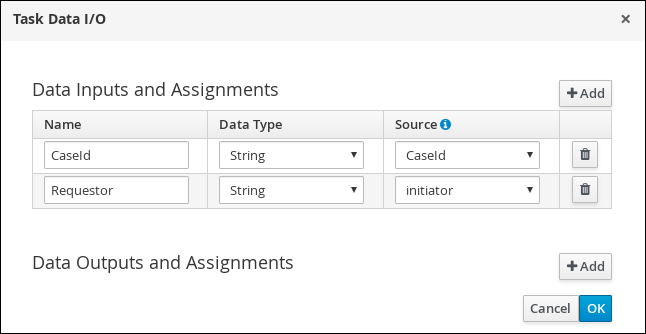
-
Click OK.
-
Click the connection from the Data-based Exclusive (XOR) gateway to the sub-process and click the Properties
icon. -
Expand Implementation/Execution, select Condition, and set the following condition expressions.

-
Click the Place order user task and create an end event.
-
-
Create and configure the order rejected user task:
-
Click the Data-based Exclusive (XOR) gateway and create a new user task.
-
Drag the new task to align it below the Place order task.
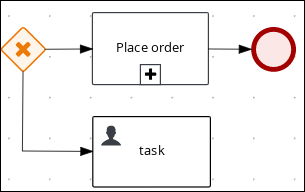
-
Click the new user task and in the upper-right corner click the Properties
icon. -
Input
Order rejectedin the Name field. -
Expand Implementation/Execution and input
OrderRejectedin the Task Name field. -
Click Add below the Actors menu, click Select → New, and input
owner. -
Click
in the Assignments field and add the following: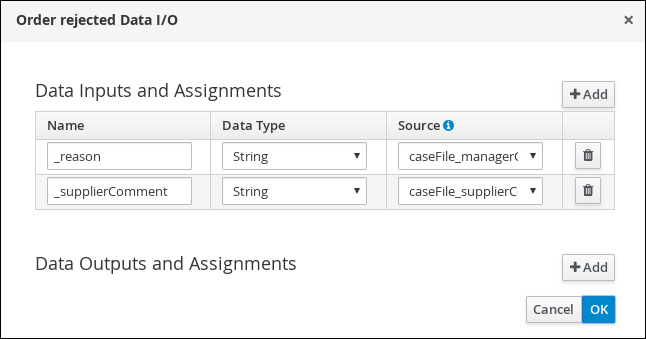
-
Click OK.
-
Select the Skippable check box and enter the following text in the Description field:
Order #{CaseId} has been rejected by manager -
Click the Order rejected user task and create an end event.
-
Click Save.
-
-
Click the connection from the Data-based Exclusive (XOR) gateway to the Order rejected user task and click the Properties
icon. -
Expand Implementation/Execution, select Condition, and set the following condition expressions.
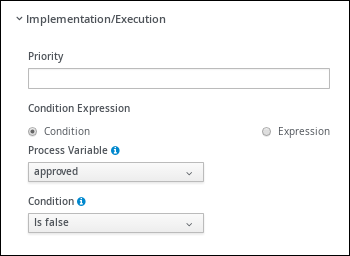
-
Click Save.
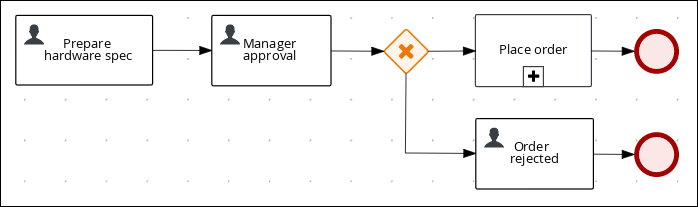 Figure 29. Manager approval business process
4.5. Milestones
Milestones are a special service task that can be configured in the case definition designer by adding the milestone node to the process designer palette. When creating a new case definition, a milestone configured as AdHoc Autostart is included on the design palette by default. Newly created milestones are not set to AdHoc Autostart by default.
Case management milestones generally occur at the end of a stage, but they can also be the result of achieving other milestones. A milestone always requires a condition to be defined in order to track progress. Milestones react to case file data when data is added to a case. A milestone represents a single point of achievement within the case instance. It can be used to flag certain events, which can be useful for Key Performance Indicator (KPI) tracking or identifying the tasks that are still to be completed.
Milestones can be in any of the following states during case execution:
-
Active: The condition has been defined on the milestone but it has not been met. -
Completed: The milestone condition has been met, the milestone has been achieved, and the case can proceed to the next task. -
Terminated: The milestone is no longer a part of the case process and is no longer required.
While a milestone is available or completed it can be triggered manually by a signal or automatically if AdHoc Autostart is configured when a case instance starts. Milestones can be triggered as many times as required, however, it is directly achieved when the condition is met.
4.5.1. Creating the Hardware spec ready milestone
Create a HardwareSpecReady milestone that is reached when the required hardware specification document is completed.
-
In the process designer, expand Milestone in the Object Library and drag a new milestone on the canvas and place it on the right side of the Place order end event.
-
Click the new milestone and in the upper-right corner click the Properties
icon. -
Input
Hardware spec readyin the Name field. -
Expand Implementation/Execution and select AdHoc Autostart.
-
Expand Data Assignments, click
in the Assignments field, and add the following:
Click the Source column drop-down, select Constant, and input
org.kie.api.runtime.process.CaseData(data.get("hwSpec") != null). -
Click OK.
4.5.2. Creating the Manager decision milestone
This milestone is reached when the managerDecision variable has been given a response.
-
In the process designer, expand Milestone in the Object Library and drag a new milestone onto the canvas below the HardwareSpecReady milestone.
-
Click the new milestone and in the upper-right corner click the Properties
icon. -
Input
Manager decisionin the Name field. -
Expand Implementation/Execution and select AdHoc Autostart.
-
Expand Data Assignments and click
in the Assignments field and add the following: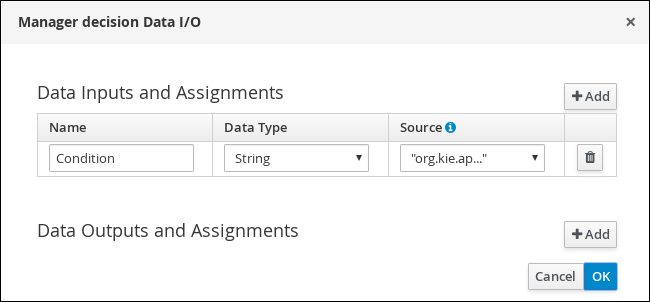
Click the Source column drop-down, select Constant, and input
org.kie.api.runtime.process.CaseData(data.get("managerDecision") != null). -
Click OK.
4.5.3. Creating the Order placed milestone
This milestone is reached when the ordered variable, which is part of the Place order sub-process, has been given a response.
-
In the process designer, expand Milestone in the Object Library and drag a new milestone on the canvas below the Prepare hardware spec user task.
-
Click the new milestone and in the upper-right corner click the Properties
icon. -
Input
Milestone 1: Order placedin the Name field. -
Expand Implementation/Execution and select AdHoc Autostart.
-
Expand Data Assignments, click
in the Assignments field, and add the following: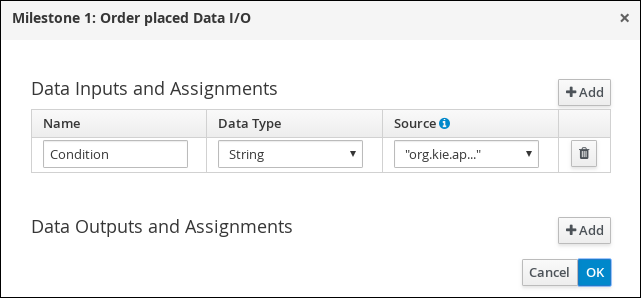
Click the Source column drop-down, select Constant, and input
org.kie.api.runtime.process.CaseData(data.get("ordered") == true). This means that a case variable namedorderedexists with the valuetrue. -
Click OK.
-
Click Milestone 1: Order placed and create a new script task.
-
Click the new script task and in the upper-right corner click the Properties
icon. -
Input
Notify requestorin the Name field. -
Expand Implementation/Execution and input
System.out.println("Notification::Order placed");. -
Click the Notify requestor script task and create a signal end event.
-
Click the signal event and in the upper-right corner click the Properties.
icon. -
Expand Implementation/Execution, click the down arrow in the Signal field, and select New.
-
Input
Milestone 2: Order shipped. -
Click the down arrow in the Signal Scope field, select Process Instance.
-
Click Save.
 Figure 30. Order placed milestone
4.5.4. Creating the Order shipped milestone
The condition for this milestone is that a case file variable named shipped is true. AdHoc Autostart is not enabled for this milestone. Instead, it is triggered by a signal event when the order is ready to be sent.
-
In the process designer, expand Milestone in the Object Library and drag a new milestone on the canvas below the Notify requestor script task.
-
Click the new milestone and in the upper-right corner click the Properties
icon. -
Input
Milestone 2: Order shippedin the Name field. -
Expand Implementation/Execution and ensure that AdHoc Autostart is not selected.
-
Expand Data Assignments, click
in the Assignments field, and add the following:
Click the Source column drop-down, select Constant, and input
org.kie.api.runtime.process.CaseData(data.get("shipped") == true). This means that a case variable namedshippedexists with the valuetrue. -
Click OK.
-
Click Milestone 2: Order shipped and create a new script task.
-
Click the new script task and in the upper-right corner click the Properties
icon. -
Input
Send to tracking systemin the Name field. -
Expand Implementation/Execution and input
System.out.println("Order added to tracking system");. -
Click the Send to tracking system script task and create a signal end event.
-
Click the signal event and in the upper-right corner click the Properties.
icon. -
Expand Implementation/Execution, click the down arrow in the Signal field, and select New.
-
Input
Milestone 3: Delivered to customer. -
Click the down arrow in the Signal Scope field, select Process Instance.
-
Click Save.
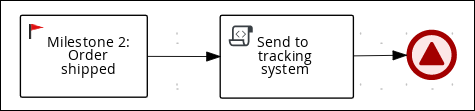 Figure 31. Order shipped milestone
4.5.5. Creating the Delivered to customer milestone
The condition for this milestone is that a case file variable named delivered is true. AdHoc Autostart is not enabled for this milestone. Instead, it is triggered by a signal event after the order has successfully shipped to the customer.
-
In the process designer, expand Milestone in the Object Library and drag a new milestone on the canvas below the Send to tracking system script task.
-
Click the new milestone and in the upper-right corner click the Properties
icon. -
Input
Milestone 3: Delivered to customerin the Name field. -
Expand Implementation/Execution and ensure that AdHoc Autostart is not selected.
-
Expand Data Assignments, click
in the Assignments field, and add the following: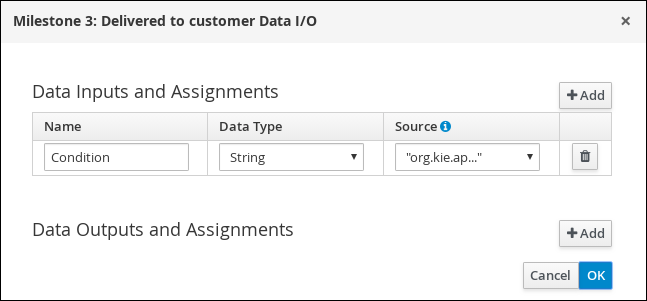
Click the Source column drop-down, select Constant, and input
org.kie.api.runtime.process.CaseData(data.get("delivered") == true). This means that a case variable nameddeliveredexists with the valuetrue. -
Click OK.
-
Click Milestone 3: Delivered to customer and create a new user task.
-
Click the new user task and in the upper-right corner click the Properties
icon. -
Input
Customer satisfaction surveyin the Name field. -
Expand Implementation/Execution, click Add below the Actors menu, click Select → New, and input
owner. -
Input
CustomerSurveyin the Task Name field. -
Select the Skippable check box and enter the following text in the in the Description field:
Satisfaction survey for order #{CaseId} -
Click
in the Assignments field and add the following: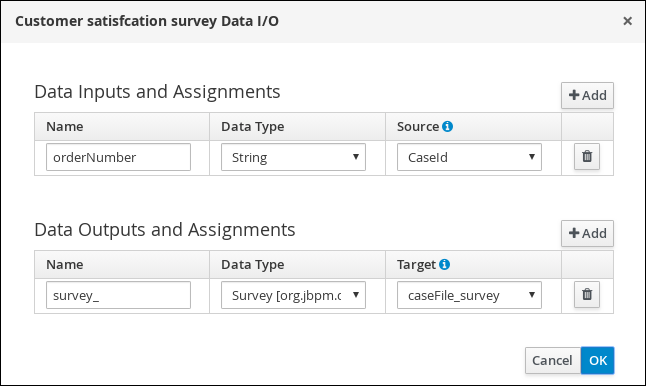
-
Click OK.
-
-
Click the Customer satisfaction survey user task and create an end event.
-
Click Save to confirm your changes.
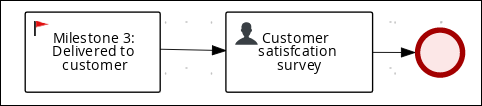 Figure 32. Delivered to customer milestone
The IT Orders case can be closed after all milestone sequences are completed. However, due to the ad hoc nature of cases, the case could be reopened if, for example, the order was never received by the customer or the item is faulty. Tasks can be re-triggered or added to the case definition as required, even during run time.
4.6. Deploying and testing the IT order case project
After you create and define all components of the new IT_Orders_New case project, deploy and test the new project.
-
You have a running KIE Server instance connected to Business Central. For more information see Installing and configuring jBPM on Red Hat JBoss EAP 7.3.
-
You have created a new case in Business Central. For more information, see Creating a new IT_Orders case project.
-
You have created the data objects. For more information, see Data objects.
-
You have created the
Place ordersub-process. For more information, see Creating the Place order sub-process. -
You have designed the
orderhardwarecase definition. For more information, see Designing the case definition.
-
In Business Central, go to Menu → Design → Projects and click IT_Orders_New.
-
Click Deploy.
-
Go to Menu → Manage → Process Definitions → Manage Process Instances → New Process Instance.
-
Go to Menu → Deploy and click Execution Servers and verify that a new container is deployed and started.
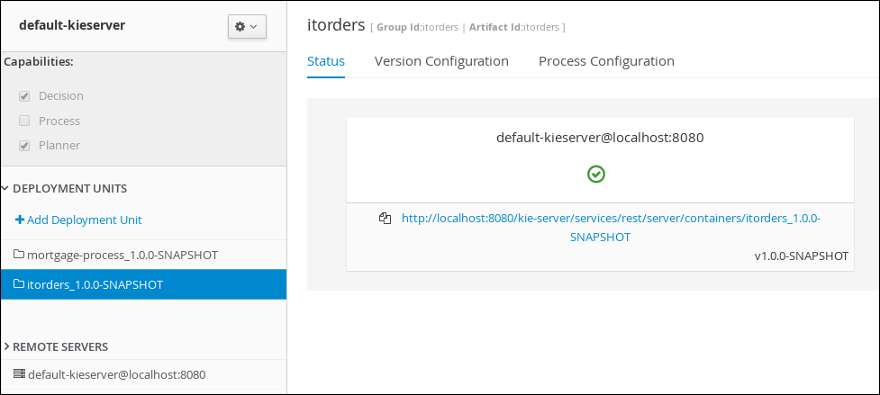
-
Use the Case Management Showcase application to start a new case instance. For instructions about using the Showcase application, see Using the Showcase application for case management.
5. Business applications
5.1. Overview
Business application can be defined as an automated solution, built with selected frameworks and capabilities that implements business functions and/or business problems. Capabilities can be (among others):
-
persistence
-
messaging
-
transactions
-
business processes, business rules
-
planning solutions
Business application is more of a logical grouping of individual services that represent certain business capabilities. Usually they are deployed separately and can also be versioned individually. Overall goal is that the complete business application will allow particular domain to achieve their business goals e.g. order management, accommodation management, etc.
-
Build on any runtime (most popular options)
-
SpringBoot
-
WildFly
-
Thorntail
-
-
deployable to cloud with just single command
-
OpenShift
-
Kubernetes
-
Docker
-
-
UI agnostic
-
Doesn’t enforce any UI frameworks and let users to make their own choice
-
-
Configurable database profiles
-
to allow smooth transition from one database to another with just single parameter/switch
-
-
Generated
-
makes it really easy to start for developers so they don’t get upset with initial failures usually related to configuration
-
-
Many project
-
data model project - shared data model between business assets and service
-
business assets (kjar) project - easily importable into Business Central
-
service project - actual service with various capabilities
-
-
Configuration for
-
maven repository - settings.xml
-
database profiles
-
deployment setup
-
local
-
docker
-
OpenShift
-
-
Service project is the one that is deployable but will in most of the cases include business assets and data model projects. Data model project represents the common data structures that will be shared between service implementation and business assets. That enables proper encapsulation and promotes reuse and at the same time reduces shortcuts to make data model classes something more than they are - include too much of implementation into data models.
Business applications you build are not restricted to having only one of each project types. In order to build the solutions you need your business app can:
-
Have multiple data model projects - each service project can expose its own public data model
-
Have multiple business assets (kjar) projects - in case there is a business need for it
-
Have multiple service projects - to split services into smaller components for better manageability
-
Have UI modules - either per service (embedded in the service project) or a federated one (separate project for UI only)
-
Service projects can communicate with each other either directly or via business processes
Following diagram represents the sample business application
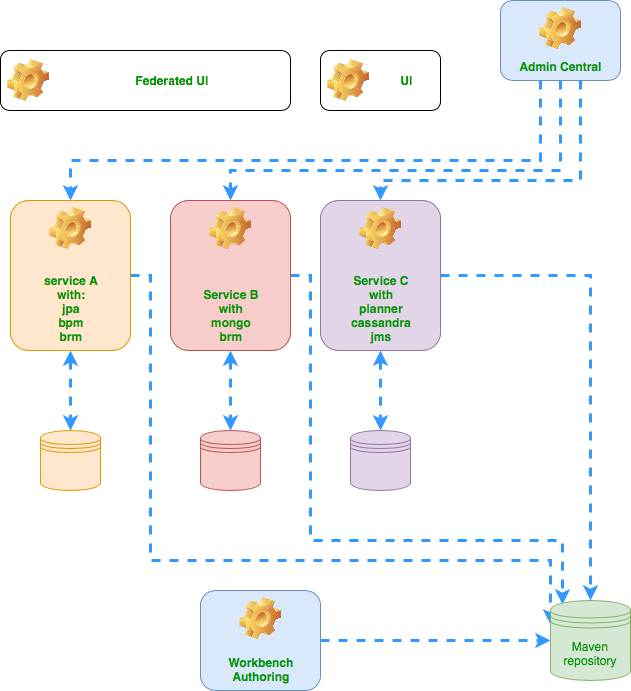
5.2. Create your business application
Business application can be created in multiple ways, depending on the project types you need.
5.2.1. Generate business application
The fastest and recommended way to quickly generate your business application is by using the jBPM online service: start.jbpm.org
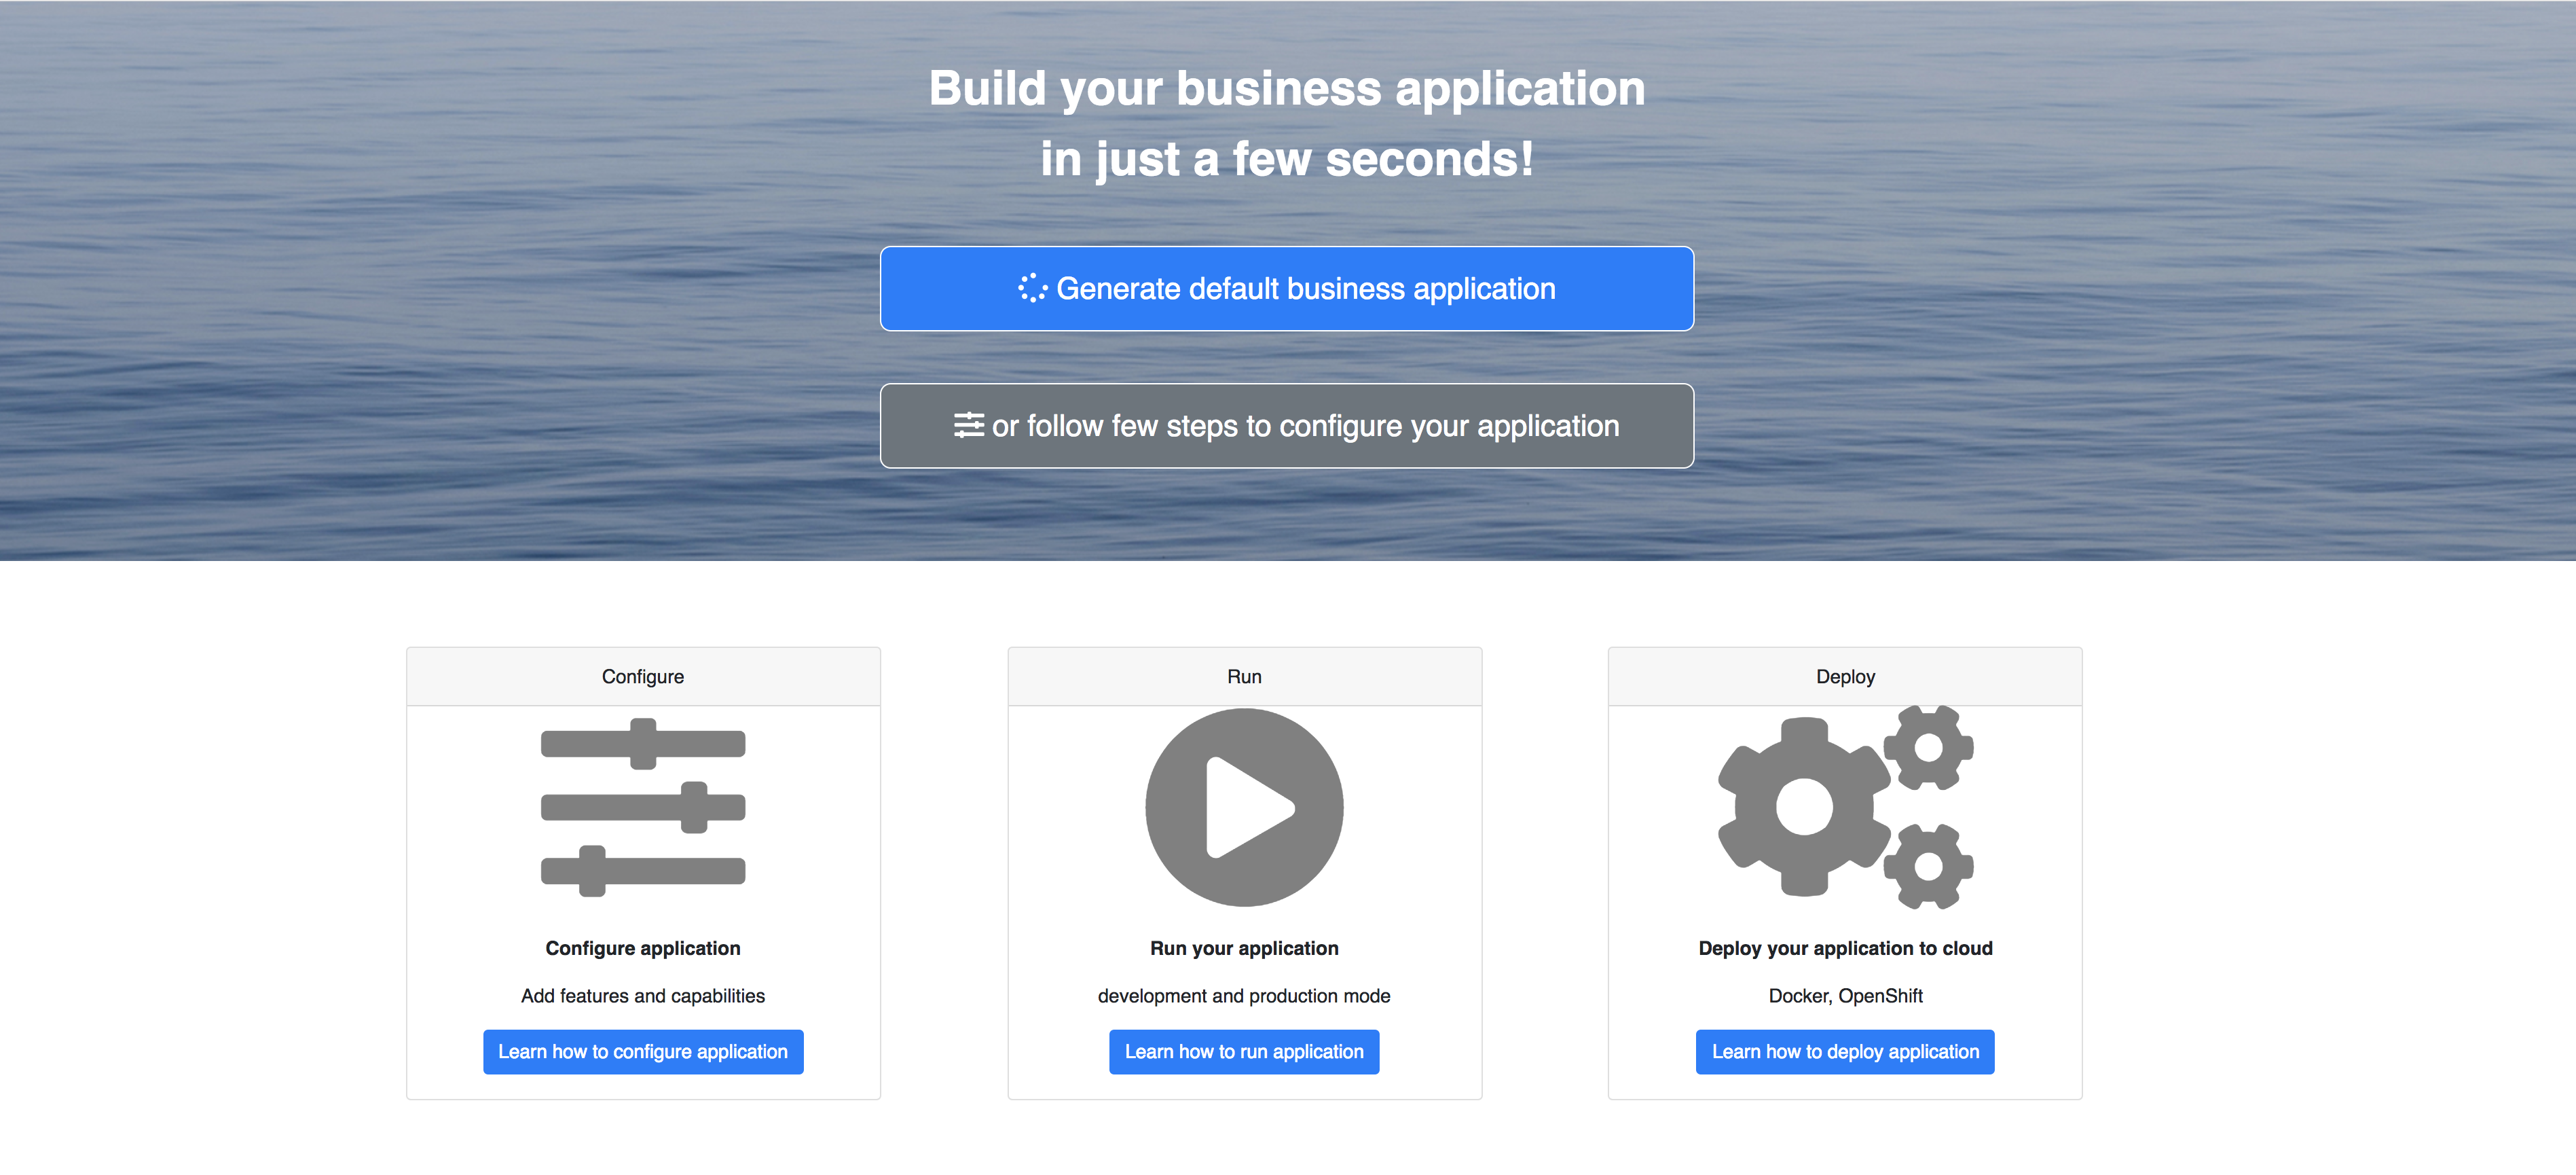
With the online service you can:
-
generate your business app using a default (most commonly used) configuration
-
configure your business application to include specific features that you need
The generated application will be delivered as a zip archive will following structure
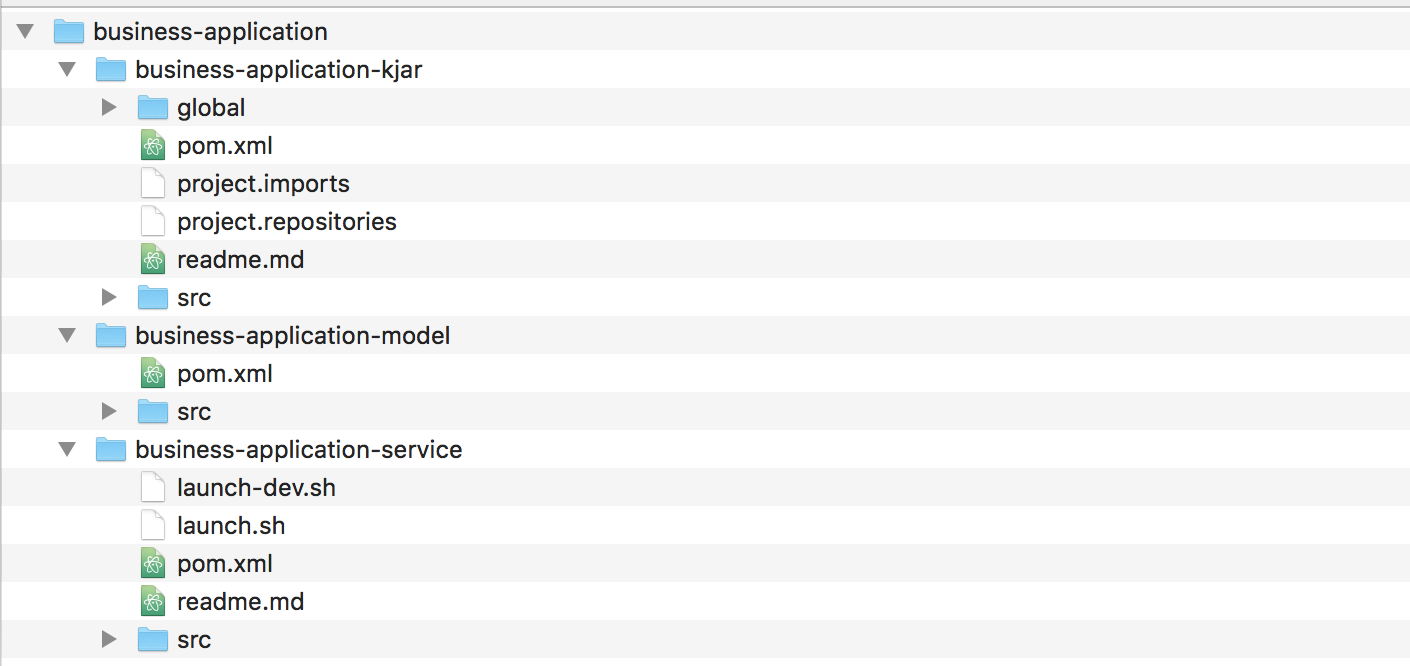
To provide more information about individual steps, let’s review different options that user can choose from
5.2.1.1. Capabilities
Capabilities essentially define the features that your business application will be equipped with. Available options are:
-
Business automation covers features for process management, case management, decision management and optimisation. These will be by default configured in the service project of your business application. Although you can turn them off via configuration.
-
Decision management covers mainly decision and rules related features (backed by Drools project)
-
Business optimisation covers planning problems and solutions related features (backed by OptaPlanner project)
5.2.1.2. Application information
General information about the application that is
-
name - the name that will be used for the projects generated
-
package - valid Java package name that will be created in the projects and used as group of maven projects
-
version - selected version of jBPM/KIE that should be used for service project
5.2.1.3. Project types
Selection of project types to be included in the business application
-
data model - basic maven/jar project to keep the data structures
-
business assets - kjar project that can be easily imported into Business Central for development
-
service - service project that will include chosen capabilities with all bits configured
5.2.2. Manually create business application
In case you can’t use jBPM online service to generate the application you can manually create individual projects. jBPM provides maven archetypes that can be easily used to generate the application. In fact jBPM online service uses these archetypes behind the scenes to generate business application.
Business assets project archetype
org.kie:kie-kjar-archetype:7.52.0.Final
Service project archetype
org.kie:kie-service-spring-boot-archetype:7.52.0.Final
Data model archetype
org.apache.maven.archetypes:maven-archetype-quickstart:1.3
Example that allows to generate all three types of projects
mvn archetype:generate -B -DarchetypeGroupId=org.kie -DarchetypeArtifactId=kie-model-archetype -DarchetypeVersion=7.52.0.Final -DgroupId=com.company -DartifactId=test-model -Dversion=1.0-SNAPSHOT -Dpackage=com.company.model

mvn archetype:generate -B -DarchetypeGroupId=org.kie -DarchetypeArtifactId=kie-kjar-archetype -DarchetypeVersion=7.52.0.Final -DgroupId=com.company -DartifactId=test-kjar -Dversion=1.0-SNAPSHOT -Dpackage=com.company

mvn archetype:generate -B -DarchetypeGroupId=org.kie -DarchetypeArtifactId=kie-service-spring-boot-archetype -DarchetypeVersion=7.52.0.Final -DgroupId=com.company -DartifactId=test-service -Dversion=1.0-SNAPSHOT -Dpackage=com.company.service -DappType=bpm
When generating projects from the archetypes in same directory you should end up with exactly the same structure as generated by jBPM online service.
5.3. Run your business application
Once your business application is created, the next step is to actually run it.
5.3.1. Launch application
By default business application has a single runnable project - that is the service project. The service project is equipped with two scripts (both for linux and windows)
-
launch.sh/launch.bat
-
launch-dev.sh/launch-dev.bat
the main difference between these two scripts is the target execution
-
launch.sh/bat is dedicated to start application in standalone mode, without additional requirements.
-
launch-dev.sh/bat is dedicated to start application in sort of development mode (in other words managed mode) so it will require Business Central to be available as jBPM controller.
Development mode is meant to allow people to work on the business assets projects and dynamically deploy changes to the business application without the need to restart it. At the same time it provides a complete monitoring environment over business automation capabilities (process instances, tasks, jobs, etc).
To launch your application just go into service project ({your business application name}-service) and invoke
./launch.sh clean install for Linux/Unix
./launch.bat clean install for Windows
the clean install part of the command is to tell maven how to build. It will then
build projects in following order
-
Data model
-
Business assets
-
Service
the first time it might take a while as it will download all dependencies of the project. At the end of the build it will start the application and after few seconds you should see output similar to following..,
INFO  o.k.s.s.a.KieServerAutoConfiguration     : KieServer (id business-application-service (name business-application-service)) started initialization process
INFO  o.k.server.services.impl.KieServerImpl   : Server Default Extension has been successfully registered as server extension
INFO  o.k.server.services.impl.KieServerImpl   : Drools KIE Server extension has been successfully registered as server extension
INFO  o.k.server.services.impl.KieServerImpl   : DMN KIE Server extension has been successfully registered as server extension
INFO  o.k.s.api.marshalling.MarshallerFactory  : Marshaller extensions init
INFO  o.k.server.services.impl.KieServerImpl   : jBPM KIE Server extension has been successfully registered as server extension
INFO  o.k.server.services.impl.KieServerImpl   : Case-Mgmt KIE Server extension has been successfully registered as server extension
INFO  o.k.server.services.impl.KieServerImpl   : jBPM-UI KIE Server extension has been successfully registered as server extension
INFO  o.k.s.s.impl.policy.PolicyManager        : Registered KeepLatestContainerOnlyPolicy{interval=0 ms} policy under name KeepLatestOnly
INFO  o.k.s.s.impl.policy.PolicyManager        : Policy manager started successfully, activated policies are []
INFO  o.k.server.services.impl.KieServerImpl   : Selected startup strategy ControllerBasedStartupStrategy - deploys kie containers given by controller ignoring locally defined
INFO  o.k.s.services.impl.ContainerManager     : About to install containers '[]' on kie server 'KieServer{id='business-application-service'name='business-application-service'version='7.9.0.Final'location='http://localhost:8090/rest/server'}'
INFO  o.k.server.services.impl.KieServerImpl   : KieServer business-application-service is ready to receive requests
INFO  o.k.s.s.a.KieServerAutoConfiguration     : KieServer (id business-application-service) started successfully
INFO  o.s.j.e.a.AnnotationMBeanExporter        : Registering beans for JMX exposure on startup
INFO  s.b.c.e.t.TomcatEmbeddedServletContainer : Tomcat started on port(s): 8090 (http)
INFO  c.c.b.service.Application                : Started Application in 14.534 seconds (JVM running for 15.193)
and you should be able to access your business application at http://localhost:8090/
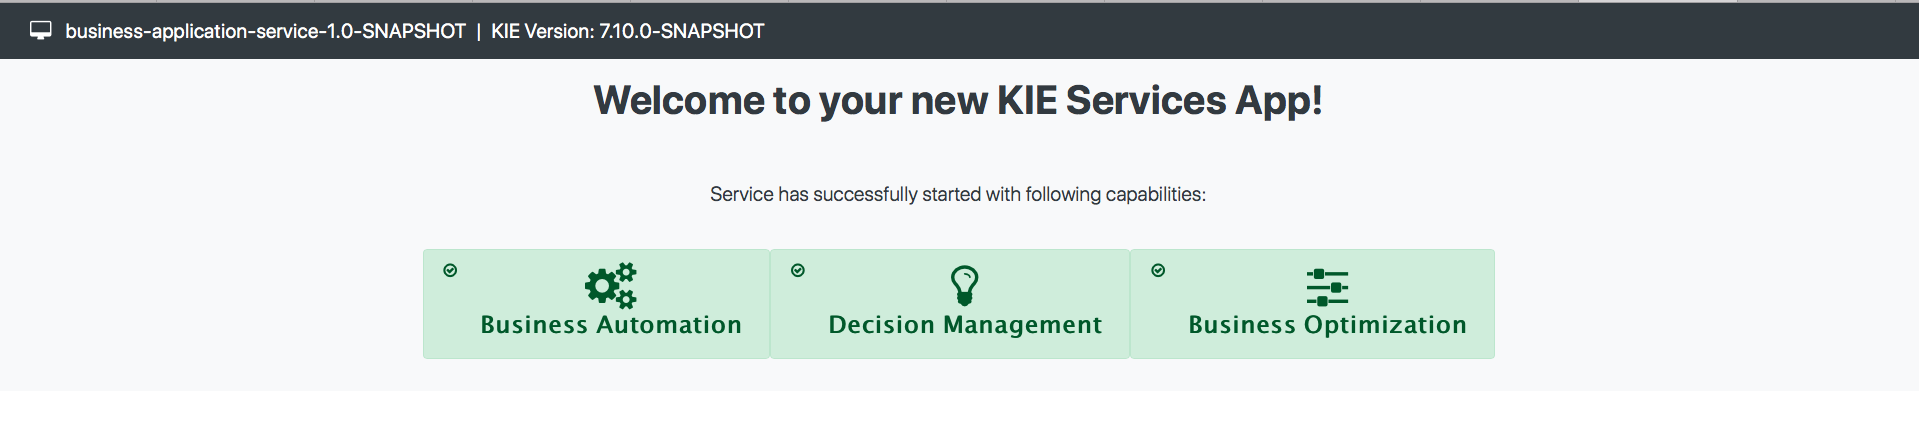
5.3.2. Launch application in development mode
| Development mode requires Business Central to be available, by default at http://localhost:8080/business-central. The easiest way to get that up and running is to use jBPM single distribution that can be downloaded at jbpm.org Look at the Getting Started guide to get yourself familiar with Business Central. |
Make sure you have Business Central up and running before launching your business application in development mode.
5.3.3. Import your business assets project into Business Central
Business assets projects that was just created can be easily imported into Business Central as soon as it’s a valid git repository. To make it as such
-
Go into business assets project - {your business application name}-kjar
-
Execute
git init -
Execute
git add -A -
Execute
git commit -m "Initial project structure" -
Log in to Business Central and go to projects
-
Select import project and enter the following URL
file:///{path to your business application}/{your business application name}-kjar -
Click import and confirm project to be imported
5.3.3.1. Work on your business assets
Once the business assets project is imported into Business Central you can start working on it. Just go to the project and add assets such as business process, rules, decision tables etc.
5.3.3.2. Launch business application in development mode
To launch your application just go into service project ({your business application name}-service) and invoke
./launch-dev.sh clean install for Linux/Unix
./launch-dev.bat clean install for Windows
this should print the first entry after the build as follows
Launching the application in development mode - requires connection to controller (Business Central)
and similar as to launching in the standalone more after couple of seconds should be able to access your business application at http://localhost:8090/
Once the application started, it should be successfully connect to jBPM controller and by that be visible in the servers perspective of Business Central.
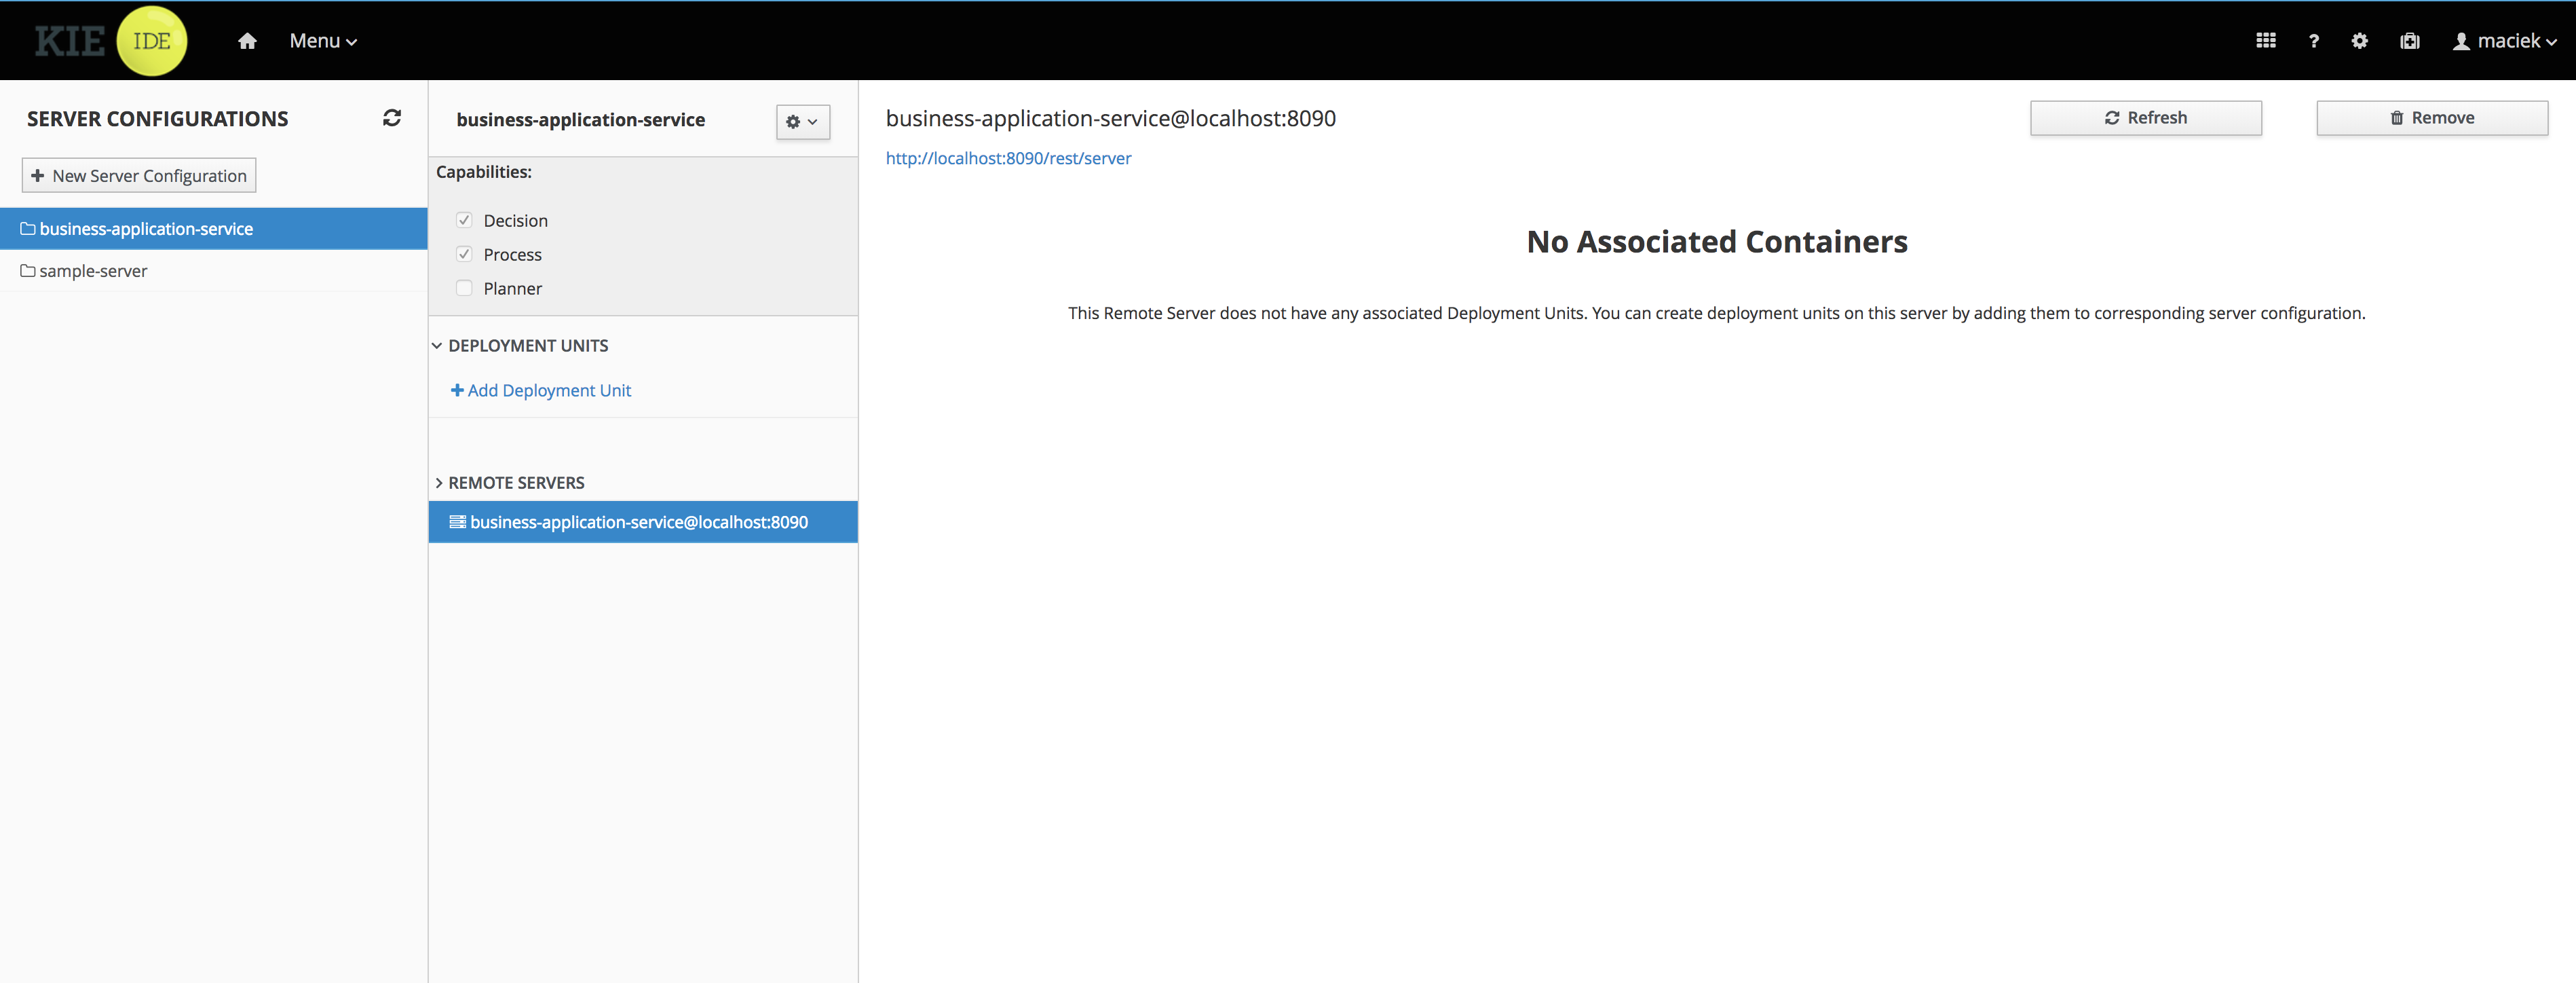
5.3.3.3. Deploy business assets project into running business application
After adding assets to your project in Business Central you can just deploy it to a running server instance.
Click the Deploy button on your project and in few seconds you should see the
project deployed on your business application.
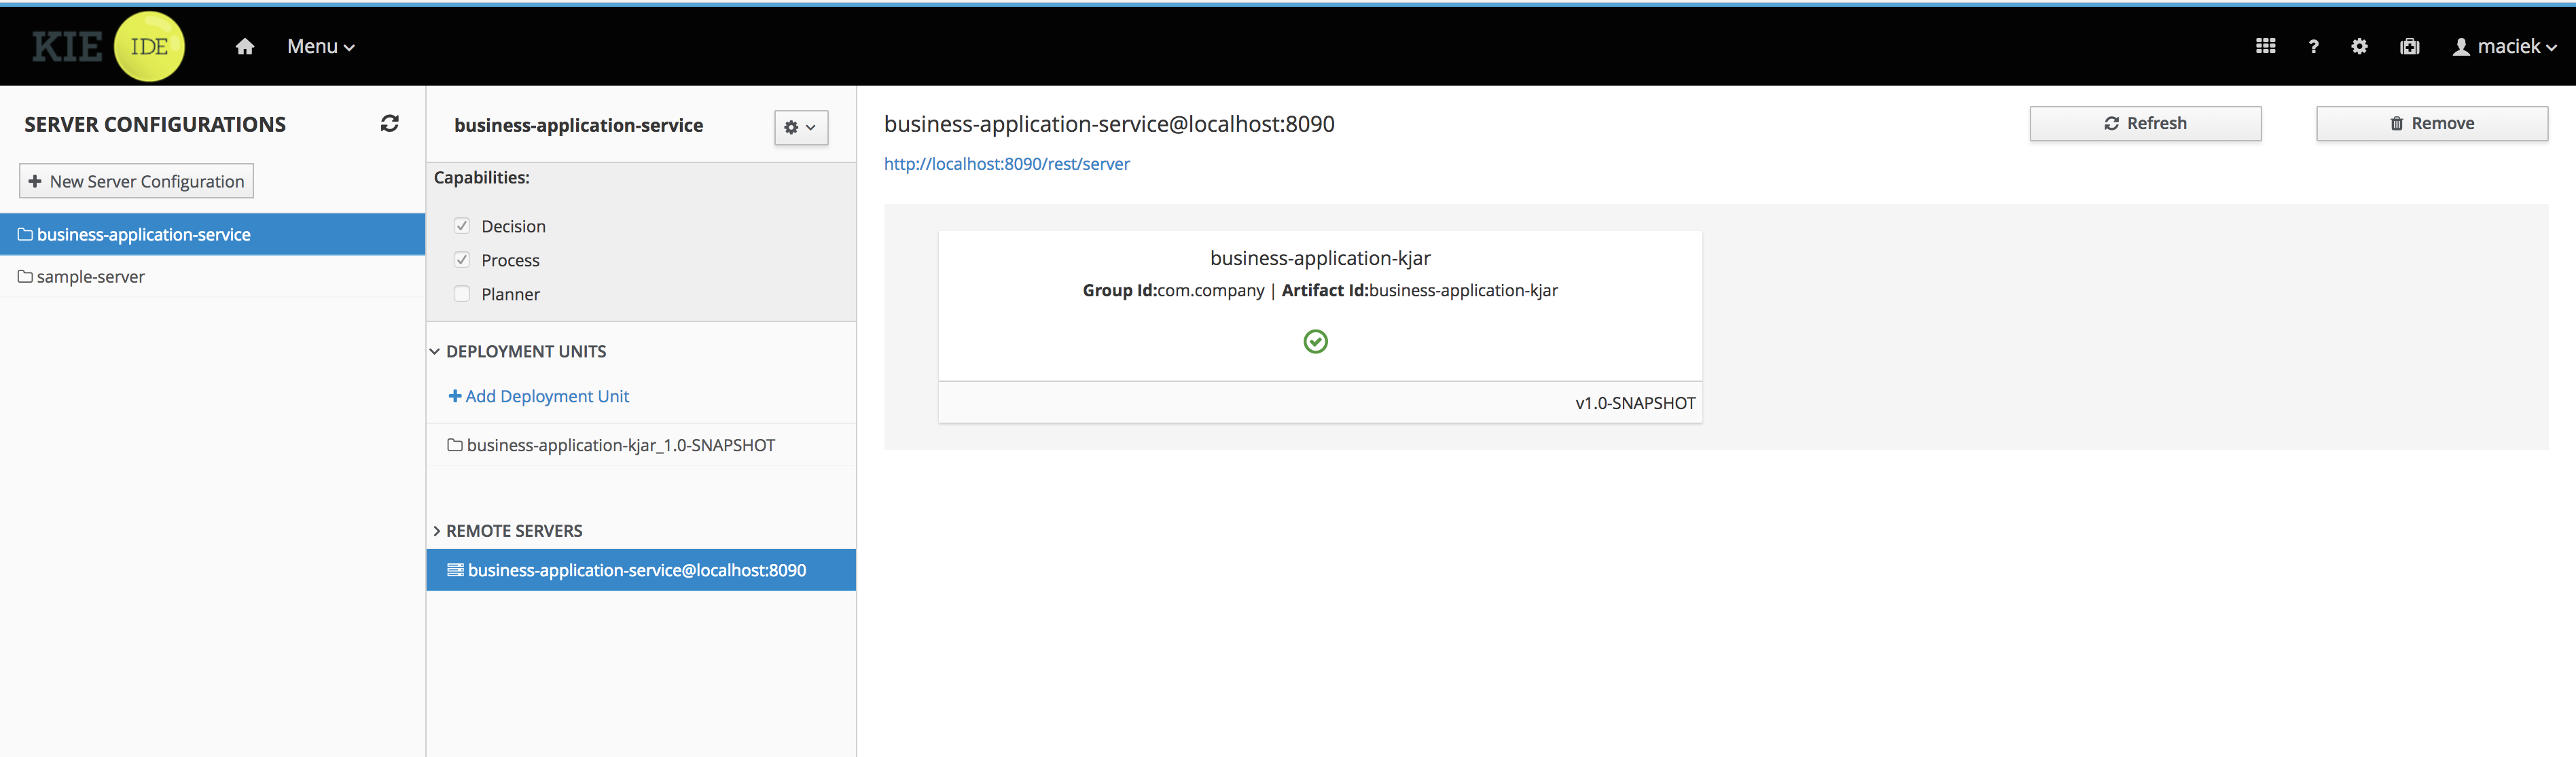
You can use Process Definitions and Process Instance perspectives of Business Central to interact with your newly deployed business assets such as processes or user tasks.
5.4. Configure business application
There are several components that can be configured in the business application. Depending on selected capabilities during application generation, a number of components can differ.
Entire configuration of the business application (service project) is done via application.properties
file that is a standard way to configure SpringBoot applications. It is located under the
src/main/resources directory of {your business application}-service folder.
5.4.1. Configuring core components
5.4.1.1. Configuring server
One of the most important configuration is actually the server itself. That is the host, port and path for the REST endpoints.
# used for server binding
server.address=localhost
server.port=8090

# used to define path for REST apis
cxf.path=/rest
5.4.1.2. Configure authentication and authorization
Business application is secured by default by protecting all REST endpoints
(URL pattern /rest/*).
Authentication is enabled for single test user named user with password user.
Additionally there is a default kieserver user that allows to easily connect to
Business Central in development mode.
Both authentication and authorization is based on Spring Security and can be
configured in DefaultWebSecurityConfig.java that is included in the generated
service project (src/main/java/com/company/service/DefaultWebSecurityConfig.java)
import org.springframework.beans.factory.annotation.Autowired;
import org.springframework.context.annotation.Configuration;
import org.springframework.security.config.annotation.authentication.builders.AuthenticationManagerBuilder;
import org.springframework.security.config.annotation.web.builders.HttpSecurity;
import org.springframework.security.config.annotation.web.configuration.EnableWebSecurity;
import org.springframework.security.config.annotation.web.configuration.WebSecurityConfigurerAdapter;


@Configuration("kieServerSecurity")
@EnableWebSecurity
public class DefaultWebSecurityConfig extends WebSecurityConfigurerAdapter {

    @Override
    protected void configure(HttpSecurity http) throws Exception {
        http
        .csrf().disable()
        .authorizeRequests()
        .antMatchers("/rest/*").authenticated()
        .and()
        .httpBasic();
    }

    @Autowired
    public void configureGlobal(AuthenticationManagerBuilder auth) throws Exception {
        auth.inMemoryAuthentication().withUser("user").password("user").roles("kie-server");
        auth.inMemoryAuthentication().withUser("kieserver").password("kieserver1!").roles("kie-server");
    }
}| This security configuration is just starting point and should be altered for all business applications going to production like setup. |
Use Keycloak as authentication provider
Configuring business applications to use Keycloak as authentication and authorisation requires few steps
-
Install Keycloak - follow official documentation at keycloak.org
-
Configure Keycloak once started
-
Use default master realm or create new one
-
Create client named springboot-app and set its AccessType to public
-
Set Valid redirect URI and Web Origin according to your local setup - with default setup they should be set to
-
Valid Redirect URIs: http://localhost:8090/*
-
Web Origins: http://localhost:8090
-
Create realm roles that are used in the application
-
Create users used in the application and assign roles to them
-
-
Configure dependencies in service project pom.xml
<dependencyManagement>
  <dependencies>
    <dependency>
      <groupId>org.keycloak.bom</groupId>
      <artifactId>keycloak-adapter-bom</artifactId>
      <version>${version.org.keycloak}</version>
      <type>pom</type>
      <scope>import</scope>
    </dependency>
  </dependencies>
</dependencyManagement>

  ....

<dependency>
  <groupId>org.keycloak</groupId>
  <artifactId>keycloak-spring-boot-starter</artifactId>
</dependency>
Business application includes jBPM (KIE) execution server that can be configured to be better identified
kieserver.serverId=business-application-service
kieserver.serverName=business-application-service
kieserver.location=http://localhost:8090/rest/server
kieserver.controllers=http://localhost:8080/business-central/rest/controller-
Configure application.properties
# keycloak security setup
keycloak.auth-server-url=http://localhost:8100/auth
keycloak.realm=master
keycloak.resource=springboot-app
keycloak.public-client=true
keycloak.principal-attribute=preferred_username
keycloak.enable-basic-auth=true-
Modify
DefaultWebSecurityConfig.javato ensure that Spring Security will work correctly with Keycloak
import org.keycloak.adapters.KeycloakConfigResolver;
import org.keycloak.adapters.springboot.KeycloakSpringBootConfigResolver;
import org.keycloak.adapters.springsecurity.authentication.KeycloakAuthenticationProvider;
import org.keycloak.adapters.springsecurity.config.KeycloakWebSecurityConfigurerAdapter;
import org.springframework.beans.factory.annotation.Autowired;
import org.springframework.context.annotation.Bean;
import org.springframework.context.annotation.Configuration;
import org.springframework.security.config.annotation.authentication.builders.AuthenticationManagerBuilder;
import org.springframework.security.config.annotation.web.builders.HttpSecurity;
import org.springframework.security.config.annotation.web.configuration.EnableWebSecurity;
import org.springframework.security.core.authority.mapping.SimpleAuthorityMapper;
import org.springframework.security.core.session.SessionRegistryImpl;
import org.springframework.security.web.authentication.session.RegisterSessionAuthenticationStrategy;
import org.springframework.security.web.authentication.session.SessionAuthenticationStrategy;

@Configuration("kieServerSecurity")
@EnableWebSecurity
public class DefaultWebSecurityConfig extends KeycloakWebSecurityConfigurerAdapter {

    @Override
    protected void configure(HttpSecurity http) throws Exception {
        super.configure(http);
        http
        .csrf().disable()
        .authorizeRequests()
            .anyRequest().authenticated()
            .and()
        .httpBasic();
    }

    @Autowired
    public void configureGlobal(AuthenticationManagerBuilder auth) throws Exception {
        KeycloakAuthenticationProvider keycloakAuthenticationProvider = keycloakAuthenticationProvider();
        SimpleAuthorityMapper mapper = new SimpleAuthorityMapper();
        mapper.setPrefix("");
        keycloakAuthenticationProvider.setGrantedAuthoritiesMapper(mapper);
        auth.authenticationProvider(keycloakAuthenticationProvider);
    }

    @Bean
    public KeycloakConfigResolver KeycloakConfigResolver() {
       return new KeycloakSpringBootConfigResolver();
    }

    @Override
    protected SessionAuthenticationStrategy sessionAuthenticationStrategy() {
        return new RegisterSessionAuthenticationStrategy(new SessionRegistryImpl());
    }
}
These are the steps to configure you business application to use Keycloak as authentication and authorisation service.
5.4.1.3. Configuring execution server
server id and server name refer to how the business application will be identified when connecting to the jBPM controller (Business Central) and thus should provide as meaningful information as possible.
location is used to inform other components that might interact with REST api where the execution server is accessible. It should not be the exact same location as defined by server.address and server.port especially when running in containers (Docker/OpenShift).
controllers allows to specify a (comma separated) list of URLs.
5.4.1.4. Configuring capabilities
In case your business application selected 'Business Automation' as the capability then there you can control which of them should actually be turned on on runtime.
# used for decision management
kieserver.drools.enabled=true
kieserver.dmn.enabled=true

# used for business processes and cases
kieserver.jbpm.enabled=true
kieserver.jbpmui.enabled=true
kieserver.casemgmt.enabled=true

# used for planning
kieserver.optaplanner.enabled=true
5.4.1.5. Configuring data source
| Data source configuration is only required for business automation (meaning when jBPM is used) |
spring.datasource.username=sa
spring.datasource.password=sa
spring.datasource.url=jdbc:h2:./target/spring-boot-jbpm;MVCC=true
spring.datasource.driver-class-name=org.h2.Driver
Above configures shows the basic data source settings, next section will deal with connection pooling for efficient data access.
| Depending on the driver class selected, make sure your application adds correct dependency that include the JDBC driver class or data source class. |
narayana.dbcp.enabled=true
narayana.dbcp.maxTotal=20
this configuration enables the data source connection pool (that is based on
commons-dbcp2 project) and a complete list of parameters can be found on
configuration page.
All parameters from the configuration page must be prefixed with narayana.dbcp.
5.4.1.6. Configuring JPA
jBPM uses Hibernate as the database access layer and thus needs to be properly configured
spring.jpa.properties.hibernate.dialect=org.hibernate.dialect.H2Dialect
spring.jpa.properties.hibernate.show_sql=false
spring.jpa.properties.hibernate.hbm2ddl.auto=update
spring.jpa.hibernate.naming.physical-strategy=org.hibernate.boot.model.naming.PhysicalNamingStrategyStandardImpl| JPA configuration is completely based on SpringBoot so all options for both hibernate and JPA can be found as SpringBoot configuration page |
Application with business automation capability creates entity manager factory based on persistence.xml that comes with jBPM. In case there are more entities that should be added to this entity manager factory (e.g. custom entities for the business application) they can easily be added by specifying a comma separated list of packages to scan
spring.jpa.properties.entity-scan-packages=org.jbpm.springboot.samples.entitiesAll entities found in that package will be automatically added to entity manager factory and thus used in the same manner as any other JPA entity in the application.
5.4.1.7. Configuring jBPM executor
jBPM executor is the backbone for asynchronous execution in jBPM. By default it is disabled, but can easily be turned on by configuration parameters.
jbpm.executor.enabled=true
jbpm.executor.retries=5
jbpm.executor.interval=0
jbpm.executor.threadPoolSize=1
jbpm.executor.timeUnit=SECONDS-
jbpm.executor.enabled = true|false - allows to completely disable executor component
-
jbpm.executor.threadPoolSize = Integer - allows to specify thread pool size where default is 1
-
jbpm.executor.retries = Integer - allows to specify number of retries in case of errors while running a job
-
jbpm.executor.interval = Integer - allows to specify interval (by default in seconds) that executor will use to synchronize with database - default is 0 seconds which means it is disabled
-
jbpm.executor.timeUnit = String - allows to specify timer unit used for calculating interval, value must be a valid constant of java.util.concurrent.TimeUnit, by default it’s SECONDS.
5.4.1.8. Configuring distributed timers - Quartz
In case you plan to run your application in a cluster (multiple instances of it at the same time) then you need to take into account the timer service setup. Since the business application is running on top of Tomcat web container the only option for timer service for distributed setup is Quartz based.
jbpm.quartz.enabled=true
jbpm.quartz.configuration=quartz.properties
Above are two mandatory parameters and the configuration file that need to be either on the classpath or on the file system (if the path is given).
For distributed timers database storage should be used and properly configured via quartz.properties file.
#============================================================================
# Configure Main Scheduler Properties
#============================================================================
org.quartz.scheduler.instanceName = SpringBootScheduler
org.quartz.scheduler.instanceId = AUTO
org.quartz.scheduler.skipUpdateCheck=true
org.quartz.scheduler.idleWaitTime=1000
#============================================================================
# Configure ThreadPool
#============================================================================
org.quartz.threadPool.class = org.quartz.simpl.SimpleThreadPool
org.quartz.threadPool.threadCount = 5
org.quartz.threadPool.threadPriority = 5
#============================================================================
# Configure JobStore
#============================================================================
org.quartz.jobStore.misfireThreshold = 60000
org.quartz.jobStore.class=org.quartz.impl.jdbcjobstore.JobStoreCMT
org.quartz.jobStore.driverDelegateClass=org.jbpm.process.core.timer.impl.quartz.DeploymentsAwareStdJDBCDelegate
org.quartz.jobStore.useProperties=false
org.quartz.jobStore.dataSource=myDS
org.quartz.jobStore.nonManagedTXDataSource=notManagedDS
org.quartz.jobStore.tablePrefix=QRTZ_
org.quartz.jobStore.isClustered=true
org.quartz.jobStore.clusterCheckinInterval = 5000
#============================================================================
# Configure Datasources
#============================================================================
org.quartz.dataSource.myDS.connectionProvider.class=org.jbpm.springboot.quartz.SpringConnectionProvider
org.quartz.dataSource.myDS.dataSourceName=quartzDataSource
org.quartz.dataSource.notManagedDS.connectionProvider.class=org.jbpm.springboot.quartz.SpringConnectionProvider
org.quartz.dataSource.notManagedDS.dataSourceName=quartzNotManagedDataSource
Data source names in quartz configuration file refer to Spring beans. Additionally
connection provider needs to be set to org.jbpm.springboot.quartz.SpringConnectionProvider
to allow integration with Spring based data sources.
|
By default Quartz requires two data sources:
-
managed data source so it can participate in transaction of the jBPM engine
-
not managed data source so it can look up for timers to trigger without any transaction handling
jBPM based business application assumes that quartz database (schema) will be collocated with jBPM tables and by that produces data source used for transactional operations for Quartz.
The other (non transactional) data source needs to be configured but it should point to the same database as the main data source.
# enable to use database as storage
jbpm.quartz.db=true

quartz.datasource.name=quartz
quartz.datasource.username=sa
quartz.datasource.password=sa
quartz.datasource.url=jdbc:h2:./target/spring-boot-jbpm;MVCC=true
quartz.datasource.driver-class-name=org.h2.Driver

# used to configure connection pool
quartz.datasource.dbcp2.maxTotal=15

# used to initialize quartz schema
quartz.datasource.initialization=true
spring.datasource.schema=classpath*:quartz_tables_h2.sql
spring.datasource.initialization-mode=always
The last three lines of the above configuration is responsible for initialising database schema automatically. When configured it should point to a proper DDL script.
5.4.1.9. Configuring different databases
Business application is generated with default H2 database - just to get started quickly and without any extra requirements. Since this default setup may not valid for production use the generated business applications come with configuration dedicated to:
-
MySQL
-
PostgreSQL
There are dedicated profiles - both Maven and Spring to get you started really fast without much work. The only thing you need to do is to alight the configuration with your databases.
MySQL configuration
spring.datasource.username=jbpm
spring.datasource.password=jbpm
spring.datasource.url=jdbc:mysql://localhost:3306/jbpm
spring.datasource.driver-class-name=com.mysql.jdbc.jdbc2.optional.MysqlXADataSource

#hibernate configuration
spring.jpa.properties.hibernate.dialect=org.hibernate.dialect.MySQL5InnoDBDialect
PostgreSQL configuration
spring.datasource.username=jbpm
spring.datasource.password=jbpm
spring.datasource.url=jdbc:postgresql://localhost:5432/jbpm
spring.datasource.driver-class-name=org.postgresql.xa.PGXADataSource

#hibernate configuration
spring.jpa.properties.hibernate.dialect=org.hibernate.dialect.PostgreSQLDialect
Once the updates to the configuration are done you can launch your application via
./launch.sh clean install -Pmysql for MySQL on Linux/Unix
./launch.bat clean install -Pmysql for MySQL on Windows
./launch.sh clean install -Ppostgres for MySQL on Linux/Unix
./launch.bat clean install -Ppostgres for MySQL on Windows
5.4.1.10. Configuring user group providers
Business automation capability supports human centric activities to be managed, to provide integration with user and group repositories there is a built in mechanism in jBPM. There are two entry points
-
UserGroupCallback- responsible for verification if user/group exists and for collecting groups for given user -
UserInfo- responsible for collecting additional information about user/group such as email address, preferred language, etc
Both of these can be configured by providing alternative implementation - either one of the provided out of the box or custom developed.
When it comes to UserGroupCallback it is recommended to stick to the default one as it is based on the security
context of the application. That means whatever backend store is used for authentication and authorisation
(e.g. Keycloak) it will be used as source information for collecting user/group information.
UserInfo requires more advanced information to be collected and thus is a separate component. Not all user/group repositories will
provide expect data especially those that are purely used for authentication and authorisation.
Following code is needed to provide alternative implementation of UserGroupCallback
@Bean(name = "userGroupCallback")
public UserGroupCallback userGroupCallback(IdentityProvider identityProvider) throws IOException {
    return new MyCustomUserGroupCallback(identityProvider);
}
Following code is needed to provide alternative implementation of UserInfo
@Bean(name = "userInfo")
public UserInfo userInfo() throws IOException {
    return new MyCustomUserInfo();
}
5.4.1.11. Enable Swagger documentation
Business application can easily enable Swagger based documentation for all endpoints available in the service project.
Add required dependencies to service project pom.xml
<dependency>
  <groupId>org.apache.cxf</groupId>
  <artifactId>cxf-rt-rs-service-description-swagger</artifactId>
  <version>3.1.11</version>
</dependency>
<dependency>
  <groupId>io.swagger</groupId>
  <artifactId>swagger-jaxrs</artifactId>
  <version>1.5.15</version>
  <exclusions>
    <exclusion>
      <groupId>javax.ws.rs</groupId>
      <artifactId>jsr311-api</artifactId>
    </exclusion>
  </exclusions>
</dependency>
Enable Swagger support in application.properties
kieserver.swagger.enabled=trueSwagger document can be found at http://localhost:8090/rest/swagger.json
Enable Swagger UI
To enable Swagger UI add following dependency to pom.xml of the service project.
<dependency>
  <groupId>org.webjars</groupId>
  <artifactId>swagger-ui</artifactId>
  <version>2.2.10</version>
</dependency>
Once the Swagger UI is enabled and server is started, complete set of endpoints can be found at http://localhost:8090/rest/api-docs/?url=http://localhost:8090/rest/swagger.json
5.5. Develop your business application
Developing custom logic in business application strictly depends on your specific requirements. In this guide we will provide some common steps that developers might need to get started.
5.5.1. Data model
The data model project in your generated business application promotes the idea (and best practice in fact) of designing data models with reuse in mind. At the same time it avoids putting too much in the model (which usually happens when model is colocated with the service itself).
Data model project should be seen as the API of the business application or one of its services. In case of application that is composed of several services it’s recommended that each service exposes its own data model (API).
That API then can be used by both service project and the business assets project.
| Generated application model is not added as dependency to service nor business assets projects. |
5.5.2. Business assets development
Business assets are usually developed in Business Central, where developers can create different assets types such as
-
Business processes
-
Case definitions
-
Rules
-
Decision tables
-
Data objects
-
Forms
-
Others
Before these assets can be created the business assets project needs to be imported into Business Central as described in Import your business assets project into Business Central
Whenever working with business assets you can easily try them out in your business application by running the application in development mode. That allows developer to build and deploy the assets project directly to a running application. Moreover Business Central can also be used to quickly interact with processes, tasks and cases. To learn more see Launch application in development mode
Once the work on business assets is finished it should be fetch back to your business application source.
-
go into business assets project - {your business application name}-kjar
-
execute
git fetch origin -
execute
git rebase origin/master
With this your business assets are now part of the business application source tree and can be launched in standalone mode - without Business Central as jBPM controller.
To launch your application just go into service project ({your business application name}-service) and invoke
./launch.sh clean install for Linux/Unix
./launch.bat clean install for Windows
| In case the version of your business assets project changes you will have to update that information in the service project. Locate the configuration file that is used for standalone mode {your business application name}-service.xml Edit it and update the version for the specific container. |
Business assets project has two special files
-
pom.xml
-
src/main/resources/META-INF/kie-deployment-descriptor.xml
The first one is Apache Maven project file and is managed via Project Settings in Business Central. It allows to define project information (group id, artifact id, version, name, description). In addition it allows to define dependencies the project will have e.g. data model project.
|
Whenever dependencies are added from the following group ids they should be marked as scope provided
|
Deployment descriptor allows to configure various components of the business automation capability such as
-
Persistence for jBPM
-
Runtime strategy
-
Event listeners
-
Work item handlers
-
Marshalling strategies
-
And more
for complete description of the deployment descriptor see Deployment descriptor
5.5.3. Work Item Handlers
Business processes can take advantage of so-called domain specific services which are implemented as work items and their actual execution is carried out by work item handlers. Work items defined in the process or case definition are linked by name with work item handler (the implementation).
Work item handlers can be registered in three ways
-
via deployment descriptor - use this approach if you want to decouple life cycle of the handler from your business application
-
via auto registration of Spring Components - use this when you have your handlers implemented as Spring beans (components) that are bound to the life cycle of the application
-
via manual registration of any work handler implementation - use this when the handler is not implemented by you and thus there is no way to use the Spring Component approach or it has advanced initialisation logic that does not fit the deployment descriptor approach
5.5.3.1. Register Work Item Handler via deployment descriptor
Registration in deployment descriptor can be done directly in Business Central via Project settings → Deployments
Add the work item handler mapped to the name of the work item
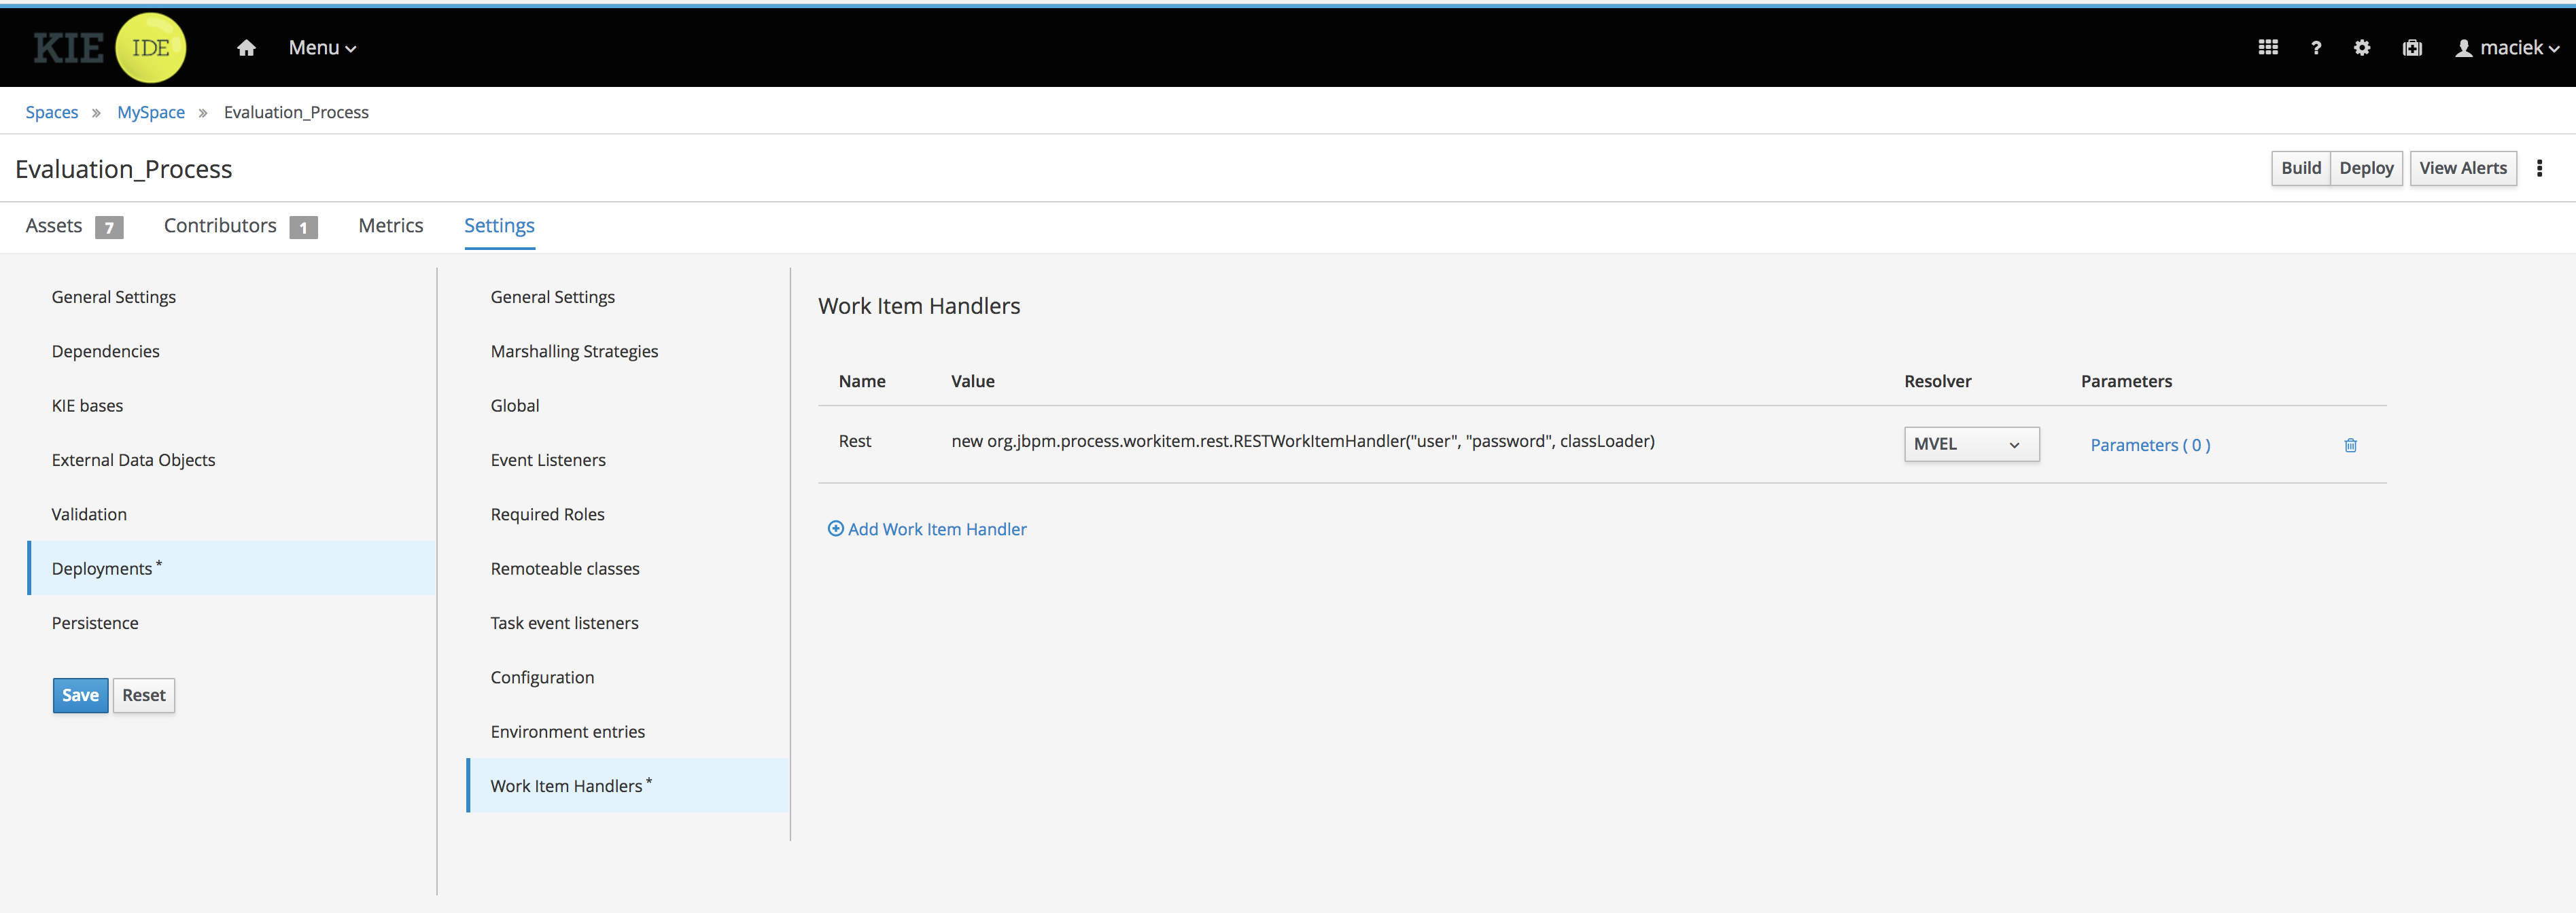
this will result in following source code of the deployment descriptor
<?xml version="1.0" encoding="UTF-8" standalone="yes"?>
<deployment-descriptor xsi:schemaLocation="http://www.jboss.org/jbpm deployment-descriptor.xsd" xmlns:xsi="http://www.w3.org/2001/XMLSchema-instance">
    <persistence-unit>org.jbpm.domain</persistence-unit>
    <audit-persistence-unit>org.jbpm.domain</audit-persistence-unit>
    <audit-mode>JPA</audit-mode>
    <persistence-mode>JPA</persistence-mode>
    <runtime-strategy>SINGLETON</runtime-strategy>
    <marshalling-strategies/>
    <event-listeners/>
    <task-event-listeners/>
    <globals/>
    <work-item-handlers>
        <work-item-handler>
            <resolver>mvel</resolver>
            <identifier>new org.jbpm.process.workitem.rest.RESTWorkItemHandler("user", "password", classLoader)</identifier>
            <parameters/>
            <name>Rest</name>
        </work-item-handler>
    </work-item-handlers>
    <environment-entries/>
    <configurations/>
    <required-roles/>
    <remoteable-classes/>
    <limit-serialization-classes>true</limit-serialization-classes>
</deployment-descriptor>
5.5.3.2. Register Work Item Handler via auto registration of Spring Components
The easiest way to register work item handlers is to rely on Spring discovery and configuration
of beans. It’s enough to annotate your work item handler class with @Component("WorkItemName")
and that bean will be automatically registered in jBPM.
import org.kie.api.runtime.process.WorkItem;
import org.kie.api.runtime.process.WorkItemHandler;
import org.kie.api.runtime.process.WorkItemManager;
import org.springframework.stereotype.Component;

@Component("Custom")
public class CustomWorkItemHandler implements WorkItemHandler {

    @Override
    public void executeWorkItem(WorkItem workItem, WorkItemManager manager) {

        manager.completeWorkItem(workItem.getId(), null);
    }

    @Override
    public void abortWorkItem(WorkItem workItem, WorkItemManager manager) {

    }

}
This will register CustomWorkItemHandler under Custom name so every work item named Custom
will use that handler to execute it’s logic.
The name attribute of @Component annotations is mandatory for registration to happen.
In case the name is missing work item handler won’t be registered and warning will be logged.
|
5.5.3.3. Register Work Item Handler programmatically
Last resort option is to get hold of DeploymentService and register handlers programmatically
@Autowire
private SpringKModuleDeploymentService deploymentService;

...

@PostConstruct
public void configure() {

    deploymentService.registerWorkItemHandler("Custom", new CustomWorkItemHandler());
}
5.5.4. Event listeners
jBPM allows to register various event listeners that will be invoked upon various events triggered by the jBPM engine. Supported event listener types are
-
ProcessEventListener
-
AgendaEventListener
-
RuleRuntimeEventListener
-
TaskLifeCycleEventListener
-
CaseEventListener
Similar to work item handlers, event listeners can be registered in three ways
-
via deployment descriptor - use this approach if you want to decouple life cycle of the listener from your business application
-
via auto registration of Spring Components - use this when you have your listeners implemented as Spring beans (components) that are bound to the life cycle of the application
-
via manual registration of any work handler implementation - use this when the listener is not implemented by you and thus there is no way to use the Spring Component approach or it has advanced initialisation logic that does not fit the deployment descriptor approach
5.5.4.1. Register event listener via deployment descriptor
Registration in deployment descriptor can be done directly in Business Central via Project settings → Deployments
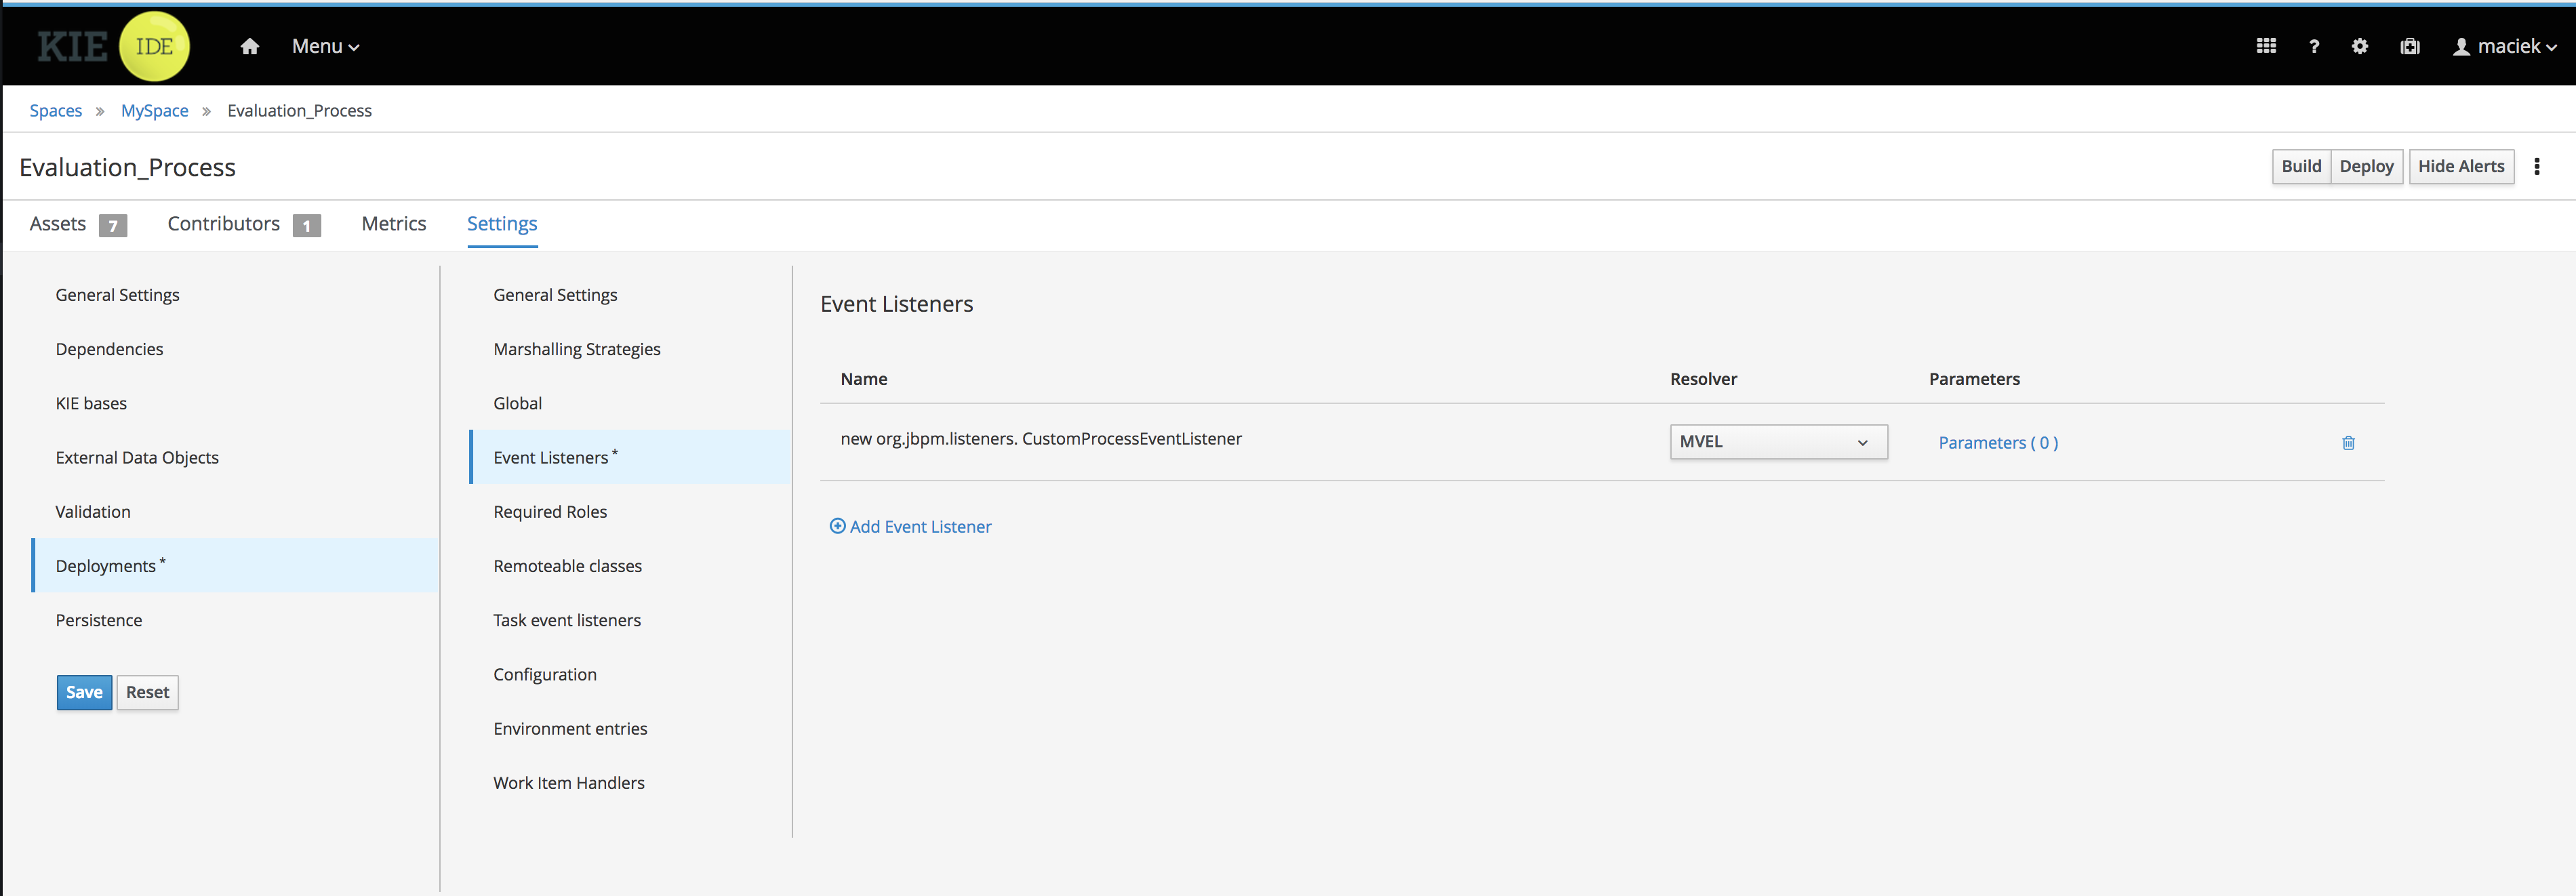
this will result in following source code of the deployment descriptor
<?xml version="1.0" encoding="UTF-8" standalone="yes"?>
<deployment-descriptor xsi:schemaLocation="http://www.jboss.org/jbpm deployment-descriptor.xsd" xmlns:xsi="http://www.w3.org/2001/XMLSchema-instance">
    <persistence-unit>org.jbpm.domain</persistence-unit>
    <audit-persistence-unit>org.jbpm.domain</audit-persistence-unit>
    <audit-mode>JPA</audit-mode>
    <persistence-mode>JPA</persistence-mode>
    <runtime-strategy>SINGLETON</runtime-strategy>
    <marshalling-strategies/>
    <event-listeners>
        <event-listener>
            <resolver>mvel</resolver>
            <identifier>new org.jbpm.listeners.CustomProcessEventListener</identifier>
            <parameters/>
        </event-listener>
    </event-listeners>
    <task-event-listeners/>
    <globals/>
    <work-item-handlers/>
    <environment-entries/>
    <configurations/>
    <required-roles/>
    <remoteable-classes/>
    <limit-serialization-classes>true</limit-serialization-classes>
</deployment-descriptor>
5.5.4.2. Register event listener via auto registration of Spring Components
The easiest way to register event listeners is to rely on Spring discovery and configuration
of beans. It’s enough to annotate your event listener implementation class with @Component()
and that bean will be automatically registered in jBPM.
import org.kie.api.event.process.ProcessCompletedEvent;
import org.kie.api.event.process.ProcessEventListener;
import org.kie.api.event.process.ProcessNodeLeftEvent;
import org.kie.api.event.process.ProcessNodeTriggeredEvent;
import org.kie.api.event.process.ProcessStartedEvent;
import org.kie.api.event.process.ProcessVariableChangedEvent;
import org.springframework.stereotype.Component;

@Component
public class CustomProcessEventListener implements ProcessEventListener {

    @Override
    public void beforeProcessStarted(ProcessStartedEvent event) {

    }

    ...

}
Event listener can extend default implementation of given event listener to avoid
implementing all methods e.g. org.kie.api.event.process.DefaultProcessEventListener
|
Type of the event listeners is determined by the interface (or super class) it implements.
5.5.4.3. Register event listener programmatically
Last resort option is to get hold of DeploymentService and register handlers programmatically
@Autowire
private SpringKModuleDeploymentService deploymentService;

...

@PostConstruct
public void configure() {

    deploymentService.registerProcessEventListener(new CustomProcessEventListener());
}
5.5.5. Custom REST endpoints
In many (if not all) cases there will be a need to expose additional REST endpoints for your business application (in your service project). This can be easily achieved by creating a JAX-RS compatible class (with JAX-RS annotations). It will automatically be registered with the running service when the following scanning option is configured in your apps application.properties config file:
cxf.jaxrs.classes-scan=true
cxf.jaxrs.classes-scan-packages=org.kie.server.springboot.samples.rest
The endpoint will be bound to the global REST api path defined in the cxf.path property.
An example of a custom endpoint can be found below
package org.kie.server.springboot.samples.rest;

import javax.ws.rs.GET;
import javax.ws.rs.Path;
import javax.ws.rs.Produces;
import javax.ws.rs.core.MediaType;
import javax.ws.rs.core.Response;

@Path("extra")
public class AdditionalEndpoint {

    @GET
    @Produces({MediaType.APPLICATION_XML, MediaType.APPLICATION_JSON})
    public Response listContainers() {

        return Response.ok().build();
    }
}
5.6. Deploy business application
Business applications are designed to run in pretty much any environment but for production the usual target is cloud-based runtimes that allow scalability and operational efficiency.
Business application deployable components are composed of services. Every application consists of one or more services that are deployed in isolation and in many cases will follow different release cycle.
5.6.1. OpenShift deployment
Business applications can be easily deployed to OpenShift Container Platform. It’s as easy as starting the application locally, meaning by using launch.sh/bat scripts.
| You need to have OpenShift installed (good choice for local installation is minishift) or remote installation that can be accessed over network. |
So first of all login to OpenShift Cluster
oc login -u system:adminonce successfully logged in following output (or similar) should be displayed
Logged into "https://192.168.64.2:8443" as "system:admin" using existing credentials.

You have access to the following projects and can switch between them with 'oc project <projectname>':

    default
    kube-public
    kube-system
  * myproject
    openshift
    openshift-infra
    openshift-node
    openshift-web-console

Using project "myproject".
To deploy your application as to OpenShift Container Platform just go into service project ({your business application name}-service) and invoke
./launch.sh clean install -Popenshift,h2 for Linux/Unix
./launch.bat clean install -Popenshift,h2 for Windows
The launch script will perform the build with openshift profile (see pom.xml in the business assets project and service project for details). The significant difference that is done for openshift is that the business assets project will generate an offline maven repository with the project itself and all its dependencies. Next this maven repository will be included in the image itself and maven (used by business automation capability) will work in offline mode - meaning no access to internet will be attempted.
Launching the application on OpenShift...
--> Found image ef440f7 (15 seconds old) in image stream "myproject/business-application-service" under tag "1.0-SNAPSHOT" for "business-application-service:1.0-SNAPSHOT"

    * This image will be deployed in deployment config "business-application-service"
    * Ports 8090/tcp, 8778/tcp, 9779/tcp will be load balanced by service "business-application-service"
      * Other containers can access this service through the hostname "business-application-service"

--> Creating resources ...
    deploymentconfig "business-application-service" created
    service "business-application-service" created
--> Success
    Application is not exposed. You can expose services to the outside world by executing one or more of the commands below:
     'oc expose svc/business-application-service'
    Run 'oc status' to view your app.
route "business-application-service" exposed
You can then go to OpenShift Web Console and look at the Overview of your project (myproject by default)
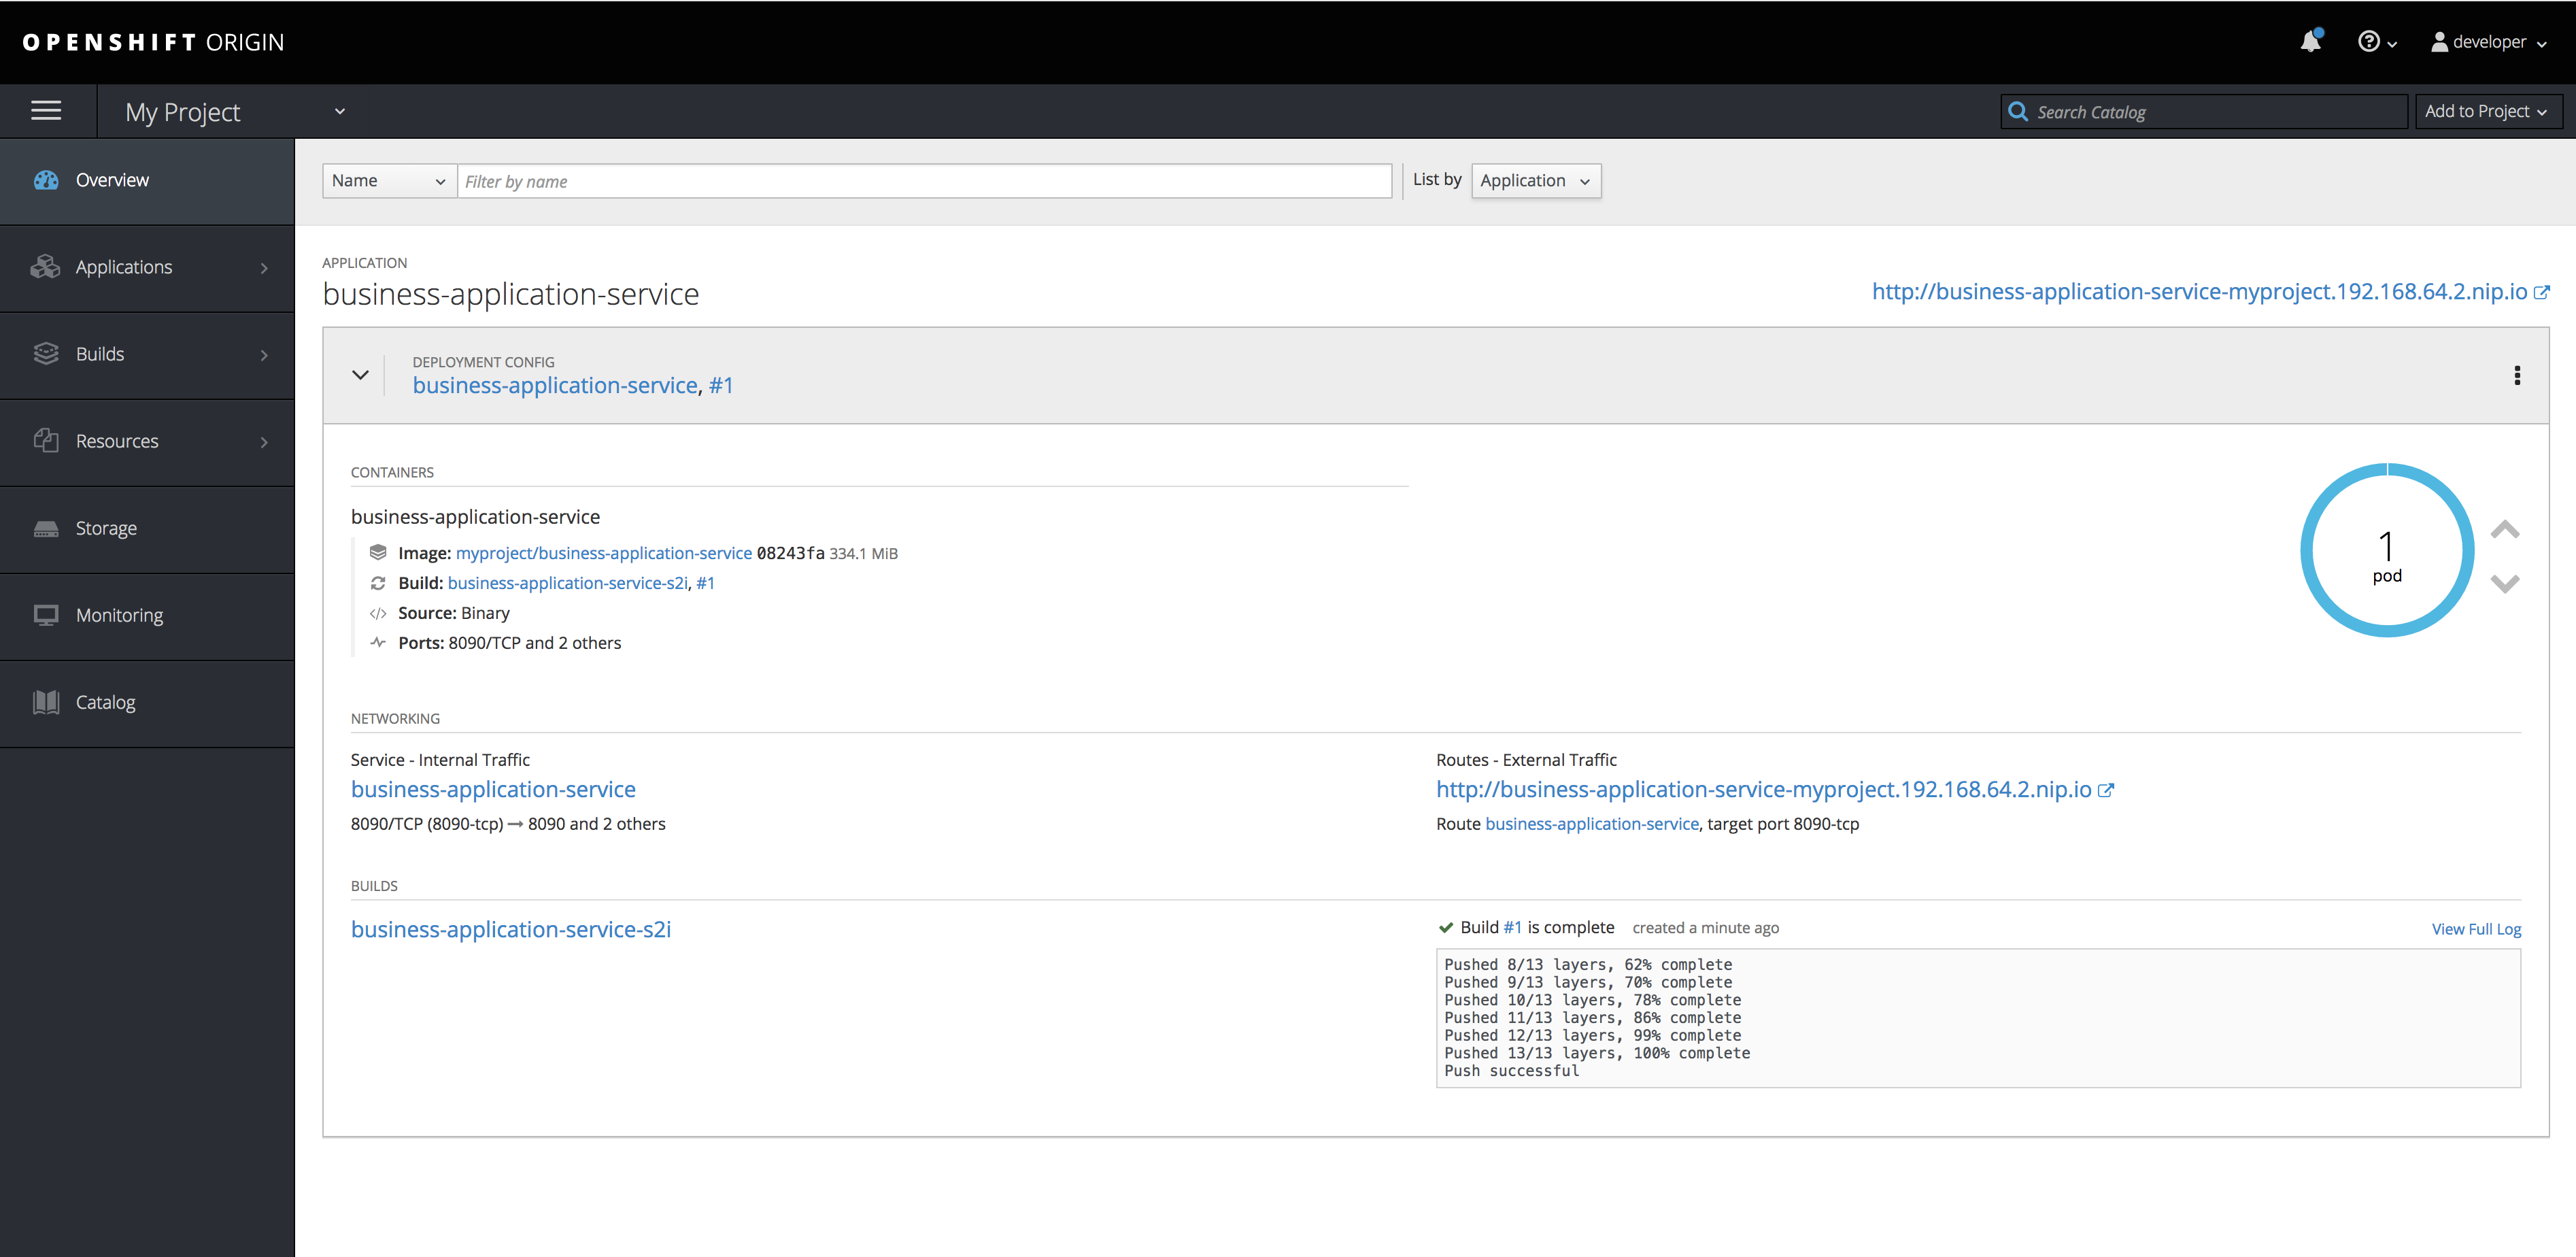
By clicking on the route url (in this case http://business-application-service-myproject.192.168.64.2.nip.io)
you can go to the application already deployed and running.
5.6.2. Docker deployment
Business applications are by default configured with option to deploy service as docker container.
This is done in very similar way as launching the service locally - via launch.sh/bat script.
| You must have Docker installed on your machine to make this work! |
To deploy your application as docker container just go into service project ({your business application name}-service) and invoke
./launch.sh clean install -Pdocker,h2 for Linux/Unix
./launch.bat clean install -Pdocker,h2 for Windows
| When building with docker proper database profile needs to be selected as well - this is done via -Pdocker,{db} so the image and the application gets proper JDBC driver selected. |
The launch script will perform the build with docker profile (see pom.xml in the business assets project and service project for details). The significant difference that is done for docker container is that the business assets project will generate an offline maven repository with the project itself and all its dependencies. Next this maven repository will be included in the docker image itself and maven (used by business automation capability) will work in offline mode - meaning no access to internet will be attempted.
Once the build is complete launch script will directly create container and start it, this should be done once the following line is printed to console
Launching the application as docker container...
d40e4cdb662d3b1d9ddee27c5a843be31cb6e7dc4936b0fc1937ce8e48f440ae
the second line is the container id that can be later on used to interact with the container, for instance to follow the logs
docker logs -f d40e4cdb662d3b1d9ddee27c5a843be31cb6e7dc4936b0fc1937ce8e48f440aethe business application will be accessible at the same port as configured by default that is 8090, simply go to http://localhost:8090 to see your application running as docker container.
5.6.3. Using external database
Currently business applications that require an external database need to provide the database in advance - before the application is launched and properly configured within the application configuration files.
Further releases will improve this by relying on docker compose/OpenShift templates.
5.7. Tutorials
5.7.1. My First Business Application
5.7.1.1. What will you do
You will build a simple but fully functional business application. Once you build it you will explore basic services exposed by the application.
5.7.1.2. What do you need
-
About 10 minutes of your time
-
Java (JDK) 8 or later
-
Maven 3.5.x
-
Access to the Internet
5.7.1.3. What should I do
To get started with business applications the easiest way is to generate the,.
Go to start.jbpm.org and click button
Generate default business application.
This will generate and download a business-application.zip file that will consists of
three projects
-
business-application-model
-
business-application-kjar
-
business-application-service
Unzip the business-application.zip file into desired location and go into
business-application-service directory. There you will find launch scripts
(for both linux/unix and windows).
./launch.sh clean install for Linux/Unix
./launch.bat clean install for Windows
Execute one applicable to your operating system and wait for it to finish.
| It might take quite some time (depending on your network) as it will download bunch of dependencies required to execute both build and application itself. |
5.7.1.4. Results
Once the build and launch is complete you can open your browser http://localhost:8090 to see your first business application up and running.
It presents with a welcome screen that is mainly for verification purpose to illustrate that application started successfully.
You can point the browser to http://localhost:8090/rest/server to see the actual Business Automation capability services
By default all REST endpoints (url pattern /rest/*) are secured and require
authentication. Default user that can be used to logon is user with password user
|
Business Automation service supports three types of data format
-
XML (JAXB based)
-
JSON
-
XML (XStream based)
To display Business Automation capability service details in different format set HTTP headers
-
Accept: application/json for JSON format
-
Accept: application/xml for XML (JAXB based) format
-
X-KIE-ContentType: XSTREAM for XML (XStream based) format
5.7.1.5. Summary
Congratulations! you have just built and started your first business application.
5.7.1.6. Source code of the tutorial
Here is the complete source code of the tutorial.
5.7.2. Business Application with Business Assets
5.7.2.1. What will you do
You will enhance your business application with some business assets
-
business process (BPMN2)
and execute this business assets
-
via REST api of your business application
-
via Business Central UI
5.7.2.2. What do you need
-
About 15 minutes of your time
-
Java (JDK) 8 or later
-
Maven 3.5.x
-
Access to the Internet
-
Business Central deployed - see single distribution for instructions
5.7.2.3. What should I do
If you haven’t done it already, complete tutorial My First Business Application.
Start Business Central (if not already started) and open your browser at
http://localhost:8080/business-central and logon as
user wbadmin with password wbadmin
Import your business assets project into Business Central
-
Go into business assets project -
business-application-kjar -
Execute
git init -
Execute
git add -A -
Execute
git commit -m "my business assets project" -
Log in to Business Central and go to projects
-
Select import project and enter the following URL
file:///{path to your business application}/business-application-kjar -
Click import and confirm project to be imported
Create Business Process
In browser where you logged into Business Central go to Projects. You will see your newly imported project named business-application-kjar, go into that project.
-
go into business-application-kjar project
-
click
Add assetbutton -
select Business Process asset
-
provide name for this asset
-
create your business process
Sample business process could be a single user task that will be assigned to user wbadmin.
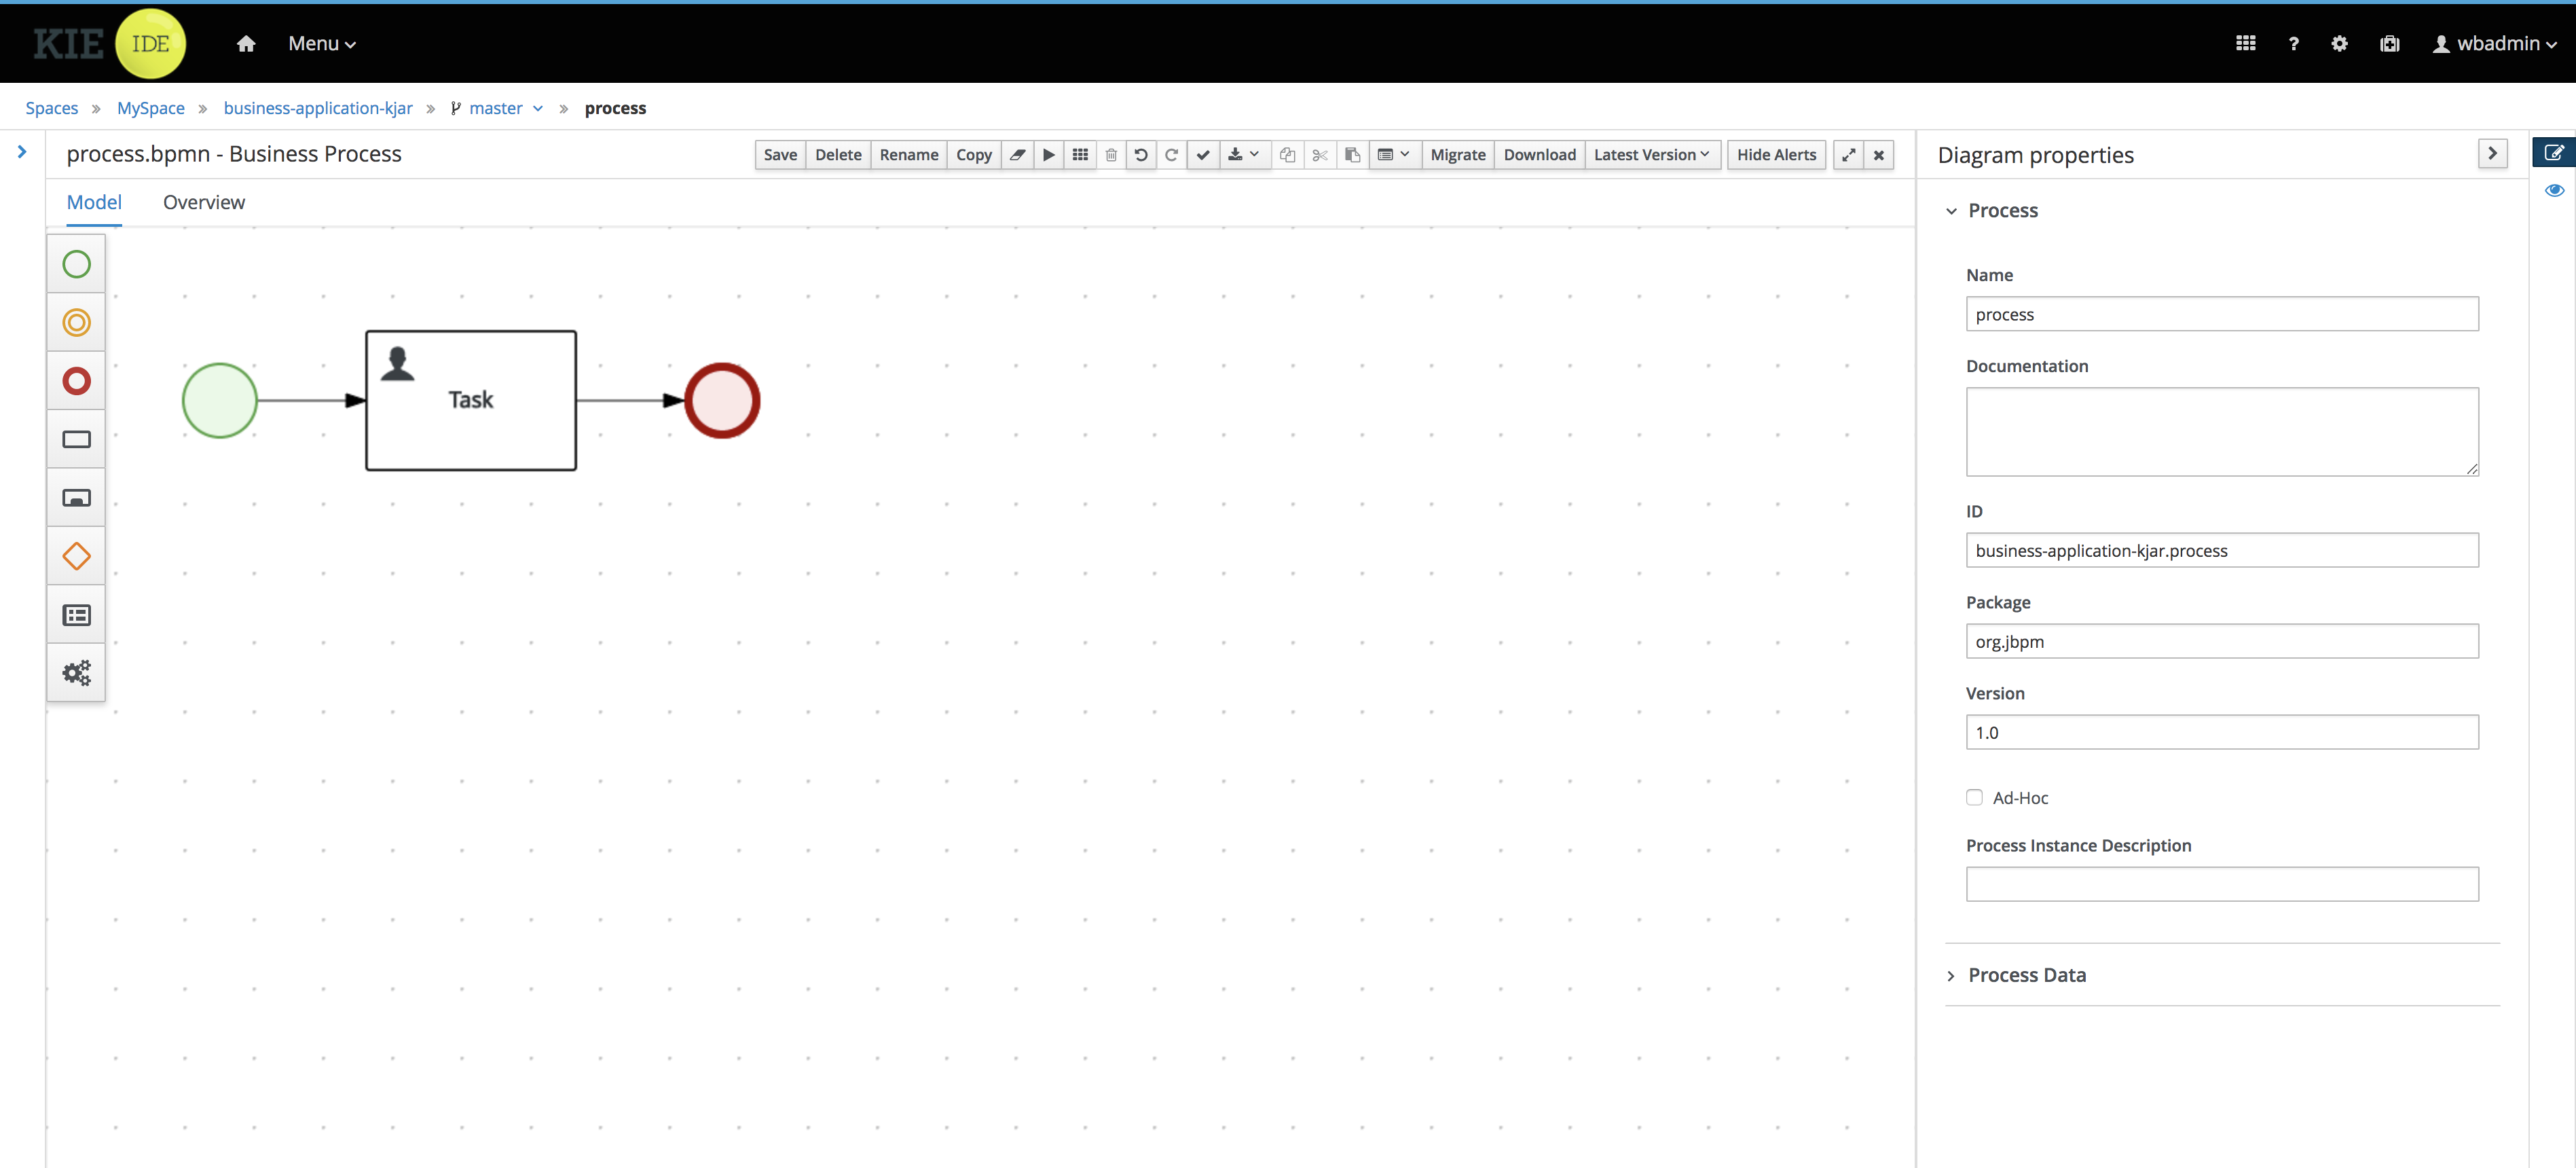
Pull back your business assets to business application source code
-
Go to business-application-kjar
-
Execute
git remote add origin ssh://wbadmin@localhost:8001/MySpace/business-application-kjar -
Execute
git pull origin master- when prompted enterwbadminas password
Go to business-application-service directory and launch the application
./launch.sh clean install for Linux/Unix
./launch.bat clean install for Windows
5.7.2.4. Results
Once the build and launch is complete you can open your browser http://localhost:8090
Next, point the browser to http://localhost:8090/rest/server/containers to see that your business assets project has been properly deployed and is running.
By default all REST endpoints (url pattern /rest/*) are secured and require
authentication. Default user that can be used to logon is wbadmin with password wbadmin
|
Next, point the browser to http://localhost:8090/rest/server/containers/business-application-kjar/processes to see business processes available for execution.
Execute business process
You can execute business process via REST api exposed by your business application (in fact by Business Automation capability).
URL: http://localhost:8090/rest/server/containers/business-application-kjar/processes/{processid}/instances
HTTP method: POST
Optionally HTTP headers can be set to change the format of data returned
-
Accept: application/json for JSON format
-
Accept: application/xml for XML (JAXB based) format
-
X-KIE-ContentType: XSTREAM for XML (XStream based) format
{processid} needs to be replaced with actual process id that is returned from the endpoint http://localhost:8090/rest/server/containers/business-application-kjar/processes
| Remember that endpoints are protected so make sure you provide user name and password when making the request. |
In response to this request, a process instance id should be returned.
<long-type>
    <value>1</value>
</long-type>
You can examine details of that process instance by pointing your browser to http://localhost:8090/rest/server/containers/business-application-kjar/processes/instances/1
<process-instance>
  <process-instance-id>1</process-instance-id>
  <process-id>business-application-kjar.process</process-id>
  <process-name>process</process-name>
  <process-version>1.0</process-version>
  <process-instance-state>1</process-instance-state>
  <container-id>business-application-kjar-1_0-SNAPSHOT</container-id>
  <initiator>wbadmin</initiator>
  <start-date>2018-09-14T11:39:39.622+02:00</start-date>
  <process-instance-desc>process</process-instance-desc>
  <correlation-key>1</correlation-key>
  <parent-instance-id>-1</parent-instance-id>
  <sla-compliance>0</sla-compliance>
  <active-user-tasks>
    <task-summary>
      <task-id>1</task-id>
      <task-name>Task</task-name>
      <task-description/>
      <task-status>Reserved</task-status>
      <task-priority>0</task-priority>
      <task-actual-owner>wbadmin</task-actual-owner>
      <task-created-by>wbadmin</task-created-by>
      <task-created-on>2018-09-14T11:39:39.661+02:00</task-created-on>
      <task-activation-time>2018-09-14T11:39:39.661+02:00</task-activation-time>
      <task-proc-inst-id>1</task-proc-inst-id>
      <task-proc-def-id>business-application-kjar.process</task-proc-def-id>
      <task-container-id>business-application-kjar-1_0-SNAPSHOT</task-container-id>
    </task-summary>
  </active-user-tasks>
</process-instance>
Execute business process from Business Central UI
Stop the application if it’s running.
Go to business-application-service directory and launch the application in development mode
./launch-dev.sh clean install for Linux/Unix
./launch-dev.bat clean install for Windows
this will connect your business application to Business Central so can be administered from within its UI.
Go to Business Central in the browser and navigate to servers (from the home screen).

As you can see the business-application-service Dev is there and connected. Although
it does not have any kjars deployed. This is because it’s now running in managed mode
meaning it’s Business Central that decides what kjars it should run.
So let’s deploy the business-application-kjar to our running application.
-
Go to projects from home screen of Business Central
-
Go into business-application-kjar project
-
Click
Deploybutton -
Make sure that
Server configurationis set tobusiness-application-service-devand click ok
The project should be successfully deployed and you can examine that state by going back to servers from home screen.
Next, go to process definitions (in Manage section of the Home screen) and select server configuration
(top right corner) - again it should be business-application-service-dev the list of available
process definition will be loaded and you should see your single process definition from the project
business-application-kjar.
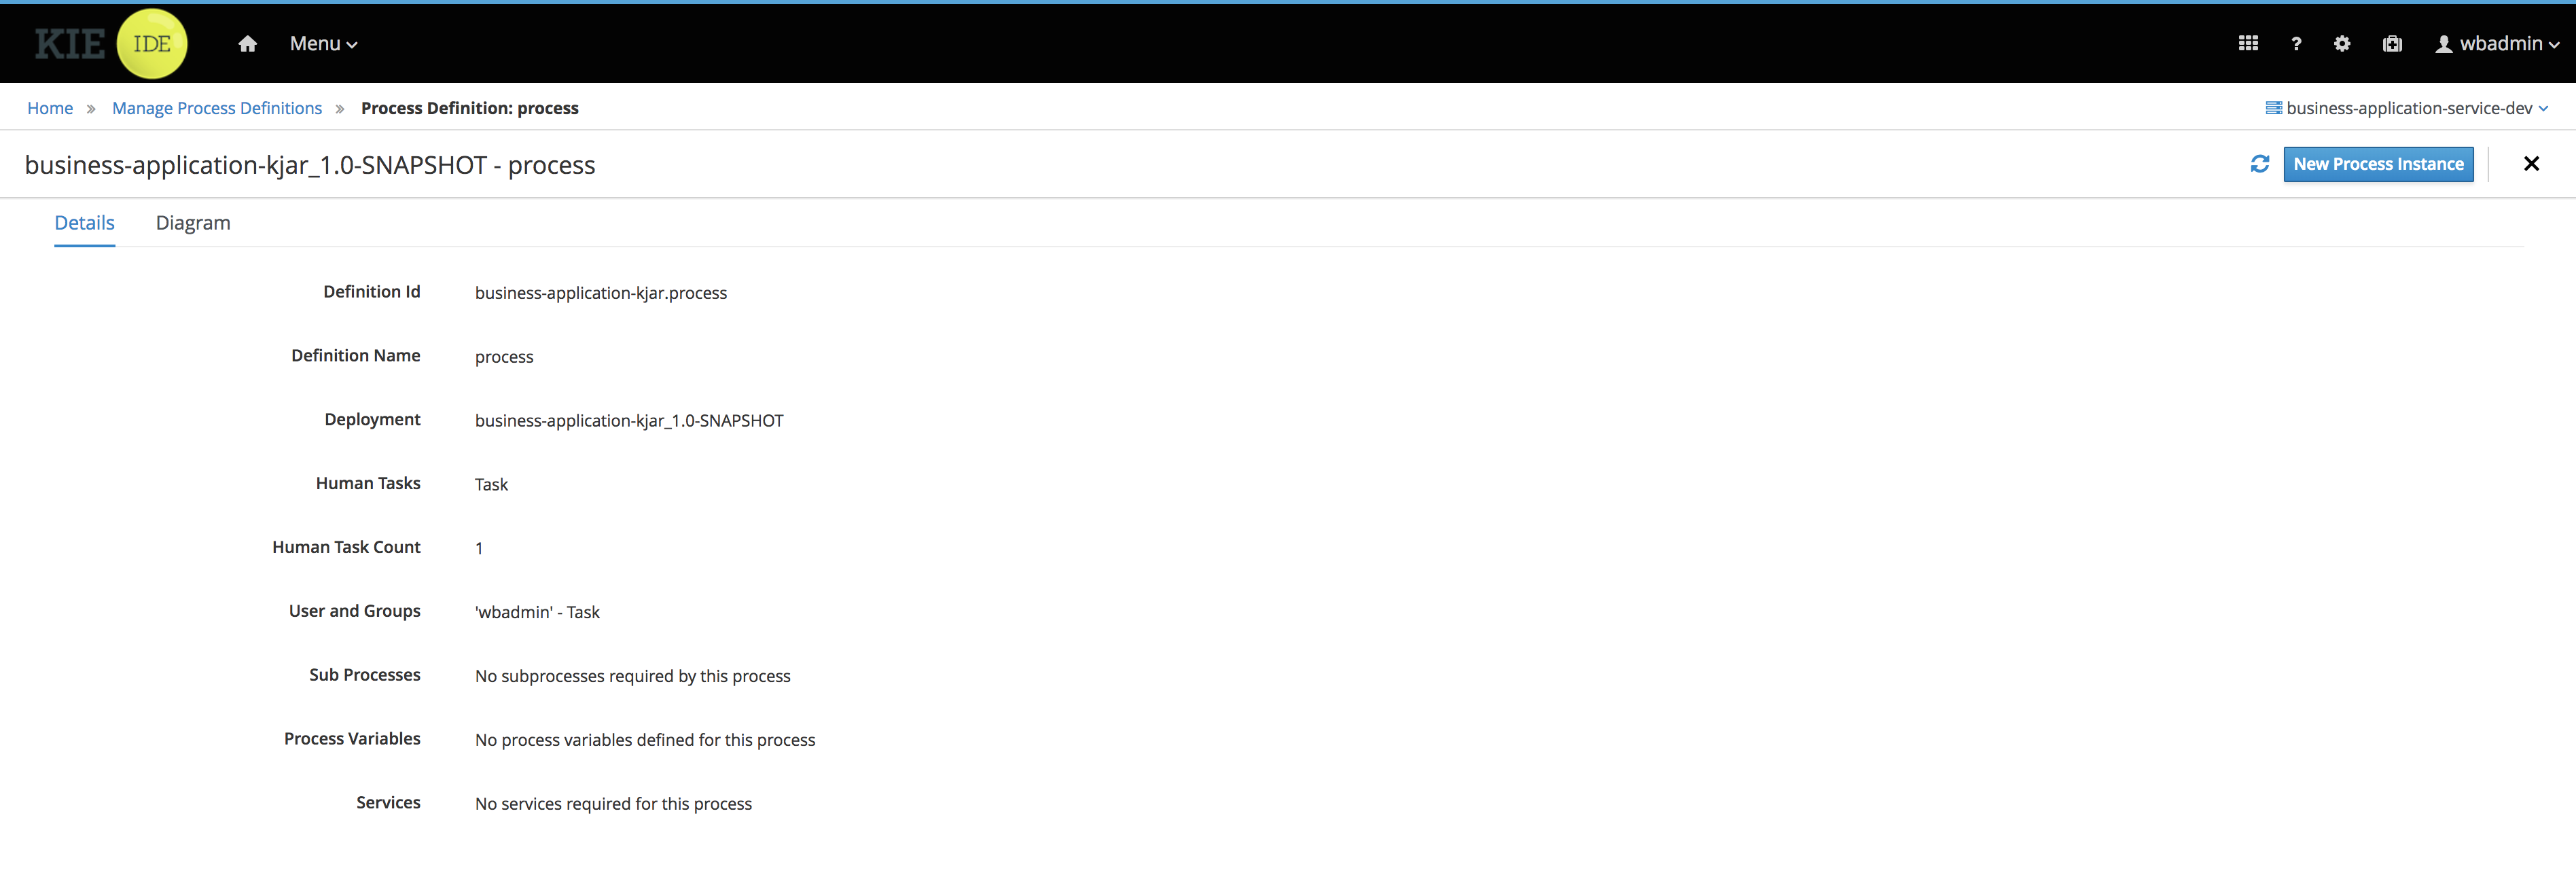
Examine details of that process definition by clicking on the row in the table. Switch to
Diagram tab to see the visual representation of your process definition.
Start new instance of the business process by clicking on New instance button. This will bring up
form (depending on your process definition) it might or might not have any fields. Just click on
Submit button to start process instance.
Once started process instance details will be opened, you can examine different sections to learn more about your active process instance
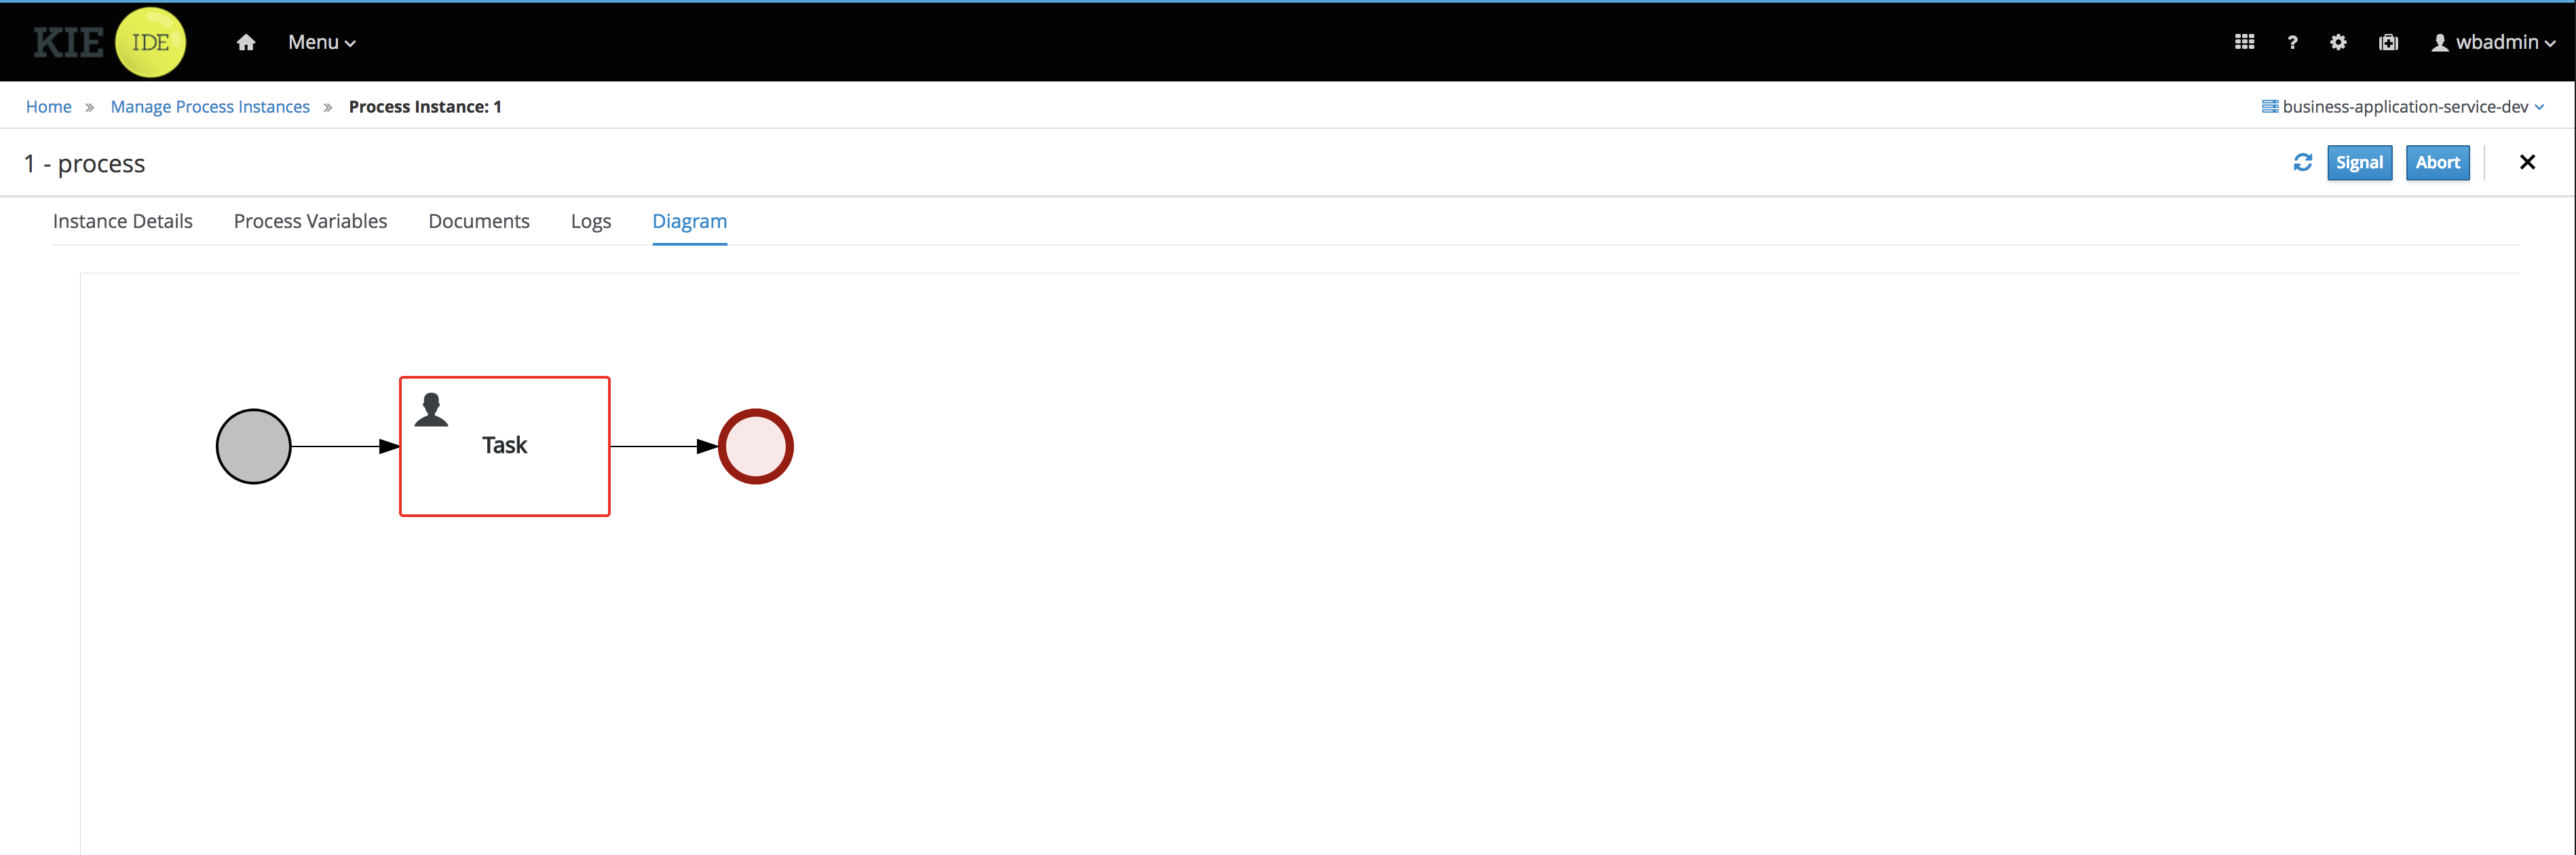
-
Instance details - base information about process instance
-
Process variables - latest values for process variables
-
Documents - list of documents managed by the process
-
Logs - detailed logs about what has been done within the process instance
-
Diagram - annotated diagram with completed (greyed out) and active (red borders) nodes
To look at user tasks, go to task inbox (in Track section of the Home screen). List of available tasks will be presented. This time there is no need to select server configuration because Business Central keeps track of recently selected configuration on different screens.
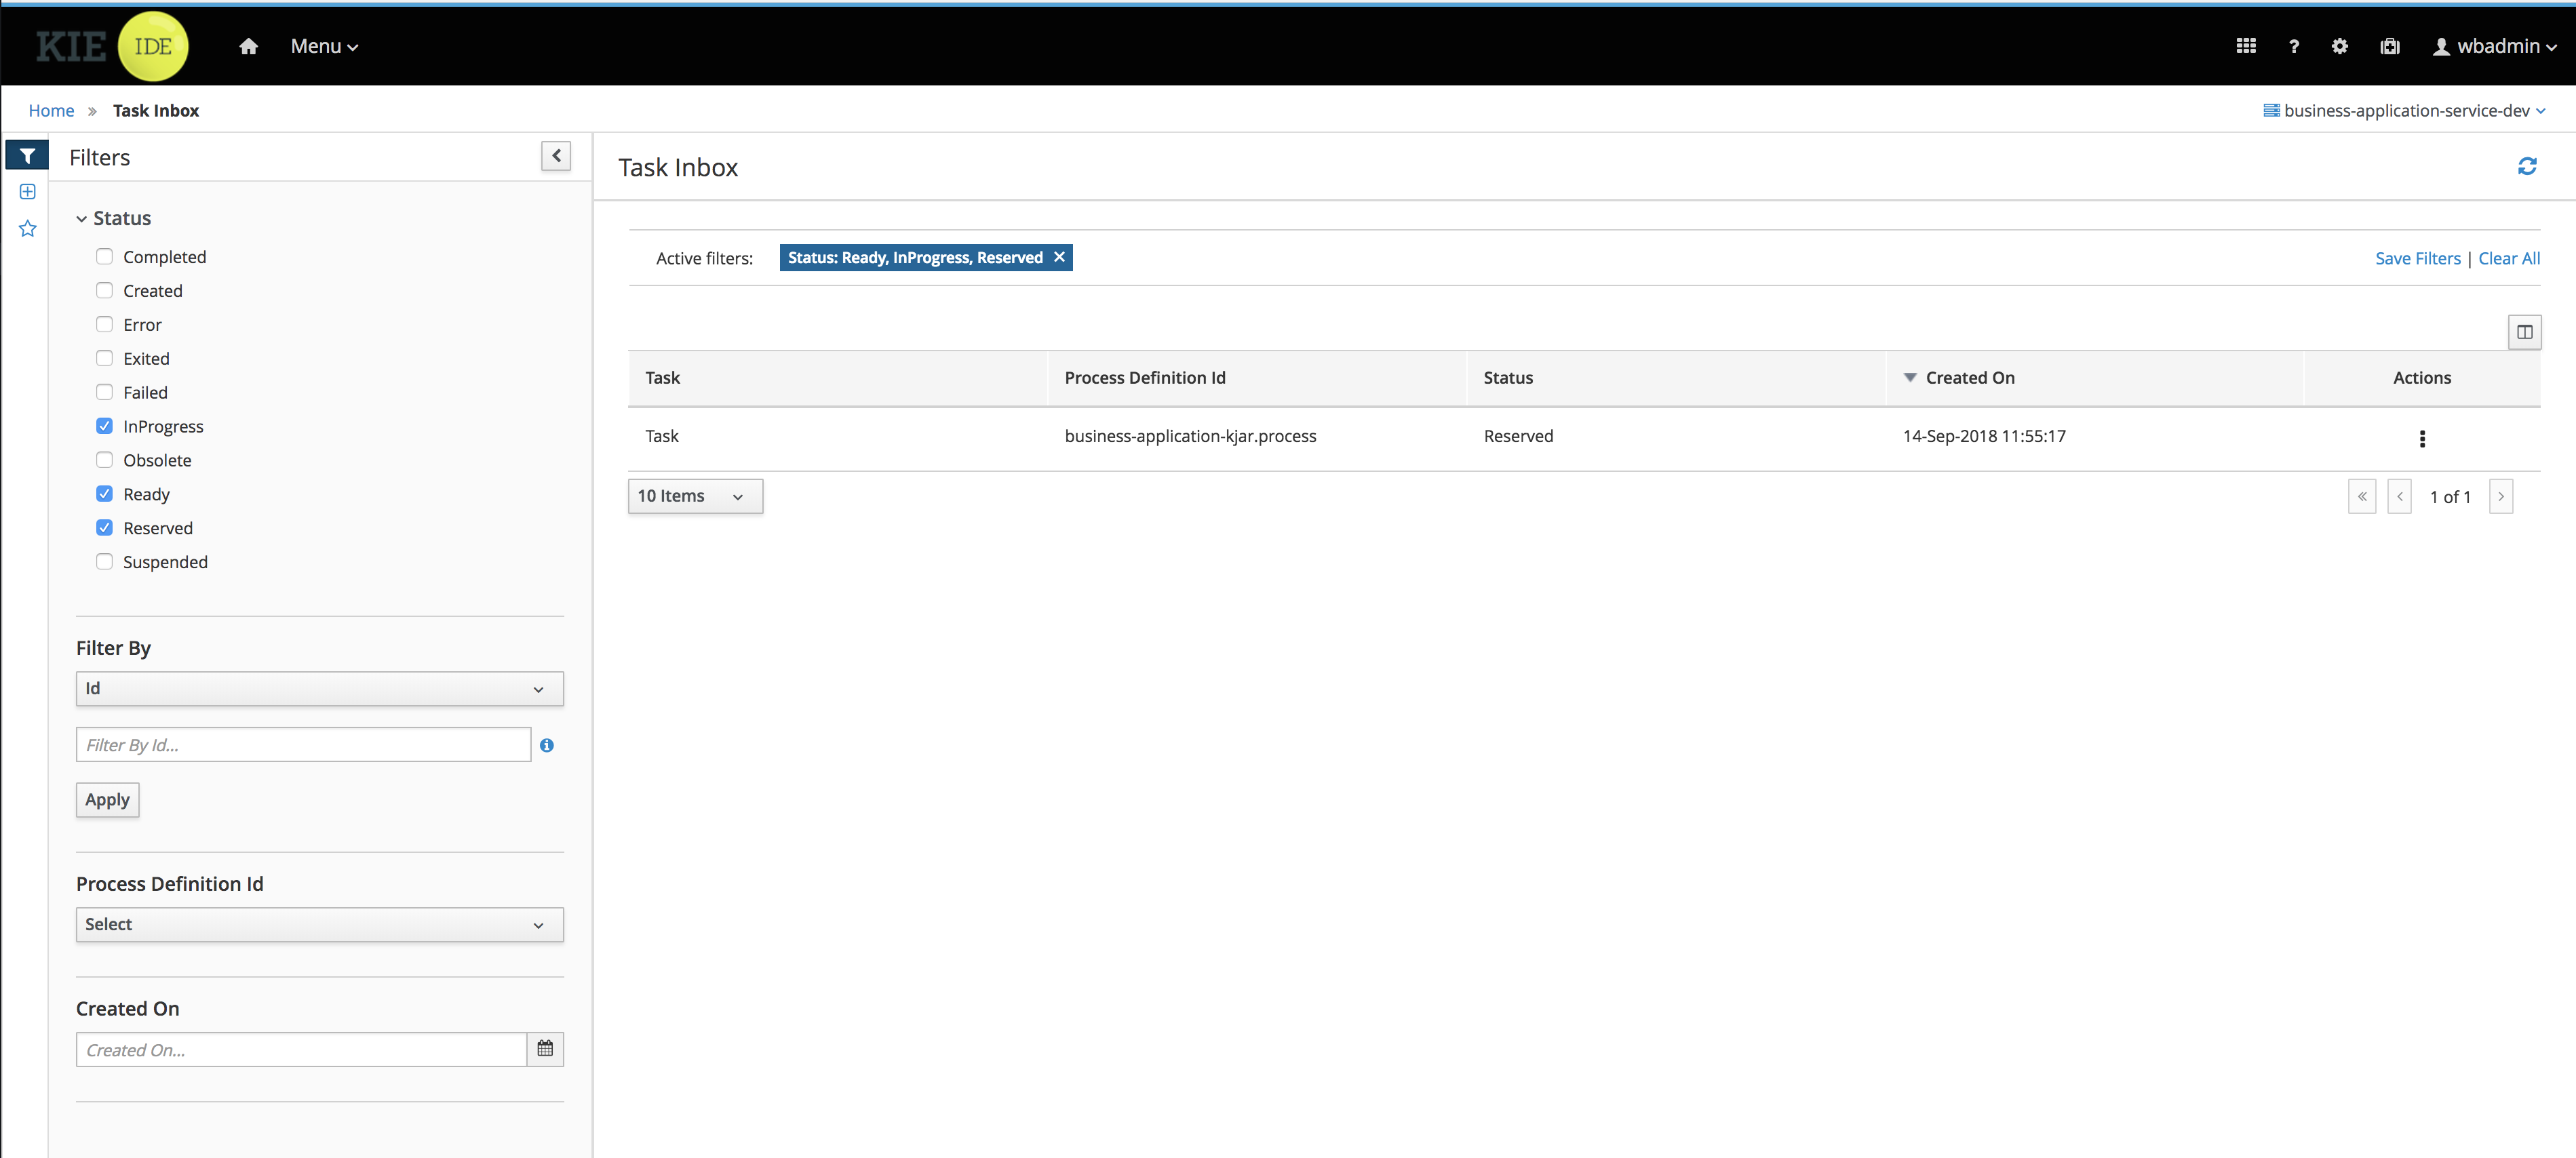
5.7.2.5. Summary
Congratulations! you have enhanced your business application to actually do something - execute business processes. At the same time you have created your first business process and made successful integration between your business application and Business Central.
5.7.2.6. Source code of the tutorial
Here is the complete source code of the tutorial.
5.7.3. Business Application with custom work item handlers and event listeners
5.7.3.1. What will you do
You will enhance your business application with business assets that execute custom business logic and monitors execution via event listeners.
-
business process (BPMN2) with custom service task (aka work item)
-
develop work item handler for the custom service task
-
develop process event listener that will receive events from the jBPM engine
and execute this business assets
-
via REST api of your business application
-
via Business Central UI
5.7.3.2. What do you need
-
About 20 minutes of your time
-
Java (JDK) 8 or later
-
Maven 3.5.x
-
IDE of your choice
-
Access to the Internet
-
Business Central deployed - see single distribution for instructions
5.7.3.3. What should I do
If you haven’t done it already, complete tutorial Business Application with Business Assets.
If you would like directly start with this tutorial you can get
complete source of the Business Application with Business Assets tutorial from
here
|
Start Business Central (if not already started) and open your browser at
http://localhost:8080/business-central and logon as
user wbadmin with password wbadmin
Import your business assets project into Business Central
if not already imported proceed with points below to import business asset project
-
Go into business assets project -
business-application-kjar -
Execute
git init -
Execute
git add -A -
Execute
git commit -m "my business assets project" -
Log in to Business Central and go to projects
-
Select import project and enter the following URL
file:///{path to your business application}/business-application-kjar -
Click import and confirm project to be imported
Create custom service task in Business Central
-
Go to Projects → business-application-kjar project
-
Click Add asset and select WorkItem Definition
-
Give it a name
CustomTask
It should look like the following snippet
[
  [
    "name" : "MyTask",
    "parameters" : [
        "MyFirstParam" : new StringDataType(),
        "MySecondParam" : new StringDataType(),
        "MyThirdParam" : new ObjectDataType()
    ],
    "results" : [
        "Result" : new ObjectDataType("java.util.Map")
    ],
    "displayName" : "My Task",
    "icon" : ""
  ]
]-
Save and close the editor
Create new process with service task (MyTask)
-
Click Add Asset button and select Business Process
-
Give it a name
CustomTaskProcess -
Open
Service Taskson the palette (cogs icon) -
Drag and Drop the MyTask service task into the canvas
-
Connect it with start event and finish it with end event
It should look like this
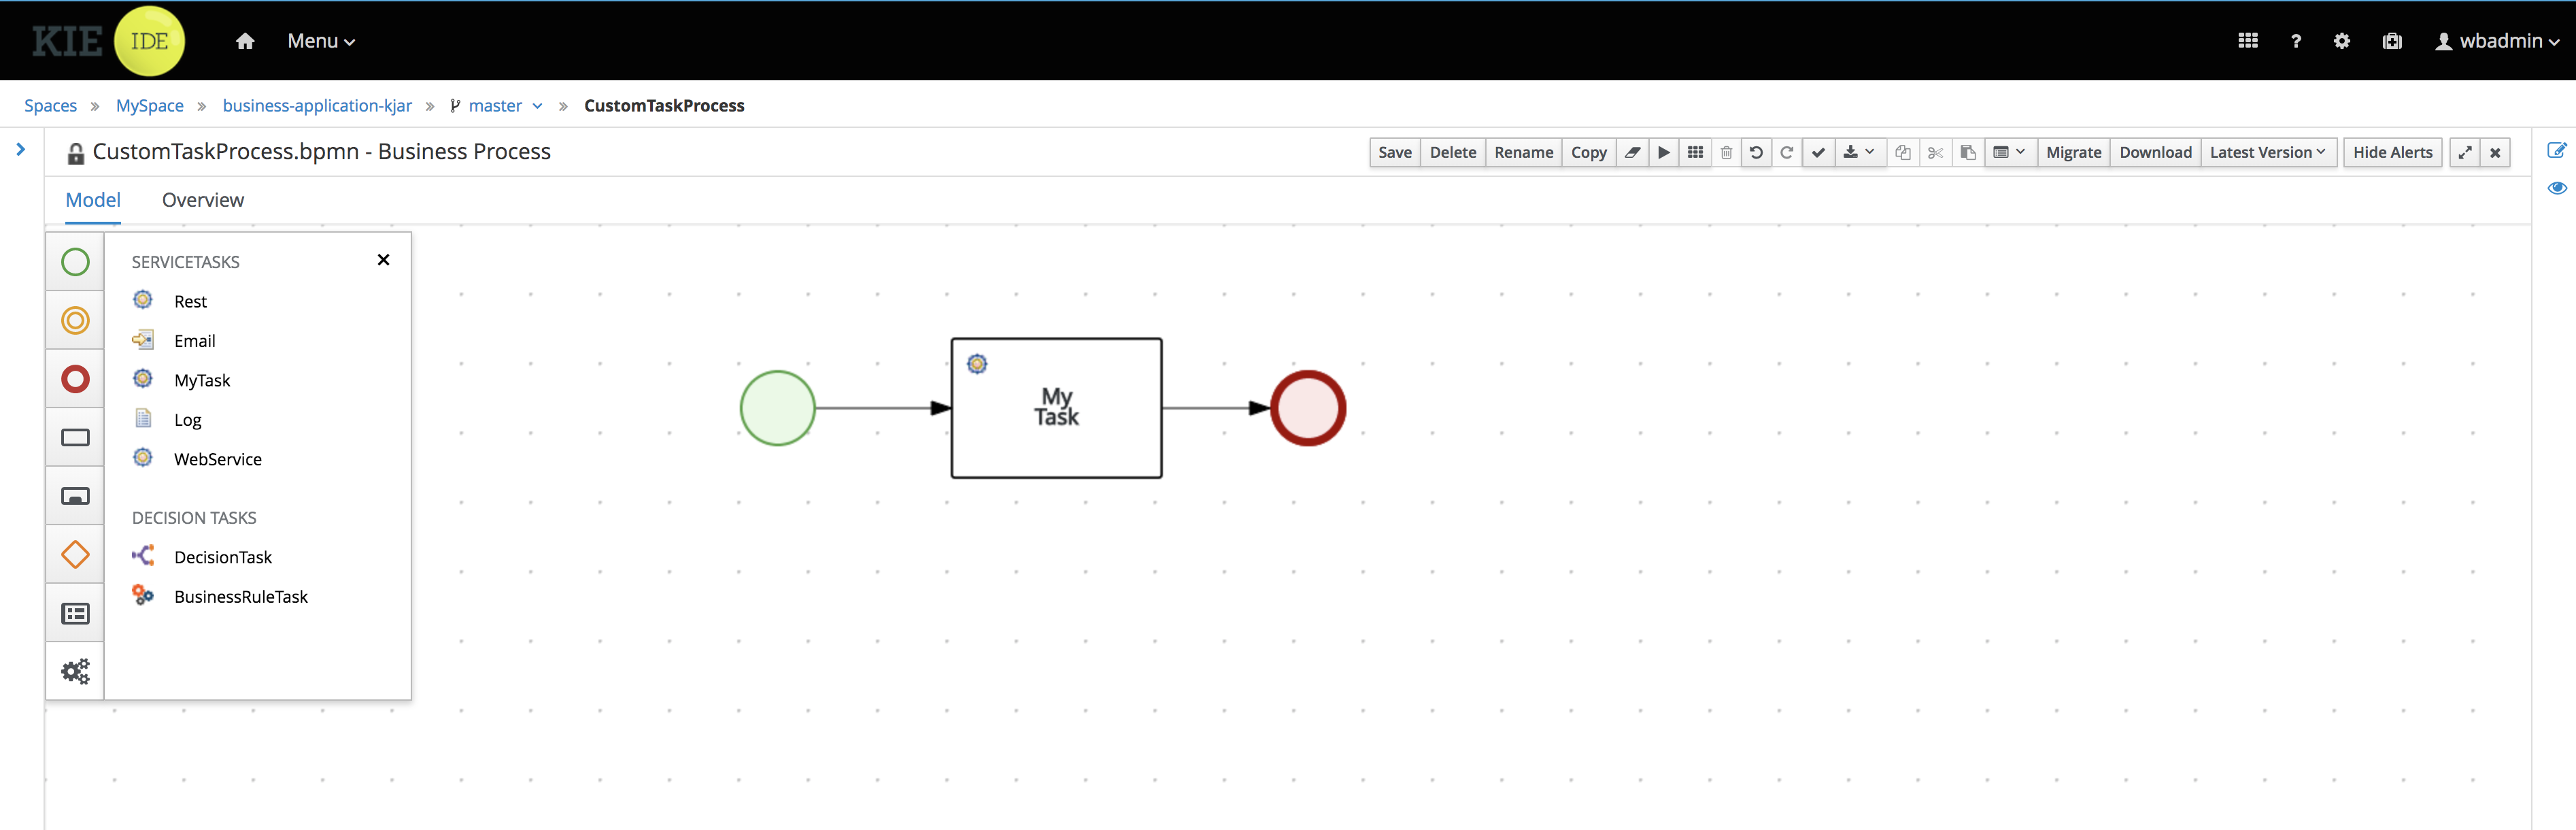
-
Save and close the editor
Implement custom work item handler
-
Import business-application-service project into IDE of your choice
-
Create new class MyTaskWorkItemHandler that implements
org.kie.api.runtime.process.WorkItemHandler -
Implement the
executeWorkItemHandlerby simply printing out work item and complete the work item
@Override
public void executeWorkItem(WorkItem workItem, WorkItemManager manager) {
    System.out.println("Work item being executed " + workItem);
    manager.completeWorkItem(workItem.getId(), null);
}-
annotate the class with
@Componentannotation with name that matches the work item defined in Business Central
Complete class of the handler should look like this
package com.company.service.handlers;

import org.kie.api.runtime.process.WorkItem;
import org.kie.api.runtime.process.WorkItemHandler;
import org.kie.api.runtime.process.WorkItemManager;
import org.springframework.stereotype.Component;

@Component("MyTask")
public class MyTaskWorkItemHandler implements WorkItemHandler {

    @Override
    public void executeWorkItem(WorkItem workItem, WorkItemManager manager) {
        System.out.println("Work item being executed " + workItem);
        manager.completeWorkItem(workItem.getId(), null);
    }

    @Override
    public void abortWorkItem(WorkItem workItem, WorkItemManager manager) {

    }

}
Implement custom event listener
To be able to monitor execution of our business assets such as business process an event listener can be implemented. In this tutorial we focus on ProcessEventListener but there are other types such as:
-
TaskLifeCycleEventListener
-
CaseEventListener
-
RuleRuntimeEventListener
-
AgendaEventListener
Go back to IDE where the business-application-service is imported
-
Create class MyProcessEventListener that implements
org.kie.api.event.process.ProcessEventListener -
Implement methods with simple print outs
-
Annotate the class with
Component- in this case the name is not relevant
Complete class of the event listener should look like this
package com.company.service.listeners;

import org.kie.api.event.process.ProcessCompletedEvent;
import org.kie.api.event.process.ProcessEventListener;
import org.kie.api.event.process.ProcessNodeLeftEvent;
import org.kie.api.event.process.ProcessNodeTriggeredEvent;
import org.kie.api.event.process.ProcessStartedEvent;
import org.kie.api.event.process.ProcessVariableChangedEvent;
import org.springframework.stereotype.Component;

@Component
public class MyProcessEventListener implements ProcessEventListener {

    @Override
    public void beforeProcessStarted(ProcessStartedEvent event) {
        System.out.println("beforeProcessStarted " + event);
    }

    @Override
    public void afterProcessStarted(ProcessStartedEvent event) {
        System.out.println("afterProcessStarted " + event);
    }

    @Override
    public void beforeProcessCompleted(ProcessCompletedEvent event) {
        System.out.println("beforeProcessCompleted " + event);
    }

    @Override
    public void afterProcessCompleted(ProcessCompletedEvent event) {
        System.out.println("afterProcessCompleted " + event);
    }

    @Override
    public void beforeNodeTriggered(ProcessNodeTriggeredEvent event) {
        System.out.println("beforeNodeTriggered " + event);
    }

    @Override
    public void afterNodeTriggered(ProcessNodeTriggeredEvent event) {
        System.out.println("afterNodeTriggered " + event);
    }

    @Override
    public void beforeNodeLeft(ProcessNodeLeftEvent event) {
        System.out.println("beforeNodeLeft " + event);
    }

    @Override
    public void afterNodeLeft(ProcessNodeLeftEvent event) {
        System.out.println("afterNodeLeft " + event);
    }

    @Override
    public void beforeVariableChanged(ProcessVariableChangedEvent event) {
        System.out.println("beforeVariableChanged " + event);
    }

    @Override
    public void afterVariableChanged(ProcessVariableChangedEvent event) {
        System.out.println("afterVariableChanged " + event);
    }

}
Run the application
At this point all development effort is done, the last remaining thing is to pull back the business assets project into the business-application-kjar project
-
Go to business-application-kjar
-
Execute
git remote add origin ssh://wbadmin@localhost:8001/MySpace/business-application-kjar(if not already added) -
Execute
git pull origin master- when prompted enterwbadminas password
Go to business-application-service directory and launch the application
./launch.sh clean install for Linux/Unix
./launch.bat clean install for Windows
5.7.3.4. Results
Once the build and launch is complete you can open your browser http://localhost:8090
Next, point the browser to http://localhost:8090/rest/server/containers to see that your business assets project has been properly deployed and is running.
By default all REST endpoints (url pattern /rest/*) are secured and require
authentication. Default user that can be used to logon is wbadmin with password wbadmin
|
Next, point the browser to http://localhost:8090/rest/server/containers/business-application-kjar/processes to see business processes available for execution. You should see two of them.
Execute business process
You can execute business process via REST api exposed by your business application (in fact by Business Automation capability).
URL: http://localhost:8090/rest/server/containers/business-application-kjar/processes/{processid}/instances
HTTP method: POST
Optionally HTTP headers can be set to change the format of data returned
-
Accept: application/json for JSON format
-
Accept: application/xml for XML (JAXB based) format
-
X-KIE-ContentType: XSTREAM for XML (XStream based) format
{processid} needs to be replaced with actual process id that is returned from the endpoint http://localhost:8090/rest/server/containers/business-application-kjar/processes
| Remember that endpoints are protected so make sure you provide user name and password when making the request. |
In response to this request, a process instance id should be returned.
<long-type>
    <value>1</value>
</long-type>
You can examine details of that process instance by pointing your browser to http://localhost:8090/rest/server/containers/business-application-kjar/processes/instances/1
<process-instance>
  <process-instance-id>1</process-instance-id>
  <process-id>business-application-kjar.CustomTaskProcess</process-id>
  <process-name>CustomTaskProcess</process-name>
  <process-version>1.0</process-version>
  <process-instance-state>2</process-instance-state>
  <container-id>business-application-kjar-1_0-SNAPSHOT</container-id>
  <initiator>wbadmin</initiator>
  <start-date>2018-10-11T13:29:55.807+02:00</start-date>
  <process-instance-desc>CustomTaskProcess</process-instance-desc>
  <correlation-key>1</correlation-key>
  <parent-instance-id>-1</parent-instance-id>
  <sla-compliance>0</sla-compliance>
</process-instance>
Looking into the application logs (console) you should see that both the handler has been executed and event listener was notified about various events
beforeVariableChanged ==>[ProcessVariableChanged(id=initiator; instanceId=initiator; oldValue=null; newValue=wbadmin; processName=CustomTaskProcess; processId=business-application-kjar.CustomTaskProcess)]
afterVariableChanged ==>[ProcessVariableChanged(id=initiator; instanceId=initiator; oldValue=null; newValue=wbadmin; processName=CustomTaskProcess; processId=business-application-kjar.CustomTaskProcess)]
beforeProcessStarted ==>[ProcessStarted(name=CustomTaskProcess; id=business-application-kjar.CustomTaskProcess)]
beforeNodeTriggered ==>[ProcessNodeTriggered(nodeId=3; id=0; nodeName=null; processName=CustomTaskProcess; processId=business-application-kjar.CustomTaskProcess)]
beforeNodeLeft ==>[ProcessNodeLeft(nodeId=3; id=0; nodeName=null; processName=CustomTaskProcess; processId=business-application-kjar.CustomTaskProcess)]
beforeNodeTriggered ==>[ProcessNodeTriggered(nodeId=1; id=1; nodeName=My Task; processName=CustomTaskProcess; processId=business-application-kjar.CustomTaskProcess)]

Work item being executed WorkItem 1 [name=MyTask, state=0, processInstanceId=1, parameters{}]

beforeNodeLeft ==>[ProcessNodeLeft(nodeId=1; id=1; nodeName=My Task; processName=CustomTaskProcess; processId=business-application-kjar.CustomTaskProcess)]
beforeNodeTriggered ==>[ProcessNodeTriggered(nodeId=2; id=2; nodeName=null; processName=CustomTaskProcess; processId=business-application-kjar.CustomTaskProcess)]
beforeNodeLeft ==>[ProcessNodeLeft(nodeId=2; id=2; nodeName=null; processName=CustomTaskProcess; processId=business-application-kjar.CustomTaskProcess)]
beforeProcessCompleted ==>[ProcessCompleted(name=CustomTaskProcess; id=business-application-kjar.CustomTaskProcess)]
afterProcessCompleted ==>[ProcessCompleted(name=CustomTaskProcess; id=business-application-kjar.CustomTaskProcess)]
afterNodeLeft ==>[ProcessNodeLeft(nodeId=2; id=2; nodeName=null; processName=CustomTaskProcess; processId=business-application-kjar.CustomTaskProcess)]
afterNodeTriggered ==>[ProcessNodeTriggered(nodeId=2; id=2; nodeName=null; processName=CustomTaskProcess; processId=business-application-kjar.CustomTaskProcess)]
afterNodeLeft ==>[ProcessNodeLeft(nodeId=1; id=1; nodeName=My Task; processName=CustomTaskProcess; processId=business-application-kjar.CustomTaskProcess)]
afterNodeTriggered ==>[ProcessNodeTriggered(nodeId=1; id=1; nodeName=My Task; processName=CustomTaskProcess; processId=business-application-kjar.CustomTaskProcess)]
afterNodeLeft ==>[ProcessNodeLeft(nodeId=3; id=0; nodeName=null; processName=CustomTaskProcess; processId=business-application-kjar.CustomTaskProcess)]
afterNodeTriggered ==>[ProcessNodeTriggered(nodeId=3; id=0; nodeName=null; processName=CustomTaskProcess; processId=business-application-kjar.CustomTaskProcess)]
afterProcessStarted ==>[ProcessStarted(name=CustomTaskProcess; id=business-application-kjar.CustomTaskProcess)]
Execute business process from Business Central UI
Follow the same procedure as described in Execute business process from Business Central UI
5.7.3.5. Summary
Congratulations! you have enhanced your business application to take advantage of custom service tasks and you learned how to keep an eye on what is actually being executed by your business application. With this knowledge you can start doing more advanced service tasks that will integrate your application with the outside world.
5.7.3.6. Source code of the tutorial
Here is the complete source code of the tutorial.
5.7.4. Business Application with JPA entity
5.7.4.1. What will you do
You will enhance your business application with JPA entity that will be used both by your business application service and business assets.
-
develop JPA entity as part of your business-application-model project
-
business process (BPMN2) with user task that will display JPA entity
and execute this business assets
-
via REST api of your business application
-
via Business Central UI
5.7.4.2. What do you need
-
About 20 minutes of your time
-
Java (JDK) 8 or later
-
Maven 3.5.x
-
IDE of your choice
-
Access to the Internet
-
Business Central deployed - see single distribution for instructions
5.7.4.3. What should I do
If you haven’t done it already, complete tutorial Business Application with Business Assets.
If you would like directly start with this tutorial you can get
complete source of the Business Application with Business Assets tutorial from
here
|
Start Business Central (if not already started) and open your browser at
http://localhost:8080/business-central and logon as
user wbadmin with password wbadmin
Import your business assets project into Business Central
if not already imported proceed with points below to import business asset project
-
Go into business assets project -
business-application-kjar -
Execute
git init -
Execute
git add -A -
Execute
git commit -m "my business assets project" -
Log in to Business Central and go to projects
-
Select import project and enter the following URL
file:///{path to your business application}/business-application-kjar -
Click import and confirm project to be imported
Implement JPA entity
-
Import business-application-model project into IDE of your choice
-
Add to pom.xml of the model project dependency to JPA api (in scope provided)
<dependencies>
  <dependency>
    <groupId>org.hibernate.javax.persistence</groupId>
    <artifactId>hibernate-jpa-2.1-api</artifactId>
    <version>1.0.0.Final</version>
    <scope>provided</scope>
  </dependency>
</dependencies>-
Implement class as JPA Entity
Person -
Create three fields in the class
-
id (of type Long)
-
firstName (of type String)
-
lastName (of type String)
-
-
Annotate the class with
@Entity -
Annotate the
idfield with@Idand@GeneratedValue(strategy = GenerationType.AUTO)
Complete class of the entity should look like this
package com.company.model;

import javax.persistence.Entity;
import javax.persistence.GeneratedValue;
import javax.persistence.GenerationType;
import javax.persistence.Id;

@Entity
public class Person {

    @Id
    @GeneratedValue(strategy = GenerationType.AUTO)
    private Long id;

    private String firstName;

    private String lastName;

    public Long getId() {
        return id;
    }

    public void setId(Long id) {
        this.id = id;
    }

    public String getFirstName() {
        return firstName;
    }

    public void setFirstName(String firstName) {
        this.firstName = firstName;
    }

    public String getLastName() {
        return lastName;
    }

    public void setLastName(String lastName) {
        this.lastName = lastName;
    }

    @Override
    public String toString() {
        return "Person [id=" + id + ", firstName=" + firstName + ", lastName=" + lastName + "]";
    }

}
Configure service project to use the JPA entity
-
Import business-application-service project into IDE of your choice
-
Add dependency to the business-application-model in your service pom.xml
<dependency>
  <groupId>com.company</groupId>
  <artifactId>business-application-model</artifactId>
  <version>1.0-SNAPSHOT</version>
</dependency>-
Edit application.properties file (that is located in src/main/resources)
-
Add
spring.jpa.properties.entity-scan-packages=com.company.modelinto the file
| Adjust the package if you did not use the default com.company.model package |
-
Add the same entry into
application-dev.propertiesfile
Create new process that use JPA entity
-
Log in to Business Central
-
Go to Projects → business-application-kjar project
-
Go to Settings tab
-
Go to Dependencies
-
Add dependency to business-application-model - make sure it is in provided scope
-
Go to Deployment → Marshalling strategy
-
Add new marshalling strategy with following value
new org.drools.persistence.jpa.marshaller.JPAPlaceholderResolverStrategy(entityManagerFactory) -
Go back to assets
-
Click Add Asset button and select Business Process
-
Give it a name
JPAProcess -
Open
Taskson the palette -
Drag and Drop the User Task into the canvas
-
Connect it with start event and finish it with end event
-
Create variable named person with type (custom)
com.company.model.Person
It should look like this
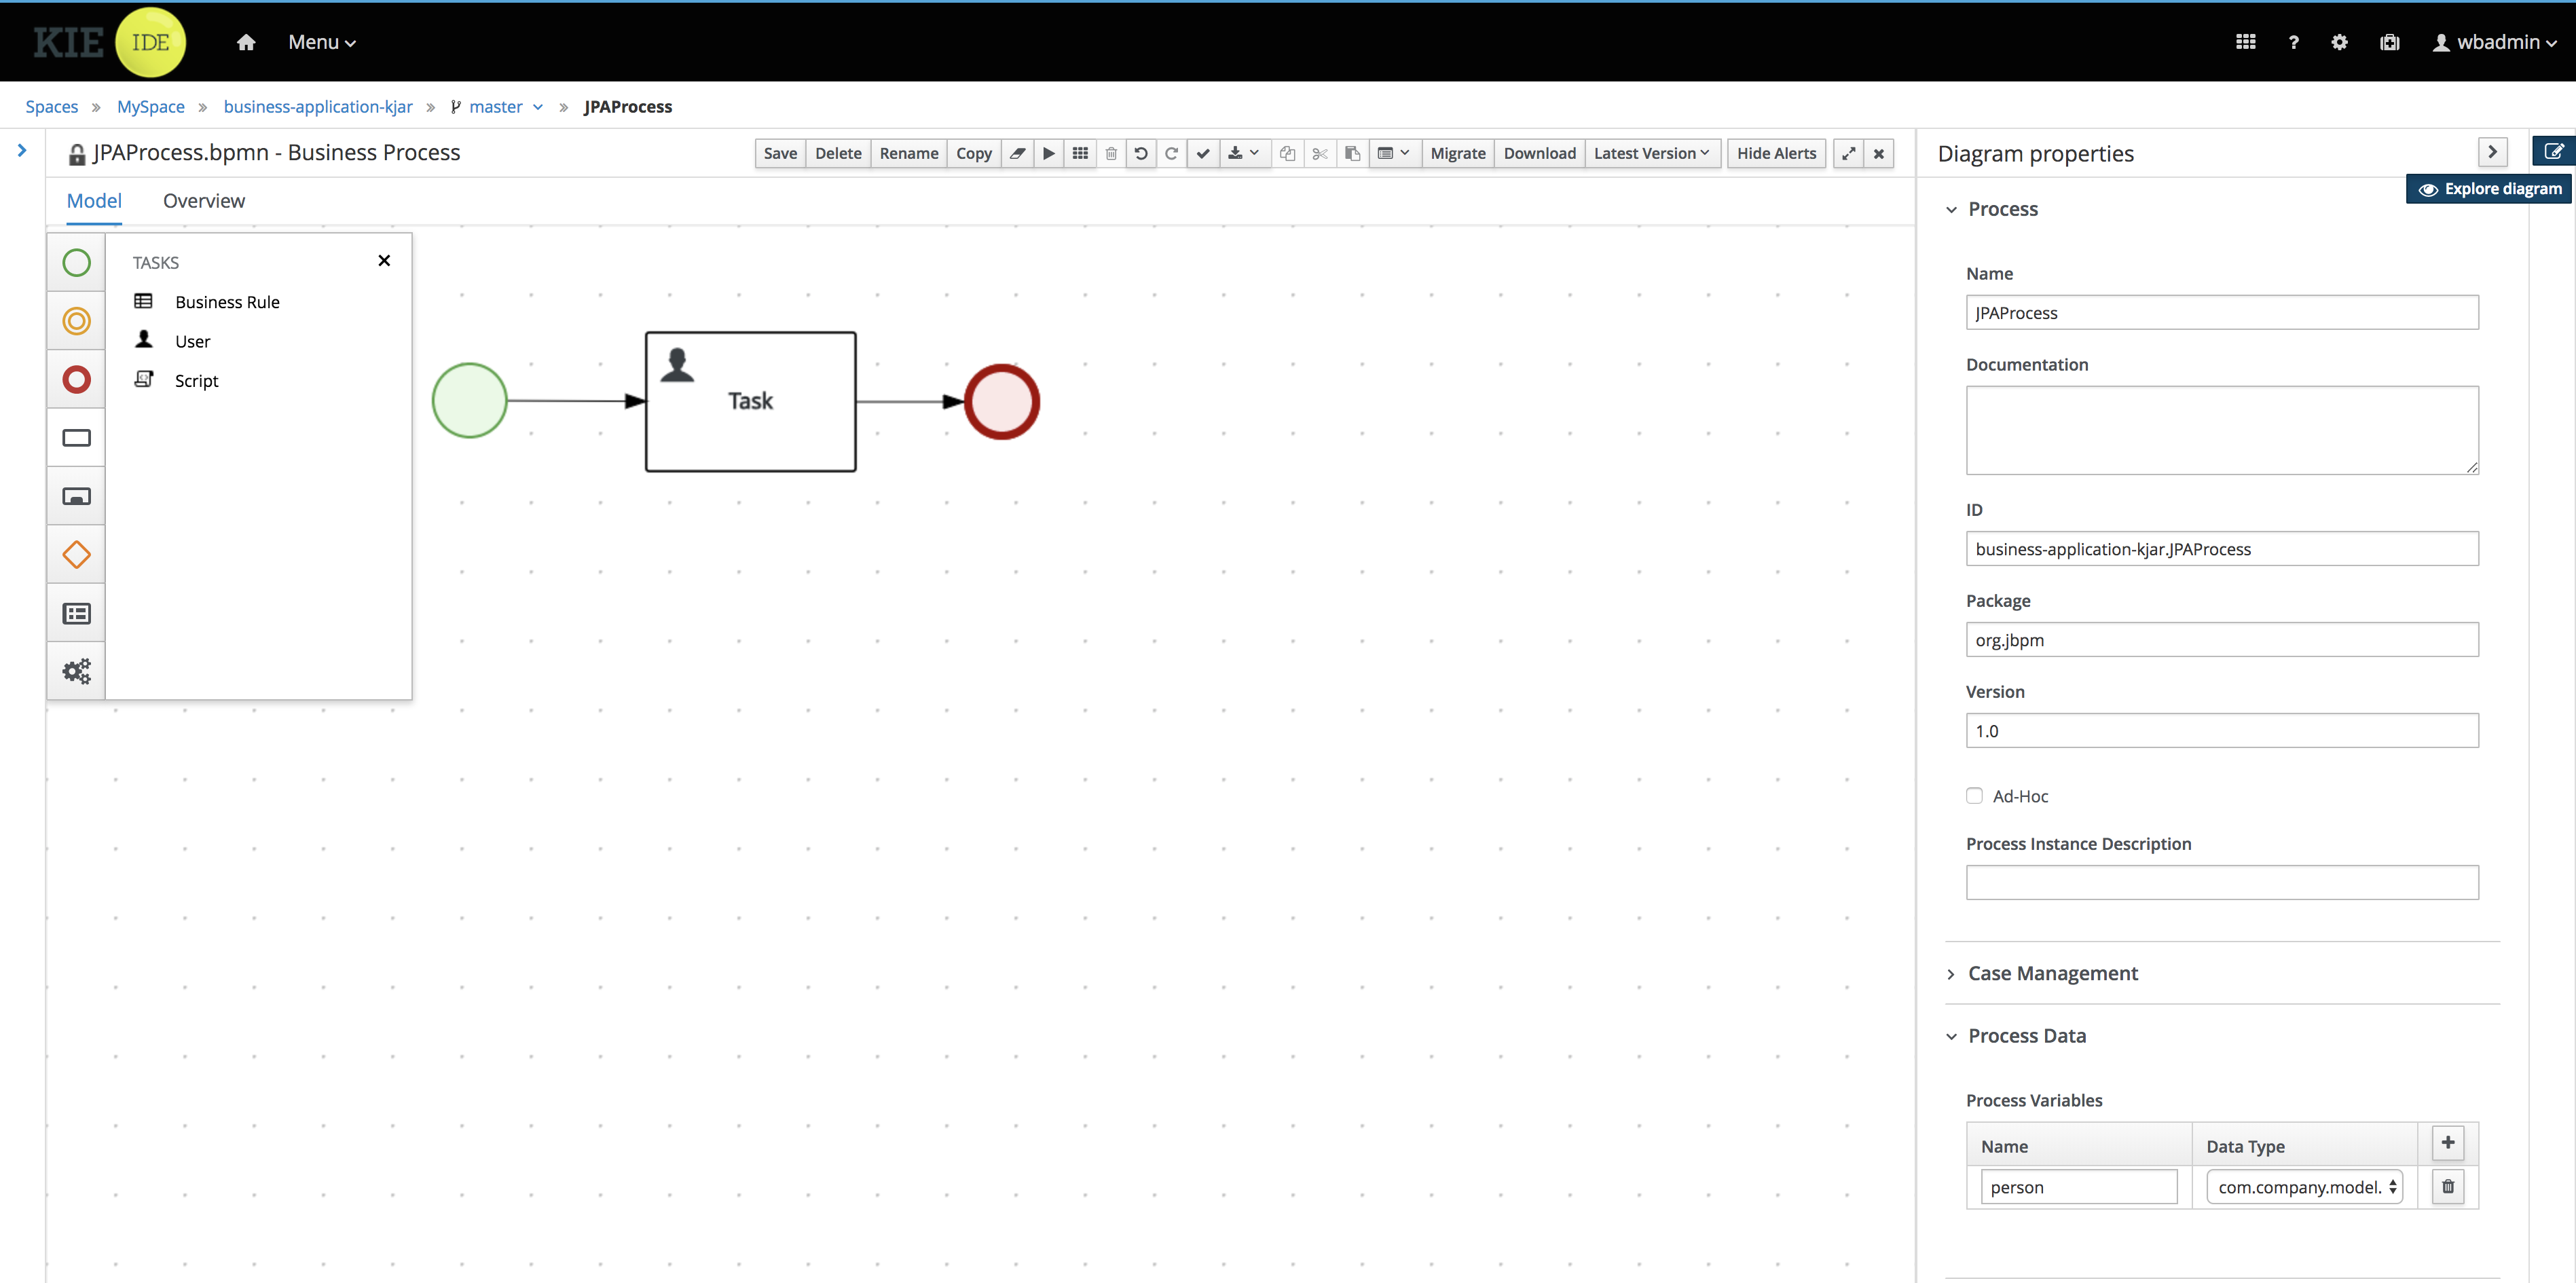
-
Map the variable as input and output of user task - use same name for input and output variable
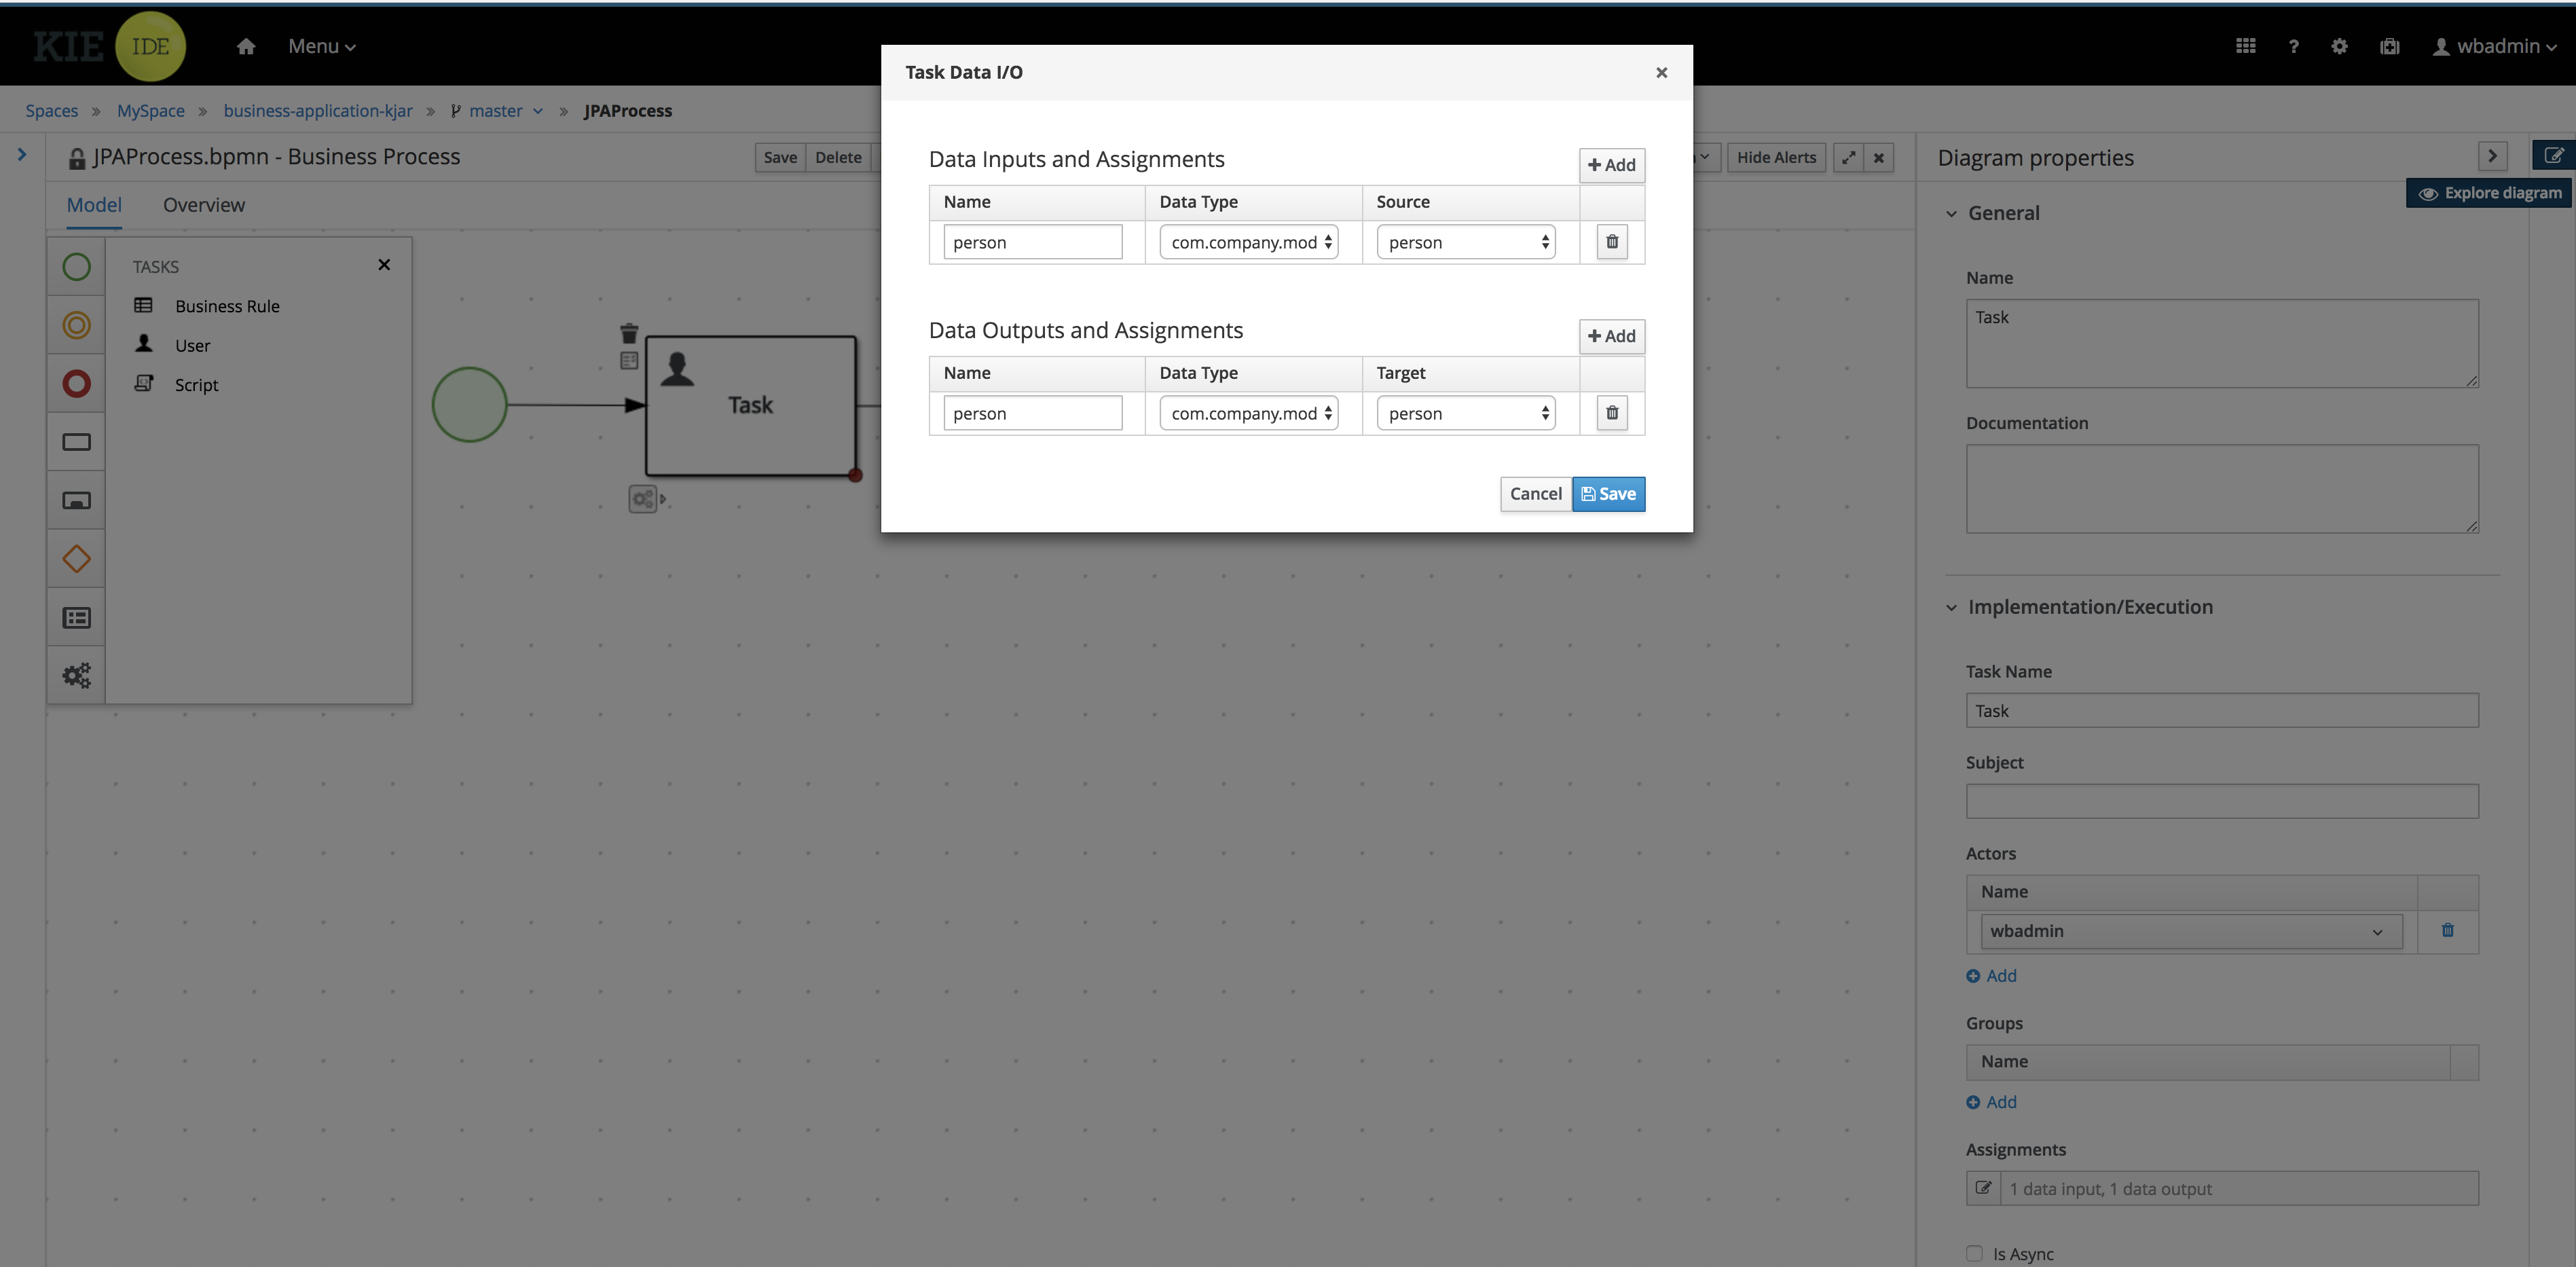
-
Save and close the editor
Run the application
At this point all development effort is done, the last remaining thing is to pull back the business assets project into the business-application-kjar project
-
Go to business-application-kjar
-
Execute
git remote add origin ssh://wbadmin@localhost:8001/MySpace/business-application-kjar(if not already added) -
Execute
git pull origin master- when prompted enterwbadminas password
Go to business-application-service directory and launch the application
./launch.sh clean install for Linux/Unix
./launch.bat clean install for Windows
5.7.4.4. Results
Once the build and launch is complete you can open your browser http://localhost:8090
Next, point the browser to http://localhost:8090/rest/server/containers to see that your business assets project has been properly deployed and is running.
By default all REST endpoints (url pattern /rest/*) are secured and require
authentication. Default user that can be used to logon is wbadmin with password wbadmin
|
Next, point the browser to http://localhost:8090/rest/server/containers/business-application-kjar/processes to see business processes available for execution. You should see two of them.
Execute business process
You can execute business process via REST api exposed by your business application (in fact by Business Automation capability).
HTTP method: POST
HTTP headers:
-
Accept: application/json
-
Content-Type: application/json
Body:
{
  "person" : {
    "Person" : {
      "firstName":"WB",
      "lastName":"Admin"
    }
  }
}
{processid} needs to be replaced with actual process id that is returned from the endpoint http://localhost:8090/rest/server/containers/business-application-kjar/processes
| Remember that endpoints are protected so make sure you provide user name and password when making the request. |
In response to this request, a process instance id should be returned.
1You can examine details of that process instance by pointing your browser to http://localhost:8090/rest/server/containers/business-application-kjar/processes/instances/1?withVars=true
<process-instance>
  <process-instance-id>1</process-instance-id>
  <process-id>business-application-kjar.JPAProcess</process-id>
  <process-name>JPAProcess</process-name>
  <process-version>1.0</process-version>
  <process-instance-state>1</process-instance-state>
  <container-id>business-application-kjar-1_0-SNAPSHOT</container-id>
  <initiator>wbadmin</initiator>
  <start-date>2018-10-11T14:42:23.053+02:00</start-date>
  <process-instance-desc>JPAProcess</process-instance-desc>
  <correlation-key>1</correlation-key>
  <parent-instance-id>-1</parent-instance-id>
  <sla-compliance>0</sla-compliance>
  <active-user-tasks>
    <task-summary>
      <task-id>1</task-id>
      <task-name>Task</task-name>
      <task-description/>
      <task-status>Reserved</task-status>
      <task-priority>0</task-priority>
      <task-actual-owner>wbadmin</task-actual-owner>
      <task-created-by>wbadmin</task-created-by>
      <task-created-on>2018-10-11T14:42:23.058+02:00</task-created-on>
      <task-activation-time>2018-10-11T14:42:23.058+02:00</task-activation-time>
      <task-proc-inst-id>2</task-proc-inst-id>
      <task-proc-def-id>business-application-kjar.JPAProcess</task-proc-def-id>
      <task-container-id>business-application-kjar-1_0-SNAPSHOT</task-container-id>
    </task-summary>
  </active-user-tasks>
  <variables>
    <entry>
      <key>person</key>
      <value xmlns:xsi="http://www.w3.org/2001/XMLSchema-instance" xsi:type="person">
        <firstName>WB</firstName>
        <id>1</id>
        <lastName>Admin</lastName>
      </value>
    </entry>
    <entry>
      <key>initiator</key>
      <value xmlns:xs="http://www.w3.org/2001/XMLSchema" xmlns:xsi="http://www.w3.org/2001/XMLSchema-instance" xsi:type="xs:string">wbadmin</value>
    </entry>
  </variables>
</process-instance>
This illustrates that an instance has been created, it has one user task assigned (the owner is wbadmin) and it has two process variables
-
initiator - set to the user who initiated the request
-
person - our JPA entity that was created based on the payload - but note that the id was generated automatically by the database
You can also examine user task by opening following URL in your browser http://localhost:8090/rest/server/containers/business-application-kjar/tasks/1?withInputData=true
<task-instance>
  <task-id>1</task-id>
  <task-priority>0</task-priority>
  <task-name>Task</task-name>
  <task-subject/>
  <task-description/>
  <task-form>Task</task-form>
  <task-status>Reserved</task-status>
  <task-actual-owner>wbadmin</task-actual-owner>
  <task-created-by>wbadmin</task-created-by>
  <task-created-on>2018-10-11T14:42:23.058+02:00</task-created-on>
  <task-activation-time>2018-10-11T14:42:23.058+02:00</task-activation-time>
  <task-skippable>false</task-skippable>
  <task-workitem-id>1</task-workitem-id>
  <task-process-instance-id>1</task-process-instance-id>
  <task-parent-id>-1</task-parent-id>
  <task-process-id>business-application-kjar.JPAProcess</task-process-id>
  <task-container-id>business-application-kjar-1_0-SNAPSHOT</task-container-id>
  <inputData>
    <entry>
      <key>TaskName</key>
      <value xmlns:xs="http://www.w3.org/2001/XMLSchema" xmlns:xsi="http://www.w3.org/2001/XMLSchema-instance" xsi:type="xs:string">Task</value>
    </entry>
    <entry>
      <key>NodeName</key>
      <value xmlns:xs="http://www.w3.org/2001/XMLSchema" xmlns:xsi="http://www.w3.org/2001/XMLSchema-instance" xsi:type="xs:string">Task</value>
    </entry>
    <entry>
      <key>person</key>
      <value xmlns:xsi="http://www.w3.org/2001/XMLSchema-instance" xsi:type="person">
        <firstName>WB</firstName>
        <id>1</id>
        <lastName>Admin</lastName>
      </value>
    </entry>
    <entry>
      <key>Skippable</key>
      <value xmlns:xs="http://www.w3.org/2001/XMLSchema" xmlns:xsi="http://www.w3.org/2001/XMLSchema-instance" xsi:type="xs:string">false</value>
    </entry>
    <entry>
      <key>ActorId</key>
      <value xmlns:xs="http://www.w3.org/2001/XMLSchema" xmlns:xsi="http://www.w3.org/2001/XMLSchema-instance" xsi:type="xs:string">wbadmin</value>
    </entry>
  </inputData>
</task-instance>
Same person JPA entity is available on the task assigned to wbadmin
5.7.4.5. Summary
Congratulations! you have enhanced your business application to take advantage of a JPA entity as shared model between your business assets and service projects. With the power of business automation and JPA you learned how to externalise data managed by automated by business processes.
5.7.4.6. Source code of the tutorial
Here is the complete source code of the tutorial.
5.7.5. Business Application with ElasticSearch
5.7.5.1. What will you do
You will build business application that pushes out information about your business automation (processes, cases, tasks) directly to an ElasticSearch server. You can then use ElasticSearch REST api to perform advanced queries on top of your business data.
5.7.5.2. What do you need
-
About 20 minutes of your time
-
Java (JDK) 8 or later
-
Maven 3.5.x
-
IDE of your choice
-
Access to the Internet
-
Business Central deployed - see single distribution for instructions
5.7.5.3. What should I do
Install ElasticSearch
To get quickly up and running with ElasticSearch, make use of docker images provided by ElasticSearch.
docker pull docker.elastic.co/elasticsearch/elasticsearch:6.4.2Once pulled, start it with basic settings recommended for development and test.
docker run -p 9200:9200 -p 9300:9300 -e "discovery.type=single-node" docker.elastic.co/elasticsearch/elasticsearch:6.4.2Wait a bit and your ElasticSearch will be up and running, to verify if it is working as expected, open you browser at http://localhost:9200 and you should see similar content
{
  "name" : "IKXT4Z_",
  "cluster_name" : "docker-cluster",
  "cluster_uuid" : "G7q7D2zgQy6JzLZBCzbtTQ",
  "version" : {
    "number" : "6.4.2",
    "build_flavor" : "default",
    "build_type" : "tar",
    "build_hash" : "04711c2",
    "build_date" : "2018-09-26T13:34:09.098244Z",
    "build_snapshot" : false,
    "lucene_version" : "7.4.0",
    "minimum_wire_compatibility_version" : "5.6.0",
    "minimum_index_compatibility_version" : "5.0.0"
  },
  "tagline" : "You Know, for Search"
}| when prompted for user name and password use elastic/changeme |
Build business application
To get started with business applications the easiest way is to generate it.
Go to start.jbpm.org and click button
Generate default business application.
This will generate and download a business-application.zip file that will consists of
three projects
-
business-application-model
-
business-application-kjar
-
business-application-service
Unzip the business-application.zip file into desired location and go into
business-application-service directory. There you will find launch scripts
(for both linux/unix and windows).
Start Business Central (if not already started) and open your browser at
http://localhost:8080/business-central and logon as
user wbadmin with password wbadmin
Import your business assets project into Business Central
if not already imported proceed with points below to import business asset project
-
Go into business assets project -
business-application-kjar -
Execute
git init -
Execute
git add -A -
Execute
git commit -m "my business assets project" -
Log in to Business Central and go to projects
-
Select import project and enter the following URL
file:///{path to your business application}/business-application-kjar -
Click import and confirm project to be imported
Create Business Process
In browser where you logged into Business Central go to Projects. You will see your newly imported project named business-application-kjar, go into that project.
-
go into business-application-kjar project
-
click
Add assetbutton -
select Business Process asset
-
provide name for this asset
-
create your business process
Sample business process could be a single user task that will be assigned to user wbadmin.

Configure service project to use the ElasticSearch
-
Import business-application-service project into IDE of your choice
-
Add dependency to the jbpm-event-emitters-elasticsearch in your service pom.xml
<dependency>
  <groupId>org.jbpm</groupId>
  <artifactId>jbpm-event-emitters-elasticsearch</artifactId>
  <version>${version.org.kie}</version>
</dependency>
There are several configuration parameters that define how business application will connect to ElasticSearch server
-
jbpm.addons.event.emitters.elasticsearch.url - location of the ElasticSearch server, defaults to http://localhost:9200
-
jbpm.addons.event.emitters.elasticsearch.date_format - date format to be used for dates defaults to yyyy-MM-dd’T’hh:mm:ss.SSSZ
-
jbpm.addons.event.emitters.elasticsearch.user - optional user name to be used to authenticate in ElasticSearch server
-
jbpm.addons.event.emitters.elasticsearch.password - optional password to be used to authenticate in ElasticSearch server
If the defaults fit your ElasticSearch setup then you don’t need to set any properties in application.properties.
For the default setup we use in this tutorial, user and password need to be set
-
Edit application.properties file (that is located in src/main/resources)
-
Add
jbpm.addons.event.emitters.elasticsearch.user=elasticinto the file -
Add
jbpm.addons.event.emitters.elasticsearch.password=changemeinto the file
Add the same entry into application-dev.properties file
|
Run the application
At this point all development effort is done, the last remaining thing is to pull back the business assets project into the business-application-kjar project
-
Go to business-application-kjar
-
Execute
git remote add origin ssh://wbadmin@localhost:8001/MySpace/business-application-kjar(if not already added) -
Execute
git pull origin master- when prompted enterwbadminas password
Go to business-application-service directory and launch the application
./launch.sh clean install for Linux/Unix
./launch.bat clean install for Windows
5.7.5.4. Results
Once the build and launch is complete you can open your browser http://localhost:8090 to see your business application up and running.
It presents with a welcome screen that is mainly for verification purpose to illustrate that application started successfully.
You can point the browser to http://localhost:8090/rest/server to see the actual Business Automation capability services
By default all REST endpoints (url pattern /rest/*) are secured and require
authentication. Default user that can be used to logon is wbadmin with password wbadmin
|
Next, point the browser to http://localhost:8090/rest/server/containers/business-application-kjar/processes to see business processes available for execution. You should see just one.
Execute business process
You can execute business process via REST api exposed by your business application (in fact by Business Automation capability).
HTTP method: POST
HTTP headers:
-
Accept: application/json
-
Content-Type: application/json
Body:
{
  "name":"wbadmin",
  "age":25
}
{processid} needs to be replaced with actual process id that is returned from the endpoint http://localhost:8090/rest/server/containers/business-application-kjar/processes
| Remember that endpoints are protected so make sure you provide user name and password when making the request. |
Once executed you can verify the integration with ElasticSearch simply by pointing your browser to http://localhost:9200/processes/_search?pretty=true and the result should be as follows
{
  "took" : 1,
  "timed_out" : false,
  "_shards" : {
    "total" : 5,
    "successful" : 5,
    "skipped" : 0,
    "failed" : 0
  },
  "hits" : {
    "total" : 1,
    "max_score" : 1.0,
    "hits" : [
      {
        "_index" : "processes",
        "_type" : "process",
        "_id" : "business-application-service-dev_1",
        "_score" : 1.0,
        "_source" : {
          "compositeId" : "business-application-service-dev_1",
          "id" : 1,
          "processId" : "usertaskprocess",
          "processName" : "usertaskprocess",
          "processVersion" : "1.0",
          "state" : 1,
          "containerId" : "business-application-kjar_1.0-SNAPSHOT",
          "initiator" : "wbadmin",
          "date" : "2018-10-25T02:41:55.205+0200",
          "processInstanceDescription" : "usertaskprocess",
          "correlationKey" : "1",
          "parentId" : -1,
          "variables" : {
            "initiator" : "wbadmin",
            "name" : "wbadmin",
            "age" : 25
          }
        }
      }
    ]
  }
}
and to see user tasks stored in ElasticSearch point your browser to http://localhost:9200/tasks/_search?pretty=true
{
  "took" : 1,
  "timed_out" : false,
  "_shards" : {
    "total" : 5,
    "successful" : 5,
    "skipped" : 0,
    "failed" : 0
  },
  "hits" : {
    "total" : 1,
    "max_score" : 1.0,
    "hits" : [
      {
        "_index" : "tasks",
        "_type" : "task",
        "_id" : "business-application-service-dev_1",
        "_score" : 1.0,
        "_source" : {
          "compositeId" : "business-application-service-dev_1",
          "id" : 1,
          "priority" : 8,
          "name" : "Complete me",
          "subject" : "TaskSubject",
          "description" : "Here is a task for wbadmin",
          "taskType" : null,
          "formName" : "CompleteMe",
          "status" : "Reserved",
          "actualOwner" : "wbadmin",
          "createdBy" : "wbadmin",
          "createdOn" : "2018-10-25T02:41:54.942+0200",
          "activationTime" : "2018-10-25T02:41:54.942+0200",
          "expirationDate" : null,
          "skipable" : false,
          "workItemId" : 1,
          "processInstanceId" : 1,
          "parentId" : -1,
          "processId" : "usertaskprocess",
          "containerId" : "business-application-kjar_1.0-SNAPSHOT",
          "potentialOwners" : [
            "wbadmin"
          ],
          "excludedOwners" : [ ],
          "businessAdmins" : [
            "Administrator",
            "Administrators"
          ],
          "inputData" : {
            "Comment" : "TaskSubject",
            "Description" : "Here is a task for wbadmin",
            "TaskName" : "CompleteMe",
            "NodeName" : "Complete me",
            "Priority" : "8",
            "name" : "wbadmin",
            "Skippable" : "false",
            "ActorId" : "wbadmin",
            "age" : 25
          },
          "outputData" : null
        }
      }
    ]
  }
}
When you complete a task or abort a process instance data in ElasticSearch will be immediately updated.
{
  "took" : 1,
  "timed_out" : false,
  "_shards" : {
    "total" : 5,
    "successful" : 5,
    "skipped" : 0,
    "failed" : 0
  },
  "hits" : {
    "total" : 1,
    "max_score" : 1.0,
    "hits" : [
      {
        "_index" : "processes",
        "_type" : "process",
        "_id" : "business-application-service-dev_2",
        "_score" : 1.0,
        "_source" : {
          "compositeId" : "business-application-service-dev_2",
          "id" : 2,
          "processId" : "usertaskprocess",
          "processName" : "usertaskprocess",
          "processVersion" : "1.0",
          "state" : 3,
          "containerId" : "business-application-kjar_1.0-SNAPSHOT",
          "initiator" : "wbadmin",
          "date" : "2018-10-25T03:01:02.557+0200",
          "processInstanceDescription" : "usertaskprocess",
          "correlationKey" : "2",
          "parentId" : -1,
          "variables" : {
            "initiator" : "wbadmin",
            "name" : "bartek",
            "age" : 5
          }
        }
      }
    ]
  }
}
5.7.5.5. Summary
Congratulations! you have integrated your business application with ElasticSearch. Now you can take advantage of all the good things ElasticSearch provides you with such as full text search by process variables, task assignees, case participants and more.
5.7.5.6. Source code of the tutorial
Here is the complete source code of the tutorial.
5.7.6. Business Application with JMS
5.7.6.1. What will you do
You will build business application that uses JMS to send information between your business processes. It combines process logic and messaging to provide comprehensive solution to common problems such as - how to notify other participants of particular event.
5.7.6.2. What do you need
-
About 20 minutes of your time
-
Java (JDK) 8 or later
-
Maven 3.5.x
-
IDE of your choice
-
Access to the Internet
-
Business Central deployed - see single distribution for instructions
5.7.6.3. What should I do
Install Apache Artemis
Download and unzip Apache Artemis distribution.
Refer to the location where you unzip it as ${ARTEMIS_HOME}.
Once downloaded, navigate to the location where you want to store your broker data and create new broker
${ARTEMIS_HOME}/bin/artemis create business-app-brokerYou will be prompted for some required information during creation, that should look like this
Creating ActiveMQ Artemis instance at: /.../business-app-broker

--user: is a mandatory property!
Please provide the default username:
admin

--password: is mandatory with this configuration:
Please provide the default password:


--allow-anonymous | --require-login: is a mandatory property!
Allow anonymous access?, valid values are Y,N,True,False
Y
Next, start the broker instance, go to business-app-broker/bin and issue following command
./artemis runOpen your browser at http://localhost:8161/console to logon to management console of Apache Artemis with user name and password provided at the time you created the broker.
| For more detailed instruction on how to configure Apache Artemis visit its website |
Last step in configuring JMS service is to create a queue (or an address as it’s called in Apache Artemis).
Once logged into Management Console
-
Go to Artemis in the menu
-
Expand the tree view and click
addresses -
On right hand side click
Create -
Create new address with name
ExternalSignalQueue -
Select
Anycast
All steps are done for installing and configuring Apache Artemis for this tutorial.
Build business application
To get started with business applications the easiest way is to generate it.
Go to start.jbpm.org and click button
Generate default business application.
This will generate and download a business-application.zip file that will consists of
three projects
-
business-application-model
-
business-application-kjar
-
business-application-service
Unzip the business-application.zip file into desired location and go into
business-application-service directory. There you will find launch scripts
(for both linux/unix and windows).
Start Business Central (if not already started) and open your browser at
http://localhost:8080/business-central and logon as
user wbadmin with password wbadmin
Import your business assets project into Business Central
if not already imported proceed with points below to import business asset project
-
Go into business assets project -
business-application-kjar -
Execute
git init -
Execute
git add -A -
Execute
git commit -m "my business assets project" -
Log in to Business Central and go to projects
-
Select import project and enter the following URL
file:///{path to your business application}/business-application-kjar -
Click import and confirm project to be imported
Create Business Processes
In browser where you logged into Business Central go to Projects. You will see your newly imported project named business-application-kjar, go into that project.
-
go into business-application-kjar project
-
click
Add assetbutton -
select Business Process asset
-
provide name for this asset (
throwsignalprocess) -
create your business process
Sample business process should be a single script task and end signal event. Signal event
should use external scope and define a signal IamDone
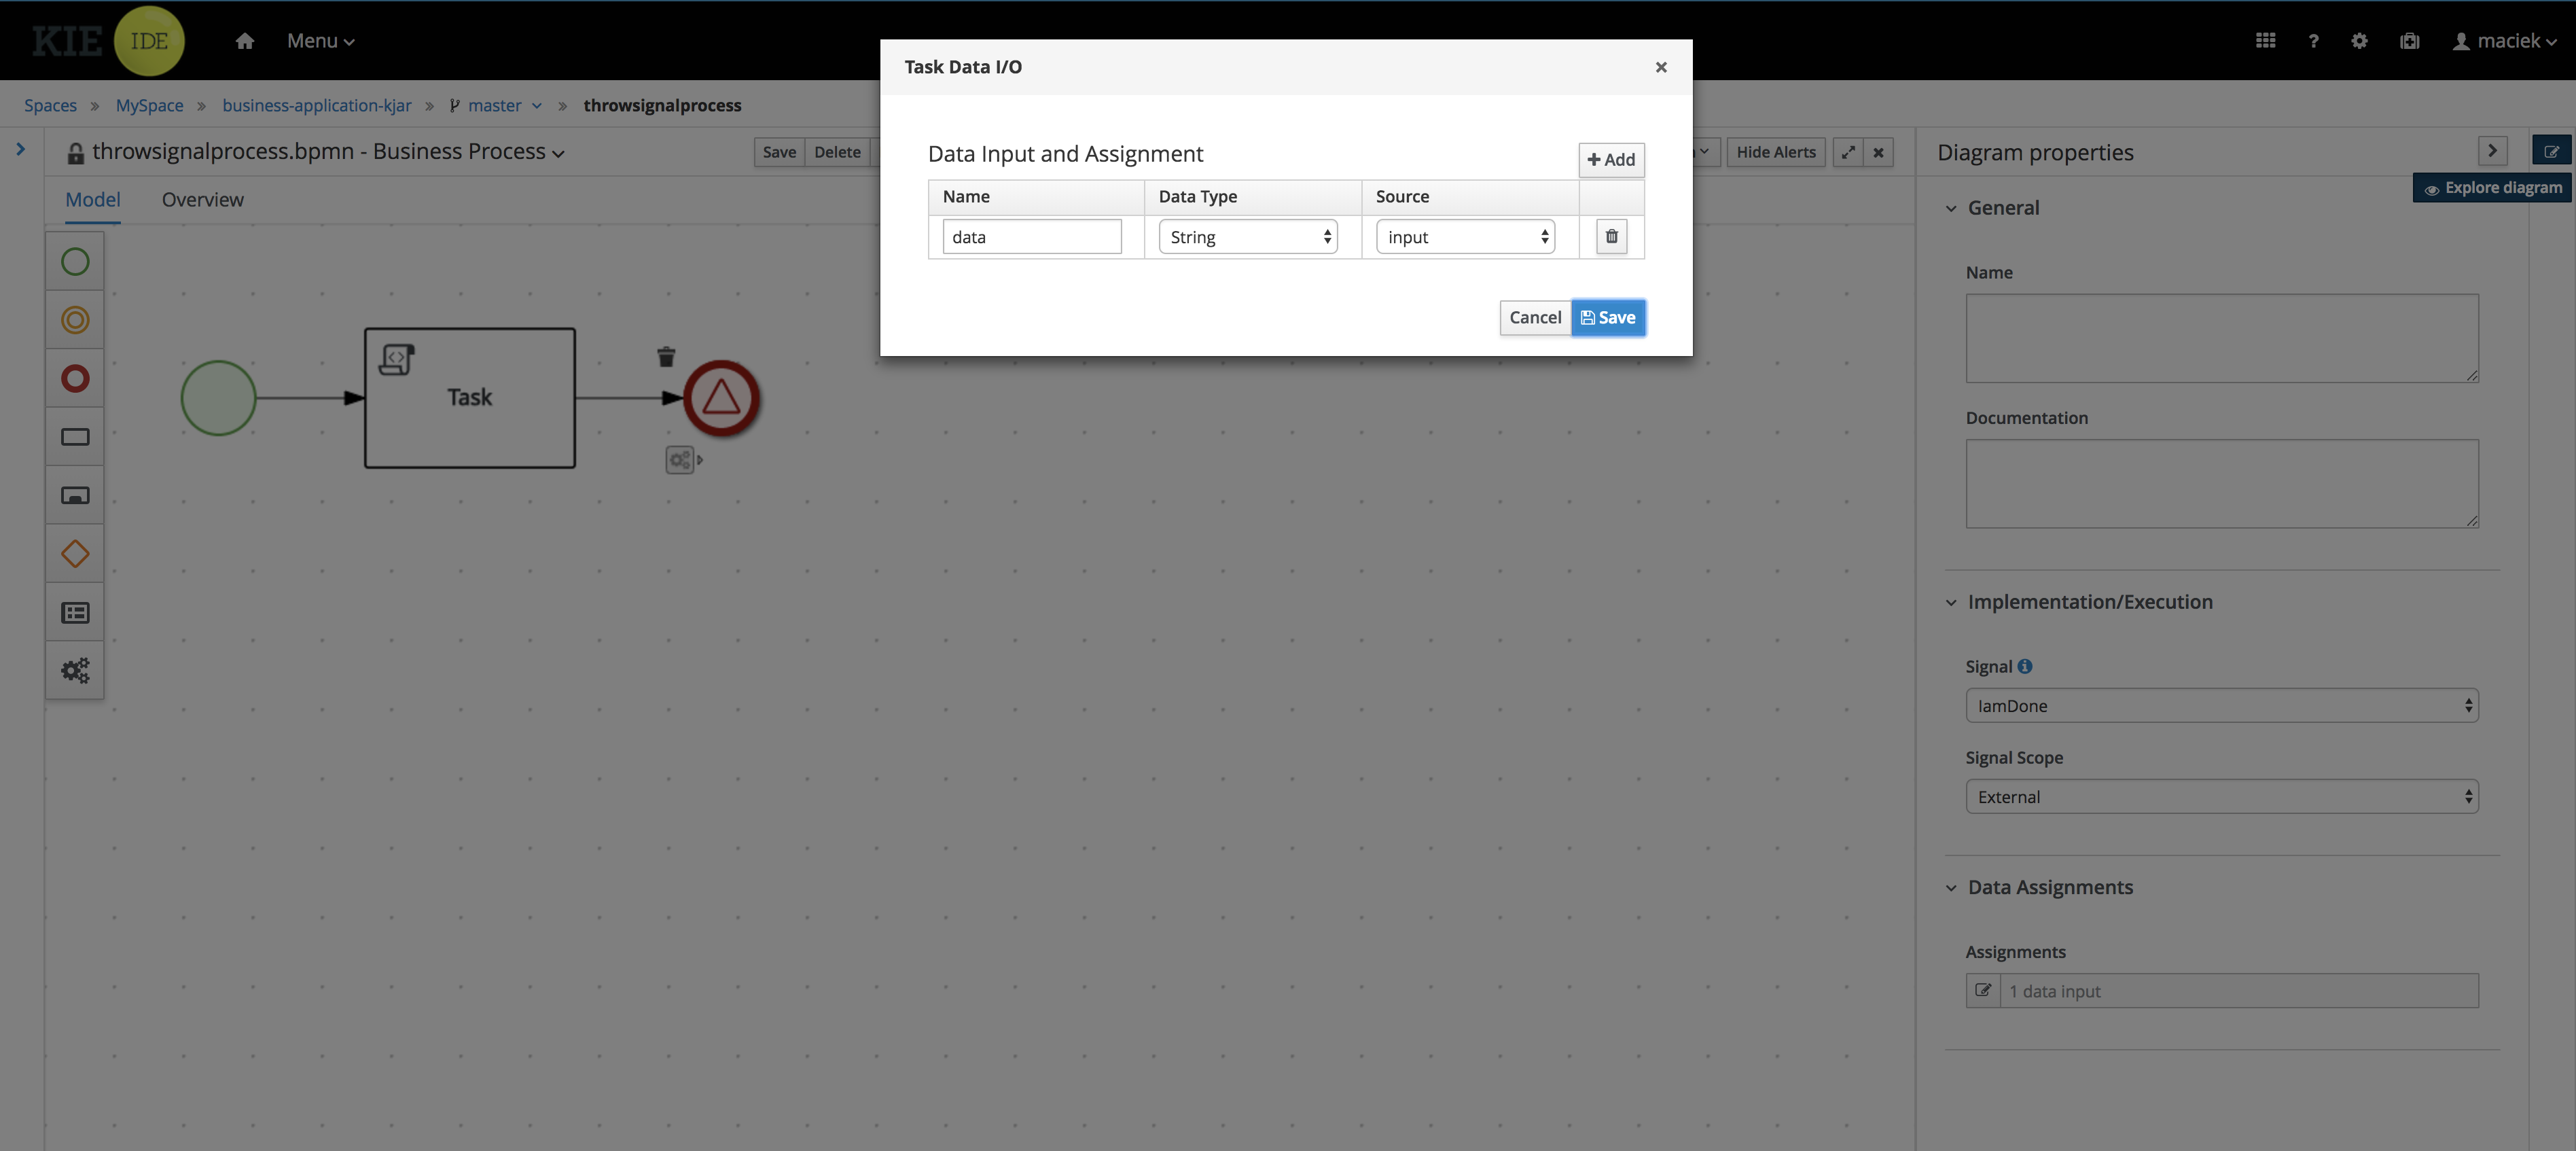
Process should define single process variable input that is then mapped as data output of the end event.
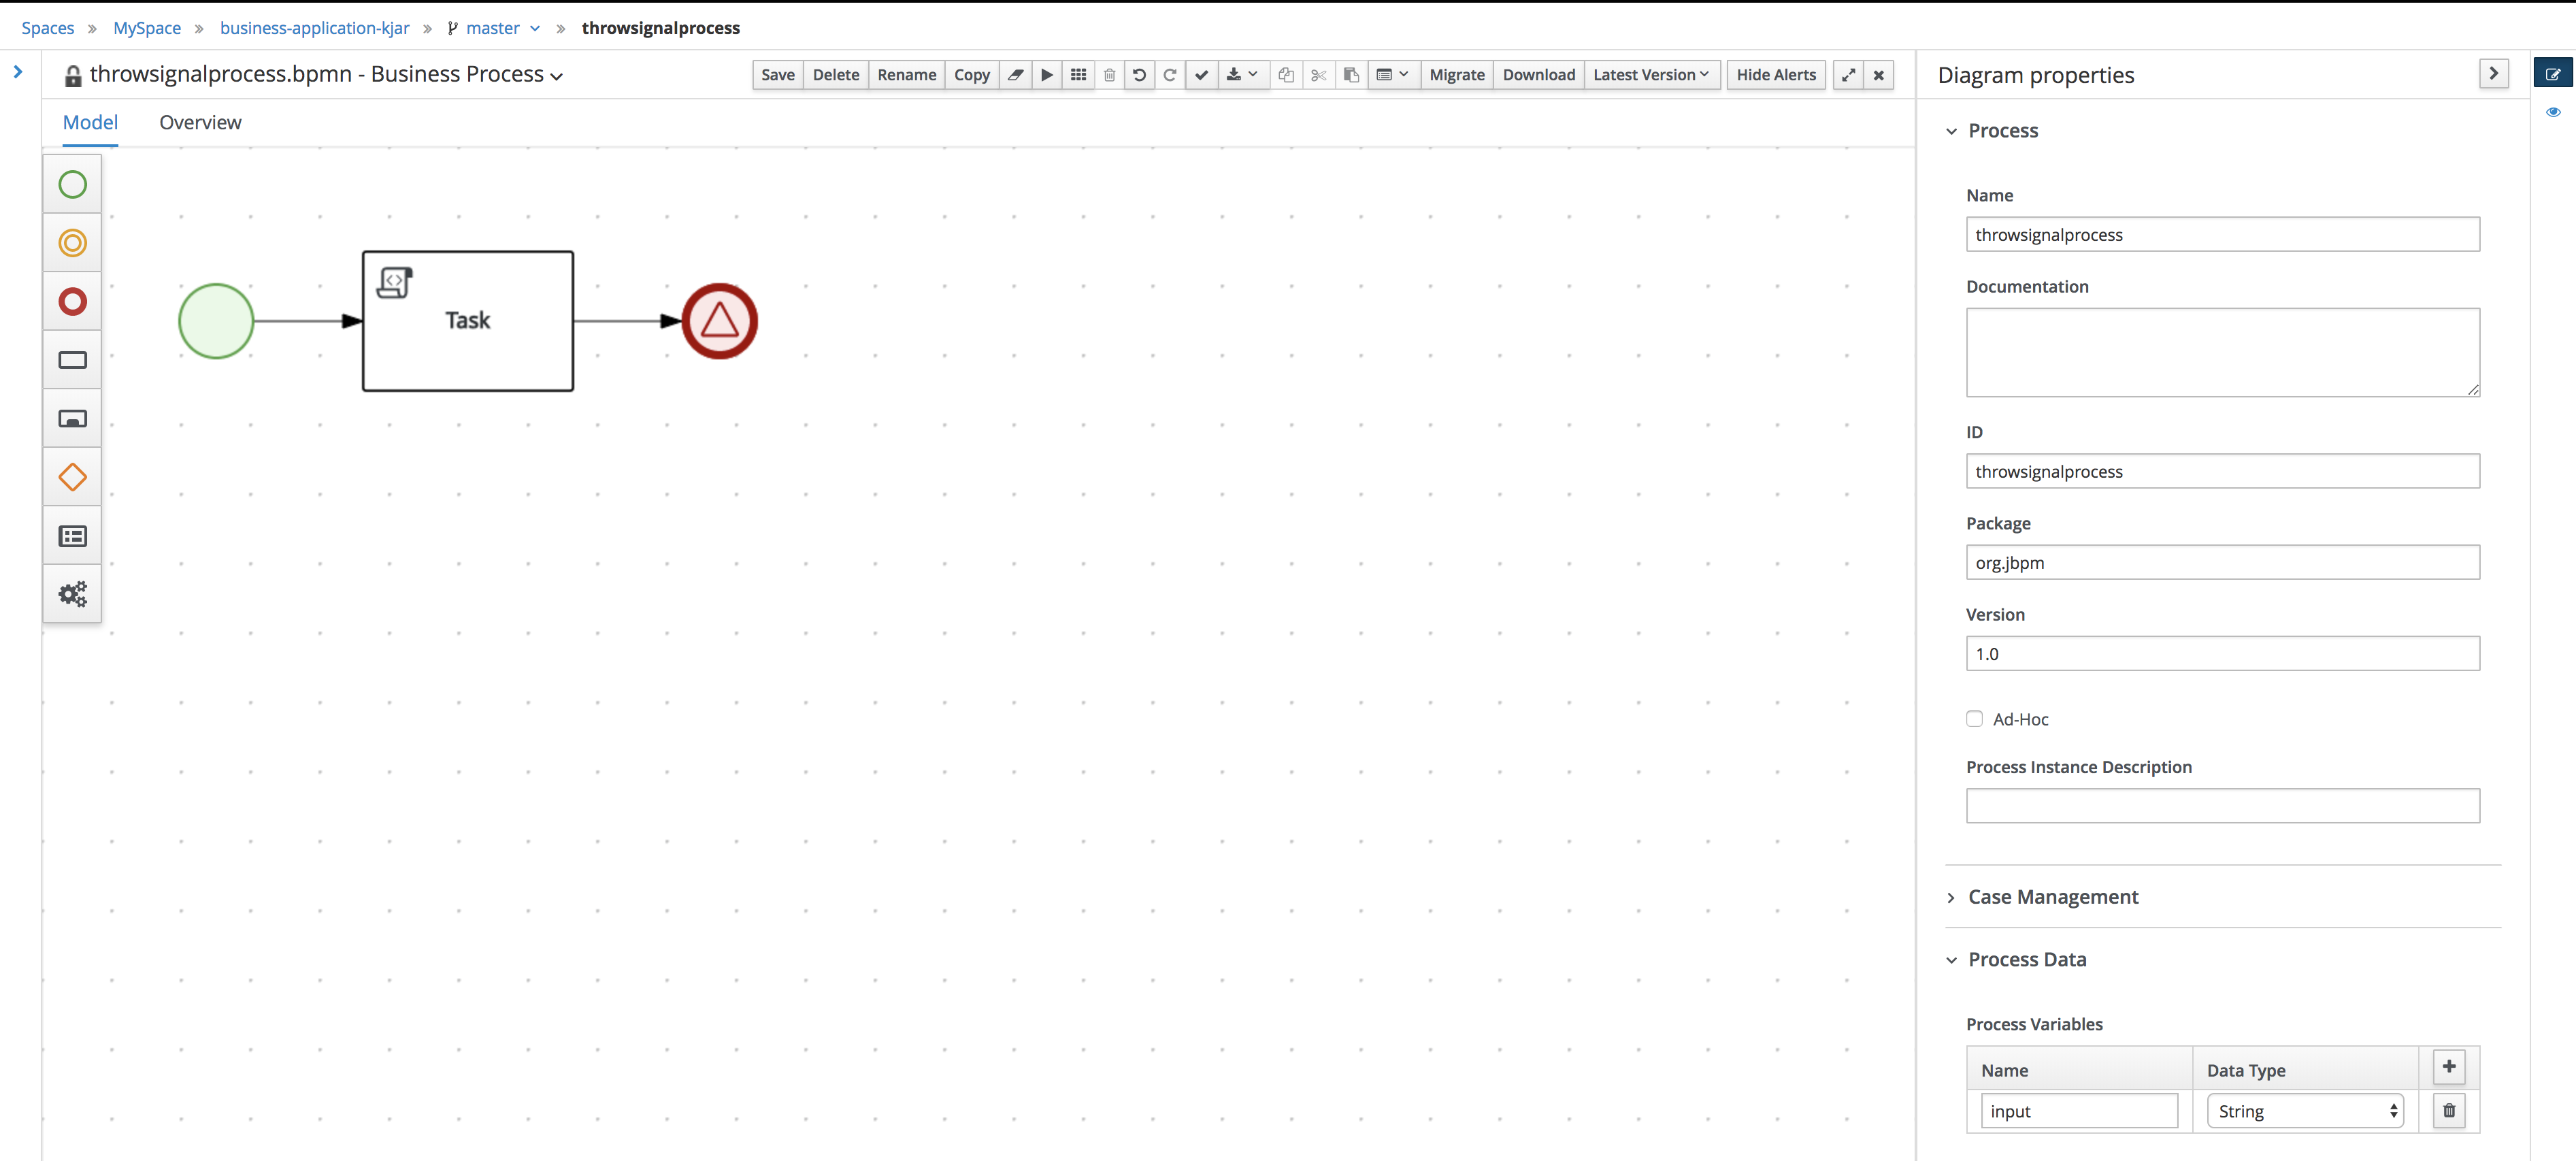
Next create another business process that will receive that signal.
-
go into business-application-kjar project
-
click
Add assetbutton -
select Business Process asset
-
provide name for this asset (
catchsignalprocess) -
create your business process
Sample business process should be a signal catch event and single user task assigned to wbadmin.
The catch signal event should use the signal same as throwing one and that is IamDone
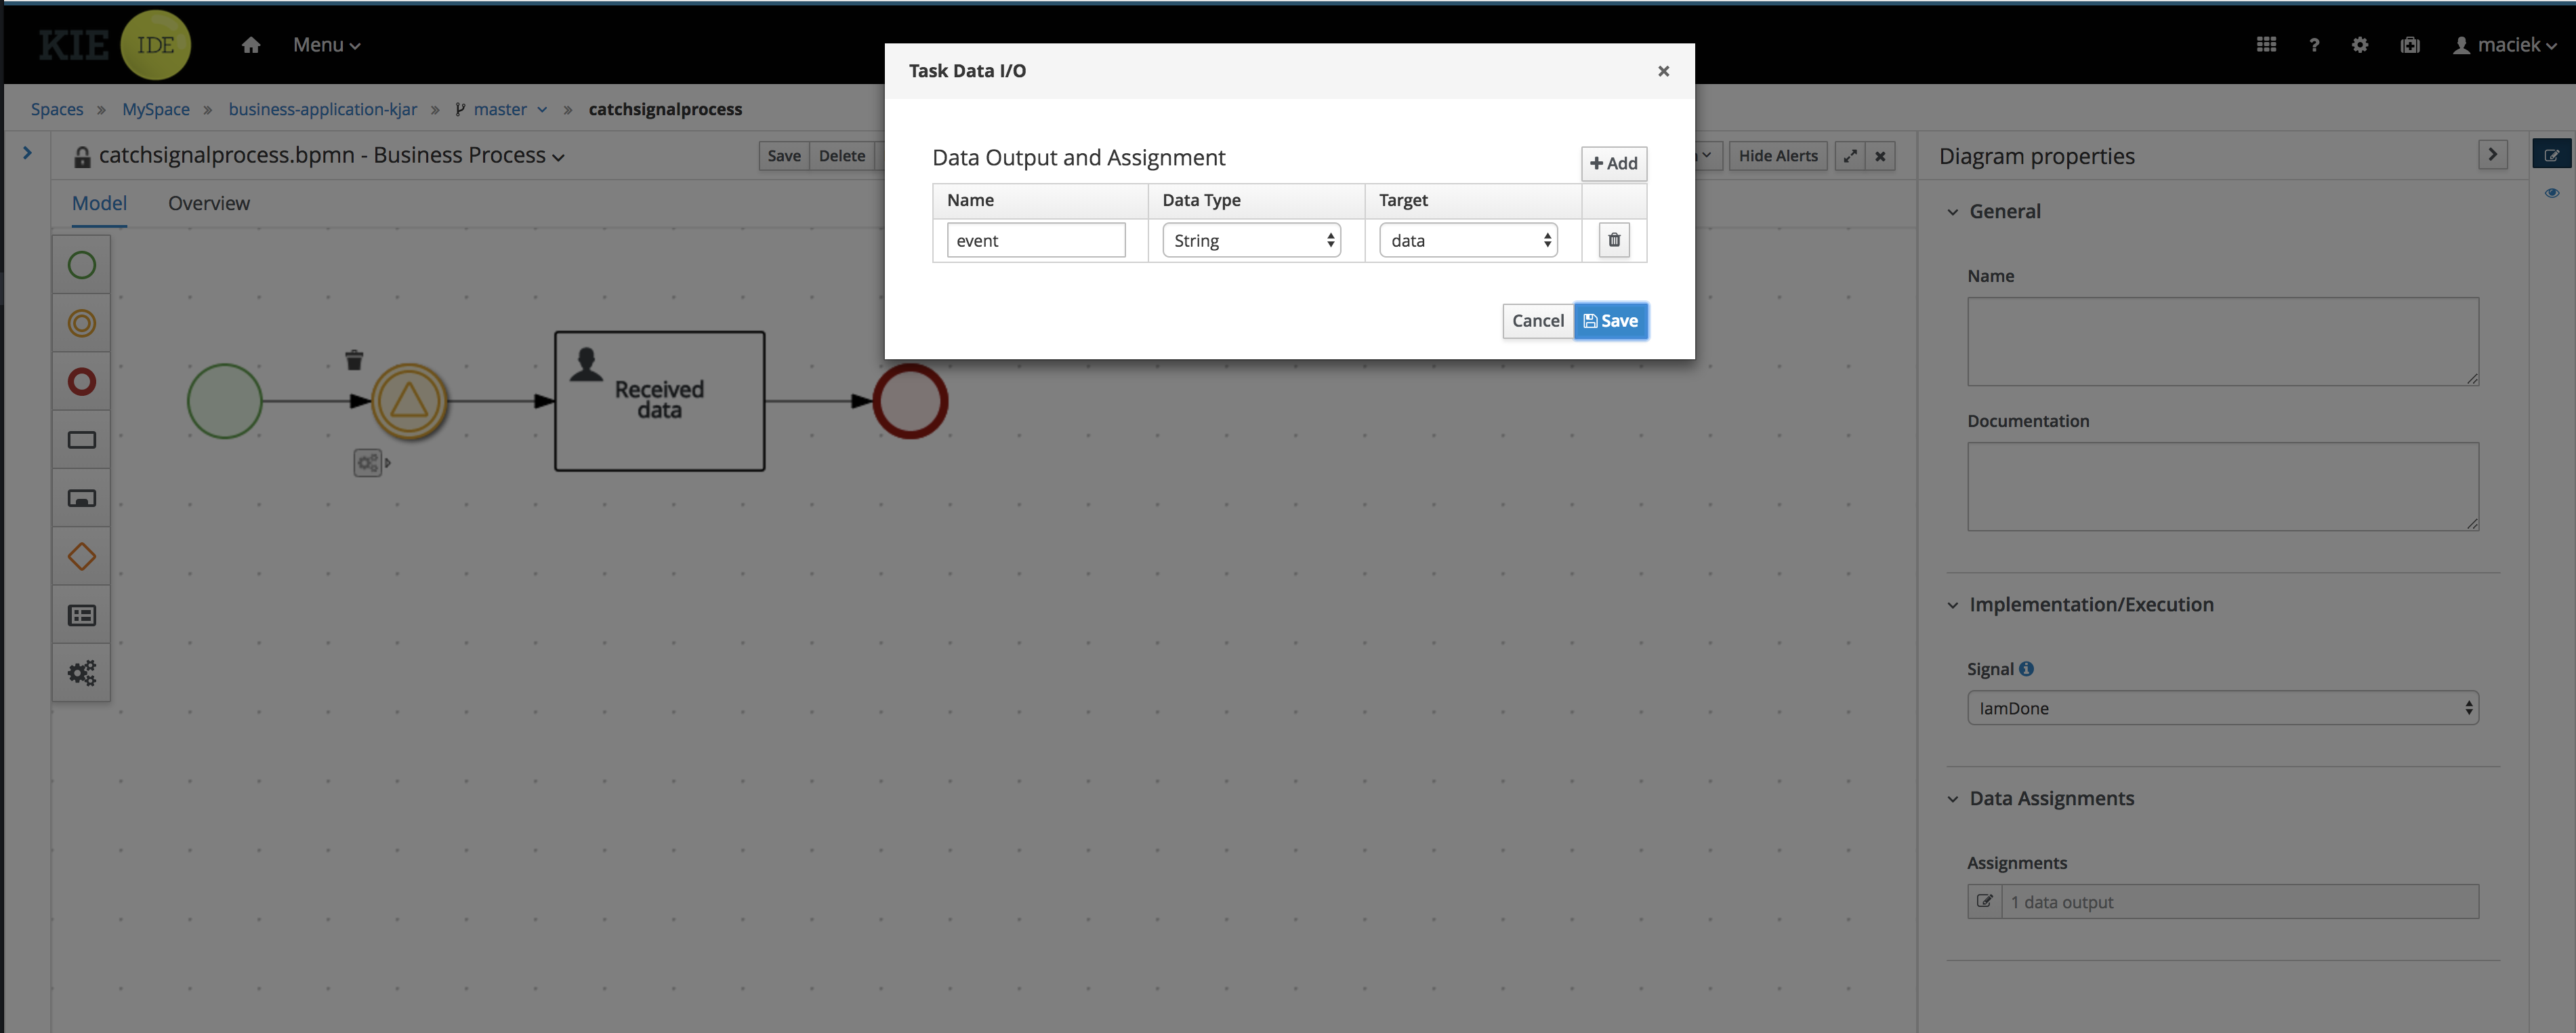
Process should define single process variable data that is then mapped as data input of the catch event.
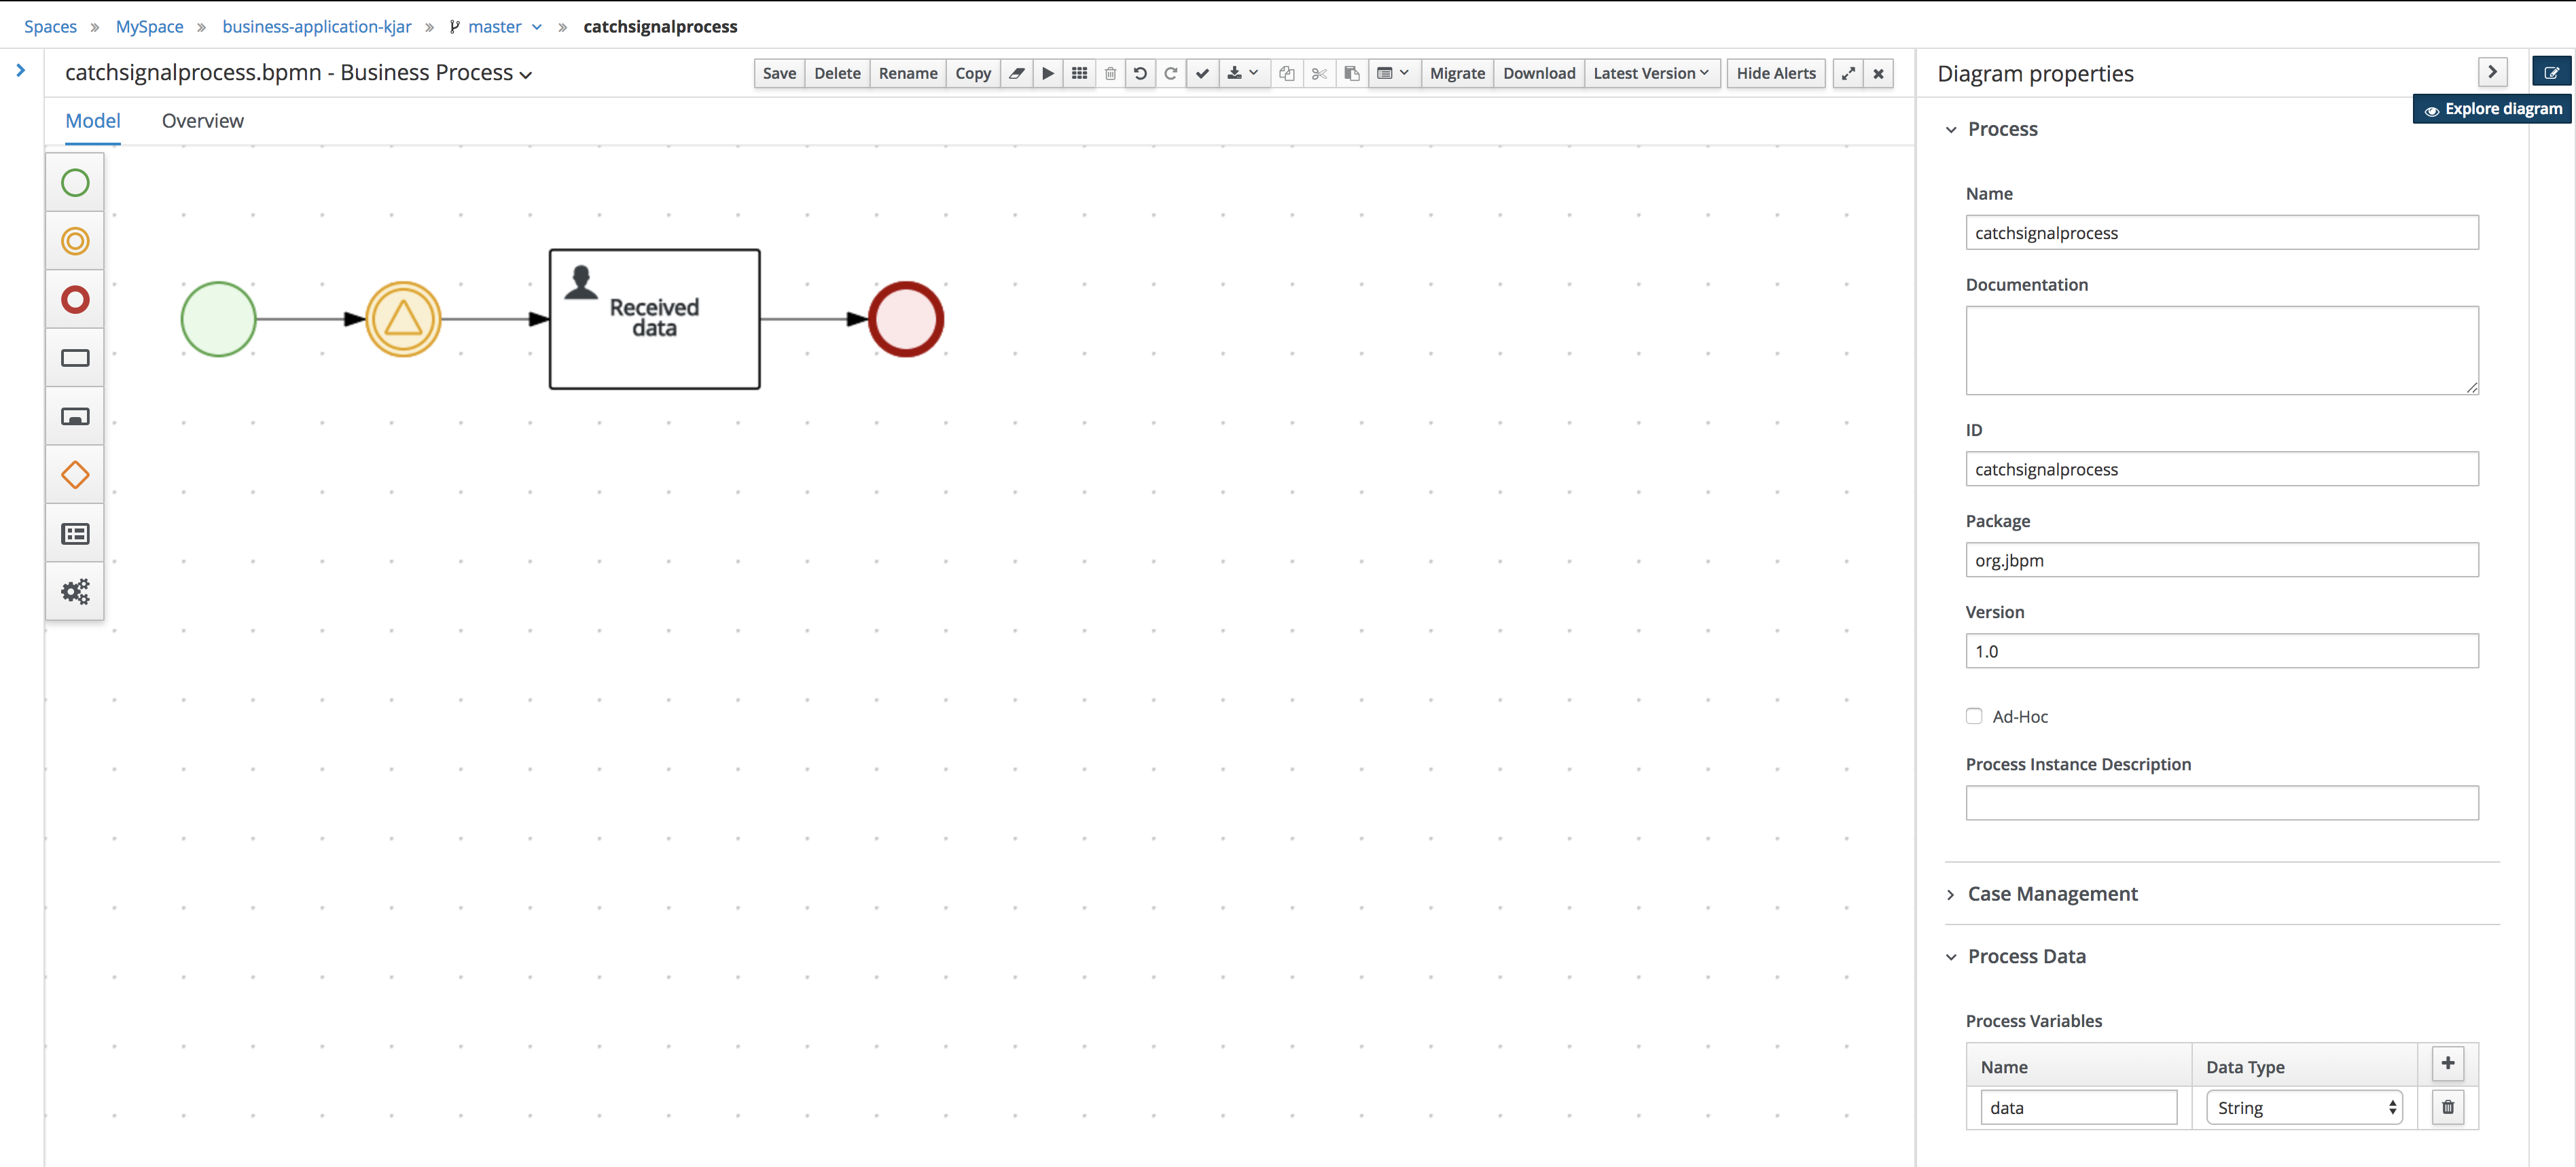
Configure service project to use the Apache Artemis
-
Import business-application-service project into IDE of your choice
-
Add dependency to the spring-boot-starter-artemis in your service pom.xml
<dependency>
  <groupId>org.springframework.boot</groupId>
  <artifactId>spring-boot-starter-artemis</artifactId>
</dependency>-
Add dependency to the jbpm-workitems-jms in your service pom.xml
<dependency>
  <groupId>org.jbpm</groupId>
  <artifactId>jbpm-workitems-jms</artifactId>
  <version>${version.org.kie}</version>
</dependency>
There are several configuration parameters that define how business application will connect to Apache Artemis
-
Edit application.properties file (that is located in src/main/resources)
spring.artemis.mode=native
spring.artemis.host=localhost
spring.artemis.port=61616
spring.artemis.user=admin
spring.artemis.password=admin| Use the user credentials you provided when creating the broker in the configuration |
Add the same entry into application-dev.properties file
|
Develop JMS components of your Business Application
First of all, you need to enable jms on the service level.
-
Open Application class (located in src/main/java/com/company/service directory)
-
Add
@EnableJmson the class level (next to @SpringBootApplication)
Then create a new class that will be responsible for sending signals over JMS. This will
be really small extension to out of the box JMS work item handler.
ConfiguredJMSSendTaskWorkItemHandler needs to extend org.jbpm.process.workitem.jms.JMSSendTaskWorkItemHandler
and this is where the most of the logic comes from.
This class needs to autowire
-
ConnectionFactory - used to connect to Apache Artemis
-
JmsTemplate - used to send messages
Overload executeWorkItem method to take advantage of JmsTemplate instead of direct JMS API.
Last but not least, annotate the class with @Component annotation so it will be automatically registered as
work item handler. Below is the complete source code of the handler implementation.
package com.company.service.jms;

import javax.jms.ConnectionFactory;

import org.jbpm.process.workitem.jms.JMSSendTaskWorkItemHandler;
import org.kie.api.runtime.process.WorkItem;
import org.kie.api.runtime.process.WorkItemManager;
import org.springframework.jms.core.JmsTemplate;
import org.springframework.stereotype.Component;

@Component("External Send Task")
public class ConfiguredJMSSendTaskWorkItemHandler extends JMSSendTaskWorkItemHandler {

    private JmsTemplate jmsTemplate;

    public ConfiguredJMSSendTaskWorkItemHandler(ConnectionFactory connectionFactory, JmsTemplate jmsTemplate) {
        super(connectionFactory, null);
        this.jmsTemplate = jmsTemplate;
    }

    @Override
    public void executeWorkItem(WorkItem workItem, WorkItemManager manager) {
        try {
            jmsTemplate.send("ExternalSignalQueue", (session) -> createMessage(workItem, session));
            manager.completeWorkItem(workItem.getId(), null);
        } catch (Exception e) {
            handleException(e);
        }
    }
}
Last development activity is to create the message receiver. This is even easier than sender
as there is out of the box receiver from jBPM - org.jbpm.process.workitem.jms.JMSSignalReceiver
package com.company.service.jms;

import javax.jms.BytesMessage;

import org.jbpm.process.workitem.jms.JMSSignalReceiver;
import org.springframework.jms.annotation.JmsListener;
import org.springframework.stereotype.Component;

@Component
public class ReceiveJMSEvents extends JMSSignalReceiver {

    @JmsListener(destination = "ExternalSignalQueue")
    public void processMessage(BytesMessage content) {
        super.onMessage(content);
    }

}
And that’s it, you’re all set to communicate between business processes via JMS.
Run the application
At this point all development effort is done, the last remaining thing is to pull back the business assets project into the business-application-kjar project
-
Go to business-application-kjar
-
Execute
git remote add origin ssh://wbadmin@localhost:8001/MySpace/business-application-kjar(if not already added) -
Execute
git pull origin master- when prompted enterwbadminas password
Go to business-application-service directory and launch the application
./launch.sh clean install for Linux/Unix
./launch.bat clean install for Windows
5.7.6.4. Results
Once the build and launch is complete you can open your browser http://localhost:8090 to see your business application up and running.
It presents with a welcome screen that is mainly for verification purpose to illustrate that application started successfully.
You can point the browser to http://localhost:8090/rest/server to see the actual Business Automation capability services
By default all REST endpoints (url pattern /rest/*) are secured and require
authentication. Default user that can be used to logon is wbadmin with password wbadmin
|
Next, point the browser to http://localhost:8090/rest/server/containers/business-application-kjar/processes to see business processes available for execution. You should see two processes:
-
catchsignalprocess
-
throwsignalprocess
Execute business process
You can execute business process via REST api exposed by your business application (in fact by Business Automation capability).
First start process instance that will wait for a signal
HTTP method: POST
HTTP headers:
-
Accept: application/json
-
Content-Type: application/json
And then start process instance that will throw (send) signal via JMS
HTTP method: POST
HTTP headers:
-
Accept: application/json
-
Content-Type: application/json
Body:
{
  "input":"hello"
}| Remember that endpoints are protected so make sure you provide user name and password when making the request. |
Verify that there is a user task assigned to wbadmin user with information coming from second process instance - hello
Execute business process from Business Central UI
Stop the application if it’s running.
Go to business-application-service directory and launch the application in development mode
./launch-dev.sh clean install for Linux/Unix
./launch-dev.bat clean install for Windows
this will connect your business application to Business Central so can be administered from within its UI.
Go to Business Central in the browser and navigate to servers (from the home screen).
Let’s deploy the business-application-kjar to our running application.
-
Go to projects from home screen of Business Central
-
Go into business-application-kjar project
-
Click
Deploybutton -
Make sure that
Server configurationis set tobusiness-application-service-devand click ok
The project should be successfully deployed and you can examine that state by going back to servers from home screen.
Next, go to process definitions (in Manage section of the Home screen) and select server configuration
(top right corner) - again it should be business-application-service-dev the list of available
process definition will be loaded and you should see your single process definitions from the project
business-application-kjar.
First start process instance that will wait for a signal (catchsignalprocess),
then start process instance that will throw (send) signal via JMS (throwsignalprocess).
When starting second process specify the input you want to send together with signal.
Go to Task inbox from home screen to see that task is created with input provided on the second process instance.
5.7.6.5. Summary
Congratulations! you have integrated your business application with JMS. Moreover, you made business processes to talk to each other (over signals). This allows you to build more advanced interactions based on your business logic.
5.7.6.6. Source code of the tutorial
Here is the complete source code of the tutorial.
5.7.7. Business Application with Dynamic Assets
5.7.7.1. What will you do
You will enhance your business application with some dynamic assets that allow more adaptive approach to business logic compared with structured business processes.
Next execute these dynamic assets
-
via REST api of your business application
-
via jBPM Case Management showcase
5.7.7.2. What do you need
-
About 15 minutes of your time
-
Java (JDK) 8 or later
-
Maven 3.5.x
-
Access to the Internet
-
Business Central deployed - see single distribution for instructions
5.7.7.3. What should I do
To get started with business applications the easiest way is to generate it.
Go to start.jbpm.org and click button
Configure your business application.
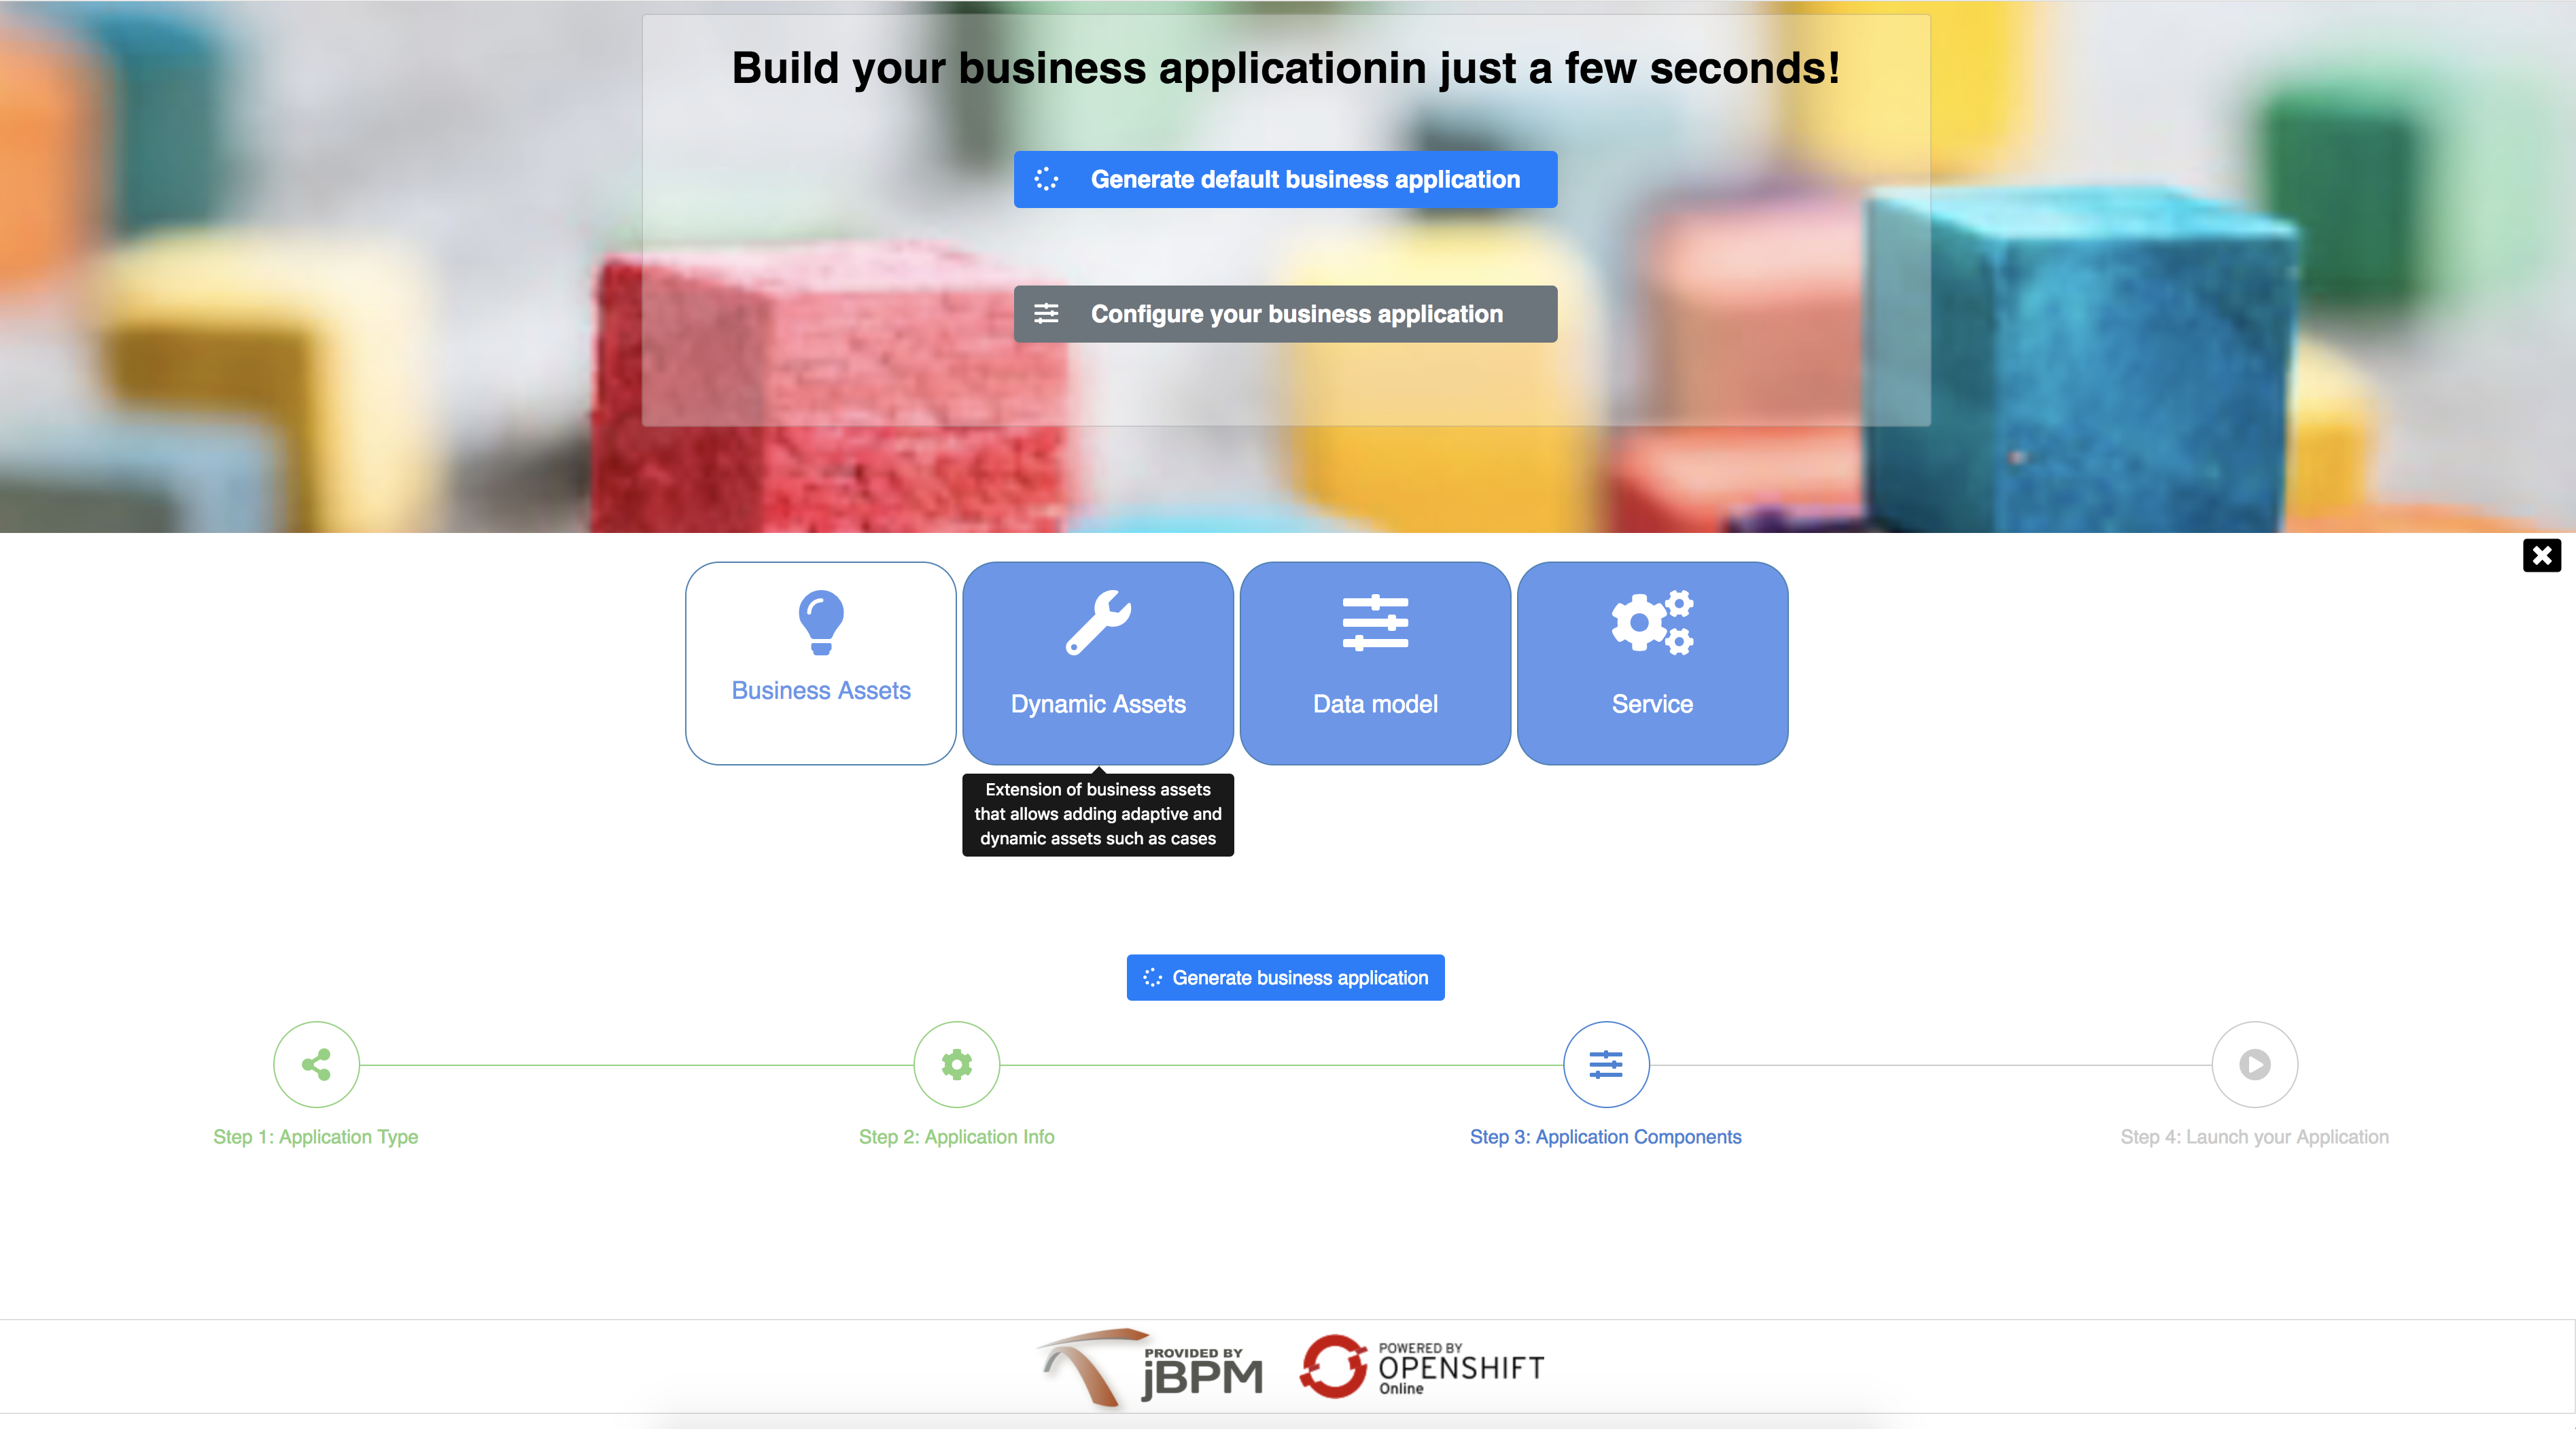
-
First step: Select
Business Automation(selected by default) -
Second step: Provide details for your business application
-
Third step: Select
Dynamic Assets,Data ModelandServiceprojects -
Click
Generate business applicationbutton
Start Business Central (if not already started) and open your browser at
http://localhost:8080/business-central and logon as
user wbadmin with password wbadmin
Import your business assets project into Business Central
-
Go into business assets project -
business-application-kjar -
Execute
git init -
Execute
git add -A -
Execute
git commit -m "my business assets project" -
Log in to Business Central and go to projects
-
Select import project and enter the following URL
file:///{path to your business application}/business-application-kjar -
Click import and confirm project to be imported
Create Dynamic Asset - Case definition
In browser where you logged into Business Central go to Projects. You will see your newly imported project named business-application-kjar.
-
go into business-application-kjar project
-
click
Add assetbutton -
select
Case definitionasset -
provide name for this asset e.g.
myfirstcase -
optionally you can provide prefix for case ids - if not given it will default to CASE-XXX where XXX is generated number
-
create your case definition
| Case definition is designed in the so-called legacy process designer. |
You can now create your dynamic case definition that does not have to have connected process activities.
Sample case definition could be a two user tasks that will be assigned to user wbadmin and not connected to anything else.
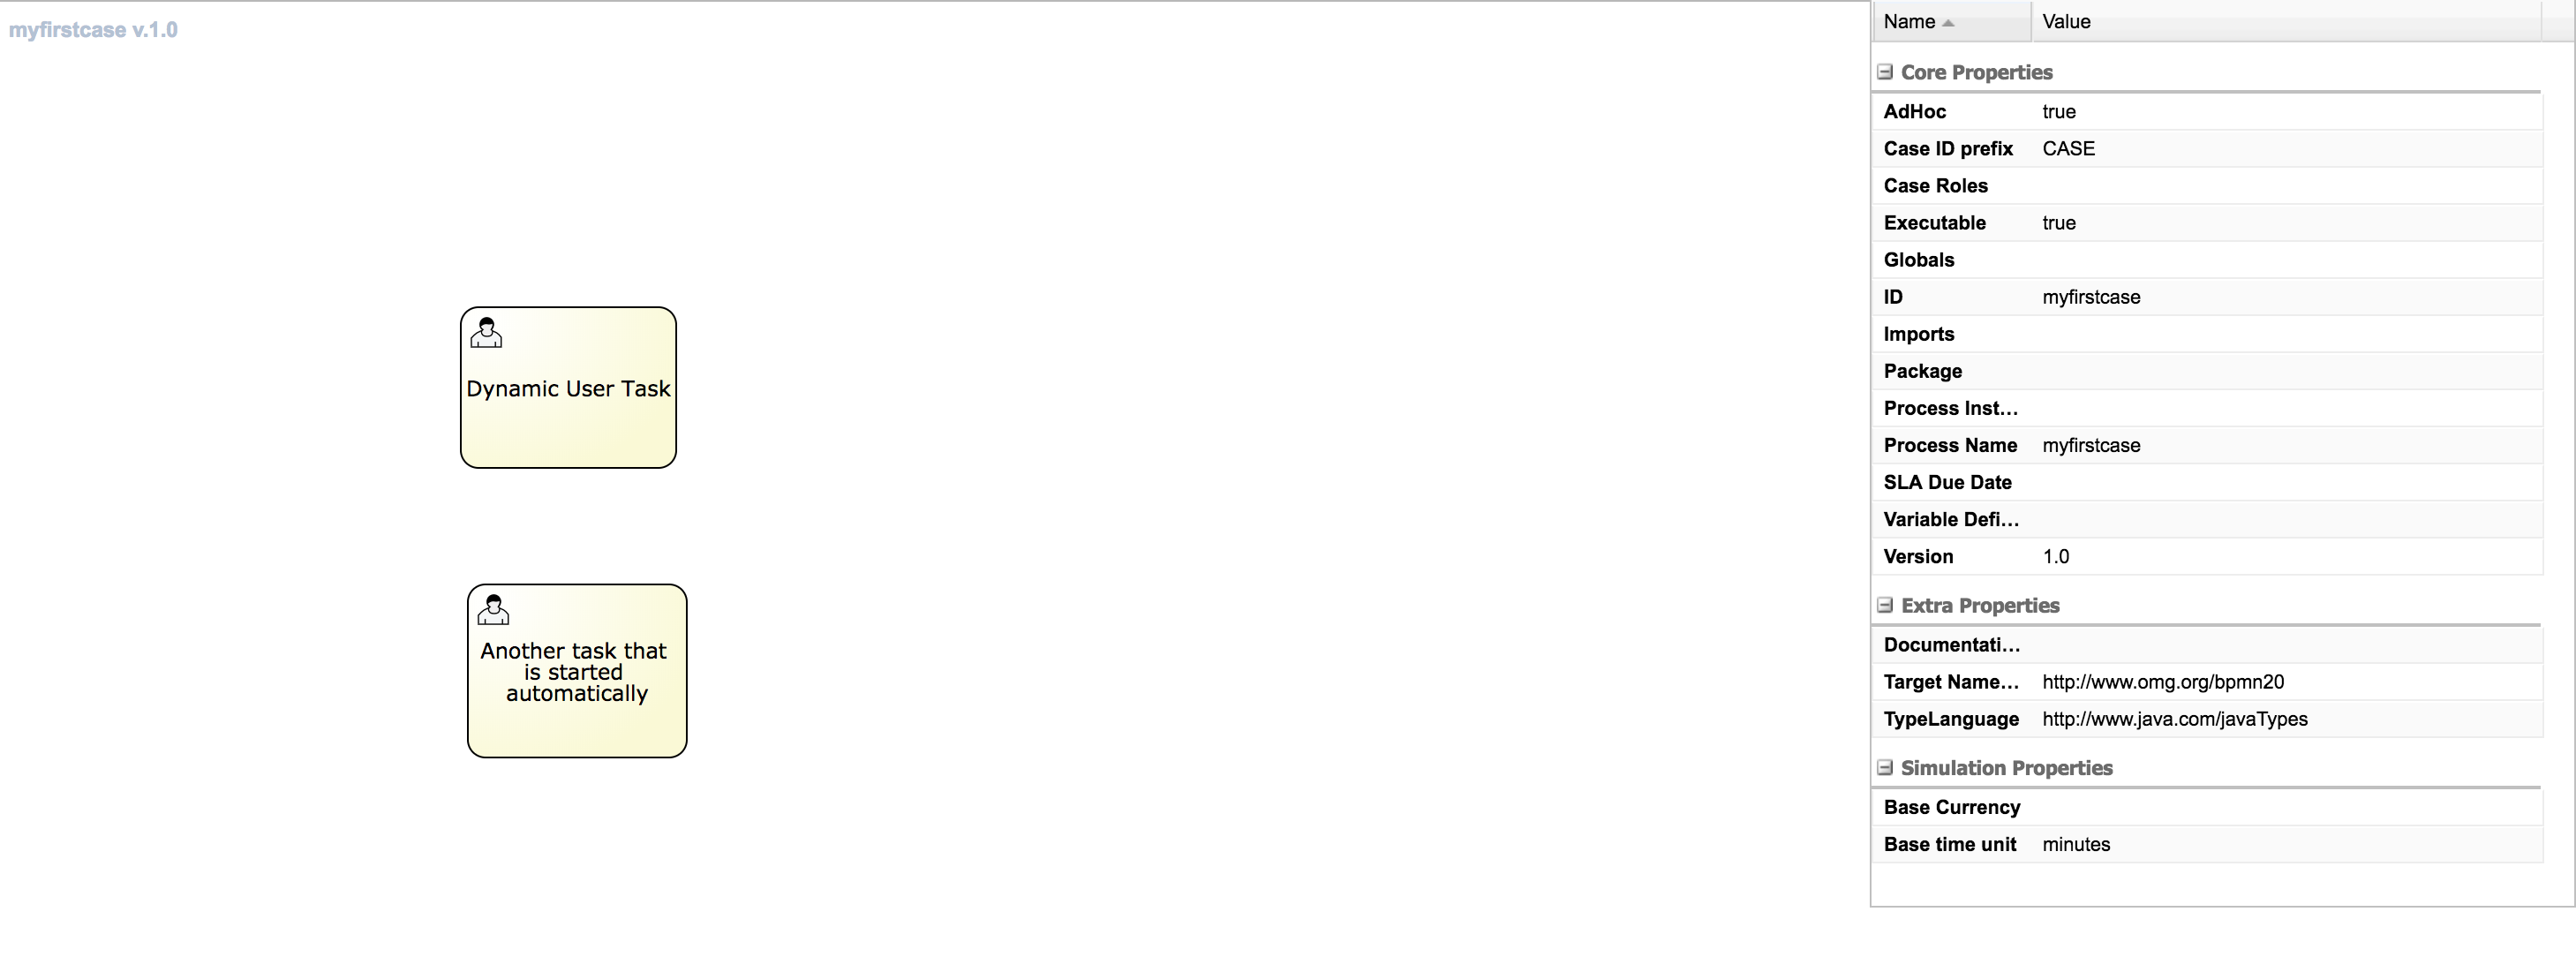
This sample case definition consists of two user tasks
-
Dynamic User Task -
Another task that is started automatically
Both of them are assigned to wbadmin user although only one (second) will be created automatically
when case instance is created. This is because it is marked as autostart and thus will be directly created.
The first one can be dynamically created on ad hoc basis.
Pull back your business assets to business application source code
-
Go to business-application-kjar
-
Execute
git remote add origin ssh://wbadmin@localhost:8001/MySpace/business-application-kjar -
Execute
git pull origin master- when prompted enterwbadminas password
Go to business-application-service directory and launch the application
./launch.sh clean install for Linux/Unix
./launch.bat clean install for Windows
5.7.7.4. Results
Once the build and launch is complete you can open your browser http://localhost:8090
Next, point the browser to http://localhost:8090/rest/server/containers to see that your business assets project has been properly deployed and is running.
By default all REST endpoints (url pattern /rest/*) are secured and require
authentication. Default user that can be used to logon is wbadmin with password wbadmin
|
Next, point the browser to http://localhost:8090/rest/server/containers/business-application-kjar/cases/definitions to see dynamic assets (cases) available for execution.
Execute business process
You can execute business process via REST api exposed by your business application (in fact by Business Automation capability).
URL: http://localhost:8090/rest/server/containers/business-application-kjar/cases/{casedefid}/instances
HTTP method: POST
HTTP headers can be set to change the format of data returned
-
Accept: application/json for JSON format
-
Accept: application/xml for XML (JAXB based) format
-
X-KIE-ContentType: XSTREAM for XML (XStream based) format
{casedefid} needs to be replaced with actual case definition id that is returned from the endpoint http://localhost:8090/rest/server/containers/business-application-kjar/cases/definitions
| Remember that endpoints are protected so make sure you provide user name and password when making the request. |
In response to this request, a case instance id should be returned.
<string-type>
    <value>CASE-0000000001</value>
</string-type>
You can examine details of that case instance by pointing your browser to http://localhost:8090/rest/server/containers/business-application-kjar/cases/instances/CASE-0000000001
<?xml version="1.0" encoding="UTF-8" standalone="yes"?>
<case-instance>
    <case-id>CASE-0000000001</case-id>
    <case-description>myfirstcase</case-description>
    <case-owner>wbadmin</case-owner>
    <case-status>1</case-status>
    <case-definition-id>myfirstcase</case-definition-id>
    <container-id>business-application-kjar-1_0-SNAPSHOT</container-id>
    <case-started-at>2018-10-30T09:54:45.747+01:00</case-started-at>
    <case-completion-msg></case-completion-msg>
    <case-sla-compliance>0</case-sla-compliance>
</case-instance>
Load tasks for given case instance that are assigned to wbadmin user
http://localhost:8090/rest/server/queries/cases/instances/CASE-0000000001/tasks/instances/pot-owners
you should see second task from case definition
<?xml version="1.0" encoding="UTF-8" standalone="yes"?>
<task-summary-list>
    <task-summary>
        <task-id>1</task-id>
        <task-name>Another task that is started automatically</task-name>
        <task-subject></task-subject>
        <task-description></task-description>
        <task-status>Reserved</task-status>
        <task-priority>0</task-priority>
        <task-is-skipable>true</task-is-skipable>
        <task-actual-owner>wbadmin</task-actual-owner>
        <task-created-by>wbadmin</task-created-by>
        <task-created-on>2018-10-30T09:54:45.790+01:00</task-created-on>
        <task-activation-time>2018-10-30T09:54:45.790+01:00</task-activation-time>
        <task-proc-inst-id>1</task-proc-inst-id>
        <task-proc-def-id>myfirstcase</task-proc-def-id>
        <task-container-id>business-application-kjar-1_0-SNAPSHOT</task-container-id>
        <task-parent-id>-1</task-parent-id>
    </task-summary>
</task-summary-list>
You can trigger dynamically the other user task by issuing request to
Optionally you can send data as payload of the request.
Load tasks again for given case instance that are assigned to wbadmin user
http://localhost:8090/rest/server/queries/cases/instances/CASE-0000000001/tasks/instances/pot-owners
you should see both tasks from case definition
<?xml version="1.0" encoding="UTF-8" standalone="yes"?>
<task-summary-list>
    <task-summary>
        <task-id>1</task-id>
        <task-name>Another task that is started automatically</task-name>
        <task-subject></task-subject>
        <task-description></task-description>
        <task-status>Reserved</task-status>
        <task-priority>0</task-priority>
        <task-is-skipable>true</task-is-skipable>
        <task-actual-owner>wbadmin</task-actual-owner>
        <task-created-by>wbadmin</task-created-by>
        <task-created-on>2018-10-30T09:54:45.790+01:00</task-created-on>
        <task-activation-time>2018-10-30T09:54:45.790+01:00</task-activation-time>
        <task-proc-inst-id>1</task-proc-inst-id>
        <task-proc-def-id>myfirstcase</task-proc-def-id>
        <task-container-id>business-application-kjar-1_0-SNAPSHOT</task-container-id>
        <task-parent-id>-1</task-parent-id>
    </task-summary>
    <task-summary>
        <task-id>3</task-id>
        <task-name>Dynamic User Task</task-name>
        <task-subject></task-subject>
        <task-description></task-description>
        <task-status>Reserved</task-status>
        <task-priority>0</task-priority>
        <task-is-skipable>true</task-is-skipable>
        <task-actual-owner>wbadmin</task-actual-owner>
        <task-created-by>wbadmin</task-created-by>
        <task-created-on>2018-10-30T10:08:01.257+01:00</task-created-on>
        <task-activation-time>2018-10-30T10:08:01.257+01:00</task-activation-time>
        <task-proc-inst-id>1</task-proc-inst-id>
        <task-proc-def-id>myfirstcase</task-proc-def-id>
        <task-container-id>business-application-kjar-1_0-SNAPSHOT</task-container-id>
        <task-parent-id>-1</task-parent-id>
    </task-summary>
</task-summary-list>
Execute business process from jBPM Case Management Showcase
There is a need to repoint the jBPM Case Management Showcase application to use business application
instead of the KIE Server bundled with single zip distribution of jBPM.
To do so, edit standalone.xml file of jbpm server (JBPM_SERVER/standalone/configuration) and change the value of
org.kie.server.location system property
<property name="org.kie.server.location" value="http://localhost:8090/rest/server"/>Once done, restart jBPM server.
Stop the application if it’s running.
Go to business-application-service directory and launch the application in development mode
./launch-dev.sh clean install for Linux/Unix
./launch-dev.bat clean install for Windows
this will connect your business application to Business Central so can be administered from within its UI.
Go to Business Central in the browser and navigate to servers (from the home screen).
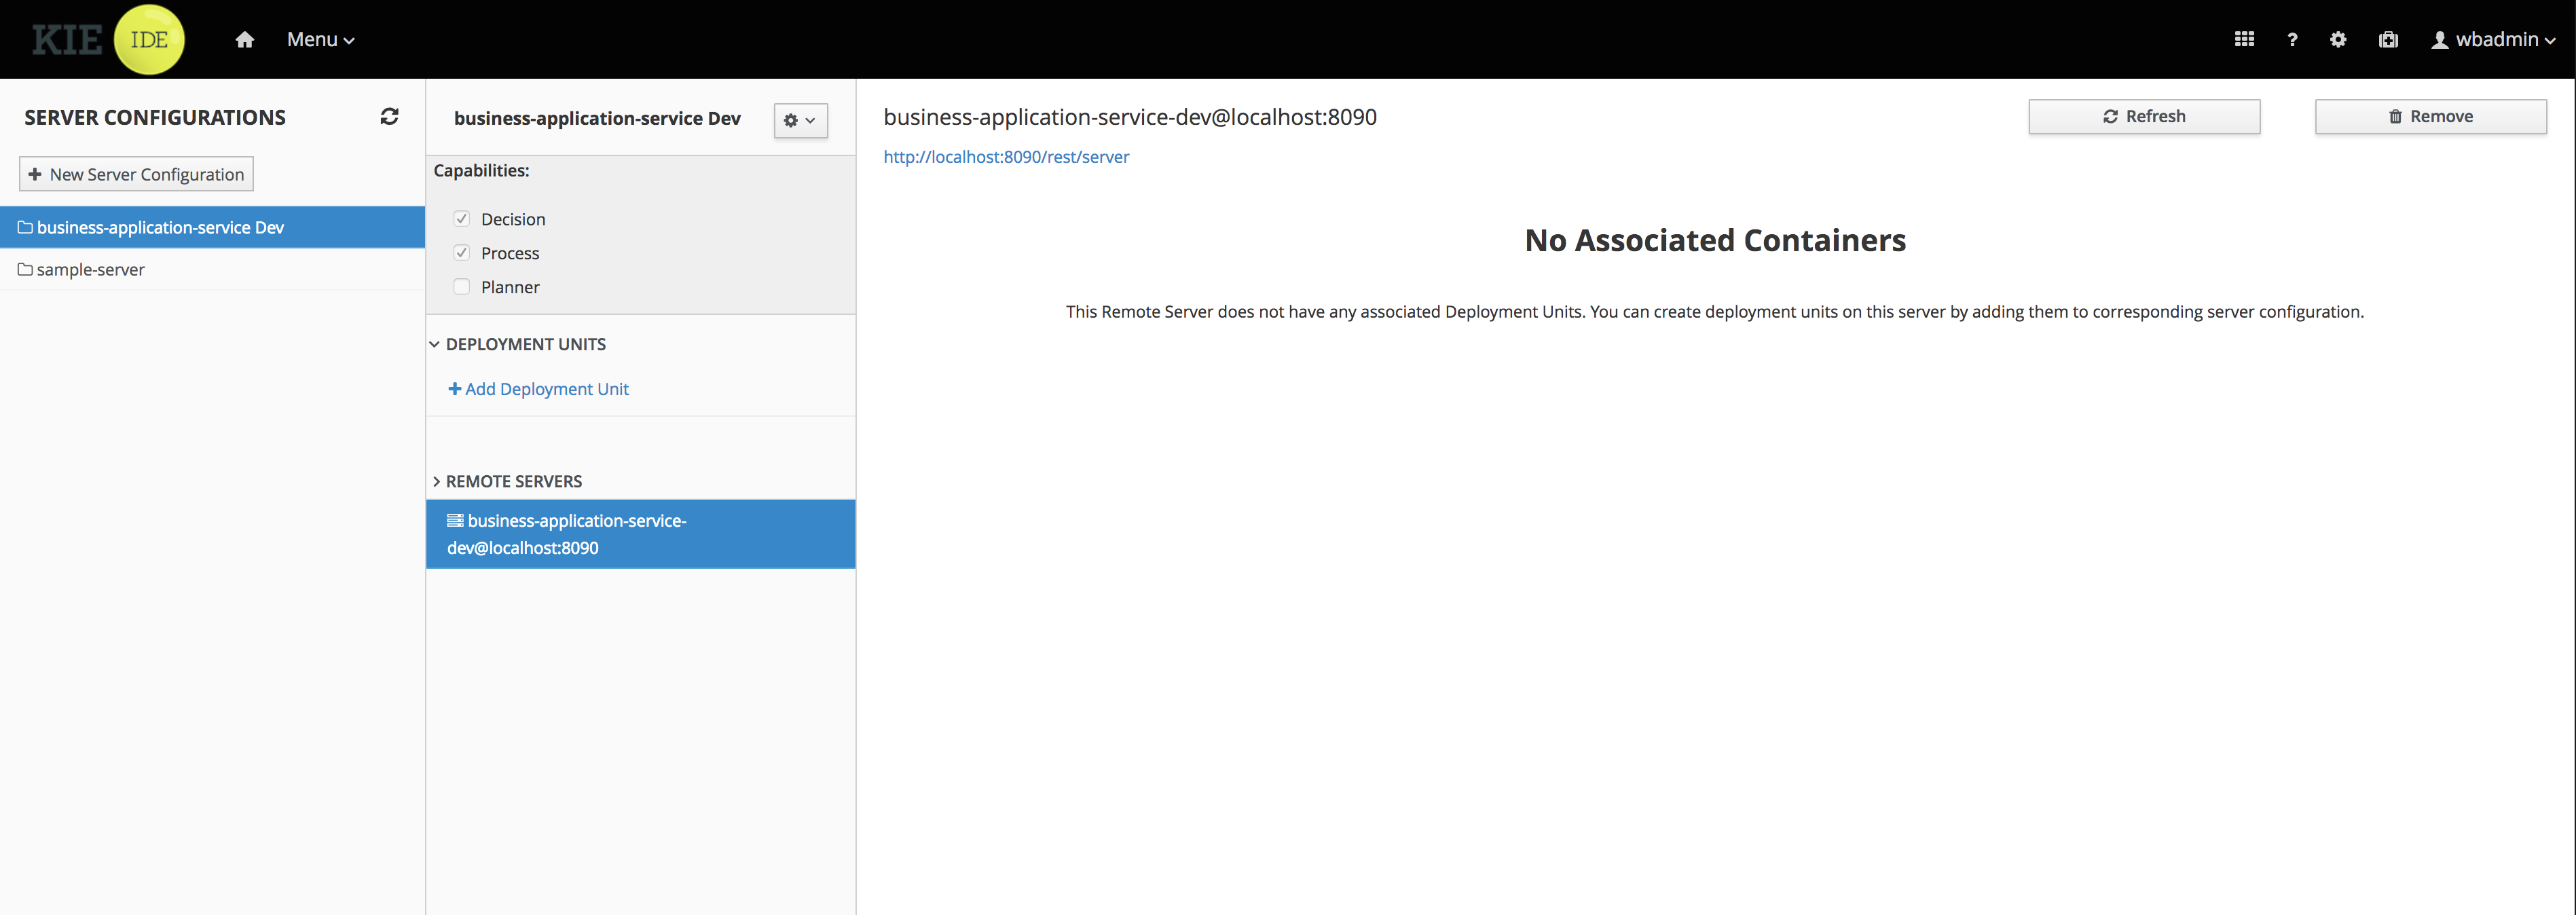
As you can see the business-application-service Dev is there and connected. Although
it does not have any kjars deployed. This is because it’s now running in managed mode
meaning it’s Business Central that decides what kjars it should run.
So let’s deploy the business-application-kjar to our running application.
-
Go to projects from home screen of Business Central
-
Go into business-application-kjar project
-
Click
Deploybutton -
Make sure that
Server configurationis set tobusiness-application-service-devand click ok
The project should be successfully deployed and you can examine that state by going back to servers from home screen.
Next, go to process definitions (in Manage section of the Home screen) and select server configuration
(top right corner) - again it should be business-application-service-dev the list of available
process definition will be loaded and you should see your single case definition from the project
business-application-kjar.
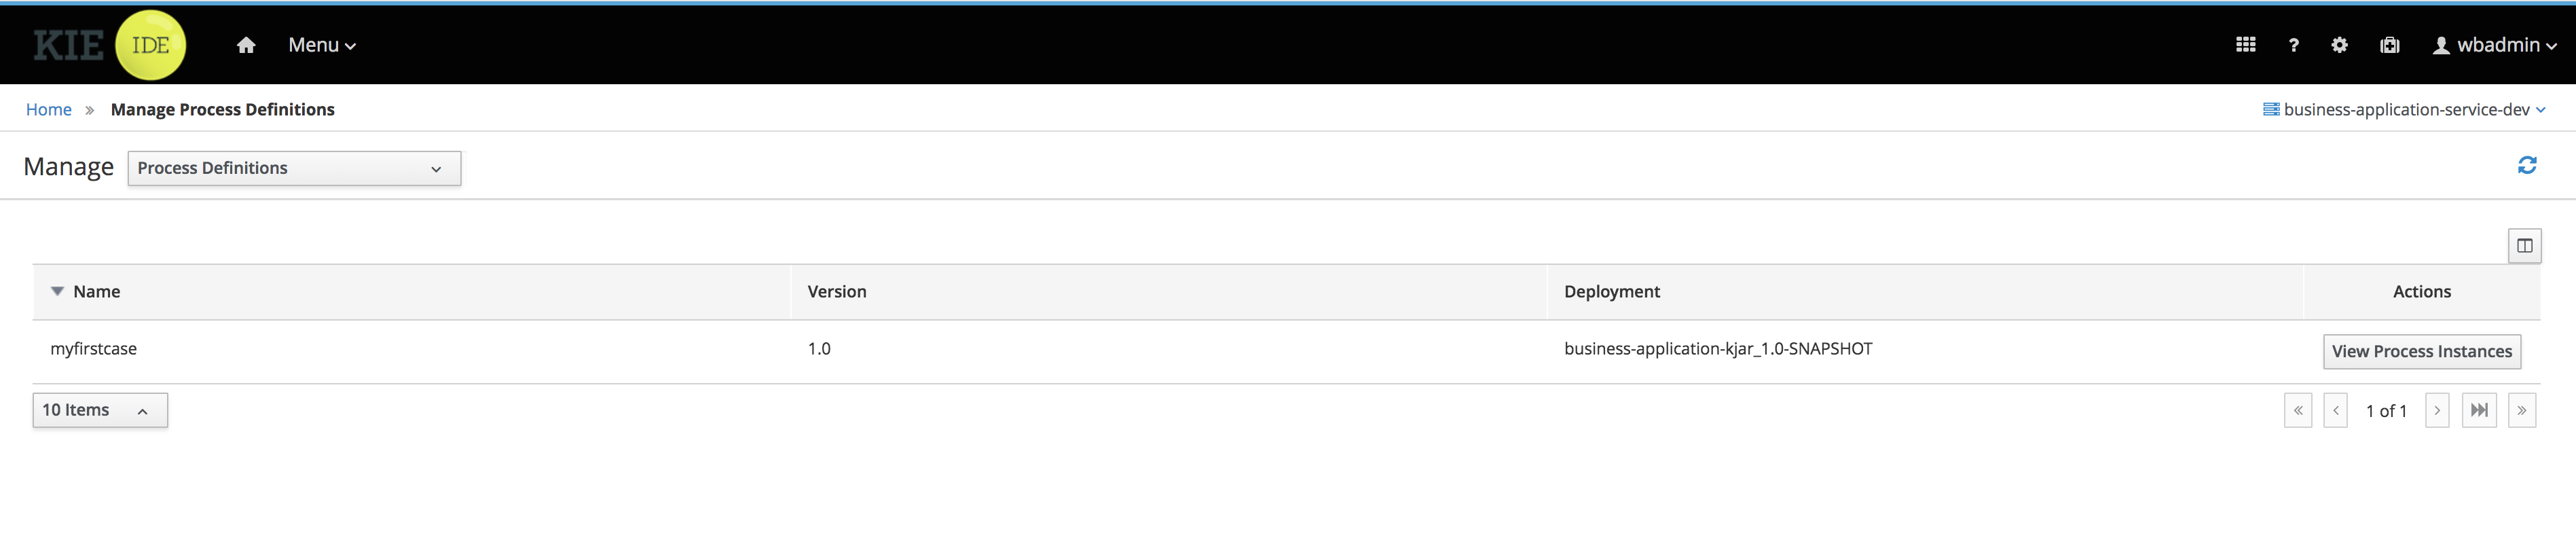
Examine details of that case definition by clicking on the row in the table. Switch to
Diagram tab to see the visual representation of your case definition.
Business Central does not allow to start case instances and thus you need to switch to Case Management showcase application. It is accessible from the Apps launcher icon (top right corner) next to logout button.
Launch the application and login with wbadmin. Once logged in you can start a new case instance.
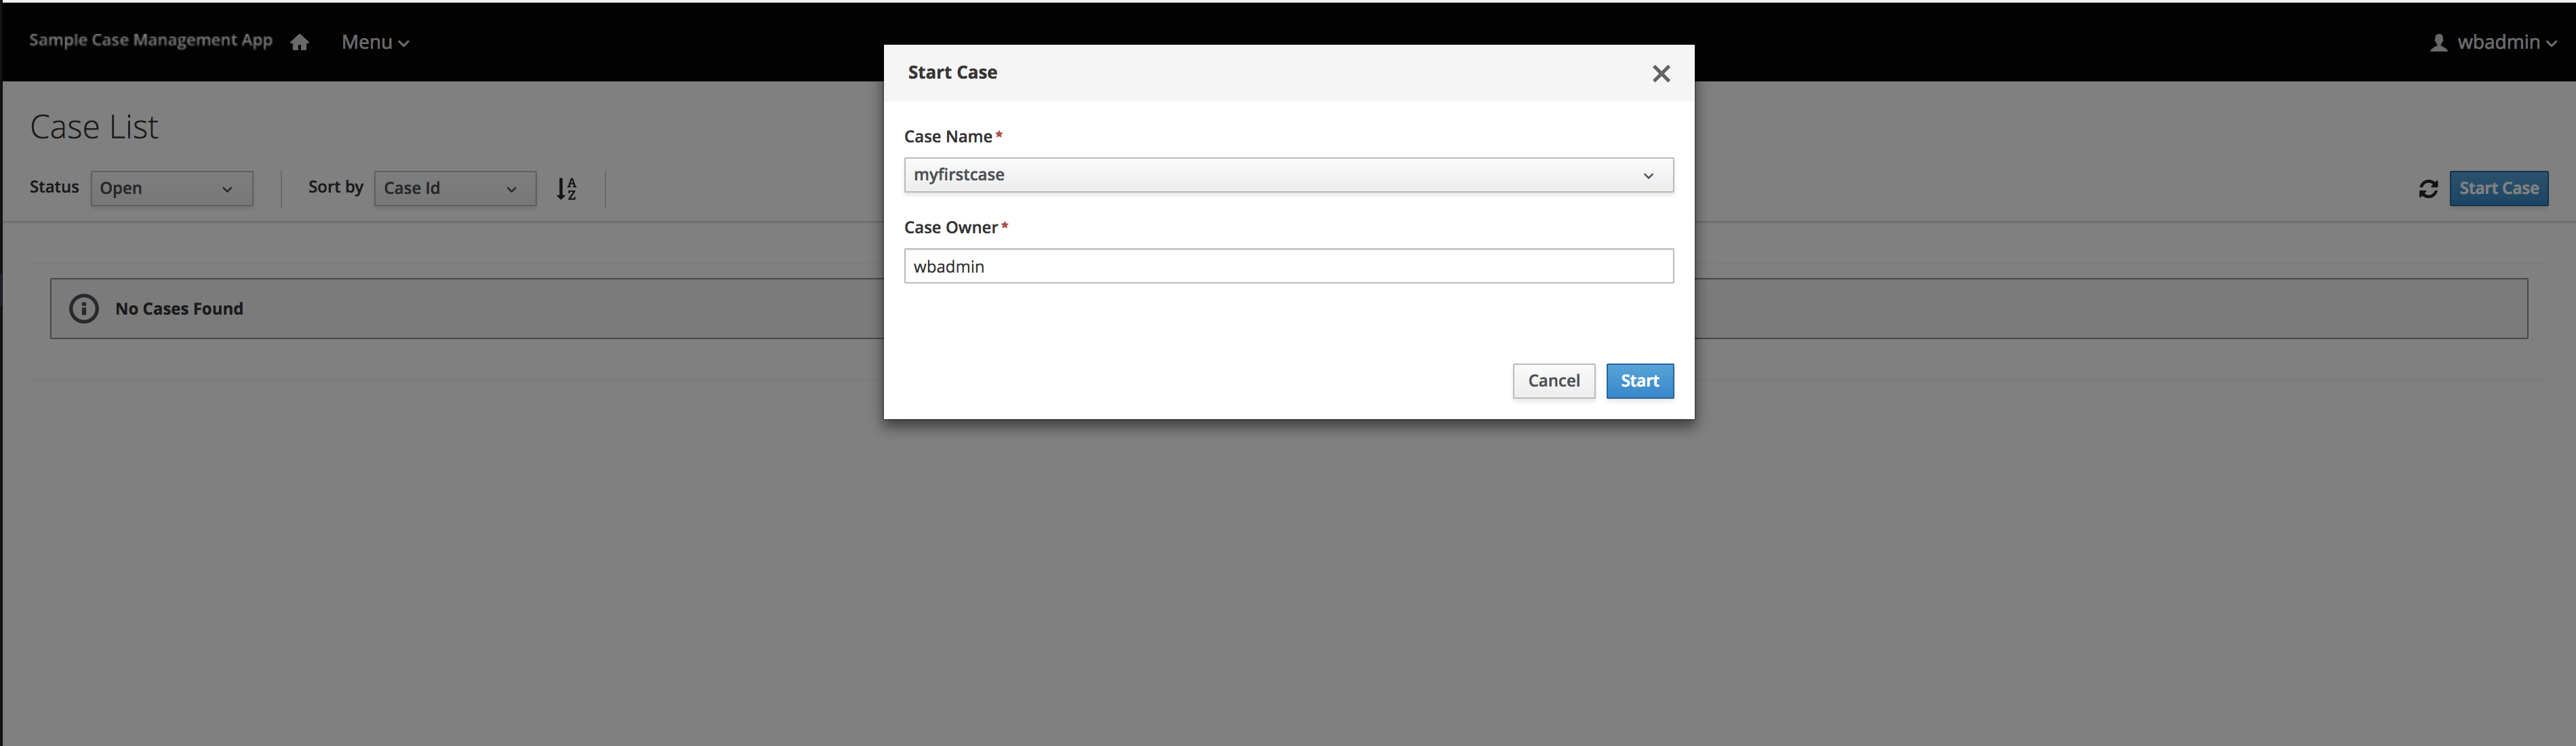
Go into newly started case instance by clicking on the row of the active cases list.
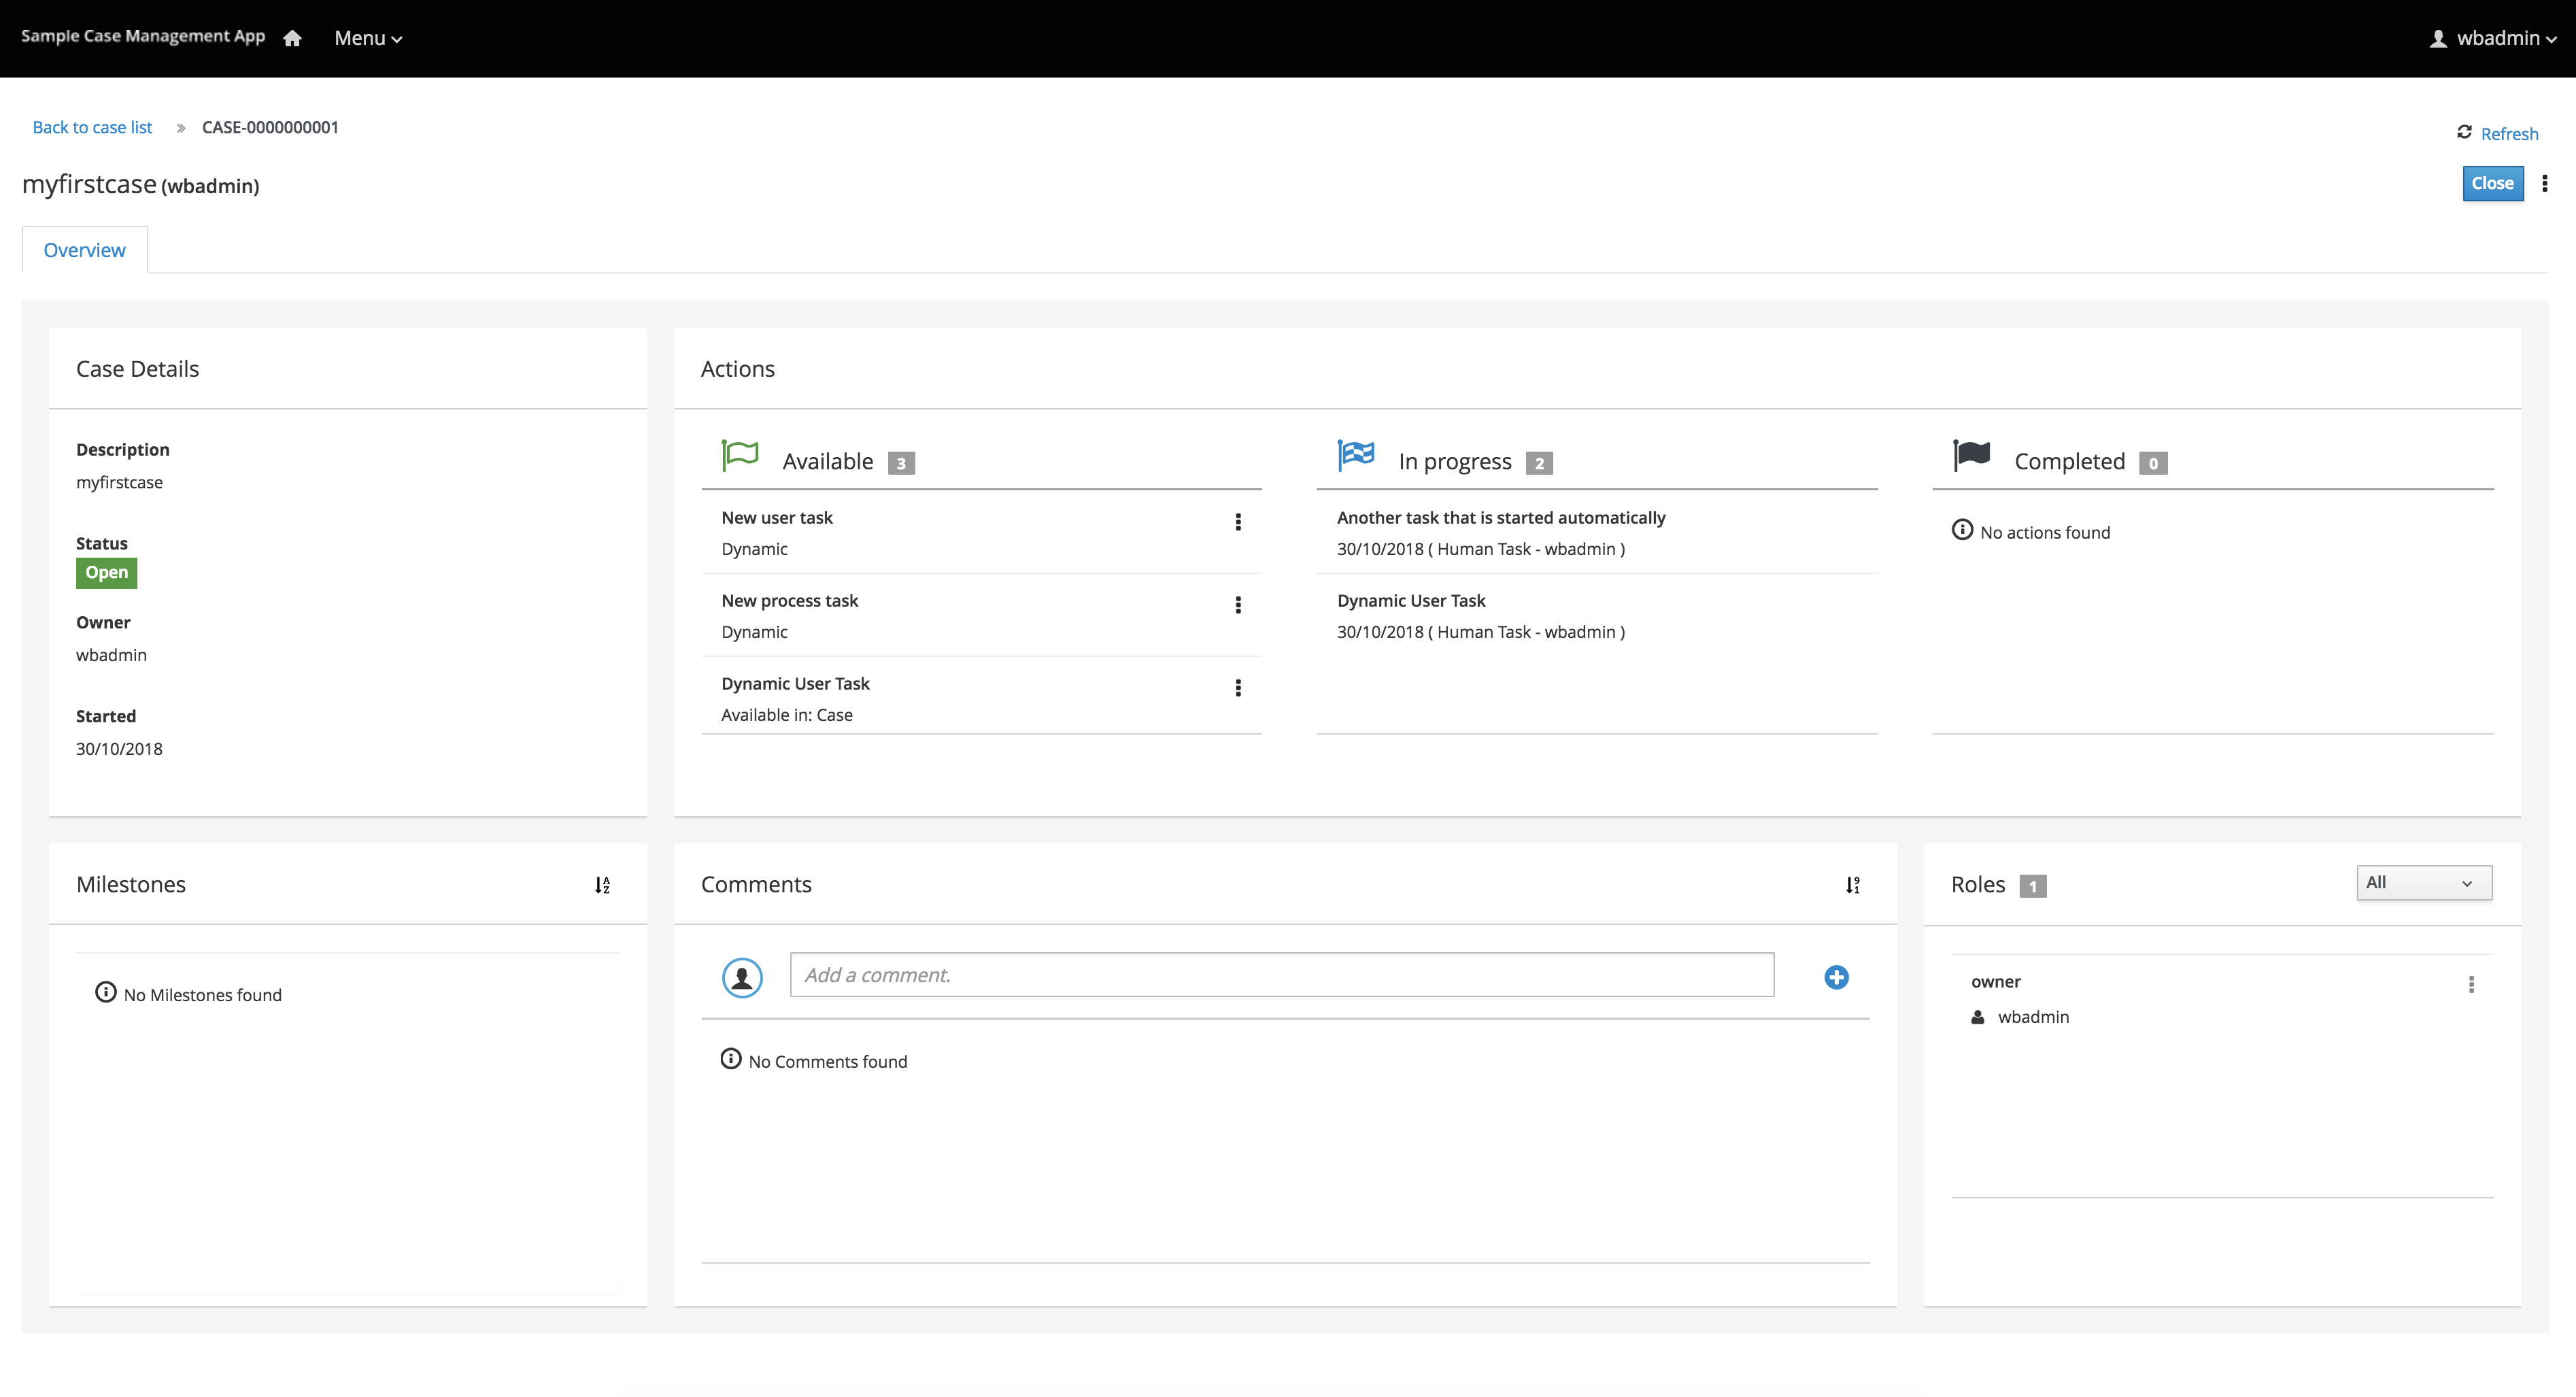
From there you can start a new instance of Dynamic User Task as the other one is already there.
5.7.7.5. Summary
Congratulations! you have enhanced your business application to take advantage of dynamic and adaptive business assets that allow to do much more than structured processes. You could see how easy it is to add additional user tasks and that’s just the beginning.
5.7.7.6. Source code of the tutorial
Here is the complete source code of the tutorial.
6. jBPM Installer
6.1. Prerequisites
This script assumes you have Java JDK 1.8+ (set as JAVA_HOME), and Ant 1.9+ installed. If you don’t, use the following links to download and install them:
|
To check whether Java and Ant are installed correctly, type the following commands inside a command prompt: java -version ant -version This should return information about which version of Java and Ant you are currently using. |
6.2. Downloading the Installer
First of all, you need to download the installer and unzip it on your local file system. There are two versions
-
full installer - already contains a lot of the dependencies that are necessary during the installation
-
minimal installer - contains only the installer and will download all required dependencies on the fly
In general, it is probably best to download the full installer: jBPM-7.55.0.Final-installer-full.zip
You can also download the latest build (only for the minimal installer).
6.3. Demo Setup
The easiest way to get started is to simply run the installation script to install the demo setup. The demo install will setup all the web tooling (on top of WildFly) and Eclipse tooling in a pre-configured setup. Go into the jbpm-installer folder where you unzipped the installer and (from a command prompt) run:
ant install.demoThis will:
-
Download WildFly application server
-
Configure and deploy a process execution server
-
Configure and deploy Business Central
-
Configure and deploy the case management application
-
Download Eclipse
-
Install the Drools and jBPM Eclipse plugin
-
Install the Eclipse BPMN 2.0 Modeler
Running this command could take a while (REALLY, not kidding, we are for example downloading an Eclipse installation, even if you downloaded the full installer, specifically for your operating system).
|
The script always shows which file it is downloading (you could for example check whether it is still downloading by checking whether the size of the file in question in the jbpm-installer/lib folder is still increasing). If you want to avoid downloading specific components (because you will not be using them or you already have them installed somewhere else), check below for running only specific parts of the demo or directing the installer to an already installed component. |
Once the demo setup has finished, you can start playing with the various components by starting the demo setup:
ant start.demoThis will:
-
Start H2 database server
-
Start WildFly application server
-
Start Eclipse
Now wait until the process management console comes up:
The case management UI will be available on:
|
It could take a minute to start up the application server and web application. If the web page doesn’t show up after a while, make sure you don’t have a firewall blocking that port, or another application already using the port 8080. You can always take a look at the server log {jbpm-installer-folder}/wildfly-{version}/standalone/log/server.log |
Once everything is started, you can start playing with the Eclipse and web tooling, as explained in the following sections.
If you only want to try out the web tooling and do not wish to download and install the Eclipse tooling, you can use these alternative commands:
ant install.demo.noeclipse
ant start.demo.noeclipse
Similarly, if you only want to try out the Eclipse tooling and do not wish to download and install the web tooling, you can use these alternative commands:
ant install.demo.eclipse
ant start.demo.eclipse
Now continue with the 10-minute tutorials. Once you’re done playing and you want to shut down the demo setup, you can use:
ant stop.demoIf at any point in time would like to start over with a clean demo setup - meaning all changes you did inside the web tooling and/or saved in the database will be lost, you can run the following command (after which you can run the installer again from scratch, note that this cannot be undone):
ant clean.demo6.4. 10-Minute Tutorial using Business Central
Open up the process management console:
|
It could take a minute to start up the application server and web application. If the web page doesn’t show up after a while, make sure you don’t have a firewall blocking that port, or another application already using the port 8080. You can always take a look at the server log {jbpm-installer-folder}/wildfly-{version}/standalone/log/server.log |
Log in, using krisv / krisv as user name / password.
Using a prebuilt Evaluation example, the following screencast gives an overview of how to manage your process instances. It shows you:
-
How to log in to Business Central
-
How to import an existing example project and build and deploy it
-
How to start a new process instance
-
How to look up the current status of a running process instance
-
How to look up your tasks
-
How to complete a task
-
How to look at reports to monitor your process execution
Business Central supports the entire life cycle of your business processes: authoring, deployment, process management, tasks and dashboards.
-
The project authoring page allows you to look at existing repositories, where each project can contain business processes (but also business rules, data models, forms, etc.). It allows you to create your own project, or you could import an existing example to take a look at.
-
In this screencast, we start by importing the Evaluation project
-
-
The project explorer shows all available artifacts:
-
evaluation: business process describing the evaluation process as a sequence of tasks
-
evaluation-taskform: process form to start the evaluation process
-
PerformanceEvaluation-taskform: task form to perform the evaluation tasks
-
-
To make a process available for execution, you need to successfully build and deploy it first. To do so, open the selected project (in the project authoring page) and click Build & Deploy (top right corner).
-
To manage your process definitions and instances, click the "Process Management" menu option at the top menu bar and select one of the available options depending on you interest:
-
Process Definitions - lists all available process definitions
-
Process Instances - lists all active process instances (allows to show completed, aborted as well by changing filter criteria)
-
-
The process definitions view allows you to start a new process instance by clicking on the Start button. The process form (as defined in the project) will be shown, where you need to fill in the necessary information to start the process. In this case, you need to fill the user you want to start an evaluation for (for example use "krisv") and a reason for the request, after which you can complete the form. Some details about the process instance that was just started will be shown in the process instance details panel. From there you can access additional details:
-
Process model - to visualize the current state of the process
-
Process variables - to see current values of process variables
-
Documents - documents related to the process instance
-
Logs - overview of all process events for that instance
The process instance that you just started is first requiring a self-evaluation of the user and is waiting until the user has completed this task.
-
-
To see the tasks that have been assigned to you, choose the "Tasks" menu option on the top bar. By default, it will show all active tasks, and a "Performance Evaluation" (that was created by the process instance you just started) should be available for you. When you click a task, the task details will be shown, including the task form related to this task. After starting the task, you can fill in the necessary information and complete the task. After completing the task, you could check the "Process Instances" once more to check the progress of your process instance. You should be able to see that the process is now waiting for your HR manager and project manager to also perform an evaluation. You could log in as "john" / "john" and "mary" / "mary" to complete these tasks.
-
After starting and/or completing a few process instances and human tasks, you can generate a report of what has happened so far. Under "Dashboards", select "Process & Task Dashboard". This is a set of predefined charts that allow users to spot what is going on in the system. Charts can be fully customized as well, as explained in the Business Activity Monitoring chapter.
6.5. 10-Minute Tutorial using Eclipse
The following screencast gives an overview of how to use the Eclipse tooling. It shows you:
-
How to import and execute the evaluation sample project
-
Import the evaluation project (included in the jbpm-installer)
-
Open the Evaluation.bpmn process
-
Open the com.sample.ProcessTest Java class
-
Execute the ProcessTest class to run the process
-
-
How to create a new jBPM project (including sample process and JUnit test)
You can import the evaluation project - a sample included in the jbpm-installer - by selecting "File → Import …", select "Existing Projects into Workspace" and browse to the jbpm-installer/sample/evaluation folder and click "Finish". You can open up the evaluation process and the ProcessTest class. To execute the class, right-click it and select "Run as … - Java Application". The console should show how the process was started and how the different actors in the process completed the tasks assigned to them, to complete the process instance.
You could also create a new project using the jBPM project wizard. The sample projects contain a process and an associated Java file to start the process. Select "File - New … - Project …" and under the "jBPM" category and select "jBPM project". Select to create a project with some example files to get you started quickly and click next. Give the project a name. You can choose from a simple HelloWorld example or a slightly more advanced example using persistence and human tasks. If you select the latter and click Finish, you should see a new project containing a "sample.bpmn" process and a "com.sample.ProcessTest" JUnit test class. You can open the BPMN2 process by double-clicking it. To execute the process, right-click ProcessTest.java and select "Run As - Java Application".
6.6. Configuration
6.6.1. Business Central Authentication
The Business Central web application is using the preinstalled other security domain for authenticating and authorizing users (as specified in the WEB-INF/jboss-web.xml inside the WARs).
The application server uses by default property files based realms - Please note that this configuration is intended only for demo purposes (users, roles and passwords are stored in simple property files on the filesystem).
Authentication is configured in the standalone.xml file as follows:
<security-domain name="other" cache-type="default">
    <authentication>
        <login-module code="Remoting" flag="optional">
            <module-option name="password-stacking" value="useFirstPass"/>
        </login-module>
        <login-module code="RealmDirect" flag="required">
            <module-option name="password-stacking" value="useFirstPass"/>
        </login-module>
        <login-module code="org.kie.security.jaas.KieLoginModule" flag="optional" module="deployment.business-central.war"/>
    </authentication>
</security-domain>
<security-realm name="ApplicationRealm">
<authentication>
<local default-user="$local" allowed-users="*" skip-group-loading="true"/>
<properties path="users.properties" relative-to="jboss.server.config.dir"/>
</authentication>
<authorization>
<properties path="roles.properties" relative-to="jboss.server.config.dir"/>
</authorization>
</security-realm>These are the default users:
| Name | Password | Business Central roles | Task roles |
|---|---|---|---|
admin |
admin |
admin,analyst,kiemgmt,rest-all,kie-server |
|
krisv |
krisv |
admin,analyst,rest-all,kie-server |
|
john |
john |
analyst,kie-server |
Accounting,PM |
mary |
mary |
analyst,kie-server |
HR |
sales-rep |
sales-rep |
analyst,kie-server |
sales |
jack |
jack |
analyst,kie-server |
IT |
katy |
katy |
analyst,kie-server |
HR |
salaboy |
salaboy |
admin,analyst,rest-all,kie-server |
IT,HR,Accounting |
kieserver |
kieserver1! |
kie-server |
Authentication can be customized by using any of the following options:
-
The users and groups management screens on the Business Central web application.
Navigate into the Business Central web application and click the menu Home → Admin and selecting Users.
-
The add-user script that comes by default on Wildfly/EAP.
Example for Linux platforms - run the following command and follow the script instructions:
/bin/sh $JBOSS_HOME/bin/add-user.sh
  --user-properties $JBOSS_HOME/standalone/configuration/users.properties
  --group-properties $JBOSS_HOME/standalone/configuration/roles.properties
  --realm ApplicationRealm
6.6.2. Using your own database with the jBPM installer
6.6.2.1. Introduction
jBPM uses the Java Persistence API specification (v2) to allow users to configure whatever datasource they want to use to persist runtime data. As a result, the instructions below describe how you should configure a datasource when using JPA on JBoss application server (e.g. EAP7 or Wildfly10) using a persistence.xml file and configuring your datasource and driver in your application server’s standalone.xml , similar to how you would configure any other application using JPA on the application server. The installer automates some of this (like copying the right files to the right location after installation).
By default, the jbpm-installer uses an H2 database for persisting runtime data. In this section we will:
-
modify the persistence settings for runtime persistence of process instance state
-
test the startup with our new settings!
You will need a local instance of a database, in this case we will use MySQL.
6.6.2.2. Database setup
In the MySQL database used in this quickstart, create a single user:
-
user/schema "jbpm" with password "jbpm" (which will be used to persist all entities)
If you end up using different names for your user/schemas, please make a note of where we insert "jbpm" in the configuration files.
If you want to try this quickstart with another database, a section at the end of this quickstart describes what you may need to modify.
6.6.2.3. Configuration
The following files define the persistence settings for the jbpm-installer demo:
-
jbpm-installer/db/jbpm-persistence-JPA2.xml
-
Application server configuration
-
standalone-*.xml
-
|
There are multiple standalone.xml files available (depending on whether you are using JBoss EAP or Wildfly and whether you are running the normal or full profile). The full profile is required to use the JMS component for remote integration, so will be used by default by the installer. Best practice is to update all standalone.xml files to have consistent setup but most important is to have standalone-full-wildfly-{version}.xml properly configured as this is used by default by the installer. |
Do the following:
-
Disable H2 default database and enable MySQL database in build.properties
# default is H2
# H2.version=1.3.168
# db.name=h2
# db.driver.jar.name=${db.name}.jar
# db.driver.download.url=http://repo1.maven.org/maven2/com/h2database/h2/${H2.version}/h2-${H2.version}.jar
#mysql
db.name=mysql
db.driver.module.prefix=com/mysql
db.driver.jar.name=mysql-connector-java-5.1.18.jar
db.driver.download.url=https://repository.jboss.org/nexus/service/local/repositories/central/content/mysql/mysql-connector-java/5.1.18/mysql-connector-java-5.1.18.jar
org.kie.server.persistence.dialect=org.hibernate.dialect.MySQLDialect
You might want to update the db driver jar name and download url to whatever version of the jar matches your installation. Look to also update the dialect to what matches your installation if needed (for example change to MySQL5Dialect for MySQL 5.x specific features).
-
db/jbpm-persistence-JPA2.xml :
This is the JPA persistence file that defines the persistence settings used by jBPM for the jBPM engine information, the logging/BAM information, and task service.
In this file, you will have to change the name of the hibernate dialect used for your database.
The original line is:
<property name="hibernate.dialect" value="org.hibernate.dialect.H2Dialect"/>In the case of a MySQL database, you need to change it to:
<property name="hibernate.dialect" value="org.hibernate.dialect.MySQLDialect"/>For those of you who decided to use another database, a list of the available hibernate dialect classes can be found here.
-
standalone-full-wildfly-{version}.xml :
Standalone.xml and standalone-full.xml are the configuration for the standalone JBoss application server. When the installer installs the demo, it copies these files to the
standalone/configurationdirectory in the JBoss server directory. Since the installer uses Wildfly by default as application server, you probably need to change standalone-full-wildfly-{version}.xml .We need to change the datasource configuration in
standalone-full.xmlso that the jBPM engine can use our MySQL database. The original file contains (something very similar to) the following lines:<datasource jta="true" jndi-name="java:jboss/datasources/jbpmDS" pool-name="H2DS" enabled="true" use-java-context="true" use-ccm="true"> <connection-url>jdbc:h2:tcp://localhost/~/jbpm-db;MVCC=TRUE</connection-url> <driver>h2</driver> <security> <user-name>sa</user-name> </security> </datasource> <drivers> <driver name="h2" module="com.h2database.h2"> <xa-datasource-class>org.h2.jdbcx.JdbcDataSource</xa-datasource-class> </driver> </drivers>Change the lines to the following:
<datasource jta="true" jndi-name="java:jboss/datasources/jbpmDS" pool-name="MySQLDS" enabled="true" use-java-context="true" use-ccm="true">
    <connection-url>jdbc:mysql://localhost:3306/jbpm</connection-url>
    <driver>mysql</driver>
    <security>
       <user-name>jbpm</user-name>
       <password>jbpm</password>
    </security>
</datasource>
and add an additional driver configuration:
<driver name="mysql" module="com.mysql"> <xa-datasource-class>com.mysql.jdbc.jdbc2.optional.MysqlXADataSource</xa-datasource-class> </driver> -
To install driver jars in JBoss application server (Wildfly, EAP, etc.), it is recommended to install the driver jar as a module. The installer already takes care of this mostly: it will copy the driver jar (you specified in the build.properties ) to the right folder inside the modules directory of your server and put a matching module.xml next to it. For MySQL, this file is called db/mysql_module.xml . Open this file and make sure that the file name of the driver jar listed there is identical the driver jar name you specified in the build.properties (including the version). Note that, even if you simply uncommented the default MySQL configuration, you will still need to add the right version here.
-
Starting the demo
We’ve modified all the necessary files at this point. Now would be a good time to make sure your database is started up as well!
The installer script copies this file into the business-central WAR before the WAR is installed on the server. If you have already run the installer, it is recommended to stop the installer and clean it first using
ant stop.demoand
ant clean.demobefore continuing.
Run
ant install.demoto (re)install the wars and copy the necessary configuration files. Once you’ve done that, (re)start the demo using
ant start.demo -
Problems?
If this isn’t working for you, please try the following:
-
Please double check the files you’ve modified: I wrote this, but still made mistakes when changing files!
-
Please make sure that you don’t secretly have another (unmodified) instance of JBoss AS running.
-
If neither of those work (and you’re using MySQL), then please do let us know.
-
6.6.2.4. Using a different database
If you decide to use a different database with this demo, you need to remember the following when going through the steps above:
-
Configuring the jBPM datasource in
standalone.xml:-
After locating the
java:jboss/datasources/jbpmDSdatasource, you need to provide the following properties specific to your database:-
Change the url of your database
-
Change the user-name and password
-
Change the name of the driver (which you’ll create next)
For example:
<datasource jta="true" jndi-name="java:jboss/datasources/jbpmDS" pool-name="PostgreSQLDS" enabled="true" use-java-context="true" use-ccm="true">
    <connection-url>jdbc:postgresql://localhost:5432/jbpm</connection-url>
    <driver>postgresql</driver>
    <security>
        <user-name>jbpm</user-name>
        <password>jbpm</password>
    </security>
</datasource>
-
-
Add an additional driver configuration:
-
Change the name of the driver to match the name you specified when configuring the datasource in the previous step
-
Change the module of the driver: the database driver jar should be installed as a module (see below) and here you should reference the unique name of the module. Since the installer can take care of automatically generating this module for you (see below), this should match the
db.driver.module.prefixproperty inbuild.properties(where forward slashes are replaced by a point). In the example below, I usedorg/postgresqlasdb.driver.module.prefixwhich means that I should then useorg.postgresqlas module name for the driver. -
Fill in the correct name of the XA datasource class to use.
-
For example:
+
<driver name="postgresql" module="org.postgresql"> <xa-datasource-class>org.postgresql.xa.PGXADataSource</xa-datasource-class> </driver> -
-
You need to change the dialect in persistence.xml to the dialect for your database, for example:
<property name="hibernate.dialect" value="org.hibernate.dialect.PostgreSQLDialect"/> -
In order to make sure your driver will be correctly installed in the JBoss application server, there are typically multiple options, like install as a module or as a deployment. It is recommended to install the driver as a module for EAP and Wildfly.
-
Install the driver JAR as a module, which is what the install script does.
-
Otherwise, you can modify and install the downloaded JAR as a deployment. In this case you will have to copy the JAR yourself to the
standalone/deploymentsdirectory.
If you choose to install driver as JBoss module (recommended), please do the following:
-
In
build.properties, disable the default H2 driver properties# default is H2 # H2.version=1.3.168 # db.name=h2 # db.driver.jar.name=h2-${H2.version}.jar # db.driver.download.url=http://repo1.maven.org/maven2/com/h2database/h2/${H2.version}/h2-${H2.version}.jar -
Uncomment one of the other example configs (mysql or postgresql) or create your own:
#postgresql db.name=postgresql db.driver.module.prefix=org/postgresql db.driver.jar.name=postgresql-9.1-902.jdbc4.jar db.driver.download.url=https://repository.jboss.org/nexus/content/repositories/thirdparty-uploads/postgresql/postgresql/9.1-902.jdbc4/postgresql-9.1-902.jdbc4.jar-
Change the
db.nameproperty inbuild.propertiesto a name for your database. -
Change the
db.driver.module.prefixproperty to a name for the module of your driver. Note that this should match the module property when configuring the driver in standalone.xml (where forward slashes in the prefix here are replaced by a point). In the example above, I usedorg/postgresqlasdb.driver.module.prefixwhich means that I should then useorg.postgresqlas module name for the driver. -
Change the
db.driver.jar.nameproperty to the name of the jar that contains your database driver. -
Change the
db.driver.download.urlproperty to where the driver jar can be downloaded. Alternatively, you could manually download the jar yourself, and place it in thedb/driversfolder, using the same name as you specified in thedb.driver.jar.nameproperty.
-
-
Lastly, you’ll have to create the
db/${db.name}_module.xmlfile. As an example you can use db/mysql_module.xml, so just make a copy of it and:-
Change the name of the module to match the driver module name above
-
Change the name of the module resource path to the name of the
db.driver.jar.nameproperty.
-
-
For example, the top of the file would look like:
-
<module xmlns="urn:jboss:module:1.0" name="org.postgresql">
   <resources>
     <resource-root path="postgresql-9.1-902.jdbc4.jar"/>
   </resources>
6.6.3. jBPM database schema scripts (DDL scripts)
By default the demo setup makes use of Hibernate auto DDL generation capabilities to build up the complete database schema, including all tables, sequences, etc. This might not always be welcomed (by your database administrator), and thus the installer provides DDL scripts for most popular databases.
| Database name | Location |
|---|---|
db2 |
jbpm-db-scripts/db/ddl-scripts/db2 |
derby |
jbpm-db-scripts/db/ddl-scripts/derby |
h2 |
jbpm-db-scripts/db/ddl-scripts/h2 |
hsqldb |
jbpm-db-scripts/db/ddl-scripts/hsqldb |
mysql5 |
jbpm-db-scripts/db/ddl-scripts/mysql5 |
mysqlinnodb |
jbpm-db-scripts/db/ddl-scripts/mysqlinnodb |
oracle |
jbpm-db-scripts/db/ddl-scripts/oracle |
postgresql |
jbpm-db-scripts/db/ddl-scripts/postgresql |
sqlserver |
jbpm-db-scripts/db/ddl-scripts/sqlserver |
sqlserver2008 |
jbpm-db-scripts/db/ddl-scripts/sqlserver2008 |
sybase |
jbpm-db-scripts/db/ddl-scripts/sybase |
DDL scripts are provided for both jBPM and Quartz schemas although Quartz schema DDL script is only required when the timer service should be configured with Quartz database job store. See the section on timers for additional details.
This can be used to initially create the database schema, but it can also serve as the basis for any\ optimization that needs to be applied - such as indexes, etc.
|
If you use MySQL 5.7 or earlier (MariaDB 10.2.3 or earlier), you also need to run jbpm-db-scripts/db/ddl-scripts/mysql5/mysql-jbpm-amend-auto-increment-procedure.sql This script creates a procedure for jBPM tables (ProcessInstanceInfo/WorkItemInfo/Task) to protect AUTO_INCREMENT counter. Without the procedure, ID values of those tables could be reset on MySQL/MariaDB restart (https://dev.mysql.com/doc/refman/8.0/en/innodb-auto-increment-handling.html#innodb-auto-increment-initialization). It would introduce further side effects. In addition to creating the procedure, you have to call the procedure on MySQL/MariaDB restart. For example, /etc/my.cnf Write mysql-jbpm-amend-auto-increment-call.sql |
|
If you use PostgreSQL with jBPM, you also need to run jbpm-db-scripts/db/ddl-scripts/postgresql/postgresql-jbpm-lo-trigger-clob.sql This script creates triggers for jBPM tables to protect CLOB references of large objects. Without the triggers, vacuumlo tool (https://www.postgresql.org/docs/9.4/static/vacuumlo.html) deletes active large objects so causes an issue to jBPM. If you are already running jBPM without the triggers, you also need to run the following SQLs after applying the triggers to protect existing CLOB. |
6.6.4. jBPM installer script
jBPM installer ant script performs most of the work automatically and usually does not require additional attention but in case it does, here is a list of available targets that might be needed to perform some of the steps manually.
| Target | Description |
|---|---|
clean.db |
cleans up database used by jBPM demo (applies only to H2 database) |
clean.demo |
cleans up entire installation so new installation can be performed |
clean.demo.noeclipse |
same as clean.demo but does not remove Eclipse |
clean.eclipse |
removes Eclipse and its workspace |
clean.generated.ddl |
removes DDL scripts generated if any |
clean.jboss |
removes application server with all its deployments |
clean.jboss.repository |
removes repository content for demo setup (guvnor Maven repo, niogit, etc) |
download.db.driver |
downloads DB driver configured in build.properties |
download.ddl.dependencies |
downloads all dependencies required to run DDL script generation tool |
download.droolsjbpm.eclipse |
downloads Drools and jBPM Eclipse plugin |
download.eclipse |
downloads Eclipse distribution |
download.eclipse.gef |
downloads Eclipse GEF feature |
download.jboss |
downloads JBoss Application Server |
download.jBPM.bin |
downloads jBPM binary distribution (jBPM libs and its dependencies) |
download.jBPM.casemgmt |
downloads jBPM case management console |
download.jBPM.console |
downloads jBPM process management console |
download.kie.server |
downloads jBPM process execution server |
install.db.files |
installs DB driver as JBoss module |
install.demo |
installs complete demo environment |
install.demo.eclipse |
installs Eclipse with all jBPM plugins, no server installation |
install.demo.noeclipse |
similar to install.demo but skips Eclipse installation |
install.droolsjbpm-eclipse.into.eclipse |
installs droolsjbpm Eclipse plugin into Eclipse |
install.eclipse |
install Eclipse IDE |
install.jboss |
installs JBoss AS |
install.jBPM-casemgmt.into.jboss |
installs jBPM case management application |
install.jBPM-console.into.jboss |
installs jBPM process management console |
install.kie-server.into.jboss |
installs jBPM process execution server |
6.7. Frequently Asked Questions
Some common issues are explained below.
-
What if the installer complains it cannot download component X?
Are you connected to the Internet? Do you have a firewall turned on? Do you require a proxy? It might be possible that one of the locations we’re downloading the components from is temporarily offline. Try downloading the components manually (possibly from alternate locations) and put them in the jbpm-installer/lib folder.
-
What if the installer complains it cannot extract / unzip a certain JAR/WAR/zip?
If your download failed while downloading a component, it is possible that the installer is trying to use an incomplete file. Try deleting the component in question from the jbpm-installer/lib folder and reinstall, so it will be downloaded again.
-
What if I have been changing my installation (and it no longer works) and I want to start over again with a clean installation?
You can use
ant clean.demoto remove all the installed components, so you end up with a fresh installation again. -
I sometimes see exceptions when trying to stop or restart certain services, what should I do?
If you see errors during shutdown, are you sure the services were still running? If you see exceptions during restart, are you sure the service you started earlier was successfully shutdown? Maybe try killing the services manually if necessary.
-
Something seems to be going wrong when running Eclipse but I have no idea what. What can I do?
Always check the consoles for output like error messages or stack traces. You can also check the Eclipse Error Log for exceptions. Try adding an audit logger to your session to figure out what’s happening at runtime, or try debugging your application.
-
Something seems to be going wrong when running the web-based application like the business-central. What can I do?
You can check the server log for possible exceptions: jbpm-installer/jboss-as-{version}/standalone/log/server.log (for JBoss AS7).
For all other questions, try contacting the jBPM community as described in the Getting Started chapter.
7. Examples
7.1. Introduction
Business Central provides various sample projects that will help you in getting started with automating business processes. These are bundled together with the application and you can easily try them out by navigating to and clicking on Try Samples.
This section shows the different examples that can be found in the jbpm-playground repository. All these examples are high level and business oriented.
If you want to contribute with these examples please get in touch with any member of the jBPM/Drools Team.
7.2. Importing Projects through Git
To import the Human Resources example, as well as other examples, follow these steps:
-
Logging in to Business Central
-
On the command line, change into the $SERVER_HOME/bin/ directory and execute the following command:
-
for Unix environment:
./standalone.sh -
for Windows environment:
./standalone.bat
-
-
Once your server is up and running, open the following address in a web browser:
http://localhost:8080/business-centralThis opens the login page.
-
Log in to Business Central with the user credentials created during installation.
-
-
Importing Projects Through Git
-
Click .
-
Click Import Project.
-
If your current space contains at least one project, the Import Project option is available under the dropdown menu in the space menu bar.
-
-
In the Import Project dialogue, enter the following information:
-
Repository URL : enter the Git URL you want to import, for example: https://github.com/kiegroup/jbpm-playground.
-
Authentication Options: If the target git repository requires authentication, you can specify the user name and password using the expanded dialog option.
-
-
Click Import.
-
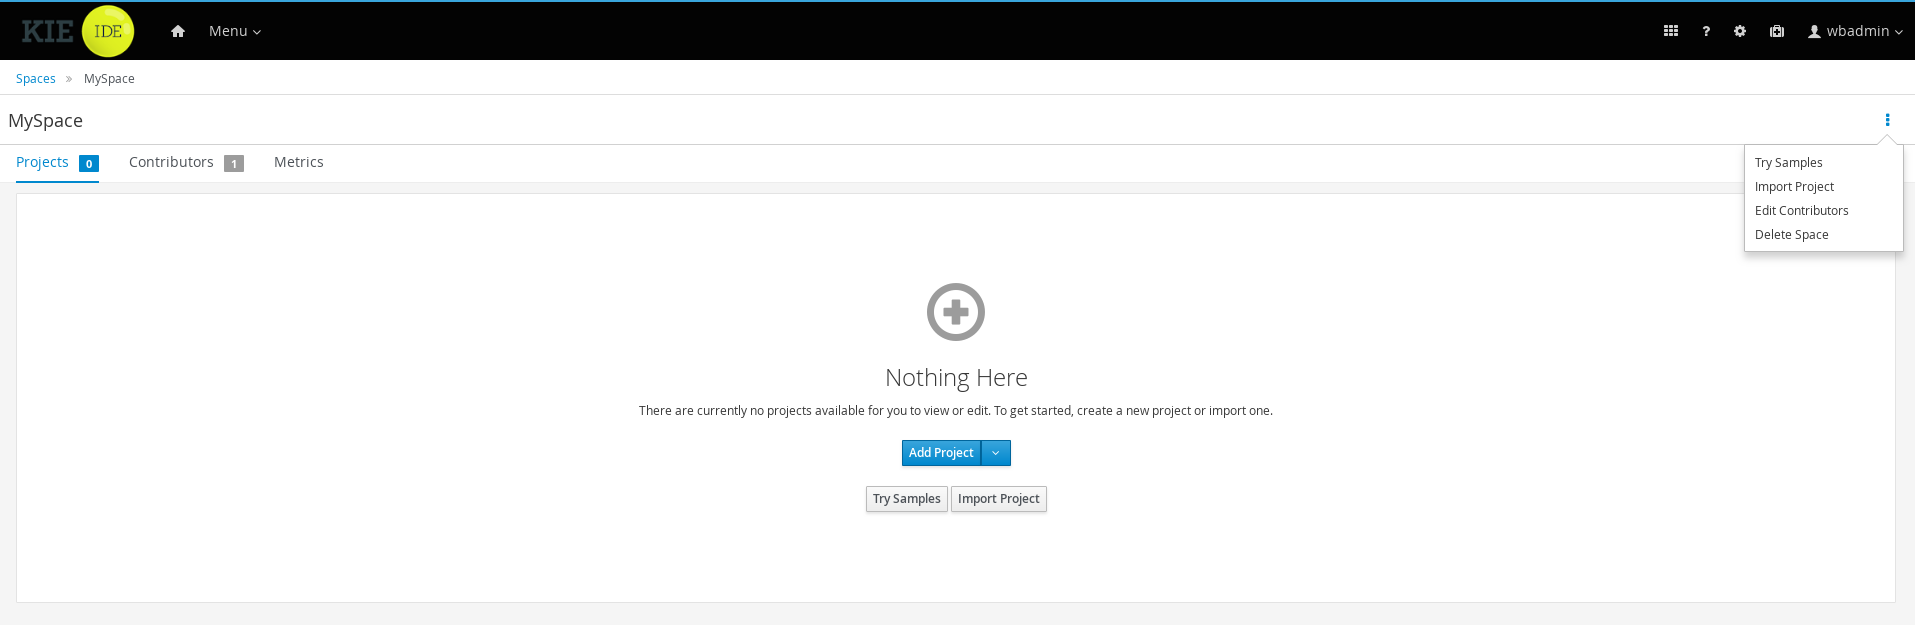
This will import a number of examples into your instance of jBPM.
7.3. Human Resources Example
The Human Resource Example’s use case can be described as follows: A company wants to hire new developers. In this process, three departments (that is the Human resources, IT, and Accounting) are involved. These departments are represented by three users: Katy, Jack, and John respectively.
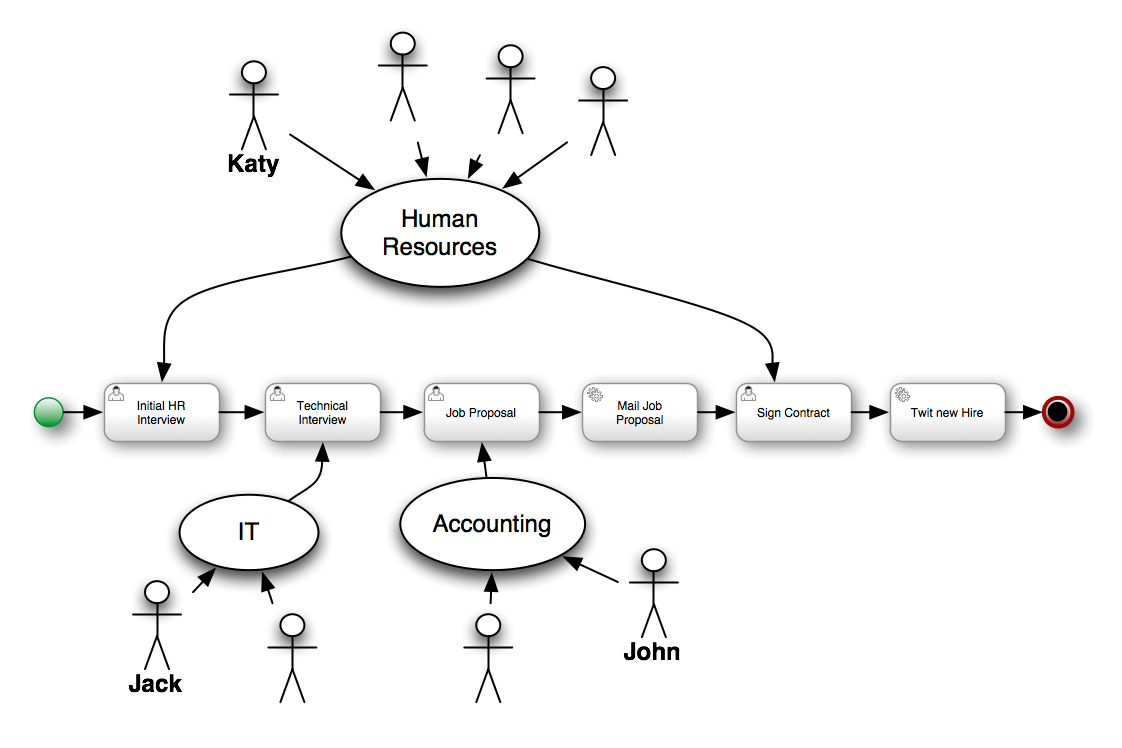
Note that only four out of the six defined activities within the business process are User Tasks. User Tasks require human interaction. The other two tasks are Service Tasks, which are automated and connected to other systems.
Each instance of the process will follow certain actions:
-
The human resources team performs the initial interview with the candidate.
-
The IT department team performs the technical interview.
-
Based on the output from the previous two steps, the accounting team creates a job proposal.
-
When the proposal has been drafted, it is automatically sent to the candidate via email.
-
If the candidate accepts the proposal, a new meeting to sign the contract is scheduled.
-
Finally, if the candidate accepts the proposal, the system posts a message about the new hire using Twitter service connector.
Note, that Jack, John, and Katy represent any employee within the company with appropriate role assigned.
7.3.1. The Kie Project: human-resources
To start exploring the project:
-
Click .
-
Click .
The asset list page contains the hiring.bpmn2 process and a set of forms for each human task. Click these assets to explore. Notice that different editors open for different types of assets.
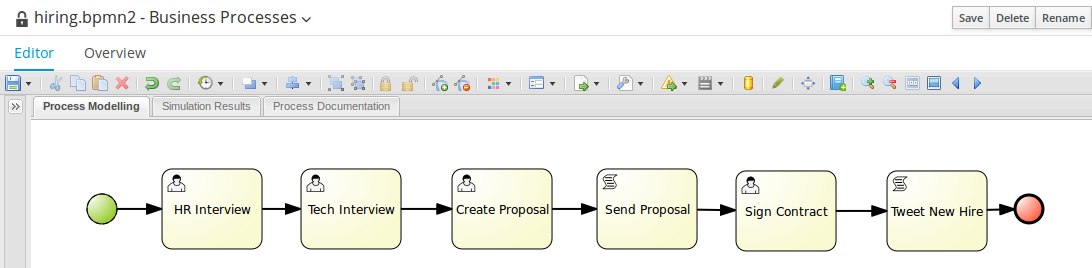
7.3.2. Building the Human Resources Example
To build the Project:
-
Click .
-
Click Human Resources Kjar Example.
-
Click Deploy.
Deploy creates a new JAR artifact that is deployed to the runtime environment as a new deployment unit.
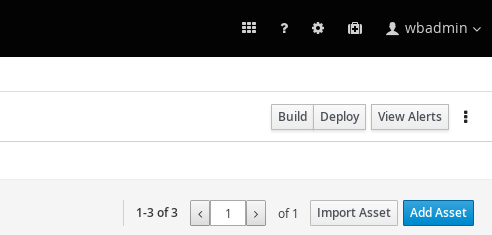
After successfully building and deploying your project, you can verify its presence in the Execution Servers tab. Click to do so.
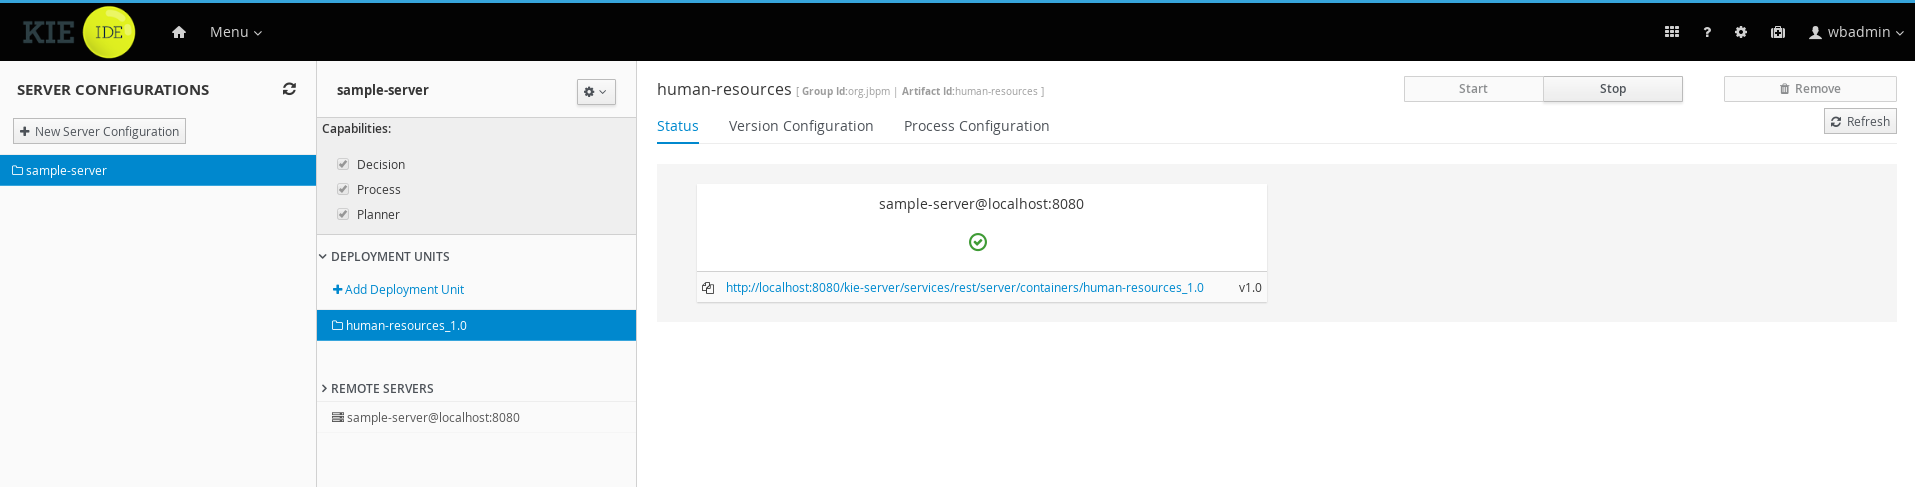
When you Deploy a project from the Project Editor, it is deployed using the default configuration which means using the Singleton strategy, the default Kie Base and the default Kie session.
If you want to change these settings, you can make the necessary adjustments on the Settings tab for the specific project. Then, you will be able to set a different strategy, or use a non-default Kie Base or Kie Session. Once you saved your settings you can redeploy the project as a new Deployment Unit.
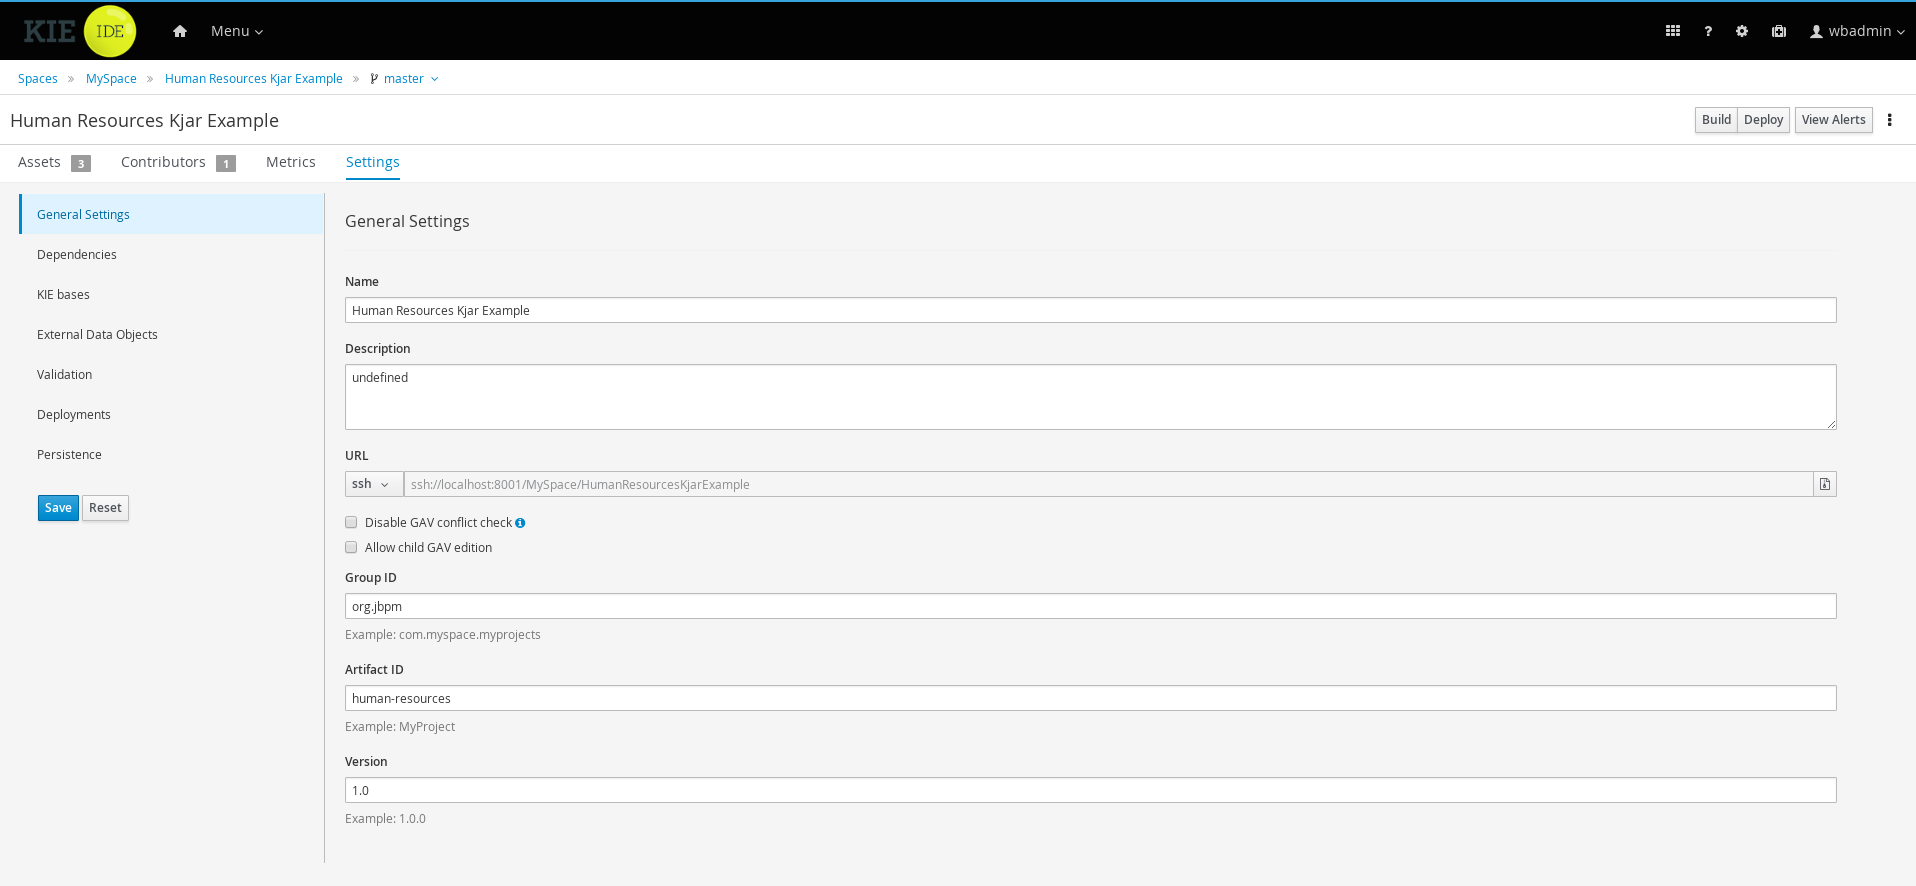
Once your artifact that contains the process definition is deployed, the Process Definition will become available in .
7.3.3. Create a new Process Instance
To create new process instances:
Click .
Start your instance:
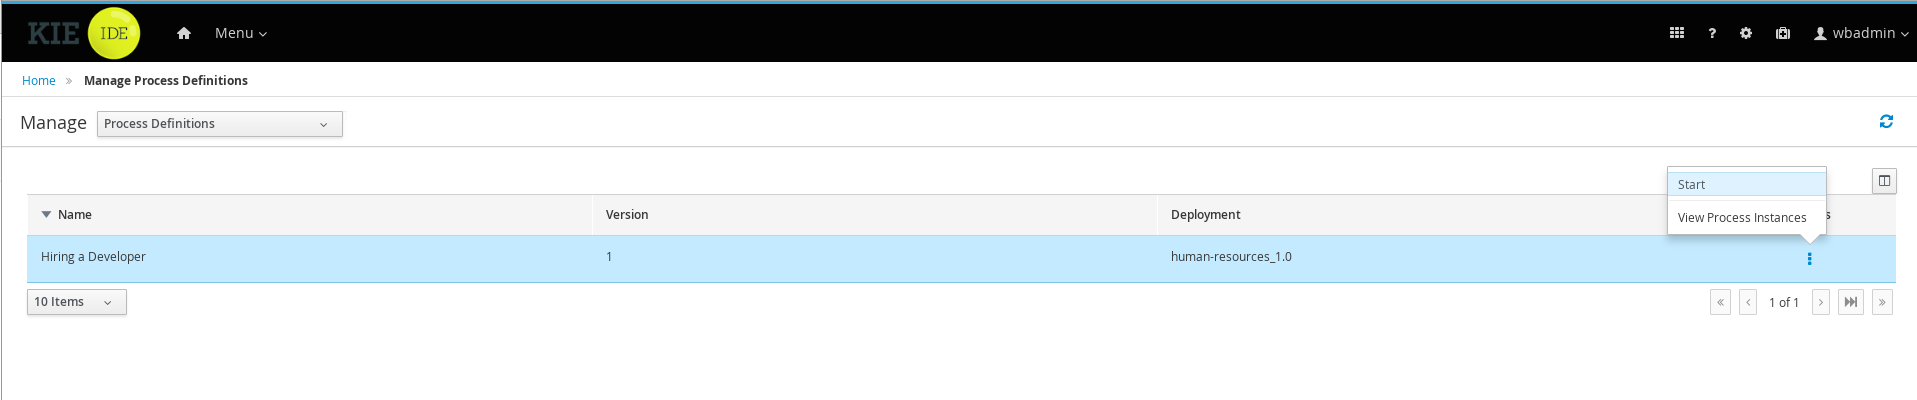
The Process Definitions section contains all the available process definitions in the runtime environment. In order to add new process definitions, build and deploy a new project.
Most processes require additional information to create a new process instance. This is done through forms. For this project, fill in the name of the candidate that is to be interviewed.
When you click Submit, you create a new process instance. This creates the first task, that is available for the Human Resources team. To see the task, you need to logout and log in as a user with the appropriate role assigned, that is someone from the Human Resources.
When you start the process, you can interact with the human tasks. To do so, click .
Note that in order to see the tasks in the task list, you need to belong to specific user groups, for which the task is designed. For example, the HR Interview task is visible only for the members of the HR group, and the Tech Interview Task is visible only to the members of the IT group.
7.4. Examples zip
A zip file of examples can also be downloaded from the downloads page, containing various examples that can be opened in the Eclipse-based Developers Tools. Simply download and unzip the examples artefact and import into your Eclipse workspace.
8. jBPM Version Migration Guide
8.1. Deprecated in jBPM 7
| Property | Description | jBPM 7 Behavior |
|---|---|---|
|
This property is responsible for how the |
In jBPM 7, this is no longer possible: all |
8.2. Changed in jBPM 7
| Jira | Description | What to do |
|---|---|---|
Value of constant |
Update your code to reflect this change - from old value |
jBPM Core
Using the jBPM Core Engine
9. Core Engine API
9.1. Core engine API for the jBPM engine
The jBPM engine executes business processes. To define the processes, you create business assets, including process definitions and custom tasks.
You can use the Core Engine API to load, execute, and manage processes in the jBPM engine.
Several levels of control are available:
-
At the lowest level, you can directly create a KIE base and a KIE session. A KIE base represents all the assets in a business process. A KIE session is an entity in the jBPM engine that runs instances of a business process. This level provides fine-grained control, but requires explicit declaration and configuration of process instances, task handlers, event handlers, and other jBPM engine entities in your code.
-
You can use the RuntimeManager class to manage sessions and processes. This class provides sessions for required process instances using a configurable strategy. It automatically configures the interaction between the KIE session and task services. It disposes of jBPM engine entities that are no longer necessary, ensuring optimal use of resources. You can use a fluent API to instantiate
RuntimeManagerwith the necessary business assets and to configure its environment. -
You can use the Services API to manage the execution of processes. For example, the deployment service deploys business assets into the engine, forming a deployment unit. The process service runs a process from this deployment unit.
If you want to embed the jBPM engine in your application, the Services API is the most convenient option, because it hides the internal details of configuring and managing the engine.
-
Finally, you can deploy a KIE Server that loads business assets from KJAR files and runs processes. The KIE Server provides a REST API for loading and managing the processes. You can also use Business Central to manage a KIE Server.
If you use a KIE Server, you do not need to use the Core Engine API.
For the full reference information for all public jBPM engine API calls, see the Java documentation. Other API classes also exist in the code, but they are internal APIs that can be changed in later versions. Use public APIs in applications that you develop and maintain.
9.2. KIE base and KIE session
A KIE base contains a reference to all process definitions and other assets relevant for a process. The engine uses this KIE base to look up all information for the process, or for several processes, whenever necessary.
You can load assets into a KIE base from various sources, such as a class path, file system, or process repository. Creating a KIE base is a resource-heavy operation, as it involves loading and parsing assets from various sources. You can dynamically modify the KIE base to add or remove process definitions and other assets at run time.
After you create a KIE base, you can instantiate a KIE session based on this KIE base. Use this KIE session to run processes based on the definitions in the KIE base.
When you use the KIE session to start a process, a new process instance is created. This instance maintains a specific process state. Different instances in the same KIE session can use the same process definition but have different states.
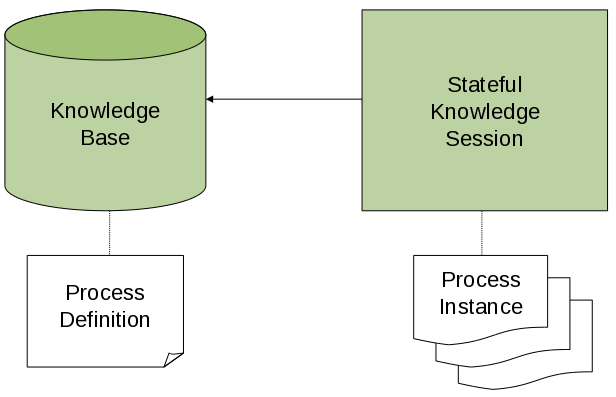
For example, if you develop an application to process sales orders, you can create one or more process definitions that determine how an order should be processed. When starting the application, you first need to create a KIE base that contains those process definitions. You can then create a session based on this KIE base. When a new sales order comes in, start a new process instance for the order. This process instance contains the state of the process for the specific sales request.
You can create many KIE sessions for the same KIE base and you can create many instances of the process within the same KIE session. Creating a KIE session, and also creating a process instance within the KIE session, uses far fewer resources than creating a KIE base. If you modify a KIE base, all the KIE sessions that use it can use the modifications automatically.
In most simple use cases, you can use a single KIE session to execute all processes. You can also use several sessions if needed. For example, if you want order processing for different customers to be completely independent, you can create a KIE session for each customer. You can also use multiple sessions for scalability reasons.
In typical applications you do not need to create a KIE base or KIE session directly. However, when you use other levels of the jBPM engine API, you can interact with elements of the API that this level defines.
9.2.1. KIE base
The KIE base includes all process definitions and other assets that your application might need to execute a business process.
To create a KIE base, use a KieHelper instance to load processes from various resources, such as the class path or the file system, and to create a new KIE base.
The following code snippet shows how to create a KIE base consisting of only one process definition, which is loaded from from the class path.
  KieHelper kieHelper = new KieHelper();
  KieBase kieBase = kieHelper
    .addResource(ResourceFactory.newClassPathResource("MyProcess.bpmn"))
    .build();
The ResourceFactory class has similar methods to load resources from a file, a URL, an InputStream, a Reader, and other sources.
|
This "manual" process of creating a KIE base is simpler than other alternatives, but can make an application hard to maintain. Use other methods of creating a KIE base, such as the |
9.2.2. KIE session
After creating and loading the KIE base, you can create a KIE session to interact with the jBPM engine. You can use this session to start and manage processes and to signal events.
The following code snippet creates a session based on the KIE base that you created previously and then starts a process instance, referencing the ID in the process definition.
KieSession ksession = kbase.newKieSession();
ProcessInstance processInstance = ksession.startProcess("com.sample.MyProcess");
9.2.3. ProcessRuntime interface
The KieSession class exposes the ProcessRuntime interface, which defines all the session methods for interacting with processes, as the following definition shows.
ProcessRuntime interface /**
* Start a new process instance. Use the process (definition) that
* is referenced by the given process ID.
*
* @param processId The ID of the process to start
* @return the ProcessInstance that represents the instance of the process that was started
*/
ProcessInstance startProcess(String processId);
/**
* Start a new process instance. Use the process (definition) that
* is referenced by the given process ID. You can pass parameters
* to the process instance as name-value pairs, and these parameters set
* variables of the process instance.
*
* @param processId the ID of the process to start
* @param parameters the process variables to set when starting the process instance
* @return the ProcessInstance that represents the instance of the process that was started
*/
ProcessInstance startProcess(String processId,
Map<String, Object> parameters);
/**
* Signals the jBPM engine that an event has occurred. The type parameter defines
* the type of event and the event parameter can contain additional information
* related to the event. All process instances that are listening to this type
* of (external) event will be notified. For performance reasons, use this type of
* event signaling only if one process instance must be able to notify
* other process instances. For internal events within one process instance, use the
* signalEvent method that also include the processInstanceId of the process instance
* in question.
*
* @param type the type of event
* @param event the data associated with this event
*/
void signalEvent(String type,
Object event);
/**
* Signals the process instance that an event has occurred. The type parameter defines
* the type of event and the event parameter can contain additional information
* related to the event. All node instances inside the given process instance that
* are listening to this type of (internal) event will be notified. Note that the event
* will only be processed inside the given process instance. All other process instances
* waiting for this type of event will not be notified.
*
* @param type the type of event
* @param event the data associated with this event
* @param processInstanceId the id of the process instance that should be signaled
*/
void signalEvent(String type,
Object event,
long processInstanceId);
/**
* Returns a collection of currently active process instances. Note that only process
* instances that are currently loaded and active inside the jBPM engine are returned.
* When using persistence, it is likely not all running process instances are loaded
* as their state is stored persistently. It is best practice not to use this
* method to collect information about the state of your process instances but to use
* a history log for that purpose.
*
* @return a collection of process instances currently active in the session
*/
Collection<ProcessInstance> getProcessInstances();
/**
* Returns the process instance with the given ID. Note that only active process instances
* are returned. If a process instance has been completed already, this method returns
* null.
*
* @param id the ID of the process instance
* @return the process instance with the given ID, or null if it cannot be found
*/
ProcessInstance getProcessInstance(long processInstanceId);
/**
* Aborts the process instance with the given ID. If the process instance has been completed
* (or aborted), or if the process instance cannot be found, this method will throw an
* IllegalArgumentException.
*
* @param id the ID of the process instance
*/
void abortProcessInstance(long processInstanceId);
/**
* Returns the WorkItemManager related to this session. This object can be used to
* register new WorkItemHandlers or to complete (or abort) WorkItems.
*
* @return the WorkItemManager related to this session
*/
WorkItemManager getWorkItemManager();9.2.4. Correlation Keys
When working with processes, you might need to assign a business identifier to a process instance and then use the identifier to reference the instance without storing the generated instance ID.
To provide such capabilities, the jBPM engine uses the CorrelationKey interface, which can define CorrelationProperties. A class that implements CorrelationKey can have either a single property describing it or a multi-property set. The value of the property or a combination of values of several properties refers to a unique instance.
The KieSession class implements the CorrelationAwareProcessRuntime interface to support correlation capabilities. This interface exposes the following methods:
CorrelationAwareProcessRuntime interface /**
* Start a new process instance. Use the process (definition) that
* is referenced by the given process ID. You can pass parameters
* to the process instance (as name-value pairs), and these parameters set
* variables of the process instance.
*
* @param processId the ID of the process to start
* @param correlationKey custom correlation key that can be used to identify the process instance
* @param parameters the process variables to set when starting the process instance
* @return the ProcessInstance that represents the instance of the process that was started
*/
ProcessInstance startProcess(String processId, CorrelationKey correlationKey, Map<String, Object> parameters);
/**
* Create a new process instance (but do not yet start it). Use the process
* (definition) that is referenced by the given process ID.
* You can pass to the process instance (as name-value pairs),
* and these parameters set variables of the process instance.
* Use this method if you need a reference to the process instance before actually
* starting it. Otherwise, use startProcess.
*
* @param processId the ID of the process to start
* @param correlationKey custom correlation key that can be used to identify the process instance
* @param parameters the process variables to set when creating the process instance
* @return the ProcessInstance that represents the instance of the process that was created (but not yet started)
*/
ProcessInstance createProcessInstance(String processId, CorrelationKey correlationKey, Map<String, Object> parameters);
/**
* Returns the process instance with the given correlationKey. Note that only active process instances
* are returned. If a process instance has been completed already, this method will return
* null.
*
* @param correlationKey the custom correlation key assigned when the process instance was created
* @return the process instance identified by the key or null if it cannot be found
*/
ProcessInstance getProcessInstance(CorrelationKey correlationKey);Correlation is usually used with long-running processes. You must enable persistence if you want to store correlation information permanently.
9.3. Runtime manager
The RuntimeManager class provides a layer in the jBPM engine API that simplifies and empowers its usage. This class encapsulates and manages the KIE base and KIE session, as well as the task service that provides handlers for all tasks in the process. The KIE session and the task service within the runtime manager are already configured to work with each other and you do not need to provide such configuration. For example, you do not need to register a human task handler and to ensure that it is connected to the required service.
The runtime manager manages the KIE session according to a predefined strategy. The following strategies are available:
-
Singleton: The runtime manager maintains a single
KieSessionand uses it for all the requested processes. -
Per Request: The runtime manager creates a new
KieSessionfor every request. -
Per Process Instance: The runtime manager maintains mapping between process instance and
KieSessionand always provides the sameKieSessionwhenever working with a given process instance.
Regardless of the strategy, the RuntimeManager class ensures the same capabilities in initialization and configuration of the jBPM engine components:
-
KieSessioninstances are loaded with the same factories (either in memory or JPA based). -
Work item handlers are registered on every
KieSessioninstance (either loaded from the database or newly created). -
Event listeners (
Process,Agenda,WorkingMemory) are registered on every KIE session, whether the session is loaded from the database or newly created. -
The task service is configured with the following required components:
-
The JTA transaction manager
-
The same entity manager factory as the one used for
KieSessioninstances -
The
UserGroupCallbackinstance that can be configured in the environment
-
The runtime manager also enables disposing the jBPM engine cleanly. It provides dedicated methods to dispose a RuntimeEngine instance when it is no longer needed, releasing any resources it might have acquired.
The following code shows the definition of the RuntimeManager interface:
RuntimeManager interfacepublic interface RuntimeManager {
/**
* Returns a <code>RuntimeEngine</code> instance that is fully initialized:
* <ul>
* <li>KieSession is created or loaded depending on the strategy</li>
* <li>TaskService is initialized and attached to the KIE session (through a listener)</li>
* <li>WorkItemHandlers are initialized and registered on the KIE session</li>
* <li>EventListeners (process, agenda, working memory) are initialized and added to the KIE session</li>
* </ul>
* @param context the concrete implementation of the context that is supported by given <code>RuntimeManager</code>
* @return instance of the <code>RuntimeEngine</code>
*/
RuntimeEngine getRuntimeEngine(Context<?> context);
/**
* Unique identifier of the <code>RuntimeManager</code>
* @return
*/
String getIdentifier();
/**
* Disposes <code>RuntimeEngine</code> and notifies all listeners about that fact.
* This method should always be used to dispose <code>RuntimeEngine</code> that is not needed
* anymore. <br/>
* Do not use KieSession.dispose() used with RuntimeManager as it will break the internal
* mechanisms of the manager responsible for clear and efficient disposal.<br/>
* Disposing is not needed if <code>RuntimeEngine</code> was obtained within an active JTA transaction,
* if the getRuntimeEngine method was invoked during active JTA transaction, then disposing of
* the runtime engine will happen automatically on transaction completion.
* @param runtime
*/
void disposeRuntimeEngine(RuntimeEngine runtime);
/**
* Closes <code>RuntimeManager</code> and releases its resources. Call this method when
* a runtime manager is not needed anymore. Otherwise it will still be active and operational.
*/
void close();
}The RuntimeManager class also provides the RuntimeEngine class, which includes methods to get access to underlying jBPM engine components:
RuntimeEngine interfacepublic interface RuntimeEngine {
/**
* Returns the <code>KieSession</code> configured for this <code>RuntimeEngine</code>
* @return
*/
KieSession getKieSession();
/**
* Returns the <code>TaskService</code> configured for this <code>RuntimeEngine</code>
* @return
*/
TaskService getTaskService();
}|
An identifier of the The same If you don’t specify an identifier when creating a If you maintain multiple runtime managers in your application, you must specify a unique identifier for every For example, the deployment service maintains multiple runtime managers and uses the GAV value of the KJAR file as an identifier. The same logic is used in Business Central and in KIE Server, because they depend on the deployment service. |
|
When you need to interact with the jBPM engine or task service from within a handler or a listener, you can use the |
9.3.1. Runtime manager strategies
The RuntimeManager class supports the following strategies for managing KIE sessions.
- Singleton strategy
-
This strategy instructs the runtime manager to maintain a single
RuntimeEngineinstance (and in turn singleKieSessionandTaskServiceinstances). Access to the runtime engine is synchronized and, therefore, thread safe, although it comes with a performance penalty due to synchronization.This strategy is similar to what was available by default in jBPM version 5.x. Use this strategy for simple use cases.
This strategy has the following characteristics:
-
It has a small memory footprint, with single instances of the runtime engine and the task service.
-
It is simple and compact in design and usage.
-
It is a good fit for low-to-medium load on the jBPM engine because of synchronized access.
-
In this strategy, because of the single
KieSessioninstance, all state objects (such as facts) are directly visible to all process instances and vice versa. -
The strategy is not contextual. When you retrieve instances of
RuntimeEnginefrom a singletonRuntimeManager, you do not need to take theContextinstance into account. Usually, you can useEmptyContext.get()as the context, although a null argument is acceptable as well. -
In this strategy, the runtime manager keeps track of the ID of the
KieSession, so that the same session remains in use after aRuntimeManagerrestart. The ID is stored as a serialized file in a temporary location in the file system that, depending on the environment, can be one of the following directories:-
The value of the
jbpm.data.dirsystem property -
The value of the
jboss.server.data.dirsystem property -
The value of the
java.io.tmpdirsystem property
-
A combination of the Singleton strategy and the EJB Timer Scheduler might raise Hibernate issues under load. Do not use this combination in production applications. The EJB Timer Scheduler is the default scheduler in the KIE Server.
-
- Per request strategy
-
This strategy instructs the runtime manager to provide a new instance of
RuntimeEnginefor every request. One or more invocations of the jBPM engine within a single transaction are considered a single request.The same instance of
RuntimeEnginemust be used within a single transaction to ensure correctness of state. Otherwise, an operation completed in one call would not be visible in the next call.This strategy is stateless, as process state is preserved only within the request. When a request is completed, the
RuntimeEngineinstance is permanently destroyed. If persistence is used, information related to the KIE session is removed from the persistence database as well.This strategy has the following characteristics:
-
It provides completely isolated jBPM engine and task service operations for every request.
-
It is completely stateless, because facts are stored only for the duration of the request.
-
It is a good fit for high-load, stateless processes, where no facts or timers must be preserved between requests.
-
In this strategy, the KIE session is only available during the life of a request and is destroyed at the end of the request.
-
The strategy is not contextual. When you retrieve instances of
RuntimeEnginefrom a per-requestRuntimeManager, you do not need to take theContextinstance into account. Usually, you can useEmptyContext.get()as the context, although a null argument is acceptable as well.
-
- Per process instance strategy
-
This strategy instructs
RuntimeManagerto maintain a strict relationship between a KIE session and a process instance. EachKieSessionis available as long as theProcessInstanceto which it belongs is active.This strategy provides the most flexible approach for using advanced capabilities of the jBPM engine, such as rule evaluation and isolation between process instances. It maximizes performance and reduces potential bottlenecks introduced by synchronization. At the same time, unlike the request strategy, it reduces the number of KIE sessions to the actual number of process instances, rather than the total number of requests.
This strategy has the following characteristics:
-
It provides isolation for every process instance.
-
It maintains a strict relationship between
KieSessionandProcessInstanceto ensure that it always delivers the sameKieSessionfor a givenProcessInstance. -
It merges the lifecycle of
KieSessionwithProcessInstance, and both are disposed when the process instance completes or aborts. -
It enables maintenance of data, such as facts and timers, in the scope of the process instance. Only the process instance has access to the data.
-
It introduces some overhead because of the need to look up and load the
KieSessionfor the process instance. -
It validates every usage of a
KieSessionso it cannot be used for other process instances. An exception is thrown if another process instance uses the sameKieSession. -
The strategy is contextual and accepts the following context instances:
-
EmptyContextor null: Used when starting a process instance because no process instance ID is available yet -
ProcessInstanceIdContext: Used after the process instance is created -
CorrelationKeyContext: Used as an alternative toProcessInstanceIdContextto use a custom (business) key instead of the process instance ID
-
-
9.3.2. Typical usage scenario for the runtime manager
The typical usage scenario for the runtime manager consists of the following stages:
-
At application startup time, complete the following stage:
-
Build a
RuntimeManagerinstance and keep it for the entire lifetime of the application, as it is thread-safe and can be accessed concurrently.
-
-
At request time, complete the following stages:
-
Get
RuntimeEnginefrom theRuntimeManager, using the proper context instance as determined by the strategy that you configured for theRuntimeManagerclass. -
Get the
KieSessionandTaskServiceobjects from theRuntimeEngine. -
Use the
KieSessionandTaskServiceobjects for operations such asstartProcessorcompleteTask. -
After completing processing, dispose
RuntimeEngineusing theRuntimeManager.disposeRuntimeEnginemethod.
-
-
At application shutdown time, complete the following stage:
-
Close the
RuntimeManagerinstance.
-
|
When |
The following example shows how you can build a RuntimeManager instance and get a RuntimeEngine instance (that encapsulates KieSession and TaskService classes) from it:
RuntimeManager instance and then getting RuntimeEngine and KieSession // First, configure the environment to be used by RuntimeManager
RuntimeEnvironment environment = RuntimeEnvironmentBuilder.Factory.get()
.newDefaultInMemoryBuilder()
.addAsset(ResourceFactory.newClassPathResource("BPMN2-ScriptTask.bpmn2"), ResourceType.BPMN2)
.get();
// Next, create the RuntimeManager - in this case the singleton strategy is chosen
RuntimeManager manager = RuntimeManagerFactory.Factory.get().newSingletonRuntimeManager(environment);
// Then get RuntimeEngine from the runtime manager, using an empty context because singleton does not keep track
// of runtime engine as there is only one
RuntimeEngine runtime = manager.getRuntimeEngine(EmptyContext.get());
// Get the KieSession from the RuntimeEngine - already initialized with all handlers, listeners, and other requirements
// configured on the environment
KieSession ksession = runtimeEngine.getKieSession();
// Add invocations of the jBPM engine here,
// for example, ksession.startProcess(processId);
// Finally, dispose the runtime engine
manager.disposeRuntimeEngine(runtimeEngine);This example provides the simplest, or minimal, way of using RuntimeManager and RuntimeEngine classes. It has the following characteristics:
-
The
KieSessioninstance is created in memory, using thenewDefaultInMemoryBuilderbuilder. -
A single process, which is added as an asset, is available for execution.
-
The
TaskServiceclass is configured and attached to theKieSessioninstance through theLocalHTWorkItemHandlerinterface to support user task capabilities within processes.
9.3.3. Runtime environment configuration object
The RuntimeManager class encapsulates internal jBPM engine complexity, such as creating, disposing, and registering handlers.
It also provides fine-grained control over jBPM engine configuration. To set this configuration, you must create a RuntimeEnvironment object and then use it to create the RuntimeManager object.
The following definition shows the methods available in the RuntimeEnvironment interface:
RuntimeEnvironment interface public interface RuntimeEnvironment {
/**
* Returns <code>KieBase</code> that is to be used by the manager
* @return
*/
KieBase getKieBase();
/**
* KieSession environment that is to be used to create instances of <code>KieSession</code>
* @return
*/
Environment getEnvironment();
/**
* KieSession configuration that is to be used to create instances of <code>KieSession</code>
* @return
*/
KieSessionConfiguration getConfiguration();
/**
* Indicates if persistence is to be used for the KieSession instances
* @return
*/
boolean usePersistence();
/**
* Delivers a concrete implementation of <code>RegisterableItemsFactory</code> to obtain handlers and listeners
* that is to be registered on instances of <code>KieSession</code>
* @return
*/
RegisterableItemsFactory getRegisterableItemsFactory();
/**
* Delivers a concrete implementation of <code>UserGroupCallback</code> that is to be registered on instances
* of <code>TaskService</code> for managing users and groups.
* @return
*/
UserGroupCallback getUserGroupCallback();
/**
* Delivers a custom class loader that is to be used by the jBPM engine and task service instances
* @return
*/
ClassLoader getClassLoader();
/**
* Closes the environment, permitting closing of all dependent components such as ksession factories
*/
void close();9.3.4. Runtime environment builder
To create an instance of RuntimeEnvironment that contains the required data, use the RuntimeEnvironmentBuilder class. This class provides a fluent API to configure a RuntimeEnvironment instance with predefined settings.
The following definition shows the methods in the RuntimeEnvironmentBuilder interface:
RuntimeEnvironmentBuilder interfacepublic interface RuntimeEnvironmentBuilder {
public RuntimeEnvironmentBuilder persistence(boolean persistenceEnabled);
public RuntimeEnvironmentBuilder entityManagerFactory(Object emf);
public RuntimeEnvironmentBuilder addAsset(Resource asset, ResourceType type);
public RuntimeEnvironmentBuilder addEnvironmentEntry(String name, Object value);
public RuntimeEnvironmentBuilder addConfiguration(String name, String value);
public RuntimeEnvironmentBuilder knowledgeBase(KieBase kbase);
public RuntimeEnvironmentBuilder userGroupCallback(UserGroupCallback callback);
public RuntimeEnvironmentBuilder registerableItemsFactory(RegisterableItemsFactory factory);
public RuntimeEnvironment get();
public RuntimeEnvironmentBuilder classLoader(ClassLoader cl);
public RuntimeEnvironmentBuilder schedulerService(Object globalScheduler);Use the RuntimeEnvironmentBuilderFactory class to obtain instances of RuntimeEnvironmentBuilder. Along with empty instances with no settings, you can get builders with several preconfigured sets of configuration options for the runtime manager.
The following definition shows the methods in the RuntimeEnvironmentBuilderFactory interface:
RuntimeEnvironmentBuilderFactory interfacepublic interface RuntimeEnvironmentBuilderFactory {
/**
* Provides a completely empty <code>RuntimeEnvironmentBuilder</code> instance to manually
* set all required components instead of relying on any defaults.
* @return new instance of <code>RuntimeEnvironmentBuilder</code>
*/
public RuntimeEnvironmentBuilder newEmptyBuilder();
/**
* Provides default configuration of <code>RuntimeEnvironmentBuilder</code> that is based on:
* <ul>
* <li>DefaultRuntimeEnvironment</li>
* </ul>
* @return new instance of <code>RuntimeEnvironmentBuilder</code> that is already preconfigured with defaults
*
* @see DefaultRuntimeEnvironment
*/
public RuntimeEnvironmentBuilder newDefaultBuilder();
/**
* Provides default configuration of <code>RuntimeEnvironmentBuilder</code> that is based on:
* <ul>
* <li>DefaultRuntimeEnvironment</li>
* </ul>
* but does not have persistence for the jBPM engine configured so it will only store process instances in memory
* @return new instance of <code>RuntimeEnvironmentBuilder</code> that is already preconfigured with defaults
*
* @see DefaultRuntimeEnvironment
*/
public RuntimeEnvironmentBuilder newDefaultInMemoryBuilder();
/**
* Provides default configuration of <code>RuntimeEnvironmentBuilder</code> that is based on:
* <ul>
* <li>DefaultRuntimeEnvironment</li>
* </ul>
* This method is tailored to work smoothly with KJAR files
* @param groupId group id of kjar
* @param artifactId artifact id of kjar
* @param version version number of kjar
* @return new instance of <code>RuntimeEnvironmentBuilder</code> that is already preconfigured with defaults
*
* @see DefaultRuntimeEnvironment
*/
public RuntimeEnvironmentBuilder newDefaultBuilder(String groupId, String artifactId, String version);
/**
* Provides default configuration of <code>RuntimeEnvironmentBuilder</code> that is based on:
* <ul>
* <li>DefaultRuntimeEnvironment</li>
* </ul>
* This method is tailored to work smoothly with KJAR files and use the kbase and ksession settings in the KJAR
* @param groupId group id of kjar
* @param artifactId artifact id of kjar
* @param version version number of kjar
* @param kbaseName name of the kbase defined in kmodule.xml stored in kjar
* @param ksessionName name of the ksession define in kmodule.xml stored in kjar
* @return new instance of <code>RuntimeEnvironmentBuilder</code> that is already preconfigured with defaults
*
* @see DefaultRuntimeEnvironment
*/
public RuntimeEnvironmentBuilder newDefaultBuilder(String groupId, String artifactId, String version, String kbaseName, String ksessionName);
/**
* Provides default configuration of <code>RuntimeEnvironmentBuilder</code> that is based on:
* <ul>
* <li>DefaultRuntimeEnvironment</li>
* </ul>
* This method is tailored to work smoothly with KJAR files and use the release ID defined in the KJAR
* @param releaseId <code>ReleaseId</code> that described the kjar
* @return new instance of <code>RuntimeEnvironmentBuilder</code> that is already preconfigured with defaults
*
* @see DefaultRuntimeEnvironment
*/
public RuntimeEnvironmentBuilder newDefaultBuilder(ReleaseId releaseId);
/**
* Provides default configuration of <code>RuntimeEnvironmentBuilder</code> that is based on:
* <ul>
* <li>DefaultRuntimeEnvironment</li>
* </ul>
* This method is tailored to work smoothly with KJAR files and use the kbase, ksession, and release ID settings in the KJAR
* @param releaseId <code>ReleaseId</code> that described the kjar
* @param kbaseName name of the kbase defined in kmodule.xml stored in kjar
* @param ksessionName name of the ksession define in kmodule.xml stored in kjar
* @return new instance of <code>RuntimeEnvironmentBuilder</code> that is already preconfigured with defaults
*
* @see DefaultRuntimeEnvironment
*/
public RuntimeEnvironmentBuilder newDefaultBuilder(ReleaseId releaseId, String kbaseName, String ksessionName);
/**
* Provides default configuration of <code>RuntimeEnvironmentBuilder</code> that is based on:
* <ul>
* <li>DefaultRuntimeEnvironment</li>
* </ul>
* It relies on KieClasspathContainer that requires the presence of kmodule.xml in the META-INF folder which
* defines the kjar itself.
* Expects to use default kbase and ksession from kmodule.
* @return new instance of <code>RuntimeEnvironmentBuilder</code> that is already preconfigured with defaults
*
* @see DefaultRuntimeEnvironment
*/
public RuntimeEnvironmentBuilder newClasspathKmoduleDefaultBuilder();
/**
* Provides default configuration of <code>RuntimeEnvironmentBuilder</code> that is based on:
* <ul>
* <li>DefaultRuntimeEnvironment</li>
* </ul>
* It relies on KieClasspathContainer that requires the presence of kmodule.xml in the META-INF folder which
* defines the kjar itself.
* @param kbaseName name of the kbase defined in kmodule.xml
* @param ksessionName name of the ksession define in kmodule.xml
* @return new instance of <code>RuntimeEnvironmentBuilder</code> that is already preconfigured with defaults
*
* @see DefaultRuntimeEnvironment
*/
public RuntimeEnvironmentBuilder newClasspathKmoduleDefaultBuilder(String kbaseName, String ksessionName);The runtime manager also provides access to a TaskService object as an integrated component of a RuntimeEngine object, configured to communicate with the KIE session. If you use one of the default builders, the following configuration settings for the task service are present:
-
The persistence unit name is set to
org.jbpm.persistence.jpa(for both jBPM engine and task service). -
The human task handler is registered on the KIE session.
-
The JPA-based history log event listener is registered on the KIE session.
-
An event listener to trigger rule task evaluation (
fireAllRules) is registered on the KIE session.
9.3.5. Registration of handlers and listeners for runtime engines
If you use the runtime manager API, the runtime engine object represents the jBPM engine.
To extend runtime engines with your own handlers or listeners, you can implement the RegisterableItemsFactory interface and then include it in the runtime environment using the RuntimeEnvironmentBuilder.registerableItemsFactory() method. Then the runtime manager automatically adds the handlers or listeners to every runtime engine it creates.
The following definition shows the methods in the RegisterableItemsFactory interface:
RegisterableItemsFactory interface /**
* Returns new instances of <code>WorkItemHandler</code> that will be registered on <code>RuntimeEngine</code>
* @param runtime provides <code>RuntimeEngine</code> in case handler need to make use of it internally
* @return map of handlers to be registered - in case of no handlers empty map shall be returned.
*/
Map<String, WorkItemHandler> getWorkItemHandlers(RuntimeEngine runtime);
/**
* Returns new instances of <code>ProcessEventListener</code> that will be registered on <code>RuntimeEngine</code>
* @param runtime provides <code>RuntimeEngine</code> in case listeners need to make use of it internally
* @return list of listeners to be registered - in case of no listeners empty list shall be returned.
*/
List<ProcessEventListener> getProcessEventListeners(RuntimeEngine runtime);
/**
* Returns new instances of <code>AgendaEventListener</code> that will be registered on <code>RuntimeEngine</code>
* @param runtime provides <code>RuntimeEngine</code> in case listeners need to make use of it internally
* @return list of listeners to be registered - in case of no listeners empty list shall be returned.
*/
List<AgendaEventListener> getAgendaEventListeners(RuntimeEngine runtime);
/**
* Returns new instances of <code>WorkingMemoryEventListener</code> that will be registered on <code>RuntimeEngine</code>
* @param runtime provides <code>RuntimeEngine</code> in case listeners need to make use of it internally
* @return list of listeners to be registered - in case of no listeners empty list shall be returned.
*/
List<WorkingMemoryEventListener> getWorkingMemoryEventListeners(RuntimeEngine runtime);The jBPM engine provides default implementations of RegisterableItemsFactory. You can extend these implementations to define custom handlers and listeners.
The following available implementations might be useful:
-
org.jbpm.runtime.manager.impl.SimpleRegisterableItemsFactory: The simplest possible implementation. It does not have any predefined content and uses reflection to produce instances of handlers and listeners based on given class names. -
org.jbpm.runtime.manager.impl.DefaultRegisterableItemsFactory: An extension of the Simple implementation that introduces the same defaults as the default runtime environment builder and still provides the same capabilities as the Simple implementation. -
org.jbpm.runtime.manager.impl.cdi.InjectableRegisterableItemsFactory: An extension of the Default implementation that is tailored for CDI environments and provides a CDI style approach to finding handlers and listeners using producers.
9.3.5.1. Registering work item handlers using a file
You can register simple work item handlers, which are stateless or rely on the KieSession state, by defining them in the CustomWorkItem.conf file and placing the file on the class path.
-
Create a file named
drools.session.confin theMETA-INFsubdirectory of the root of the class path. For web applications the directory isWEB-INF/classes/META-INF. -
Add the following line to the
drools.session.conffile:drools.workItemHandlers = CustomWorkItemHandlers.conf -
Create a file named
CustomWorkItemHandlers.confin the same directory. -
In the
CustomWorkItemHandlers.conffile, define custom work item handlers using the MVEL style, similar to the following example:[ "Log": new org.jbpm.process.instance.impl.demo.SystemOutWorkItemHandler(), "WebService": new org.jbpm.process.workitem.webservice.WebServiceWorkItemHandler(ksession), "Rest": new org.jbpm.process.workitem.rest.RESTWorkItemHandler(), "Service Task" : new org.jbpm.process.workitem.bpmn2.ServiceTaskHandler(ksession) ]
The work item handlers that you listed are registered for any KIE session created by the application, regardless of whether the application uses the runtime manager API.
9.3.5.2. Registration of handlers and listeners in a CDI environment
If your application uses the runtime manager API and runs in a CDI environment, your classes can implement the dedicated producer interfaces to provide custom work item handlers and event listeners to all runtime engines.
To create a work item handler, you must implement the WorkItemHandlerProducer interface.
WorkItemHandlerProducer interfacepublic interface WorkItemHandlerProducer {
/**
* Returns a map of work items (key = work item name, value= work item handler instance)
* to be registered on the KieSession
* <br/>
* The following parameters are accepted:
* <ul>
* <li>ksession</li>
* <li>taskService</li>
* <li>runtimeManager</li>
* </ul>
*
* @param identifier - identifier of the owner - usually RuntimeManager that allows the producer to filter out
* and provide valid instances for given owner
* @param params - the owner might provide some parameters, usually KieSession, TaskService, RuntimeManager instances
* @return map of work item handler instances (recommendation is to always return new instances when this method is invoked)
*/
Map<String, WorkItemHandler> getWorkItemHandlers(String identifier, Map<String, Object> params);
}To create an event listener, you must implement the EventListenerProducer interface. Annotate the event listener producer with the proper qualifier to indicate the type of listeners that it provides. Use one of the following annotations:
-
@ProcessforProcessEventListener -
@AgendaforAgendaEventListener -
@WorkingMemoryforWorkingMemoryEventListener
EventListenerProducer interfacepublic interface EventListenerProducer<T> {
/**
* Returns a list of instances for given (T) type of listeners
* <br/>
* The following parameters are accepted:
* <ul>
* <li>ksession</li>
* <li>taskService</li>
* <li>runtimeManager</li>
* </ul>
* @param identifier - identifier of the owner - usually RuntimeManager that allows the producer to filter out
* and provide valid instances for given owner
* @param params - the owner might provide some parameters, usually KieSession, TaskService, RuntimeManager instances
* @return list of listener instances (recommendation is to always return new instances when this method is invoked)
*/
List<T> getEventListeners(String identifier, Map<String, Object> params);
}Package your implementations of these interfaces as a bean archive by including beans.xml in the META-INF subdirectory. Place the bean archive on the application class path, for example, in WEB-INF/lib for a web application. The CDI-based runtime manager discovers the packages and registers the work item handlers and event listeners in every KieSession that it creates or loads from the data store.
The jBPM engine provides certain parameters to the producers to enable stateful and advanced operation. For example, the handlers or listeners can use the parameters to signal the jBPM engine or the process instance in case of an error. The jBPM engine provides the following components as parameters:
-
KieSession -
TaskService -
RuntimeManager
In addition, the identifier of the RuntimeManager class instance is provided as a parameter. You can apply filtering to the identifier to decide whether this RuntimeManager instance receives the handlers and listeners.
9.4. Services in the jBPM engine
The jBPM engine provides a set of high-level services, running on top of the runtime manager API. This API is available since jBPM version 6.2.
The services provide the most convenient way to embed the jBPM engine in your application. The KIE Server also uses these services internally.
When you use services, you do not need to implement your own handling of the runtime manager, runtime engines, sessions, and other jBPM engine entities. However, you can access the underlying RuntimeManager objects through the services when necessary.
|
If you use the EJB remote client for the services API, the |
9.4.1. Modules for jBPM engine services
The jBPM engine services are provided as a set of modules. These modules are grouped by their framework dependencies. You can choose the suitable modules and use only these modules, without making your application dependent on the frameworks that other modules use.
The following modules are available:
-
jbpm-services-api: Only API classes and interfaces -
jbpm-kie-services: A code implementation of the services API in pure Java without any framework dependencies -
jbpm-services-cdi: A CDI wrapper on top of the core services implementation -
jbpm-services-ejb-api: An extension of the services API to support EJB requirements -
jbpm-services-ejb-impl: EJB wrappers on top of the core services implementation -
jbpm-services-ejb-timer: A scheduler service based on the EJB timer service to support time-based operations, such as timer events and deadlines -
jbpm-services-ejb-client: An EJB remote client implementation, currently supporting only Red Hat JBoss EAP
9.4.2. Deployment service
The deployment service deploys and undeploys units in the jBPM engine.
A deployment unit represents the contents of a KJAR file. A deployment unit includes business assets, such as process definitions, rules, forms, and data models. After deploying the unit you can execute the processes it defines. You can also query the available deployment units.
Every deployment unit has a unique identifier string, deploymentId, also known as deploymentUnitId. You can use this identifier to apply any service actions to the deployment unit.
In a typical use case for this service, you can load and unload multiple KJARs at the same time and, when necessary, execute processes simultaneously.
The following code sample shows simple use of the deployment service.
// Create deployment unit by providing the GAV of the KJAR
DeploymentUnit deploymentUnit = new KModuleDeploymentUnit(GROUP_ID, ARTIFACT_ID, VERSION);
// Get the deploymentId for the deployed unit
String deploymentId = deploymentUnit.getIdentifier();
// Deploy the unit
deploymentService.deploy(deploymentUnit);
// Retrieve the deployed unit
DeployedUnit deployed = deploymentService.getDeployedUnit(deploymentId);
// Get the runtime manager
RuntimeManager manager = deployed.getRuntimeManager();
The following definition shows the complete DeploymentService interface:
DeploymentService interfacepublic interface DeploymentService {
void deploy(DeploymentUnit unit);
void undeploy(DeploymentUnit unit);
RuntimeManager getRuntimeManager(String deploymentUnitId);
DeployedUnit getDeployedUnit(String deploymentUnitId);
Collection<DeployedUnit> getDeployedUnits();
void activate(String deploymentId);
void deactivate(String deploymentId);
boolean isDeployed(String deploymentUnitId);
}9.4.3. Definition service
When you deploy a process definition using the deployment service, the definition service automatically scans the definition, parses the process, and extracts the information that the jBPM engine requires.
You can use the definition service API to retrieve information about the process definition. The service extracts this information directly from the BPMN2 process definition. The following information is available:
-
Process definition such as ID, name, and description
-
Process variables including the name and type of every variable
-
Reusable sub-processes used in the process (if any)
-
Service tasks that represent domain-specific activities
-
User tasks including assignment information
-
Task data with input and output information
The following code sample shows simple use of the definition service. The processID must correspond to the ID of a process definition in a KJAR file that you already deployed using the deployment service.
String processId = "org.jbpm.writedocument";

Collection<UserTaskDefinition> processTasks =
bpmn2Service.getTasksDefinitions(deploymentUnit.getIdentifier(), processId);

Map<String, String> processData =
bpmn2Service.getProcessVariables(deploymentUnit.getIdentifier(), processId);

Map<String, String> taskInputMappings =
bpmn2Service.getTaskInputMappings(deploymentUnit.getIdentifier(), processId, "Write a Document" );
You can also use the definition service to scan a definition that you provide as BPMN2-compliant XML content, without the use of a KJAR file. The buildProcessDefinition method provides this capability.
The following definition shows the complete DefinitionService interface:
DefinitionService interfacepublic interface DefinitionService {
ProcessDefinition buildProcessDefinition(String deploymentId, String bpmn2Content, ClassLoader classLoader, boolean cache) throws IllegalArgumentException;
ProcessDefinition getProcessDefinition(String deploymentId, String processId);
Collection<String> getReusableSubProcesses(String deploymentId, String processId);
Map<String, String> getProcessVariables(String deploymentId, String processId);
Map<String, String> getServiceTasks(String deploymentId, String processId);
Map<String, Collection<String>> getAssociatedEntities(String deploymentId, String processId);
Collection<UserTaskDefinition> getTasksDefinitions(String deploymentId, String processId);
Map<String, String> getTaskInputMappings(String deploymentId, String processId, String taskName);
Map<String, String> getTaskOutputMappings(String deploymentId, String processId, String taskName);
}9.4.4. Process service
The deployment and definition services prepare process data in the jBPM engine. To execute processes based on this data, use the process service. The process service supports interaction with the jBPM engine execution environment, including the following actions:
-
Starting a new process instance
-
Running a process as a single transaction
-
Working with an existing process instance, for example, signalling events, getting information details, and setting values of variables
-
Working with work items
The process service is also a command executor. You can use it to execute commands on the KIE session to extend its capabilities.
|
The process service is optimized for runtime operations. Use it when you need to run a process or to alter a process instance, for example, signal events or change variables. For read operations, for example, showing available process instances, use the runtime data service. |
The following code sample shows deploying and running a process:
KModuleDeploymentUnit deploymentUnit = new KModuleDeploymentUnit(GROUP_ID, ARTIFACT_ID, VERSION);

deploymentService.deploy(deploymentUnit);

long processInstanceId = processService.startProcess(deploymentUnit.getIdentifier(), "customtask");

ProcessInstance pi = processService.getProcessInstance(processInstanceId);
The startProcess method expects deploymentId as the first argument. Using this argument, you can start processes in a certain deployment when your application might have multiple deployments.
For example, you might deploy different versions of the same process from different KJAR files. You can then start the required version using the correct deploymentId.
The following definition shows the complete ProcessService interface:
ProcessService interfacepublic interface ProcessService {
/**
* Starts a process with no variables
*
* @param deploymentId deployment identifier
* @param processId process identifier
* @return process instance IDentifier
* @throws RuntimeException in case of encountered errors
* @throws DeploymentNotFoundException in case a deployment with the given deployment identifier does not exist
* @throws DeploymentNotActiveException in case the deployment with the given deployment identifier is not active
*/
Long startProcess(String deploymentId, String processId);
/**
* Starts a process and sets variables
*
* @param deploymentId deployment identifier
* @param processId process identifier
* @param params process variables
* @return process instance IDentifier
* @throws RuntimeException in case of encountered errors
* @throws DeploymentNotFoundException in case a deployment with the given deployment identifier does not exist
* @throws DeploymentNotActiveException in case the deployment with the given deployment identifier is not active
*/
Long startProcess(String deploymentId, String processId, Map<String, Object> params);
/**
* Starts a process with no variables and assigns a correlation key
*
* @param deploymentId deployment identifier
* @param processId process identifier
* @param correlationKey correlation key to be assigned to the process instance - must be unique
* @return process instance IDentifier
* @throws RuntimeException in case of encountered errors
* @throws DeploymentNotFoundException in case a deployment with the given deployment identifier does not exist
* @throws DeploymentNotActiveException in case the deployment with the given deployment identifier is not active
*/
Long startProcess(String deploymentId, String processId, CorrelationKey correlationKey);
/**
* Starts a process, sets variables, and assigns a correlation key
*
* @param deploymentId deployment identifier
* @param processId process identifier
* @param correlationKey correlation key to be assigned to the process instance - must be unique
* @param params process variables
* @return process instance IDentifier
* @throws RuntimeException in case of encountered errors
* @throws DeploymentNotFoundException in case a deployment with the given deployment identifier does not exist
* @throws DeploymentNotActiveException in case the deployment with the given deployment identifier is not active
*/
Long startProcess(String deploymentId, String processId, CorrelationKey correlationKey, Map<String, Object> params);
/**
* Run a process that is designed to start and finish in a single transaction.
* This method starts the process and returns when the process completes.
* It returns the state of process variables at the outcome of the process
*
* @param deploymentId deployment identifier for the KJAR file of the process
* @param processId process identifier
* @param params process variables
* @return the state of process variables at the end of the process
*/
Map<String, Object> computeProcessOutcome(String deploymentId, String processId, Map<String, Object> params);
/**
* Starts a process at the listed nodes, instead of the normal starting point.
* This method can be used for restarting a process that was aborted. However,
* it does not restore the context of a previous process instance. You must
* supply all necessary variables when calling this method.
* This method does not guarantee that the process is started in a valid state.
*
* @param deploymentId deployment identifier
* @param processId process identifier
* @param params process variables
* @param nodeIds list of BPMN node identifiers where the process must start
* @return process instance IDentifier
* @throws RuntimeException in case of encountered errors
* @throws DeploymentNotFoundException in case a deployment with the given deployment identifier does not exist
* @throws DeploymentNotActiveException in case the deployment with the given deployment identifier is not active
*/
Long startProcessFromNodeIds(String deploymentId, String processId, Map<String, Object> params, String... nodeIds);
/**
* Starts a process at the listed nodes, instead of the normal starting point,
* and assigns a correlation key.
* This method can be used for restarting a process that was aborted. However,
* it does not restore the context of a previous process instance. You must
* supply all necessary variables when calling this method.
* This method does not guarantee that the process is started in a valid state.
*
* @param deploymentId deployment identifier
* @param processId process identifier
* @param key correlation key (must be unique)
* @param params process variables
* @param nodeIds list of BPMN node identifiers where the process must start.
* @return process instance IDentifier
* @throws RuntimeException in case of encountered errors
* @throws DeploymentNotFoundException in case a deployment with the given deployment identifier does not exist
* @throws DeploymentNotActiveException in case the deployment with the given deployment identifier is not active
*/
Long startProcessFromNodeIds(String deploymentId, String processId, CorrelationKey key, Map<String, Object> params, String... nodeIds);
/**
* Aborts the specified process
*
* @param processInstanceId process instance unique identifier
* @throws DeploymentNotFoundException in case the deployment unit was not found
* @throws ProcessInstanceNotFoundException in case a process instance with the given ID was not found
*/
void abortProcessInstance(Long processInstanceId);
/**
* Aborts the specified process
*
* @param deploymentId deployment to which the process instance belongs
* @param processInstanceId process instance unique identifier
* @throws DeploymentNotFoundException in case the deployment unit was not found
* @throws ProcessInstanceNotFoundException in case a process instance with the given ID was not found
*/
void abortProcessInstance(String deploymentId, Long processInstanceId);
/**
* Aborts all specified processes
*
* @param processInstanceIds list of process instance unique identifiers
* @throws DeploymentNotFoundException in case the deployment unit was not found
* @throws ProcessInstanceNotFoundException in case a process instance with the given ID was not found
*/
void abortProcessInstances(List<Long> processInstanceIds);
/**
* Aborts all specified processes
*
* @param deploymentId deployment to which the process instance belongs
* @param processInstanceIds list of process instance unique identifiers
* @throws DeploymentNotFoundException in case the deployment unit was not found
* @throws ProcessInstanceNotFoundException in case a process instance with the given ID was not found
*/
void abortProcessInstances(String deploymentId, List<Long> processInstanceIds);
/**
* Signals an event to a single process instance
*
* @param processInstanceId the process instance unique identifier
* @param signalName the ID of the signal in the process
* @param event the event object to be passed with the event
* @throws DeploymentNotFoundException in case the deployment unit was not found
* @throws ProcessInstanceNotFoundException in case a process instance with the given ID was not found
*/
void signalProcessInstance(Long processInstanceId, String signalName, Object event);
/**
* Signals an event to a single process instance
*
* @param deploymentId deployment to which the process instance belongs
* @param processInstanceId the process instance unique identifier
* @param signalName the ID of the signal in the process
* @param event the event object to be passed with the event
* @throws DeploymentNotFoundException in case the deployment unit was not found
* @throws ProcessInstanceNotFoundException in case a process instance with the given ID was not found
*/
void signalProcessInstance(String deploymentId, Long processInstanceId, String signalName, Object event);
/**
* Signal an event to a list of process instances
*
* @param processInstanceIds list of process instance unique identifiers
* @param signalName the ID of the signal in the process
* @param event the event object to be passed with the event
* @throws DeploymentNotFoundException in case the deployment unit was not found
* @throws ProcessInstanceNotFoundException in case a process instance with the given ID was not found
*/
void signalProcessInstances(List<Long> processInstanceIds, String signalName, Object event);
/**
* Signal an event to a list of process instances
*
* @param deploymentId deployment to which the process instances belong
* @param processInstanceIds list of process instance unique identifiers
* @param signalName the ID of the signal in the process
* @param event the event object to be passed with the event
* @throws DeploymentNotFoundException in case the deployment unit was not found
* @throws ProcessInstanceNotFoundException in case a process instance with the given ID was not found
*/
void signalProcessInstances(String deploymentId, List<Long> processInstanceIds, String signalName, Object event);
/**
* Signal an event to a single process instance by correlation key
*
* @param correlationKey the unique correlation key of the process instance
* @param signalName the ID of the signal in the process
* @param event the event object to be passed in with the event
* @throws DeploymentNotFoundException in case the deployment unit was not found
* @throws ProcessInstanceNotFoundException in case a process instance with the given key was not found
*/
void signalProcessInstanceByCorrelationKey(CorrelationKey correlationKey, String signalName, Object event);
/**
* Signal an event to a single process instance by correlation key
*
* @param deploymentId deployment to which the process instance belongs
* @param correlationKey the unique correlation key of the process instance
* @param signalName the ID of the signal in the process
* @param event the event object to be passed in with the event
* @throws DeploymentNotFoundException in case the deployment unit was not found
* @throws ProcessInstanceNotFoundException in case a process instance with the given key was not found
*/
void signalProcessInstanceByCorrelationKey(String deploymentId, CorrelationKey correlationKey, String signalName, Object event);
/**
* Signal an event to given list of correlation keys
*
* @param correlationKeys list of unique correlation keys of process instances
* @param signalName the ID of the signal in the process
* @param event the event object to be passed in with the event
* @throws DeploymentNotFoundException in case the deployment unit was not found
* @throws ProcessInstanceNotFoundException in case a process instance with one of the given keys was not found
*/
void signalProcessInstancesByCorrelationKeys(List<CorrelationKey> correlationKeys, String signalName, Object event);
/**
* Signal an event to given list of correlation keys
*
* @param deploymentId deployment to which the process instances belong
* @param correlationKeys list of unique correlation keys of process instances
* @param signalName the ID of the signal in the process
* @param event the event object to be passed in with the event
* @throws DeploymentNotFoundException in case the deployment unit was not found
* @throws ProcessInstanceNotFoundException in case a process instance with one of the given keys was not found
*/
void signalProcessInstancesByCorrelationKeys(String deploymentId, List<CorrelationKey> correlationKeys, String signalName, Object event);
/**
* Signal an event to a any process instance that listens to a given signal and belongs to a given deployment
*
* @param deployment identifier of the deployment
* @param signalName the ID of the signal in the process
* @param event the event object to be passed with the event
* @throws DeploymentNotFoundException in case the deployment unit was not found
*/
void signalEvent(String deployment, String signalName, Object event);
/**
* Returns process instance information. Will return null if no
* active process with the ID is found
*
* @param processInstanceId The process instance unique identifier
* @return Process instance information
* @throws DeploymentNotFoundException in case the deployment unit was not found
*/
ProcessInstance getProcessInstance(Long processInstanceId);
/**
* Returns process instance information. Will return null if no
* active process with the ID is found
*
* @param deploymentId deployment to which the process instance belongs
* @param processInstanceId The process instance unique identifier
* @return Process instance information
* @throws DeploymentNotFoundException in case the deployment unit was not found
*/
ProcessInstance getProcessInstance(String deploymentId, Long processInstanceId);
/**
* Returns process instance information. Will return null if no
* active process with that correlation key is found
*
* @param correlationKey correlation key assigned to the process instance
* @return Process instance information
* @throws DeploymentNotFoundException in case the deployment unit was not found
*/
ProcessInstance getProcessInstance(CorrelationKey correlationKey);
/**
* Returns process instance information. Will return null if no
* active process with that correlation key is found
*
* @param deploymentId deployment to which the process instance belongs
* @param correlationKey correlation key assigned to the process instance
* @return Process instance information
* @throws DeploymentNotFoundException in case the deployment unit was not found
*/
ProcessInstance getProcessInstance(String deploymentId, CorrelationKey correlationKey);
/**
* Sets a process variable.
* @param processInstanceId The process instance unique identifier
* @param variableId The variable ID to set
* @param value The variable value
* @throws DeploymentNotFoundException in case the deployment unit was not found
* @throws ProcessInstanceNotFoundException in case a process instance with the given ID was not found
*/
void setProcessVariable(Long processInstanceId, String variableId, Object value);
/**
* Sets a process variable.
*
* @param deploymentId deployment to which the process instance belongs
* @param processInstanceId The process instance unique identifier
* @param variableId The variable id to set.
* @param value The variable value.
* @throws DeploymentNotFoundException in case the deployment unit was not found
* @throws ProcessInstanceNotFoundException in case a process instance with the given ID was not found
*/
void setProcessVariable(String deploymentId, Long processInstanceId, String variableId, Object value);
/**
* Sets process variables.
*
* @param processInstanceId The process instance unique identifier
* @param variables map of process variables (key = variable name, value = variable value)
* @throws DeploymentNotFoundException in case the deployment unit was not found
* @throws ProcessInstanceNotFoundException in case a process instance with the given ID was not found
*/
void setProcessVariables(Long processInstanceId, Map<String, Object> variables);
/**
* Sets process variables.
*
* @param deploymentId deployment to which the process instance belongs
* @param processInstanceId The process instance unique identifier
* @param variables map of process variables (key = variable name, value = variable value)
* @throws DeploymentNotFoundException in case the deployment unit was not found
* @throws ProcessInstanceNotFoundException in case a process instance with the given ID was not found
*/
void setProcessVariables(String deploymentId, Long processInstanceId, Map<String, Object> variables);
/**
* Gets a process instance variable.
*
* @param processInstanceId the process instance unique identifier
* @param variableName the variable name to get from the process
* @throws DeploymentNotFoundException in case the deployment unit was not found
* @throws ProcessInstanceNotFoundException in case a process instance with the given ID was not found
*/
Object getProcessInstanceVariable(Long processInstanceId, String variableName);
/**
* Gets a process instance variable.
*
* @param deploymentId deployment to which the process instance belongs
* @param processInstanceId the process instance unique identifier
* @param variableName the variable name to get from the process
* @throws DeploymentNotFoundException in case the deployment unit was not found
* @throws ProcessInstanceNotFoundException in case a process instance with the given ID was not found
*/
Object getProcessInstanceVariable(String deploymentId, Long processInstanceId, String variableName);
/**
* Gets a process instance variable values.
*
* @param processInstanceId The process instance unique identifier
* @throws DeploymentNotFoundException in case the deployment unit was not found
* @throws ProcessInstanceNotFoundException in case a process instance with the given ID was not found
*/
Map<String, Object> getProcessInstanceVariables(Long processInstanceId);
/**
* Gets a process instance variable values.
*
* @param deploymentId deployment to which the process instance belongs
* @param processInstanceId The process instance unique identifier
* @throws DeploymentNotFoundException in case the deployment unit was not found
* @throws ProcessInstanceNotFoundException in case a process instance with the given ID was not found
*/
Map<String, Object> getProcessInstanceVariables(String deploymentId, Long processInstanceId);
/**
* Returns all signals available in current state of given process instance
*
* @param processInstanceId process instance ID
* @return list of available signals or empty list if no signals are available
*/
Collection<String> getAvailableSignals(Long processInstanceId);
/**
* Returns all signals available in current state of given process instance
*
* @param deploymentId deployment to which the process instance belongs
* @param processInstanceId process instance ID
* @return list of available signals or empty list if no signals are available
*/
Collection<String> getAvailableSignals(String deploymentId, Long processInstanceId);
/**
* Completes the specified WorkItem with the given results
*
* @param id workItem ID
* @param results results of the workItem
* @throws DeploymentNotFoundException in case the deployment unit was not found
* @throws WorkItemNotFoundException in case a work item with the given ID was not found
*/
void completeWorkItem(Long id, Map<String, Object> results);
/**
* Completes the specified WorkItem with the given results
*
* @param deploymentId deployment to which the process instance belongs
* @param processInstanceId process instance ID to which the work item belongs
* @param id workItem ID
* @param results results of the workItem
* @throws DeploymentNotFoundException in case the deployment unit was not found
* @throws WorkItemNotFoundException in case a work item with the given ID was not found
*/
void completeWorkItem(String deploymentId, Long processInstanceId, Long id, Map<String, Object> results);
/**
* Abort the specified workItem
*
* @param id workItem ID
* @throws DeploymentNotFoundException in case the deployment unit was not found
* @throws WorkItemNotFoundException in case a work item with the given ID was not found
*/
void abortWorkItem(Long id);
/**
* Abort the specified workItem
*
* @param deploymentId deployment to which the process instance belongs
* @param processInstanceId process instance ID to which the work item belongs
* @param id workItem ID
* @throws DeploymentNotFoundException in case the deployment unit was not found
* @throws WorkItemNotFoundException in case a work item with the given ID was not found
*/
void abortWorkItem(String deploymentId, Long processInstanceId, Long id);
/**
* Returns the specified workItem
*
* @param id workItem ID
* @return The specified workItem
* @throws DeploymentNotFoundException in case the deployment unit was not found
* @throws WorkItemNotFoundException in case a work item with the given ID was not found
*/
WorkItem getWorkItem(Long id);
/**
* Returns the specified workItem
*
* @param deploymentId deployment to which the process instance belongs
* @param processInstanceId process instance ID to which the work item belongs
* @param id workItem ID
* @return The specified workItem
* @throws DeploymentNotFoundException in case the deployment unit was not found
* @throws WorkItemNotFoundException in case a work item with the given ID was not found
*/
WorkItem getWorkItem(String deploymentId, Long processInstanceId, Long id);
/**
* Returns active work items by process instance ID.
*
* @param processInstanceId process instance ID
* @return The list of active workItems for the process instance
* @throws DeploymentNotFoundException in case the deployment unit was not found
* @throws ProcessInstanceNotFoundException in case a process instance with the given ID was not found
*/
List<WorkItem> getWorkItemByProcessInstance(Long processInstanceId);
/**
* Returns active work items by process instance ID.
*
* @param deploymentId deployment to which the process instance belongs
* @param processInstanceId process instance ID
* @return The list of active workItems for the process instance
* @throws DeploymentNotFoundException in case the deployment unit was not found
* @throws ProcessInstanceNotFoundException in case a process instance with the given ID was not found
*/
List<WorkItem> getWorkItemByProcessInstance(String deploymentId, Long processInstanceId);
/**
* Executes the provided command on the underlying command executor (usually KieSession)
* @param deploymentId deployment identifier
* @param command actual command for execution
* @return results of the command execution
* @throws DeploymentNotFoundException in case a deployment with the given deployment identifier does not exist
* @throws DeploymentNotActiveException in case the deployment with the given deployment identifier is not active for restricted commands (for example, start process)
*/
public <T> T execute(String deploymentId, Command<T> command);
/**
* Executes the provided command on the underlying command executor (usually KieSession)
* @param deploymentId deployment identifier
* @param context context implementation to be used to get the runtime engine
* @param command actual command for execution
* @return results of the command execution
* @throws DeploymentNotFoundException in case a deployment with the given deployment identifier does not exist
* @throws DeploymentNotActiveException in case the deployment with the given deployment identifier is not active for restricted commands (for example, start process)
*/
public <T> T execute(String deploymentId, Context<?> context, Command<T> command);
}9.4.5. Runtime Data Service
You can use the runtime data service to retrieve all runtime information about processes, such as started process instances and executed node instances.
For example, you can build a list-based UI to show process definitions, process instances, tasks for a given user, and other data, based on information provided by the runtime data service.
This service is optimized to be as efficient as possible while providing all required information.
The following examples show various usage of this service.
Collection definitions = runtimeDataService.getProcesses(new QueryContext());Collection<processinstancedesc> instances = runtimeDataService.getProcessInstances(new QueryContext());Collection<nodeinstancedesc> instances = runtimeDataService.getProcessInstanceHistoryActive(processInstanceId, new QueryContext());johnList<tasksummary> taskSummaries = runtimeDataService.getTasksAssignedAsPotentialOwner("john", new QueryFilter(0, 10));The runtime data service methods support two important parameters, QueryContext and QueryFilter. QueryFilter is an extension of QueryContext. You can use these parameters to manage the result set, providing pagination, sorting, and ordering. You can also use them to apply additional filtering when searching for user tasks.
The following definition shows the methods of the RuntimeDataService interface:
RuntimeDataService interfacepublic interface RuntimeDataService {
/**
* Represents type of node instance log entries
*
*/
enum EntryType {
START(0),
END(1),
ABORTED(2),
SKIPPED(3),
OBSOLETE(4),
ERROR(5);
}
// Process instance information
/**
* Returns a list of process instance descriptions
* @param queryContext control parameters for the result, such as sorting and paging
* @return list of {@link ProcessInstanceDesc} instances representing the available process instances
*/
Collection<ProcessInstanceDesc> getProcessInstances(QueryContext queryContext);
/**
* Returns a list of all process instance descriptions with the given statuses and initiated by <code>initiator</code>
* @param states list of possible state (int) values that the {@link ProcessInstance} can have
* @param initiator the initiator of the {@link ProcessInstance}
* @param queryContext control parameters for the result, such as sorting and paging
* @return list of {@link ProcessInstanceDesc} instances representing the process instances that match
* the given criteria (states and initiator)
*/
Collection<ProcessInstanceDesc> getProcessInstances(List<Integer> states, String initiator, QueryContext queryContext);
/**
* Returns a list of process instance descriptions found for the given process ID and statuses and initiated by <code>initiator</code>
* @param states list of possible state (int) values that the {@link ProcessInstance} can have
* @param processId ID of the {@link Process} (definition) used when starting the process instance
* @param initiator initiator of the {@link ProcessInstance}
* @param queryContext control parameters for the result, such as sorting and paging
* @return list of {@link ProcessInstanceDesc} instances representing the process instances that match
* the given criteria (states, processId, and initiator)
*/
Collection<ProcessInstanceDesc> getProcessInstancesByProcessId(List<Integer> states, String processId, String initiator, QueryContext queryContext);
/**
* Returns a list of process instance descriptions found for the given process name and statuses and initiated by <code>initiator</code>
* @param states list of possible state (int) values that the {@link ProcessInstance} can have
* @param processName name (not ID) of the {@link Process} (definition) used when starting the process instance
* @param initiator initiator of the {@link ProcessInstance}
* @param queryContext control parameters for the result, such as sorting and paging
* @return list of {@link ProcessInstanceDesc} instances representing the process instances that match
* the given criteria (states, processName and initiator)
*/
Collection<ProcessInstanceDesc> getProcessInstancesByProcessName(List<Integer> states, String processName, String initiator, QueryContext queryContext);
/**
* Returns a list of process instance descriptions found for the given deployment ID and statuses
* @param deploymentId deployment ID of the runtime
* @param states list of possible state (int) values that the {@link ProcessInstance} can have
* @param queryContext control parameters for the result, such as sorting and paging
* @return list of {@link ProcessInstanceDesc} instances representing the process instances that match
* the given criteria (deploymentId and states)
*/
Collection<ProcessInstanceDesc> getProcessInstancesByDeploymentId(String deploymentId, List<Integer> states, QueryContext queryContext);
/**
* Returns process instance descriptions found for the given processInstanceId. If no descriptions are found, null is returned. At the same time, the method
* fetches all active tasks (in status: Ready, Reserved, InProgress) to provide the information about what user task is keeping each instance
* and who owns the task (if the task is already claimed by a user)
* @param processInstanceId ID of the process instance to be fetched
* @return process instance information, in the form of a {@link ProcessInstanceDesc} instance
*/
ProcessInstanceDesc getProcessInstanceById(long processInstanceId);
/**
* Returns the active process instance description found for the given correlation key. If none is found, returns null. At the same time it
* fetches all active tasks (in status: Ready, Reserved, InProgress) to provide information about which user task is keeping each instance
* and who owns the task (if the task is already claimed by a user)
* @param correlationKey correlation key assigned to the process instance
* @return process instance information, in the form of a {@link ProcessInstanceDesc} instance
*/
ProcessInstanceDesc getProcessInstanceByCorrelationKey(CorrelationKey correlationKey);
/**
* Returns process instances descriptions (regardless of their states) found for the given correlation key. If no descriptions are found, an empty list is returned
* This query uses 'LIKE' to match correlation keys so it accepts partial keys. Matching
* is performed based on a 'starts with' criterion
* @param correlationKey correlation key assigned to the process instance
* @return list of {@link ProcessInstanceDesc} instances representing the process instances that match
* the given correlation key
*/
Collection<ProcessInstanceDesc> getProcessInstancesByCorrelationKey(CorrelationKey correlationKey, QueryContext queryContext);
/**
* Returns process instance descriptions, filtered by their states, that were found for the given correlation key. If none are found, returns an empty list
* This query uses 'LIKE' to match correlation keys so it accepts partial keys. Matching
* is performed based on a 'starts with' criterion
* @param correlationKey correlation key assigned to process instance
* @param states list of possible state (int) values that the {@link ProcessInstance} can have
* @return list of {@link ProcessInstanceDesc} instances representing the process instances that match
* the given correlation key
*/
Collection<ProcessInstanceDesc> getProcessInstancesByCorrelationKeyAndStatus(CorrelationKey correlationKey, List<Integer> states, QueryContext queryContext);
/**
* Returns a list of process instance descriptions found for the given process definition ID
* @param processDefId ID of the process definition
* @param queryContext control parameters for the result, such as sorting and paging
* @return list of {@link ProcessInstanceDesc} instances representing the process instances that match
* the given criteria (deploymentId and states)
*/
Collection<ProcessInstanceDesc> getProcessInstancesByProcessDefinition(String processDefId, QueryContext queryContext);
/**
* Returns a list of process instance descriptions found for the given process definition ID, filtered by state
* @param processDefId ID of the process definition
* @param states list of possible state (int) values that the {@link ProcessInstance} can have
* @param queryContext control parameters for the result, such as sorting and paging
* @return list of {@link ProcessInstanceDesc} instances representing the process instances that match
* the given criteria (deploymentId and states)
*/
Collection<ProcessInstanceDesc> getProcessInstancesByProcessDefinition(String processDefId, List<Integer> states, QueryContext queryContext);
/**
* Returns process instance descriptions that match process instances that have the given variable defined, filtered by state
* @param variableName name of the variable that process instance should have
* @param states list of possible state (int) values that the {@link ProcessInstance} can have. If null, returns only active instances
* @param queryContext control parameters for the result, such as sorting and paging
* @return list of {@link ProcessInstanceDesc} instances representing the process instances that have the given variable defined
*/
Collection<ProcessInstanceDesc> getProcessInstancesByVariable(String variableName, List<Integer> states, QueryContext queryContext);
/**
* Returns process instance descriptions that match process instances that have the given variable defined and the value of the variable matches the given variableValue
* @param variableName name of the variable that process instance should have
* @param variableValue value of the variable to match
* @param states list of possible state (int) values that the {@link ProcessInstance} can have. If null, returns only active instances
* @param queryContext control parameters for the result, such as sorting and paging
* @return list of {@link ProcessInstanceDesc} instances representing the process instances that have the given variable defined with the given value
*/
Collection<ProcessInstanceDesc> getProcessInstancesByVariableAndValue(String variableName, String variableValue, List<Integer> states, QueryContext queryContext);
/**
* Returns a list of process instance descriptions that have the specified parent
* @param parentProcessInstanceId ID of the parent process instance
* @param states list of possible state (int) values that the {@link ProcessInstance} can have. If null, returns only active instances
* @param queryContext control parameters for the result, such as sorting and paging
* @return list of {@link ProcessInstanceDesc} instances representing the available process instances
*/
Collection<ProcessInstanceDesc> getProcessInstancesByParent(Long parentProcessInstanceId, List<Integer> states, QueryContext queryContext);
/**
* Returns a list of process instance descriptions that are subprocesses of the specified process, or subprocesses of those subprocesses, and so on. The list includes the full hierarchy of subprocesses under the specified parent process
* @param processInstanceId ID of the parent process instance
* @return list of {@link ProcessInstanceDesc} instances representing the full hierarchy of this process
*/
Collection<ProcessInstanceDesc> getProcessInstancesWithSubprocessByProcessInstanceId(Long processInstanceId, List<Integer> states, QueryContext queryContext);
// Node and Variable instance information
/**
* Returns the active node instance descriptor for the given work item ID, if the work item exists and is active
* @param workItemId identifier of the work item
* @return NodeInstanceDesc for work item if it exists and is still active, otherwise null is returned
*/
NodeInstanceDesc getNodeInstanceForWorkItem(Long workItemId);
/**
* Returns a trace of all active nodes for the given process instance ID
* @param processInstanceId unique identifier of the process instance
* @param queryContext control parameters for the result, such as sorting and paging
* @return
*/
Collection<NodeInstanceDesc> getProcessInstanceHistoryActive(long processInstanceId, QueryContext queryContext);
/**
* Returns a trace of all executed (completed) nodes for the given process instance ID
* @param processInstanceId unique identifier of the process instance
* @param queryContext control parameters for the result, such as sorting and paging
* @return
*/
Collection<NodeInstanceDesc> getProcessInstanceHistoryCompleted(long processInstanceId, QueryContext queryContext);
/**
* Returns a complete trace of all executed (completed) and active nodes for the given process instance ID
* @param processInstanceId unique identifier of the process instance
* @param queryContext control parameters for the result, such as sorting and paging
* @return {@link NodeInstance} information, in the form of a list of {@link NodeInstanceDesc} instances,
* that come from a process instance that matches the given criteria (deploymentId, processId)
*/
Collection<NodeInstanceDesc> getProcessInstanceFullHistory(long processInstanceId, QueryContext queryContext);
/**
* Returns a complete trace of all events of the given type (START, END, ABORTED, SKIPPED, OBSOLETE or ERROR) for the given process instance
* @param processInstanceId unique identifier of the process instance
* @param queryContext control parameters for the result, such as sorting and paging
* @param type type of events to be returned (START, END, ABORTED, SKIPPED, OBSOLETE or ERROR). To return all events, use {@link #getProcessInstanceFullHistory(long, QueryContext)}
* @return collection of node instance descriptions
*/
Collection<NodeInstanceDesc> getProcessInstanceFullHistoryByType(long processInstanceId, EntryType type, QueryContext queryContext);
/**
* Returns a trace of all nodes for the given node types and process instance ID
* @param processInstanceId unique identifier of the process instance
* @param nodeTypes list of node types to filter nodes of the process instance
* @param queryContext control parameters for the result, such as sorting and paging
* @return collection of node instance descriptions
*/
Collection<NodeInstanceDesc> getNodeInstancesByNodeType(long processInstanceId, List<String> nodeTypes, QueryContext queryContext);
/**
* Returns a trace of all nodes for the given node types and correlation key
* @param correlationKey correlation key
* @param states list of states
* @param nodeTypes list of node types to filter nodes of process instance
* @param queryContext control parameters for the result, such as sorting and paging
* @return collection of node instance descriptions
*/
Collection<NodeInstanceDesc> getNodeInstancesByCorrelationKeyNodeType(CorrelationKey correlationKey, List<Integer> states, List<String> nodeTypes, QueryContext queryContext);
/**
* Returns a collection of all process variables and their current values for the given process instance
* @param processInstanceId process instance ID
* @return information about variables in the specified process instance,
* represented by a list of {@link VariableDesc} instances
*/
Collection<VariableDesc> getVariablesCurrentState(long processInstanceId);
/**
* Returns a collection of changes to the given variable within the scope of a process instance
* @param processInstanceId unique identifier of the process instance
* @param variableId ID of the variable
* @param queryContext control parameters for the result, such as sorting and paging
* @return information about the variable with the given ID in the specified process instance,
* represented by a list of {@link VariableDesc} instances
*/
Collection<VariableDesc> getVariableHistory(long processInstanceId, String variableId, QueryContext queryContext);
// Process information
/**
* Returns a list of process definitions for the given deployment ID
* @param deploymentId deployment ID of the runtime
* @param queryContext control parameters for the result, such as sorting and paging
* @return list of {@link ProcessDefinition} instances representing processes that match
* the given criteria (deploymentId)
*/
Collection<ProcessDefinition> getProcessesByDeploymentId(String deploymentId, QueryContext queryContext);
/**
* Returns a list of process definitions that match the given filter
* @param filter regular expression
* @param queryContext control parameters for the result, such as sorting and paging
* @return list of {@link ProcessDefinition} instances with a name or ID that matches the given regular expression
*/
Collection<ProcessDefinition> getProcessesByFilter(String filter, QueryContext queryContext);
/**
* Returns all process definitions available
* @param queryContext control parameters for the result, such as sorting and paging
* @return list of all available processes, in the form a of a list of {@link ProcessDefinition} instances
*/
Collection<ProcessDefinition> getProcesses(QueryContext queryContext);
/**
* Returns a list of process definition identifiers for the given deployment ID
* @param deploymentId deployment ID of the runtime
* @param queryContext control parameters for the result, such as sorting and paging
* @return list of all available process id's for a particular deployment/runtime
*/
Collection<String> getProcessIds(String deploymentId, QueryContext queryContext);
/**
* Returns process definitions for the given process ID regardless of the deployment
* @param processId ID of the process
* @return collection of {@link ProcessDefinition} instances representing the {@link Process}
* with the specified process ID
*/
Collection<ProcessDefinition> getProcessesById(String processId);
/**
* Returns the process definition for the given deployment and process identifiers
* @param deploymentId ID of the deployment (runtime)
* @param processId ID of the process
* @return {@link ProcessDefinition} instance, representing the {@link Process}
* that is present in the specified deployment with the specified process ID
*/
ProcessDefinition getProcessesByDeploymentIdProcessId(String deploymentId, String processId);
// user task query operations
/**
* Return a task by its workItemId
* @param workItemId
* @return @{@link UserTaskInstanceDesc} task
*/
UserTaskInstanceDesc getTaskByWorkItemId(Long workItemId);
/**
* Return a task by its taskId
* @param taskId
* @return @{@link UserTaskInstanceDesc} task
*/
UserTaskInstanceDesc getTaskById(Long taskId);
/**
* Return a task by its taskId with SLA data if the withSLA param is true
* @param taskId
* @param withSLA
* @return @{@link UserTaskInstanceDesc} task
*/
UserTaskInstanceDesc getTaskById(Long taskId, boolean withSLA);
/**
* Return a list of assigned tasks for a Business Administrator user. Business
* administrators play the same role as task stakeholders but at task type
* level. Therefore, business administrators can perform the exact same
* operations as task stakeholders. Business administrators can also observe
* the progress of notifications
*
* @param userId identifier of the Business Administrator user
* @param filter filter for the list of assigned tasks
* @return list of @{@link TaskSummary} task summaries
*/
List<TaskSummary> getTasksAssignedAsBusinessAdministrator(String userId, QueryFilter filter);
/**
* Return a list of assigned tasks for a Business Administrator user for with one of the listed
* statuses
* @param userId identifier of the Business Administrator user
* @param statuses the statuses of the tasks to return
* @param filter filter for the list of assigned tasks
* @return list of @{@link TaskSummary} task summaries
*/
List<TaskSummary> getTasksAssignedAsBusinessAdministratorByStatus(String userId, List<Status> statuses, QueryFilter filter);
/**
* Return a list of tasks that a user is eligible to own
*
* @param userId identifier of the user
* @param filter filter for the list of tasks
* @return list of @{@link TaskSummary} task summaries
*/
List<TaskSummary> getTasksAssignedAsPotentialOwner(String userId, QueryFilter filter);
/**
* Return a list of tasks the user or user groups are eligible to own
*
* @param userId identifier of the user
* @param groupIds a list of identifiers of the groups
* @param filter filter for the list of tasks
* @return list of @{@link TaskSummary} task summaries
*/
List<TaskSummary> getTasksAssignedAsPotentialOwner(String userId, List<String> groupIds, QueryFilter filter);
/**
* Return a list of tasks the user is eligible to own and that are in one of the listed
* statuses
*
* @param userId identifier of the user
* @param status filter for the task statuses
* @param filter filter for the list of tasks
* @return list of @{@link TaskSummary} task summaries
*/
List<TaskSummary> getTasksAssignedAsPotentialOwnerByStatus(String userId, List<Status> status, QueryFilter filter);
/**
* Return a list of tasks the user or groups are eligible to own and that are in one of the listed
* statuses
* @param userId identifier of the user
* @param groupIds filter for the identifiers of the groups
* @param status filter for the task statuses
* @param filter filter for the list of tasks
* @return list of @{@link TaskSummary} task summaries
*/
List<TaskSummary> getTasksAssignedAsPotentialOwner(String userId, List<String> groupIds, List<Status> status, QueryFilter filter);
/**
* Return a list of tasks the user is eligible to own, that are in one of the listed
* statuses, and that have an expiration date starting at <code>from</code>. Tasks that do not have expiration date set
* will also be included in the result set
*
* @param userId identifier of the user
* @param status filter for the task statuses
* @param from earliest expiration date for the tasks
* @param filter filter for the list of tasks
* @return list of @{@link TaskSummary} task summaries
*/
List<TaskSummary> getTasksAssignedAsPotentialOwnerByExpirationDateOptional(String userId, List<Status> status, Date from, QueryFilter filter);
/**
* Return a list of tasks the user has claimed, that are in one of the listed
* statuses, and that have an expiration date starting at <code>from</code>. Tasks that do not have expiration date set
* will also be included in the result set
*
* @param userId identifier of the user
* @param strStatuses filter for the task statuses
* @param from earliest expiration date for the tasks
* @param filter filter for the list of tasks
* @return list of @{@link TaskSummary} task summaries
*/
List<TaskSummary> getTasksOwnedByExpirationDateOptional(String userId, List<Status> strStatuses, Date from, QueryFilter filter);
/**
* Return a list of tasks the user has claimed
*
* @param userId identifier of the user
* @param filter filter for the list of tasks
* @return list of @{@link TaskSummary} task summaries
*/
List<TaskSummary> getTasksOwned(String userId, QueryFilter filter);
/**
* Return a list of tasks the user has claimed with one of the listed
* statuses
*
* @param userId identifier of the user
* @param status filter for the task statuses
* @param filter filter for the list of tasks
* @return list of @{@link TaskSummary} task summaries
*/
List<TaskSummary> getTasksOwnedByStatus(String userId, List<Status> status, QueryFilter filter);
/**
* Get a list of tasks the Process Instance is waiting on
*
* @param processInstanceId identifier of the process instance
* @return list of task identifiers
*/
List<Long> getTasksByProcessInstanceId(Long processInstanceId);
/**
* Get filter for the tasks the Process Instance is waiting on that are in one of the
* listed statuses
*
* @param processInstanceId identifier of the process instance
* @param status filter for the task statuses
* @param filter filter for the list of tasks
* @return list of @{@link TaskSummary} task summaries
*/
List<TaskSummary> getTasksByStatusByProcessInstanceId(Long processInstanceId, List<Status> status, QueryFilter filter);
/**
* Get a list of task audit logs for all tasks owned by the user, applying a query filter to the list of tasks
*
*
* @param userId identifier of the user that owns the tasks
* @param filter filter for the list of tasks
* @return list of @{@link AuditTask} task audit logs
*/
List<AuditTask> getAllAuditTask(String userId, QueryFilter filter);
/**
* Get a list of task audit logs for all tasks that are active and owned by the user, applying a query filter to the list of tasks
*
* @param userId identifier of the user that owns the tasks
* @param filter filter for the list of tasks
* @return list of @{@link AuditTask} audit tasks
*/
List<AuditTask> getAllAuditTaskByStatus(String userId, QueryFilter filter);
/**
* Get a list of task audit logs for group tasks (actualOwner == null) for the user, applying a query filter to the list of tasks
*
* @param userId identifier of the user that is associated with the group tasks
* @param filter filter for the list of tasks
* @return list of @{@link AuditTask} audit tasks
*/
List<AuditTask> getAllGroupAuditTask(String userId, QueryFilter filter);
/**
* Get a list of task audit logs for tasks that are assigned to a Business Administrator user, applying a query filter to the list of tasks
*
* @param userId identifier of the Business Administrator user
* @param filter filter for the list of tasks
* @return list of @{@link AuditTask} audit tasks
*/
List<AuditTask> getAllAdminAuditTask(String userId, QueryFilter filter);
/**
* Gets a list of task events for the given task
* @param taskId identifier of the task
* @param filter for the list of events
* @return list of @{@link TaskEvent} task events
*/
List<TaskEvent> getTaskEvents(long taskId, QueryFilter filter);
/**
* Query on {@link TaskSummary} instances
* @param userId the user associated with the tasks queried
* @return {@link TaskSummaryQueryBuilder} used to create the query
*/
TaskSummaryQueryBuilder taskSummaryQuery(String userId);
/**
* Gets a list of {@link TaskSummary} instances for tasks that define a given variable
* @param userId the ID of the user associated with the tasks
* @param variableName the name of the task variable
* @param statuses the list of statuses that the task can have
* @param queryContext the query context
* @return a {@link List} of {@link TaskSummary} instances
*/
List<TaskSummary> getTasksByVariable(String userId, String variableName, List<Status> statuses, QueryContext queryContext);
/**
* Gets a list of {@link TaskSummary} instances for tasks that define a given variable and the variable is set to the given value
* @param userId the ID of the user associated with the tasks
* @param variableName the name of the task variable
* @param variableValue the value of the task variable
* @param statuses the list of statuses that the task can have
* @param context the query context
* @return a {@link List} of {@link TaskSummary} instances
*/
List<TaskSummary> getTasksByVariableAndValue(String userId, String variableName, String variableValue, List<Status> statuses, QueryContext context);
}9.4.6. User Task Service
The user task service covers the complete lifecycle of an individual task, and you can use the service to manage a user task from start to end.
Task queries are not a part of the user task service. Use the runtime data service to query for tasks. Use the user task service for scoped operations on one task, including the following actions:
-
Modification of selected properties
-
Access to task variables
-
Access to task attachments
-
Access to task comments
The user task service is also a command executor. You can use it to execute custom task commands.
The following example shows starting a process and interacting with a task in the process:
long processInstanceId =
processService.startProcess(deployUnit.getIdentifier(), "org.jbpm.writedocument");

List<Long> taskIds =
runtimeDataService.getTasksByProcessInstanceId(processInstanceId);

Long taskId = taskIds.get(0);

userTaskService.start(taskId, "john");
UserTaskInstanceDesc task = runtimeDataService.getTaskById(taskId);

Map<String, Object> results = new HashMap<String, Object>();
results.put("Result", "some document data");
userTaskService.complete(taskId, "john", results);
9.4.7. Quartz-based timer service
The jBPM engine provides a cluster-ready timer service using Quartz. You can use the service to dispose or load your KIE session at any time. The service can manage how long a KIE session is active in order to fire each timer appropriately.
The following example shows a basic Quartz configuration file for a clustered environment:
#============================================================================
# Configure Main Scheduler Properties
#============================================================================

org.quartz.scheduler.instanceName = jBPMClusteredScheduler
org.quartz.scheduler.instanceId = AUTO

#============================================================================
# Configure ThreadPool
#============================================================================

org.quartz.threadPool.class = org.quartz.simpl.SimpleThreadPool
org.quartz.threadPool.threadCount = 5
org.quartz.threadPool.threadPriority = 5

#============================================================================
# Configure JobStore
#============================================================================

org.quartz.jobStore.misfireThreshold = 60000

org.quartz.jobStore.class=org.quartz.impl.jdbcjobstore.JobStoreCMT
org.quartz.jobStore.driverDelegateClass=org.quartz.impl.jdbcjobstore.StdJDBCDelegate
org.quartz.jobStore.useProperties=false
org.quartz.jobStore.dataSource=managedDS
org.quartz.jobStore.nonManagedTXDataSource=nonManagedDS
org.quartz.jobStore.tablePrefix=QRTZ_
org.quartz.jobStore.isClustered=true
org.quartz.jobStore.clusterCheckinInterval = 20000

#=========================================================================
# Configure Datasources
#=========================================================================
org.quartz.dataSource.managedDS.jndiURL=jboss/datasources/psbpmsDS
org.quartz.dataSource.nonManagedDS.jndiURL=jboss/datasources/quartzNonManagedDS
You must modify the previous example to fit your environment.
For more information about configuring a Quartz scheduler, see the documentation for the Quartz 1.8.5 distribution archive.
9.4.8. Query service
The query service provides advanced search capabilities that are based on Dashbuilder data sets.
With this approach, you can control how to retrieve data from underlying data store. You can use complex JOIN statements with external tables such as JPA entities tables or custom systems database tables.
The query service is built around the following two sets of operations:
-
Management operations:
-
Register a query definition
-
Replace a query definition
-
Unregister (remove) a query definition
-
Get a query definition
-
Get all registered query definitions
-
-
Runtime operations:
-
Simple query based on
QueryParamas the filter provider -
Advanced query based on
QueryParamBuilderas the filter provider
-
Dashbuilder data sets provide support for multiple data sources, such as CSV, SQL, and Elastic Search. However, the jBPM engine uses a RDBMS-based backend and focuses on SQL-based data sets.
Therefore, the jBPM engine query service is a subset of Dashbuilder data set capabilities that enables efficient queries with a simple API.
9.4.8.1. Key classes of the query service
The query service relies on the following key classes:
-
QueryDefinition: Represents the definition of a data set. The definition consists of a unique name, an SQL expression (the query) and the source, the JNDI name of the data source to use when performing queries. -
QueryParam: The basic structure that represents an individual query parameter or condition. This structure consists of the column name, operator, and expected values. -
QueryResultMapper: The class that maps raw dataset data (rows and columns) to an object representation. -
QueryParamBuilder: The class that builds query filters that are applied to the query definition to invoke the query.
QueryResultMapper maps data taken from a database (dataset) to an object representation. It is similar to ORM providers such as hibernate, which map tables to entities.
Many object types can be used for representing dataset results. Therefore, existing mappers might not always suit your needs. Mappers in QueryResultMapper are pluggable and you can provide your own mapper when necessary, in order to transform dataset data into any type you need.
The jBPM engine supplies the following mappers:
-
org.jbpm.kie.services.impl.query.mapper.ProcessInstanceQueryMapper, registered with the nameProcessInstances -
org.jbpm.kie.services.impl.query.mapper.ProcessInstanceWithVarsQueryMapper, registered with the nameProcessInstancesWithVariables -
org.jbpm.kie.services.impl.query.mapper.ProcessInstanceWithCustomVarsQueryMapper, registered with the nameProcessInstancesWithCustomVariables -
org.jbpm.kie.services.impl.query.mapper.UserTaskInstanceQueryMapper, registered with the nameUserTasks -
org.jbpm.kie.services.impl.query.mapper.UserTaskInstanceWithVarsQueryMapper, registered with the nameUserTasksWithVariables -
org.jbpm.kie.services.impl.query.mapper.UserTaskInstanceWithCustomVarsQueryMapper, registered with nameUserTasksWithCustomVariables -
org.jbpm.kie.services.impl.query.mapper.TaskSummaryQueryMapper, registered with the nameTaskSummaries -
org.jbpm.kie.services.impl.query.mapper.RawListQueryMapper, registered with the nameRawList
Each QueryResultMapper is registered with a unique string name. You can look up mappers by this name instead of referencing the full class name. This feature is especially important when using EJB remote invocation of services, because it avoids relying on a particular implementation on the client side.
To reference a QueryResultMapper by the string name, use NamedQueryMapper, which is a part of the jbpm-services-api module. This class acts as a delegate (lazy delegate) and looks up the actual mapper when the query is performed.
NamedQueryMapperqueryService.query("my query def", new NamedQueryMapper<Collection<ProcessInstanceDesc>>("ProcessInstances"), new QueryContext());QueryParamBuilder provides an advanced way of building filters for data sets.
By default, when you use a query method of QueryService that accepts zero or more QueryParam instances, all of these parameters are joined with an AND operator, so a data entry must match all of them.
However, sometimes more complicated relationships between parameters are required. You can use QueryParamBuilder to build custom builders that provide filters at the time the query is issued.
One existing implementation of QueryParamBuilder is available in the jBPM engine. It covers default QueryParams that are based on the core functions.
These core functions are SQL-based conditions, including the following conditions:
-
IS_NULL -
NOT_NULL -
EQUALS_TO -
NOT_EQUALS_TO -
LIKE_TO -
GREATER_THAN -
GREATER_OR_EQUALS_TO -
LOWER_THAN -
LOWER_OR_EQUALS_TO -
BETWEEN -
IN -
NOT_IN
Before invoking a query, the jBPM engine invokes the build method of the QueryParamBuilder interface as many times as necessary while the method returns a non-null value. Because of this approach, you can build up complex filter options that could not be expressed by a simple list of QueryParams.
The following example shows a basic implementation of QueryParamBuilder. It relies on the DashBuilder Dataset API.
QueryParamBuilderpublic class TestQueryParamBuilder implements QueryParamBuilder<ColumnFilter> {
private Map<String, Object> parameters;
private boolean built = false;
public TestQueryParamBuilder(Map<String, Object> parameters) {
this.parameters = parameters;
}
@Override
public ColumnFilter build() {
// return null if it was already invoked
if (built) {
return null;
}
String columnName = "processInstanceId";
ColumnFilter filter = FilterFactory.OR(
FilterFactory.greaterOrEqualsTo((Long)parameters.get("min")),
FilterFactory.lowerOrEqualsTo((Long)parameters.get("max")));
filter.setColumnId(columnName);
built = true;
return filter;
}
}After implementing the builder, you can use an instance of this class when performing a query with the QueryService service, as shown in the following example:
QueryService servicequeryService.query("my query def", ProcessInstanceQueryMapper.get(), new QueryContext(), paramBuilder);9.4.8.2. Using the query service in a typical scenario
The following procedure outlines the typical way in which your code might use the query service.
-
Define the data set, which is a view of the data you want to use. Use the
QueryDefinitionclass in the services API to complete this operation:Defining the data setSqlQueryDefinition query = new SqlQueryDefinition("getAllProcessInstances", "java:jboss/datasources/ExampleDS"); query.setExpression("select * from processinstancelog");This example represents the simplest possible query definition.
The constructor requires the following parameters:
-
A unique name that identifies the query at run time
-
A JNDI data source name to use for performing queries with this definition
The parameter of the
setExpression()method is the SQL statement that builds up the data set view. Queries in the query service use data from this view and filter this data as necessary.
-
-
Register the query:
Registering a queryqueryService.registerQuery(query); -
If required, collect all the data from the dataset, without any filtering:
Collecting all the data from the datasetCollection<ProcessInstanceDesc> instances = queryService.query("getAllProcessInstances", ProcessInstanceQueryMapper.get(), new QueryContext());This simple query uses defaults from
QueryContextfor paging and sorting. -
If required, use a
QueryContextobject that changes the defaults of the paging and sorting:Changing defaults using aQueryContextobjectQueryContext ctx = new QueryContext(0, 100, "start_date", true); Collection<ProcessInstanceDesc> instances = queryService.query("getAllProcessInstances", ProcessInstanceQueryMapper.get(), ctx); -
If required, use the query to filter data:
Using a query to filter data// single filter param Collection<ProcessInstanceDesc> instances = queryService.query("getAllProcessInstances", ProcessInstanceQueryMapper.get(), new QueryContext(), QueryParam.likeTo(COLUMN_PROCESSID, true, "org.jbpm%")); // multiple filter params (AND) Collection<ProcessInstanceDesc> instances = queryService.query("getAllProcessInstances", ProcessInstanceQueryMapper.get(), new QueryContext(), QueryParam.likeTo(COLUMN_PROCESSID, true, "org.jbpm%"), QueryParam.in(COLUMN_STATUS, 1, 3));
With the query service, you can define what data to fetch and how to filter it. Limitation of the JPA provider or other similar limitations do not apply. You can tailor database queries to your environment to increase performance.
Further examples can be found here.
9.4.9. Advanced query service
The advanced query service provides capabilities to search for processes and tasks, based on process and task attributes, process variables, and internal variables of user tasks. The search automatically covers all existing processes in the jBPM engine.
The names and required values of attributes and variables are defined in QueryParam objects.
Process attributes include process instance ID, correlation key, process definition ID, and deployment ID. Task attributes include task name, owner, and status.
The following search methods are available:
-
queryProcessByVariables: Search for process instances based on a list of process attributes and process variable values. To be included in the result, a process instance must have the listed attributes and the listed values in its process variables. -
queryProcessByVariablesAndTask: Search for process instances based on a list of process attributes, process variable values, and task variable values. To be included in the result, a process instance must have the listed attributes and the listed values in its process variables. It also must include a task with the listed values in its task variables. -
queryUserTasksByVariables: Search for user tasks based on a list of task attributes, task variable values, and process variable values. To be included in the result, a task must have the listed attributes and listed values in its task variables. It also must be included in a process with the listed values in its process variables.
The service is provided by the AdvanceRuntimeDataService class. The interface for this class also defines predefined task and process attribute names.
AdvanceRuntimeDataService interfacepublic interface AdvanceRuntimeDataService {
String TASK_ATTR_NAME = "TASK_NAME";
String TASK_ATTR_OWNER = "TASK_OWNER";
String TASK_ATTR_STATUS = "TASK_STATUS";
String PROCESS_ATTR_INSTANCE_ID = "PROCESS_INSTANCE_ID";
String PROCESS_ATTR_CORRELATION_KEY = "PROCESS_CORRELATION_KEY";
String PROCESS_ATTR_DEFINITION_ID = "PROCESS_DEFINITION_ID";
String PROCESS_ATTR_DEPLOYMENT_ID = "PROCESS_DEPLOYMENT_ID";
String PROCESS_COLLECTION_VARIABLES = "ATTR_COLLECTION_VARIABLES";
List<ProcessInstanceWithVarsDesc> queryProcessByVariables(List<QueryParam> attributes,
List<QueryParam> processVariables, QueryContext queryContext);
List<ProcessInstanceWithVarsDesc> queryProcessByVariablesAndTask(List<QueryParam> attributes,
List<QueryParam> processVariables, List<QueryParam> taskVariables,
List<String> potentialOwners, QueryContext queryContext);
List<UserTaskInstanceWithPotOwnerDesc> queryUserTasksByVariables(List<QueryParam> attributes,
List<QueryParam> taskVariables, List<QueryParam> processVariables,
List<String> potentialOwners, QueryContext queryContext);
}9.4.10. Process instance migration service
The process instance migration service is a utility for migrating process instances from one deployment to another. Process or task variables are not affected by the migration. However, the new deployment can use a different process definition.
When migrating a process, the process instance migration service also automatically migrates all the subprocesses of the process, the subprocesses of those subprocesses, and so on. If you attempt to migrate a subprocess without migrating the parent process, the migration fails.
For the simplest approach to process migration, let active process instances finish and start new process instances in the new deployment. If this approach is not suitable for your needs, consider the following issues before starting process instance migration:
-
Backward compatibility
-
Data change
-
Need for node mapping
Whenever possible, create backward-compatible processes by extending process definitions. For example, removing nodes from the process definition breaks compatibility. If you make such changes, you must provide node mapping. Process instance migration uses node mapping if an active process instance is in a node that has been removed.
A node map contains source node IDs from the old process definition mapped to target node IDs in the new process definition. You can map nodes of the same type only, such as a user task to a user task.
jBPM offers several implementations of the migration service:
ProcessInstanceMigrationService interface that implement the migration servicepublic interface ProcessInstanceMigrationService {
/**
* Migrates a given process instance that belongs to the source deployment into the target process ID that belongs to the target deployment.
* The following rules are enforced:
* <ul>
* <li>the source deployment ID must point to an existing deployment</li>
* <li>the process instance ID must point to an existing and active process instance</li>
* <li>the target deployment must exist</li>
* <li>the target process ID must exist in the target deployment</li>
* </ul>
* Returns a migration report regardless of migration being successful or not; examine the report for the outcome of the migration.
* @param sourceDeploymentId deployment to which the process instance to be migrated belongs
* @param processInstanceId ID of the process instance to be migrated
* @param targetDeploymentId ID of the deployment to which the target process belongs
* @param targetProcessId ID of the process to which the process instance should be migrated
* @return returns complete migration report
*/
MigrationReport migrate(String sourceDeploymentId, Long processInstanceId, String targetDeploymentId, String targetProcessId);
/**
* Migrates a given process instance (with node mapping) that belongs to source deployment into the target process ID that belongs to the target deployment.
* The following rules are enforced:
* <ul>
* <li>the source deployment ID must point to an existing deployment</li>
* <li>the process instance ID must point to an existing and active process instance</li>
* <li>the target deployment must exist</li>
* <li>the target process ID must exist in the target deployment</li>
* </ul>
* Returns a migration report regardless of migration being successful or not; examine the report for the outcome of the migration.
* @param sourceDeploymentId deployment to which the process instance to be migrated belongs
* @param processInstanceId ID of the process instance to be migrated
* @param targetDeploymentId ID of the deployment to which the target process belongs
* @param targetProcessId ID of the process to which the process instance should be migrated
* @param nodeMapping node mapping - source and target unique IDs of nodes to be mapped - from process instance active nodes to new process nodes
* @return returns complete migration report
*/
MigrationReport migrate(String sourceDeploymentId, Long processInstanceId, String targetDeploymentId, String targetProcessId, Map<String, String> nodeMapping);
/**
* Migrates given process instances that belong to the source deployment into a target process ID that belongs to the target deployment.
* The following rules are enforced:
* <ul>
* <li>the source deployment ID must point to an existing deployment</li>
* <li>the process instance ID must point to an existing and active process instance</li>
* <li>the target deployment must exist</li>
* <li>the target process ID must exist in the target deployment</li>
* </ul>
* Returns a migration report regardless of migration being successful or not; examine the report for the outcome of the migration.
* @param sourceDeploymentId deployment to which the process instances to be migrated belong
* @param processInstanceIds list of process instance IDs to be migrated
* @param targetDeploymentId ID of the deployment to which the target process belongs
* @param targetProcessId ID of the process to which the process instances should be migrated
* @return returns complete migration report
*/
List<MigrationReport> migrate(String sourceDeploymentId, List<Long> processInstanceIds, String targetDeploymentId, String targetProcessId);
/**
* Migrates given process instances (with node mapping) that belong to the source deployment into a target process ID that belongs to the target deployment.
* The following rules are enforced:
* <ul>
* <li>the source deployment ID must point to an existing deployment</li>
* <li>the process instance ID must point to an existing and active process instance</li>
* <li>the target deployment must exist</li>
* <li>the target process ID must exist in the target deployment</li>
* </ul>
* Returns a migration report regardless of migration being successful or not; examine the report for the outcome of the migration.
* @param sourceDeploymentId deployment to which the process instances to be migrated belong
* @param processInstanceIds list of process instance ID to be migrated
* @param targetDeploymentId ID of the deployment to which the target process belongs
* @param targetProcessId ID of the process to which the process instances should be migrated
* @param nodeMapping node mapping - source and target unique IDs of nodes to be mapped - from process instance active nodes to new process nodes
* @return returns list of migration reports one per each process instance
*/
List<MigrationReport> migrate(String sourceDeploymentId, List<Long> processInstanceIds, String targetDeploymentId, String targetProcessId, Map<String, String> nodeMapping);
}To migrate process instances on a KIE Server, use the following implementations. These methods are similar to the methods in the ProcessInstanceMigrationService interface, providing the same migration implementations for KIE Server deployments.
ProcessAdminServicesClient interface that implement the migration service for KIE Server deploymentspublic interface ProcessAdminServicesClient {
MigrationReportInstance migrateProcessInstance(String containerId, Long processInstanceId, String targetContainerId, String targetProcessId);
MigrationReportInstance migrateProcessInstance(String containerId, Long processInstanceId, String targetContainerId, String targetProcessId, Map<String, String> nodeMapping);
List<MigrationReportInstance> migrateProcessInstances(String containerId, List<Long> processInstancesId, String targetContainerId, String targetProcessId);
List<MigrationReportInstance> migrateProcessInstances(String containerId, List<Long> processInstancesId, String targetContainerId, String targetProcessId, Map<String, String> nodeMapping);
}You can migrate a single process instance or multiple process instances at once. If you migrate multiple process instances, each instance is migrated in a separate transaction to ensure that the migrations do not affect each other.
After migration is completed, the migrate method returns a MigrationReport object that contains the following information:
-
The start and end dates of the migration.
-
The migration outcome (success or failure).
-
A log entry of the
INFO,WARN, orERRORtype. TheERRORmessage terminates the migration.
The following example shows a process instance migration:
import org.kie.server.api.model.admin.MigrationReportInstance;
import org.kie.server.api.marshalling.MarshallingFormat;
import org.kie.server.client.KieServicesClient;
import org.kie.server.client.KieServicesConfiguration;

public class ProcessInstanceMigrationTest{

	private static final String SOURCE_CONTAINER = "com.redhat:MigrateMe:1.0";
  private static final String SOURCE_PROCESS_ID = "MigrateMe.MigrateMev1";
	private static final String TARGET_CONTAINER = "com.redhat:MigrateMe:2";
  private static final String TARGET_PROCESS_ID = "MigrateMe.MigrateMeV2";

	public static void main(String[] args) {

		KieServicesConfiguration config = KieServicesFactory.newRestConfiguration("http://HOST:PORT/kie-server/services/rest/server", "USERNAME", "PASSWORD");
		config.setMarshallingFormat(MarshallingFormat.JSON);
		KieServicesClient client = KieServicesFactory.newKieServicesClient(config);

		long sourcePid = client.getProcessClient().startProcess(SOURCE_CONTAINER, SOURCE_PROCESS_ID);

    // Use the 'report' object to return migration results.
		MigrationReportInstance report = client.getAdminClient().migrateProcessInstance(SOURCE_CONTAINER, sourcePid,TARGET_CONTAINER, TARGET_PROCESS_ID);

		System.out.println("Was migration successful:" + report.isSuccessful());

		client.getProcessClient().abortProcessInstance(TARGET_CONTAINER, sourcePid);

	}
}
Known limitations of process instance migration
The following situations can cause a failure of the migration or incorrect migration:
-
A new or modified task requires inputs that are not available in the migrated process instance.
-
You modify the tasks prior to the active task where the changes have an impact on further processing.
-
You remove a human task that is currently active. To replace a human task, you must map it to another human task.
-
You add a new task parallel to the single active task. As all branches in an
ANDgateway are not activated, the process gets stuck. -
You remove active timer events (these events are not changed in the database).
-
You fix or update inputs and outputs in an active task (the task data is not migrated).
If you apply mapping to a task node, only the task node name and description are mapped. Other task fields, including the TaskName variable, are not mapped to the new task.
9.4.11. Deployments and different process versions
The deployment service puts business assets into an execution environment. However, in some cases additional management is required to make the assets available in the correct context. Notably, if you deploy several versions of the same process, you must ensure that process instances use the correct version.
Activation and Deactivation of deployments
In some cases, a number of process instances are running on a deployment, and then you add a new version of the same process to the runtime environment.
You might decide that new instances of this process definition must use the new version while the existing active instances should continue with the previous version.
To enable this scenario, use the following methods of the deployment service:
-
activate: Activates a deployment so it can be available for interaction. You can list its process definitions and start new process instances for this deployment. -
deactivate: Deactivates a deployment. Disables the option to list process definitions and to start new process instances of processes in the deployment. However, you can continue working with the process instances that are already active, for example, signal events and interact with user tasks.
You can use this feature for smooth transition between project versions without the need for process instance migration.
Invocation of the latest version of a process
If you need to use the latest version of the project’s process, you can use the latest keyword to interact with several operations in services. This approach is supported only when the process identifier remains the same in all versions.
The following example explains the feature.
The initial deployment unit is org.jbpm:HR:1.0. It contains the first version of a hiring process.
After several weeks, you develop a new version and deploy it to the execution server as org.jbpm:HR.2.0. It includes version 2 of the hiring process.
If you want to call the process and ensure that you use the latest version, you can use the following deployment ID:
org.jbpm.HR:latestIf you use this deployment ID, the jBPM engine finds the latest available version of the project. It uses the following identifiers:
-
groupId:org.jbpm -
artifactId:HR
The version numbers are compared by Maven rules to find the latest version.
The following code example shows deployment of multiple versions and interacting with the latest version:
KModuleDeploymentUnit deploymentUnitV1 = new KModuleDeploymentUnit("org.jbpm", "HR", "1.0");
deploymentService.deploy(deploymentUnitV1);

long processInstanceId = processService.startProcess("org.jbpm:HR:LATEST", "customtask");
ProcessInstanceDesc piDesc = runtimeDataService.getProcessInstanceById(processInstanceId);

// We have started a process with the project version 1
assertEquals(deploymentUnitV1.getIdentifier(), piDesc.getDeploymentId());

// Next we deploy version 2
KModuleDeploymentUnit deploymentUnitV2 = new KModuleDeploymentUnit("org.jbpm", "HR", "2.0");
deploymentService.deploy(deploymentUnitV2);

processInstanceId = processService.startProcess("org.jbpm:HR:LATEST", "customtask");
piDesc = runtimeDataService.getProcessInstanceById(processInstanceId);

// This time we have started a process with the project version 2
assertEquals(deploymentUnitV2.getIdentifier(), piDesc.getDeploymentId());|
This feature is also available in the KIE Server REST API. When sending a request with a deployment ID, you can use |
9.4.12. Deployment synchronization
Prior to jBPM 6.2, jBPM services did not have a deployment store by default.
When embedded in business-central/kie-wb, they utilized the sistem.git VFS repository to preserve deployed units across server restarts.
While that approach works, it causes some drawbacks:
-
It is not available for custom systems that use services
-
It requires a complex setup process in a cluster deployment, involving
zookeeperandhelix
Since version 6.2, jBPM services include a deployment synchronizer that stores available deployments into a database, including the deployment descriptor for every deployment.
The synhronizer also monitors this table to keep it in sync with other installations that might be using the same data source. This functionality is especially important when running in a cluster or when Business Central and a custom application must operate on the same artifacts.
By default, when running core services, you must configure synchronization. For EJB and CDI extensions, synchronization is enabled automatically.
The following code sample configures synchronization:
TransactionalCommandService commandService = new TransactionalCommandService(emf);

DeploymentStore store = new DeploymentStore();
store.setCommandService(commandService);

DeploymentSynchronizer sync = new DeploymentSynchronizer();
sync.setDeploymentService(deploymentService);
sync.setDeploymentStore(store);

DeploymentSyncInvoker invoker = new DeploymentSyncInvoker(sync, 2L, 3L, TimeUnit.SECONDS);
invoker.start();
....
invoker.stop();
With this configuration, deployments are synchronized every three seconds with an initial delay of two seconds.
9.5. Threads in the jBPM engine
We can refer to two types of multi-threading: logical and technical. Technical multi-threading involves multiple threads or processes that are started, for example, by a Java or C program. Logical multi-threading happens in a BPM process, for example, after the process reaches a parallel gateway. In execution logic, the original process splits into two processes that run in a parallel fashion.
jBPM engine code implements logical multi-threading using one technical thread.
The reason for this design choice is that multiple (technical) threads must be able to communicate state information to each other if they are working on the same process. This requirement brings a number of complications. The extra logic required for safe communication between threads, as well as the extra overhead required to avoid race conditions and deadlocks, can negate any performance benefit of using such threads.
In general, the jBPM engine executes actions in series. For example, when the jBPM engine encounters a script task in a process, it executes the script synchronously and waits for it to complete before continuing execution. In the same way, if a process encounters a parallel gateway, the jBPM engine sequentially triggers each of the outgoing branches, one after the other.
This is possible because execution is almost always instantaneous, meaning that it is extremely fast and produces almost no overhead. As a result, sequential execution does not create any effects that a user can notice.
Any code in a process that you supply is also executed synchronously and the jBPM engine waits for it to finish before continuing the process. For example, if you use a Thread.sleep(…) as part of a custom script, the jBPM engine thread is blocked during thre sleep period.
When a process reaches a service task, the jBPM engine also invokes the handler for the task synchronously and waits for the completeWorkItem(…) method to return before continuing execution. If your service handler is not instantaneous, implement the asynchronous execution independently in your code.
For example, your service task might invoke an external service. The delay in invoking this service remotely and waiting for the results might be significant. Therefore, invoke this service asynchronously. Your handler must only invoke the service and then return from the method, then notify the jBPM engine later when the results are available. In the meantime, the jBPM engine can continue execution of the process.
Human tasks are a typical example of a service that needs to be invoked asynchronously. A human task requires a human actor to respond to a request, and the jBPM engine must not wait for this response.
When a human task node is triggered, the human task handler only creates a new task on the task list of the assigned actor. The jBPM engine is then able to continue execution on the rest of the process, if necessary. The handler notifies the jBPM engine asynchronously when the user has completed the task.
9.6. Event Listeners in the jBPM engine
You can develop a class that implements the ProcessEventListener interface. This class can listen to process-related events, such as starting or completing a process or entering and leaving a node.
The jBPM engine passes an event object to this class. The object provides access to related information, like the process instance and node instance linked to the event.
The following list shows the different methods of the ProcessEventListener interface:
ProcessEventListener interfacepublic interface ProcessEventListener {
void beforeProcessStarted( ProcessStartedEvent event );
void afterProcessStarted( ProcessStartedEvent event );
void beforeProcessCompleted( ProcessCompletedEvent event );
void afterProcessCompleted( ProcessCompletedEvent event );
void beforeNodeTriggered( ProcessNodeTriggeredEvent event );
void afterNodeTriggered( ProcessNodeTriggeredEvent event );
void beforeNodeLeft( ProcessNodeLeftEvent event );
void afterNodeLeft( ProcessNodeLeftEvent event );
void beforeVariableChanged(ProcessVariableChangedEvent event);
void afterVariableChanged(ProcessVariableChangedEvent event);
}The before and after event calls typically act like a stack. If event A directly causes event B, the following sequence of calls happens:
-
Before A
-
Before B
-
After B
-
After A
For example, if leaving node X triggers node Y, all event calls related to triggering node Y occur between the beforeNodeLeft and afterNodeLeft calls for node X.
In the same way, if starting a process directly causes some nodes to start, all nodeTriggered and nodeLeft event calls occur between the beforeProcessStarted and afterProcessStarted calls.
This approach reflects cause and effect relationships between events. However, the timing and order of after event calls are not always intuitive. For example, an afterProcessStarted call can happen after the afterNodeLeft calls for some nodes in the process.
In general, to be notified when a particular event occurs, use the before call for the event. Use an after call only if you want to make sure that all processing related to this event has ended, for example, when you want to be notified when all steps associated with starting a particular process instance have been completed.
Depending on the type of node, some nodes might only generate nodeLeft calls and others might only generate nodeTriggered calls. For example, catch intermediate event nodes do not generate nodeTriggered calls, because they are not triggered by another process node. Similarly, throw intermediate event nodes do not generate nodeLeft calls, as these nodes do not have an outgoing connection to another node.
The KieSession class implements the RuleRuntimeEventManager interface that provides methods for registering, removing, and listing event listeners, as shown in the following list.
RuleRuntimeEventManager interface void addEventListener(AgendaEventListener listener);
void addEventListener(RuleRuntimeEventListener listener);
void removeEventListener(AgendaEventListener listener);
void removeEventListener(RuleRuntimeEventListener listener);
Collection<AgendaEventListener> getAgendaEventListeners();
Collection<RuleRuntimeEventListener> getRuleRintimeEventListeners();However, in a typical case, do not use these methods.
If you are using the RuntimeManager interface, you can use the RuntimeEnvironment class to register event listeners.
If you are using the Services API, you can add fully qualified class names of event listeners to the META-INF/services/org.jbpm.services.task.deadlines.NotificationListener file in your project. The Services API also registers some default listeners, including org.jbpm.services.task.deadlines.notifications.impl.email.EmailNotificationListener, which can send email notifications for events.
To exclude a default listener, you can add the fully qualified name of the listener to the org.kie.jbpm.notification_listeners.exclude JVM system property.
9.6.1. KieRuntimeLogger event listener
The KieServices package contains the KieRuntimeLogger event listener that you can add to your KIE session. You can use this listener to create an audit log. This log contains all the different events that occurred at runtime.
|
These loggers are intended for debugging purposes. They might be too detailed for business-level process analysis. |
The listener implements the following logger types:
-
Console logger: This logger writes out all the events to the console. The fully qualified class name for this logger is
org.drools.core.audit.WorkingMemoryConsoleLogger. -
File logger: This logger writes out all the events to a file using an XML representation. You can use the log file in an IDE to generate a tree-based visualization of the events that occurred during execution. The fully qualified class name for this logger is
org.drools.core.audit.WorkingMemoryFileLogger.The file logger writes the events to disk only when closing the logger or when the number of events in the logger reaches a predefined level. Therefore, it is not suitable for debugging processes at runtime.
-
Threaded file logger: This logger writes the events to a file after a specified time interval. You can use this logger to visualize the progress in real time while debugging processes. The fully qualified class name for this logger is
org.drools.core.audit.ThreadedWorkingMemoryFileLogger.
When creating a logger, you must pass the KIE session as an argument. The file loggers also require the name of the log file to be created. The threaded file logger requires the interval in milliseconds after which the events are saved.
Always close the logger at the end of your application.
The following example shows the use of the file logger.
  import org.kie.api.KieServices;
  import org.kie.api.logger.KieRuntimeLogger;
  ...
  KieRuntimeLogger logger = KieServices.Factory.get().getLoggers().newFileLogger(ksession, "test");
  // add invocations to the jBPM engine here,
  // e.g. ksession.startProcess(processId);
  ...
  logger.close();
The log file that is created by the file-based loggers contains an XML-based overview of all the events that occurred during the runtime of the process.
9.7. jBPM engine configuration
You can use several control parameters available to alter the jBPM engine default behavior to suit the requirements of your environment.
Set these parameters as JVM system properties, usually with the -D option when starting a program such as an application server.
| Name | Possible values | Default value | Description |
|---|---|---|---|
|
String |
Alternative JNDI name to be used when there is no access to the default name ( NOTE: The name must be valid for the given runtime environment. Do not use this variable if there is no access to the default user transaction JNDI name. |
|
|
|
|
Enable multiple incoming and outgoing sequence flows support for activities |
|
String |
/ |
Alternative class path location of the business calendar configuration file |
|
Long |
2000 |
Specifies the delay for overdue timers to allow proper initialization, in milliseconds |
|
String |
Alternative comparator class to enable starting a process by name,
by default the |
|
|
|
|
Enable or disable loop iteration tracking for advanced loop support when using XOR gateways |
|
String |
|
Alternative JNDI name for the mail session used by Task Deadlines |
|
String |
/ |
Alternative class path location for a user group callback implementation (LDAP, DB) |
|
String |
|
Alternative location of the |
|
String |
/ |
Alternative class path location of the user info configuration (used by |
|
String |
|
Alternative separator of actors and groups for user tasks |
|
String |
Location of the Quartz configiration file to activate the Quartz-based timer service |
|
|
String |
|
Location to store data files produced by the jBPM engine |
|
Integer |
|
Thread pool size for the jBPM engine executor |
|
Integer |
3 |
Number of retries attempted by the jBPM engine executor in case of an error |
|
Integer |
0 |
Frequency used to check for pending jobs by the jBPM engine executor, in seconds. If the value is |
|
|
|
Disable the jBPM engine executor |
|
String |
|
Fully qualified name of the class that implements |
|
String |
Fully qualified names of event listeners that must be excluded even if they would otherwise be used. Separate multiple names with commas. For example, you can add |
|
|
String |
Fully qualified names of event listeners that must be included. Separate multiple names with commas. If you set this property, only the listeners in this property are included and all other listeners are excluded. |
10. Processes
10.1. What is BPMN 2.0
|
"The primary goal of BPMN is to provide a notation that is readily understandable by all business users, from the business analysts that create the initial drafts of the processes, to the technical developers responsible for implementing the technology that will perform those processes, and finally, to the business people who will manage and monitor those processes." |
The Business Process Model and Notation (BPMN) 2.0 specification is an OMG specification that not only defines a standard on how to graphically represent a business process (like BPMN 1.x), but now also includes execution semantics for the elements defined, and an XML format on how to store (and share) process definitions.
jBPM6 allows you to execute processes defined using the BPMN 2.0 XML format. That means that you can use all the different jBPM6 tooling to model, execute, manage and monitor your business processes using the BPMN 2.0 format for specifying your executable business processes. Actually, the full BPMN 2.0 specification also includes details on how to represent things like choreographies and collaboration. The jBPM project however focuses on that part of the specification that can be used to specify executable processes.
Executable processes in BPMN consist of different types of nodes being connected to each other using sequence flows. The BPMN 2.0 specification defines three main types of nodes:
-
Events: They are used to model the occurrence of a particular event. This could be a start event (that is used to indicate the start of the process), end events (that define the end of the process, or of that subflow) and intermediate events (that indicate events that might occur during the execution of the process).
-
Activities: These define the different actions that need to be performed during the execution of the process. Different types of tasks exist, depending on the type of activity you are trying to model (e.g. human task, service task, etc.) and activities could also be nested (using different types of sub-processes).
-
Gateways: Can be used to define multiple paths in the process. Depending on the type of gateway, these might indicate parallel execution, choice, etc.
jBPM6 does not implement all elements and attributes as defined in the BPMN 2.0 specification. We do however support a significant subset, including the most common node types that can be used inside executable processes. This includes (almost) all elements and attributes as defined in the "Common Executable" subclass of the BPMN 2.0 specification, extended with some additional elements and attributes we believe are valuable in that context as well. The full set of elements and attributes that are supported can be found below, but it includes elements like:
-
Flow objects
-
Events
-
Start Event (None, Conditional, Signal, Message, Timer)
-
End Event (None, Terminate, Error, Escalation, Signal, Message, Compensation)
-
Intermediate Catch Event (Signal, Timer, Conditional, Message)
-
Intermediate Throw Event (None, Signal, Escalation, Message, Compensation)
-
Non-interrupting Boundary Event (Escalation, Signal, Timer, Conditional, Message)
-
Interrupting Boundary Event (Escalation, Error, Signal, Timer, Conditional, Message, Compensation)
-
-
Activities
-
Script Task
-
Task
-
Service Task
-
User Task
-
Business Rule Task
-
Manual Task
-
Send Task
-
Receive Task
-
Reusable Sub-Process (Call Activity)
-
Embedded Sub-Process
-
Event Sub-Process
-
Ad-Hoc Sub-Process
-
Data-Object
-
-
Gateways
-
Diverging
-
Exclusive
-
Inclusive
-
Parallel
-
Event-Based
-
-
Converging
-
Exclusive
-
Inclusive
-
Parallel
-
-
-
Lanes
-
-
Data
-
Java type language
-
Process properties
-
Embedded Sub-Process properties
-
Activity properties
-
-
Connecting objects
-
Sequence flow
-
For example, consider the following "Hello World" BPMN 2.0 process, which does nothing more than writing out a "Hello World" statement when the process is started.
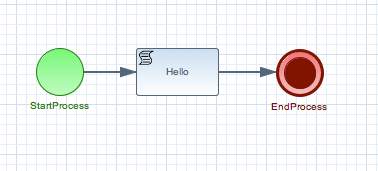
An executable version of this process expressed using BPMN 2.0 XML would look something like this:
<?xml version="1.0" encoding="UTF-8"?>
<definitions id="Definition"
             targetNamespace="http://www.example.org/MinimalExample"
             typeLanguage="http://www.java.com/javaTypes"
             expressionLanguage="http://www.mvel.org/2.0"
             xmlns="http://www.omg.org/spec/BPMN/20100524/MODEL"
             xmlns:xs="http://www.w3.org/2001/XMLSchema-instance"
             xs:schemaLocation="http://www.omg.org/spec/BPMN/20100524/MODEL BPMN20.xsd"
             xmlns:bpmndi="http://www.omg.org/spec/BPMN/20100524/DI"
             xmlns:dc="http://www.omg.org/spec/DD/20100524/DC"
             xmlns:di="http://www.omg.org/spec/DD/20100524/DI"
             xmlns:tns="http://www.jboss.org/drools">

  <process processType="Private" isExecutable="true" id="com.sample.HelloWorld" name="Hello World" >

    <!-- nodes -->
    <startEvent id="_1" name="StartProcess" />
    <scriptTask id="_2" name="Hello" >
      <script>System.out.println("Hello World");</script>
    </scriptTask>
    <endEvent id="_3" name="EndProcess" >
        <terminateEventDefinition/>
    </endEvent>

    <!-- connections -->
    <sequenceFlow id="_1-_2" sourceRef="_1" targetRef="_2" />
    <sequenceFlow id="_2-_3" sourceRef="_2" targetRef="_3" />

  </process>

  <bpmndi:BPMNDiagram>
    <bpmndi:BPMNPlane bpmnElement="Minimal" >
      <bpmndi:BPMNShape bpmnElement="_1" >
        <dc:Bounds x="15" y="91" width="48" height="48" />
      </bpmndi:BPMNShape>
      <bpmndi:BPMNShape bpmnElement="_2" >
        <dc:Bounds x="95" y="88" width="83" height="48" />
      </bpmndi:BPMNShape>
      <bpmndi:BPMNShape bpmnElement="_3" >
        <dc:Bounds x="258" y="86" width="48" height="48" />
      </bpmndi:BPMNShape>
      <bpmndi:BPMNEdge bpmnElement="_1-_2" >
        <di:waypoint x="39" y="115" />
        <di:waypoint x="75" y="46" />
        <di:waypoint x="136" y="112" />
      </bpmndi:BPMNEdge>
      <bpmndi:BPMNEdge bpmnElement="_2-_3" >
        <di:waypoint x="136" y="112" />
        <di:waypoint x="240" y="240" />
        <di:waypoint x="282" y="110" />
      </bpmndi:BPMNEdge>
    </bpmndi:BPMNPlane>
  </bpmndi:BPMNDiagram>

</definitions>
To create your own process using BPMN 2.0 format, you can
-
The jBPM Designer is an open-source web-based editor that supports the BPMN 2.0 format. We have embedded it into Business Central for BPMN 2.0 process visualization and editing. You could use the Designer (either standalone or integrated) to create / edit BPMN 2.0 processes and then export them to BPMN 2.0 format or save them into repository and import them so they can be executed.
-
A new BPMN2 Eclipse plugin is being created to support the full BPMN2 specification.
-
You can always manually create your BPMN 2.0 process files by writing the XML directly. You can validate the syntax of your processes against the BPMN 2.0 XSD, or use the validator in the Eclipse plugin to check both syntax and completeness of your model.
-
Drools Eclipse Process editor has been deprecated in favor of BPMN2 Modeler for process modeling. It can still be used for limited number of supported elements but should be faced out as it is not being developed any more.
Create a new Process file using the Drools Eclipse plugin wizard and in the last page of the wizard, make sure you select Drools 5.1 code compatibility. This will create a new process using the BPMN 2.0 XML format. Note however that this is not exactly a BPMN 2.0 editor, as it still uses different attributes names etc. It does however save the process using valid BPMN 2.0 syntax. Also note that the editor does not support all node types and attributes that are already supported in the jBPM engine.
The following code fragment shows you how to load a BPMN2 process into your KIE base …
private static KnowledgeBase createKnowledgeBase() throws Exception {
    KieHelper kieHelper = new KieHelper();
    KieBase kieBase = kieHelper
    .addResource(ResourceFactory.newClassPathResource("sample.bpmn2"))
    .build();

    return kieBase;
}
... and how to execute this process …
KieBase kbase = createKnowledgeBase();
KieSession ksession = kbase.newKieSession();
ksession.startProcess("com.sample.HelloWorld");
For more detail, check out the chapter on the API and the basics.
10.2. Business processes
A business process is a diagram that describes the order for a series of steps that must be executed and consists of predefined nodes and connections. Each node represents one step in the process while the connections specify how to transition from one node to another.
A typical business process consists of the following components:
-
The header section that comprises global elements such as the name of the process, imports, and variables
-
The nodes section that contains all the different nodes that are part of the process
-
The connections section that links these nodes to each other to create a flow chart
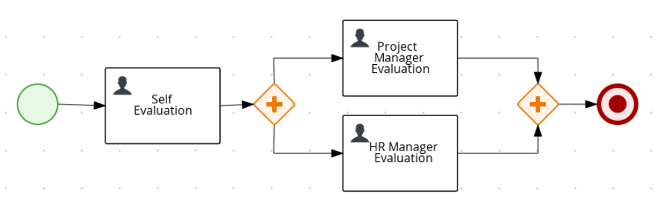
jBPM contains the legacy process designer and the new process designer for creating business process diagrams. The new process designer has an improved layout and feature set and continues to be developed. Until all features of the legacy process designer are completely implemented in the new process designer, both designers are available in Business Central for you to use.
10.2.1. Creating a business process in Business Central
The process designer is the jBPM process modeler. The output of the modeler is a BPMN 2.0 process definition file. The definition is used as input for the jBPM jBPM engine, which creates a process instance based on the definition.
The procedures in this section provide a general overview of how to create a simple business process.
-
You have created or imported a jBPM project.
-
You have created the required users. User privileges and settings are controlled by the roles assigned to a user and the groups that a user belongs to.
-
In Business Central, go to Menu → Design → Projects.
-
Click the project name to open the project’s asset list.
-
Click Add Asset → Business Process.
-
In the Create new Business Process wizard, enter the following values:
-
Business Process: New business process name
-
Package: Package location for your new business process, for example
com.myspace.myProject
-
-
Click Ok to open the process designer.
-
In the upper-right corner, click the Properties
 icon and add your business process property information, such as process data and variables:
-
Scroll down and expand Process Data.
-
Click
 next to Process Variables and define the process variables that you want to use in your business process.
Table 7. General process properties Label Description Name
Enter the name of the process.
Documentation
Describes the process. The text in this field is included in the process documentation, if applicable.
ID
Enter an identifier for this process, such as
orderItems.Package
Enter the package location for this process in your jBPM project, such as
org.acme.ProcessType
Specify whether the process is public or private (or null, if not applicable).
Version
Enter the artifact version for the process.
Ad hoc
Select this option if this process is an ad hoc sub-process.
Process Instance Description
Enter a description of the purpose of the process.
Imports
Click to open the Imports window and add any data object classes required for your process.
Executable
Select this option to make the process executable part of your jBPM project.
SLA Due Date
Enter the service level agreement (SLA) expiration date.
Process Variables
Add any process variables for the process. Process variables are visible within the specific process instance. Process variables are initialized at process creation and destroyed on process completion. Variable Tags provide greater control over variable behavior, for example whether the variable is
requiredorreadonly. For more information about variable tags, see Variables.Metadata Attributes
Add any custom metadata attribute name and value that you want to use for custom event listeners, such as a listener to implement some action when a metadata attribute is present.
Global Variables
Add any global variables for the process. Global variables are visible to all process instances and assets in a project. Global variables are typically used by business rules and constraints, and are created dynamically by the rules or constraints.
The Metadata Attributes entries are similar to Process Variables tags in that they enable new
metaDataextensions to BPMN diagrams. However, process variable tags modify the behavior of specific process variables, such as whether a certain variable isrequiredorreadonly, whereas metadata attributes are key-value definitions that modify the behavior of the overall process.For example, the following custom metadata attribute
riskLeveland valuelowin a BPMN process correspond to a custom event listener for starting the process: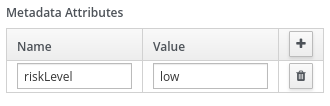 Figure 38. Example metadata attribute and value in the BPMN modelerExample metadata attribute and value in the BPMN file
<bpmn2:process id="approvals" name="approvals" isExecutable="true" processType="Public">
  <bpmn2:extensionElements>
    <tns:metaData name="riskLevel">
      <tns:metaValue><![CDATA[low]]></tns:metaValue>
    </tns:metaData>
  </bpmn2:extensionElements>
Example event listener with metadata valuepublic class MyListener implements ProcessEventListener { ... @Override public void beforeProcessStarted(ProcessStartedEvent event) { Map < String, Object > metadata = event.getProcessInstance().getProcess().getMetaData(); if (metadata.containsKey("low")) { // Implement some action for that metadata attribute } } } -
-
In the process designer canvas, use the left toolbar to drag and drop BPMN components to define your business process logic, connections, events, tasks, or other elements.
A task and event in jBPM expect one incoming and one outgoing flow. If you want to design a business process with multiple incoming and multiple outgoing flows, then consider redesigning the business process using gateways. Using gateways makes the logic apparent, which a sequence flow is executing. Therefore, gateways are considered as a best practice for multiple connections.
However, if it is a must to use multiple connections for a task or an event, then you must set the JVM (Java virtual machine) system property
jbpm.enable.multi.contotrue. When Business Central and KIE Server run on different servers, then ensure that both of them contains thejbpm.enable.multi.consystem property as enabled otherwise, the jBPM engine throws an exception. -
After you add and define all components of the business process, click Save to save the completed business process.
10.2.1.1. Creating business rules tasks
Business rules tasks are used to make decisions through a Decision Model and Notation (DMN) model or rule flow group.
-
Create a business process.
-
In the process designer, select the Activities tool from the tool palette.
-
Select Business Rule.
-
Click a blank area of the process designer canvas.
-
If necessary, in the upper-right corner of the screen, click the Properties icon.
-
Add or define the task information listed in the following table as required.
Table 8. Business rule task parameters Label Description Name
The name of the business rule task. You can also double-click the business rule task shape to edit the name.
Rule Language
The output language for the task. Select Decision Model and Notation (DMN) or Drools (DRL).
Rule Flow Group
The rule flow group associated with this business task. Select a rule flow group from the list or specify a new rule flow group.
On Entry Action
A Java, JavaScript, or MVEL script that specifies an action at the start of the task.
On Exit Action
A Java, JavaScript, or MVEL script that specifies an action at the end of the task.
Is Async
Select if this task should be invoked asynchronously. Make tasks asynchronous if they cannot be executed instantaneously, for example a task performed by an outside service.
AdHoc Autostart
Select if this is an ad hoc task that should be started automatically. AdHoc Autostart enables the task to automatically start when the process or case instance is created instead of being starting by a start task. It is often used in case management.
SLA Due Date
The date that the service level agreement (SLA) expires.
Assignments
Click to add local variables.
-
Click Save.
10.2.1.2. Creating script tasks
Script tasks are used to execute a piece of code written in Java, JavaScript, or MVEL. They contain code snippets that specify the action of the script task. You can include global and process variables in your scripts.
Note that MVEL accepts any valid Java code and additionally provides support for nested access of parameters. For example, the MVEL equivalent of the Java call person.getName() is person.name. MVEL also provides other improvements over Java and MVEL expressions are generally more convenient for business users.
-
Create a business process.
-
In the process designer, select the Activities tool from the tool palette.
-
Select Script.
-
Click a blank area of the process designer canvas.
-
If necessary, in the upper-right corner of the screen, click the Properties icon.
-
Add or define the task information listed in the following table as required.
Table 9. Script task parameters Label Description Name
The name of the script task. You can also double-click the script task shape to edit the name.
Documentation
Enter a description of the task. The text in this field is included in the process documentation. Click the Documentation tab in the upper-left side of the process designer canvas to view the process documentation.
Script
Enter a script in Java, JavaScript, or MVEL to be excuted by the task, and select the script type.
Is Async
Select if this task should be invoked asynchronously. Make tasks asynchronous if they cannot be executed instantaneously, for example a task performed by an outside service.
AdHoc Autostart
Select if this is an ad hoc task that should be started automatically. AdHoc Autostart enables the task to automatically start when the process or case instance is created instead of being starting by a start task. It is often used in case management.
-
Click Save.
10.2.1.3. Creating service tasks
A service task is a task that executes an action based on a web service call or in a Java class method. Examples of service tasks include sending an email and logging a message when these tasks are performed by systems. You can define the parameters (input) and results (output) that are associated with a service task. A Service Task should have one incoming connection and one outgoing connection.
-
In Business Central, select the Admin icon in the top-right corner of the screen and select Artifacts.
-
Click Upload to open the Artifact upload window.
-
Choose the
.jarfile and click .
.The
.jarfile contains data types (data objects) and Java classes for web service and Java service tasks respectively. -
Create a project you want to use.
-
Go to your project Settings → Dependencies.
-
Click Add from repository, locate the uploaded
.jarfile, and click Select. -
Open your project Settings → Work Item Handler.
-
Enter the following values in the given fields:
-
Name -
Service Task -
Value -
new org.jbpm.process.workitem.bpmn2.ServiceTaskHandler(ksession, classLoader)
-
-
Save the project.
Example of creating web service taskThe default implementation of a service task in the BPMN2 specification is a web service. The web service support is based on the Apache CXF dynamic client, which provides a dedicated service task handler that implements the
WorkItemHandlerinterface:org.jbpm.process.workitem.bpmn2.ServiceTaskHandlerTo create a service task using web service, you must configure the web service:
-
Create a business process.
-
If necessary, in the upper-right corner of the screen, click the Properties icon.
-
Click
 in the Imports property to open the Imports window.
 -
Click +Add next to the WSDL Imports to import the required WSDL (Web Services Description Language) values. For example:
-
Location: http://localhost:8080/sample-ws-1/SimpleService?wsdl
The location points to the WSDL file of your service.
-
Namespace: http://bpmn2.workitem.process.jbpm.org/
The namespace must match
targetNamespacefrom your WSDL file.
-
-
In the process designer, select the Activities tool from the tool palette.
-
Select Service Task.
-
Click a blank area of the process designer canvas.
-
Add or define the task information listed in the following table as required.
Table 10. Web service task parameters Label Description Name
The name of the service task. You can also double-click the service task shape to edit the name.
Documentation
Enter a description of the task. The text in this field is included in the process documentation. Click the Documentation tab in the upper-left side of the process designer canvas to view the process documentation.
Implementation
Specify a web service.
Interface
The service used to implement the script, such as
CountriesPortService.Operation
The operation that is called by the interface, such as
getCountry.Assignments
Click to add local variables.
AdHoc Autostart
Select if this is an ad hoc task that should be started automatically. AdHoc Autostart enables the task to automatically start when the process or case instance is created instead of being starting by a start task. It is often used in case management.
Is Async
Select if this task should be invoked asynchronously. Make tasks asynchronous if they cannot be executed instantaneously, for example a task performed by an outside service.
Is Multiple Instance
Select if this task has multiple instances.
MI Execution mode
Select if the multiple instances execute in parallel or sequentially.
MI Collection input
Specify a variable that represents a collection of elements for which new instances are created, such as
inputCountryNames.MI Data Input
Specify the input data assignment that is transferred to a web service, such as
Parameter.MI Collection output
The array list in which values returned from the web service task is stored, such as
outputCountries.MI Data Output
Specify the output data assignment for the web service task, which stores the result of class execution on the server, such as
Result.MI Completion Condition (mvel)
Specify the MVEL expression that is evaluated on each completed instance to check if the specified multiple instance node can complete.
On Entry Action
A Java, JavaScript, or MVEL script that specifies an action at the start of the task.
On Exit Action
A Java, JavaScript, or MVEL script that specifies an action at the end of the task.
SLA Due Date
The date that the service level agreement (SLA) expires.
Example of creating Java service taskWhen you create a service task using Java method, then the method can only contain one parameter and returns a single value. To create a service task using a Java method, you must add the Java class to the dependencies of the project:
-
Create a business process.
-
In the process designer, select the Activities tool from the tool palette.
-
Select Service Task.
-
Click a blank area of the process designer canvas.
-
If necessary, in the upper-right corner of the screen, click the Properties icon.
-
Add or define the task information listed in the following table as required.
Table 11. Java service task parameters Label Description Name
The name of the service task. You can also double-click the service task shape to edit the name.
Documentation
Enter a description of the task. The text in this field is included in the process documentation. Click the Documentation tab in the upper-left side of the process designer canvas to view the process documentation.
Implementation
Specify the task is implemented in Java.
Interface
The class used to implement the script, such as
org.xyz.HelloWorld.Operation
The method that is called by the interface, such as
sayHello.Assignments
Click to add local variables.
AdHoc Autostart
Select if this is an ad hoc task that should be started automatically. AdHoc Autostart enables the task to automatically start when the process or case instance is created instead of being starting by a start task. It is often used in case management.
Is Async
Select if this task should be invoked asynchronously. Make tasks asynchronous if they cannot be executed instantaneously, for example a task performed by an outside service.
Is Multiple Instance
Select if this task has multiple instances.
MI Execution mode
Select if the multiple instances execute in parallel or sequentially.
MI Collection input
Specify a variable that represents a collection of elements for which new instances are created, such as
InputCollection.MI Data Input
Specify the input data assignment that is transferred to a Java class. For example, you can set the input data assignments as
ParameterandParameterType.ParameterTyperepresents the type ofParameterand sends arguments to the execution of Java method.MI Collection output
The array list in which values returned from the Java class is stored, such as
OutputCollection.MI Data Output
Specify the output data assignment for Java service task, which stores the result of class execution on the server, such as
Result.MI Completion Condition (mvel)
Specify the MVEL expression that is evaluated on each completed instance to check if the specified multiple instance node can complete. For example,
OutputCollection.size() <= 3indicates more than three people are not addressed.On Entry Action
A Java, JavaScript, or MVEL script that specifies an action at the start of the task.
On Exit Action
A Java, JavaScript, or MVEL script that specifies an action at the end of the task.
SLA Due Date
The date that the service level agreement (SLA) expires.
-
-
Click Save.
10.2.1.4. Creating user tasks
User tasks are used to include human actions as input to the business process.
-
Create a business process.
-
In the process designer, select the Activities tool from the tool palette.
-
Select User.
-
Drag and drop a user task onto the process designer canvas.
-
If necessary, in the upper-right corner of the screen, click the Properties icon.
-
Add or define the task information listed in the following table as required.
Table 12. User task parameters Label Description Name
The name of the user task. You can also double-click the user task shape to edit the name.
Documentation
Enter a description of the task. The text in this field is included in the process documentation. Click the Documentation tab in the upper-left side of the process designer canvas to view the process documentation.
Task Name
The name of the human task.
Subject
Enter a subject for the task.
Actors
The actors responsible for executing the human task. Click Add to add a row then select an actor from the list or click New to add a new actor.
Groups
The groups responsible for executing the human task. Click Add to add a row then select a group from the list or click New to add a new group.
Assignments
Local variables for this task. Click to open the Task Data I/O window then add data inputs and outputs as required. You can also add MVEL expressions as data input and output assignments. For more information about MVEL language, see Language Guide for 2.0.
Reassignments
Specify a different actor to complete this task.
Notifications
Click to specify notifications associated with the task.
Is Async
Select if this task should be invoked asynchronously. Make tasks asynchronous if they cannot be executed instantaneously, for example a task performed by an outside service.
Skippable
Select if this task is not mandatory.
Priority
Specify a priority for the task.
Description
Enter a description for the human task.
Created By
The user that created this task.
AdHoc Autostart
Select if this is an ad hoc task that should be started automatically. AdHoc Autostart enables the task to automatically start when the process or case instance is created instead of being starting by a start task. It is often used in case management.
Multiple Instance
Select if this task has multiple instances.
On Entry Action
A Java, JavaScript, or MVEL script that specifies an action at the start of the task.
On Exit Action
A Java, JavaScript, or MVEL script that specifies an action at the end of the task.
Content
The content of the script.
SLA Due Date
The date that the service level agreement (SLA) expires.
-
Click Save.
10.2.1.5. Copying elements from one business process to another business process
You can copy individual elements from one business process to another business process in Business Central.
-
In the business process designer canvas, click and drag the cursor to select the elements that you want to copy.
-
Click
 in the upper-right toolbar to copy your selection.
 -
Switch into the second business process where you want to add the copied elements.
-
In the second business process, create any process variables that are used in the business process that you want to copy. The variable
NameandTypeparameters must be identical in order to preserve variable mapping. -
Click
 to paste your selection.
 -
Click Save to save the updated business process.
10.2.1.6. Making a copy of a business process
You can make a copy of a business process in Business Central and modify the copied process as needed.
-
In the business process designer, click Copy in the upper-right toolbar.
-
In the Make a Copy window, enter a new name for the copied business process, select the target package, and optionally add a comment.
-
Click Make a Copy.
-
Modify the copied business process as needed and click Save to save the updated business process.
10.2.1.7. Resizing elements and using the zoom function to view business processes
You can resize individual elements in a business process and zoom in or out to modify the view of your business process.
-
In the business process designer, select the element and click the red dot in the lower-right corner of the element.
-
Drag the red dot to resize the element.
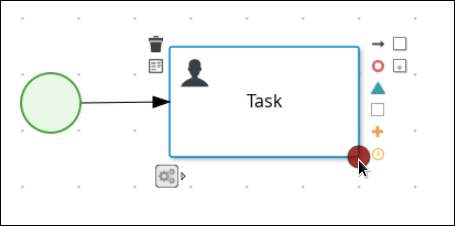 Figure 39. Resize an element
 -
To zoom in or out to view the entire diagram, click the plus or minus sign on the lower-right side of the canvas.
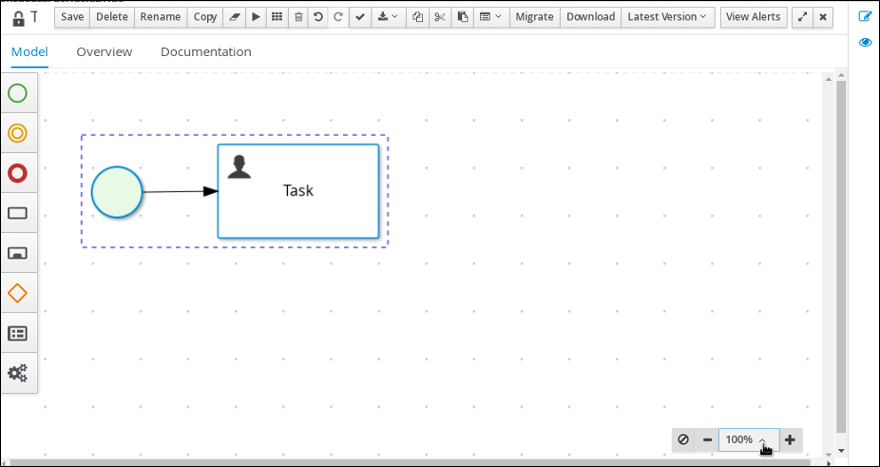 Figure 40. Enlarge or shrink a business process
10.2.2. Deploying a business process in Business Central
After you design your business process in Business Central, you can build and deploy your project in Business Central to make the process available to KIE Server.
-
KIE Server is deployed and connected to Business Central.
-
In Business Central, go to Menu → Design → Projects.
-
Click the project that you want to deploy.
-
Click Deploy.
You can also select the Build & Install option to build the project and publish the KJAR file to the configured Maven repository without deploying to a KIE Server. In a development environment, you can click Deploy to deploy the built KJAR file to a KIE Server without stopping any running instances (if applicable), or click Redeploy to deploy the built KJAR file and replace all instances. The next time you deploy or redeploy the built KJAR, the previous deployment unit (KIE container) is automatically updated in the same target KIE Server. In a production environment, the Redeploy option is disabled and you can click Deploy only to deploy the built KJAR file to a new deployment unit (KIE container) on a KIE Server.
To configure the KIE Server environment mode, set the
org.kie.server.modesystem property toorg.kie.server.mode=developmentororg.kie.server.mode=production. To configure the deployment behavior for a corresponding project in Business Central, go to project Settings → General Settings → Version and toggle the Development Mode option. By default, KIE Server and all new projects in Business Central are in development mode. You cannot deploy a project with Development Mode turned on or with a manually addedSNAPSHOTversion suffix to a KIE Server that is in production mode.To review project deployment details, click View deployment details in the deployment banner at the top of the screen or in the Deploy drop-down menu. This option directs you to the Menu → Deploy → Execution Servers page.
10.2.3. Executing a business process in Business Central
After you build and deploy the project that contains your business process, you can execute the defined functionality for the business process.
As an example, this procedure uses the Mortgage_Process sample project in Business Central. In this scenario, you input data into a mortgage application form acting as the mortgage broker. The MortgageApprovalProcess business process runs and determines whether or not the applicant has offered an acceptable down payment based on the decision rules defined in the project. The business process either ends the rule testing or requests that the applicant increase the down payment to proceed. If the application passes the business rule testing, the bank approver reviews the application and either approves or denies the loan.
-
KIE Server is deployed and connected to Business Central.
-
In Business Central, go to Menu → Projects and select a space. The default space is MySpace.
-
In the upper-right corner of the window, click the arrow next to Add Project and select Try Samples.
-
Select the Mortgage_Process sample and click Ok.
-
On the project page, select Mortgage_Process.
-
On the Mortgage_Process page, click Build.
-
After the project has built, click Deploy.
-
Go to Menu → Manage → Process Definitions.
-
Click anywhere in the MortgageApprovalProcess row to view the process details.
-
Click the Diagram tab to view the business process diagram in the editor.
-
Click New Process Instance to open the Application form and input the following values into the form fields:
-
Down Payment:
30000 -
Years of amortization:
10 -
Name:
Ivo -
Annual Income:
60000 -
SSN:
123456789 -
Age of property:
8 -
Address of property:
Brno -
Locale:
Rural -
Property Sale Price:
50000
-
-
Click Submit to start a new process instance. After starting the process instance, the Instance Details view opens.
-
Click the Diagram tab to view the process flow within the process diagram. The state of the process is highlighted as it moves through each task.
-
Click Menu → Manage → Tasks.
For this example, the user or users working on the corresponding tasks are members of the following groups:
-
approver: For the Qualify task
-
broker: For the Correct Data and Increase Down Payment tasks
-
manager: For the Final Approval task
-
-
As the approver, review the Qualify task information, click Claim and then Start to start the task, and then select Is mortgage application in limit? and click Complete to complete the task flow.
-
In the Tasks page, click anywhere in the Final Approval row to open the Final Approval task.
-
Click Claim to claim responsibility for the task, and click Complete to finalize the loan approval process.
| The Save and Release buttons are only used to either pause the approval process and save the instance if you are waiting on a field value, or to release the task for another user to modify. |
10.2.4. Process definitions and process instances in Business Central
A process definition is a Business Process Model and Notation (BPMN) 2.0 file that serves as a container for a process and its BPMN diagram. The process definition shows all of the available information about the business process, such as any associated sub-processes or the number of users and groups that are participating in the selected definition.
A process definition also defines the import entry for imported processes that the process definition uses, and the relationship entries.
<definitions id="Definition"
               targetNamespace="http://www.jboss.org/drools"
               typeLanguage="http://www.java.com/javaTypes"
               expressionLanguage="http://www.mvel.org/2.0"
               xmlns="http://www.omg.org/spec/BPMN/20100524/MODEL"Rule Task
               xmlns:xsi="http://www.w3.org/2001/XMLSchema-instance"
               xsi:schemaLocation="http://www.omg.org/spec/BPMN/20100524/MODEL BPMN20.xsd"
               xmlns:g="http://www.jboss.org/drools/flow/gpd"
               xmlns:bpmndi="http://www.omg.org/spec/BPMN/20100524/DI"
               xmlns:dc="http://www.omg.org/spec/DD/20100524/DC"
               xmlns:di="http://www.omg.org/spec/DD/20100524/DI"
               xmlns:tns="http://www.jboss.org/drools">

    <process>
      PROCESS
    </process>

    <bpmndi:BPMNDiagram>
     BPMN DIAGRAM DEFINITION
    </bpmndi:BPMNDiagram>

    </definitions>
After you have created, configured, and deployed your project that includes your business processes, you can view the list of all the process definitions in Business Central Menu → Manage → Process Definitions. You can refresh the list of deployed process definitions at any time by clicking the refresh button in the upper-right corner.
The process definition list shows all the available process definitions that are deployed into the platform. Click any of the process definitions listed to show the corresponding process definition details. This displays information about the process definition, such as if there is a sub-process associated with it, or how many users and groups exist in the process definition. The Diagram tab in the process definition details page contains the BPMN2-based diagram of the process definition.
Within each selected process definition, you can start a new process instance for the process definition by clicking the New Process Instance button in the upper-right corner. Process instances that you start from the available process definitions are listed in Menu → Manage → Process Instances.
You can also define the default pagination option for all users under the Manage drop-down menu (Process Definition, Process Instances, Tasks, Jobs, and Execution Errors) and in Menu → Track → Task Inbox.
10.2.4.1. Starting a process instance from the process definitions page
You can start a process instance in Menu → Manage → Process Definitions. This is useful for environments where you are working with several projects or process definitions at the same time.
-
A project with a process definition has been deployed in Business Central.
-
In Business Central, go to Menu → Manage → Process Definitions.
-
Select the process definition for which you want to start a new process instance from the list. The details page of the definition opens.
-
Click New Process Instance in the upper-right corner to start a new process instance.
-
Provide any required information for the process instance.
-
Click Submit to create the process instance.
-
View the new process instance in Menu → Manage → Process Instances.
10.2.4.2. Starting a process instance from the process instances page
You can create new process instances or view the list of all the running process instances in Menu → Manage → Process Instances.
-
A project with a process definition has been deployed in Business Central.
-
In Business Central, go to Menu → Manage → Process Instances.
-
Click New Process Instance in the upper-right corner and select the process definition for which you want to start a new process instance from the drop-down list.
-
Provide any information required to start a new process instance.
-
Click Start to create the process instance.
The new process instance appears in the Manage Process Instances list.
10.2.4.3. Generating process documentation in Business Central
In the process designer in Business Central, you can view and print a report of the process definition. The process documentation summarizes the components, data, and visual flow of the process in a format (PDF) that you can print and share more easily.
-
In Business Central, navigate to a project that contains a business process and select the process.
-
In the process designer, click the Documentation tab to view the summary of the process file, and click Print in the top-right corner of the window to print the PDF report.
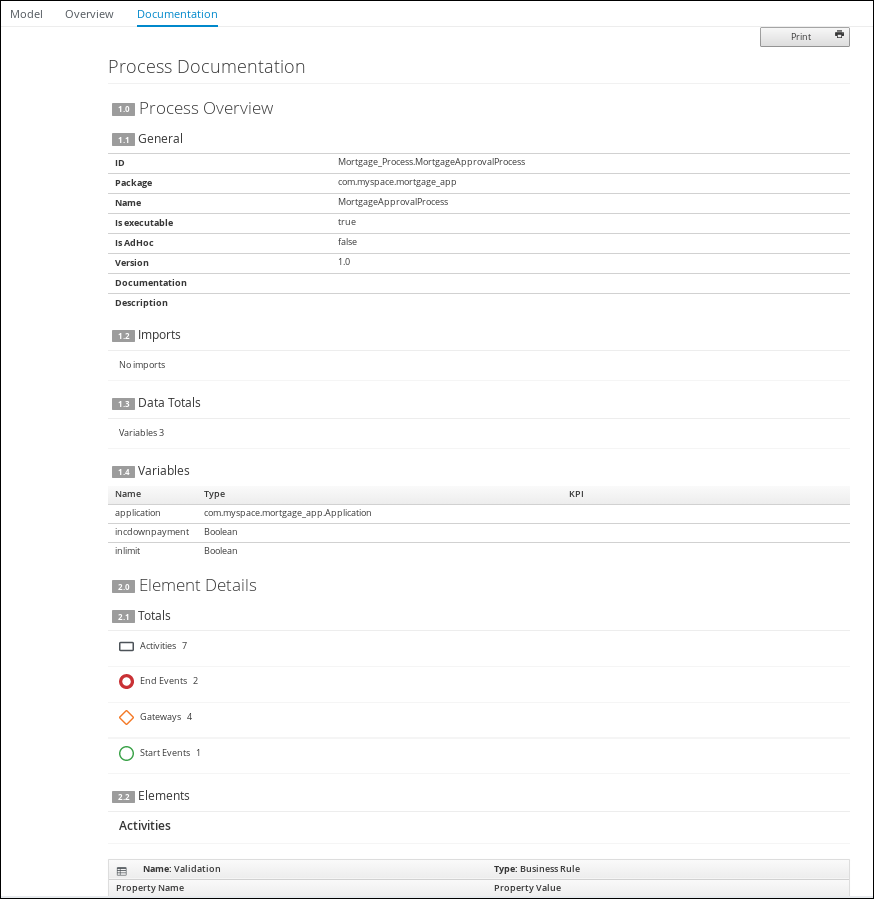 Figure 41. Generate process documentation
10.2.4.4. Process definitions in XML
You can create processes directly in XML format using the BPMN 2.0 specifications. The syntax of these XML processes is defined using the BPMN 2.0 XML Schema Definition.
A process XML file consists of the following core sections:
-
process: This is the top part of the process XML that contains the definition of the different nodes and their properties. The process XML file consists of exactly one<process>element. This element contains parameters related to the process (its type, name, ID, and package name), and consists of three subsections: a header section where process-level information such as variables, globals, imports, and lanes are defined, a nodes section that defines each of the nodes in the process, and a connections section that contains the connections between all the nodes in the process. -
BPMNDiagram: This is the lower part of the process XML file that contains all graphical information, such as the location of the nodes. The nodes section contains a specific element for each node and defines the various parameters and any sub-elements for that node type.
The following process XML file fragment shows a simple process that contains a sequence of a start event, a script task that prints "Hello World" to the console, and an end event:
<?xml version="1.0" encoding="UTF-8"?>

<definitions
  id="Definition"
  targetNamespace="http://www.jboss.org/drools"
  typeLanguage="http://www.java.com/javaTypes"
  expressionLanguage="http://www.mvel.org/2.0"
  xmlns="http://www.omg.org/spec/BPMN/20100524/MODEL"
  xmlns:xsi="http://www.w3.org/2001/XMLSchema-instance"
  xsi:schemaLocation="http://www.omg.org/spec/BPMN/20100524/MODEL BPMN20.xsd"
  xmlns:g="http://www.jboss.org/drools/flow/gpd"
  xmlns:bpmndi="http://www.omg.org/spec/BPMN/20100524/DI"
  xmlns:dc="http://www.omg.org/spec/DD/20100524/DC"
  xmlns:di="http://www.omg.org/spec/DD/20100524/DI"
  xmlns:tns="http://www.jboss.org/drools">

  <process processType="Private" isExecutable="true" id="com.sample.hello" name="Hello Process">
    <!-- nodes -->
    <startEvent id="_1" name="Start" />

    <scriptTask id="_2" name="Hello">
      <script>System.out.println("Hello World");</script>
    </scriptTask>

    <endEvent id="_3" name="End" >
      <terminateEventDefinition/>
    </endEvent>

    <!-- connections -->

    <sequenceFlow id="_1-_2" sourceRef="_1" targetRef="_2" />
    <sequenceFlow id="_2-_3" sourceRef="_2" targetRef="_3" />
  </process>

  <bpmndi:BPMNDiagram>
    <bpmndi:BPMNPlane bpmnElement="com.sample.hello" >

      <bpmndi:BPMNShape bpmnElement="_1" >
        <dc:Bounds x="16" y="16" width="48" height="48" />
      </bpmndi:BPMNShape>

      <bpmndi:BPMNShape bpmnElement="_2" >
        <dc:Bounds x="96" y="16" width="80" height="48" />
      </bpmndi:BPMNShape>

      <bpmndi:BPMNShape bpmnElement="_3" >
        <dc:Bounds x="208" y="16" width="48" height="48" />
      </bpmndi:BPMNShape>

      <bpmndi:BPMNEdge bpmnElement="_1-_2" >
        <di:waypoint x="40" y="40" />
        <di:waypoint x="136" y="40" />
      </bpmndi:BPMNEdge>

      <bpmndi:BPMNEdge bpmnElement="_2-_3" >
        <di:waypoint x="136" y="40" />
        <di:waypoint x="232" y="40" />
      </bpmndi:BPMNEdge>

    </bpmndi:BPMNPlane>
  </bpmndi:BPMNDiagram>

</definitions>
10.2.5. Invoking a Decision Model and Notation (DMN) service in a business process
You can use Decision Model and Notation (DMN) to model a decision service graphically in a decision requirements diagram (DRD) in Business Central and then invoke that DMN service as part of a business process in Business Central. Business processes interact with DMN services by identifying the DMN service and mapping business data between DMN inputs and the business process properties.
As an illustration, this procedure uses an example TrainStation project that defines train routing logic. This example project contains the following data object and DMN components designed in Business Central for the routing decision logic:
Train objectpublic class Train {
private String departureStation;
private String destinationStation;
private BigDecimal railNumber;
// Getters and setters
}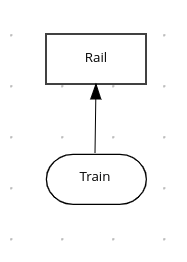
Compute Rail DMN model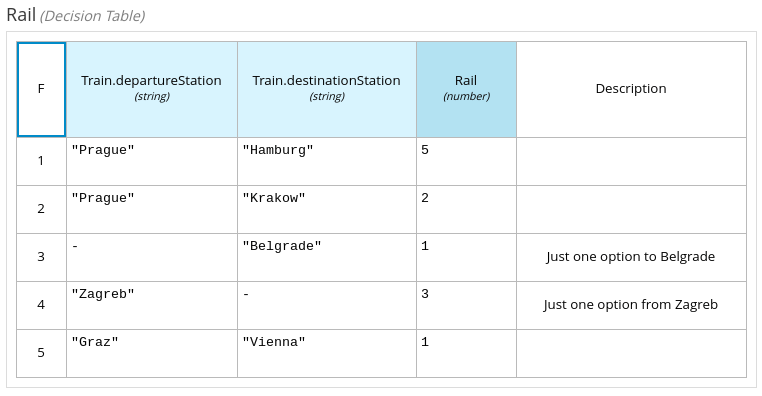
Rail DMN decision table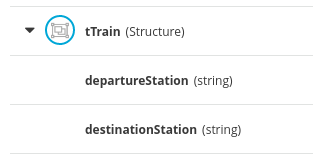
tTrain DMN data typeFor more information about creating DMN models in Business Central, see Decision Model and Notation (DMN) in the Drools documentation.
-
All required data objects and DMN model components are defined in the project.
-
In Business Central, go to Menu → Design → Projects and click the project name.
-
Select or create the business process asset in which you want to invoke the DMN service.
-
In the process designer, use the left toolbar to drag and drop BPMN components as usual to define your overall business process logic, connections, events, tasks, or other elements.
-
To incorporate a DMN service in the business process, add a Business Rule task from the left toolbar or from the start-node options and insert the task in the relevant location in the process flow.
For this example, the following
Accept Trainbusiness process incorporates the DMN service in theRoute To Railnode: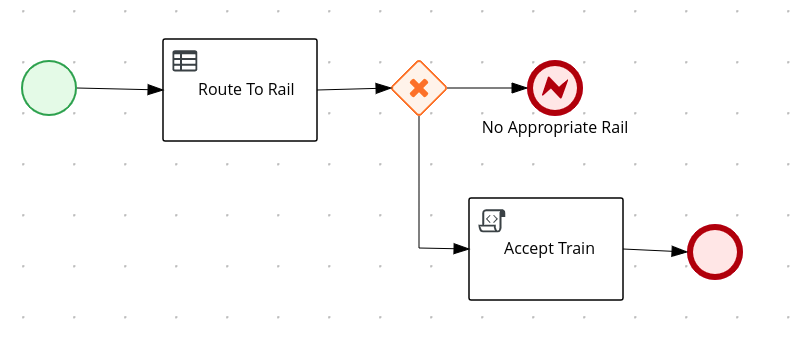 Figure 45. Example
Accept Trainbusiness process with a DMN service -
Select the business rule task node that you want to use for the DMN service, click Properties in the upper-right corner of the process designer, and under Implementation/Execution, define the following fields:
-
Rule Language: Select
DMN. -
Namespace: Enter the unique namespace from the DMN model file. Example:
https://www.drools.org/kie-dmn -
Decision Name: Enter the name of the DMN decision node that you want to invoke in the selected process node. Example:
Rail -
DMN Model Name: Enter the DMN model name. Example:
Compute RailWhen you explore the root node, ensure that the Namespace and DMN Model Name fields consist of the same value in BPMN as DMN diagram.
-
-
Under Data Assignments → Assignments, click the Edit icon and add the DMN input and output data to define the mapping between the DMN service and the process data.
For the
Route To RailDMN service node in this example, you add an input assignment forTrainthat corresponds to the input node in the DMN model, and add an output assignment forRailthat corresponds to the decision node in the DMN model. The Data Type must match the type that you set for that node in the DMN model, and the Source and Target definition is the relevant variable or field for the specified object. Figure 46. Example input and output mapping for the
Route To RailDMN service node -
Click Save to save the data input and output data.
-
Define the remainder of your business process according to how you want the completed DMN service to be handled.
For this example, the Properties → Implementation/Execution → On Exit Action value is set to the following code to store the rail number after the
Route To RailDMN service is complete:Example code forOn Exit Actiontrain.setRailNumber(rail);If the rail number is not computed, the process reaches a
No Appropriate Railend error node that is defined with the following condition expression: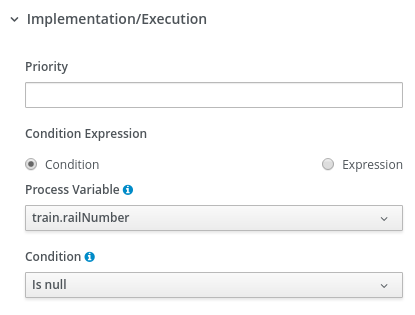 Figure 47. Example condition for
No Appropriate Railend error nodeIf the rail number is computed, the process reaches an
Accept Trainscript task that is defined with the following condition expression: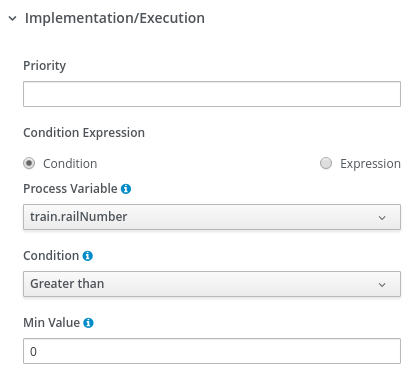 Figure 48. Example condition for
Accept Trainscript task nodeThe
Accept Trainscript task also uses the following script in Properties → Implementation/Execution → Script to print a message about the train route and current rail:com.myspace.trainstation.Train t = (com.myspace.trainstation.Train) kcontext.getVariable("train"); System.out.println("Train from: " + t.getDepartureStation() + ", to: " + t.getDestinationStation() + ", is on rail: " + t.getRailNumber()); -
After you define your business process with the incorporated DMN service, save your process in the process designer, deploy the project, and run the corresponding process definition to invoke the DMN service.
For this example, when you deploy the TrainStation project and run the corresponding process definition, you open the process instance form for the
Accept Trainprocess definition and set thedeparture stationanddestination stationfields to test the execution: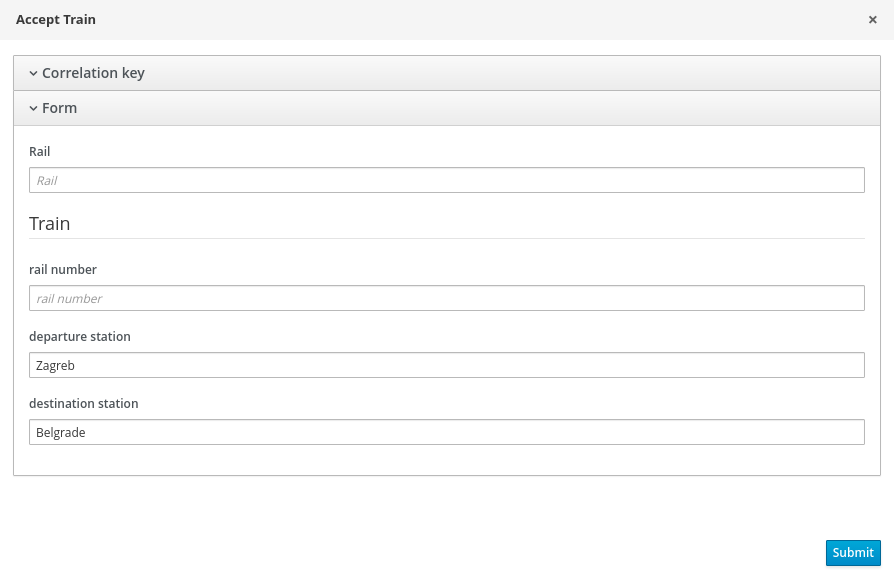 Figure 49. Example process instance form for the
Accept Trainprocess definitionAfter the process is executed, a message appears in the server log with the train route that you specified:
Example server log output for theAccept TrainprocessTrain from: Zagreb, to: Belgrade, is on rail: 1
10.3. BPMN2 tasks in process designer
A task is an automatic activity that is defined in the process model and the smallest unit of work in a process flow. The following task types defined in the BPMN2 specification are available in the jBPM process designer palette:
-
Business rule task
-
Script task
-
User task
-
Service task
-
None task
Business rule task |
|
Script task |
|
User task |
|
Service task |
|
None task |
|
In addition, the BPMN2 specification provides the ability to create custom tasks. For more information about custom tasks, see BPMN2 custom tasks in process designer.
A business rule task defines a way to make a decision either through a DMN model or a rule flow group.
When a process reaches a business rule task defined by a DMN model, the jBPM engine executes the DMN model decision with the inputs provided.
When a process reaches a business rule task defined by a rule flow group, the jBPM engine begins executing the rules in the defined rule flow group. When there are no more active rules in the rule flow group, the execution continues to the next element. During the rule flow group execution, new activations belonging to the active rule flow group can be added to the agenda because these activations are changed by other rules.
A script task represents a script to be executed during the process execution.
The associated script can access process variables and global variables. Review the following list before using a script task:
-
Avoid low-level implementation details in the process. A script task can be used to manipulate variables, but consider using a service task or a custom task when modelling more complex operations.
-
Ensure that the script is executed immediately, otherwise use an asynchronous service task.
-
Avoid contacting external services through a script task. Use a service task to model communication with an external service.
-
Ensure scripts do not throw exceptions. Runtime exceptions should be caught and managed, for example, inside the script or transformed into signals or errors that can then be handled inside the process.
When a script task is reached during execution, the script is executed and the outgoing flow is taken.
User tasks are tasks in the process workflow that cannot be performed automatically by the system and therefore require the intervention of a human user, the actor.
On execution, the User task element is instantiated as a task that appears in the list of tasks of one or more actors. If a User task element defines the Groups attribute, it is displayed in task lists of all users that are members of the group. Any user who is a member of the group can claim the task.
After it is claimed, the task disappears from the task list of the other users.
User tasks are implemented as domain-specific tasks and serve as a base for custom tasks.
Service tasks are tasks that do not require human interaction. They are completed automatically by an external software service.
None tasks are completed on activation. This is a conceptual model only. A none task is never actually executed by an IT system.
10.4. BPMN2 sub-processes in process designer
A sub-process is an activity that contains nodes. You can embed part of the main process within a sub-process. You can also include variable definitions within the sub-process. These variables are accessible to all nodes inside the sub-process.
A sub-process must have at least one incoming connection and one outgoing connection. A terminate end event inside a sub-process ends the sub-process instance but does not automatically end the parent process instance. A sub-process ends when there are no more active elements in it.
The following sub-process types are supported in jBPM:
-
Embedded sub-process: A sub-process that is a part of the parent process execution and shares the parent process data, along with declaring its own local sub-process variables.
-
Ad hoc sub-process: A sub-process that has no strict element execution order.
-
Reusable sub-process: A sub-process that is independent of its parent process.
-
Event sub-process: A sub-process that is only triggered on a start event or a timer.
-
Multi-instance sub-process: A sub-process that is instantiated multiple times.
In the following example, the Place order sub-process checks whether sufficient stock is available to place the order and updates the stock information if the order can be placed. The customer is then notified through the main process based on whether or not the order was placed.
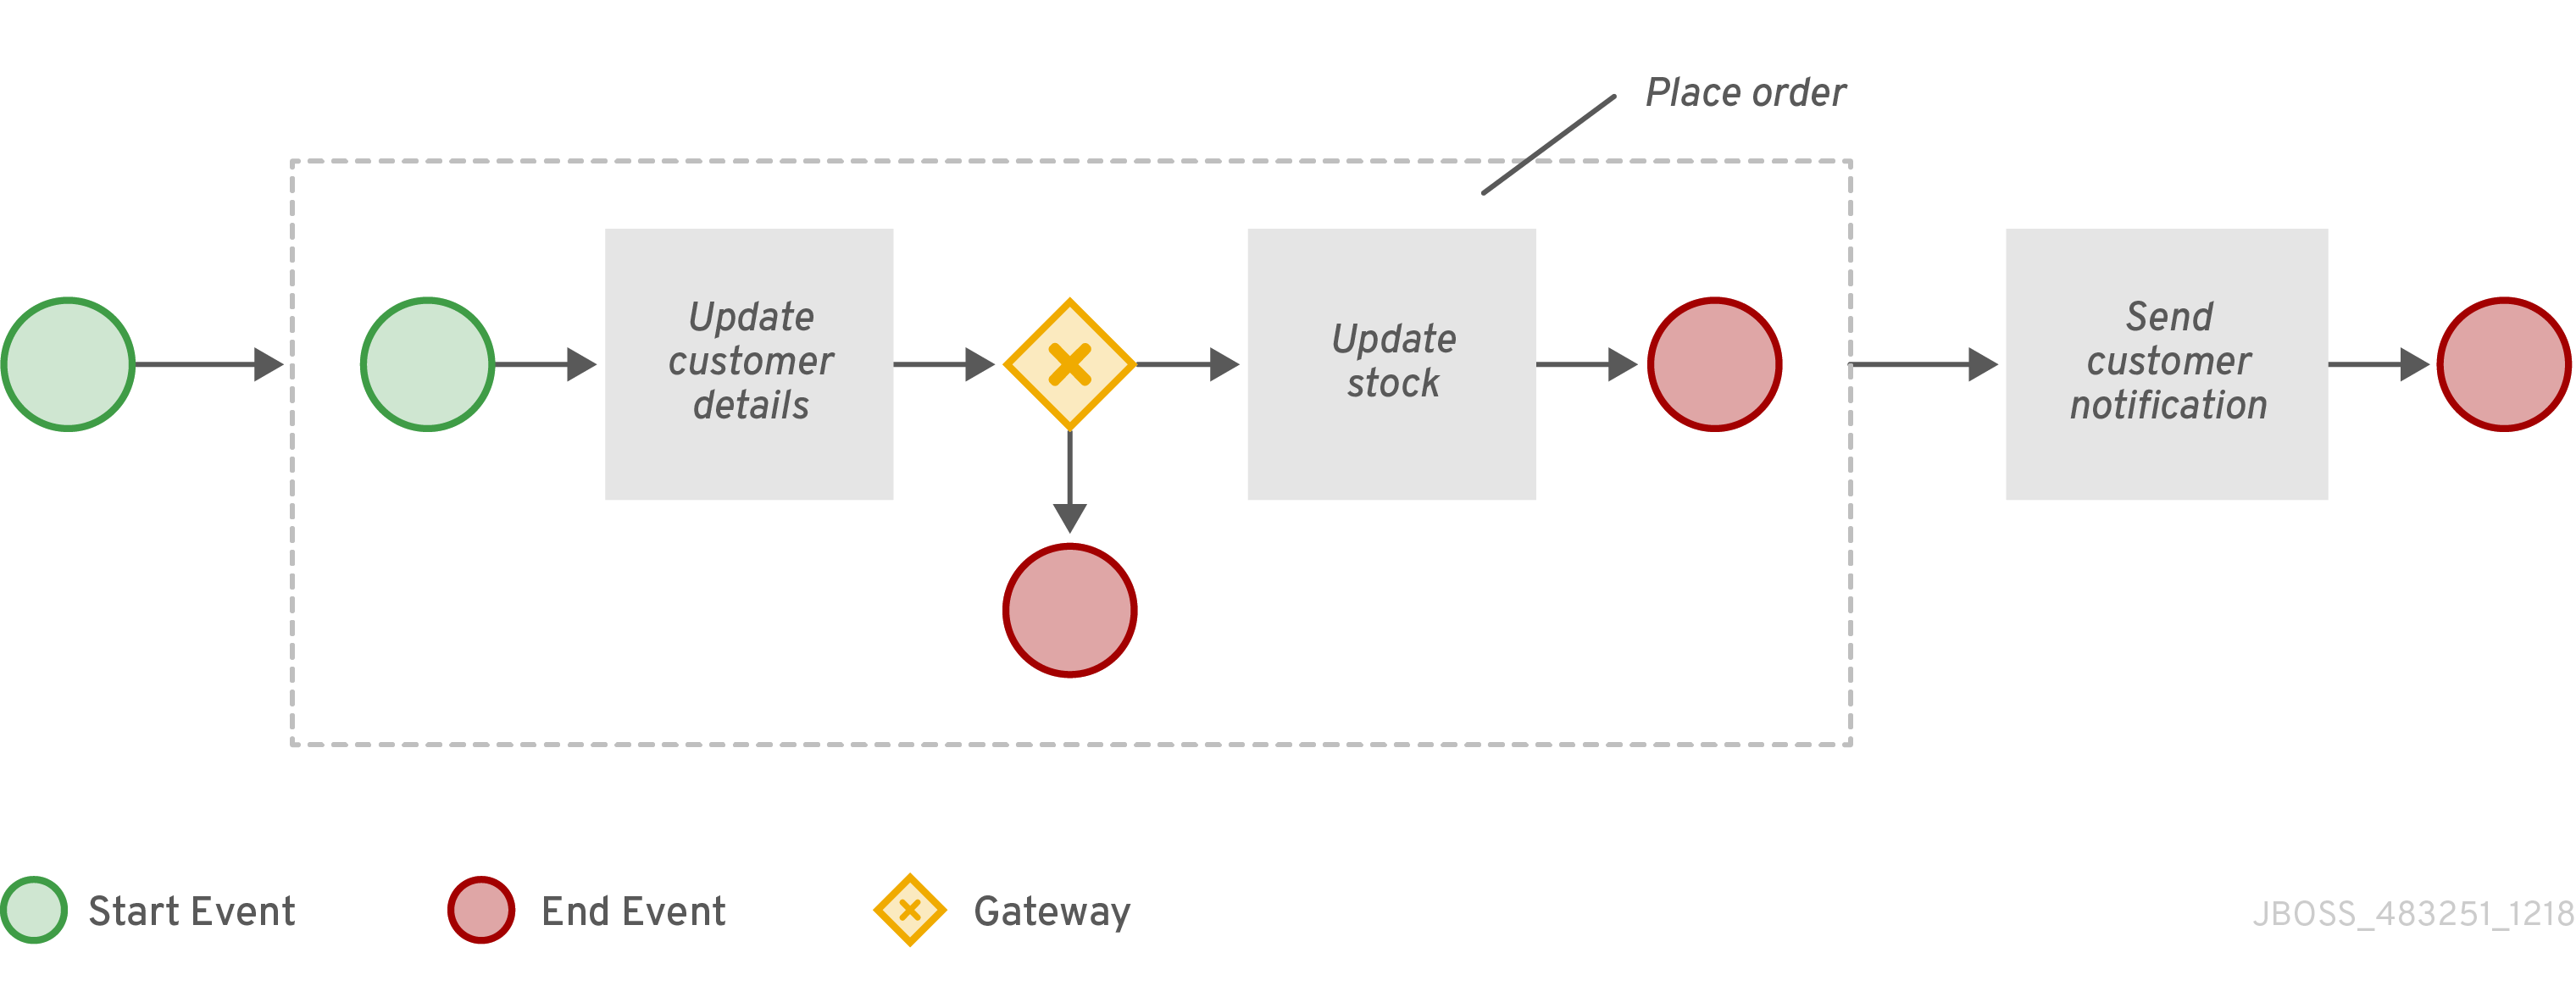
An embedded sub-process encapsulates a part of the process. It must contain a start event and at least one end event. Note that the element enables you to define local sub-process variables that are accessible to all elements inside this container.
An ad hoc sub-process or process contains a number of embedded inner activities and is intended to be executed with a more flexible ordering compared to the typical process flow. Unlike regular processes, an ad hoc sub-process does not contain a complete, structured BPMN2 diagram description, for example, from start event to end event. Instead, the ad hoc sub-process contains only activities, sequence flows, gateways, and intermediate events. An ad hoc sub-process can also contain data objects and data associations. The activities within the ad hoc sub-processes are not required to have incoming and outgoing sequence flows. However, you can specify sequence flows between some of the contained activities. When used, sequence flows provide the same ordering constraints as in a regular process. To have any meaning, intermediate events must have outgoing sequence flows and they can be triggered multiple times while the ad hoc sub-process is active.
Reusable sub-processes appear collapsed within the parent process. To configure a reusable sub-process, select the reusable sub-process, click , and expand Implementation/Execution. Set the following properties:
-
Called Element: The ID of the sub-process that the activity calls and instantiates.
-
Independent: If selected, the sub-process is started as an independent process. If not selected, the active sub-process is canceled when the parent process is terminated.
-
Abort Parent: If selected, non-independent reusable sub-processes can abort the parent process when there is an error during the execution of the called process instance. For example, when there’s an error when trying to invoke the sub-process or when the sub-process instance is aborted. This property is visible only when the Independent property is not selected. The following rules apply:
-
If the reusable sub-process is independent, Abort parent is not available.
-
If the reusable sub-process is not independent, Abort parent is available.
-
-
Wait for completion: If selected, the specified On Exit Action is not performed until the called sub-process instance is terminated. The parent process execution continues when the On Exit Action completes. This property is selected (set to
true) by default. -
Is Async: Select if the task should be invoked asynchronously and cannot be executed instantly.
-
Multiple Instance: Select to execute the sub-process elements a specified number of times. If selected, the following options are available:
-
MI Execution mode: Indicates if the multiple instances execute in parallel or sequentially. If set to Sequential, new instances are not created until the previous instance completes.
-
MI Collection input: Select a variable that represents a collection of elements for which new instances are created. The sub-process is instantiated as many times as the size of the collection.
-
MI Data Input: Specifies the name of the variable containing the selected element in the collection. The variable is used to access elements in the collection.
-
MI Collection output: Optional variable that represents the collection of elements that will gather the output of the multi-instance node.
-
MI Data Output: Specifies the name of the variable that is added to the output collection that you selected in the MI Collection output property.
-
MI Completion Condition (mvel): MVEL expression that is evaluated on each completed instance to check if the specified multiple instance node can complete. If it evaluates to
true, all remaining instances are canceled.
-
-
On Entry Action: A Java or MVEL script that specifies an action at the start of the task.
-
On Exit Action: A Java or MVEL script that specifies an action at the end of the task.
-
SLA Due Date: The date that the service level agreement (SLA) expires. You can specify the duration in days, minutes, seconds, and milliseconds. For example,
1mvalue in SLA due date field indicates one minute.
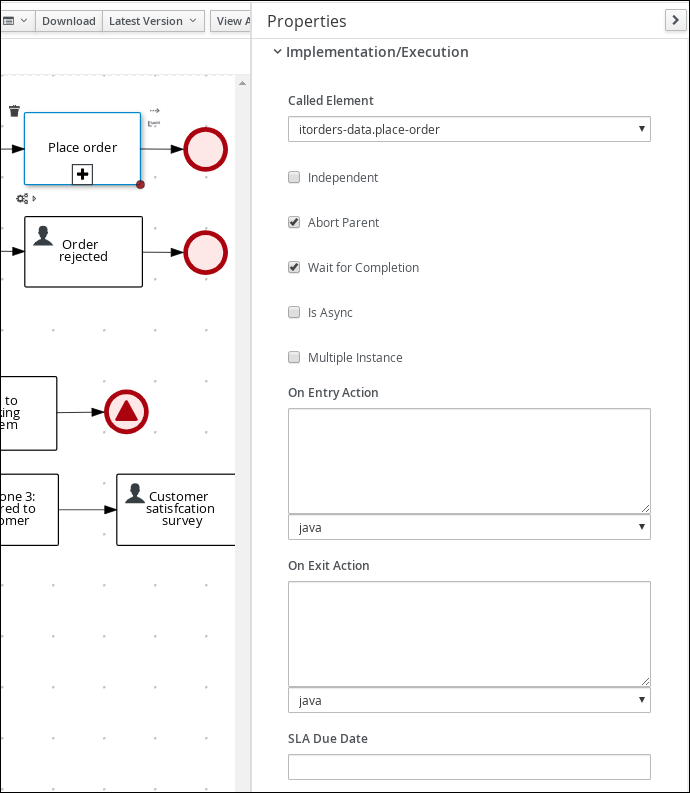
You can open the sub-process in a new editor in Business Central by clicking the Place order task in the main process and then clicking the Open Sub-process task icon.
An event sub-process becomes active when its start event is triggered. It can interrupt the parent process context or run in parallel with it.
With no outgoing or incoming connections, only an event or a timer can trigger the sub-process. The sub-process is not part of the regular control flow. Although self-contained, it is executed in the context of the bounding process.
Use an event sub-process within a process flow to handle events that happen outside of the main process flow. For example, while booking a flight, two events may occur:
-
Cancel booking (interrupting)
-
Check booking status (non-interrupting)
You can model both of these events using the event sub-process.
A multiple instances sub-process is instantiated multiple times when its execution is triggered. The instances are created sequentially or parallelly. If you set the sequential mode, a new sub-process instance is created only after the previous instance has finished. However, when you set the parallel mode, all the sub-process instances are created at once.
A multiple instances sub-process has one incoming connection and one outgoing connection.
10.5. BPMN2 custom tasks in process designer
The BPMN2 specification supports the ability to extend the bpmn2:task element to create custom tasks in a software implementation. Similar to standard BPMN tasks, custom tasks identify actions to be completed in a business process model, but they also include specialized functionality, such as compatibility with an external service of a specific type (REST, email, or web service) or checkpoint behavior within a process (milestone).
jBPM provides the following predefined custom tasks under Custom Tasks in the BPMN modeler palette:
| Custom task type | Custom task node |
|---|---|
Rest |
|
|
|
Log |
|
WebService |
|
Milestone |
|
DecisionTask |
|
BusinessRuleTask |
|
KafkaPublishMessages |
|
For more information about enabling or disabling custom tasks in Business Central, see Domain Specific Processes in the jBPM documentation.
In the BPMN modeler, you can configure the following general properties for a selected custom task:
| Label | Description |
|---|---|
Name |
Identifies the name of the task. You can also double-click the task node to edit the name. |
Documentation |
Describes the task. The text in this field is included in the process documentation, if applicable. |
Is Async |
Determines whether this task is invoked asynchronously. |
AdHoc Autostart |
Determines whether this is an ad hoc task that is started automatically. This option enables the task to automatically start when the process is created instead of being started by a signal event. |
On Entry Action |
Defines a Java, JavaScript, or MVEL script that directs an action at the start of the task. |
On Exit Action |
Defines a Java, JavaScript, or MVEL script that directs an action at the end of the task. |
SLA Due Date |
Specifies the duration (string type) when the service level agreement (SLA) expires. You can specify the duration in days, minutes, seconds, and milliseconds. For example, |
Assignments |
Defines data input and output for the task. |
A rest custom task is used to invoke a remote RESTful service or perform an HTTP request from a process.
To use the rest custom task, you can set the URL, HTTP method, and credentials in the process modeler. When a process reaches a rest custom task, it generates an HTTP request and returns the response as a string.
You can click Assignments in the Properties panel to open the REST Data I/O window. In the REST Data I/O window, you can configure the data input and output as required. For example, to execute a rest custom task, enter the following data inputs in Data Inputs and Assignments fields:
-
Url: Endpoint URL for the REST service. This attribute is mandatory.
-
Method: Method of the endpoint called, such as
GET, andPOST. The default value isGET. -
ContentType: Data type when sending data. This attribute is mandatory for
POSTandPUTrequests. -
ContentTypeCharset: Character set for the
ContentType. -
Content: Data you want to send. This attribute supports backward compatibility, use the ContentData attribute instead.
-
ContentData: Data you want to send. This attribute is mandatory for
POSTandPUTrequests. -
ConnectTimeout: Connection timeout (in seconds). The default value is 60000 milliseconds. You must provide the input value in milliseconds.
-
ReadTimeout: Timeout (in seconds) on response. The default value is 60000 milliseconds. You must provide the input value in milliseconds.
-
Username: User name for authentication.
-
Password: Password for authentication.
-
AuthUrl: URL that is handling authentication.
-
AuthType: Type of URL that is handling authentication.
-
HandleResponseErrors (Optional): Instructs handler to throw errors in case of an unsuccessful response codes (except 2XX).
-
ResultClass: Valid name of the class to which the response is unmarshalled. If not provided, then the raw response is returned in a string format.
-
AcceptHeader: Value of the accept header.
-
AcceptCharset: Character set of the accept header.
-
Headers: Headers to pass for REST call, such as
content-type=text/html.
You can add the following data output in Data Outputs and Assignments to store the output of the task execution:
-
Result: Output variable (object type) of the rest custom task.
An email custom task is used to send an email from a process. It contains email body associated with it.

When an email custom task is activated, the email data is assigned to the data input property of the task. An email custom task completes when the associated email is sent.
You can click Assignments in the Properties panel to open the Email Data I/O window. In the Email Data I/O window, you can configure the data input as required. For example, to execute an email custom task, enter the following data inputs in Data Inputs and Assignments fields:
-
Body: Body of the email.
-
From: Email address of the sender.
-
Subject: Subject of the email.
-
To: Email address of the recipient. You can specify multiple email addresses separated by semicolon (;).
-
Template (Optional): Template to generate body of the email. The
Templateattribute overrides theBodyparameter, if entered. -
Reply-To: Email address to which reply message is sent.
-
Cc: Email address of the copied recipient. You can specify multiple email addresses separated by semicolon (;).
-
Bcc: Email address of the blind copied recipient. You can specify multiple email addresses separated by semicolon (;).
-
Attachments: Email attachment to send along with the email.
-
Debug: Flag to enable the debug logging.
A log custom task is used to log a message from a process. When a business process reaches a log custom task, the message data is assigned to the data input property.
A log custom task completes when the associated message is logged. You can click Assignments in the Properties panel to open the Log Data I/O window. In the Log Data I/O window, you can configure the data input as required. For example, to execute a log custom task, enter the following data inputs in Data Inputs and Assignments fields:
-
Message: Log message from the process.
A web service custom task is used to invoke a web service from a process. This custom task serves as a web service client with the web service response stored as a string.
To invoke a web service from a process, you must use the correct task type. You can click Assignments in the Properties panel to open the WS Data I/O window. In the WS Data I/O window, you can configure the data input and output as required. For example, to execute a web service task, enter the following data inputs in Data Inputs and Assignments fields:
-
Endpoint: Endpoint location of the web service to invoke.
-
Interface: Name of a service, such as
Weather. -
Mode: Mode of a service, such as
SYNC,ASYNC, orONEWAY. -
Namespace: Namespace of the web service, such as
http://ws.cdyne.com/WeatherWS/. -
Operation: Method name to call.
-
Parameter: Object or array to be sent for the operation.
-
Url: URL of the web service, such as
http://wsf.cdyne.com/WeatherWS/Weather.asmx?WSDL.
You can add the following data output in Data Outputs and Assignments to store the output of the task execution:
-
Result: Output variable (object type) of the web service task.
A milestone represents a single point of achievement within a process instance. You can use milestones to flag certain events to trigger other tasks or track the progress of the process.

Milestones are useful for Key Performance Indicator (KPI) tracking or for identifying the tasks that are still to be completed. Milestones can occur at the end of a stage in a process or they can be the result of achieving other milestones.
Milestones can reach the following states during process execution:
-
Active: A milestone condition has been defined for the milestone node but it has not been met. -
Completed: A milestone condition has been met (if applicable), the milestone has been achieved, and the process can proceed to the next task or can end.
You can click Assignments in the Properties panel to open the Milestone Data I/O window. In the Milestone Data I/O window, you can configure the data input as required. For example, to execute a milestone, enter the following data inputs in Data Inputs and Assignments fields:
-
Condition: Condition for the milestone to meet. For example, you can enter a Java expression (string data type) that uses a process variable.
A decision task is used to execute a DMN diagram and invoke a decision engine service from a process. By default, a decision task maps to the DMN decision.
You can use decision tasks to make an operational decision in a process. Decision tasks are useful for identifying key decisions in a process that need to be made.
You can click Assignments in the Properties panel to open the Decision Task Data I/O window. In the Decision Task Data I/O window, you can configure the data input as required. For example, to execute a decision task, enter the following data inputs in Data Inputs and Assignments fields:
-
Decision: Decision for a process to make.
-
Language: Language of the decision task, defaults to DMN.
-
Model: Name of the DMN model.
-
Namespace: Namespace of the DMN model.
A business rule task is used to evaluate a DRL rule and invoke a decision engine service from a process. By default, a business rule task maps to the DRL rules.
You can use business rule tasks to evaluate key business rules in a business process. You can click Assignments in the Properties panel to open the Business Rule Task Data I/O window. In the Business Rule Task Data I/O window, you can configure the data input as required. For example, to execute a business rule task, enter the following data inputs in Data Inputs and Assignments fields:
-
KieSessionName: Name of the KIE session.
-
KieSessionType: Type of the KIE session.
-
Language: Language of the business rule task, defaults to DRL.
A Kafka work item is used to send events to a Kafka topic. This custom task includes a work item handler, which uses the Kafka producer to send messages to a specific Kafka server topic. For example, KafkaPublishMessages task publishes messages from a process to a Kafka topic.

You can click Assignments in the Properties panel to open the KafkaPublishMessages Data I/O window. In the KafkaPublishMessages Data I/O window, you can configure the data input and output as required. For example, to execute a Kafka work item, enter the following data inputs in Data Inputs and Assignments fields:
-
Key: Key of the Kafka message to be sent.
-
Topic: Name of a Kafka topic.
-
Value: Value of the Kafka message to be sent.
You can add the following data output in Data Outputs and Assignments to store the output of the work item execution:
-
Result: Output variable (string type) of the work item.
10.6. BPMN2 events in process designer
An event is something that happens to a business process. BPMN2 supports three categories of events:
-
Start
-
End
-
Intermediate
A start event catches an event trigger, an end event throws an event trigger, and an intermediate event can both catch and throw event triggers.
The following business process diagram shows examples of events:

In this example, the following events occurred:
-
The ATM Card Inserted signal start event is triggered when the signal is received.
-
The timeout intermediate event is an interrupting event based on a timer trigger. This means that the Wait for PIN sub-process is canceled when the timer event is triggered.
-
Depending on the inputs to the process, either end event associated with the Validate User Pin task or the end event associated with the Inform User of Timeout task ends the process.
10.6.1. Start events
Use start events to indicate the start of a business process. A start event cannot have an incoming sequence flow and must have only one outgoing sequence flow. You can use none start events in top-level processes, embedded sub-process, callable sub-processes, and event sub-processes.
All start events, with the exception of the none start event, are catch events. For example, a signal start event starts the process only when the referenced signal (event trigger) is received. You can configure start events in event sub-processes to be interrupting or non-interrupting. An interrupting start event for an event sub-process stops or interrupts the execution of the containing or parent process. A non-interrupting start event does not stop or interrupt the execution of the containing or parent process.
| Start event type | Top-level | sub-processes | |
|---|---|---|---|
Interrupt |
Non-interrupt |
||
|
|||
|
|
|
|
|
|
||
|
|||
|
|
|
|
|
|
|
|
|
|
|
|
|
|
|


The none start event is a start event without a trigger condition. A process or a sub-process can contain at most one none start event, which is triggered on process or sub-process start by default, and the outgoing flow is taken immediately.
When you use a none start event in a sub-process, the execution of the process flow is transferred from the parent process into the sub-process and the none start event is triggered. This means that the token (the current location within the process flow) is passed from the parent process into the sub-process activity and the none start event of the sub-process generates a token of its own.
The conditional start event is a start event with a Boolean condition definition. The execution is triggered when the condition is first evaluated to false and then to true. The process execution starts only if the condition is evaluated to true after the start event has been instantiated.
A process can contain multiple conditional start events.
A compensation start event is used to start a compensation event sub-process when using a sub-process as the target activity of a compensation intermediate event.
A process or sub-process can contain multiple error start events, which are triggered when an error object with a particular ErrorRef property is received.
The error object can be produced by an error end event. It indicates an incorrect process ending. The process instance with the error start event starts execution after it has received the respective error object. The error start event is executed immediately upon receiving the error object and its outgoing flow is taken.
The escalation start event is a start event that is triggered by an escalation with a particular escalation code. Processes can contain multiple escalation start events. The process instance with an escalation start event starts its execution when it receives the defined escalation object. The process is instantiated and the escalation start event is executed immediately and its outgoing flow is taken.
A process or an event sub-process can contain multiple message start events, which are triggered by a particular message. The process instance with a message start event only starts its execution from this event after it has received the respective message. After the message is received, the process is instantiated and its message start event is executed immediately (its outgoing flow is taken).
Because a message can be consumed by an arbitrary number of processes and process elements, including no elements, one message can trigger multiple message start events and therefore instantiate multiple processes.
The signal start event is triggered by a signal with a particular signal code. A process can contain multiple signal start events. The signal start event only starts its execution within the process instance after the instance has received the respective signal. Then, the signal start event is executed and its outgoing flow is taken.
The timer start event is a start event with a timing mechanism. A process can contain multiple timer start events, which are triggered at the start of the process, after which the timing mechanism is applied.
When you use a timer start event in a sub-process, execution of the process flow is transferred from the parent process into the sub-process and the timer start event is triggered. The token is taken from the parent sub-process activity and the timer start event of the sub-process is triggered and waits for the timer to trigger. After the time defined by the timing definition has been reached, the outgoing flow is taken.
10.6.2. Intermediate events
Intermediate events drive the flow of a business process. Intermediate events are used to either catch or throw an event during the execution of the business process. These events are placed between the start and end events and can also be used on the boundary of an activity, like a sub-process or a human task, as a catch event. In the BPMN modeler, you can set a data output in the Data Output and Assignments field for a boundary event, which is used in a further process to access the process instance details. Note that the compensation events do not support the feature of setting a data output variable.
For example, you can set the following data output variables for a boundary event:
-
nodeInstance: Carries the node instance details to use in a further process when the boundary event is triggered. -
signal: Carries the name of the signal. -
event: Carries the event details. -
workItem: Carries the work item details. This variable can be set for work item or user task.
The boundary catch events can be configured as interrupting or non-interrupting. An interrupting boundary catch event cancels the bound activity whereas a non-interrupting event does not.
An intermediate event handles a particular situation that occurs during process execution. The situation is a trigger for an intermediate event. In a process, intermediate events with one outgoing flow can be placed on an activity boundary.
If the event occurs while the activity is being executed, the event triggers its execution to the outgoing flow. One activity may have multiple boundary intermediate events. Note that depending on the behavior you require from the activity with the boundary intermediate event, you can use either of the following intermediate event types:
-
Interrupting: The activity execution is interrupted and the execution of the intermediate event is triggered.
-
Non-interrupting: The intermediate event is triggered and the activity execution continues.
| Intermediate event type | Catching | Boundary | Throwing | |
|---|---|---|---|---|
Interrupt |
Non-interrupt |
|||
|
|
|
|
|
|
|
|
||
|
||||
|
|
|
|
|
|
|
|
||
|
|
|
||
|
|
|
|
|
|
|


A message intermediate event is an intermediate event that enables you to manage a message object. Use one of the following events:
-
A throwing message intermediate event produces a message object based on the defined properties.
-
A catching message intermediate event listens for a message object with the defined properties.
A timer intermediate event enables you to delay workflow execution or to trigger the workflow execution periodically. It represents a timer that can trigger one or multiple times after a specified period of time. When the timer intermediate event is triggered, the timer condition, which is the defined time, is checked and the outgoing flow is taken. When the timer intermediate event is placed in the process workflow, it has one incoming flow and one outgoing flow. Its execution starts when the incoming flow transfers to the event. When a timer intermediate event is placed on an activity boundary, the execution is triggered at the same time as the activity execution.
The timer is canceled if the timer element is canceled, for example by completing or aborting the enclosing process instance.
A conditional intermediate event is an intermediate event with a boolean condition as its trigger. The event triggers further workflow execution when the condition evaluates to true and its outgoing flow is taken.
The event must define the Expression property. When a conditional intermediate event is placed in the process workflow, it has one incoming flow, one outgoing flow, and its execution starts when the incoming flow transfers to the event. When a conditional intermediate event is placed on an activity boundary, the execution is triggered at the same time as the activity execution. Note that if the event is non-interrupting, the event triggers continuously while the condition is true.
A signal intermediate event enables you to produce or consume a signal object. Use either of the following options:
-
A throwing signal intermediate event produces a signal object based on the defined properties.
-
A catching signal intermediate event listens for a signal object with the defined properties.
An error intermediate event is an intermediate event that can be used only on an activity boundary. It enables the process to react to an error end event in the respective activity.
The activity must not be atomic. When the activity finishes with an error end event that produces an error object with the respective ErrorCode property, the error intermediate event catches the error object and execution continues to its outgoing flow.
A compensation intermediate event is a boundary event attached to an activity in a transaction sub-process. It can finish with a compensation end event or a cancel end event. The compensation intermediate event must be associated with a flow, which is connected to the compensation activity.
The activity associated with the boundary compensation intermediate event is executed if the transaction sub-process finishes with the compensation end event. The execution continues with the respective flow.
An escalation intermediate event is an intermediate event that enables you to produce or consume an escalation object. Depending on the action the event element should perform, you need to use either of the following options:
-
A throwing escalation intermediate event produces an escalation object based on the defined properties.
-
A catching escalation intermediate event listens for an escalation object with the defined properties.
A link intermediate event is an intermediate event that makes the process diagram easier to understand without adding additional logic to the process. Link intermediate event is limited to a single process level, for example, link intermediate event cannot connect a parent process with a sub-process.
Use either of the following options:
-
A throwing link intermediate event produces a link object based on the defined properties.
-
A catching link intermediate event listens for a link object with the defined properties.
10.6.3. End events
End events are used to end a business process and may not have any outgoing sequence flows. There may be multiple end events in a business process. All end events, with the exception of the none and terminate end events, are throw events.
End events indicate the completion of a business process. An end event is a node that ends a particular workflow. It has one or more incoming sequence flows and no outgoing flow.
A process must contain at least one end event.
During run time, an end event finishes the process workflow. The end event can finish only the workflow that reached it, or all workflows in the process instance, depending on the end event type.
| End event | Icon |
|---|---|
|
|
|
|
|
|
|
|
|
|
|
|
|


The none end event specifies that no other special behavior is associated with the end of the process.
When a flow enters a message end event, the flow finishes and the end event produces a message as defined in its properties.
A throwing signal end event is used to finish a process or sub-process flow. When the execution flow enters the element, the execution flow finishes and produces a signal identified by its SignalRef property.
The throwing error end event finishes the incoming workflow, which means consumes the incoming token, and produces an error object. Any other running workflows in the process or sub-process remain uninfluenced.
A compensation end event is used to finish a transaction sub-process and trigger the compensation defined by the compensation intermediate event attached to the boundary of the sub-process activities.
The escalation end event finishes the incoming workflow, which means consumes the incoming token, and produces an escalation signal as defined in its properties, triggering the escalation process.
The terminate end event finishes all execution flows in the specified process instance. Activities being executed are canceled. The sub-process instance terminates if it reaches a terminate end event.
10.7. BPMN2 gateways in process designer
Gateways are used to create or synchronize branches in the workflow using a set of conditions called the gating mechanism. BPMN2 supports two types of gateways:
-
Converging gateways, merging multiple flows into one flow
-
Diverging gateways, splitting one flow into multiple flows
One gateway cannot have multiple incoming and multiple outgoing flows.
In the following business process diagram, the XOR gateway evaluates only the incoming flow whose condition evaluates to true:
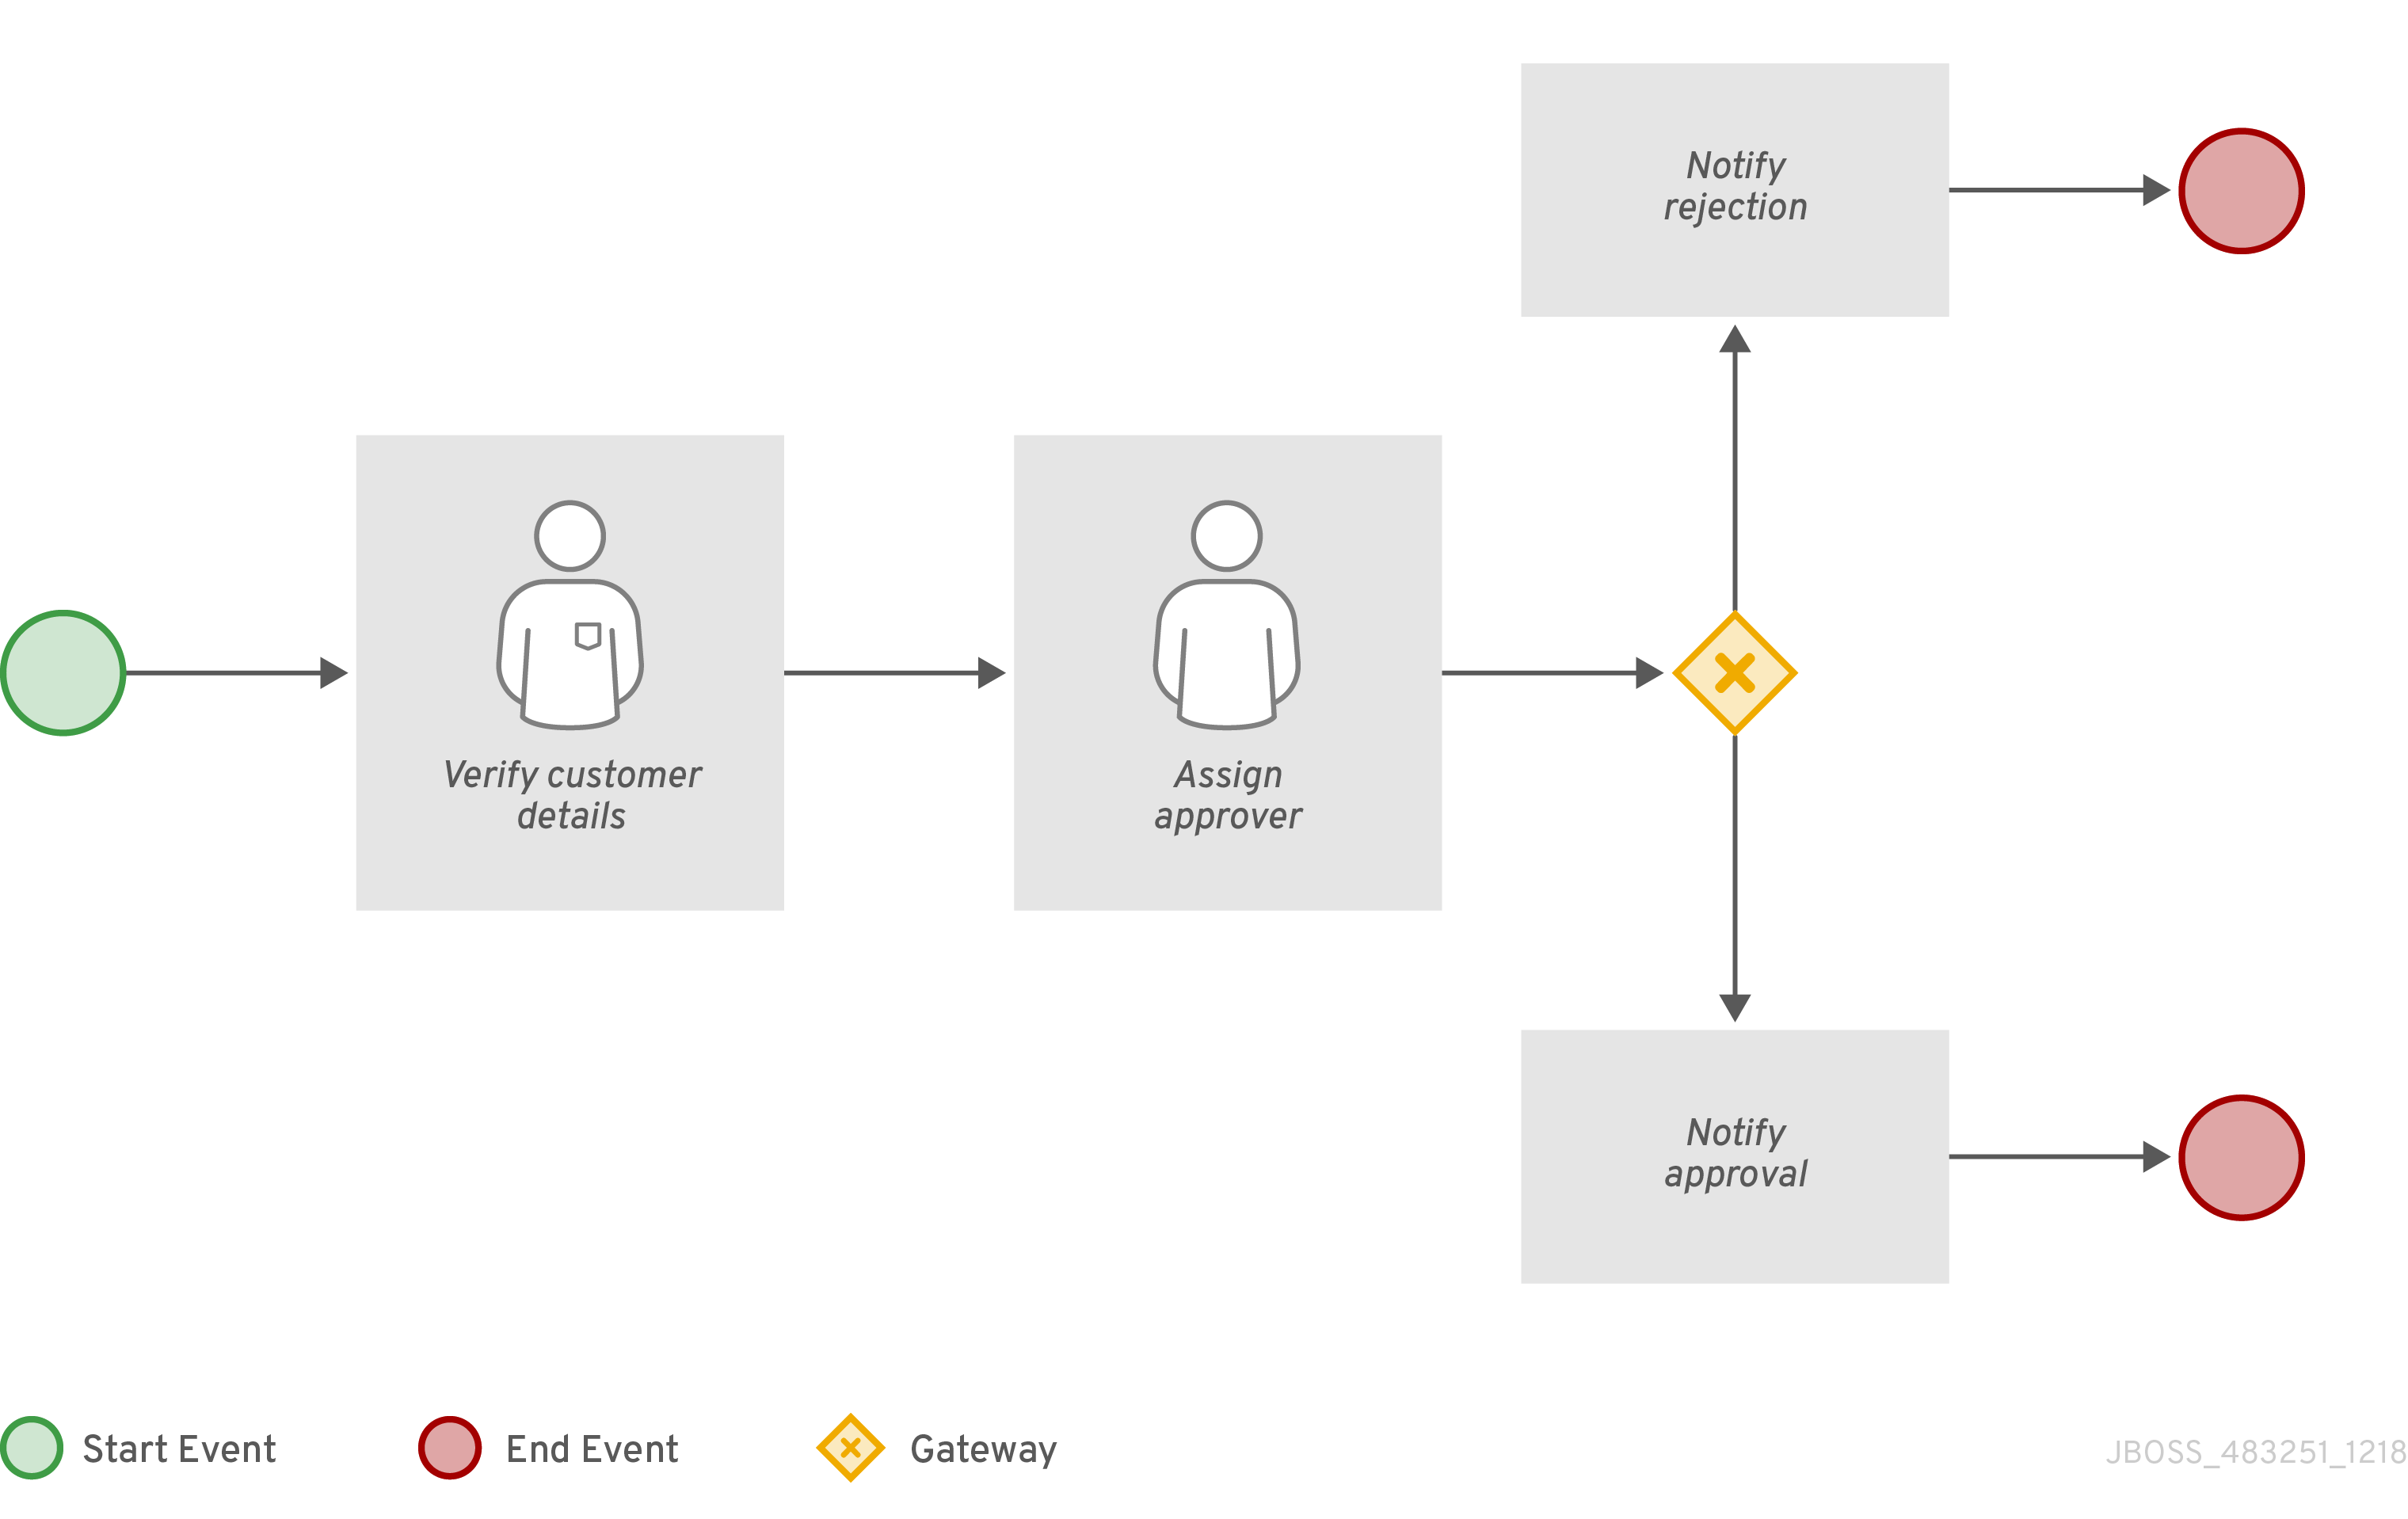
In this example, the customer details are verified by a user and the process is assigned to a user for approval. If approved, an approval notification is sent to the user. If the event of the request is rejected, a rejection notification is sent to the user.
| Element type | Icon |
|---|---|
exclusive (XOR) |
|
Inclusive |
|
Parallel |
|
Event |
|


In an exclusive diverging gateway, only the first incoming flow whose condition evaluates to true is chosen. In a converging gateway, the next node is triggered for each triggered incoming flow.
The gateway triggers exactly one outgoing flow. The flow with the constraint evaluated to true and the lowest priority number is taken.
|
Ensure that at least one of the outgoing flows evaluates to true at run time. Otherwise, the process instance terminates with a runtime exception. |
The converging gateway enables a workflow branch to continue to its outgoing flow as soon as it reaches the gateway. When one of the incoming flows triggers the gateway, the workflow continues to the outgoing flow of the gateway. If it is triggered from more than one incoming flow, it triggers the next node for each trigger.
With an inclusive diverging gateway, the incoming flow is taken and all outgoing flows that evaluate to true are taken.
Connections with lower priority numbers are triggered before triggering higher priority connections. Priorities are evaluated but the BPMN2 specification does not guarantee the priority order. Avoid depending on the priority attribute in your workflow.
|
Ensure that at least one of the outgoing flows evaluates to true at run time. Otherwise, the process instance terminates with a runtime exception. |
A converging inclusive gateway merges all incoming flows previously created by an inclusive diverging gateway. It acts as a synchronizing entry point for the inclusive gateway branches.
Use a parallel gateway to synchronize and create parallel flows. With a parallel diverging gateway, the incoming flow is taken, all outgoing flows are taken simultaneously. With a converging parallel gateway, the gateway waits until all incoming flows have entered and only then triggers the outgoing flow.
An event-based gateway is only diverging and enables you to react to possible events as opposed to the data-based exclusive gateway, which reacts to the process data. The outgoing flow is taken based on the event that occurs. Only one outgoing flow is taken at a time. The gateway might act as a start event, where the process is instantiated only if one of the intermediate events connected to the event-based gateway occurs.
10.8. BPMN2 connecting objects in process designer
Connecting objects create an association between two BPMN2 elements. When a connecting object is directed, the association is sequential and indicates that one of the elements is executed immediately before the other, within an instance of the process. Connecting objects can start and end at the top, bottom, right, or left of the process elements being associated. The OMG BPMN2 specification allows you to use your discretion, placing connecting objects in a way that makes the process behavior easy to understand and follow.
BPMN2 supports two main types of connecting objects:
-
Sequence flows: Connect elements of a process and define the order in which those elements are executed within an instance.
-
Association flows: Connect the elements of a process without execution semantics. Association flows can be undirected or unidirectional.
| The new process designer supports only undirected association flows. The legacy designer supports one direction and Unidirection flows. |
10.9. BPMN2 swimlanes in process designer
Swimlanes are process elements that visually group tasks related to one group or user. You can use user tasks in combination with swimlanes to assign multiple user tasks to the same actor, due to Autoclaim property of the swimlanes. When a potential owner of a group claims the first task in a swimlane, then other tasks are directly assigned to the same owner. Therefore, the claim for other tasks is not needed by the remaining owners of the group. The Autoclaim property enables the auto-assignment of the tasks that are related to a swimlane.
If the remaining user tasks in a swimlane contain multiple predefined ActorIds, then the user tasks are not assigned automatically.
|
In the following example, an analyst lane consists of two user tasks:
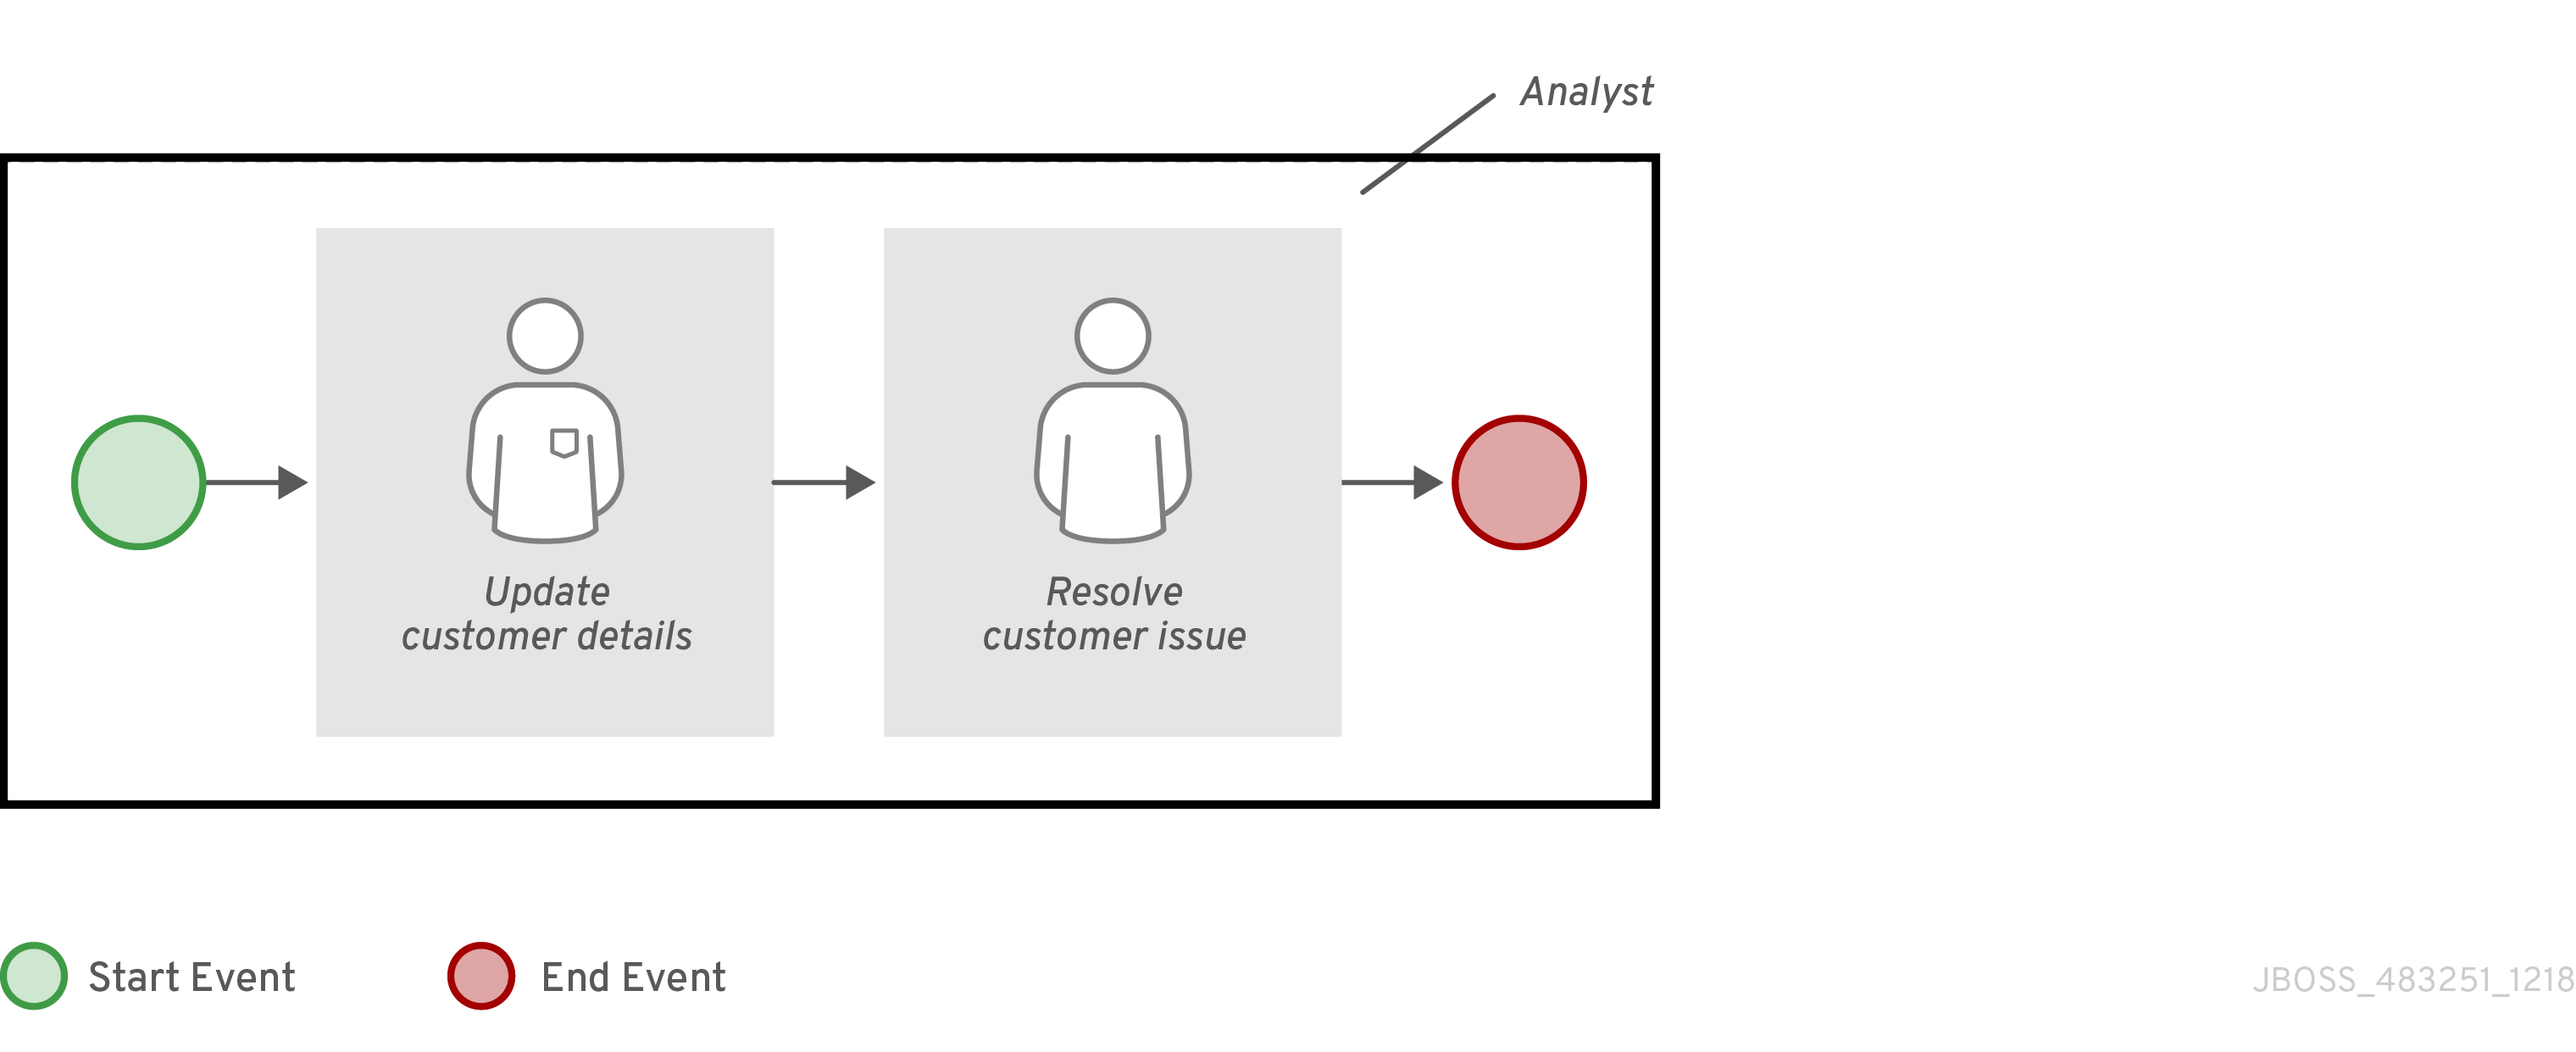
The Group field in the Update Customer Details and Resolve Customer Issue tasks contain the value analyst. When the process is started, and the Update Customer Details task is claimed, started, or completed by an analyst, and the Resolve Customer Issue task is claimed and assigned to the user who completed the first task. However, if only the Update Customer Details task contains the analyst group assigned, and the second task contains no user or group assignments, and the process stops after the first task completes.
You can disable the Autoclaim property of the swimlanes. If the Autoclaim property is disabled, then the tasks related to a swimlane are not assigned automatically. By default, the value of Autoclaim property is set as true. If needed, you can also change the default value for the Autoclaim property from project settings in Business Central or using the deployment descriptor file.
To change the default value of Autoclaim property of swimlanes in Business Central:
-
Go to project Settings.
-
Open Deployment → Environment entries.
-
Enter the following values in the given fields:
-
Name -
Autoclaim -
Value -
"false”
-
If you want to set the environment entry in the XML deployment descriptor, add the following code to the kie-deployment-descriptor.xml file:
<environment-entries>
  ..
    <environment-entry>
        <resolver>mvel</resolver>
        <identifier>new String ("false")</identifier>
        <parameters/>
        <name>Autoclaim</name>
    </environment-entry>
  ..
</environment-entries>
10.10. BPMN2 artifacts in process designer
Artifacts are used to provide additional information about a process. An artifact is any object depicted in the BPMN2 diagram that is not part of the process workflow. Artifacts have no incoming or outgoing flow objects.The purpose of artifacts is to provide additional information required to understand the diagram. The artifacts table lists the artifacts supported in the legacy process designer.
| Artifact type | Description |
|---|---|
Group |
Organizes tasks or processes that have significance in the overall process. Group artifacts are not supported in the new process designer. |
Text annotation |
Provides additional textual information for the BPMN2 diagram. |
Data object |
Displays the data flowing through a process in the BPMN2 diagram. |
10.10.1. Creating data object
Data objects represent, for example, documents used in a process in physical and digital form. Data objects appear as a page with a folded top right corner. The following procedure is a generic overview of creating a data object.
|
In jBPM 7.52.0, limited support for data objects is provided that excludes support for data inputs, data outputs, and associations. |
-
Create a business process.
-
In the process designer, select the Artifacts → Data Object from the tool palette.
-
Either drag and drop a data object onto the process designer canvas or click a blank area of the canvas.
-
If necessary, in the upper-right corner of the screen, click the Properties icon.
-
Add or define the data object information listed in the following table as required.
Table 21. Data object parameters Label Description Name
The name of the data object. You can also double-click the data object shape to edit the name.
Type
Select a type of the data object.
-
Click Save.
10.11. Variables
Variables store data that is used during runtime. Process designer uses three types of variables:
Global variables are visible to all process instances and assets in a particular session. They are intended to be used primarily by business rules and by constraints and are created dynamically by rules or constraints.
Process variables are defined as properties in the BPMN2 definition file and are visible within the process instance. They are initialized at process creation and destroyed on process completion.
Local variables are associated with and available within specific process elements, such as activities. They are initialized when the element context is initialized, that is, when the execution workflow enters the node and execution of the onEntry action has finished, if applicable. They are destroyed when the element context is destroyed, that is, when the execution workflow leaves the element.
An element, such as a process, sub-process, or task can only access variables in its own and parent contexts. An element cannot access a variable defined in the element’s child element. Therefore, when an elements requires access to a variable during runtime, its own context is searched first.
If the variable cannot be found directly in the element’s context, the immediate parent context is searched. The search continues until the process context is reached. In case of global variables, the search is performed directly on the session container.
If the variable cannot be found, a read access request returns null and a write access produces an error message, and the process continues its execution.
Variables are searched for based on their ID.
10.11.1. Variable tags
For greater control over variable behavior, you can tag process variables and local variables in the BPMN process file. Tags are simple string values that you add as metadata to a specific variable.
jBPM supports the following tags for process variables and local variables:
-
required: Sets the variable as a requirement in order to start a process instance. If a process instance starts without the required variable, jBPM generates aVariableViolationExceptionerror. -
readonly: Indicates that the variable is for informational purposes only and can be set only once during process instance execution. If the value of a read-only variable is modified at any time, jBPM generates aVariableViolationExceptionerror. -
restricted: A special tag that is used with theVariableGuardProcessEventListenerto indicate that permission is granted to modify the variable based on the required and the existing role.VariableGuardProcessEventListeneris extended fromDefaultProcessEventListenerand supports two different constructors:-
VariableGuardProcessEventListenerpublic VariableGuardProcessEventListener(String requiredRole, IdentityProvider identityProvider) { this("restricted", requiredRole, identityProvider); } -
VariableGuardProcessEventListenerpublic VariableGuardProcessEventListener(String tag, String requiredRole, IdentityProvider identityProvider) { this.tag = tag; this.requiredRole = requiredRole; this.identityProvider = identityProvider; }Therefore, you must add an event listener to the session with the allowed role name and identity provider that returns the user role as shown in the following example:
ksession.addEventListener(new VariableGuardProcessEventListener("AdminRole", myIdentityProvider));
In the previous example, the
VariableGuardProcessEventListenermethod verifies if a variable is tagged with a security constraint tag (restricted). If the user does not have the required role, then jBPM generates aVariableViolationExceptionerror. -
The variable tags that appear in the Business Central UI, for example internal, input, output, business-relevant, and tracked are not supported in jBPM.
|
You can add the tag directly to the BPMN process source file as a customTags metadata property with the tag value defined in the format ![CDATA[TAG_NAME]].
For example, the following BPMN process applies the required tag to an approver process variable:
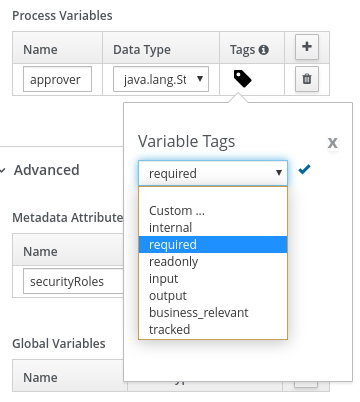
<bpmn2:property id="approver" itemSubjectRef="ItemDefinition_9" name="approver">
  <bpmn2:extensionElements>
    <tns:metaData name="customTags">
      <tns:metaValue><![CDATA[required]]></tns:metaValue>
    </tns:metaData>
  </bpmn2:extensionElements>
</bpmn2:property>
You can use more than one tag for a variable where applicable. You can also define custom variable tags in your BPMN files to make variable data available to jBPM process event listeners. Custom tags do not influence the jBPM runtime as the standard variable tags do and are for informational purposes only. You define custom variable tags in the same customTags metadata property format that you use for standard jBPM variable tags.
10.11.2. Defining global variables
Global variables exist in a knowledge session and can be accessed and are shared by all assets in that session. They belong to the particular session of the Knowledge Base and they are used to pass information to the engine. Every global variable defines its ID and item subject reference. The ID serves as the variable name and must be unique within the process definition. The item subject reference defines the data type the variable stores.
|
The rules are evaluated at the moment the fact is inserted.
Therefore, if you are using a global variable to constrain a fact pattern and the global is not set, the system returns a |
Global variables are initialized either when the process with the variable definition is added to the session or when the session is initialized with globals as its parameters.
Values of global variables can typically be changed during the assignment, which is a mapping between a process variable and an activity variable. The global variable is then associated with the local activity context, local activity variable, or by a direct call to the variable from a child context.
-
You have created a project in Business Central and it contains at least one business process asset.
-
Open a business process asset.
-
Click a blank area of the process designer canvas.
-
Click the Properties icon on the upper-right side of the screen to open the Properties panel.
-
If necessary, expand the Process section.
-
In the Global Variables sub-section, click the plus icon.
-
Enter a name for the variable in the Name box.
-
Select a data type from the Data Type menu.
10.11.3. Defining process variables
Process variables are defined as properties in the BPMN2 definition file and are visible within the process instance. They are initialized at process creation and destroyed on process completion.
A process variable is a variable that exists in a process context and can be accessed by its process or its child elements. Process variables belong to a particular process instance and cannot be accessed by other process instances. Every process variable defines its ID and item subject reference: the ID serves as the variable name and must be unique within the process definition. The item subject reference defines the data type the variable stores.
Process variables are initialized when the process instance is created. Their value can be changed by the process activities using the Assignment, when the global variable is associated with the local Activity context, local Activity variable, or by a direct call to the variable from a child context.
Note that process variables should be mapped to local variables.
-
You have created a project in Business Central and it contains at least one business process asset.
-
Open a business process asset.
-
Click a blank area of the process designer canvas.
-
Click the Properties icon on the upper-right side of the screen to open the Properties panel.
-
If necessary, expand the Process Data section.
-
In the Process Variables sub-section, click the plus icon.
-
Enter a name for the variable in the Name box.
-
Select a data type from the Data Type menu.
10.11.4. Defining local variables
Local variables are available within their process element, such as an activity. They are initialized when the element context is initialized, that is, when the execution workflow enters the node and execution of the onEntry action has finished, if applicable. They are destroyed when the element context is destroyed, that is, when the execution workflow leaves the element.
Values of local variables can be mapped to global or process variables. This enables you to maintain relative independence of the parent element that accommodates the local variable. Such isolation might help prevent technical exceptions.
A local variable is a variable that exists in a child element context of a process and can be accessed only from within this context. Local variables belong to the particular element of a process.
For tasks, with the exception of the Script task, you can define Data Input Assignments and Data Output Assignments in the Assignments property. Data Input Assignment defines variables that enter the Task and therefore provide the entry data needed for the task execution. The Data Output Assignments can refer to the context of the Task after execution to acquire output data.
User Tasks present data related to the actor that is executing the User Task. Additionally, User Tasks also request the actor to provide result data related to the execution.
To request and provide the data, use task forms and map the data in the Data Input Assignment parameter to a variable. Map the data provided by the user in the Data Output Assignment parameter if you want to preserve the data as output.
-
You have created a project in Business Central and it contains at least one business process asset that has at least one task that is not a script task.
-
Open a business process asset.
-
Select a task that is not a script task.
-
Click the Properties icon on the upper-right side of the screen to open the Properties panel.
-
Click the box under the Assignments sub-section. The Task Data I/O dialog box opens.
-
Click Add next to Data Inputs and Assignments or Data Outputs and Assignments.
-
Enter a name for the local variable in the Name box.
-
Select a data type from the Data Type menu.
-
Select a source or target then click Save.
10.11.5. Editing process variable values
After starting a process instance, you can edit process variable values in Business Central. The supported variables types are: Boolean, Float, Integer, and Enums.
-
You have created a project in Business Central and have started a process instance.
-
In Business Central, go to Menu → Manage → Process Instances.
-
Select the Process Variables tab and click Edit for the variable name that you want to edit.
-
Add or change the Variable Value and click Save.
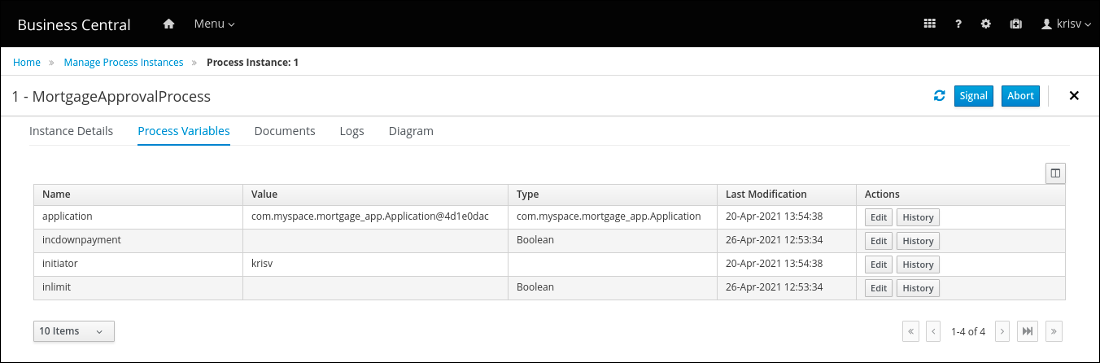
10.12. Action scripts
Action scripts are pieces of code that define the Script property or the interceptor action of an element. Action scripts can access the global variables, process variables, and predefined variable kcontext. kcontext is an instance of the ProcessContext interface. For more information about kcontext variable, see the ProcessContext Javadoc.
Java and MVEL are supported as dialects for action script definitions. MVEL accepts valid Java code and additionally provides support for nested access to parameters. For example, the MVEL call person.name is equivalent of Java call person.getName().
// Java dialect
System.out.println(person.getName());

// MVEL dialect
System.out.println(person.name);
You can also use action scripts to view information about process instances. For example, use the following commands to:
-
Return the ID of a process instance:
System.out.println(kcontext.getProcessInstance().getId()); -
Return the parent process instance ID if a process instance has a parent:
System.out.println(kcontext.getProcessInstance().getParentProcessInstanceId()); -
Return the ID of a process definition related to a process instance:
System.out.println(kcontext.getProcessInstance().getProcessId()); -
Return the name of a process definition related to a process instance:
System.out.println(kcontext.getProcessInstance().getProcessName()); -
Return the state of a process instance:
System.out.println(kcontext.getProcessInstance().getState());
To set a process variable in an action script, use kcontext.setVariable("VARIABLE_NAME", "VALUE").
10.13. Timers
You can use timers to trigger logic after a certain period or to repeat specific actions at regular intervals. Timers wait for a predefined amount of time before triggering once or repeatedly.
10.13.1. Supported timers for jBPM
jBPM supports two types of timers:
-
Quartz: Recommended for use with Spring Boot and Tomcat
-
EJB: Recommended for use with Red Hat JBoss EAP, both on-premise and Red Hat OpenShift Container Platform
|
Do not use timers for the following business strategies:
|
10.13.2. Configuring timers with delay and period
You can set a timer with delay and a certain period. The delay specifies the waiting time after the node activation, and the period defines the time between the subsequent trigger activation. The period value 0 results in a one-shot timer. You can specify the delay and period expression in [#d][#h][#m][#s][#[ms]] form, indicating the number of days, hours, minutes, seconds, and milliseconds (default). For example, the expression 1h indicates one hour waiting time before triggering the timer again.
10.13.3. Configuring timers with ISO-8601 date format
You can configure timers with ISO-8601 date format that supports both one-shot timers and repeatable timers. You can define timers as date and time representation, time duration, or repeating intervals. For example:
-
Date
2020-12-24T20:00:00.000+02:00signifies that timer is triggered exactly on Christmas at 8:00 p.m. -
Duration
PT1Ssignifies that timer is triggered once after one second. -
Repeating intervals
R/PT1Ssignifies that timer is triggered every second with any limit. Alternatively,R5/PT1Striggers the timer five times every second.
10.13.4. Configuring timers with process variables
You can also specify timers using process variables, consisting of the string representation of delay and period or ISO8601 date format. When you specify #{variable}, the engine parses the expression and replaces the expression value with the variable. In a process, you can use timers using the following ways:
-
Add a timer event to a process flow. The process activation starts the timer and when the timer is triggered (once or repeatedly), it activates the successor of the timer node. Subsequently, the outgoing connection of a timer with a positive period value is triggered multiple times. When a timer node is canceled, the associated timer is also canceled and no more triggers occur.
-
Associate timer as a boundary event with a sub-process or task.
10.13.5. Updating timers in a running process instance
In some cases, the scheduled timer needs to be rescheduled to accommodate the new requirements, such as changing delay, period, or repeat limit. Updating a timer includes many low-level operations, therefore, jBPM provides the following command to perform the low-level operations related to updating a timer as an atomic operation. The following command ensures that all the operations are performed within the same transaction.
org.jbpm.process.instance.command.UpdateTimerCommand
| Only boundary timer events and intermediate timer events are supported to update. |
You can reschedule the timer by specifying the two mandatory parameters and one of the three optional parameter sets of the UpdateTimerCommand class.
| Parameter or parameter set | Type |
|---|---|
process instance ID (Mandatory) |
|
timer node name (Mandatory) |
|
delay (Optional) |
|
period (Optional) |
|
repeat limit (Optional) |
|
// Start the process instance and record its ID:
long id = kieSession.startProcess(BOUNDARY_PROCESS_NAME).getId();

// Set the timer delay to 3 seconds:
kieSession.execute(new UpdateTimerCommand(id, BOUNDARY_TIMER_ATTACHED_TO_NAME, 3));
10.14. Constraints
A constraint is a boolean expression that is evaluated when an element containing a constraint is executed. You can use constraints in various parts of your process, such as in a diverging gateway.
jBPM supports two types of constraints, including:
-
Code constraints: Constraints that are defined in Java, Javascript, Drools, or MVEL. Code constraints can access the data in the working memory, including the global and process variables. The following code constraint examples contain
personas a variable in a process:Example Java code constraintreturn person.getAge() > 20;Example MVEL code constraintreturn person.age > 20;Example Javascript code constraintperson.age > 20 -
Rule constraints: Constraints that are defined in the form of DRL rule conditions. Rule constraints can access the data in the working memory, including global variables. However, rule constraints cannot access the variables directly in a process but using a process instance. To retrieve the reference of the parent process instance, use the
processInstancevariable of the typeWorkflowProcessInstance.You can insert a process instance into the session and update it if necessary, for example, using Java code or an on-entry, on-exit, or explicit action in your process. The following example shows a rule constraint, searching for a person with the same name as the value of the
namevariable in the process.Example rule constraint with process variable assignmentprocessInstance : WorkflowProcessInstance() Person( name == ( processInstance.getVariable("name") ) ) # add more constraints here ...
10.15. BPMN process fluent API for Business Central processes
jBPM provides a BPMN process fluent API that enables you to create business processes using factories. You can also manually validate the business process that you created using process fluent API. The process fluent API is defined in the org.kie.api.fluent package.
Therefore, instead of using BPMN2 XML standard, you can use the process fluent API to create business processes in a few lines of code.
10.15.1. Example requests with the BPMN process fluent API
The following example includes BPMN process fluent API requests for basic interactions with a business process. For more examples, see the process fluent API source in GitHub.
- Creating and interacting with Business Central business processes
-
The following example shows basic business process with a script task, an exception handler, and a variable:
Example request to create and interact with a Business Central business processProcess process = // Create process builder factory.processBuilder(processId) // package and name .packageName("org.jbpm") .name("My process") // start node .startNode(1).name("Start").done() // Add variable of type string .variable(var("pepe", String.class)) // Add exception handler .exceptionHandler(IllegalArgumentException.class, Dialect.JAVA, "System.out.println(\"Exception\");") // script node in Java language that prints "action" .actionNode(2).name("Action") .action(Dialect.JAVA, "System.out.println(\"Action\");").done() // end node .endNode(3).name("End").done() // connections .connection(1, 2) .connection(2, 3) .build();In this example, a
ProcessBuilderFactoryreference is obtained and then, usingprocessBuilder(String processId)method, aProcessBuilderinstance is created, which is associated with the given process Id. TheProcessBuilderinstance enables you to build a definition of the created process using the fluent API.A business process consists of three components:
-
Header: The header section contains global elements such as the name of the process, imports, and variables.
In the previous example, the header contains the name and version of the process and the package name.
-
Nodes: The nodes section contains all the different nodes that are part of the process.
In the previous example, nodes are added to the process by calling the
startNode(),actionNode(), andendNode()methods. These methods return a specificNodeBuilderthat allows you to set the properties of that node. After the code finishes configuring that specific node, thedone()method returns theNodeContainerBuilderto add more nodes, if necessary. -
Connections: The connections section links the nodes to create a flow chart.
In the previous example, once you add all the nodes, you must connect them by creating connections between them. You can call the
connection()method, which links the nodes.
Finally, you can call the
build()method and obtain the generated process definition. Thebuild()method also validates the process definition and throws an exception if the process definition is not valid. -
10.15.2. Example requests to execute a business process
Once you create a valid process definition instance, you can execute it using a combination of public and internal KIE APIs. To execute a process, create a Resource, which is used to create a KieBase. Using the KieBase, you can create a KieSession to execute the process.
The following example uses ProcessBuilderFactory.toBytes process to create a ByteArrayResource resource.
// Build resource from Process
KieResources resources = ServiceRegistry.getInstance().get(KieResources.class);
Resource res = resources
.newByteArrayResource(factory.toBytes(process))
.setSourcePath("/tmp/processFactory.bpmn2"); // source path or target path must be set to be added into kbase
// Build kie base from this resource using KIE API
KieServices ks = KieServices.Factory.get();
KieRepository kr = ks.getRepository();
KieFileSystem kfs = ks.newKieFileSystem();
kfs.write(res);
KieBuilder kb = ks.newKieBuilder(kfs);
kb.buildAll(); // kieModule is automatically deployed to KieRepository if successfully built.
KieContainer kContainer = ks.newKieContainer(kr.getDefaultReleaseId());
KieBase kbase = kContainer.getKieBase();
// Create kie session using KieBase
KieSessionConfiguration conf = ...;
Environment env = ....;
KieSession ksession = kbase.newKieSession(conf,env);
// execute process using same process Id that is used to obtain ProcessBuilder instance
ksession.startProcess(processId)10.16. Testing a business process
A business process can be updated dynamically, which can cause errors, therefore testing a process business is also a part of the business process life cycle similar to any other development artifact.
The unit test for a business process ensures that the process behaves as expected in a specific use case. For example, you can test an output based on a particular input. To simplify unit testing, jBPM includes the org.jbpm.test.JbpmJUnitBaseTestCase class.
The JbpmJUnitBaseTestCase performs as a base test case class, which is used for jBPM related tests. The JbpmJUnitBaseTestCase provides the following usage areas:
-
JUnit life cycle methods
Table 23. JUnit life cycle methods Method Description setUpThis method is annotated as
@Before. It configures a data source andEntityManagerFactoryand deletes the session ID of a singleton.tearDownThis method is annotated as
@After. It removes history, closesEntityManagerFactoryand a data source, and disposesRuntimeManagerandRuntimeEngines. -
Knowledge base and knowledge session management methods: To create a session, create
RuntimeManagerandRuntimeEngine. Use the following methods to create and disposeRuntimeManager:Table 24. RuntimeManagerandRuntimeEnginemanagement methodsMethod Description createRuntimeManagerCreates
RuntimeManagerfor a given set of assets and selected strategy.disposeRuntimeManagerDisposes
RuntimeManagerthat is active in the scope of the test.getRuntimeEngineCreates new
RuntimeEnginefor the given context. -
Assertions: To test the state of assets, use the following methods:
Table 25. RuntimeManagerandRuntimeEngineManagement MethodsAssertion Description assertProcessInstanceActive(long processInstanceId, KieSession ksession)Verifies whether a process instance with the given
processInstanceIdis active.assertProcessInstanceCompleted(long processInstanceId)Verifies whether a process instance with the given
processInstanceIdis completed. You can use this method if session persistence is enabled, otherwise useassertProcessInstanceNotActive(long processInstanceId, KieSession ksession).assertProcessInstanceAborted(long processInstanceId)Verifies whether a process instance with the given
processInstanceIdis aborted. You can use this method if session persistence is enabled, otherwise useassertProcessInstanceNotActive(long processInstanceId, KieSession ksession).assertNodeExists(ProcessInstance process, String… nodeNames)Verifies whether the specified process contains the given nodes.
assertNodeActive(long processInstanceId, KieSession ksession, String… name)Verifies whether a process instance with the given
processInstanceIdcontains at least one active node with the specified node names.assertNodeTriggered(long processInstanceId, String… nodeNames)Verifies whether a node instance is triggered for each given node during the execution of the specified process instance.
assertProcessVarExists(ProcessInstance process, String… processVarNames)Verifies whether the given process contains the specified process variables.
assertProcessNameEquals(ProcessInstance process, String name)Verifies whether the given name matches the specified process name.
assertVersionEquals(ProcessInstance process, String version)Verifies whether the given process version matches the specified process version.
-
Helper methods: Use following methods to create a new
RuntimeManagerandRuntimeEnginefor a given set of processes with or without using persistence. For more information about persistence, see jBPM engine in jBPM.Table 26. RuntimeManagerandRuntimeEngineManagement MethodsMethod Description setupPoolingDataSourceConfigures a data source.
getDsReturns the configured data source.
getEmfReturns the configured
EntityManagerFactory.getTestWorkItemHandlerReturns a test work item handler that can be registered in addition to the default work item handler.
clearHistoryClears the history log.
The following example contains a start event, a script task, and an end event. The example JUnit test creates a new session, starts the hello.bpmn process, and verifies whether the process instance is completed and the StartProcess, Hello, and EndProcess nodes are executed.
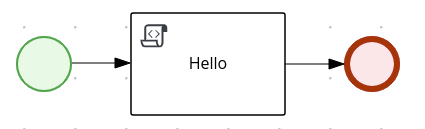
hello.bpmn Processpublic class ProcessPersistenceTest extends JbpmJUnitBaseTestCase {
public ProcessPersistenceTest() {
super(true, true);
}
@Test
public void testProcess() {
createRuntimeManager("hello.bpmn");
RuntimeEngine runtimeEngine = getRuntimeEngine();
KieSession ksession = runtimeEngine.getKieSession();
ProcessInstance processInstance = ksession.startProcess("com.sample.bpmn.hello");
assertProcessInstanceNotActive(processInstance.getId(), ksession);
assertNodeTriggered(processInstance.getId(), "StartProcess", "Hello", "EndProcess");
}
}JbpmJUnitBaseTestCase supports all predefined RuntimeManager strategies as part of the unit testing. Therefore, it is enough to specify the strategy that is used when you create a RuntimeManager as part of a single test.
The following example shows the use of the PerProcessInstance strategy in a task service to manage user tasks:
public class ProcessHumanTaskTest extends JbpmJUnitBaseTestCase {

    private static final Logger logger = LoggerFactory.getLogger(ProcessHumanTaskTest.class);

    public ProcessHumanTaskTest() {
        super(true, false);
    }

    @Test
    public void testProcessProcessInstanceStrategy() {
        RuntimeManager manager = createRuntimeManager(Strategy.PROCESS_INSTANCE, "manager", "humantask.bpmn");
        RuntimeEngine runtimeEngine = getRuntimeEngine(ProcessInstanceIdContext.get());
        KieSession ksession = runtimeEngine.getKieSession();
        TaskService taskService = runtimeEngine.getTaskService();

        int ksessionID = ksession.getId();
        ProcessInstance processInstance = ksession.startProcess("com.sample.bpmn.hello");

        assertProcessInstanceActive(processInstance.getId(), ksession);
        assertNodeTriggered(processInstance.getId(), "Start", "Task 1");

        manager.disposeRuntimeEngine(runtimeEngine);
        runtimeEngine = getRuntimeEngine(ProcessInstanceIdContext.get(processInstance.getId()));

        ksession = runtimeEngine.getKieSession();
        taskService = runtimeEngine.getTaskService();

        assertEquals(ksessionID, ksession.getId());

        // let John execute Task 1
        List<TaskSummary> list = taskService.getTasksAssignedAsPotentialOwner("john", "en-UK");
        TaskSummary task = list.get(0);
        logger.info("John is executing task {}", task.getName());
        taskService.start(task.getId(), "john");
        taskService.complete(task.getId(), "john", null);

        assertNodeTriggered(processInstance.getId(), "Task 2");

        // let Mary execute Task 2
        list = taskService.getTasksAssignedAsPotentialOwner("mary", "en-UK");
        task = list.get(0);
        logger.info("Mary is executing task {}", task.getName());
        taskService.start(task.getId(), "mary");
        taskService.complete(task.getId(), "mary", null);

        assertNodeTriggered(processInstance.getId(), "End");
        assertProcessInstanceNotActive(processInstance.getId(), ksession);
    }
}
10.16.1. Testing integration with external services
Business processes often include the invocation of external services. Unit testing of a business process enables you to register test handlers that verify whether the specific services are requested correctly, and also provide test responses for the requested services.
To test the interaction with external services, use the default TestWorkItemHandler handler. You can register the TestWorkItemHandler to collect all the work items of a particular type. Also, TestWorkItemHandler contains data related to a task. A work item represents one unit of work, such as sending a specific email or invoking a specific service. The TestWorkItemHandler verifies whether a specific work item is requested during an execution of a process, and the associated data is correct.
The following example shows how to verify an email task and whether an exception is raised if the email is not sent. The unit test uses a test handler that is executed when an email is requested and enables you to test the data related to the email, such as the sender and recipient. Once the abortWorkItem() method notifies the engine about the email delivery failure, the unit test verifies that the process handles such case by generating an error and logging the action. In this case, the process instance is eventually aborted.
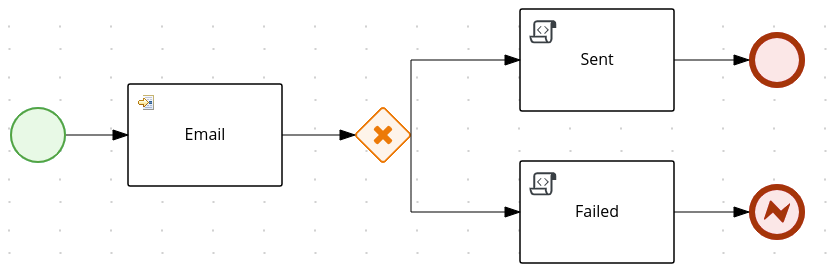
public void testProcess2() {

    createRuntimeManager("sample-process.bpmn");

    RuntimeEngine runtimeEngine = getRuntimeEngine();

    KieSession ksession = runtimeEngine.getKieSession();

    TestWorkItemHandler testHandler = getTestWorkItemHandler();

    ksession.getWorkItemManager().registerWorkItemHandler("Email", testHandler);

    ProcessInstance processInstance = ksession.startProcess("com.sample.bpmn.hello2");

    assertProcessInstanceActive(processInstance.getId(), ksession);
    assertNodeTriggered(processInstance.getId(), "StartProcess", "Email");

    WorkItem workItem = testHandler.getWorkItem();
    assertNotNull(workItem);
    assertEquals("Email", workItem.getName());
    assertEquals("me@mail.com", workItem.getParameter("From"));
    assertEquals("you@mail.com", workItem.getParameter("To"));

    ksession.getWorkItemManager().abortWorkItem(workItem.getId());
    assertProcessInstanceNotActive(processInstance.getId(), ksession);
    assertNodeTriggered(processInstance.getId(), "Gateway", "Failed", "Error");

}
11. Human Tasks
11.1. Introduction
An important aspect of business processes is human task management. While some of the work performed in a process can be executed automatically, some tasks need to be executed by human actors.
jBPM supports a special human task node inside processes for modeling this interaction with human users. This human task node allows process designers to define the properties related to the task that the human actor needs to execute, like for example the type of task, the actor(s), or the data associated with the task.
jBPM also includes a so-called human task service, a back-end service that manages the life cycle of these tasks at runtime. The jBPM implementation is based on the WS-HumanTask specification. Note however that this implementation is fully pluggable, meaning that users can integrate their own human task solution if necessary.
In order to have human actors participate in your processes, you first need to (1) include human task nodes inside your process to model the interaction with human actors, (2) integrate a task management component (like for example the WS-HumanTask based implementation provided by jBPM) and (3) have end users interact with a human task client to request their task list and claim and complete the tasks assigned to them. Each of these three elements will be discussed in more detail in the next sections.
11.2. Creating user tasks
User tasks are used to include human actions as input to the business process.
-
Create a business process.
-
In the process designer, select the Activities tool from the tool palette.
-
Select User.
-
Drag and drop a user task onto the process designer canvas.
-
If necessary, in the upper-right corner of the screen, click the Properties icon.
-
Add or define the task information listed in the following table as required.
Table 27. User task parameters Label Description Name
The name of the user task. You can also double-click the user task shape to edit the name.
Documentation
Enter a description of the task. The text in this field is included in the process documentation. Click the Documentation tab in the upper-left side of the process designer canvas to view the process documentation.
Task Name
The name of the human task.
Subject
Enter a subject for the task.
Actors
The actors responsible for executing the human task. Click Add to add a row then select an actor from the list or click New to add a new actor.
Groups
The groups responsible for executing the human task. Click Add to add a row then select a group from the list or click New to add a new group.
Assignments
Local variables for this task. Click to open the Task Data I/O window then add data inputs and outputs as required. You can also add MVEL expressions as data input and output assignments. For more information about MVEL language, see Language Guide for 2.0.
Reassignments
Specify a different actor to complete this task.
Notifications
Click to specify notifications associated with the task.
Is Async
Select if this task should be invoked asynchronously. Make tasks asynchronous if they cannot be executed instantaneously, for example a task performed by an outside service.
Skippable
Select if this task is not mandatory.
Priority
Specify a priority for the task.
Description
Enter a description for the human task.
Created By
The user that created this task.
AdHoc Autostart
Select if this is an ad hoc task that should be started automatically. AdHoc Autostart enables the task to automatically start when the process or case instance is created instead of being starting by a start task. It is often used in case management.
Multiple Instance
Select if this task has multiple instances.
On Entry Action
A Java, JavaScript, or MVEL script that specifies an action at the start of the task.
On Exit Action
A Java, JavaScript, or MVEL script that specifies an action at the end of the task.
Content
The content of the script.
SLA Due Date
The date that the service level agreement (SLA) expires.
-
Click Save.
11.2.1. Setting the user task assignment strategy
The user task assignment strategy is used to automatically assign the tasks to a suitable user. The assignment strategy allows more efficient task allocation based on the associated properties, such as potential owners, task priority, and task data. org.jbpm.task.assignment.strategy is the system property for the user task assignment strategy in jBPM. You can also explicitly define an assignment strategy for a user task in Business Central.
-
You have created a project in Business Central.
-
You must set the
org.jbpm.task.assignment.enabledsystem property totrue.
-
Create a business process.
For more information about creating a business process in Business Central, see Creating a business process in Business Central.
-
Create a user task.
For more information about creating a user task in Business Central, see Creating user tasks.
-
In the upper-right corner of the screen, click the Properties icon.
-
Expand Implementation/Execution and click
below to Assignments, to open the Data I/O window. -
Add a data input with the name
AssignmentStrategy, with the typeString, and with the constant source, such as the strategy name.If AssignmentStrategyis set as null, then no assignment strategy is used for the task. -
Click Ok.
The
AssignmentStrategyvariable is added as a data input to the user task.
11.2.2. BPMN2 swimlanes in process designer
Swimlanes are process elements that visually group tasks related to one group or user. You can use user tasks in combination with swimlanes to assign multiple user tasks to the same actor, due to Autoclaim property of the swimlanes. When a potential owner of a group claims the first task in a swimlane, then other tasks are directly assigned to the same owner. Therefore, the claim for other tasks is not needed by the remaining owners of the group. The Autoclaim property enables the auto-assignment of the tasks that are related to a swimlane.
If the remaining user tasks in a swimlane contain multiple predefined ActorIds, then the user tasks are not assigned automatically.
|
In the following example, an analyst lane consists of two user tasks:
The Group field in the Update Customer Details and Resolve Customer Issue tasks contain the value analyst. When the process is started, and the Update Customer Details task is claimed, started, or completed by an analyst, and the Resolve Customer Issue task is claimed and assigned to the user who completed the first task. However, if only the Update Customer Details task contains the analyst group assigned, and the second task contains no user or group assignments, and the process stops after the first task completes.
You can disable the Autoclaim property of the swimlanes. If the Autoclaim property is disabled, then the tasks related to a swimlane are not assigned automatically. By default, the value of Autoclaim property is set as true. If needed, you can also change the default value for the Autoclaim property from project settings in Business Central or using the deployment descriptor file.
To change the default value of Autoclaim property of swimlanes in Business Central:
-
Go to project Settings.
-
Open Deployment → Environment entries.
-
Enter the following values in the given fields:
-
Name -
Autoclaim -
Value -
"false”
-
If you want to set the environment entry in the XML deployment descriptor, add the following code to the kie-deployment-descriptor.xml file:
<environment-entries>
  ..
    <environment-entry>
        <resolver>mvel</resolver>
        <identifier>new String ("false")</identifier>
        <parameters/>
        <name>Autoclaim</name>
    </environment-entry>
  ..
</environment-entries>
11.3. Configuring emails in task notification
Earlier it was possible to send notifications only to users or group of users in Business Central. Now you can directly add any email addresses as well.
You have created a project in Business Central.
-
Create a business process.
For more information about creating a business process in Business Central, see Creating a business process in Business Central.
-
Create a user task.
For more information about creating a user task in Business Central, see Creating user tasks.
-
In the upper-right corner of the screen, click the Properties icon.
-
Expand Implementation/Execution and click
next to Notifications, to open the Notifications window. -
Click Add.
-
In the Notifications window, enter an email address in the To: email(s) field to set the recipients of the task notification emails.
You can add multiple email addresses separated by comma.
-
Enter the subject and body of the email.
-
Click Ok.
You can see the added email addresses in the To: email(s) column in the Notifications window.
-
Click Ok.
11.4. BPMN2 user task life cycle in process designer
You can trigger a user task element during the process instance execution to create a user task. The user task service of the task execution engine executes the user task instance. The process instance continues the execution only when the associated user task is completed or aborted. A user task life cycle is as follows:
-
When a process instance enters a user task element, the user task is in the
Createdstage. -
Createdstage is a transient stage and the user task enters theReadystage immediately. The task appears in the task list of all the actors who are allowed to execute the task. -
When an actor claims the user task, the task becomes
Reserved.
|
If a user task has a single potential actor, the task is assigned to that actor upon creation. |
-
When an actor who claimed the user task starts the execution, the status of the user task changes to
InProgress. -
Once an actor completes the user task, the status changes to
CompletedorFaileddepending on the execution outcome.
There are also several other life cycle methods, including:
-
Delegating or forwarding a user task so the user task is assigned to another actor.
-
Revoking a user task, then the user task is no longer claimed by a single actor but is available to all actors who are allowed to take it.
-
Suspending and resuming a user task.
-
Stopping a user task that is in progress.
-
Skipping a user task, in which the execution of the task is suspended.
For more information about the user task life cycle, refer Web Services Human Task.
11.5. BPMN2 task permission matrix in process designer
The user task permission matrix summarizes the actions that are allowed for specific user roles. The user roles are as follows:
-
Potential owner: User who can claim the task, which was claimed earlier and is released and forwarded. The tasks with
Readystatus can be claimed, and the potential owner becomes the actual owner of the task. -
Actual owner: User who claims the task and progresses the task to completion or failure.
-
Business administrator: Super user who can modify the status or progress with the task at any point of the task life cycle.
The following permission matrix represents the authorizations for all operations that modify a task.
-
+indicates that the user role is allowed to do the specified operation. -
-indicates that the user role is not allowed to do the specified operation, or the operation does not match with the user’s role.
| Operation | Potential owner | Actual owner | Business administrator |
|---|---|---|---|
activate |
|
|
|
claim |
|
|
|
complete |
|
|
|
delegate |
|
|
|
fail |
|
|
|
forward |
|
|
|
nominate |
|
|
|
release |
|
|
|
remove |
|
|
|
resume |
|
|
|
skip |
|
|
|
start |
|
|
|
stop |
|
|
|
suspend |
|
|
|
11.6. Task Service and The jBPM engine
As far as the jBPM engine is concerned, human tasks are similar to any other external service that needs to be invoked and are implemented as a domain-specific service. (For more on domain-specific services, see the chapter on them here.) Because a human task is an example of such a domain-specific service, the process itself only contains a high-level, abstract description of the human task to be executed and a work item handler that is responsible for binding this (abstract) task to a specific implementation.
Users can plug in any human task service implementation, such as the one that’s provided by jBPM, or they may register their own implementation. In the next paragraphs, we will describe the human task service implementation provided by jBPM.
The jBPM project provides a default implementation of a human task service based on the WS-HumanTask specification. If you do not need to integrate jBPM with another existing implementation of a human task service, you can use this service. The jBPM implementation manages the life cycle of the tasks (creation, claiming, completion, etc.) and stores the state of all the tasks, task lists, and other associated information. It also supports features like internationalization, calendar integration, different types of assignments, delegation, escalation and deadlines. The code for the implementation itself can be found in the jbpm-human-task module.
The jBPM task service implementation is based on the WS-HumanTask (WS-HT) specification. This specification defines (in detail) the model of the tasks, the life cycle, and many other features. It is very comprehensive and the first version can be found here.
11.7. Task Service API
The human task service exposes a Java API for managing the life cycle of tasks. This allows clients to integrate (at a low level) with the human task service. Note that end users should probably not interact with this low-level API directly, but use one of the more user-friendly task clients (see below) instead. These clients offer a graphical user interface to request task lists, claim and complete tasks, and manage tasks in general. The task clients listed below use the Java API to internally interact with the human task service. Of course, the low-level API is also available so that developers can use it in their code to interact with the human task service directly.
A task service (interface org.kie.api.task.TaskService) offers the following methods (among others) for managing the life cycle of human tasks:
              ...

              void start( long taskId, String userId );

              void stop( long taskId, String userId );

              void release( long taskId, String userId );

              void suspend( long taskId, String userId );

              void resume( long taskId, String userId );

              void skip( long taskId, String userId );

              void delegate(long taskId, String userId, String targetUserId);

              void complete( long taskId, String userId, Map<String, Object> results );

              ...
If you take a look at the method signatures you will notice that almost all of these methods take the following arguments:
-
taskId: The id of the task that we are working with. This is usually extracted from the currently selected task in the user task list in the user interface.
-
userId: The id of the user that is executing the action. This is usually the id of the user that is logged in into the application.
There is also an internal interface that you should check for more methods to interact with the Task Service, this interface is internal until it gets tested. Future version of the External (public) interface can include some of the methods proposed in the InternalTaskService interface. If you want to make use of the methods provided by this interface you need to manually cast to InternalTaskService. One method that can be useful from this interface is getTaskContent():
Map<String, Object> getTaskContent( long taskId );This method saves you from doing all the boiler plate of getting the ContentMarshallerContext to unmarshall the serialized version of the task content. If you only want to use the stable/public APIs you can just copy what this method does:
              Task taskById = taskQueryService.getTaskInstanceById(taskId);
              Content contentById = taskContentService.getContentById(taskById.getTaskData().getDocumentContentId());
              ContentMarshallerContext context = getMarshallerContext(taskById);
              Object unmarshalledObject = ContentMarshallerHelper.unmarshall(contentById.getContent(), context.getEnvironment(), context.getClassloader());
              if (!(unmarshalledObject instanceof Map)) {
                  throw new IllegalStateException(" The Task Content Needs to be a Map in order to use this method and it was: "+unmarshalledObject.getClass());

              }
              Map<String, Object> content = (Map<String, Object>) unmarshalledObject;
              return content;
Because the content of the Task can be any Object, the previous method assume that you are storing a Map of objects to work. If you are storing other than a Map you should do the correspondent checks.
11.7.1. Task event listener
Task service supports task listeners to be invoked upon various life cycle events happening on given task instance. In majority of cases task event listeners are used to intercept certain operation to perform additional logic - like storing task information in separate tables for business activity monitoring needs.
Task event listeners are pluggable and users can provide their own implementation of org.kie.api.task.TaskLifeCycleEventListener interface. There are beforeTask* and afterTask* methods that are invoked upon given event occurred on a task instance.
TaskEvent (org.kie.api.task.TaskEvent) is the only argument available to the listener that provides access to:
-
Task instance that the event correspond to
-
TaskContext that provides access to services for further processing needs such as TaskPersistenceContext
In many cases implementors of task event listener need to have access to task variables (either input or output or both) to perform required operations. It can be done as described above (using various services and content marshaller helper) though that in many cases leads to code duplication in multiple listeners thus an extended support was added in 6.5 to simply use TaskContext to obtain that information.
loadTaskVariables(Task task);Method loadTaskVariables can be used to populate both input and output variables of a given task by simple and single method call. That method is "no op" in case task variables are already set on a task.
To improve performance task variables are automatically set when they are available - usually given by caller on task service:
-
when task is created it usually has input variables, these variables are then set on Task instance so there is no need to use loadTaskVariables method as only task input variables are available when task is being created - applies to beforeTaskAdded and afterTaskAdded events handling
-
when task is completed it usually has output variables, these variables are set on a task so there is no need to use loadTaskVariables method if only task output variables are required.
Other than that loadTaskVariables should be used to populate task variables.
| It’s enough to call it once (like in beforeTask) method of the listener as they will be available to both beforeTask* and afterTask* methods then. |
11.7.2. Data model of task service
Below is the database model used by task service with all tables and their relationship illustrated.
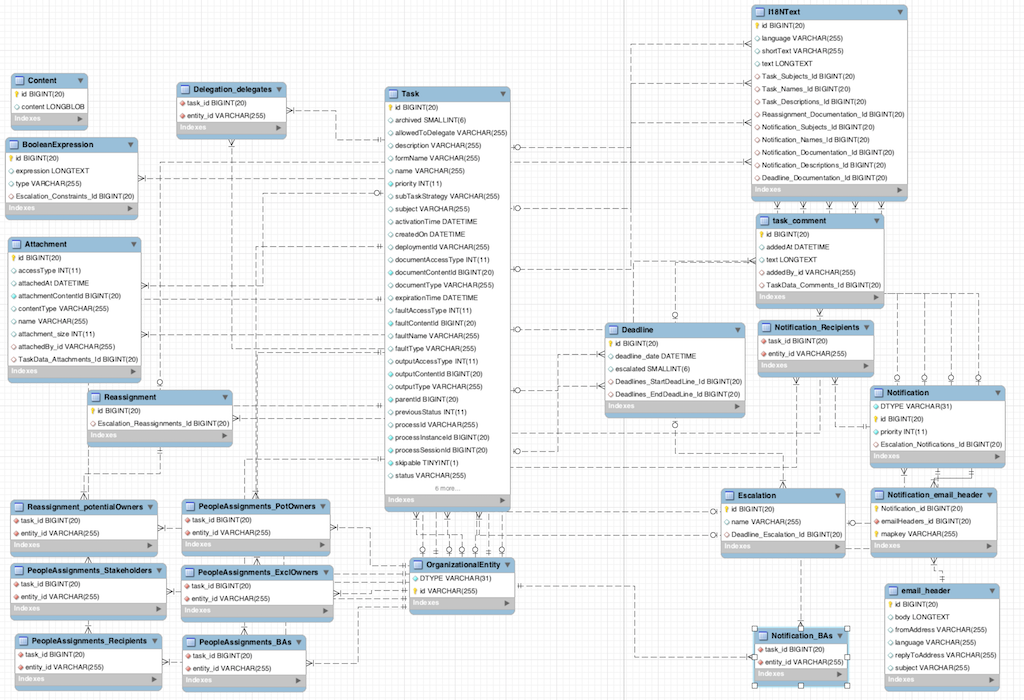
11.8. Interacting with the Task Service
In order to get access to the Task Service API it is recommended to let the Runtime Manager to make sure that everything is setup correctly. Look at the Runtime Manager section for more information. From the API perspective you should be doing something like this:
// ...

RuntimeEngine engine = runtimeManager.getRuntimeEngine(EmptyContext.get());
KieSession kieSession = engine.getKieSession();
// Start a process
kieSession.startProcess("CustomersRelationship.customers", params);
// Do Task Operations
TaskService taskService = engine.getTaskService();
List<TaskSummary> tasksAssignedAsPotentialOwner = taskService.getTasksAssignedAsPotentialOwner("mary", "en-UK");

// Claim Task
taskService.claim(taskSummary.getId(), "mary");
// Start Task
taskService.start(taskSummary.getId(), "mary");

// ...
If you use this approach, there is no need to register the Task Service with the jBPM engine. The Runtime Manager will do that for you automatically. If you don’t use the Runtime Manager, you will be responsible for setting the LocalHTWorkItemHandler in the session in order to get the Task Service notifying the jBPM engine when a task is completed, or the jBPM engine notifying that a task has been created.
In jBPM 6.x the Task Service runs locally to the jBPM engine and for that reason multiple light clients can be created for different jBPM engine instances. All the clients will be sharing the same database (backend storage for the tasks).
11.9. Experimental features
11.9.1. SubTasks
The "Subtasks" feature is an experimental feature in the task service. This feature allows one task to have sub-tasks in a parent-child relationship. The parent task can auto-complete depending on the state of its children (and the subtask strategy used).
You can use it by setting the parentId of a task, either when creating the task manually via the
task service or otherwise by setting the ParentId parameter of the task definition in the BPMN2
process definition.
12. Persistence and Transactions
12.1. Persistence and transactions in the jBPM engine
The jBPM engine implements persistence for process states. The implementation uses the JPA framework with an SQL database backend. It can also store audit log information in the database.
The jBPM engine also enables transactional execution of processes using the JTA framework, relying on the persistence backend to support the transactions.
12.2. Persistence of process runtime states
The jBPM engine supports persistent storage of the runtime state of running process instances. Because it stores the runtime states, it can continue execution of a process instance if the jBPM engine stopped or encountered a problem at any point.
The jBPM engine also persistently stores the process definitions and the history logs of current and previous process states.
You can use the persistence.xml file, specified by the JPA framework, to configure persistence in an SQL database. You can plug in different persistence strategies. For more information about the persistence.xml file, see Configuration in the persistence.xml file.
By default, if you do not configure persistence in the jBPM engine, process information, including process instance states, is not made persistent.
When the jBPM engine starts a process, it creates a process instance, which represents the execution of the process in that specific context. For example, when executing a process that processes a sales order, one process instance is created for each sales request.
The process instance contains the current runtime state and context of a process, including current values of any process variables. However, it does not include information about the history of past states of the process, as this information is not required for ongoing execution of a process.
When the runtime state of process instances is made persistent, you can restore the state of execution of all running processes in case the jBPM engine fails or is stopped. You can also remove a particular process instance from memory and then restore it at a later time.
If you configure the jBPM engine to use persistence, it automatically stores the runtime state into the database. You do not need to trigger persistence in the code.
When you restore the state of the jBPM engine from a database, all instances are automatically restored to their last recorded state. Process instances automatically resume execution if they are triggered, for example, by an expired timer, the completion of a task that was requested by the process instance, or a signal being sent to the process instance. You do not need to load separate instances and trigger their execution manually.
The jBPM engine also automatically reloads process instances on demand.
12.2.1. Safe points for persistence
The jBPM engine saves the state of a process instance to persistent storage at safe points during the execution of the process.
When a process instance is started or resumes execution from a previous wait state, the jBPM engine continues the execution until no more actions can be performed. If no more actions can be performed, it means that the process has completed or else has reached a wait state. If the process contains several parallel paths, all the paths must reach a wait state.
This point in the execution of the process is considered a safe point. At this point, the jBPM engine stores the state of the process instance, and of any other process instances that were affected by the execution, to persistent storage.
12.2.2. Binary runtime persistence data model
The runtime persistence data is internal. As a general rule, do not access the database tables directly and, most importantly, do not modify it. Changing the runtime state information for process instances without using the jBPM engine might have unexpected consequences. Use a history log to analyze information about the current or past states of process instances.
In rare cases it might be useful to query internal database tables directly if you have a specific need to do so.
The jBPM engine uses a binary persistence mechanism, otherwise known as marshalling, which converts the state of the process instance into a binary dataset. The same mechanism is also applied to the session state and any work item states.
When the process instance state is persisted, the jBPM engine completes two steps:
-
First, it transforms the process instance information into a binary blob. For performance reasons, the jBPM engine uses a custom serialization mechanism and not standard Java serialization.
-
Next, it stores the blob alongside metadata about this process instance. This metadata includes the process instance ID, process ID, and process start date, as well as other data.
Apart from process instance states, the jBPM engine stores some state information for the session, including the state of timer jobs and the session data for evaluating business rules. The jBPM engine stores the session state as a separate binary blob, along with metadata that includes the ID of the session.
To restore the state of a session, reload the session with a particular ID using the ksession.getId() method.
Binary datasets that represent process instance states are usually relatively small, because they contain only the minimal execution state of the process instance. For a simple process instance, the state usually includes the nodes that are currently executing and any existing variable values.
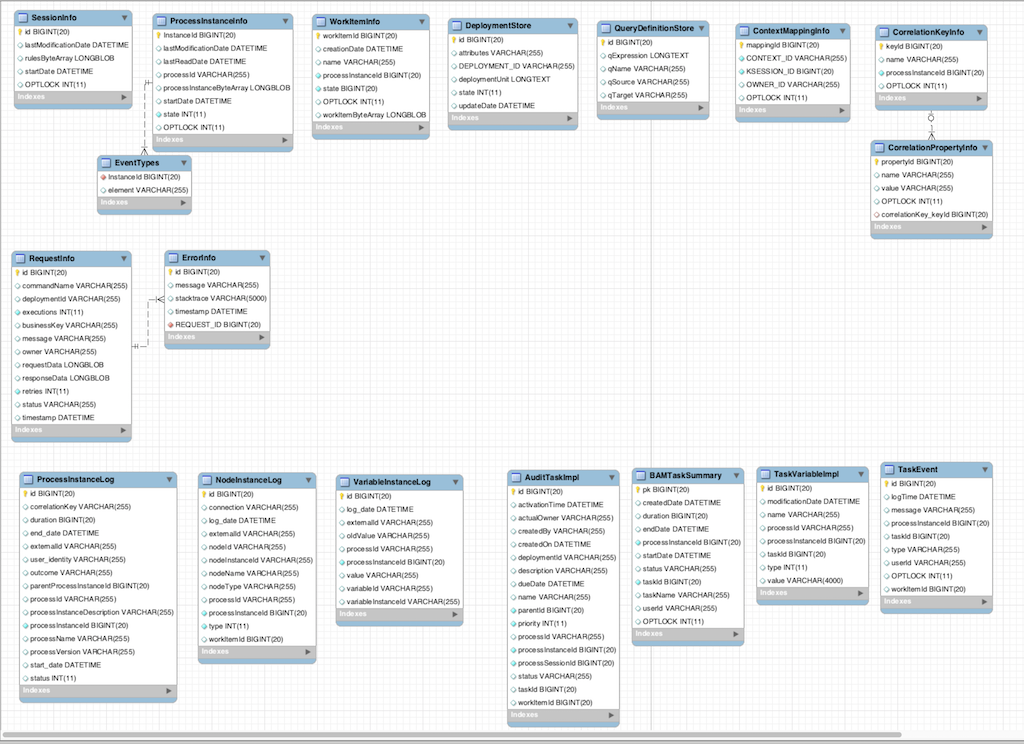
The sessioninfo entity contains the state of the knowledge session in which the process instance is running.
| Field | Description | Nullable |
|---|---|---|
|
The primary key |
NOT NULL |
|
The last time that the entity was saved to the database |
|
|
The binary dataset containing the state of the session |
NOT NULL |
|
The start time of the session |
|
|
The version field that serves as its optimistic lock value |
The processinstanceinfo entity contains the state of the process instance.
| Field | Description | Nullable |
|---|---|---|
|
The primary key |
NOT NULL |
|
The last time that the entity was saved to the database |
|
|
The last time that the entity was retrieved (read) from the database |
|
|
The name (ID) of the process |
|
|
The binary dataset containing the state of the process instance |
NOT NULL |
|
The start time of the process |
|
|
An integer representing the state of the process instance |
NOT NULL |
|
The version field that serves as its optimistic lock value |
The eventtypes entity contains information about events that a process instance will undergo or has undergone.
| Field | Description | Nullable |
|---|---|---|
|
This column references the |
NOT NULL |
|
A text field related to an event that the process has undergone |
The workiteminfo entity contains the state of a work item.
| Field | Description | Nullable |
|---|---|---|
|
The primary key |
NOT NULL |
|
The creation date of the work item |
|
|
The name of the work item |
|
|
The (primary key) ID of the process. There is no foreign key constraint on this field. |
NOT NULL |
|
An integer representing the state of the work item |
NOT NULL |
|
The version field that serves as its optimistic lock value |
|
|
The binary dataset containing the state of the work item |
NOT NULL |
The CorrelationKeyInfo entity contains information about correlation keys assigned to the given process instance. The relationship is loose, because this table is optional, used only when correlation capabilities are required.
| Field | Description | Nullable |
|---|---|---|
|
The primary key |
NOT NULL |
|
The assigned name of the correlation key |
|
|
The ID of the process instance which is assigned to this correlation key |
NOT NULL |
|
The version field that serves as its optimistic lock value |
The CorrelationPropertyInfo entity contains information about correlation properties for the given correlation key that is assigned to the given process instance.
| Field | Description | Nullable |
|---|---|---|
|
The primary key |
NOT NULL |
|
The name of the property |
|
|
The value of the property |
NOT NULL |
|
The version field that serves as its optimistic lock value |
|
|
Foreign key to map to the correlation key |
NOT NULL |
The ContextMappingInfo entity contains information about contextual information mapped to a ksession.
This entity is an internal part of the RuntimeManager class and can be considered optional when RuntimeManager is not used.
| Field | Description | Nullable |
|---|---|---|
|
The primary key |
NOT NULL |
|
Identifier of the context |
NOT NULL |
|
Identifier of the ksession mapped to this context |
NOT NULL |
|
Identifier of the runtime manager |
NOT NULL |
|
The version field that serves as its optimistic lock value |
12.3. The persistent audit log
The jBPM engine can store information about the execution of process instances, including the successive historical states of the instances.
This information can be useful in many cases. For example, you might want to verify which actions have been executed for a particular process instance or to monitor and analyze the efficiency of a particular process.
However, storing history information in the runtime database would result in the database rapidly increasing in size and would also affect the performance of the persistence layer. Therefore, history log information is stored separately.
The jBPM engine creates a log based on events that it generates during execution of processes. It uses the event listener mechanism to receive events and extract the necessary information, then persists this information to a database. The jbpm-audit module contains an event listener that stores process-related information in a database using JPA.
You can use filters to limit the scope of the logged information.
12.3.1. The jBPM engine audit log data model
You can query jBPM engine audit log information to use it in different scenarios, for example, creating a history log for one specific process instance or analyzing the performance of all instances of a specific process.
The audit log data model is a default implementation. Depending on your use cases, you might also define your own data model for storing the information you require. You can use process event listeners to extract the information.
The data model contains three entities: one for process instance information, one for node instance information, and one for process variable instance information.
The ProcessInstanceLog table contains the basic log information about a process instance.
| Field | Description | Nullable |
|---|---|---|
|
The primary key and ID of the log entity |
NOT NULL |
|
The correlation of this process instance |
|
|
Actual duration of this process instance since its start date |
|
|
When applicable, the end date of the process instance |
|
|
Optional external identifier used to correlate to some elements, for example, a deployment ID |
|
|
Optional identifier of the user who started the process instance |
|
|
The outcome of the process instance. This field contains the error code if the process instance was finished with an error event. |
|
|
The process instance ID of the parent process instance, if applicable |
|
|
The ID of the process |
|
|
The process instance ID |
NOT NULL |
|
The name of the process |
|
|
The type of the instance (process or case) |
|
|
The version of the process |
|
|
The due date of the process according to the service level agreement (SLA) |
|
|
The level of compliance with the SLA |
|
|
The start date of the process instance |
|
|
The status of the process instance that maps to the process instance state |
The NodeInstanceLog table contains more information about which nodes were executed inside each process instance.
Whenever a node instance is entered from one of its incoming connections or is exited through one of its outgoing connections, information about the event is stored in this table.
| Field | Description | Nullable |
|---|---|---|
|
The primary key and ID of the log entity |
NOT NULL |
|
Actual identifier of the sequence flow that led to this node instance |
|
|
The date of the event |
|
|
Optional external identifier used to correlate to some elements, for example, a deployment ID |
|
|
The node ID of the corresponding node in the process definition |
|
|
The node instance ID |
|
|
The name of the node |
|
|
The type of the node |
|
|
The ID of the process that the process instance is executing |
|
|
The process instance ID |
NOT NULL |
|
The due date of the node according to the service level agreement (SLA) |
|
|
The level of compliance with the SLA |
|
|
The type of the event (0 = enter, 1 = exit) |
NOT NULL |
|
(Optional, only for certain node types) The identifier of the work item |
|
|
The identifier of the container, if the node is inside an embedded sub-process node |
|
|
The reference identifier |
The VariableInstanceLog table contains information about changes in variable instances. By default, the jBPM engine generates log entries after a variable changes its value. The jBPM engine can also log entries before the changes.
| Field | Description | Nullable |
|---|---|---|
|
The primary key and ID of the log entity |
NOT NULL |
|
Optional external identifier used to correlate to some elements, for example, a deployment ID |
|
|
The date of the event |
|
|
The ID of the process that the process instance is executing |
|
|
The process instance ID |
NOT NULL |
|
The previous value of the variable at the time that the log is made |
|
|
The value of the variable at the time that the log is made |
|
|
The variable ID in the process definition |
|
|
The ID of the variable instance |
The AuditTaskImpl table contains information about user tasks.
| Field | Description | Nullable |
|---|---|---|
|
The primary key and ID of the task log entity |
|
|
Time when this task was activated |
|
|
Actual owner assigned to this task. This value is set set only when the owner claims the task. |
|
|
User who created this task |
|
|
Date when the task was created |
|
|
The ID of the deployment of which this task is a part |
|
|
Description of the task |
|
|
Due date set on this task |
|
|
Name of the task |
|
|
Parent task ID |
|
|
Priority of the task |
|
|
Process definition ID to which this task belongs |
|
|
Process instance ID with which this task is associated |
|
|
KIE session ID used to create this task |
|
|
Current status of the task |
|
|
Identifier of the task |
|
|
Identifier of the work item assigned on the process side to this task ID |
|
|
The date and time when the process instance state was last recorded in the persistence database |
The BAMTaskSummary table collects information about tasks that is used by the BAM engine to build charts and dashboards.
| Field | Description | Nullable |
|---|---|---|
|
The primary key and ID of the log entity |
NOT NULL |
|
Date when the task was created |
|
|
Duration since the task was created |
|
|
Date when the task reached an end state (complete, exit, fail, skip) |
|
|
The process instance ID |
|
|
Date when the task was started |
|
|
Current status of the task |
|
|
Identifier of the task |
|
|
Name of the task |
|
|
User ID assigned to the task |
|
|
The version field that serves as its optimistic lock value |
The TaskVariableImpl table contains information about task variable instances.
| Field | Description | Nullable |
|---|---|---|
|
The primary key and ID of the log entity |
NOT NULL |
|
Date when the variable was modified most recently |
|
|
Name of the task |
|
|
The ID of the process that the process instance is executing |
|
|
The process instance ID |
|
|
Identifier of the task |
|
|
Type of the variable: either input or output of the task |
|
|
Variable value |
The TaskEvent table contains information about changes in task instances.
Operations such as claim, start, and stop are stored in this table to provide a timeline view of events that happened to the given task.
| Field | Description | Nullable |
|---|---|---|
|
The primary key and ID of the log entity |
NOT NULL |
|
Date when this event was saved |
|
|
Log event message |
|
|
The process instance ID |
|
|
Identifier of the task |
|
|
Type of the event. Types correspond to life cycle phases of the task |
|
|
User ID assigned to the task |
|
|
Identifier of the work item to which the task is assigned |
|
|
The version field that serves as its optimistic lock value |
|
|
Correlation key of the process instance |
|
|
Type of the process instance (process or case) |
12.3.2. Configuration for storing the process events log in a database
To log process history information in a database with a default data model, you must register the logger on your session.
KieSession ksession = ...;
ksession.addProcessEventListener(AuditLoggerFactory.newInstance(Type.JPA, ksession, null));

// invoke methods for your session here
To specify the database for storing the information, you must modify the persistence.xml file to include the audit log classes: ProcessInstanceLog, NodeInstanceLog, and VariableInstanceLog.
persistence.xml file that includes the audit log classes<?xml version="1.0" encoding="UTF-8" standalone="yes"?>
<persistence
version="2.0"
xsi:schemaLocation="http://java.sun.com/xml/ns/persistence http://java.sun.com/xml/ns/persistence/persistence_2_0.xsd
http://java.sun.com/xml/ns/persistence/orm http://java.sun.com/xml/ns/persistence/orm_2_0.xsd"
xmlns="http://java.sun.com/xml/ns/persistence"
xmlns:orm="http://java.sun.com/xml/ns/persistence/orm"
xmlns:xsi="http://www.w3.org/2001/XMLSchema-instance">
<persistence-unit name="org.jbpm.persistence.jpa" transaction-type="JTA">
<provider>org.hibernate.ejb.HibernatePersistence</provider>
<jta-data-source>jdbc/jbpm-ds</jta-data-source>
<mapping-file>META-INF/JBPMorm.xml</mapping-file>
<class>org.drools.persistence.info.SessionInfo</class>
<class>org.jbpm.persistence.processinstance.ProcessInstanceInfo</class>
<class>org.drools.persistence.info.WorkItemInfo</class>
<class>org.jbpm.persistence.correlation.CorrelationKeyInfo</class>
<class>org.jbpm.persistence.correlation.CorrelationPropertyInfo</class>
<class>org.jbpm.runtime.manager.impl.jpa.ContextMappingInfo</class>
<class>org.jbpm.process.audit.ProcessInstanceLog</class>
<class>org.jbpm.process.audit.NodeInstanceLog</class>
<class>org.jbpm.process.audit.VariableInstanceLog</class>
<properties>
<property name="hibernate.dialect" value="org.hibernate.dialect.H2Dialect"/>
<property name="hibernate.max_fetch_depth" value="3"/>
<property name="hibernate.hbm2ddl.auto" value="update"/>
<property name="hibernate.show_sql" value="true"/>
<property name="hibernate.connection.release_mode" value="after_transaction"/>
<property name="hibernate.transaction.jta.platform" value="org.hibernate.service.jta.platform.internal.JBossStandAloneJtaPlatform"/>
</properties>
</persistence-unit>
</persistence>12.3.3. Configuration for sending the process events log to a JMS queue
When the jBPM engine stores events in the database with the default audit log implementation, the database operation is completed synchronously, within the same transaction as the actual execution of the process instance. This operation takes time, and on highly loaded systems it might have some impact on database performance, especially when both the history log and the runtime data are stored in the same database.
As an alternative, you can use the JMS-based logger that the jBPM engine provides. You can configure this logger to submit process log entries as messages to a JMS queue, instead of directly persisting them in the database.
You can configure the JMS logger to be transactional, in order to avoid data inconsistencies if a jBPM engine transaction is rolled back.
ConnectionFactory factory = ...;
Queue queue = ...;
StatefulKnowledgeSession ksession = ...;
Map<String, Object> jmsProps = new HashMap<String, Object>();
jmsProps.put("jbpm.audit.jms.transacted", true);
jmsProps.put("jbpm.audit.jms.connection.factory", factory);
jmsProps.put("jbpm.audit.jms.queue", queue);
ksession.addProcessEventListener(AuditLoggerFactory.newInstance(Type.JMS, ksession, jmsProps));

// invoke methods one your session here
This is just one of the possible ways to configure JMS audit logger. You can use the AuditLoggerFactory class to set additional configuration parameters.
12.3.4. Auditing of variables
By default, values of process and task variables are stored in audit tables as string representations. To create string representations of non-string variable types, the jBPM engine calls the variable.toString() method. If you use a custom class for a variable, you can implement this method for the class. In many cases this representation is sufficient.
However, sometimes a string representation in the logs might not be sufficient, especially when there is a need for efficient queries by process or task variables. For example, a Person object, used as a value for a variable, might have the following structure:
Person object, used as a process or task variable valuepublic class Person implements Serializable {
private static final long serialVersionUID = -5172443495317321032L;
private String name;
private int age;
public Person(String name, int age) {
this.name = name;
this.age = age;
}
public String getName() {
return name;
}
public void setName(String name) {
this.name = name;
}
public int getAge() {
return age;
}
public void setAge(int age) {
this.age = age;
}
@Override
public String toString() {
return "Person [name=" + name + ", age=" + age + "]";
}
}The toString() method provides a human-readable format. However, it might not be sufficient for a search. A sample string value is Person [name="john", age="34"]. Searching through a large number of such strings to find people of age 34 would make a database query inefficient.
To enable more efficient searching, you can audit variables using VariableIndexer objects, which extract relevant parts of the variable for storage in the audit log.
VariableIndexer interface/**
* Variable indexer that transforms a variable instance into another representation (usually string)
* for use in log queries.
*
* @param <V> type of the object that will represent the indexed variable
*/
public interface VariableIndexer<V> {
/**
* Tests if this indexer can index a given variable
*
* NOTE: only one indexer can be used for a given variable
*
* @param variable variable to be indexed
* @return true if the variable should be indexed with this indexer
*/
boolean accept(Object variable);
/**
* Performs an index/transform operation on the variable. The result of this operation can be
* either a single value or a list of values, to support complex type separation.
* For example, when the variable is of the type Person that has name, address, and phone fields,
* the indexer could build three entries out of it to represent individual fields:
* person = person.name
* address = person.address.street
* phone = person.phone
* this configuration allows advanced queries for finding relevant entries.
* @param name name of the variable
* @param variable actual variable value
* @return
*/
List<V> index(String name, Object variable);
}The default indexer uses the toString() method to produce a single audit entry for a single variable. Other indexers can return a list of objects from indexing a single variable.
To enable efficient queries for the Person type, you can build a custom indexer that indexes a Person instance into separate audit entries, one representing the name and another representing the age.
Person typepublic class PersonTaskVariablesIndexer implements TaskVariableIndexer {
@Override
public boolean accept(Object variable) {
if (variable instanceof Person) {
return true;
}
return false;
}
@Override
public List<TaskVariable> index(String name, Object variable) {
Person person = (Person) variable;
List<TaskVariable> indexed = new ArrayList<TaskVariable>();
TaskVariableImpl personNameVar = new TaskVariableImpl();
personNameVar.setName("person.name");
personNameVar.setValue(person.getName());
indexed.add(personNameVar);
TaskVariableImpl personAgeVar = new TaskVariableImpl();
personAgeVar.setName("person.age");
personAgeVar.setValue(person.getAge()+"");
indexed.add(personAgeVar);
return indexed;
}
}The jBPM engine can use this indexer to index values when they are of the Person type, while all other variables are indexed with the default toString() method. Now, to query for process instances or tasks that refer to a person with age 34, you can use the following query:
-
variable name:
person.age -
variable value:
34
As a LIKE type query is not used, the database server can optimize the query and make it efficient on a large set of data.
Custom indexers
The jBPM engine supports indexers for both process and task variables. However, it uses different interfaces for the indexers, because they must produce different types of objects that represent an audit view of the variable.
You must implement the following interfaces to build custom indexers:
-
For process variables:
org.kie.internal.process.ProcessVariableIndexer -
For task variables:
org.kie.internal.task.api.TaskVariableIndexer
You must implement two methods for either of the interfaces:
-
accept: Indicates whether a type is handled by this indexer. The jBPM engine expects that only one indexer can index a given variable value, so it uses the first indexer that accepts the type. -
index: Indexes a value, producing a object or list of objects (usually strings) for inclusion in the audit log.
After implementing the interface, you must package this implementation as a JAR file and list the implementation in one of the following files:
-
For process variables, the
META-INF/services/org.kie.internal.process.ProcessVariableIndexerfile, which lists fully qualified class names of process variable indexers (single class name per line) -
For task variables, the
META-INF/services/org.kie.internal.task.api.TaskVariableIndexerfile, which lists fully qualified class names of task variable indexers (single class name per line)
The ServiceLoader mechanism discovers the indexers using these files. When indexing a process or task variable, the jBPM engine examines the registered indexers to find any indexer that accepts the value of the variable. If no other indexer accepts the value, the jBPM engine applies the default indexer that uses the toString() method.
12.4. Transactions in the jBPM engine
The jBPM engine supports Java Transaction API (JTA) transactions.
It also supports local transactions only when using Spring. For more information about using Spring to set up persistence, please see the Spring chapter in the Drools integration guide. The current version of the jBPM engine does not support pure local transactions.
If you do not provide transaction boundaries inside your application, the jBPM engine automatically executes each method invocation on the jBPM engine in a separate transaction.
Optionally, you can specify the transaction boundaries in the application code, for example, to combine multiple commands into one transaction.
12.4.1. Registration of a transaction manager
You must register a transaction manager in the environment to use user-defined transactions.
The following sample code registers the transaction manager and uses JTA calls to specify transaction boundaries.
// Create the entity manager factory
EntityManagerFactory emf = EntityManagerFactoryManager.get().getOrCreate("org.jbpm.persistence.jpa");
TransactionManager tm = TransactionManagerServices.getTransactionManager();

// Set up the runtime environment
RuntimeEnvironment environment = RuntimeEnvironmentBuilder.Factory.get()
.newDefaultBuilder()
.addAsset(ResourceFactory.newClassPathResource("MyProcessDefinition.bpmn2"), ResourceType.BPMN2)
    .addEnvironmentEntry(EnvironmentName.TRANSACTION_MANAGER, tm)
    .get();

// Get the KIE session
RuntimeManager manager = RuntimeManagerFactory.Factory.get().newPerRequestRuntimeManager(environment);
RuntimeEngine runtime = manager.getRuntimeEngine(ProcessInstanceIdContext.get());
KieSession ksession = runtime.getKieSession();

// Start the transaction
UserTransaction ut = InitialContext.doLookup("java:comp/UserTransaction");
ut.begin();

// Perform multiple commands inside one transaction
ksession.insert( new Person( "John Doe" ) );
ksession.startProcess("MyProcess");

// Commit the transaction
ut.commit();
You must provide a jndi.properties file in you root class path to create a JNDI InitialContextFactory object, because transaction-related objects like UserTransaction, TransactionManager, and TransactionSynchronizationRegistry are registered in JNDI.
If your project includes the jbpm-test module, this file is already included by default.
Otherwise, you must create the jndi.properties file with the following content:
jndi.properties filejava.naming.factory.initial=org.jbpm.test.util.CloseSafeMemoryContextFactory
org.osjava.sj.root=target/test-classes/config
org.osjava.jndi.delimiter=/
org.osjava.sj.jndi.shared=trueThis configuration assumes that the simple-jndi:simple-jndi artifact is present in the class path of your project. You can also use a different JNDI implementation.
By default, the Narayana JTA transaction manager is used. If you want to use a different JTA transaction manager, you can change the persistence.xml file to use the required transaction manager. For example, if your application runs on Red Hat JBoss EAP version 7 or later, you can use the JBoss transaction manager. In this case, change the transaction manager property in the persistence.xml file:
persistence.xml file for the JBoss transaction manager<property name="hibernate.transaction.jta.platform" value="org.hibernate.service.jta.platform.internal.JBossAppServerJtaPlatform" />|
Using the Singleton strategy of the To avoid this race condition, explicitly synchronize around the |
12.4.2. Configuring container-managed transactions
If you embed the jBPM engine in an application that executes in container-managed transaction (CMT) mode, for example, EJB beans, you must complete additional configuration. This configuration is especially important if the application runs on an application server that does not allow a CMT application to access a UserTransaction instance from JNDI, for example, WebSphere Application Server.
The default transaction manager implementation in the jBPM engine relies on UserTransaction to query transaction status and then uses the status to determine whether to start a transaction. In environments that prevent access to a UserTransaction instance, this implementation fails.
To enable proper execution in CMT environments, the jBPM engine provides a dedicated transaction manager implementation:
org.jbpm.persistence.jta.ContainerManagedTransactionManager. This transaction manager expects that the transaction is active and always returns ACTIVE when the getStatus() method is invoked. Operations such as begin, commit, and rollback are no-op methods, because the transaction manager cannot affect these operations in container-managed transaction mode.
|
During process execution your code must propagate any exceptions thrown by the engine to the container to ensure that the container rolls transactions back when necessary. |
To configure this transaction manager, complete the steps in this procedure.
-
In your code, insert the transaction manager and persistence context manager into the environment before creating or loading a session:
Inserting the transaction manager and persistence context manager into the environmentEnvironment env = EnvironmentFactory.newEnvironment(); env.set(EnvironmentName.ENTITY_MANAGER_FACTORY, emf); env.set(EnvironmentName.TRANSACTION_MANAGER, new ContainerManagedTransactionManager()); env.set(EnvironmentName.PERSISTENCE_CONTEXT_MANAGER, new JpaProcessPersistenceContextManager(env)); env.set(EnvironmentName.TASK_PERSISTENCE_CONTEXT_MANAGER, new JPATaskPersistenceContextManager(env)); -
In the
persistence.xmlfile, configure the JPA provider. The following example useshibernateand WebSphere Application Server.Configuring the JPA provider in thepersistence.xmlfile<property name="hibernate.transaction.factory_class" value="org.hibernate.transaction.CMTTransactionFactory"/> <property name="hibernate.transaction.jta.platform" value="org.hibernate.service.jta.platform.internal.WebSphereJtaPlatform"/> -
To dispose a KIE session, do not dispose it directly. Instead, execute the
org.jbpm.persistence.jta.ContainerManagedTransactionDisposeCommandcommand. This commands ensures that the session is disposed at the completion of the current transaction. In the following example,ksessionis theKieSessionobject that you want to dispose.Disposing a KIE session using theContainerManagedTransactionDisposeCommandcommandksession.execute(new ContainerManagedTransactionDisposeCommand());Directly disposing the session causes an exception at the completion of the transaction, because the jBPM engine registers transaction synchronization to clean up the session state.
12.4.3. Transaction retries
When the jBPM engine commits a transaction, sometimes the commit operation fails because another transaction is being committed at the same time. In this case, the jBPM engine must retry the transaction.
If several retries fail, the transaction fails permanently.
You can use JVM system properties to control the retrying process.
| Property | Values | Default | Description |
|---|---|---|---|
|
Integer |
5 |
This property describes how many times the process engine retries a transaction before failing permanently. |
|
Integer |
50 |
The delay time before the first retry, in milliseconds. |
|
Integer |
4 |
The multiplier for increasing the delay time for each subsequent retry. With the default values, the process engine waits 50 milliseconds before the first retry, 200 milliseconds before the second retry, 800 milliseconds before the third retry, and so on. |
12.5. Configuration of persistence in the jBPM engine
If you use the jBPM engine without configuring any persistence, it does not save runtime data to any database; no in-memory database is available by default. You can use this mode if it is required for performance reasons or when you want to manage persistence yourself.
To use JPA persistence in the jBPM engine, you must configure it.
Configuration usually requires adding the necessary dependencies, configuring a data source, and creating the jBPM engine classes with persistence configured.
12.5.1. Configuration in the persistence.xml file
To use JPA persistence, you must add a persistence.xml persistence configuration to your class path to configure JPA to use Hibernate and the H2 database (or any other database that you prefer). Place this file in the META-INF directory of your project.
persistence.xml file<?xml version="1.0" encoding="UTF-8" standalone="yes"?>
<persistence
version="2.0"
xsi:schemaLocation="http://java.sun.com/xml/ns/persistence http://java.sun.com/xml/ns/persistence/persistence_2_0.xsd
http://java.sun.com/xml/ns/persistence/orm http://java.sun.com/xml/ns/persistence/orm_2_0.xsd"
xmlns="http://java.sun.com/xml/ns/persistence"
xmlns:orm="http://java.sun.com/xml/ns/persistence/orm"
xmlns:xsi="http://www.w3.org/2001/XMLSchema-instance">
<persistence-unit name="org.jbpm.persistence.jpa" transaction-type="JTA">
<provider>org.hibernate.ejb.HibernatePersistence</provider>
<jta-data-source>jdbc/jbpm-ds</jta-data-source>
<mapping-file>META-INF/JBPMorm.xml</mapping-file>
<class>org.drools.persistence.info.SessionInfo</class>
<class>org.jbpm.persistence.processinstance.ProcessInstanceInfo</class>
<class>org.drools.persistence.info.WorkItemInfo</class>
<class>org.jbpm.persistence.correlation.CorrelationKeyInfo</class>
<class>org.jbpm.persistence.correlation.CorrelationPropertyInfo</class>
<class>org.jbpm.runtime.manager.impl.jpa.ContextMappingInfo</class>
<properties>
<property name="hibernate.dialect" value="org.hibernate.dialect.H2Dialect"/>
<property name="hibernate.max_fetch_depth" value="3"/>
<property name="hibernate.hbm2ddl.auto" value="update"/>
<property name="hibernate.show_sql" value="true"/>
<property name="hibernate.connection.release_mode" value="after_transaction"/>
<property name="hibernate.transaction.jta.platform" value="org.hibernate.service.jta.platform.internal.JBossStandAloneJtaPlatform"/>
</properties>
</persistence-unit>
</persistence>The example refers to a jdbc/jbpm-ds data source. For instructions about configuring a data source, see Configuration of data sources for jBPM engine persistence.
12.5.2. Configuration of data sources for jBPM engine persistence
To configure JPA persistence in the jBPM engine, you must provide a data source, which represents a database backend.
If you run your application in an application server, such as Red Hat JBoss EAP, you can use the application server to set up data sources, for example, by adding a data source configuration file in the deploy directory. For instructions about creating data sources, see the documentaion for the application server.
If you deploy your application to Red Hat JBoss EAP, you can create a data source by creating a configuration file in the deploy directory:
<?xml version="1.0" encoding="UTF-8"?>
<datasources>
  <local-tx-datasource>
    <jndi-name>jdbc/jbpm-ds</jndi-name>
    <connection-url>jdbc:h2:tcp://localhost/~/test</connection-url>
    <driver-class>org.h2.jdbcx.JdbcDataSource</driver-class>
    <user-name>sa</user-name>
    <password></password>
  </local-tx-datasource>
</datasources>
If your application runs in a plain Java environment, you can use Narayana and Tomcat DBCP by using the DataSourceFactory class from the kie-test-util module supplied by jBPM. See the following code fragment. This example uses the H2 in-memory database in combination with Narayana and Tomcat DBCP.
Properties driverProperties = new Properties();
driverProperties.put("user", "sa");
driverProperties.put("password", "sa");
driverProperties.put("url", "jdbc:h2:mem:jbpm-db;MVCC=true");
driverProperties.put("driverClassName", "org.h2.Driver");
driverProperties.put("className", "org.h2.jdbcx.JdbcDataSource");
PoolingDataSourceWrapper pdsw = DataSourceFactory.setupPoolingDataSource("jdbc/jbpm-ds", driverProperties);
12.5.3. Dependencies for persistence
Persistence requires certain JAR artifact dependencies.
The jbpm-persistence-jpa.jar file is always required. This file contains the code for saving the runtime state whenever necessary.
Depending on the persistence solution and database you are using, you might need additional dependencies. The default configuration combination includes the following components:
-
Hibernate as the JPA persistence provider
-
H2 in-memory database
-
Narayana for JTA-based transaction management
-
Tomcat DBCP for connection pooling capabilities
This configuration requires the following additional dependencies:
-
jbpm-persistence-jpa(org.jbpm) -
drools-persistence-jpa(org.drools) -
persistence-api(javax.persistence) -
hibernate-entitymanager(org.hibernate) -
hibernate-annotations(org.hibernate) -
hibernate-commons-annotations(org.hibernate) -
hibernate-core(org.hibernate) -
commons-collections(commons-collections) -
dom4j(org.dom4j) -
jta(javax.transaction) -
narayana-jta(org.jboss.narayana.jta) -
tomcat-dbcp(org.apache.tomcat) -
jboss-transaction-api_1.2_spec(org.jboss.spec.javax.transaction) -
javassist(javassist) -
slf4j-api(org.slf4j) -
slf4j-jdk14(org.slf4j) -
simple-jndi(simple-jndi) -
h2(com.h2database) -
jbpm-test(org.jbpm) only for testing, do not include this artifact in the production application
12.5.4. Creating a KIE session with persistence
If your code creates KIE sessions directly, you can use the JPAKnowledgeService class to create your KIE session. This approach provides full access to the underlying configuration.
-
Create a KIE session using the
JPAKnowledgeServiceclass, based on a KIE base, a KIE session configuration (if necessary), and an environment. The environment must contain a reference to the Entity Manager Factory that you use for persistence.Creating a KIE session with persistence// create the entity manager factory and register it in the environment EntityManagerFactory emf = Persistence.createEntityManagerFactory( "org.jbpm.persistence.jpa" ); Environment env = KnowledgeBaseFactory.newEnvironment(); env.set( EnvironmentName.ENTITY_MANAGER_FACTORY, emf ); // create a new KIE session that uses JPA to store the runtime state StatefulKnowledgeSession ksession = JPAKnowledgeService.newStatefulKnowledgeSession( kbase, null, env ); int sessionId = ksession.getId(); // invoke methods on your method here ksession.startProcess( "MyProcess" ); ksession.dispose(); -
To re-create a session from the database based on a specific session ID, use the
JPAKnowledgeService.loadStatefulKnowledgeSession()method:Re-creating a KIE session from the persistence database// re-create the session from database using the sessionId ksession = JPAKnowledgeService.loadStatefulKnowledgeSession(sessionId, kbase, null, env );
12.5.5. Persistence in the runtime manager
If your code uses the RuntimeManager class, use the RuntimeEnvironmentBuilder class to configure the environment for persistence. By default, the runtime manager searches for the org.jbpm.persistence.jpa persistence unit.
The following example creates a KieSession with an empty context.
RuntimeEnvironmentBuilder builder = RuntimeEnvironmentBuilder.Factory.get()
        .newDefaultBuilder()
        .knowledgeBase(kbase);
RuntimeManager manager = RuntimeManagerFactory.Factory.get()
        .newSingletonRuntimeManager(builder.get(), "com.sample:example:1.0");
RuntimeEngine engine = manager.getRuntimeEngine(EmptyContext.get());
KieSession ksession = engine.getKieSession();
The prevous example requires a KIE base as the kbase parameter. You can use a kmodule.xml KJAR descriptor on the class path to buld the KIE base.
kmodule.xml KJAR descriptorKieServices ks = KieServices.Factory.get();
KieContainer kContainer = ks.getKieClasspathContainer();
KieBase kbase = kContainer.getKieBase("kbase");A kmodule.xml descriptor file can include an attribute for resource packages to scan to find and deploy jBPM engine workflows.
kmodule.xml descriptor file<kmodule xmlns="http://jboss.org/kie/6.0.0/kmodule">
<kbase name="kbase" packages="com.sample"/>
</kmodule>To control the persistence, you can use the RuntimeEnvironmentBuilder::entityManagerFactory methods.
EntityManagerFactory emf = Persistence.createEntityManagerFactory("org.jbpm.persistence.jpa");

RuntimeEnvironment runtimeEnv = RuntimeEnvironmentBuilder.Factory
        .get()
        .newDefaultBuilder()
        .entityManagerFactory(emf)
        .knowledgeBase(kbase)
        .get();

StatefulKnowledgeSession ksession = (StatefulKnowledgeSession) RuntimeManagerFactory.Factory.get()
        .newSingletonRuntimeManager(runtimeEnv)
        .getRuntimeEngine(EmptyContext.get())
        .getKieSession();
After creating the ksession KIE session in this example, you can call methods in ksession, for example, StartProcess(). The jBPM engine persists the runtime state in the configured data source.
You can restore a process instance from persistent storage by using the process instance ID. The runtime manager automatically re-creates the required session.
RuntimeEngine runtime = manager.getRuntimeEngine(ProcessInstanceIdContext.get(processInstanceId));

KieSession session = runtime.getKieSession();
12.6. Persisting process variables in a separate database schema in jBPM
When you create process variables to use within the processes that you define, jBPM stores those process variables as binary data in a default database schema. You can persist process variables in a separate database schema for greater flexibility in maintaining and implementing your process data.
For example, persisting your process variables in a separate database schema can help you perform the following tasks:
-
Maintain process variables in human-readable format
-
Make the variables available to services outside of jBPM
-
Clear the log of the default database tables in jBPM without losing process variable data
| This procedure applies to process variables only. This procedure does not apply to case variables. |
-
You have defined processes in jBPM for which you want to implement variables.
-
If you want to persist variables in a database schema outside of jBPM, you have created a data source and the separate database schema that you want to use. For information about creating data sources, see [_wb.datasources].
-
In the data object file that you use as a process variable, add the following elements to configure variable persistence:
Example Person.java object configured for variable persistence@javax.persistence.Entity (1) @javax.persistence.Table(name = "Person") (2) public class Person extends org.drools.persistence.jpa.marshaller.VariableEntity (3) implements java.io.Serializable { (4) static final long serialVersionUID = 1L; @javax.persistence.GeneratedValue(strategy = javax.persistence.GenerationType.AUTO, generator = "PERSON_ID_GENERATOR") @javax.persistence.Id (5) @javax.persistence.SequenceGenerator(name = "PERSON_ID_GENERATOR", sequenceName = "PERSON_ID_SEQ") private java.lang.Long id; private java.lang.String name; private java.lang.Integer age; public Person() { } public java.lang.Long getId() { return this.id; } public void setId(java.lang.Long id) { this.id = id; } public java.lang.String getName() { return this.name; } public void setName(java.lang.String name) { this.name = name; } public java.lang.Integer getAge() { return this.age; } public void setAge(java.lang.Integer age) { this.age = age; } public Person(java.lang.Long id, java.lang.String name, java.lang.Integer age) { this.id = id; this.name = name; this.age = age; } }1 Configures the data object as a persistence entity. 2 Defines the database table name used for the data object. 3 Creates a separate MappedVariablemapping table that maintains the relationship between this data object and the associated process instance. If you do not need this relationship maintained, you do not need to extend theVariableEntityclass. Without this extension, the data object is still persisted, but contains no additional data.4 Configures the data object as a serializable object. 5 Sets a persistence ID for the object. To make the data object persistable using Business Central, navigate to the data object file in your project, click the Persistence icon in the upper-right corner of the window, and configure the persistence behavior:
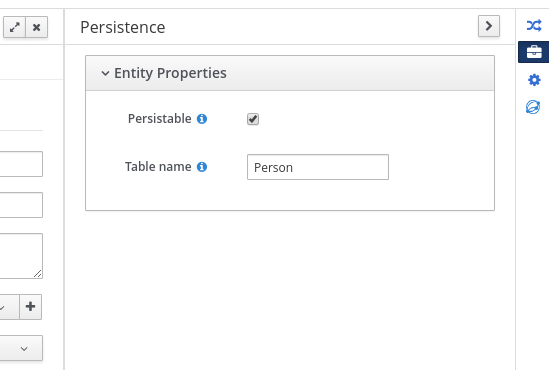 Figure 56. Persistence configuration in Business Central
 -
In the
pom.xmlfile of your project, add the following dependency for persistence support. This dependency contains theVariableEntityclass that you configured in your data object.Project dependency for persistence<dependency> <groupId>org.drools</groupId> <artifactId>drools-persistence-jpa</artifactId> <version>${jbpm.version}</version> <scope>provided</scope> </dependency> -
In the
~/META-INF/kie-deployment-descriptor.xmlfile of your project, configure the JPA marshalling strategy and a persistence unit to be used with the marshaller. The JPA marshalling strategy and persistence unit are required for objects defined as entities.JPA marshaller and persistence unit configured in the kie-deployment-descriptor.xml file<marshalling-strategy> <resolver>mvel</resolver> <identifier>new org.drools.persistence.jpa.marshaller.JPAPlaceholderResolverStrategy("myPersistenceUnit", classLoader)</identifier> <parameters/> </marshalling-strategy> -
In the
~/META-INFdirectory of your project, create apersistence.xmlfile that specifies in which data source you want to persist the process variable:Example persistence.xml file with data source configuration<persistence xmlns="http://java.sun.com/xml/ns/persistence" xmlns:orm="http://java.sun.com/xml/ns/persistence/orm" xmlns:xsi="http://www.w3.org/2001/XMLSchema-instance" version="2.0" xsi:schemaLocation="http://java.sun.com/xml/ns/persistence http://java.sun.com/xml/ns/persistence/persistence_2_0.xsd http://java.sun.com/xml/ns/persistence/orm http://java.sun.com/xml/ns/persistence/orm_2_0.xsd"> <persistence-unit name="myPersistenceUnit" transaction-type="JTA"> <provider>org.hibernate.jpa.HibernatePersistenceProvider</provider> <jta-data-source>java:jboss/datasources/ExampleDS</jta-data-source> (1) <class>org.space.example.Person</class> <exclude-unlisted-classes>true</exclude-unlisted-classes> <properties> <property name="hibernate.dialect" value="org.hibernate.dialect.PostgreSQLDialect"/> <property name="hibernate.max_fetch_depth" value="3"/> <property name="hibernate.hbm2ddl.auto" value="update"/> <property name="hibernate.show_sql" value="true"/> <property name="hibernate.id.new_generator_mappings" value="false"/> <property name="hibernate.transaction.jta.platform" value="org.hibernate.service.jta.platform.internal.JBossAppServerJtaPlatform"/> </properties> </persistence-unit> </persistence>1 Sets the data source in which the process variable is persisted To configure the marshalling strategy, persistence unit, and data source using Business Central, navigate to project Settings → Deployments → Marshalling Strategies and to project Settings → Persistence:
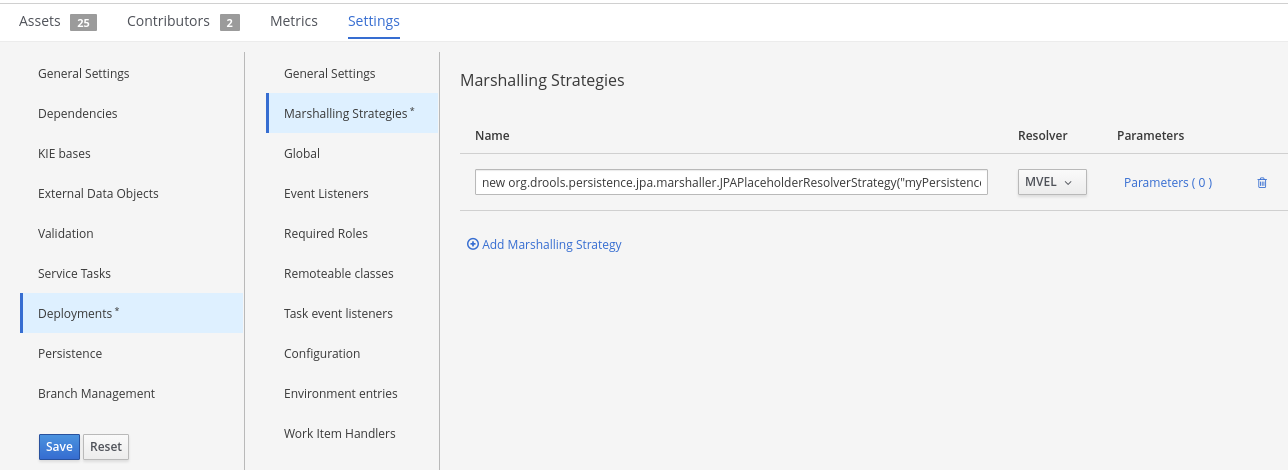 Figure 57. JPA marshaller configuration in Business Central
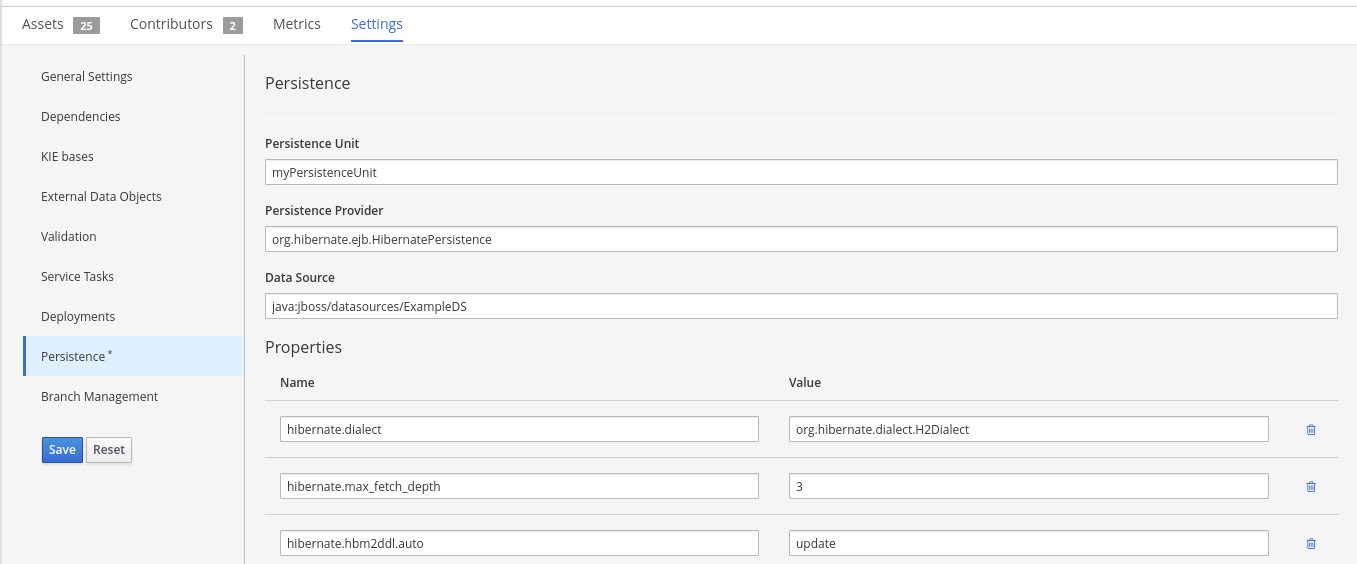 Figure 58. Persistence unit and data source configuration in Business Central
Business Central
How to use the web-based Business Central application
13. Business Central (General)
13.1. Installation
13.1.1. War installation
Use the war from the Business Central distribution zip that corresponds to your application server.
The differences between these war files are mainly superficial.
For example, some JARs might be excluded if the application server already supplies them.
-
eap7: tailored for Red Hat JBoss Enterprise Application Platform 7 -
wildfly14: tailored for Wildfly 14
13.1.2. Business Central data
Business Central stores its data, by default in the directory $WORKING_DIRECTORY/.niogit, for example wildfly-14.0.1.Final/bin/.niogit, but it can be overridden with the system property-Dorg.uberfire.nio.git.dir.
|
In production, make sure to back up the Business Central data directory. |
13.1.3. Troubleshooting
13.1.3.1. Loading.. does not disappear and Business Central fails to show
There have been reports that Firewalls in between the server and the browser can interfere with Server Sent Events (SSE) used by Business Central.
The issue results in the "Loading…" spinner remaining visible and Business Central failing to materialize.
The workaround is to disable the Business Central’s use of Server Sent Events by adding file /WEB-INF/classes/ErraiService.properties to the exploded WAR containing the value errai.bus.enable_sse_support=false.
Re-package the WAR and re-deploy.
Some Users have also reported disabling Server Sent Events does not resolve the issue. The solution found to work is to configure the JVM to use a different Entropy Gathering Device on Linux for SecureRandom. This can be configured by setting System Property java.security.egd to file:/dev/./urandom. See this Stack Overflow post for details.
Please note however this affects the JVM’s random number generation and may present other challenges where strong cryptography is required. Configure with caution.
13.1.3.2. Not able to clone Business Central Git repository using ssh protocol.
Git clients using ssh to interact with the Git server that is bundled with Business Central are authenticated and authorized to perform git commands by the security API that is part of the Uberfire backend server. When using an LDAP security realm, some git clients were not being authorized as expected. This was due to the fact that for non-web clients such as Git via ssh, the principal (i.e., user or group) name assigned to a user by the application server’s user registry is the more complex DN associated to that principal by LDAP. The logic of the Uberfire backend server looked for on exact match of roles allowed with the principal name returned and therefore failed.
It is now possible to control the role-principal matching via the system property
org.uberfire.ldap.regex.role_mapperwhich takes as its value a Regex pattern to be applied when matching LDAP principal to role names. The pattern must contain the literal word variable 'role'. During authorization the variable is replaced by each of the allow application roles. If the pattern is matched the role is added to the user.
For instance, if the DN for the admin group in LDAP is
DN: cn=admin,ou=groups,dc=example,dc=comand its intended role is admin, then setting org.uberfire.ldap.regex.role_mapper with value
cn[\\ ]*=[\\ ]*rolewill find a match on role 'admin'.
13.2. Business Central system properties
The Business Central system properties listed in this section are passed to standalone*.xml files.
- Git directory
-
Use the following properties to set the location and name for the Business Central Git directory:
-
org.uberfire.nio.git.dir: Location of the Business Central Git directory. -
org.uberfire.nio.git.dirname: Name of the Business Central Git directory. Default value:.niogit. -
org.uberfire.nio.git.ketch: Enables or disables Git ketch. -
org.uberfire.nio.git.hooks: Location of the Git hooks directory.
-
- Git over HTTP
-
Use the following properties to configure access to the Git repository over HTTP:
-
org.uberfire.nio.git.proxy.ssh.over.http: Specifies whether SSH should use an HTTP proxy. Default value:false. -
http.proxyHost: Defines the host name of the HTTP proxy. Default value:null. -
http.proxyPort: Defines the host port (integer value) of the HTTP proxy. Default value:null. -
http.proxyUser: Defines the user name of the HTTP proxy. -
http.proxyPassword: Defines the user password of the HTTP proxy. -
org.uberfire.nio.git.http.enabled: Enables or disables the HTTP daemon. Default value:true. -
org.uberfire.nio.git.http.host: If the HTTP daemon is enabled, it uses this property as the host identifier. This is an informative property that is used to display how to access the Git repository over HTTP. The HTTP still relies on the servlet container. Default value:localhost. -
org.uberfire.nio.git.http.hostname: If the HTTP daemon is enabled, it uses this property as the host name identifier. This is an informative property that is used to display how to access the Git repository over HTTP. The HTTP still relies on the servlet container. Default value:localhost. -
org.uberfire.nio.git.http.port: If the HTTP daemon is enabled, it uses this property as the port number. This is an informative property that is used to display how to access the Git repository over HTTP. The HTTP still relies on the servlet container. Default value:8080.
-
- Git over HTTPS
-
Use the following properties to configure access to the Git repository over HTTPS:
-
org.uberfire.nio.git.proxy.ssh.over.https: Specifies whether SSH uses an HTTPS proxy. Default value:false. -
https.proxyHost: Defines the host name of the HTTPS proxy. Default value:null. -
https.proxyPort: Defines the host port (integer value) of the HTTPS proxy. Default value:null. -
https.proxyUser: Defines the user name of the HTTPS proxy. -
https.proxyPassword: Defines the user password of the HTTPS proxy. -
user.dir: Location of the user directory. -
org.uberfire.nio.git.https.enabled: Enables or disables the HTTPS daemon. Default value:false -
org.uberfire.nio.git.https.host: If the HTTPS daemon is enabled, it uses this property as the host identifier. This is an informative property that is used to display how to access the Git repository over HTTPS. The HTTPS still relies on the servlet container. Default value:localhost. -
org.uberfire.nio.git.https.hostname: If the HTTPS daemon is enabled, it uses this property as the host name identifier. This is an informative property that is used to display how to access the Git repository over HTTPS. The HTTPS still relies on the servlet container. Default value:localhost. -
org.uberfire.nio.git.https.port: If the HTTPS daemon is enabled, it uses this property as the port number. This is an informative property that is used to display how to access the Git repository over HTTPS. The HTTPS still relies on the servlet container. Default value:8080.
-
- JGit
-
-
org.uberfire.nio.jgit.cache.instances: Defines the JGit cache size. -
org.uberfire.nio.jgit.cache.overflow.cleanup.size: Defines the JGit cache overflow cleanup size. -
org.uberfire.nio.jgit.remove.eldest.iterations: Enables or disables whether to remove eldest JGit iterations. -
org.uberfire.nio.jgit.cache.evict.threshold.duration: Defines the JGit evict threshold duration. -
org.uberfire.nio.jgit.cache.evict.threshold.time.unit: Defines the JGit evict threshold time unit.
-
- Git daemon
-
Use the following properties to enable and configure the Git daemon:
-
org.uberfire.nio.git.daemon.enabled: Enables or disables the Git daemon. Default value:true. -
org.uberfire.nio.git.daemon.host: If the Git daemon is enabled, it uses this property as the local host identifier. Default value:localhost. -
org.uberfire.nio.git.daemon.hostname: If the Git daemon is enabled, it uses this property as the local host name identifier. Default value:localhost -
org.uberfire.nio.git.daemon.port: If the Git daemon is enabled, it uses this property as the port number. Default value:9418. -
org.uberfire.nio.git.http.sslVerify: Enables or disables SSL certificate checking for Git repositories. Default value:true.If the default or assigned port is already in use, a new port is automatically selected. Ensure that the ports are available and check the log for more information.
-
- Git SSH
-
Use the following properties to enable and configure the Git SSH daemon:
-
org.uberfire.nio.git.ssh.enabled: Enables or disables the SSH daemon. Default value:true. -
org.uberfire.nio.git.ssh.host: If the SSH daemon enabled, it uses this property as the local host identifier. Default value:localhost. -
org.uberfire.nio.git.ssh.hostname: If the SSH daemon is enabled, it uses this property as local host name identifier. Default value:localhost. -
org.uberfire.nio.git.ssh.port: If the SSH daemon is enabled, it uses this property as the port number. Default value:8001.If the default or assigned port is already in use, a new port is automatically selected. Ensure that the ports are available and check the log for more information. -
org.uberfire.nio.git.ssh.cert.dir: Location of the.securitydirectory where local certificates are stored. Default value: Working directory. -
org.uberfire.nio.git.ssh.idle.timeout: Sets the SSH idle timeout. -
org.uberfire.nio.git.ssh.passphrase: Pass phrase used to access the public key store of your operating system when cloning git repositories with SCP style URLs. Example:git@github.com:user/repository.git. -
org.uberfire.nio.git.ssh.algorithm: Algorithm used by SSH. Default value:RSA. -
org.uberfire.nio.git.gc.limit: Sets the GC limit. -
org.uberfire.nio.git.ssh.ciphers: A comma-separated string of ciphers. The available ciphers areaes128-ctr,aes192-ctr,aes256-ctr,arcfour128,arcfour256,aes192-cbc,aes256-cbc. If the property is not used, all available ciphers are loaded. -
org.uberfire.nio.git.ssh.macs: A comma-separated string of message authentication codes (MACs). The available MACs arehmac-md5,hmac-md5-96,hmac-sha1,hmac-sha1-96,hmac-sha2-256,hmac-sha2-512. If the property is not used, all available MACs are loaded.If you plan to use RSA or any algorithm other than DSA, make sure you set up your application server to use the Bouncy Castle JCE library.
-
- KIE Server nodes and jBPM controller
-
Use the following properties to configure the connections with the KIE Server nodes from the jBPM controller:
-
org.kie.server.controller: The URL is used to connect to the jBPM controller. For example,ws://localhost:8080/business-central/websocket/controller. -
org.kie.server.user: User name used to connect to the KIE Server nodes from the jBPM controller. This property is only required when using this Business Central installation as a jBPM controller. -
org.kie.server.pwd: Password used to connect to the KIE Server nodes from the jBPM controller. This property is only required when using this Business Central installation as a jBPM controller.
-
- Maven and miscellaneous
-
Use the following properties to configure Maven and other miscellaneous functions:
-
kie.maven.offline.force: Forces Maven to behave as if offline. If true, disables online dependency resolution. Default value:false.Use this property for Business Central only. If you share a runtime environment with any other component, isolate the configuration and apply it only to Business Central. -
org.uberfire.gzip.enable: Enables or disables Gzip compression on theGzipFiltercompression filter. Default value:true. -
org.kie.workbench.profile: Selects the Business Central profile. Possible values areFULLorPLANNER_AND_RULES. A prefixFULL_sets the profile and hides the profile preferences from the administrator preferences. Default value:FULL -
org.appformer.m2repo.url: Business Central uses the default location of the Maven repository when looking for dependencies. It directs to the Maven repository inside Business Central, for example,http://localhost:8080/business-central/maven2. Set this property before starting Business Central. Default value: File path to the innerm2repository. -
appformer.ssh.keystore: Defines the custom SSH keystore to be used with Business Central by specifying a class name. If the property is not available, the default SSH keystore is used. -
appformer.ssh.keys.storage.folder: When using the default SSH keystore, this property defines the storage folder for the user’s SSH public keys. If the property is not available, the keys are stored in the Business Central.securityfolder. -
appformer.experimental.features: Enables the experimental features framework. Default value:false. -
org.kie.demo: Enables an external clone of a demo application from GitHub. -
org.uberfire.metadata.index.dir: Place where the Lucene.indexdirectory is stored. Default value: Working directory. -
org.uberfire.ldap.regex.role_mapper: Regex pattern used to map LDAP principal names to the application role name. Note that the variable role must be a part of the pattern as the application role name substitutes the variable role when matching a principle value and role name. -
org.uberfire.sys.repo.monitor.disabled: Disables the configuration monitor. Do not disable unless you are sure. Default value:false. -
org.uberfire.secure.key: Password used by password encryption. Default value:org.uberfire.admin. -
org.uberfire.secure.alg: Crypto algorithm used by password encryption. Default value:PBEWithMD5AndDES. -
org.uberfire.domain: Security-domain name used by uberfire. Default value:ApplicationRealm. -
org.guvnor.m2repo.dir: Place where the Maven repository folder is stored. Default value:<working-directory>/repositories/kie. -
org.guvnor.project.gav.check.disabled: Disables group ID, artifact ID, and version (GAV) checks. Default value:false. -
org.kie.build.disable-project-explorer: Disables automatic build of a selected project in Project Explorer. Default value:false. -
org.kie.builder.cache.size: Defines the cache size of the project builder. Default value:20. -
org.kie.library.assets_per_page: You can customize the number of assets per page in the project screen. Default value:15. -
org.kie.verification.disable-dtable-realtime-verification: Disables the real-time validation and verification of decision tables. Default value:false.
-
- jBPM controller
-
Use the following properties to configure how to connect to the jBPM controller:
-
org.kie.workbench.controller: The URL used to connect to the jBPM controller, for example,ws://localhost:8080/kie-server-controller/websocket/controller. -
org.kie.workbench.controller.user: The jBPM controller user. Default value:kieserver. -
org.kie.workbench.controller.pwd: The jBPM controller password. Default value:kieserver1!. -
org.kie.workbench.controller.token: The token string used to connect to the jBPM controller.For more information about how to use token-based authentication, see Using token-based authentication.
-
- Java Cryptography Extension KeyStore (JCEKS)
-
Use the following properties to configure JCEKS:
-
kie.keystore.keyStoreURL: The URL used to load a Java Cryptography Extension KeyStore (JCEKS). For example,file:///home/kie/keystores/keystore.jceks. -
kie.keystore.keyStorePwd: The password used for the JCEKS. -
kie.keystore.key.ctrl.alias: The alias of the key for the default REST jBPM controller. -
kie.keystore.key.ctrl.pwd: The password of the alias for the default REST jBPM controller.
-
- Rendering
-
Use the following properties to switch between Business Central and KIE Server rendered forms:
-
org.jbpm.wb.forms.renderer.ext: Switches the form rendering between Business Central and KIE Server. By default, the form rendering is performed by Business Central. Default value:false. -
org.jbpm.wb.forms.renderer.name: Enables you to switch between Business Central and KIE Server rendered forms. Default value:workbench.
-
13.3. Quick Start
These steps help you get started with minimum of effort.
They should not be a substitute for reading the documentation in full.
13.3.1. Importing examples
If Business Central is empty you are shown an empty Space page. Clicking "Try Samples" button below will show the examples that are available.
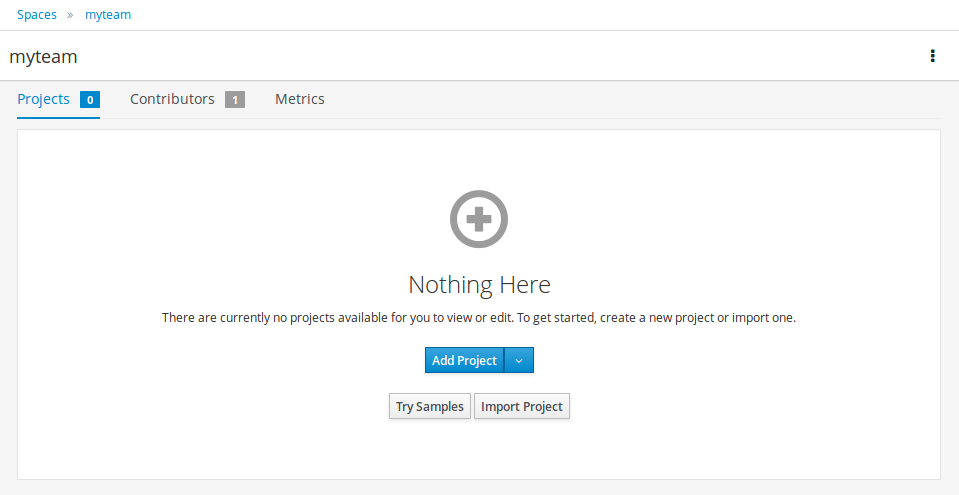
Once "Try Samples" page opens, you can select one or more examples and click "Ok".
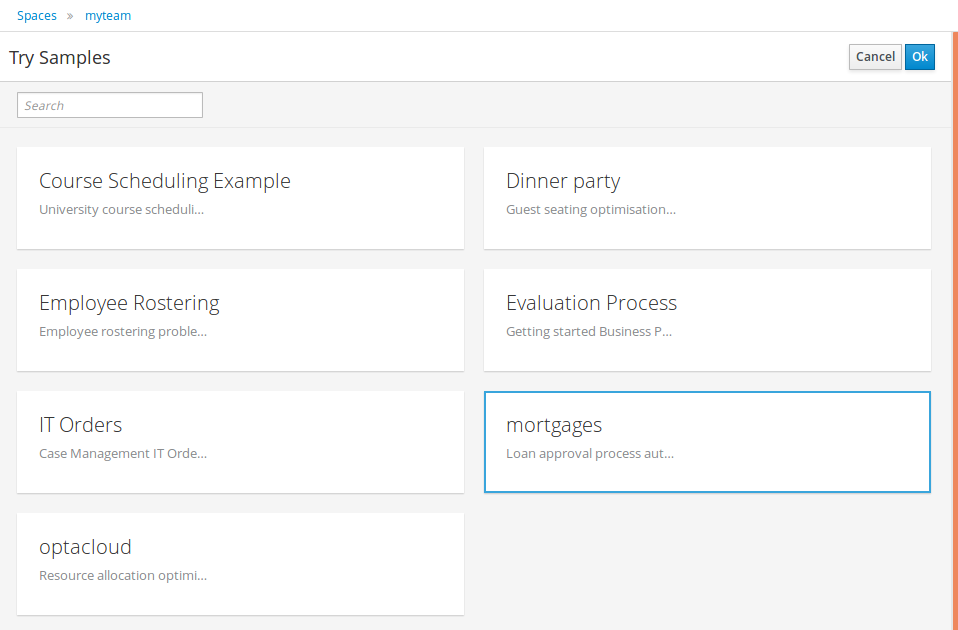
If Business Central already contains Projects the examples can be imported with the "Try Samples" button found from the menu.
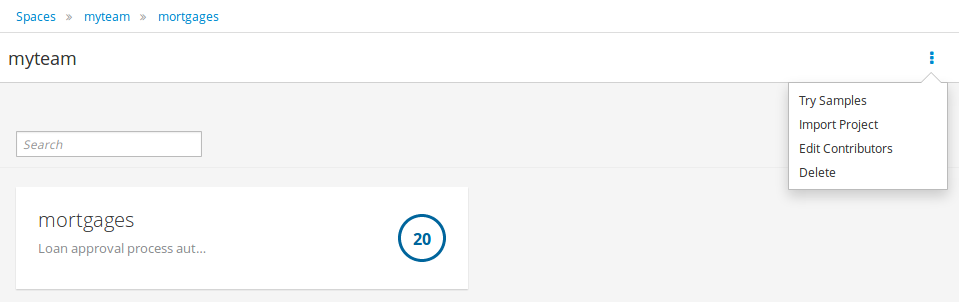
13.3.2. Add Project
Alternatively, to importing an example, a new empty project can be created from the Space page with "Add Project".
Give the Project a name and optional description.
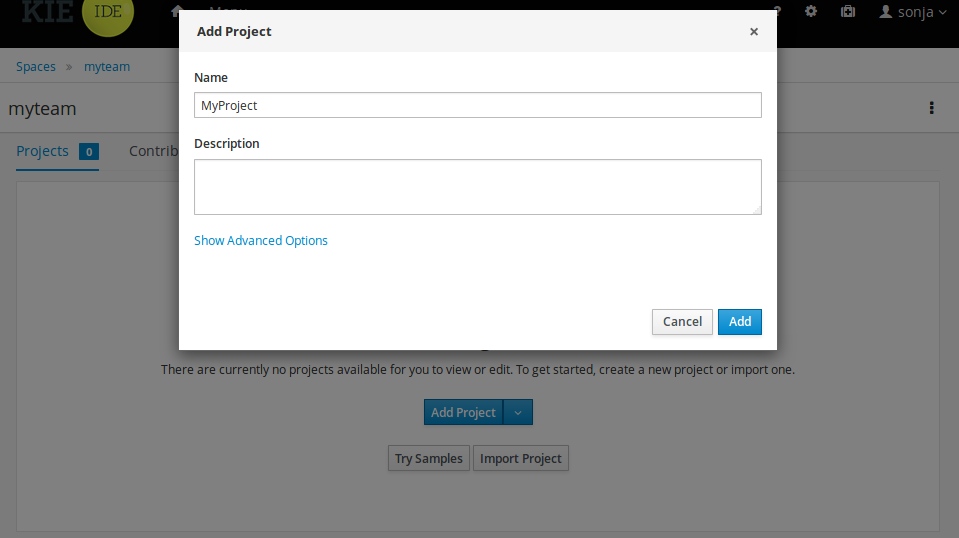
13.3.3. Define Data Model
After a Project has been created you need to define Types to be used by your rules.
Select "Data Object" from the "Add Asset" menu.
|
You can also use types contained in existing JARs. Please consult the full documentation for details. |
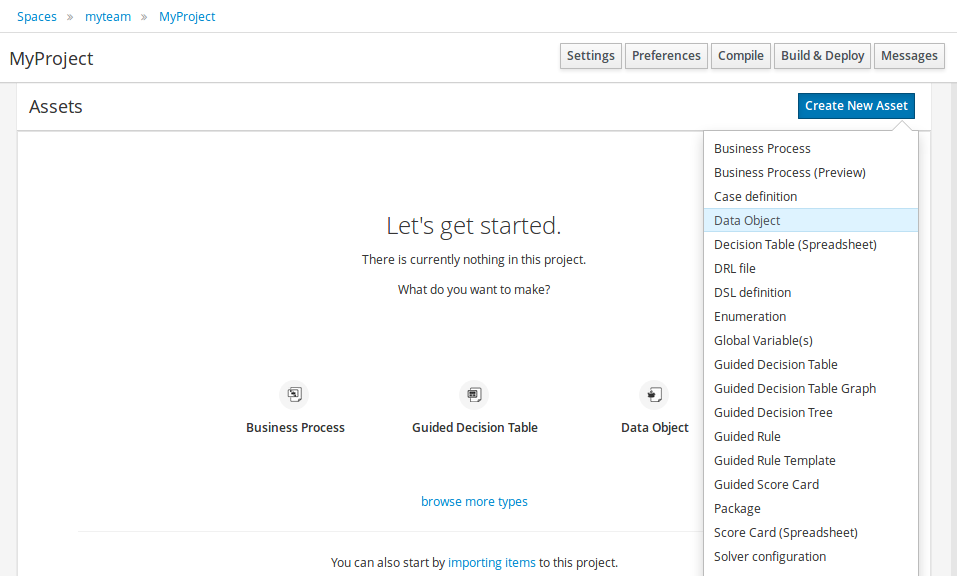
Set the name and select a package for the new type.
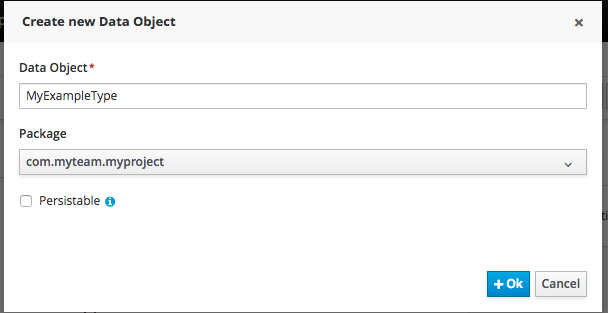
Click "+ add field" button and set a field name and type and click "Create" to create a field for the type.
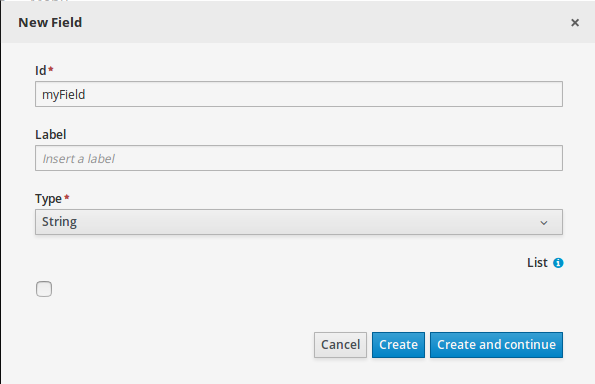
Click "Save" to update the model.
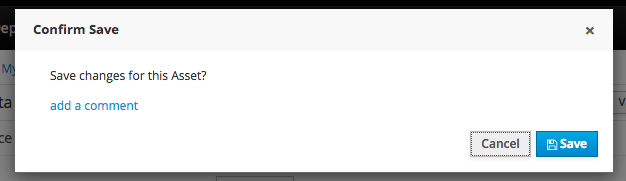
13.3.4. Define Rule
Select "DRL file" (for example) from the "Add Asset" menu.
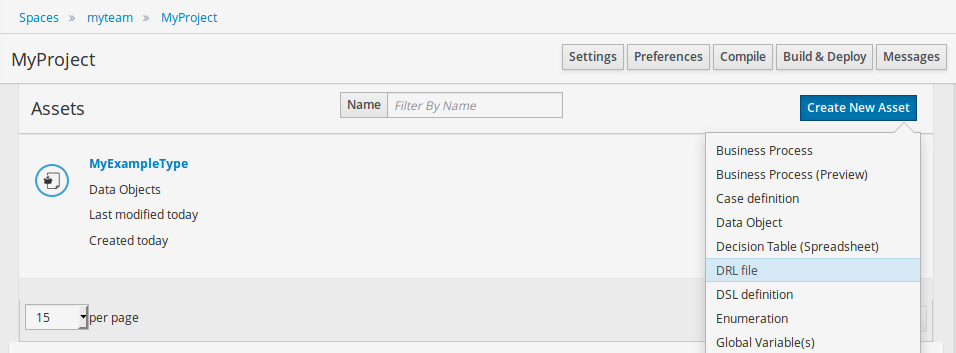
Enter a file name for the new rule.
|
Make sure you select the same package as the rule had. It is possible to have rules and data models in different packages, but let’s keep things simple for demo purposes. |
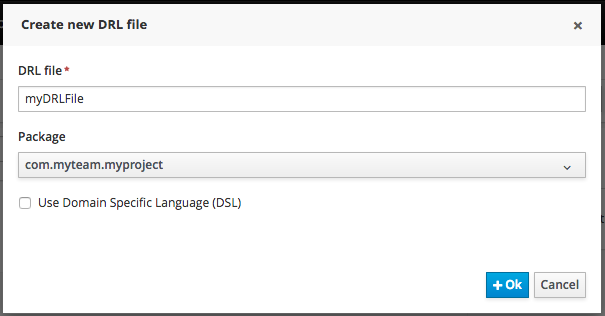
Enter a definition for the rule.
The definition process differs from asset type to asset type.
The full documentation has details about the different editors.
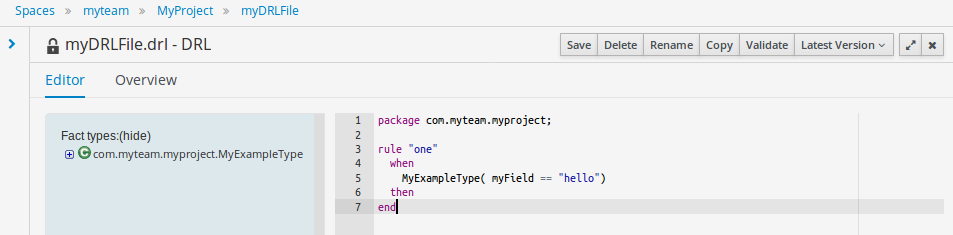
Once the rule has been defined it will need to be saved in the same way we saved the model.
13.3.5. Build and Deploy
Once rules have been defined within a project; the project can be built and deployed to the Business Central’s Maven Artifact Repository.
To build a project select the "Build & Deploy" from the Project Authoring.
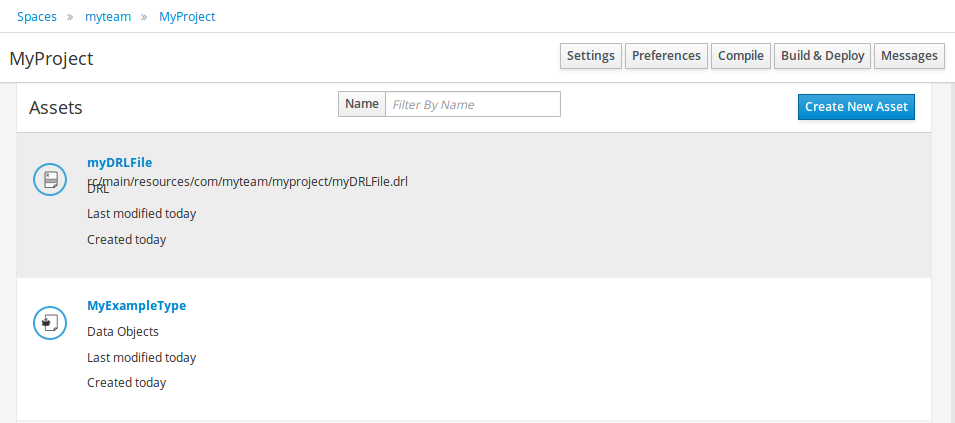
Click "Build & Deploy" to build the project and deploy it to the Business Central’s Maven Artifact Repository.
When you select Build & Deploy Business Central will deploy to any repositories defined in the Dependency Management section of the pom in your Business Central project. You can edit the pom.xml file associated with your Business Central project under the Repository View of the project explorer. Details on dependency management in maven can be found here : http://maven.apache.org/guides/introduction/introduction-to-dependency-mechanism.html
If there are errors during the build process they will be reported in the "Messages" panel.
Now the project has been built and deployed; it can be referenced from your own projects as any other Maven Artifact.
The full documentation contains details about integrating projects with your own applications.
13.4. Configuration
13.4.1. Basic user management
Business Central authenticates its users against the application server’s authentication and authorization (JAAS).
On JBoss EAP and WildFly, add a user with the script $JBOSS_HOME/bin/add-user.sh (or .bat):
$ ./add-user.sh
// Type: Application User
// Realm: empty (defaults to ApplicationRealm)
// Role: admin
There is no need to restart the application server.
13.4.2. Roles
Business Central uses the following roles:
-
admin
-
analyst
-
developer
-
manager
-
user
13.4.2.1. Admin
Administrates the BPMS system.
-
Manages users
-
Manages VFS Repositories
-
Has full access to make any necessary changes
13.4.2.2. Developer
Developer can do almost everything admin can do, except clone repositories.
-
Manages rules, models, process flows, forms and dashboards
-
Manages the asset repository
-
Can create, build and deploy projects
-
Can use the JBDS connection to view processes
13.4.2.3. Analyst
Analyst is a weaker version of developer and does not have access to the asset repository or the ability to deploy projects.
13.4.2.4. Business user
Daily user of the system to take actions on business tasks that are required for the processes to continue forward. Works primarily with the task lists.
-
Does process management
-
Handles tasks and dashboards
13.4.2.5. Manager/Viewer-only User
Viewer of the system that is interested in statistics around the business processes and their performance, business indicators, and other reporting of the system and people who interact with the system.
-
Only has access to dashboards
13.5. Introduction
13.5.1. Log in and log out
Create a user with the role admin and log in with those credentials.
After successfully logging in, the account user name is displayed at the top right. Click it to review the roles of the current account.
13.5.2. Home screen
After logging in, the home screen shows. The actual content of the home screen depends on the Business Central variant (Drools, jBPM, …).
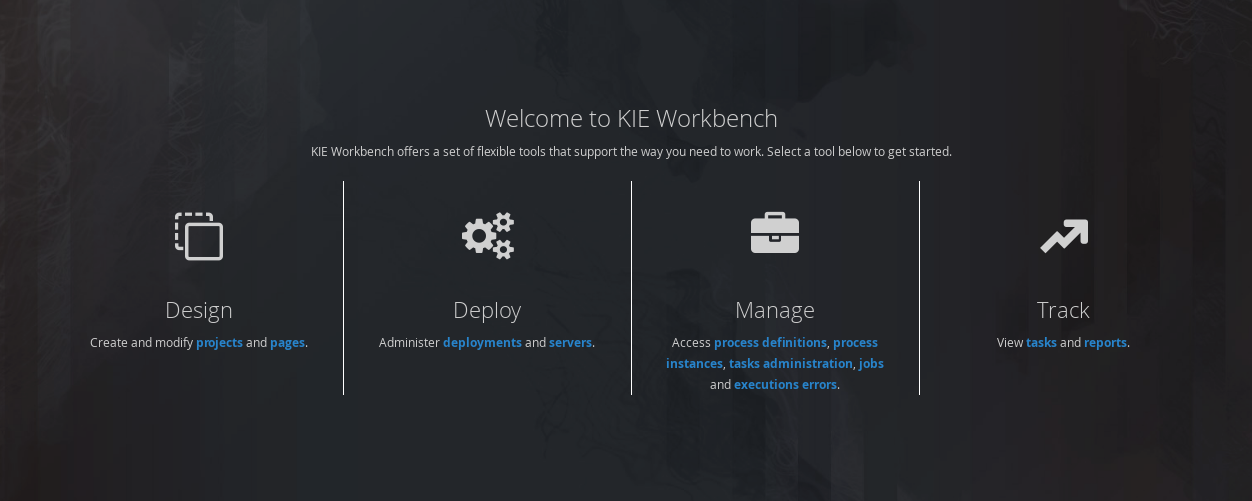
13.5.3. Business Central overview
Business Central is structured with Spaces and Projects:
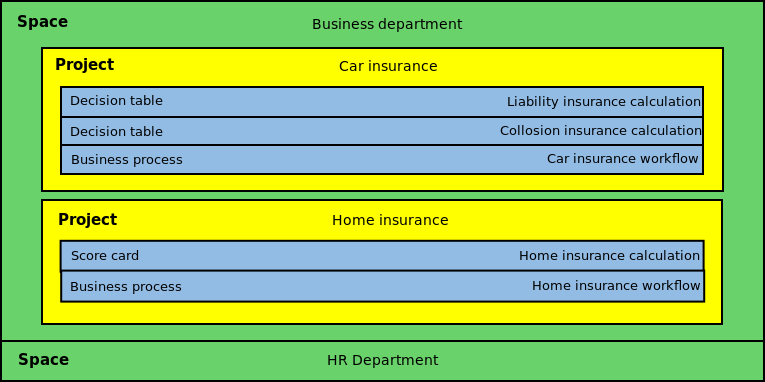
13.5.3.1. Space
Spaces are useful to model departments and divisions.
A Space can hold multiple Projects.
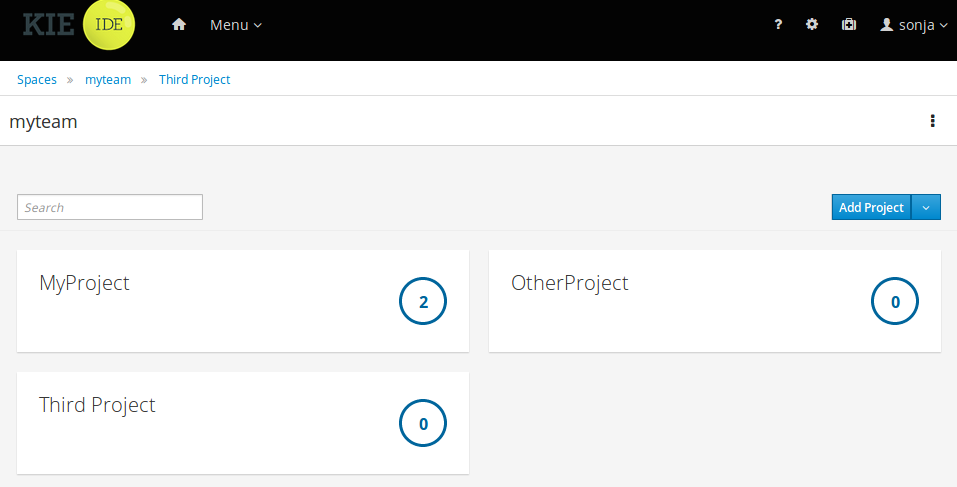
13.5.3.2. Project
Projects are the place where assets are stored and each project belongs to a single Space.
Projects are in fact a Virtual File System based storage, that by default uses GIT as backend. Such setup allows Business Central to work with multiple backends and, at the same time, take full advantage of backend specifics features like in GIT case versioning, branching and even external access.
A new Project can be created from scratch or cloned from an existing repository.
One of the biggest advantages of using GIT as backend is the ability to clone a repository from external and use your preferred tools to edit and build your assets.
|
Never clone your repositories directly from .niogit directory. |
13.5.4. Business Central user interface concepts
Business Central consists of different logical entities:
-
Part
A Part is a screen or editor with which the user can interact to perform operations.
Example Parts are "Project Explorer", "Project Editor", "Guided Rule Editor" etc.
-
Page
A perspective is a logical grouping of related Panels and Parts. A perspective is usually named as page, since it is a term far more familiar to end users whereas a perspective is more developer oriented. Notice however, Business Central supports both developer created pages and those created by end users from the page builder (aka Content Management) tooling but, generally speaking, page is used to refer to both of them.
The user can switch between pages by clicking on one of the top-level menu items; such as "Home", "Authoring", "Deploy" etc.
13.6. Customizing project preferences
In Business Central, a project is a part of your space and stores the related assets. You can add multiple projects in a space.
For example, an organization includes various departments, such as HR, Payroll, Engineering, and R&D. You can map each department to a space in Business Central, along with adding respective projects.
You can customize the project settings in Business Central. Also, you can create a new project or clone projects from an existing Git repository.
-
In Business Central, select the Admin icon in the upper-right corner and select Projects.
-
In the Project Preferences panel, select the preference you want to modify. The project preferences include:
-
Project Importing: This preference consists of the following property:
-
Select the Allow multiple projects to be imported on cluster to import multiple projects on a cluster.
-
-
File exporting: This preference consists of the following properties:
Table 1. File exporting properties Field Description PDF orientation
Determines whether the PDF orientation is portrait or landscape.
PDF units
Determines whether the PDF unit is PT, MM, CN, or IN.
PDF page format
Determines whether the PDF page format is A[0-10], B[0-10], or C[0-10].
-
Spaces: This preference consists of the following properties:
Table 2. Spaces properties Field Description Name
The default name of the space that is created automatically if none exists.
Owner
The default owner of the space that is created automatically if none exists.
Group ID
The default group ID of the space that is created automatically if none exists.
Alias (in singular)
Determines the customized alias (singular) of the space.
Alias (in plural)
Determines the customized alias (plural) of the space.
-
Default values: This preference consists of the following properties:
Table 3. Default values properties Field Description Version
The default version number of a project when creating projects.
Description
The default description of a project when creating projects.
Branch
The default branch to be used when using a Git repository.
Assets Per Page
Used to customize the number of assets per page in the project. The default value is
15. -
Advanced GAV preferences: This preference consists of the following properties:
Table 4. Advanced GAV preference properties Field Description Disable GAV conflict check?
Determines whether to enable or disable the GAV conflict check. Disabling this checkbox enables the projects to contain the same GAV (group ID, artifact, and version).
Allow child GAV edition?
Determines whether to allow child or subprojects to contain GAV edition.
Duplicate GAV detection is disabled for projects in the development mode. To enable duplicate GAV detection for a project in Business Central, go to project Settings → General Settings → Version and toggle the Development Mode option to OFF (if applicable).
-
-
Click Save.
13.7. Changing the layout
13.7.1. Resizing
Move the mouse pointer over the panel splitter (a grey horizontal or vertical line in between panels).
The cursor will by changing indicate it is positioned correctly over the splitter. Press and hold the left mouse button and drag the splitter to the required position; then release the left mouse button.
13.8. Authoring (General)
13.8.1. Artifact Repository
Projects often need external artifacts in their classpath in order to build, for example a domain model JARs. The artifact repository holds those artifacts.
The Artifact Repository is a full blown Maven repository. It follows the semantics of a Maven remote repository: all snapshots are timestamped. But it is often stored on the local hard drive.
By default the artifact repository is stored under $WORKING_DIRECTORY/repositories/kie, but it can be overridden with the system property-Dorg.guvnor.m2repo.dir.
There is only 1 Maven repository per installation.
The Artifact Repository screen shows a list of the artifacts in the Maven repository:
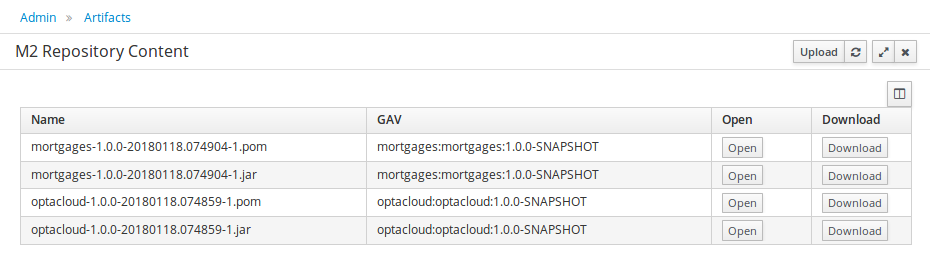
To add a new artifact to that Maven repository, either:
-
Use the upload button and select a JAR. If the JAR contains a POM file under
META-INF/maven(which every JAR build by Maven has), no further information is needed. Otherwise, a groupId, artifactId and version need to be given too.
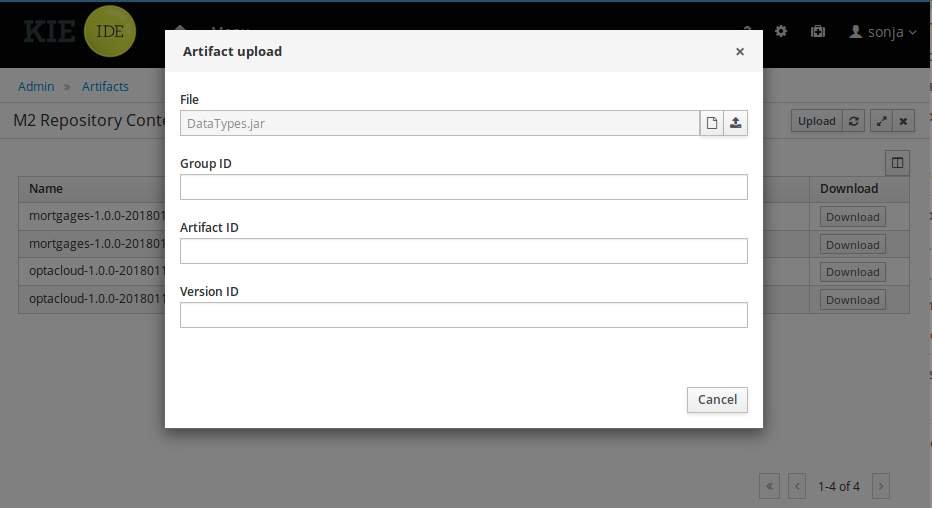
-
Using Maven,
mvn deployto that Maven repository. Refresh the list to make it show up.
|
This remote Maven repository is relatively simple. It does not support proxying, mirroring, … like Nexus or Archiva. |
13.8.2. Asset Editor
The Asset Editor is the principle component of the Business Central user interface. It consists of two main views Editor and Overview.
-
The views
 Figure 69. The Asset Editor - Editor tab
-
A : The editing area - exactly what form the editor takes depends on the Asset type. An asset can only be edited by one user at a time to avoid conflicts. When a user begins to edit an asset, a lock will automatically be acquired. This is indicated by a lock symbol appearing on the asset title bar as well as in the project explorer view (see Project Explorer for details). If a user starts editing an already locked asset a pop-up notification will appear to inform the user that the asset can’t currently be edited, as it is being worked on by another user. Changes will be prevented until the editing user saves or closes the asset, or logs out of Business Central. Session timeouts will also cause locks to be released. Every user further has the option to force a lock release, if required (see the Metadata section below).
-
B : This menu bar contains various actions for the Asset; such as Save, Rename, Copy etc. Note that saving, renaming and deleting are deactivated if the asset is locked by a different user.
-
C : Different views for asset content or asset information.
-
Editor shows the main editor for the asset
-
Overview contains the metadata and conversation views for this editor. Explained in more detail below.
-
Source shows the asset in plain DRL. Note: This tab is only visible if the asset content can be generated into DRL.
-
Data Objects contains the model available for authoring. By default only Data Objects that reside within the same package as the asset are available for authoring. Data Objects outside of this package can be imported to become available for authoring the asset.
-
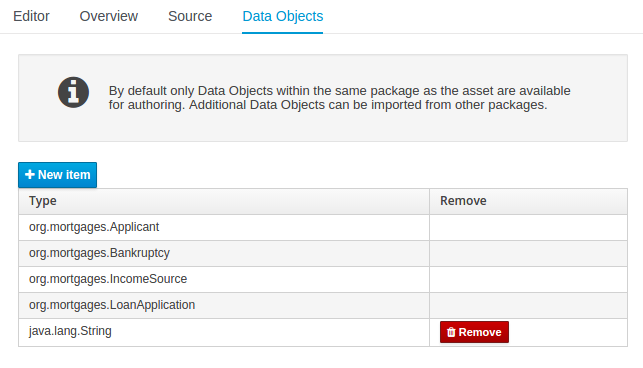 Figure 70. The Asset Editor - Data Objects tab
 -
-
Overview
-
A : General information about the asset and the asset’s description.
"Type:" The format name of the type of Asset.
"Description:" Description for the asset.
"Used in projects:" Names the projects where this rule is used.
"Last Modified:" Who made the last change and when.
"Created on:" Who created the asset and when.
-
B : Version history for the asset. Selecting a version loads the selected version into this editor.
-
C : Meta data (from the "Dublin Core" standard)
-
D : Comments regarding the development of the Asset can be recorded here.
-
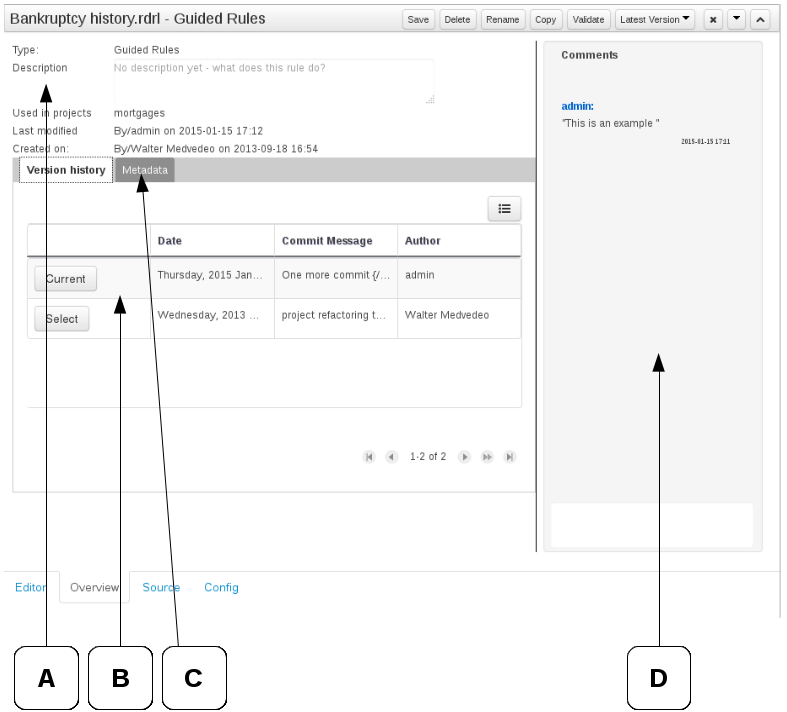
-
Metadata
-
A : Meta data:-
"Tags:" A tagging system for grouping the assets.
"Note:" A comment made when the Asset was last updated (i.e. why a change was made)
"URI:" URI to the asset inside the Git repository.
"Subject/Type/External link/Source" : Other miscellaneous meta data for the Asset.
"Lock status" : Shows the lock status of the asset and, if locked, allows to force unlocking the asset.
-

-
Locking
Business Central supports pessimistic locking of assets. When one User starts editing an asset it is locked to change by other Users. The lock is held until a period of inactivity lapses, the Editor is closed or the application stopped and restarted. Locks can also be forcibly removed on the MetaData section of the Overview tab.
A "padlock" icon is shown in the Editor’s title bar and beside the asset in the Project Explorer when an asset is locked.
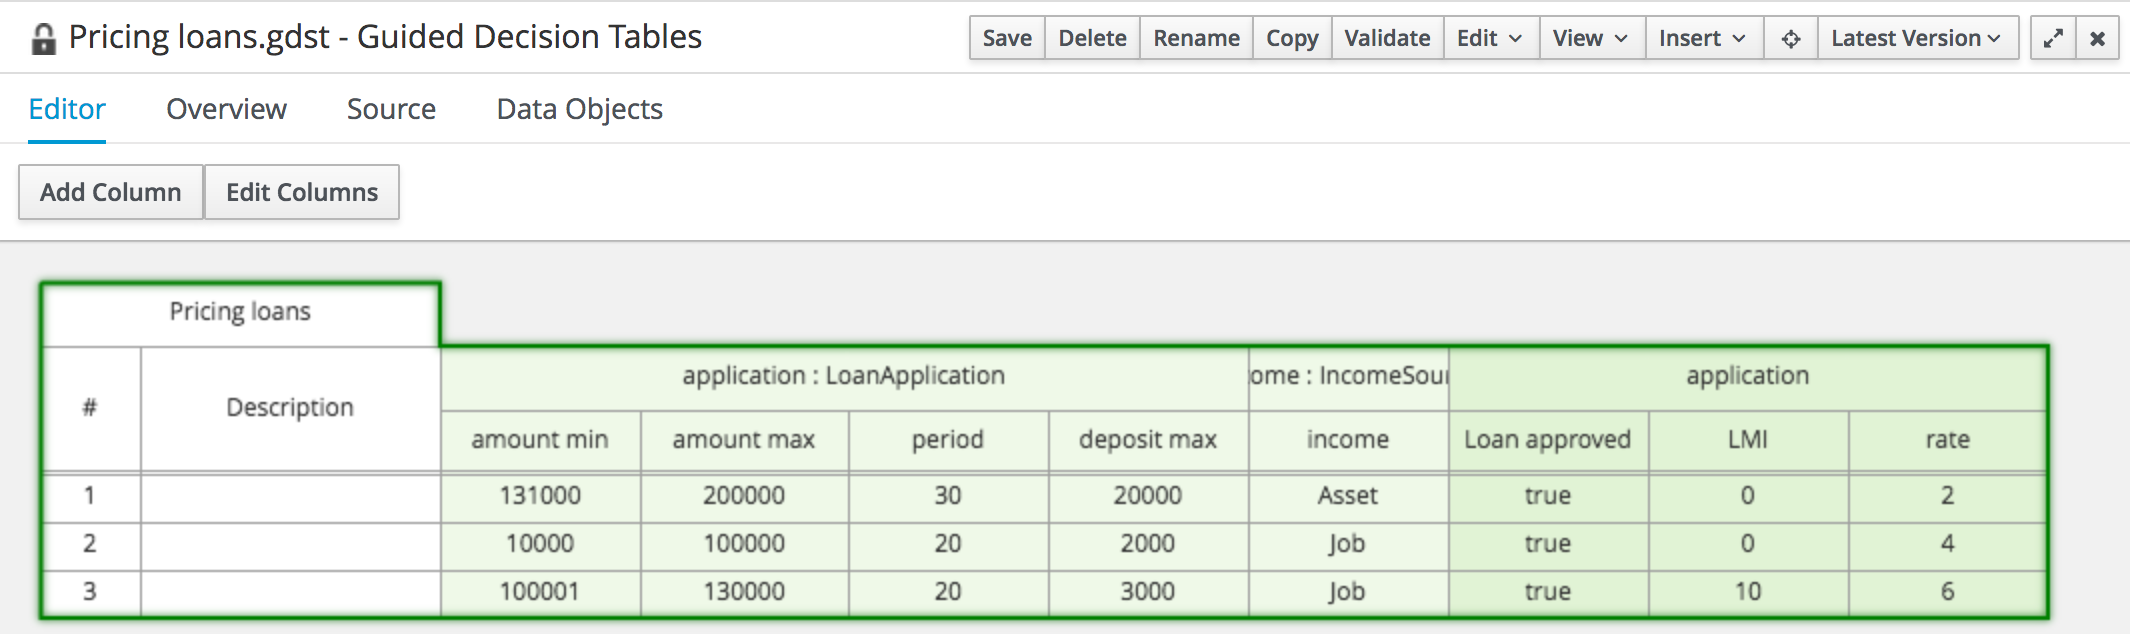 Figure 73. The Asset Editor - Locked assets cannot be edited by other users
13.8.3. Tags Editor
Tags allow assets to be labelled with any number of tags that you define. These tags can be used to filter assets on the Project Explorer enabling "Tag filtering".
13.8.3.1. Creating Tags
To create tags you simply have to write them on the Tags input and press the "Add new Tag/s" button. The Tag Editor allows creating tags one by one or writing more than one separated with a white space.
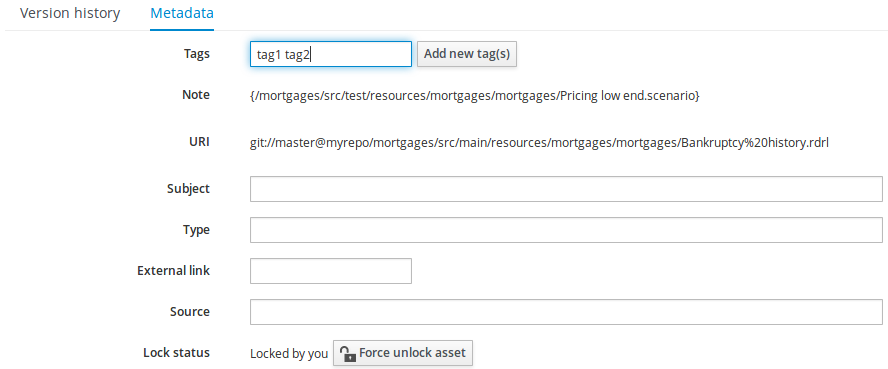
Once you created new Tags they will appear over the Editor allowing you to remove them by pressing on them if you want.
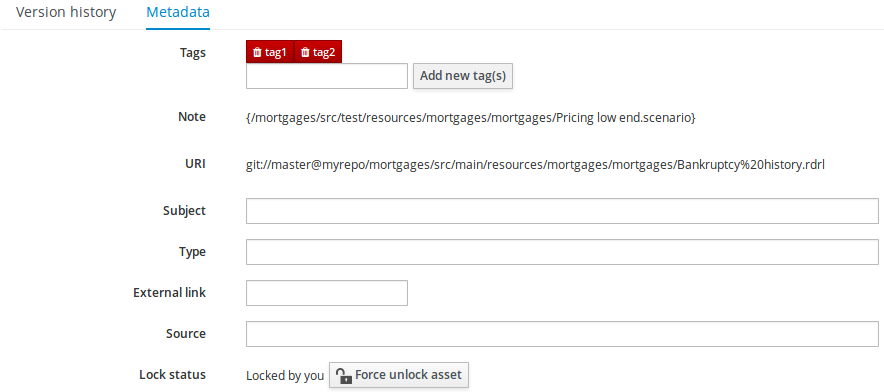
13.8.4. Project Explorer
The Project Explorer provides the ability to browse files inside the current Project. The Project Explorer can be accessed from the left side when an Asset Editor is open.
13.8.4.1. Initial view
If a file is currently being edited by another user, a lock symbol will be displayed in front of the file name. The symbol is blue in case the lock is owned by the currently authenticated user, otherwise black. Moving the mouse pointer over the lock symbol will display a tooltip providing the name of the user who is currently editing the file (and therefore owning the lock). To learn more about locking see Asset Editor for details.
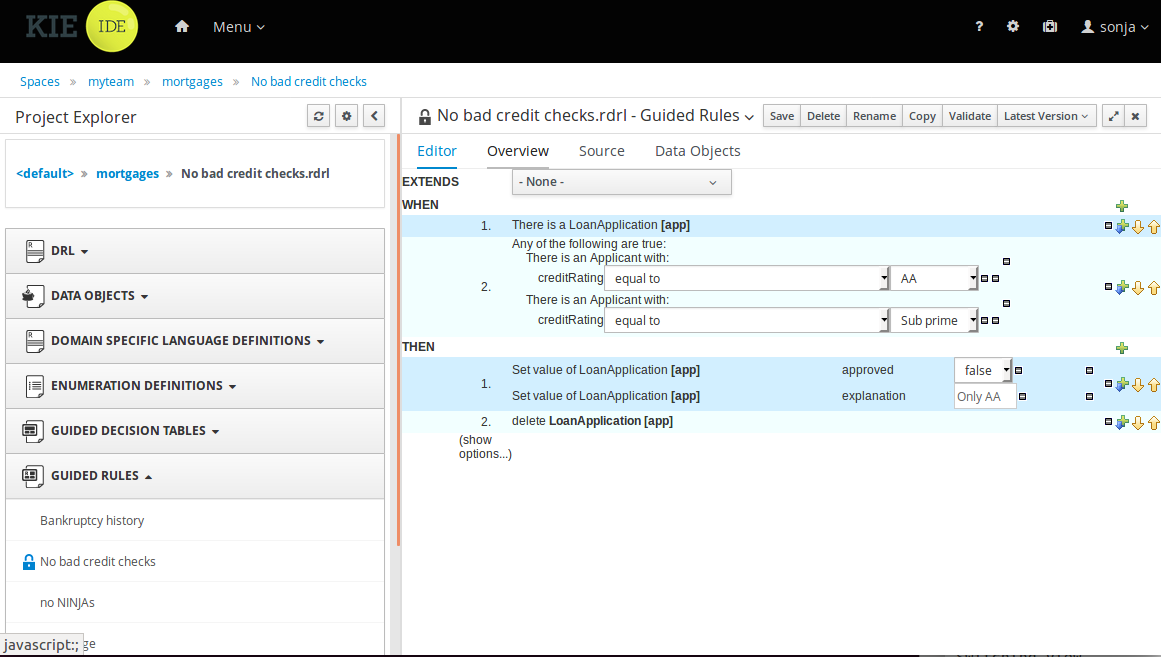
13.8.4.2. Different views
Project Explorer supports multiple views.
-
Project View
A simplified view of the underlying project structure. Certain system files are hidden from view.
-
Repository View
A complete view of the underlying project structure including all files; either user-defined or system generated.
Views can be selected by clicking on the icon within the Project Explorer, as shown below.
Both Project and Repository Views can be further refined by selecting either "Show as Folders" or "Show as Links".
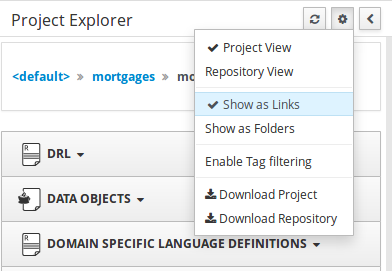
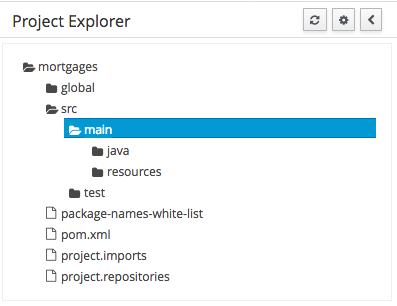
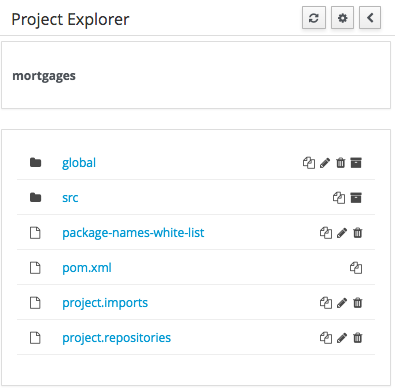
13.8.4.3. Download Project or Repository
"Download Project" or "Download Repository" make it possible to download the project or the repository as a ZIP file.
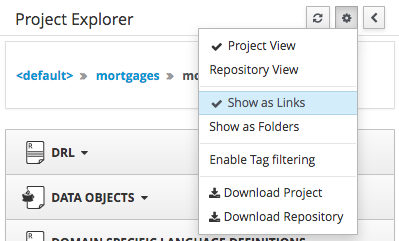
13.8.4.4. Filtering by Tag
Viewing elements in packages that contain a lot of assets easily is now made possible by enabling the Tag filter, which allows you to filter assets by their tags.
To see how to add tags to an asset look at: Tags Editor
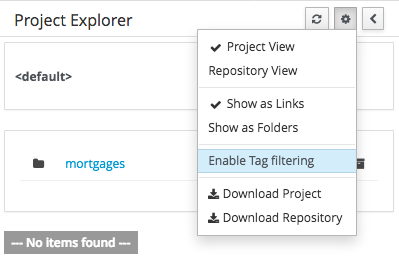
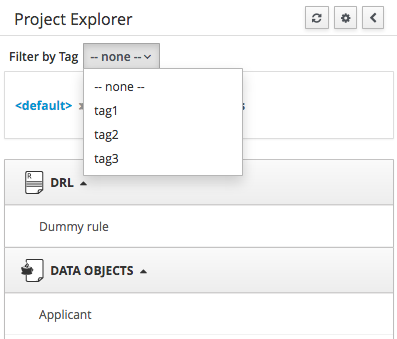
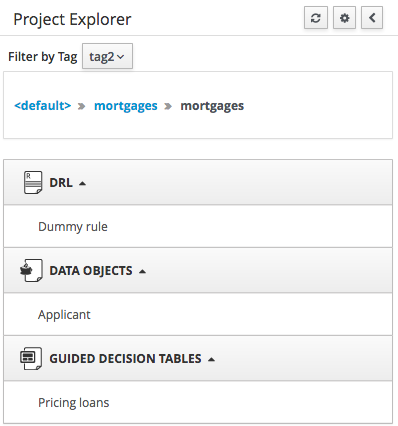
13.8.4.5. Copy, Rename, Delete and Download Actions
Copy, rename and delete actions are available on Links mode, for packages in of Project View and for files and directories in the Repository View. Download action is available for directories. Download option downloads the selected the selected directory as a zip file.
-
A : Copy
-
B : Rename
-
C : Delete
-
D : Download
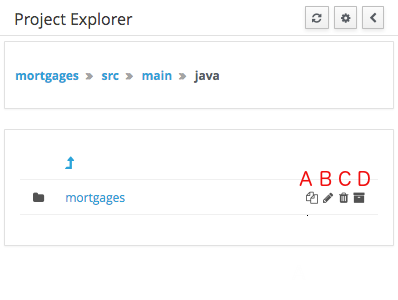
|
Business Central roadmap includes a refactoring and an impact analysis tool, but currently doesn’t have it. Until both tools are provided make sure that your changes (copy/rename/delete) on packages, files or directories doesn’t have a major impact on your project. In cases that your change had an unexpected impact, Business Central enables you to restore your repository using the Repository editor. |
|
Files locked by other users as well as directories that contain such files cannot be renamed or deleted until the corresponding locks are released. If that is the case the rename and delete symbols will be deactivated. To learn more about locking see Asset Editor for details. 
|
13.8.5. Project Editor
The Project Editor screen can be accessed from Project Explorer. Project Editor shows the settings for the currently active project.
Unlike most of the Business Central editors, project editor edits more than one file. Showing everything that is needed for configuring the KIE project in one place.
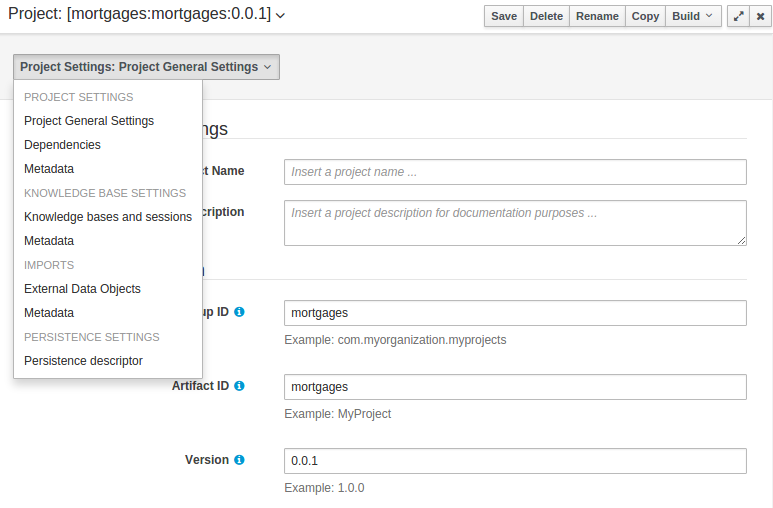
13.8.5.1. Build & Deploy
Build & Deploy builds the current project and deploys the KJAR into the Business Central internal Maven repository.
13.8.5.2. Project Settings
Project Settings edits the pom.xml file used by Maven.
Project General Settings
General settings provide tools for project name and GAV-data (Group, Artifact, Version). GAV values are used as identifiers to differentiate projects and versions of the same project.

Dependencies
The project may have any number of either internal or external dependencies. Dependency is a project that has been built and deployed to a Maven repository. Internal dependencies are projects built and deployed in the same Business Central as the project. External dependencies are retrieved from repositories outside of the current Business Central. Each dependency uses the GAV-values to specify the project name and version that is used by the project.
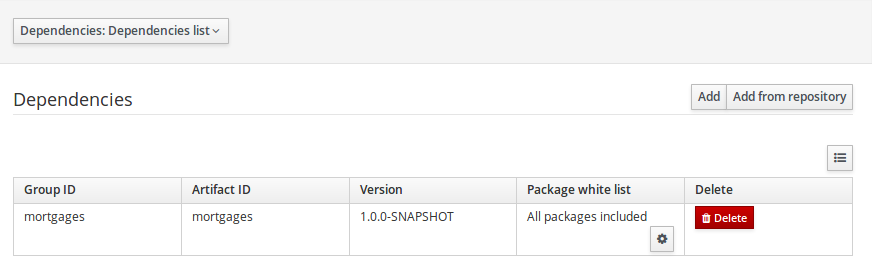
Classes and declared types in white listed packages show up as Data Objects that can be imported in assets. The full list is stored in package-name-white-list file that is stored in each project root.
Package white list has three modes:
-
All packages included: Every package defined in this jar is white listed.
-
Packages not included: None of the packages listed in this jar are white listed.
-
Some packages included: Only part of the packages in the jar are white listed.
Metadata
Metadata for the pom.xml file.
13.8.5.3. KIE base Settings
KIE base Settings edits the kmodule.xml file used by Drools.
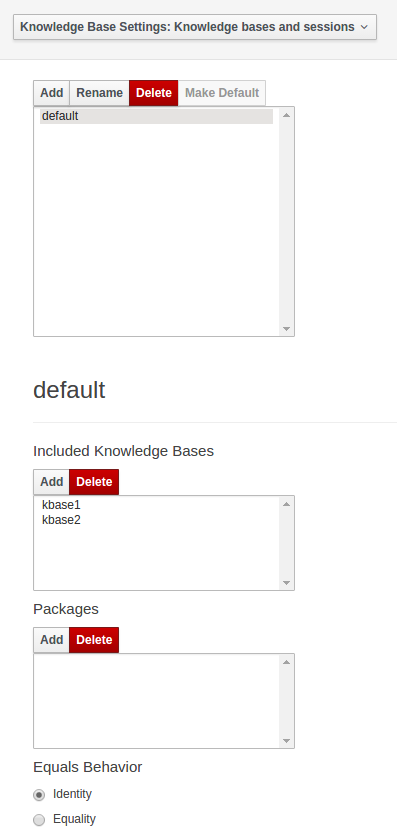
|
For more information about the KIE base properties, check the Drools Expert documentation for kmodule.xml. |
KIE bases and sessions
KIE bases and sessions lists the KIE bases and the KIE sessions specified for the project.
Lists all the KIE bases by name. Only one KIE base can be set as default.
KIE base can include other KIE bases. The models, rules and any other content in the included KIE base will be visible and usable by the currently selected KIE base.
Rules and models are stored in packages. The packages property specifies what packages are included into this KIE base.
Equals behavior is explained in the Drools Expert part of the documentation.
Event processing mode is explained in the Drools Fusion part of the documentation.
The table lists all the KIE sessions in the selected KIE base. There can be only one default of each type. The types are stateless and stateful. Clicking the pen-icon opens a popup that shows more properties for the KIE session.
Metadata
Metadata for the kmodule.xml
13.8.5.4. Imports
Settings edits the project.imports file used by the Business Central editors.
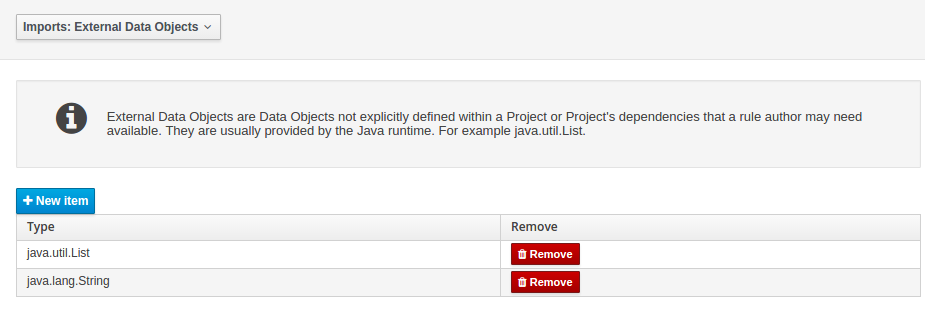
External Data Objects
Data Objects provided by the Java Runtime environment may need to be registered to be available to rule authoring where such Data Objects are not implicitly available as part of an existing Data Object defined within the Business Central or a Project dependency.
For example an Author may want to define a rule that checks for java.util.ArrayList in Working Memory.
If a domain Data Object has a field of type java.util.ArrayList, then there is no need to create a registration.
Metadata
Metadata for the project.imports file.
13.8.5.5. Duplicate GAV detection
When performing any of the following operations a check is now made against all Maven Repositories, resolved for the Project, for whether the Project’s GroupId, ArtifactId and Version pre-exist.
If a clash is found the operation is prevented; although this can be overridden by Users with the admin role.
|
The feature can be disabled by setting the System Property |
Resolved repositories are those discovered in:-
-
The Project’s
POMsection (or any parent<repositories>POM). -
The Project’s
POMsection.<distributionManagement> -
Maven’s global
settings.xmlconfiguration file.
Affected operations:-
-
Creation of new Managed Repositories.
-
Saving a Project definition with the Project Editor.
-
Adding new Modules to a Managed Multi-Module Repository.
-
Saving the
pom.xmlfile. -
Build & installing a Project with the Project Editor.
-
Build & deploying a Project with the Project Editor.
-
Asset Management operations building, installing or deploying Projects.
-
RESToperations creating, installing or deploying Projects.
Users with the Admin role can override the list of Repositories checked using the "Repositories" settings in the Project Editor.
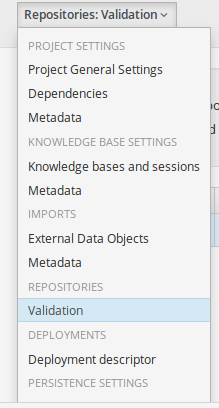
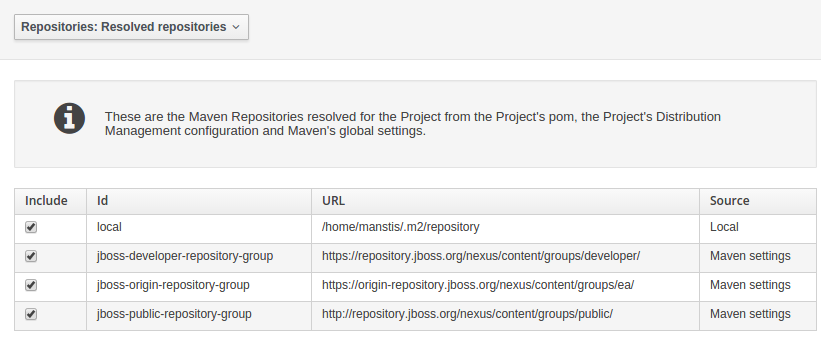
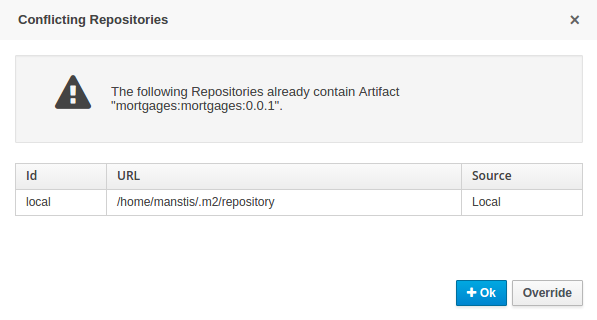
13.8.6. Validation
Business Central provides a common and consistent service for users to understand whether files authored within the environment are valid.
13.8.6.1. Problem Panel
The Problems Panel shows real-time validation results of assets within a Project.
When a Project is selected from the Project Explorer the Problems Panel will refresh with validation results of the chosen Project.
When files are created, saved or deleted the Problems Panel content will update to show either new validation errors, or remove existing if a file was deleted.
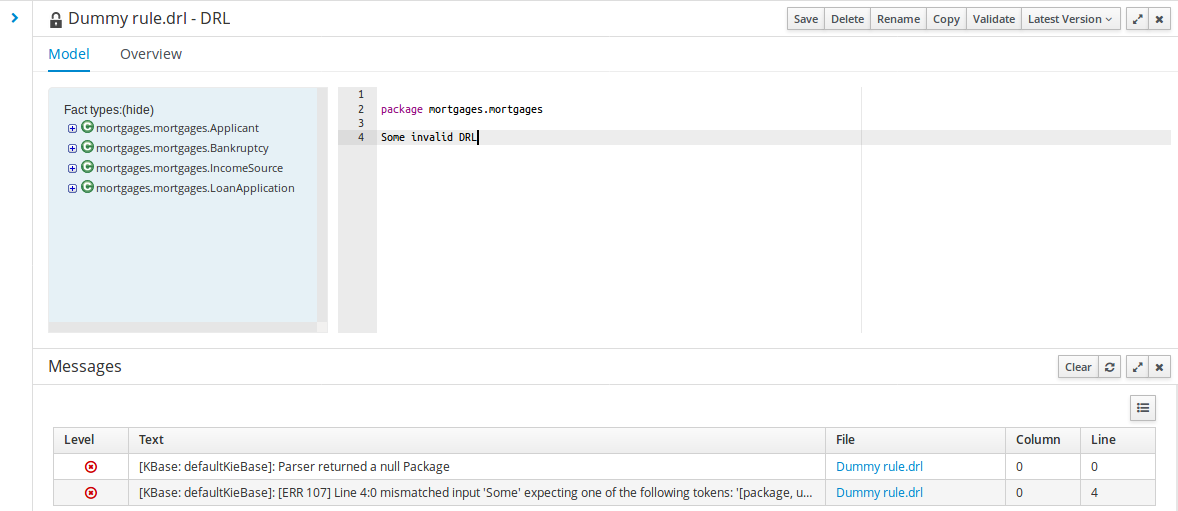
13.8.6.2. On demand validation
It is not always desirable to save a file in order to determine whether it is in a valid state.
All of the file editors provide the ability to validate the content before it is saved.
Clicking on the 'Validate' button shows validation errors, if any.

13.8.7. Data Modeller
13.8.7.1. First steps to create a data model
By default, a data model is always constrained to the context of a project. For the purpose of this tutorial, we will assume that a correctly configured project already exists and the authoring page is open.
To start the creation of a data model inside a project, take the following steps:
-
From the home panel, select the Design page and select the given project.
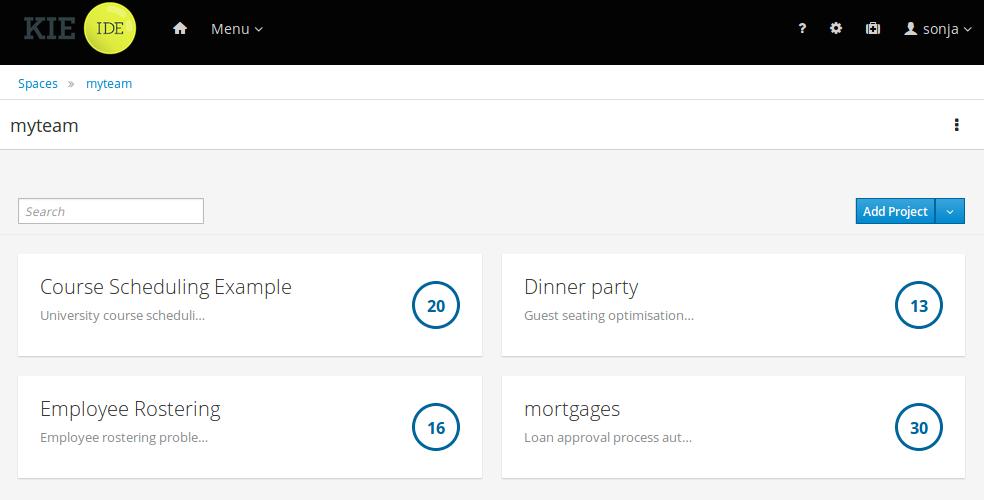 Figure 94. Go to authoring page and select a project
 -
Open the Data Modeller tool by clicking on a Data Object file, or using the "Add Asset → Data Object" menu option. Set Data Object name to "PurchaseOrder" and click Ok.
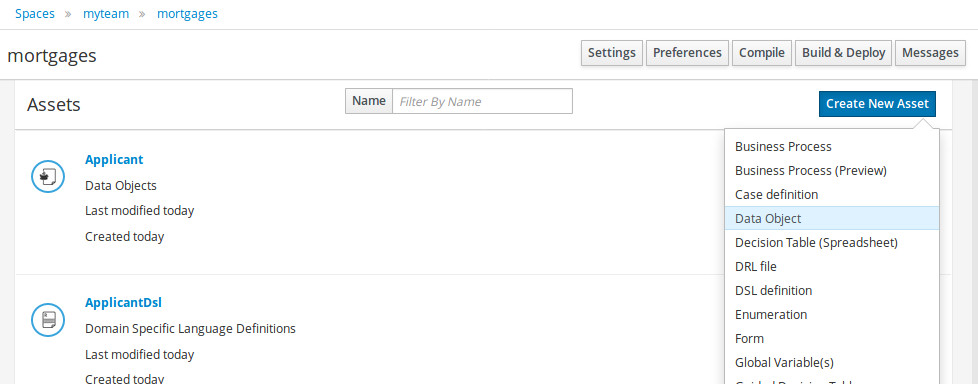 Figure 95. Click a Data Object
This will start up the Data Modeller tool, which has the following general aspect:
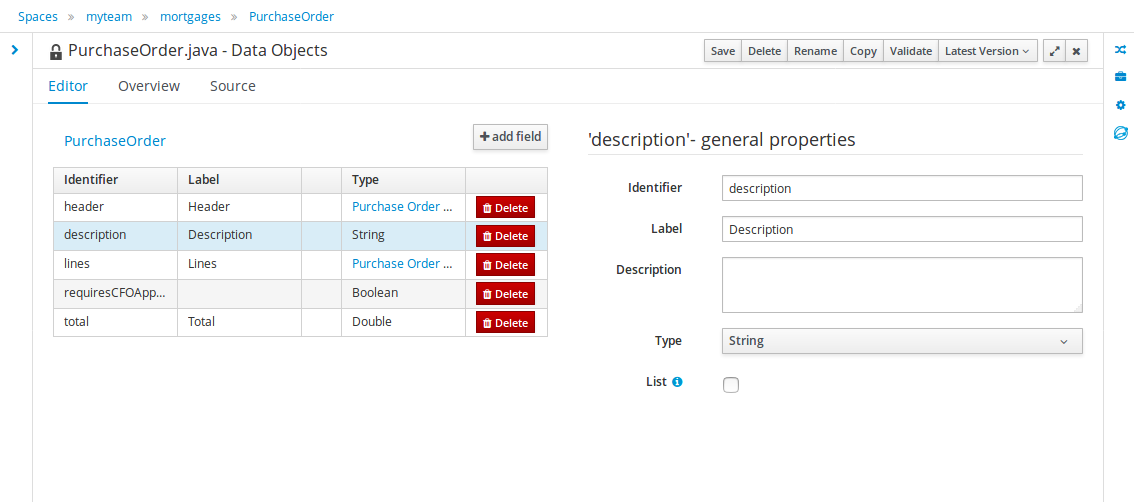
The "Editor" tab is divided into the following sections:
-
The new field section is dedicated to the creation of new fields, and is opened when the "add field" button is pressed.
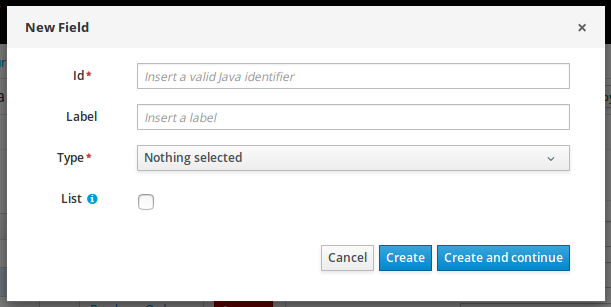 Figure 97. New field creation
 -
The Data Object’s "field browser" section displays a list with the data object fields.
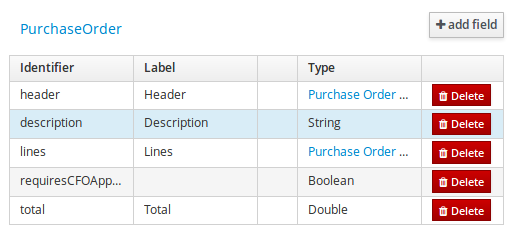 Figure 98. The Data Object’s field browser
 -
The "Data Object / Field general properties" section. This is the rightmost section of the Data Modeller editor and visualizes the "Data Object" or "Field" general properties, depending on user selection.
Data Object general properties can be selected by clicking on the Data Object Selector.
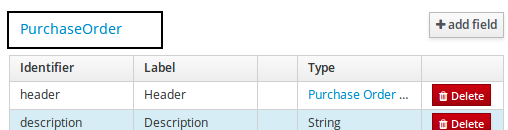 Figure 99. Data Object selector
 Figure 100. Data Object general properties
Field general properties can be selected by clicking on a field.
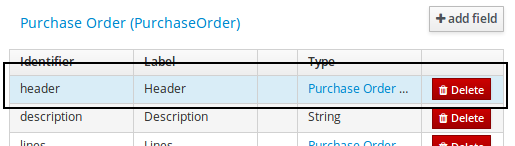
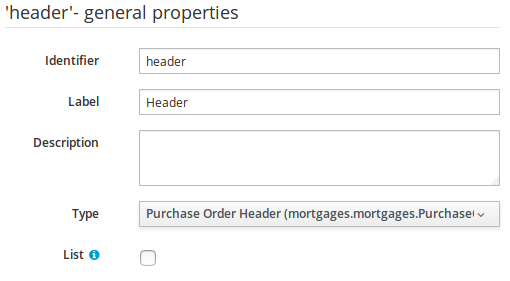
-
On the right side of Business Central a new "Tool Bar" is provided that enables the selection of different context sensitive tool windows that will let the user do domain specific configurations. Currently four tool windows are provided for the following domains "Drools & jBPM", "OptaPlanner", "Persistence" and "Advanced" configurations.
 Figure 103. Data modeller Tool Bar
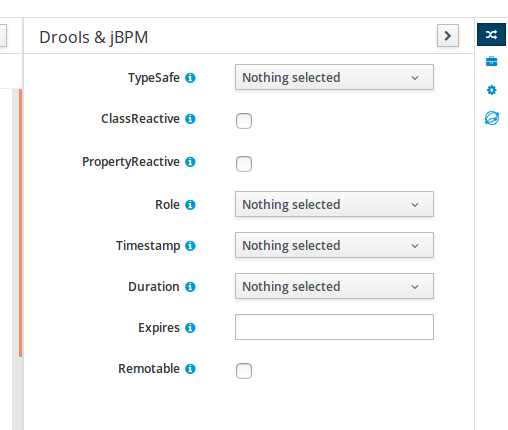 Figure 104. Drools & jBPM tool window
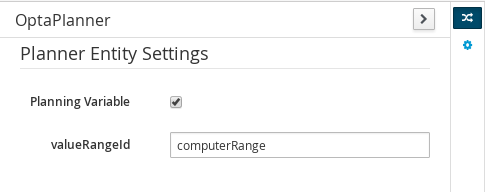 Figure 105. OptaPlanner tool window
To see and use the OptaPlanner tool window, the user needs to have the role
plannermgmt.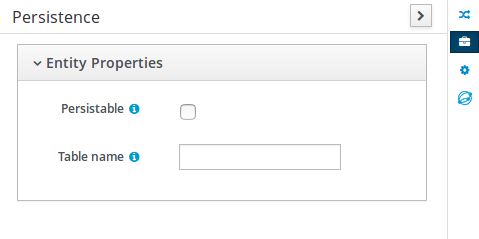 Figure 106. Persistence tool window
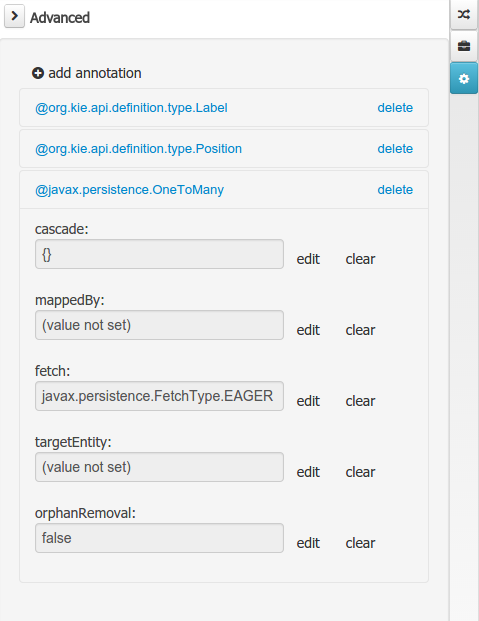 Figure 107. Advanced tool window
The "Source" tab shows an editor that allows the visualization and modification of the generated java code.
-
Round trip between the "Editor" and "Source" tabs is possible, and also source code preservation is provided. It means that no matter where the Java code was generated (e.g. Eclipse, Data modeller), the data modeller will only update the necessary code blocks to maintain the model updated.
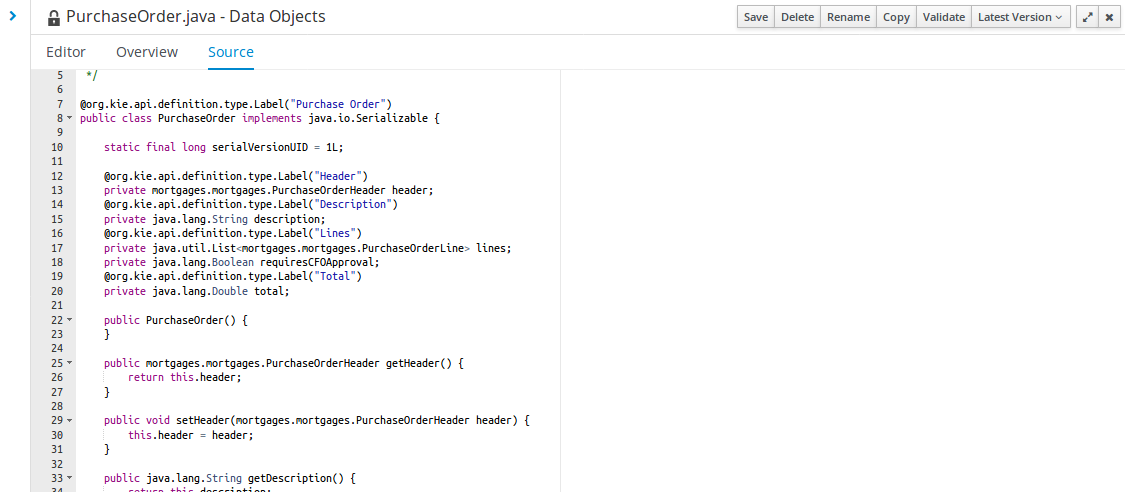 Figure 108. Source editor
The "Overview" tab shows the standard metadata and version information as the other workbench editors.
13.8.7.2. Data Objects
A data model consists of data objects which are a logical representation of some real-world data. Such data objects have a fixed set of modeller (or application-owned) properties, such as its internal identifier, a label, description, package etc. Besides those, a data object also has a variable set of user-defined fields, which are an abstraction of a real-world property of the type of data that this logical data object represents.
Creating a data object can be achieved using the Business Central "New Item - Data Object" menu option.
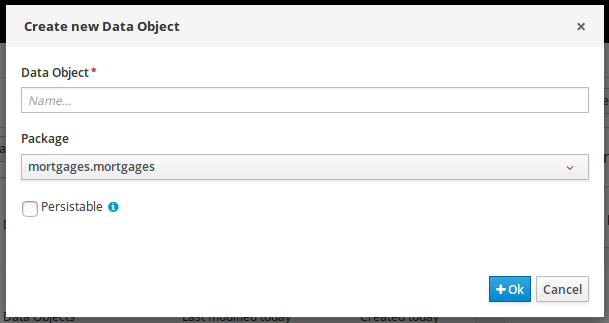
Both resource name and location are mandatory parameters. When the "Ok" button is pressed a new Java file will be created and a new editor instance will be opened for the file edition. The optional "Persistable" attribute will add by default configurations on the data object in order to make it a JPA entity. Use this option if your jBPM project needs to store data object’s information in a database.
13.8.7.3. Properties & relationships
Once the data object has been created, it now has to be completed by adding user-defined properties to its definition. This can be achieved by pressing the "add field" button. The "New Field" dialog will be opened and the new field can be created by pressing the "Create" button. The "Create and continue" button will also add the new field to the Data Object, but won’t close the dialog. In this way multiple fields can be created avoiding the popup opening multiple times. The following fields can (or must) be filled out:
-
The field’s internal identifier (mandatory). The value of this field must be unique per data object, i.e. if the proposed identifier already exists within current data object, an error message will be displayed.
-
A label (optional): as with the data object definition, the user can define a user-friendly label for the data object field which is about to be created. This has no further implications on how fields from objects of this data object will be treated. If a label is defined, then this is how the field will be displayed throughout the data modeller tool.
-
A field type (mandatory): each data object field needs to be assigned with a type.
This type can be either of the following:
-
A 'primitive java object' type: these include most of the object equivalents of the standard Java primitive types, such as Boolean, Short, Float, etc, as well as String, Date, BigDecimal and BigInteger.
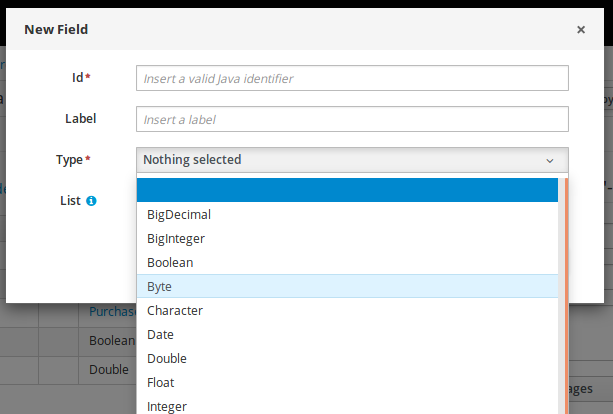 Figure 110. Primitive object field types
 -
A 'data object' type: any user defined data object automatically becomes a candidate to be defined as a field type of another data object, thus enabling the creation of relationships between them. A data object field can be created either in 'single' or in 'multiple' form, the latter implying that the field will be defined as a collection of this type, which will be indicated by selecting "List" checkbox.
-

-
A 'primitive java' type: these include java primitive types byte, short, int, long, float, double, char and boolean.

When finished introducing the initial information for a new field, clicking the 'Create' button will add the newly created field to the end of the data object’s fields table below:
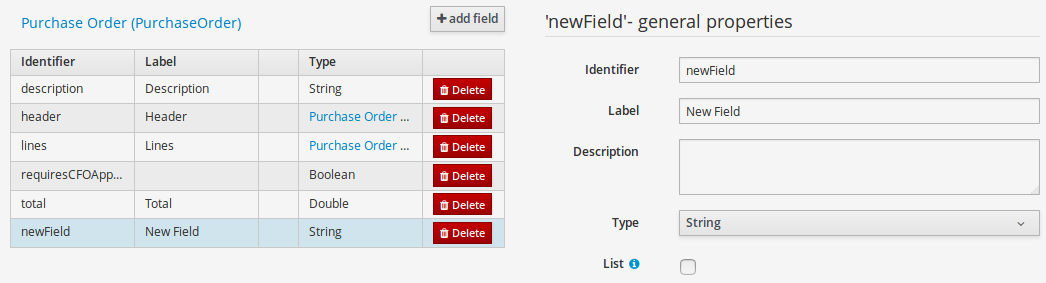
The new field will also automatically be selected in the data object’s field list, and its properties will be shown in the Field general properties editor. Additionally the field properties will be loaded in the different tool windows, in this way the field will be ready for edition in whatever selected tool window.
At any time, any field (without restrictions) can be deleted from a data object definition by clicking on the corresponding 'x' icon in the data object’s fields table.
13.8.7.4. Additional options
As stated before, both Data Objects as well as Fields require some of their initial properties to be set upon creation. Additionally there are three domains of properties that can be configured for a given Data Object. A domain is basically a set of properties related to a given business area. Current available domains are, "Drools & jBPM", "Persistence" and the "Advanced" domain. To work on a given domain the user should select the corresponding "Tool window" (see below) on the right side toolbar. Every tool window usually provides two editors, the "Data Object" level editor and the "Field" level editor, that will be shown depending on the last selected item, the Data Object or the Field.
Drools & jBPM domain
The Drools & jBPM domain editors manages the set of Data Object or Field properties related to drools applications.
The Drools & jBPM object editor manages the object level drools properties
-
TypeSafe: this property allows to enable/disable the type safe behaviour for current type. By default all type declarations are compiled with type safety enabled. (See Drools for more information on this matter).
-
ClassReactive: this property allows to mark this type to be treated as "Class Reactive" by the Drools engine. (See Drools for more information on this matter).
-
PropertyReactive: this property allows to mark this type to be treated as "Property Reactive" by the Drools engine. (See Drools for more information on this matter).
-
Role: this property allows to configure how the Drools engine should handle instances of this type: either as regular facts or as events. By default all types are handled as a regular fact, so for the time being the only value that can be set is "Event" to declare that this type should be handled as an event. (See Drools Fusion for more information on this matter).
-
Timestamp: this property allows to configure the "timestamp" for an event, by selecting one of his attributes. If set the Drools engine will use the timestamp from the given attribute instead of reading it from the Session Clock. If not, the Drools engine will automatically assign a timestamp to the event. (See Drools Fusion for more information on this matter).
-
Duration: this property allows to configure the "duration" for an event, by selecting one of his attributes. If set the Drools engine will use the duration from the given attribute instead of using the default event duration = 0. (See Drools Fusion for more information on this matter).
-
Expires: this property allows to configure the "time offset" for an event expiration. If set, this value must be a temporal interval in the form: [d][#h][#m][#s][[ms]] Where [ ] means an optional parameter and # means a numeric value. e.g.: 1d2h, means one day and two hours. (See Drools Fusion for more information on this matter).
-
Remotable: If checked this property makes the Data Object available to be used with jBPM remote services as REST, JMS and WS. (See jBPM for more information on this matter).
The Drools & jBPM object editor manages the field level drools properties
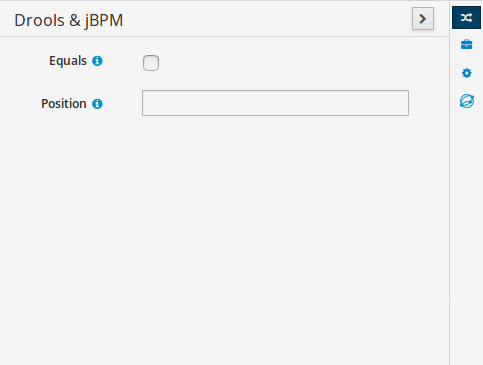
-
Equals: checking this property for a Data Object field implies that it will be taken into account, at the code generation level, for the creation of both the equals() and hashCode() methods in the generated Java class. We will explain this in more detail in the following section.
-
Position: this field requires a zero or positive integer. When set, this field will be interpreted by the Drools engine as a positional argument (see the section below and also the Drools documentation for more information on this subject).
Persistence domain
The Persistence domain editors manages the set of Data Object or Field properties related to persistence.
Persistence domain object editor manages the object level persistence properties
-
Persistable: this property allows to configure current Data Object as persistable.
-
Table name: this property allows to set a user defined database table name for current Data Object.
The persistence domain field editor manages the field level persistence properties and is divided into three sections.
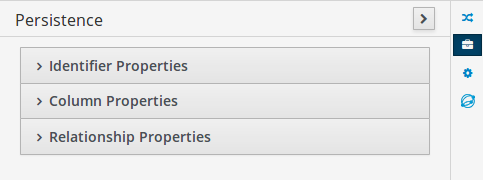
A persistable Data Object should have one and only one field defined as the Data Object identifier. The identifier is typically a unique number that distinguishes a given Data Object instance from all other instances of the same class.
-
Is Identifier: marks current field as the Data Object identifier. A persistable Data Object should have one and only one field marked as identifier, and it should be a base java type, like String, Integer, Long, etc. A field that references a Data Object, or is a multiple field can not be marked as identifier. And also composite identifiers are not supported in this version. When a persistable Data Object is created an identifier field is created by default with the properly initializations, it’s strongly recommended to use this identifier.
-
Generation Strategy: the generation strategy establishes how the identifier values will be automatically generated when the Data Object instances are created and stored in a database. (e.g. by the forms associated to jBPM processes human tasks.) When the by default Identifier field is created, the generation strategy will be also automatically set and it’s strongly recommended to use this configuration.
-
Sequence Generator: the generator represents the seed for the values that will be used by the Generation Strategy. When the by default Identifier field is created the Sequence Generator will be also automatically generated and properly configured to be used by the Generation Strategy.
The column properties section enables the customization of some properties of the database column that will store the field value.
-
Column name: optional value that sets the database column name for the given field.
-
Unique: When checked the unique property establishes that current field value should be a unique key when stored in the database. (if not set the default value is false)
-
Nullable: When checked establishes that current field value can be null when stored in a database. (if not set the default value is true)
-
Insertable: When checked establishes that column will be included in SQL INSERT statements generated by the persistence provider. (if not set the default value is true)
-
Updatable: When checked establishes that the column will be included SQL UPDATE statements generated by the persistence provider. (if not set the default value is true)
When the field’s type is a Data Object type, or a list of a Data Object type a relationship type should be set in order to let the persistence provider to manage the relation. Fortunately this relation type is automatically set when such kind of fields are added to an already marked as persistable Data Object. The relationship type is set by the following popup.
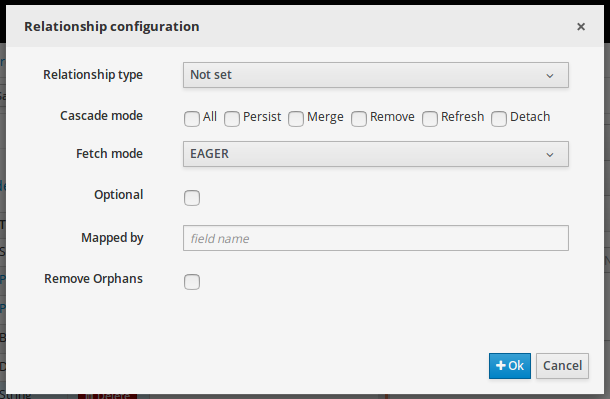
-
Relationship type: sets the type of relation from one of the following options:
One to one: typically used for 1:1 relations where "A is related to one instance of B", and B exists only when A exists. e.g. PurchaseOrder → PurchaseOrderHeader (a PurchaseOrderHeader exists only if the PurchaseOrder exists)
One to many: typically used for 1:N relations where "A is related to N instances of B", and the related instances of B exists only when A exists. e.g. PurchaseOrder → PurchaseOrderLine (a PurchaseOrderLine exists only if the PurchaseOrder exists)
Many to one: typically used for 1:1 relations where "A is related to one instance of B", and B can exist even without A. e.g. PurchaseOrder → Client (a Client can exist in the database even without an associated PurchaseOrder)
Many to many: typically used for N:N relations where "A can be related to N instances of B, and B can be related to M instances of A at the same time", and both B and A instances can exist in the database independently of the related instances. e.g. Course → Student. (Course can be related to N Students, and a given Student can attend to M courses)
When a field of type "Data Object" is added to a given persistable Data Object, the "Many to One" relationship type is generated by default.
And when a field of type "list of Data Object" is added to a given persistable Data Object , the "One to Many" relationship is generated by default.
-
Cascade mode: Defines the set of cascadable operations that are propagated to the associated entity. The value cascade=ALL is equivalent to cascade={PERSIST, MERGE, REMOVE, REFRESH}. e.g. when A → B, and cascade "PERSIST or ALL" is set, if A is saved, then B will also be saved.
The by default cascade mode created by the data modeller is "ALL" and it’s strongly recommended to use this mode when Data Objects are being used by jBPM processes and forms.
-
Fetch mode: Defines how related data will be fetched from database at reading time.
EAGER: related data will be read at the same time. e.g. If A → B, when A is read from database B will be read at the same time.
LAZY: reading of related data will be delayed usually to the moment they are required. e.g. If PurchaseOrder → PurchaseOrderLine the lines reading will be postponed until a method "getLines()" is invoked on a PurchaseOrder instance.
The default fetch mode created by the data modeller is "EAGER" and it’s strongly recommended to use this mode when Data Objects are being used by jBPM processes and forms.
-
Optional: establishes if the right side member of a relationship can be null.
-
Mapped by: used for reverse relations.
Advanced domain
The advanced domain enables the configuration of whatever parameter set by the other domains as well as the adding of arbitrary parameters. As it will be shown in the code generation section every "Data Object / Field" parameter is represented by a java annotation. The advanced mode enables the configuration of this annotations.
The advanced domain editor has the same shape for both Data Object and Field.
The following operations are available
-
delete: enables the deletion of a given Data Object or Field annotation.
-
clear: clears a given annotation parameter value.
-
edit: enables the edition of a given annotation parameter value.
-
add annotation: The add annotation button will start a wizard that will let the addition of whatever java annotation available in the project dependencies.
Add annotation wizard step #1: the first step of the wizard requires the entering of a fully qualified class name of an annotation, and by pressing the "search" button the annotation definition will be loaded into the wizard. Additionally when the annotation definition is loaded, different wizard steps will be created in order to enable the completion of the different annotation parameters. Required parameters will be marked with "*".
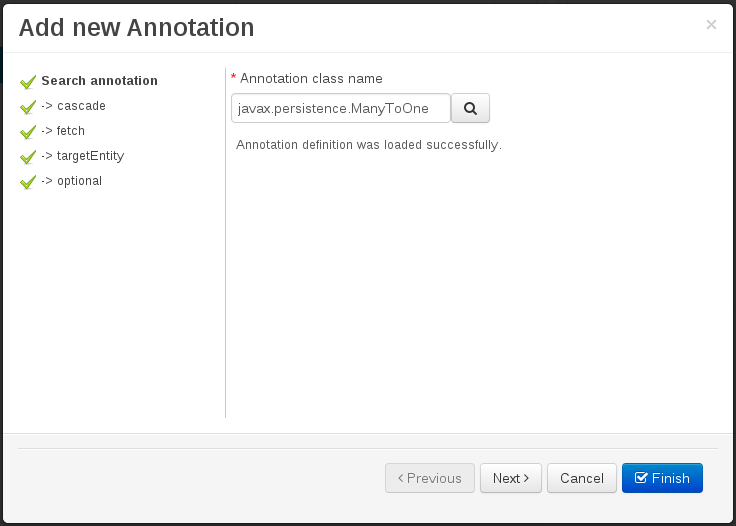 Figure 120. Annotation definition loaded into the wizard.
Whenever it’s possible the wizard will provide a suitable editor for the given parameters.
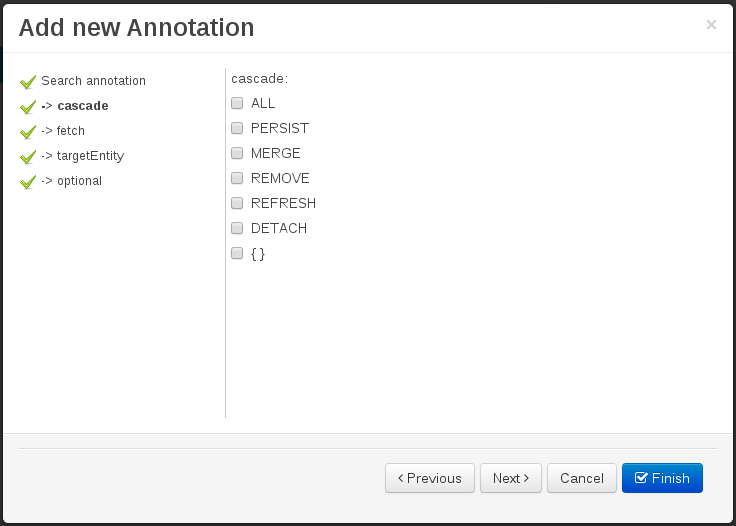 Figure 121. Automatically generated enum values editor for an Enumeration annotation parameter.
A generic parameter editor will be provided when it’s not possible to calculate a customized editor
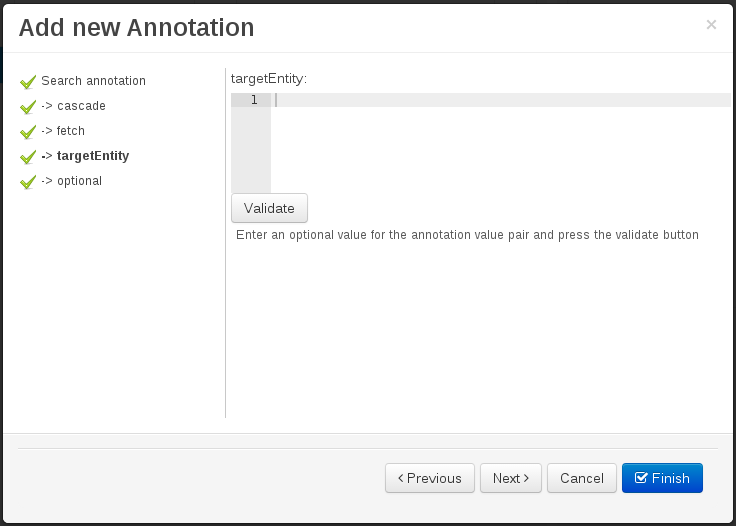 Figure 122. Generic annotation parameter editor
When all required parameters have been entered and validated, the finish button will be enabled and the wizard can be completed by adding an annotation to the given Data Object or Field.
13.8.7.5. Generate data model code.
The data model in itself is merely a visual tool that allows the user to define high-level data structures, for them to interact with the Drools engine on the one hand, and the jBPM platform on the other. In order for this to become possible, these high-level visual structures have to be transformed into low-level artifacts that can effectively be consumed by these platforms. These artifacts are Java POJOs (Plain Old Java Objects), and they are generated every time the data model is saved, by pressing the "Save" button in the top Data Modeller Menu. Additionally when the user round trip between the "Editor" and "Source" tab, the code is auto generated to maintain the consistency with the Editor view and vice versa.

The resulting code is generated according to the following transformation rules:
-
The data object’s identifier property will become the Java class’s name. It therefore needs to be a valid Java identifier.
-
The data object’s package property becomes the Java class’s package declaration.
-
The data object’s superclass property (if present) becomes the Java class’s extension declaration.
-
The data object’s label and description properties will translate into the Java annotations "@org.kie.api.definition.type.Label" and "@org.kie.api.definition.type.Description", respectively. These annotations are merely a way of preserving the associated information, and as yet are not processed any further.
-
The data object’s role property (if present) will be translated into the "@org.kie.api.definition.type.Role" Java annotation, that IS interpreted by the application platform, in the sense that it marks this Java class as a Drools Event Fact-Type.
-
The data object’s type safe property (if present) will be translated into the "@org.kie.api.definition.type.TypeSafe Java annotation. (see Drools)
-
The data object’s class reactive property (if present) will be translated into the "@org.kie.api.definition.type.ClassReactive Java annotation. (see Drools)
-
The data object’s property reactive property (if present) will be translated into the "@org.kie.api.definition.type.PropertyReactive Java annotation. (see Drools)
-
The data object’s timestamp property (if present) will be translated into the "@org.kie.api.definition.type.Timestamp Java annotation. (see Drools)
-
The data object’s duration property (if present) will be translated into the "@org.kie.api.definition.type.Duration Java annotation. (see Drools)
-
The data object’s expires property (if present) will be translated into the "@org.kie.api.definition.type.Expires Java annotation. (see Drools)
-
The data object’s remotable property (if present) will be translated into the "@org.kie.api.remote.Remotable Java annotation. (see jBPM)
A standard Java default (or no parameter) constructor is generated, as well as a full parameter constructor, i.e. a constructor that accepts as parameters a value for each of the data object’s user-defined fields.
The data object’s user-defined fields are translated into Java class fields, each one of them with its own getter and setter method, according to the following transformation rules:
-
The data object field’s identifier will become the Java field identifier. It therefore needs to be a valid Java identifier.
-
The data object field’s type is directly translated into the Java class’s field type. In case the field was declared to be multiple (i.e. 'List'), then the generated field is of the "java.util.List" type.
-
The equals property: when it is set for a specific field, then this class property will be annotated with the "@org.kie.api.definition.type.Key" annotation, which is interpreted by the Drools engine, and it will 'participate' in the generated equals() method, which overwrites the equals() method of the Object class. The latter implies that if the field is a 'primitive' type, the equals method will simply compares its value with the value of the corresponding field in another instance of the class. If the field is a sub-entity or a collection type, then the equals method will make a method-call to the equals method of the corresponding data object’s Java class, or of the java.util.List standard Java class, respectively.
If the equals property is checked for ANY of the data object’s user defined fields, then this also implies that in addition to the default generated constructors another constructor is generated, accepting as parameters all of the fields that were marked with Equals. Furthermore, generation of the equals() method also implies that also the Object class’s hashCode() method is overwritten, in such a manner that it will call the hashCode() methods of the corresponding Java class types (be it 'primitive' or user-defined types) for all the fields that were marked with Equals in the Data Model.
-
The position property: this field property is automatically set for all user-defined fields, starting from 0, and incrementing by 1 for each subsequent new field. However the user can freely change the position among the fields. At code generation time this property is translated into the "@org.kie.api.definition.type.Position" annotation, which can be interpreted by the Drools engine. Also, the established property order determines the order of the constructor parameters in the generated Java class.
As an example, the generated Java class code for the Purchase Order data object, corresponding to its definition as shown in the following figure purchase_example.jpg is visualized in the figure at the bottom of this chapter. Note that the two of the data object’s fields, namely 'header' and 'lines' were marked with Equals, and have been assigned with the positions 2 and 1, respectively).
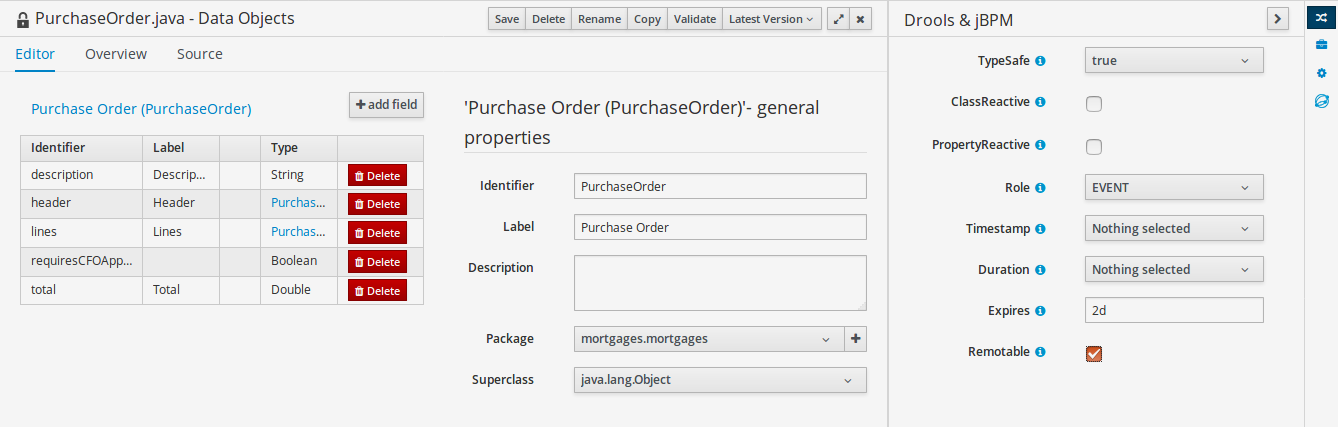
    package org.jbpm.examples.purchases;

    /**
    * This class was automatically generated by the data modeler tool.
    */
    @org.kie.api.definition.type.Label("Purchase Order")
    @org.kie.api.definition.type.TypeSafe(true)
    @org.kie.api.definition.type.Role(org.kie.api.definition.type.Role.Type.EVENT)
    @org.kie.api.definition.type.Expires("2d")
    @org.kie.api.remote.Remotable
    public class PurchaseOrder implements java.io.Serializable
    {

    static final long serialVersionUID = 1L;

    @org.kie.api.definition.type.Label("Total")
    @org.kie.api.definition.type.Position(3)
    private java.lang.Double total;

    @org.kie.api.definition.type.Label("Description")
    @org.kie.api.definition.type.Position(0)
    private java.lang.String description;

    @org.kie.api.definition.type.Label("Lines")
    @org.kie.api.definition.type.Position(2)
    @org.kie.api.definition.type.Key
    private java.util.List<org.jbpm.examples.purchases.PurchaseOrderLine> lines;

    @org.kie.api.definition.type.Label("Header")
    @org.kie.api.definition.type.Position(1)
    @org.kie.api.definition.type.Key
    private org.jbpm.examples.purchases.PurchaseOrderHeader header;

    @org.kie.api.definition.type.Position(4)
    private java.lang.Boolean requiresCFOApproval;

    public PurchaseOrder()
    {
    }

    public java.lang.Double getTotal()
    {
    return this.total;
    }

    public void setTotal(java.lang.Double total)
    {
    this.total = total;
    }

    public java.lang.String getDescription()
    {
    return this.description;
    }

    public void setDescription(java.lang.String description)
    {
    this.description = description;
    }

    public java.util.List<org.jbpm.examples.purchases.PurchaseOrderLine> getLines()
    {
    return this.lines;
    }

    public void setLines(java.util.List<org.jbpm.examples.purchases.PurchaseOrderLine> lines)
    {
    this.lines = lines;
    }

    public org.jbpm.examples.purchases.PurchaseOrderHeader getHeader()
    {
    return this.header;
    }

    public void setHeader(org.jbpm.examples.purchases.PurchaseOrderHeader header)
    {
    this.header = header;
    }

    public java.lang.Boolean getRequiresCFOApproval()
    {
    return this.requiresCFOApproval;
    }

    public void setRequiresCFOApproval(java.lang.Boolean requiresCFOApproval)
    {
    this.requiresCFOApproval = requiresCFOApproval;
    }

    public PurchaseOrder(java.lang.Double total, java.lang.String description,
    java.util.List<org.jbpm.examples.purchases.PurchaseOrderLine> lines,
    org.jbpm.examples.purchases.PurchaseOrderHeader header,
    java.lang.Boolean requiresCFOApproval)
    {
    this.total = total;
    this.description = description;
    this.lines = lines;
    this.header = header;
    this.requiresCFOApproval = requiresCFOApproval;
    }

    public PurchaseOrder(java.lang.String description,
    org.jbpm.examples.purchases.PurchaseOrderHeader header,
    java.util.List<org.jbpm.examples.purchases.PurchaseOrderLine> lines,
    java.lang.Double total, java.lang.Boolean requiresCFOApproval)
    {
    this.description = description;
    this.header = header;
    this.lines = lines;
    this.total = total;
    this.requiresCFOApproval = requiresCFOApproval;
    }

    public PurchaseOrder(
    java.util.List<org.jbpm.examples.purchases.PurchaseOrderLine> lines,
    org.jbpm.examples.purchases.PurchaseOrderHeader header)
    {
    this.lines = lines;
    this.header = header;
    }

    @Override
    public boolean equals(Object o)
    {
    if (this == o)
    return true;
    if (o == null || getClass() != o.getClass())
    return false;
    org.jbpm.examples.purchases.PurchaseOrder that = (org.jbpm.examples.purchases.PurchaseOrder) o;
    if (lines != null ? !lines.equals(that.lines) : that.lines != null)
    return false;
    if (header != null ? !header.equals(that.header) : that.header != null)
    return false;
    return true;
    }

    @Override
    public int hashCode()
    {
    int result = 17;
    result = 31 * result + (lines != null ? lines.hashCode() : 0);
    result = 31 * result + (header != null ? header.hashCode() : 0);
    return result;
    }

    }
13.8.7.6. Using external models
Using an external model means the ability to use a set for already defined POJOs in current project context. In order to make those POJOs available a dependency to the given JAR should be added. Once the dependency has been added the external POJOs can be referenced from current project data model.
There are two ways to add a dependency to an external JAR file:
-
Dependency to a JAR file already installed in current local M2 repository (typically associated the user home).
-
Dependency to a JAR file installed in current Business Central "Guvnor M2 repository". (internal to the application)
Dependency to a JAR file in local M2 repository
To add a dependency to a JAR file in local M2 repository, follow these steps.
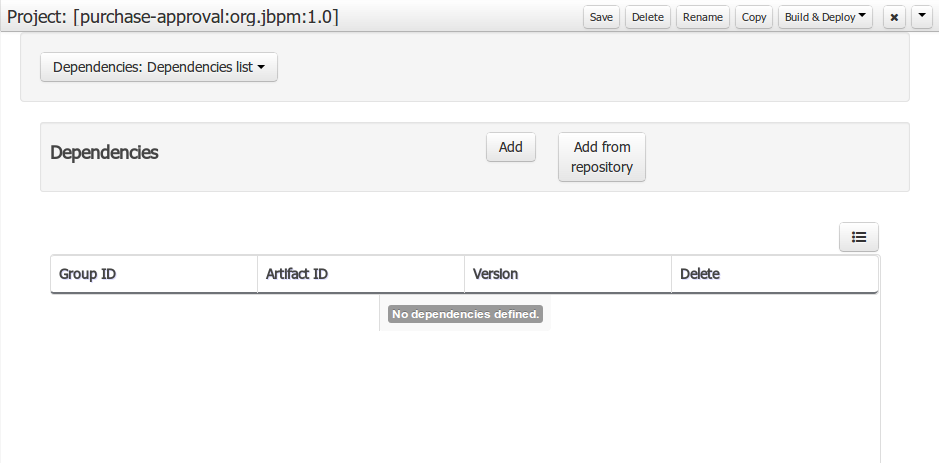
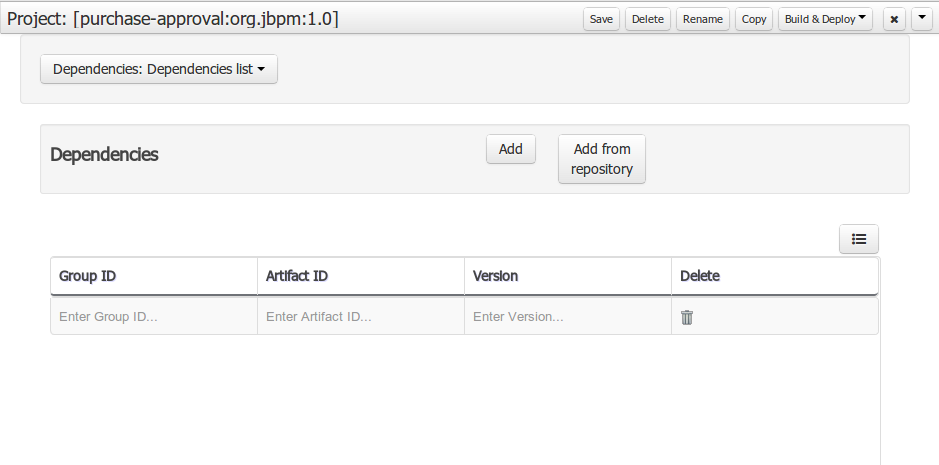
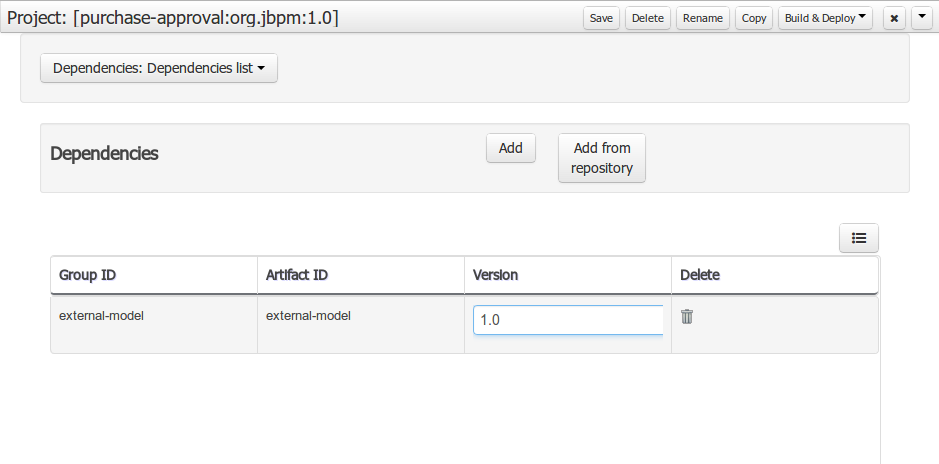
When project is saved the POJOs defined in the external file will be available.
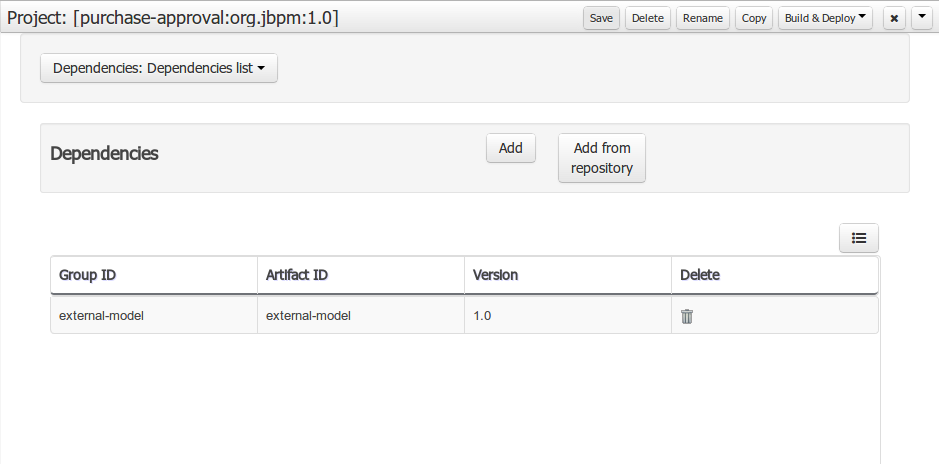
Dependency to a JAR file in current "Guvnor M2 repository".
To add a dependency to a JAR file in current "Guvnor M2 repository", follow these steps.
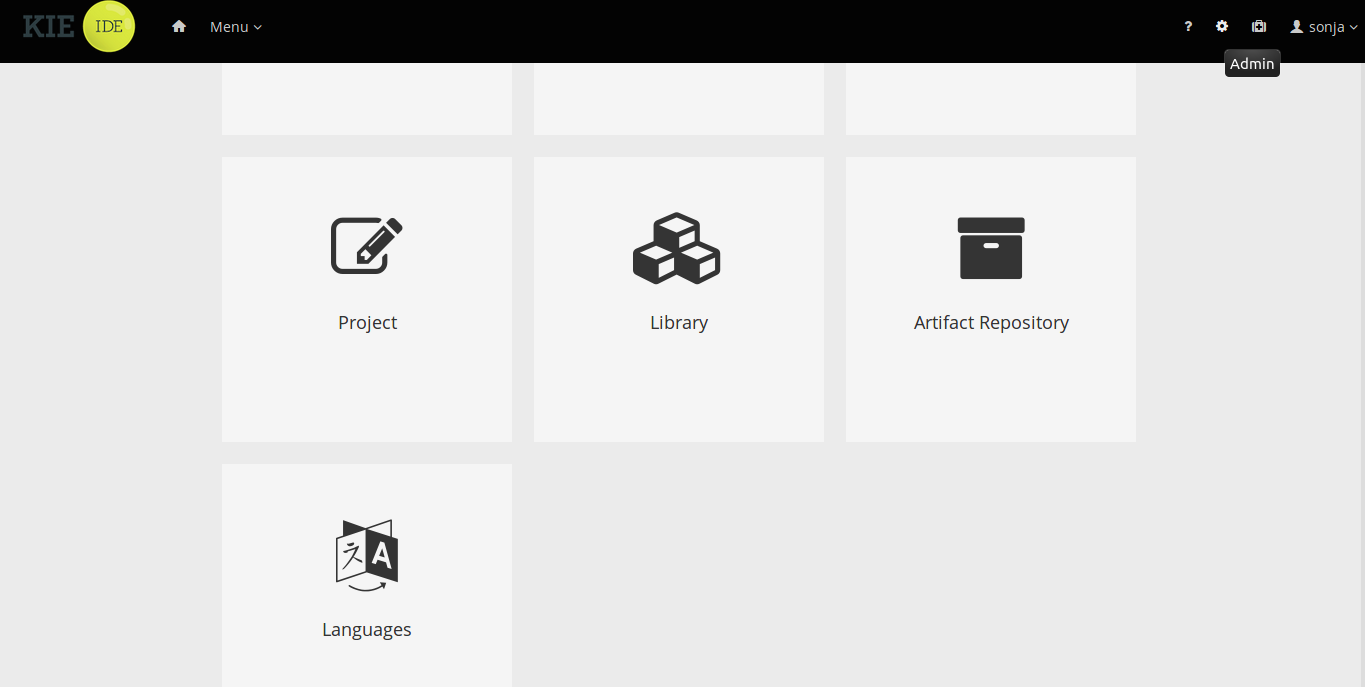
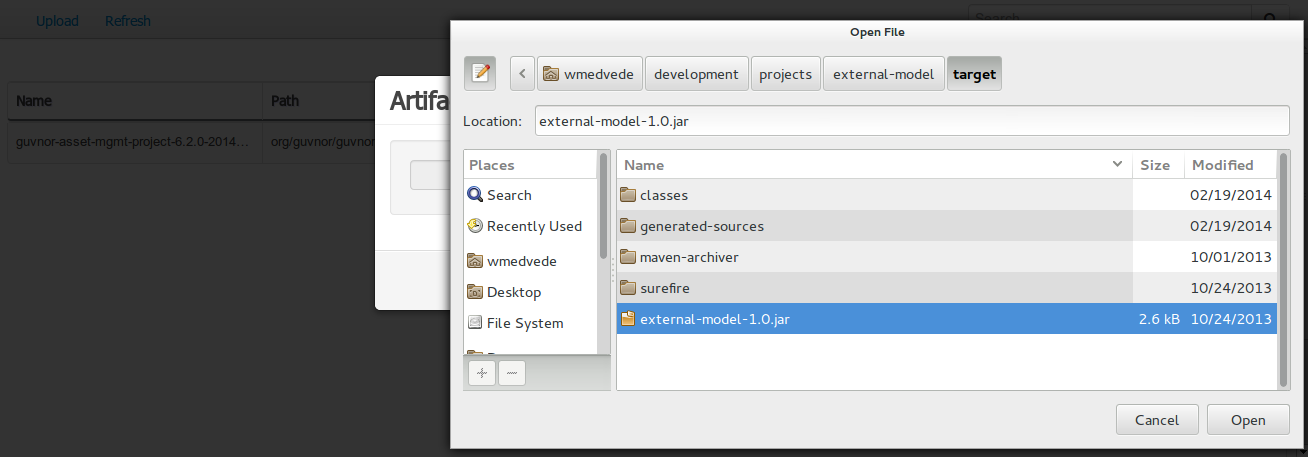
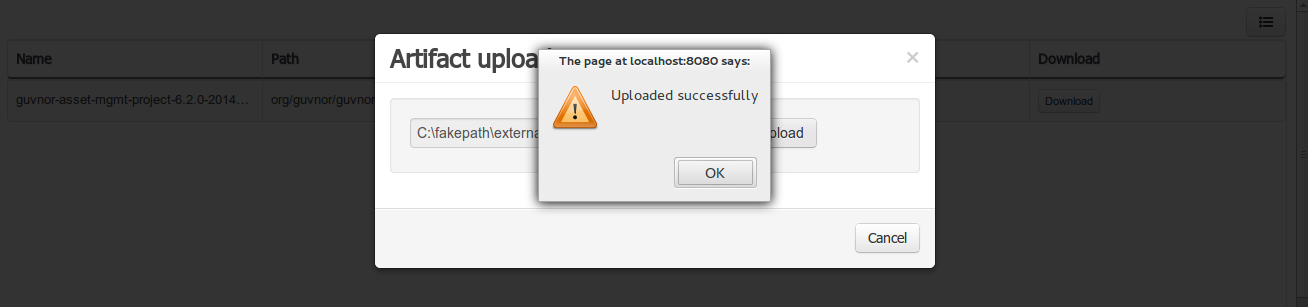
Once the file has been loaded it will be displayed in the repository files list.
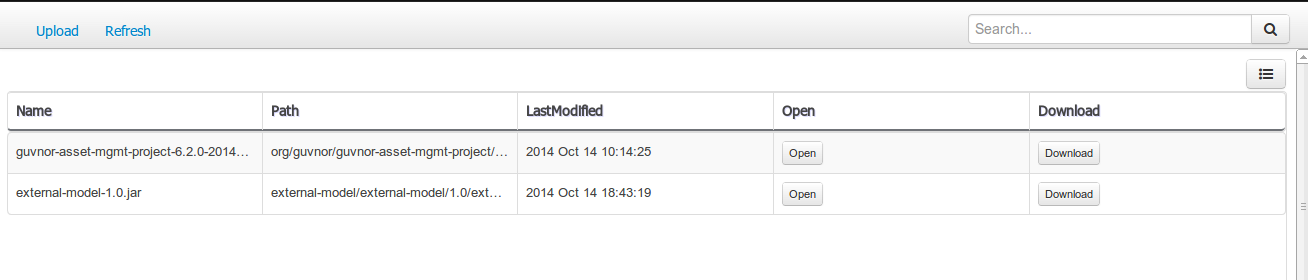
If the uploaded file is not a valid Maven JAR (don’t have a pom.xml file) the system will prompt the user in order to provide a GAV for the file to be installed.
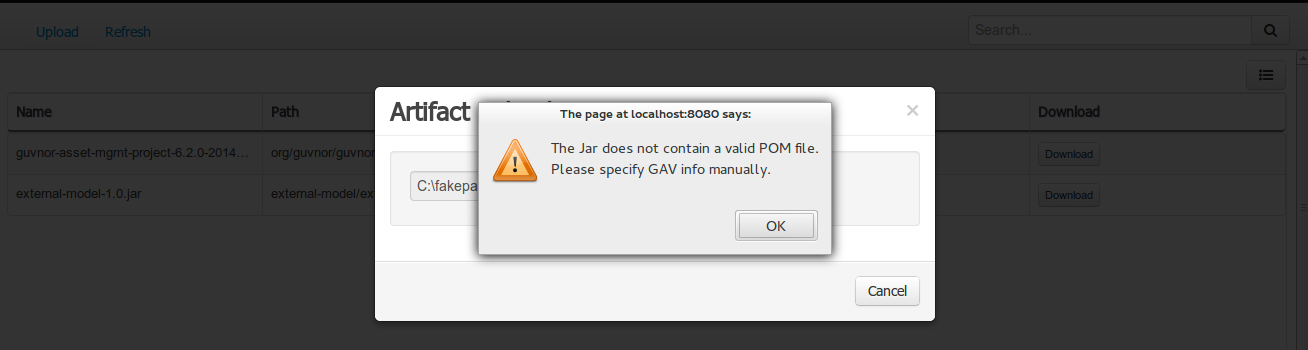
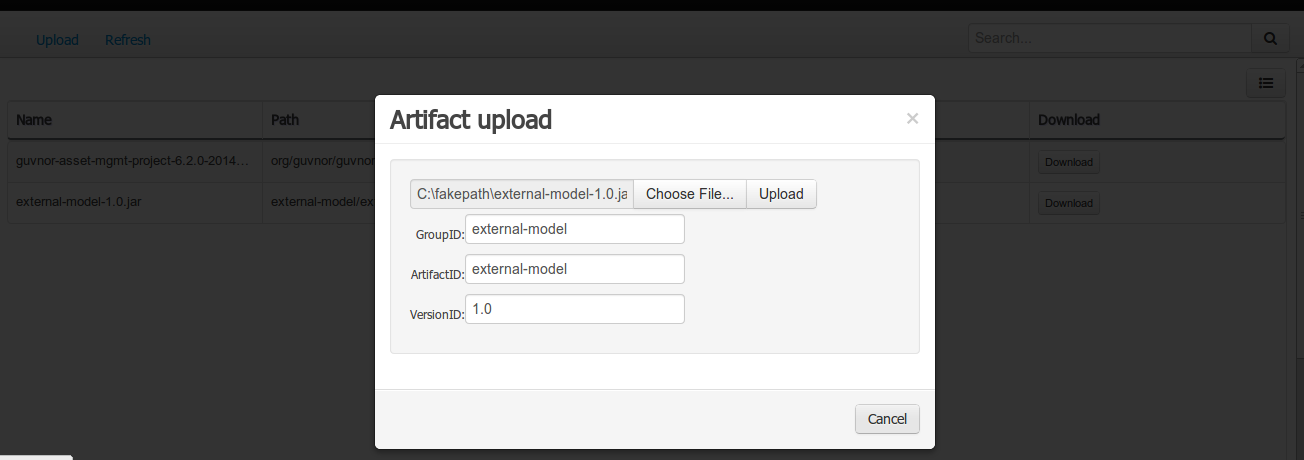
Open the project editor (see below) and click the "Add from repository" button to open the JAR selector to see all the installed JAR files in current "Guvnor M2 repository". When the desired file is selected the project should be saved in order to make the new dependency available.
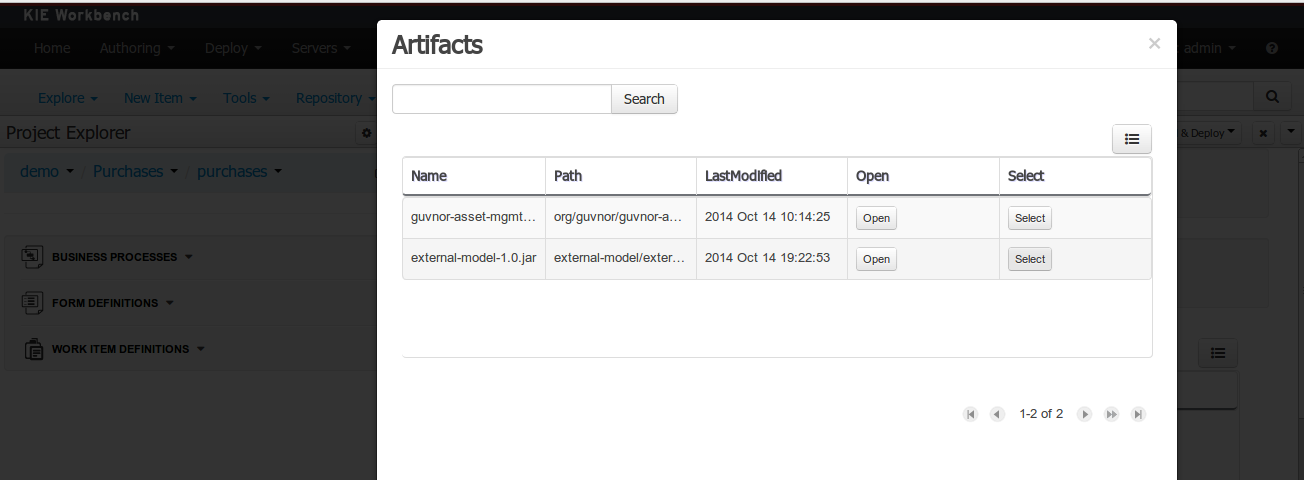
Using the external objects
When a dependency to an external JAR has been set, the external POJOs can be used in the context of current project data model in the following ways:
-
External POJOs can be extended by current model data objects.
-
External POJOs can be used as field types for current model data objects.
The following screenshot shows how external objects are prefixed with the string " -ext- " in order to be quickly identified.
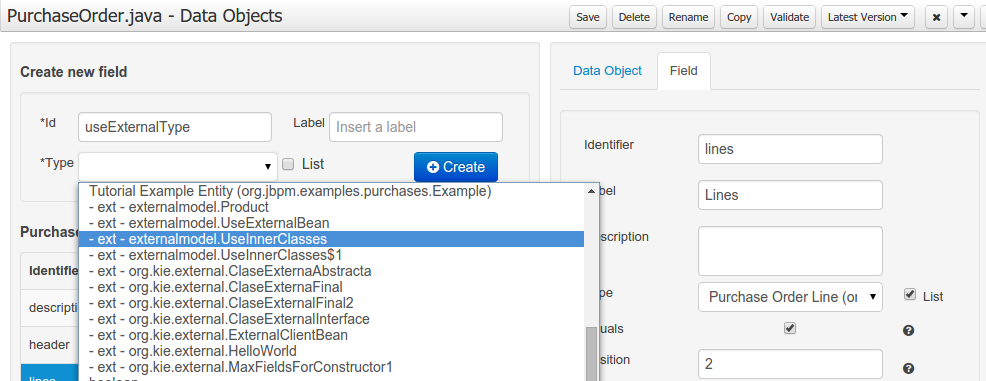
13.8.7.7. Roundtrip and concurrency
Current version implements roundtrip and code preservation between Data modeller and Java source code. No matter where the Java code was generated (e.g. Eclipse, Data modeller), the data modeller will only create/delete/update the necessary code elements to maintain the model updated, i.e, fields, getter/setters, constructors, equals method and hashCode method. Also whatever Type or Field annotation not managed by the Data Modeler will be preserved when the Java sources are updated by the Data modeller.
Aside from code preservation, like in the other Business Central editors, concurrent modification scenarios are still possible. Common scenarios are when two different users are updating the model for the same project, e.g. using the data modeller or executing a 'git push command' that modifies project sources.
From an application context’s perspective, we can basically identify two different main scenarios:
No changes have been undertaken through the application
In this scenario the application user has basically just been navigating through the data model, without making any changes to it. Meanwhile, another user modifies the data model externally.
In this case, no immediate warning is issued to the application user. However, as soon as the user tries to make any kind of change, such as add or remove data objects or properties, or change any of the existing ones, the following pop-up will be shown:
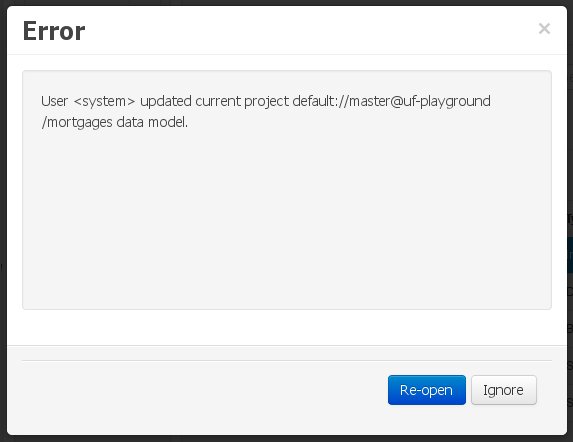
The user can choose to either:
-
Re-open the data model, thus loading any external changes, and then perform the modification he was about to undertake, or
-
Ignore any external changes, and go ahead with the modification to the model. In this case, when trying to persist these changes, another pop-up warning will be shown:
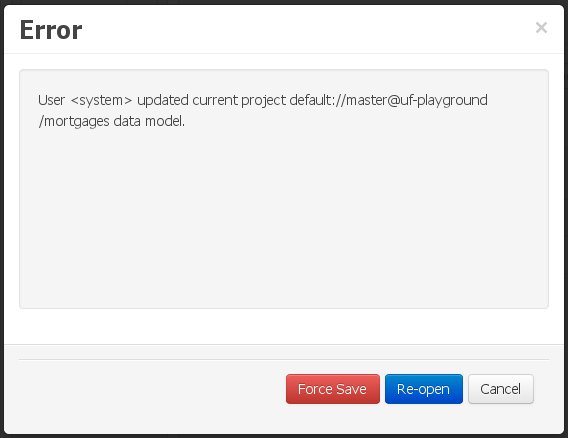 Figure 138. Force save / re-open
The "Force Save" option will effectively overwrite any external changes, while "Re-open" will discard any local changes and reload the model.
"Force Save" overwrites any external changes!
Changes have been undertaken through the application
The application user has made changes to the data model. Meanwhile, another user simultaneously modifies the data model from outside the application context.
In this alternative scenario, immediately after the external user commits his changes to the asset repository (or e.g. saves the model with the data modeller in a different session), a warning is issued to the application user:
As with the previous scenario, the user can choose to either:
-
Re-open the data model, thus losing any modifications that were made through the application, or
-
Ignore any external changes, and continue working on the model.
One of the following possibilities can now occur: ** The user tries to persist the changes he made to the model by clicking the "Save" button in the data modeller top level menu. This leads to the following warning message:
+
Figure 140. Force save / re-openThe "Force Save" option will effectively overwrite any external changes, while "Re-open" will discard any local changes and reload the model.
13.8.8. Data sets authoring
A data set is a collection of related sets of information and can be stored in a database, in a Microsoft Excel file, or in memory. A data set definition instructs Business Central methods to access, read, and parse a data set. Business Central does not store data. It enables you to define access to a data set regardless of where the data is stored.
For example, if data is stored in a database, a valid data set can contain the entire database or a subset of the database as a result of an SQL query. In both cases the data is used as input for the reporting components of Business Central which then displays the information.
To access a data set, you must create and register a data set definition. The data set definition specifies the location of the data set, options to access it, read it, and parse it, and the columns that it contains.
| The Data Sets page is visible only to users with the admin role. |
13.8.8.1. Adding data sets
You can create a data set to fetch data from an external data source and use that data for the reporting components.
-
In Business Central, go to Admin → Data Sets.
The Data Sets page opens.
-
Click New Data Set and select one of the following provider types:
-
Bean: Generates a data set from a Java class
-
CSV: Generates a data set from a remote or local CSV file
-
SQL: Generates a data set from an ANSI-SQL compliant database
-
Elastic Search: Generates a data set from Elastic Search nodes
-
Prometheus: Generates a data set using the Prometheus query
-
Kafka: Generates a data set using metrics from Kafka broker, consumer, or producer
You must configure KIE Server for Prometheus, Kafka, and Execution Server options.
-
-
Complete the Data Set Creation Wizard and click Test.
The configuration steps differ based on the provider you choose. -
Click Save.
13.8.8.2. Editing data sets
You can edit existing data sets to ensure that the data fetched to the reporting components is up-to-date.
-
In Business Central, go to Admin → Data Sets.
The Data Set Explorer page opens.
-
In the Data Set Explorer pane, search for the data set you want to edit, select the data set, and click Edit.
-
In the Data Set Editor pane, use the appropriate tab to edit the data as required. The tabs differ based on the data set provider type you chose.
For example, the following changes are applicable for editing a CSV data provider:
-
CSV Configuration: Enables you to change the name of the data set definition, the source file, the separator, and other properties.
-
Preview: Enables you to preview the data. After you click Test in the CSV Configuration tab, the system executes the data set lookup call and if the data is available, a preview appears. Note that the Preview tab has two sub-tabs:
-
Data columns: Enables you to specify what columns are part of your data set definition.
-
Filter: Enables you to add a new filter.
-
-
Advanced: Enables you to manage the following configurations:
-
Caching: See Caching data for more information.
-
Cache life-cycle Enables you to specify an interval of time after which a data set (or data) is refreshed. The Refresh on stale data feature refreshes the cached data when the back-end data changes.
-
-
-
After making the required changes, click Validate.
-
Click Save.
13.8.8.3. Data refresh
The data refresh feature enables you to specify an interval of time after which a data set (or data) is refreshed. You can access the Data refresh every feature on the Advanced tab of the data set. The Refresh on stale data feature refreshes the cached data when the back-end data changes.
13.8.8.4. Caching data
Business Central provides caching mechanisms for storing data sets and performing data operations using in-memory data. Caching data reduces network traffic, remote system payload, and processing time. To avoid performance issues, configure the cache settings in Business Central.
For any data lookup call that results in a data set, the caching method determines where the data lookup call is executed and where the resulting data set is stored. An example of a data lookup call would be all the mortgage applications whose locale parameter is set as "Urban".
Business Central data set functionality provides two cache levels:
-
Client level
-
Back-end level
You can set the Client Cache and Backend Cache settings on the Advanced tab of the data set.
Client cache
When the cache is turned on, the data set is cached in a web browser during the lookup operation and further lookup operations do not perform requests to the back-end. Data set operations like grouping, aggregations, filtering, and sorting are processed in the web browser. Enable client caching only if the data set size is small, for example, for data sets with less than 10 MB of data. For large data sets, browser issues such as slow performance or intermittent freezing can occur. Client caching reduces the number of back-end requests including requests to the storage system.
Back-end cache
When the cache is enabled, the Drools engine caches the data set. This reduces the number of back-end requests to the remote storage system. All data set operations are performed in the Drools engine using in-memory data. Enable back-end caching only if the data set size is not updated frequently and it can be stored and processed in memory. Using back-end caching is also useful in cases with low latency connectivity issues with the remote storage.
| Back-end cache settings are not always visible in the Advanced tab of the Data Set Editor because Java and CSV data providers rely on back-end caching (data set must be in the memory) in order to resolve any data lookup operation using the in-memory Drools engine. |
13.8.9. Data source and database driver management
Business Central provides data source management features that enable you to define data sources for accessing a database. These data sources are then used by other Business Central components such as data sets. A database driver enables communication between a data source and the targeted database.
From the Data Source Authoring page you can add data sources and database drivers to Business Central.
|
Business Central provides a default data source that can be used but cannot be edited or deleted. |
13.8.9.1. Adding a data source
You can add a new data source to Business Central from the Data Sources Authoring page.
-
In Business Central, select the Admin icon in the upper-right corner of the screen and select Data Sources.
-
In the DataSource Explorer pane, click Add DataSource.
The New data source window opens.
-
In the New data source window, enter the Name, Connection URL, User, Password, and Driver fields of the data source.
-
Click Test Connection to verify the connection to the database.
-
Click Finish.
13.8.9.2. Editing a data source
You can edit the properties of a data source and also test its connection to the database in Business Central.
-
In Business Central, select the Admin icon in the upper-right corner of the screen and select Data Sources.
-
In the DataSource Explorer pane, click the data source you want to edit.
-
In the Data Source Definition pane, make the necessary changes to the Name, Connection URL, User, Password, and the Driver fields.
-
Click Test Connection to verify the connection to the database.
-
Click Update.
-
Click Save.
13.8.9.3. Deleting a data source
You can delete an existing data source from the DataSource Explorer pane in Business Central.
-
In Business Central, select the Admin icon in the upper-right corner of the screen and select Data Sources.
-
In the DataSource Explorer pane, click the data source you want to delete.
-
Click Remove.
-
Click Delete to confirm the deletion of the data source.
13.8.9.4. Adding a database driver
You can add a new database driver to Business Central.
-
In Business Central, select the Admin icon in the upper-right corner of the screen and select Data Sources.
-
In the DataSource Explorer pane, click Add Driver.
The New driver window opens.
-
In the New driver window, enter the Name, Driver Class Name, Group Id, Artifact Id, and Version fields of the database driver.
-
Click Finish.
13.8.9.5. Editing a database driver
You can edit the properties of a database driver from the Driver Definition pane.
-
In Business Central, select the Admin icon in the upper-right corner of the screen and select Data Sources.
-
In the DataSource Explorer pane, select the driver you want to edit.
-
In the Driver Definition pane, make the necessary changes to the Name, Driver Class Name, Group Id, Artifact Id, and the Version fields.
-
Click Update.
-
Click Yes.
13.8.9.6. Deleting a database driver
You can remove database drivers from the Data Source Definition pane of Business Central.
-
In Business Central, select the Admin icon in the upper-right corner of the screen and select Data Sources.
-
In the DataSource Explorer pane, select the driver you want to delete.
-
Click Remove.
-
Click Delete.
13.9. User and group management
Business Central defines three types of entities for security management: users, groups, and roles. You can assign permissions to both roles and groups. You can assign the following roles in Business Central:
-
process-admin
-
manager
-
admin
-
analyst
-
rest-all
-
developer
-
rest-project
-
user
|
User roles in the application Role Registry have a role identifier, whereas user groups do not. |
Use Business Central to create and manage as many users and groups as you require. A user must be assigned to at least one user-specific role to log in to Business Central. User privileges depend on permissions from the groups and roles that the user is a member of. Note that the role or group priority is considered if a user has several roles or groups assigned to it.
13.9.1. Creating users
User privileges and settings are controlled by the roles assigned to a user and the groups that a user belongs to. You can create any number of users in Business Central.
|
Do not create a user called |
-
In Business Central, select the Admin icon in the top-right corner of the screen and select Users.
-
Click New user, enter a user name, and then click Next.
-
To assign roles to the user, click the Roles tab, click Add Roles, select the desired roles, and click Add to selected roles.
-
Optional: To assign groups to the user, click the Groups tab, click Add to groups, select the desired groups, and click Add to selected groups.
-
Click Create.
-
Click Yes to set a password for the user, enter a desired password, and click Change.
|
The user must have at least one role to access Business Central. |
13.9.2. Editing users
You can change the group and role of a user using the Users option on the Business Central Settings page. All user permissions are based on the group and role permissions of the user. You can view the user permissions from the Permissions tab.
-
In Business Central, select the Admin icon in the top-right corner of the screen and select Users.
-
From the All users list, click the user you want to edit. The user details display in the right pane.
-
Click Edit to perform any of the following tasks:
-
To change the groups of a user, click the Groups tab, click Add to groups, select the groups you want the user to be part of, click Add to selected groups, and click Save.
-
To change the roles of a user, click the Roles tab, click Add roles, select the roles you want to assign to the user, click Add to selected roles, and click Save.
-
To view the user permissions, click the Permissions tab and expand the attributes.
-
To change the password, click Change Password, enter the new password, and click Change.
-
To delete the user, click Delete and then click Yes to confirm removal.
-
13.9.3. Creating groups
In Business Central, you can use groups to control permissions for a collection of users. You can create as many groups as you want but a group must have at least one user.
-
In Business Central, select the Admin icon in the top-right corner of the screen and select Groups.
-
Click New group, enter a group name, and then click Next.
-
Select the users that you want to add to this group, and then click Add selected users.
The newly created group is listed under All groups.
13.9.4. Editing groups
You can edit the attribute of a group such as home page, priority, and permissions according to your requirements. From the Groups option on the Business Central Settings page, you can modify or delete a group.
-
In Business Central, select the Admin icon in the top-right corner of the screen and select Groups.
-
From the All groups list, click the group that you want to edit. The user details display in the right pane.
-
Select the home page from the Home Page list.
-
Select the priority from the Priority list.
-
In the Permissions section, expand the resource attribute and change its permission.
You can add exceptions to Pages, Editor, Spaces, and Projects permissions.
-
Click Save to apply the changes.
13.10. Security management
Security management is the process of managing users, groups, and permissions. You can control access to Business Central resources and features from the Business Central Security management page.
Business Central defines three types of entities for security management: users, groups, and roles. You can assign permissions to both roles and groups. A user inherits permissions from the groups and roles that the user is a member of.
13.10.1. Security management providers
In the context of security management, a realm restricts access to different application resources. Realms contain information about users, groups, roles, and permissions. A concrete user and group management service implementation for a specific realm is called a security management provider.
If the built-in security management providers do not meet the requirements of your application security realm, then you can build and register your own security management provider.
| If the security management provider is not installed, the user interface for managing the security realm is not available. After you install and configure a security management provider, the user and group management features are automatically enabled in the security management user interface. |
Business Central includes the Red Hat JBoss EAP security management provider which supports realm types based on the contents of the application-users.properties or application-roles.properties property file.
13.10.1.1. Configuring the Red Hat JBoss EAP security management provider based on property files
You can build and register your own Red Hat JBoss EAP security management provider. To use the Red Hat JBoss EAP security management provider based on property files, complete the steps in this procedure.
-
Red Hat JBoss EAP is installed.
-
To use an existing users or roles property file from the Red Hat JBoss EAP instance, include the following system properties in the
EAP_HOME/standalone/configuration/application-users.propertiesandEAP_HOME/standalone/configuration/application-roles.propertiesfiles, as shown in the following example:<property name="org.uberfire.ext.security.management.wildfly.properties.realm" value="ApplicationRealm"/> <property name="org.uberfire.ext.security.management.wildfly.properties.users-file-path" value="/standalone/configuration/application-users.properties"/> <property name="org.uberfire.ext.security.management.wildfly.properties.groups-file-path" value="/standalone/configuration/application-roles.properties"/>The following table provides a description and default value for these properties:
Table 44. Red Hat JBoss EAP security management provider based on property files Property Description Default value org.uberfire.ext.security.management.wildfly.properties.realmThe name of the realm. This property is not mandatory.
ApplicationRealmorg.uberfire.ext.security.management.wildfly.properties.users-file-pathThe absolute file path for the users property file. This property is mandatory.
./standalone/configuration/application-users.propertiesorg.uberfire.ext.security.management.wildfly.properties.groups-file-pathThe absolute file path for the groups property file. This property is mandatory.
./standalone/configuration/application-roles.properties -
Create the
security-management.propertiesfile in the root directory of your application. For example, create the following file:src/main/resources/security-management.properties -
Enter the following system property and security provider name as a value in the
security-management.propertiesfile:<property name="org.uberfire.ext.security.management.api.userManagementServices" value="WildflyUserManagementService"/>
13.10.1.2. Configuring the Red Hat JBoss EAP security management provider based on property files and CLI mode
To use the Red Hat JBoss EAP security management provider based on property files and CLI mode, complete the steps in this procedure.
-
Red Hat JBoss EAP is installed.
-
To use an existing users or roles property file from the Red Hat JBoss EAP instance, include the following system properties in the
EAP_HOME/standalone/configuration/application-users.propertiesandEAP_HOME/standalone/configuration/application-roles.propertiesfiles, as shown in the following example:<property name="org.uberfire.ext.security.management.wildfly.cli.host" value="localhost"/> <property name="org.uberfire.ext.security.management.wildfly.cli.port" value="9990"/> <property name="org.uberfire.ext.security.management.wildfly.cli.user" value="<USERNAME>"/> <property name="org.uberfire.ext.security.management.wildfly.cli.password" value="<USER_PWD>"/> <property name="org.uberfire.ext.security.management.wildfly.cli.realm" value="ApplicationRealm"/>The following table provides a description and default value for these properties:
Table 45. Red Hat JBoss EAP security management provider based on property files and CLI mode Property Description Default value org.uberfire.ext.security.management.wildfly.cli.hostThe native administration interface host.
localhostorg.uberfire.ext.security.management.wildfly.cli.portThe native administration interface port.
9990org.uberfire.ext.security.management.wildfly.cli.userThe native administration interface username.
NA
org.uberfire.ext.security.management.wildfly.cli.passwordThe native administration interface user’s password.
NA
org.uberfire.ext.security.management.wildfly.cli.realmThe realm used by the application’s security context.
ApplicationRealm -
Create the
security-management.propertiesfile in the root directory of your application. For example, create the following file:src/main/resources/security-management.properties -
Enter the following system property and security provider name as a value in the
security-management.propertiesfile:<property name="org.uberfire.ext.security.management.api.userManagementServices" value="WildflyCLIUserManagementService"/>
13.10.2. Permissions and settings
A permission is an authorization granted to a user to perform actions related to a specific resource within the application. For example, a user can have following permissions:
-
View a page.
-
Save the project.
-
View a repository.
-
Delete a dashboard.
You can grant or deny a permission and a permission can be global or resource specific. You can use permissions to protect access to resources and customize features within the application.
13.10.2.1. Changing permissions for groups and roles in Business Central
In Business Central, you cannot change permissions for an individual user. However, you can change permissions for groups and roles. The changed permissions apply to users with the role or that belong to a group that you changed.
|
Any changes that you make to roles or groups affect all of the users associated with that role or group. |
-
You are logged in to Business Central with the
adminuser role.
-
To access the Security management page in Business Central, select the Admin icon in the top-right corner of the screen.
-
Click Roles, Groups, or Users on the Business Central Settings page.
The Security management page opens on the tab for the icon that you clicked.
-
From the list, click the role or group you want to edit. All details are displayed in the right panel.
-
Set the Home Page or Priority under the Settings section.
-
Set the Business Central, page, editor, space, and project permissions under the Permissions section.
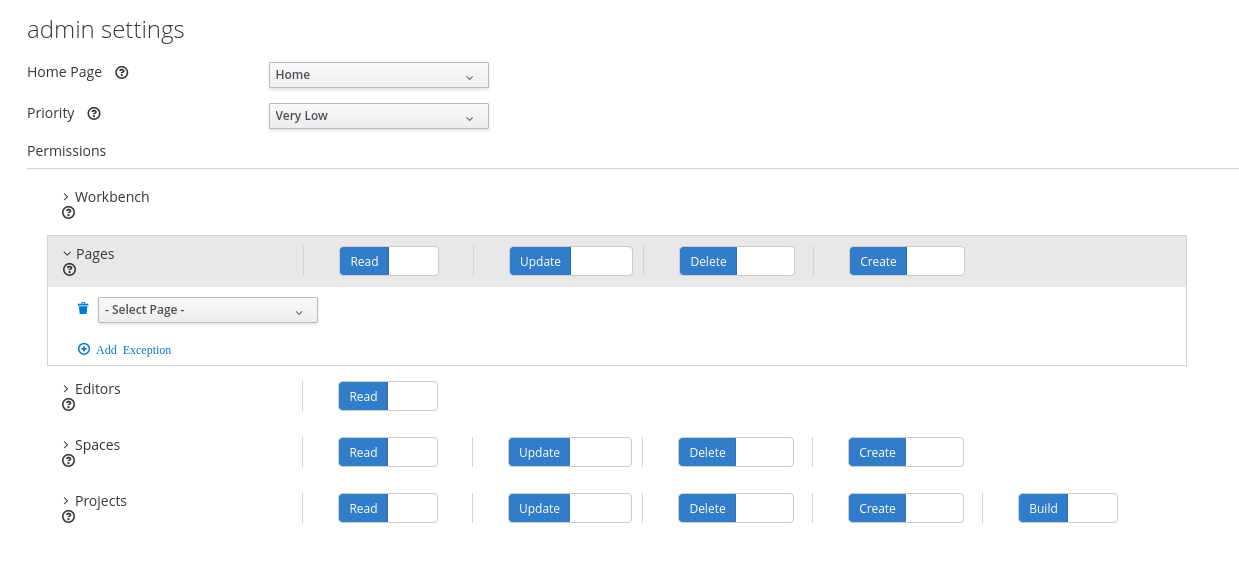 Figure 141. Setting the permissions
 -
Click the arrow next to a resource type to expand the resource type whose permissions you want to change.
-
Optional: To add an exception for a resource type, click Add Exception and then set the permissions as required.
You cannot add an exception to the Business Central resource type.
-
Click Save.
13.10.2.2. Changing the Business Central home page
The home page is the page that appears after you log in to Business Central. By default, the home page is set to Home. You can specify a different home page for each role and group.
-
In Business Central, select the Admin icon in the top-right corner of the screen and select Roles or Groups.
-
Select a role or group.
-
Select a page from the Home Page list.
-
Click Save.
The role or group must have read access to a page before you can make it the home page.
13.10.2.3. Setting priorities
A user can have multiple roles and belong to multiple groups. The Priority setting determines the order of precedence of a role or group.
-
You are logged in to Business Central with the
adminuser role.
-
In Business Central, select the Admin icon in the top-right corner of the screen and select Roles or Groups.
-
Select a role or group.
-
Select a priority from the Priority menu, and then click Save.
|
If a user has a role or belongs to a group that has conflicting settings, the settings of the role or group with the highest priority applies. |
13.11. SSH keystore
This section provides an overview of the Business Central SSH keystore and includes a guide for platform users. It explains how to use the Business Central SSH keystore to register and use it’s SSH public keys.
13.11.1. Introduction
Business Central includes an SSH keystore service to provide proper SSH authentication for users.
It provides a configurable default SSH keystore, extensible APIs to allow custom implementations, support for multiple SSH public keys formats, and a new UI available on the Admin page to enable users to register their SSH public keys.
13.11.1.1. The default SSH keystore
The default SSH keystore included with Business Central provides a file-based storage mechanism to store users' SSH public keys.
By default, it uses Business Central .security folder as a root path. It is possible to use a custom storage path
by setting the appformer.ssh.keys.storage.folder property to direct to a different folder.
The SSH public keys are stored in the {securityFolderPath}/pkeys/{userName}/ folder structure.
Each SSH public key consists of a pair of files in the storage folder:
-
{keyId}.pub: a file containing the SSH public key content. The file name determines the logic key ID on the system, so do not modify the file name during runtime. For example
ssh-rsa AAAAB3NzaC1yc2EAAAADAQABAAACAQDmak4Wu23RZ6XmN94bOsqecZxuTa4RRhhQmHmTZjMB7HM57/90u/B/gB/GhsPEu1nAXL0npY56tT/MPQ8vRm2C2W9A7CzN5+z5yyL3W01YZy3kzslk77CjULjfhrcfQSL3b2sPG5jv5E5/nyC/swSytucwT/PE7aXTS9H6cHIKUdYPzIt94SHoBxWRIK7PJi9d+eLB+hmDzvbVa1ezu5a8yu2kcHi6NxxfI5iRj2rsceDTp0imC1jMoC6ZDfBvZSxL9FXTMwFdNnmTlJveBtv9nAbnAvIWlilS0VOkdj1s3GxBxeZYAcKbcsK9sJzusptk5dxGsG2Z8vInaglN6OaOQ7b7tcomzCYYwviGQ9gRX8sGsVrw39gsDIGYP2tA4bRr7ecHnlNg1b0HCchA5+QCDk4Hbz1UrnHmPA2Lg9c3WGm2qedvQdVJXuS3mlwYOqL40aXPs6890PvFJUlpiVSznF50djPnwsMxJZEf1HdTXgZD1Bh54ogZf7czyUNfkNkE69yJDbTHjpQd0cKUQnu9tVxqmBzhX31yF4VcsMeADcf2Z8wlA3n4LZnC/GwonYlq5+G93zJpFOkPhme8c2XuPuCXF795lsxyJ8SB/AlwPJAhEtm0y0s0l1l4eWqxsDxkBOgN+ivU0czrVMssHJEJb4o0FLf7iHhOW56/iMdD9w== userName -
.{keyId}.pub.meta: a file containing the key metadata in JSON format. If a key has no metadata, a new metadata file is dynamically generated. For example:
{
    "name":"Key",
    "creationDate":"Oct 10, 2018 10:10:50 PM",
    "lastTimeUsed":"Oct 11, 2018 12:11:23 PM"
}
13.11.1.2. Using a custom SSH keystore
It is possible to extend and customize the platform default SSH keystore to meet more specific requirements.
Use the system property appformer.ssh.keystore to specify the Java class name of the service to use. If the property
does not exist or it contains a wrong value, the default SSH keystore is loaded.
|
To create a custom implementation of the SSH keystore, your Java Class must implement the class |
13.11.2. Using the SSH keystore
This section describes how to use the SSH keystore to register your own keys and how to use them.
13.11.2.1. The SSH keystore UI
The SSH keystore provides an intuitive UI to enable users to manage their SSH public keys on the system. It is accessible from the Admin page by using the SSH Keys menu option.
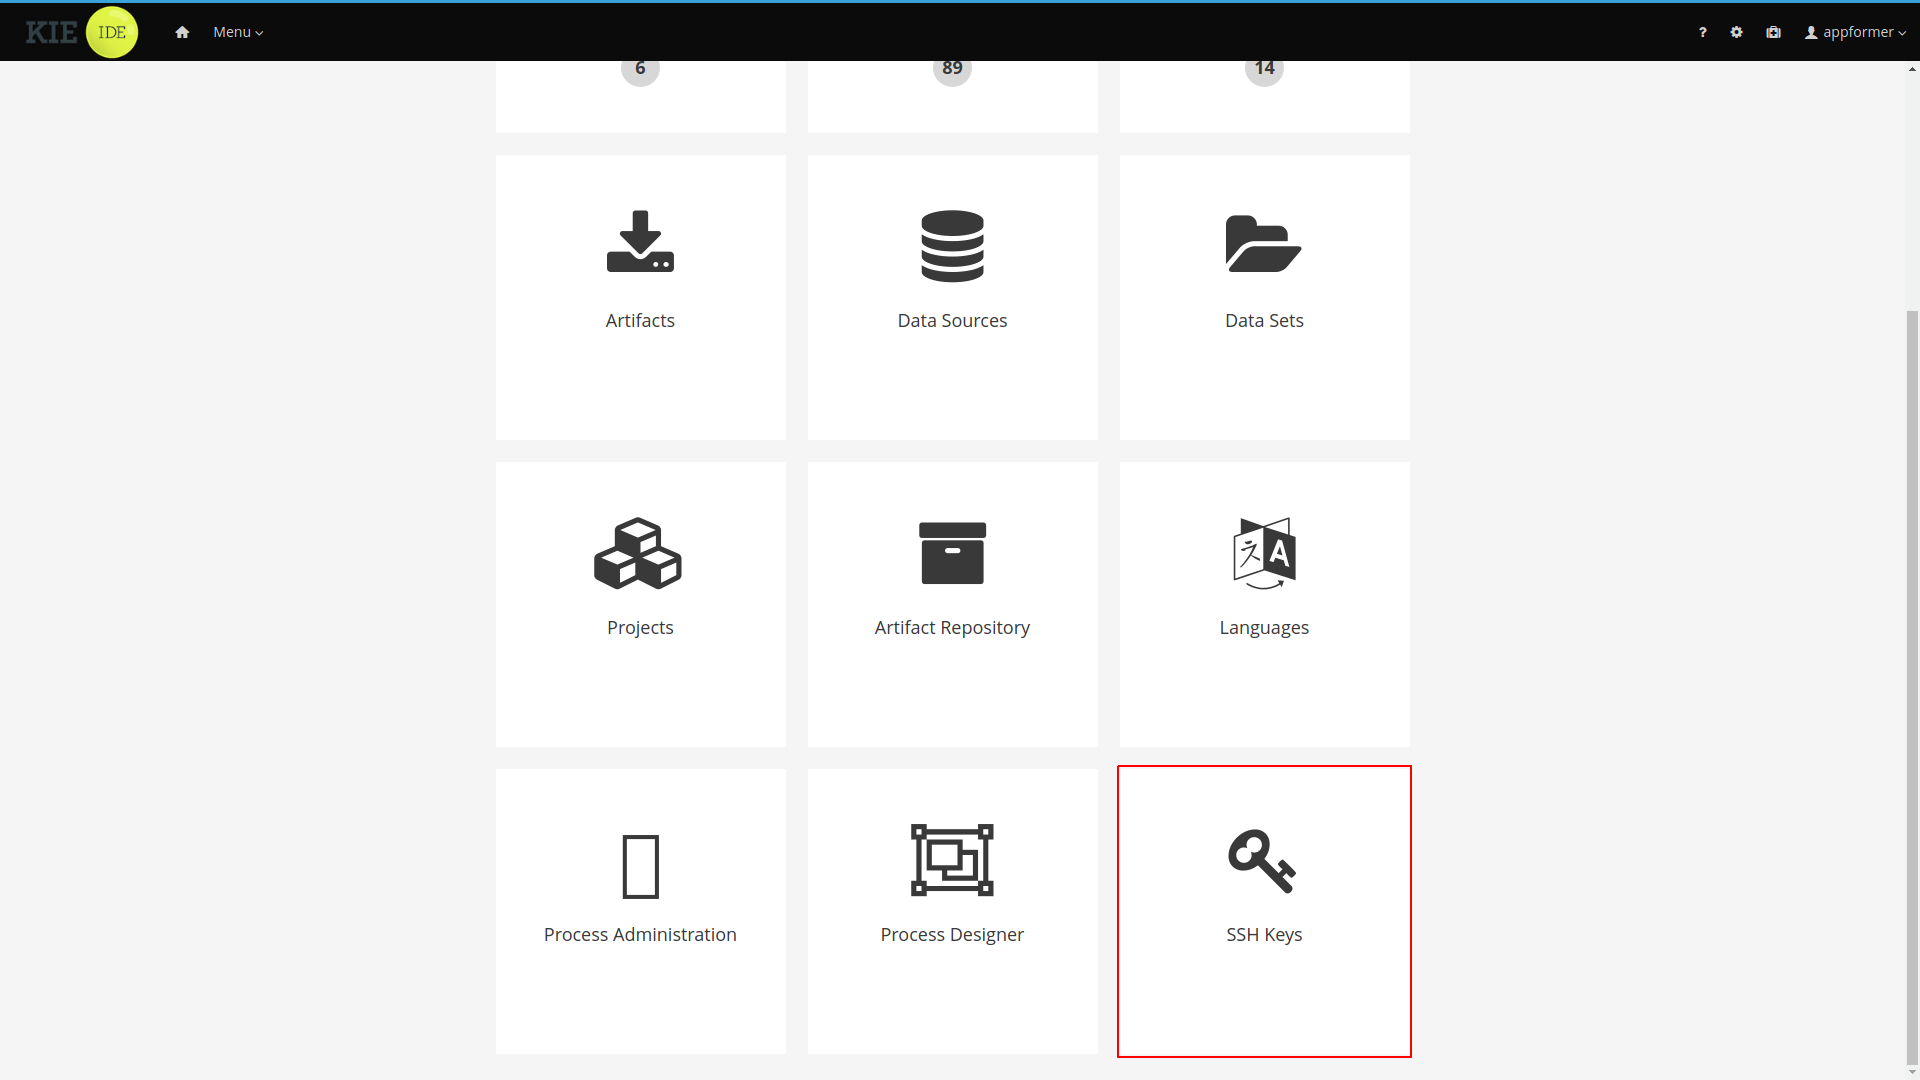
After you click the SSH Keys menu option the SSH Keys Editor will open. the editor displays a table showing the user SSH public keys and provides access to the main action buttons.
-
Add SSH Key: Used to add an SSH public key for the user.
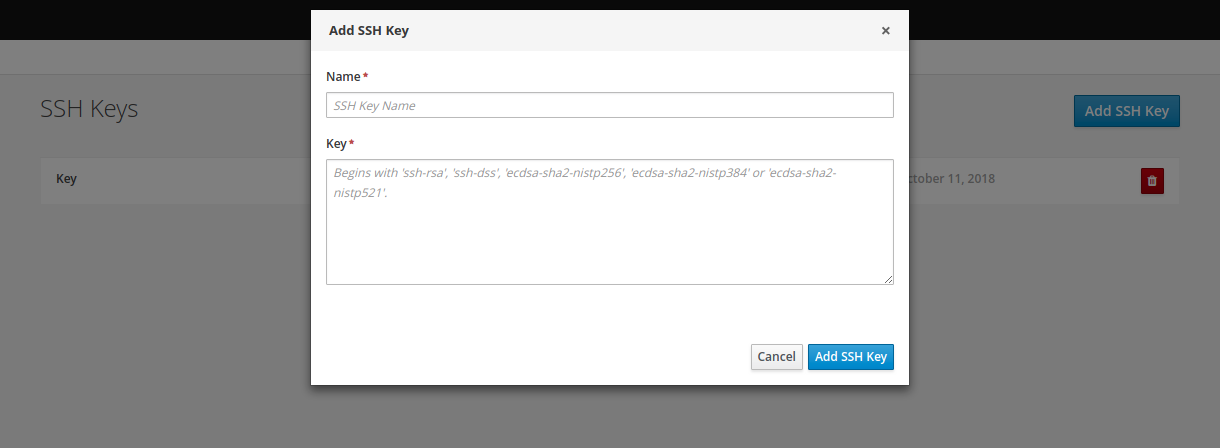 Figure 143. Adding new SSH public key
 -
Delete SSH Key: Used to remove an existing SSH public key
 Figure 144. Deleting a SSH public key
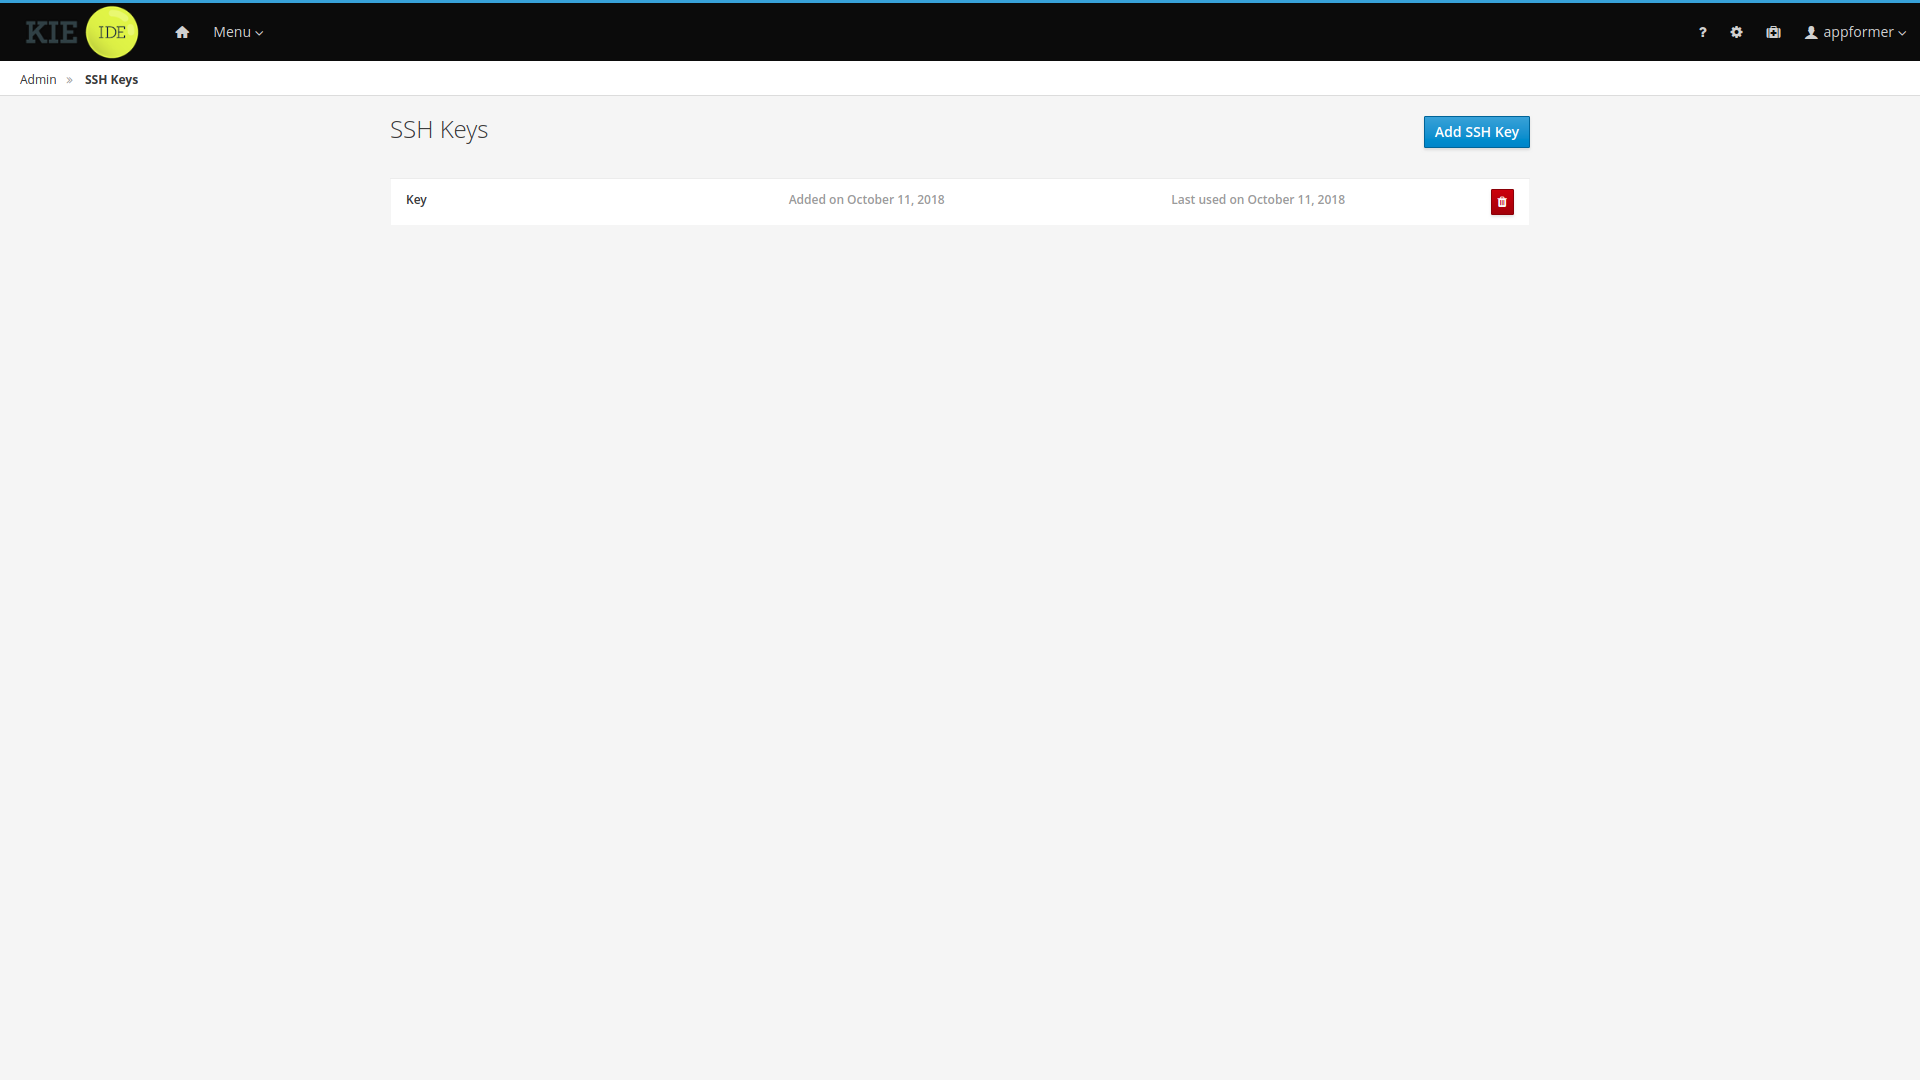
13.11.2.2. Adding SSH keys
This section explains step by step how to add an SSH public key to the SSH keystore.
Creating the SSH key on your computer
-
Open a terminal on your computer
-
Run the
ssh-keygencommand to create the key:ssh-keygen -t rsa -b 4096 -C "<your_user_login_here>"The SSH key formats supported by the keystore are 'ssh-rsa', 'ssh-dss', 'ecdsa-sha2-nistp256', 'ecdsa-sha2-nistp384' and 'ecdsa-sha2-nistp521'.
-
When prompted, press Enter and accept the default key file location.
Enter a file in which to save the key (/home/<your_login_here>/.ssh/id_rsa): [Press enter] -
When prompted, enter the pass phrase that you want to use.
Enter passphrase (empty for no passphrase): [Type a passphrase] Enter same passphrase again: [Type passphrase again] -
Start the
ssh-agent:eval "$(ssh-agent -s)" Agent pid <any-number-here> -
Add the new SSH private key to the
ssh-agent. If you used a different key name, replaceid_rsawith your key namessh-add ~/.ssh/id_rsa
Registering your SSH public key with the SSH keystore
-
In Business Central, go to the gear icon next to your login to open the Admin page.
 Figure 146. Accessing the Admin Page
 -
Open the SSH keystore UI by clicking the SSH Keys menu option.
Figure 147. SSH Keys Menu Option on Admin Page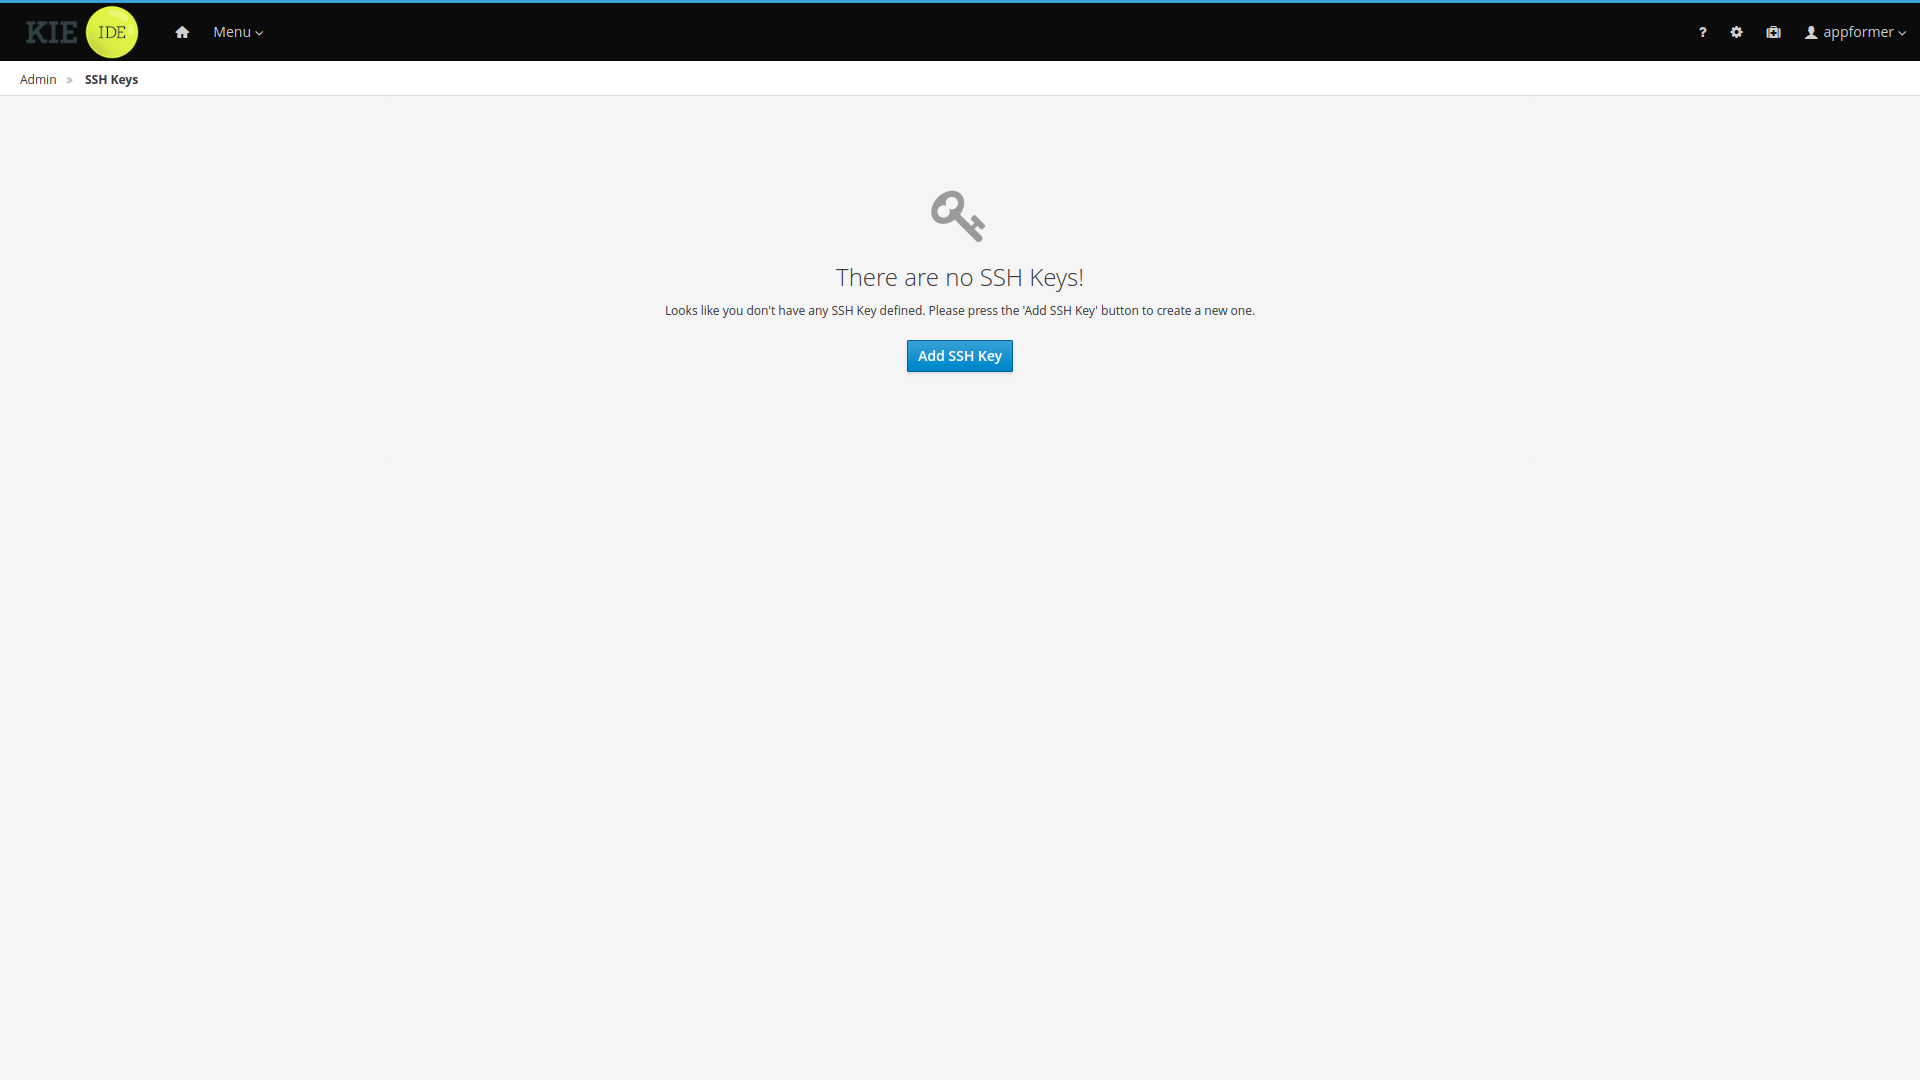 Figure 148. SSH Keystore UI Without keys
 -
Copy the contents of your SSH Public key onto the clipboard. Use the
catcommand to display your key content. If you used a different key name: replaceid_rsawith your key name, and copy it.cat ~/.ssh/id_rsa.pub -
In the SSH keystore UI press the Add SSH Key button to open the New SSH public key form. Specify a name, copy the key content into the key field and click Add SSH Key to register the key.
Figure 149. Adding new SSH public key-
Name field cannot be empty, this field defines a meaningful name for the user to identify the key on the SSH public keys table.
-
Key must be a valid SSH Public key, so it cannot be empty and the key format must be supported by the platform.
-
13.12. Embedding Business Central in Your Application
Apart from the individual perspectives (such as the Library or Content Management), Business Central provides a number of editors used for designing and managing assets in different formats. Within Business Central, each asset type has a corresponding editor.
Business Central provides the possibility to embed the perspectives and editors in the user’s application using the standalone mode. Without actually switching to Business Central, it is possible to display perspectives and edit various assets, such as rules, processes, or decision tables, in separate applications.
To embed a part of Business Central in an application, Business Central must be deployed and running on a web server or an application server. Then, in your application, include an HTML inline frame with the proper HTTP query parameters as described in the following table.
| Parameter | Values | Description |
|---|---|---|
|
none |
This parameter must be included in each URL of a perspective or an editor that will be used in the standalone mode. |
|
|
Used for specifying the perspective to be displayed. |
|
|
Displays the breadcrumbs at the top of the page that can be used for navigating to the lists of spaces and projects within the Library. This parameter can be used only if |
|
|
Specifies the path to the asset to be opened in a corresponding editor. The path must be specified in the format |
| URL | Description |
|---|---|
http://localhost:8080/business-central/kie-wb.jsp?standalone&perspective=LibraryPerspective |
Opens the Library where it is possible to select a project to be managed. |
Opens the Library with the list of projects. The |
|
Opens the editor of the specified asset. |
|
http://localhost:8080/business-central/kie-wb.jsp?standalone&perspective=ContentManagerPerspective |
Opens the Content Management perspective, where it is possible to create and manage custom pages. |
http://localhost:8080/business-central/kie-wb.jsp?standalone&perspective=MyCustomPage |
Opens the specified custom page that has been created before using the Content Management perspective. The value of the |
13.13. Execution Server Management UI
The Execution Server Management UI allows users create and modify Server Templates and Containers, it also allows users manage Remote Servers. This screen is available via Deploy → Rule Deployments menu.

|
The management UI is only available for KIE Managed Servers. |
13.13.1. Server Templates
Server templates are used to define a common configuration that can be used for multiple servers, thus the name: Template.
Server Templates can be created directly from the management UI. A server template is automatically created when a server connects to the jBPM controller and there isn’t a template definition for that remote server. Server templates may have one or more capabilities, such capabilities can’t be modified, if you need to modify the capabilities you’ll have to create a new template. Here is the list of current capabilities:
-
Rule (Drools)
-
Process (jBPM)
-
Planning (Optaplanner)
|
For Planner capability it’s mandatory to enable Rule’s capability too. |
In order to create a new Server Template you have to click at New Server Template button and follow the wizard. It’s also possible to create a container during Wizard, but for now let’s limit to just the template.
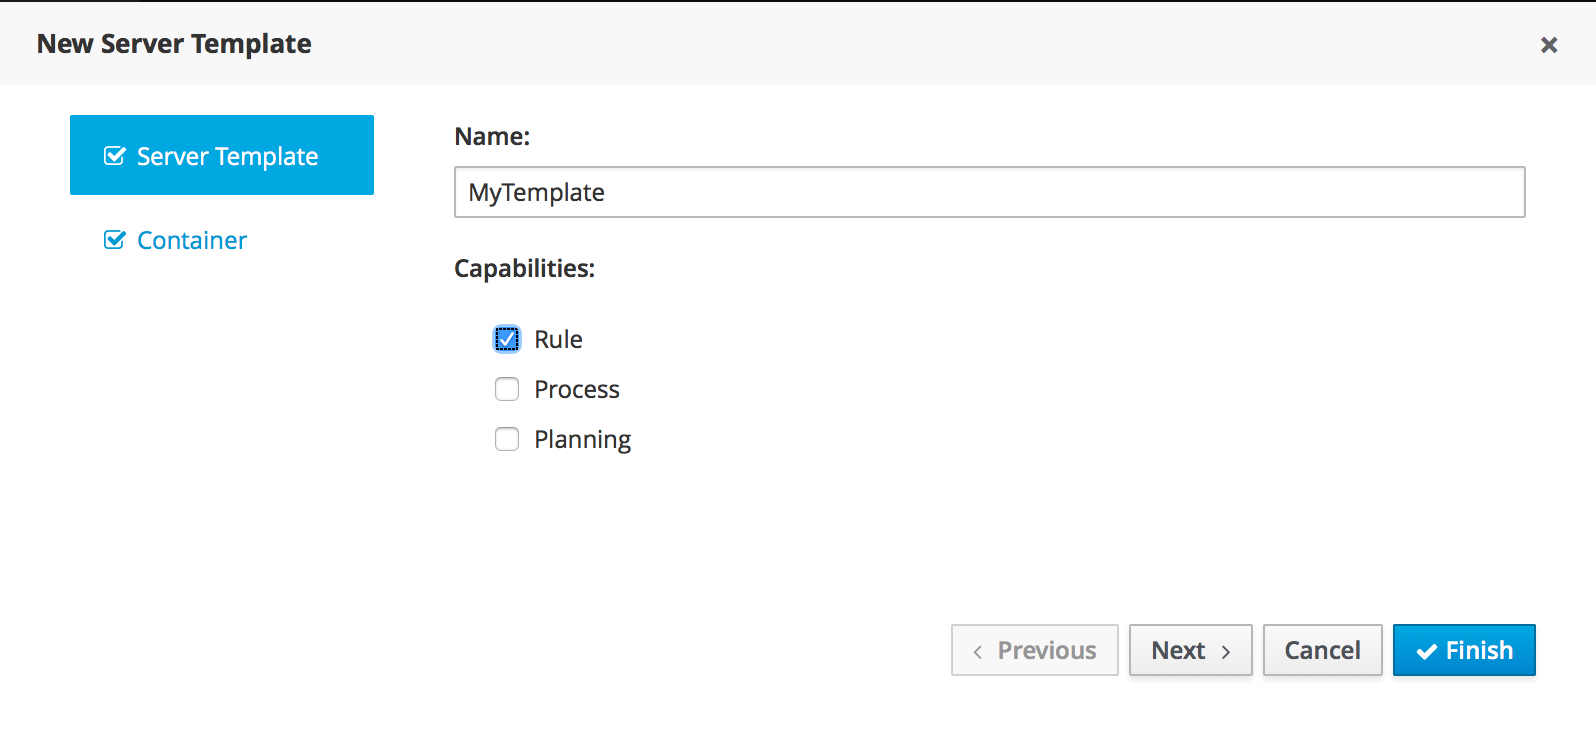
Once created you’ll get the new Template listed on the left hand side, with the new Server Template highlighted. On the right hand side you get the 2nd level navigation that lists Containers and Remote Servers that are related to selected Server Template.
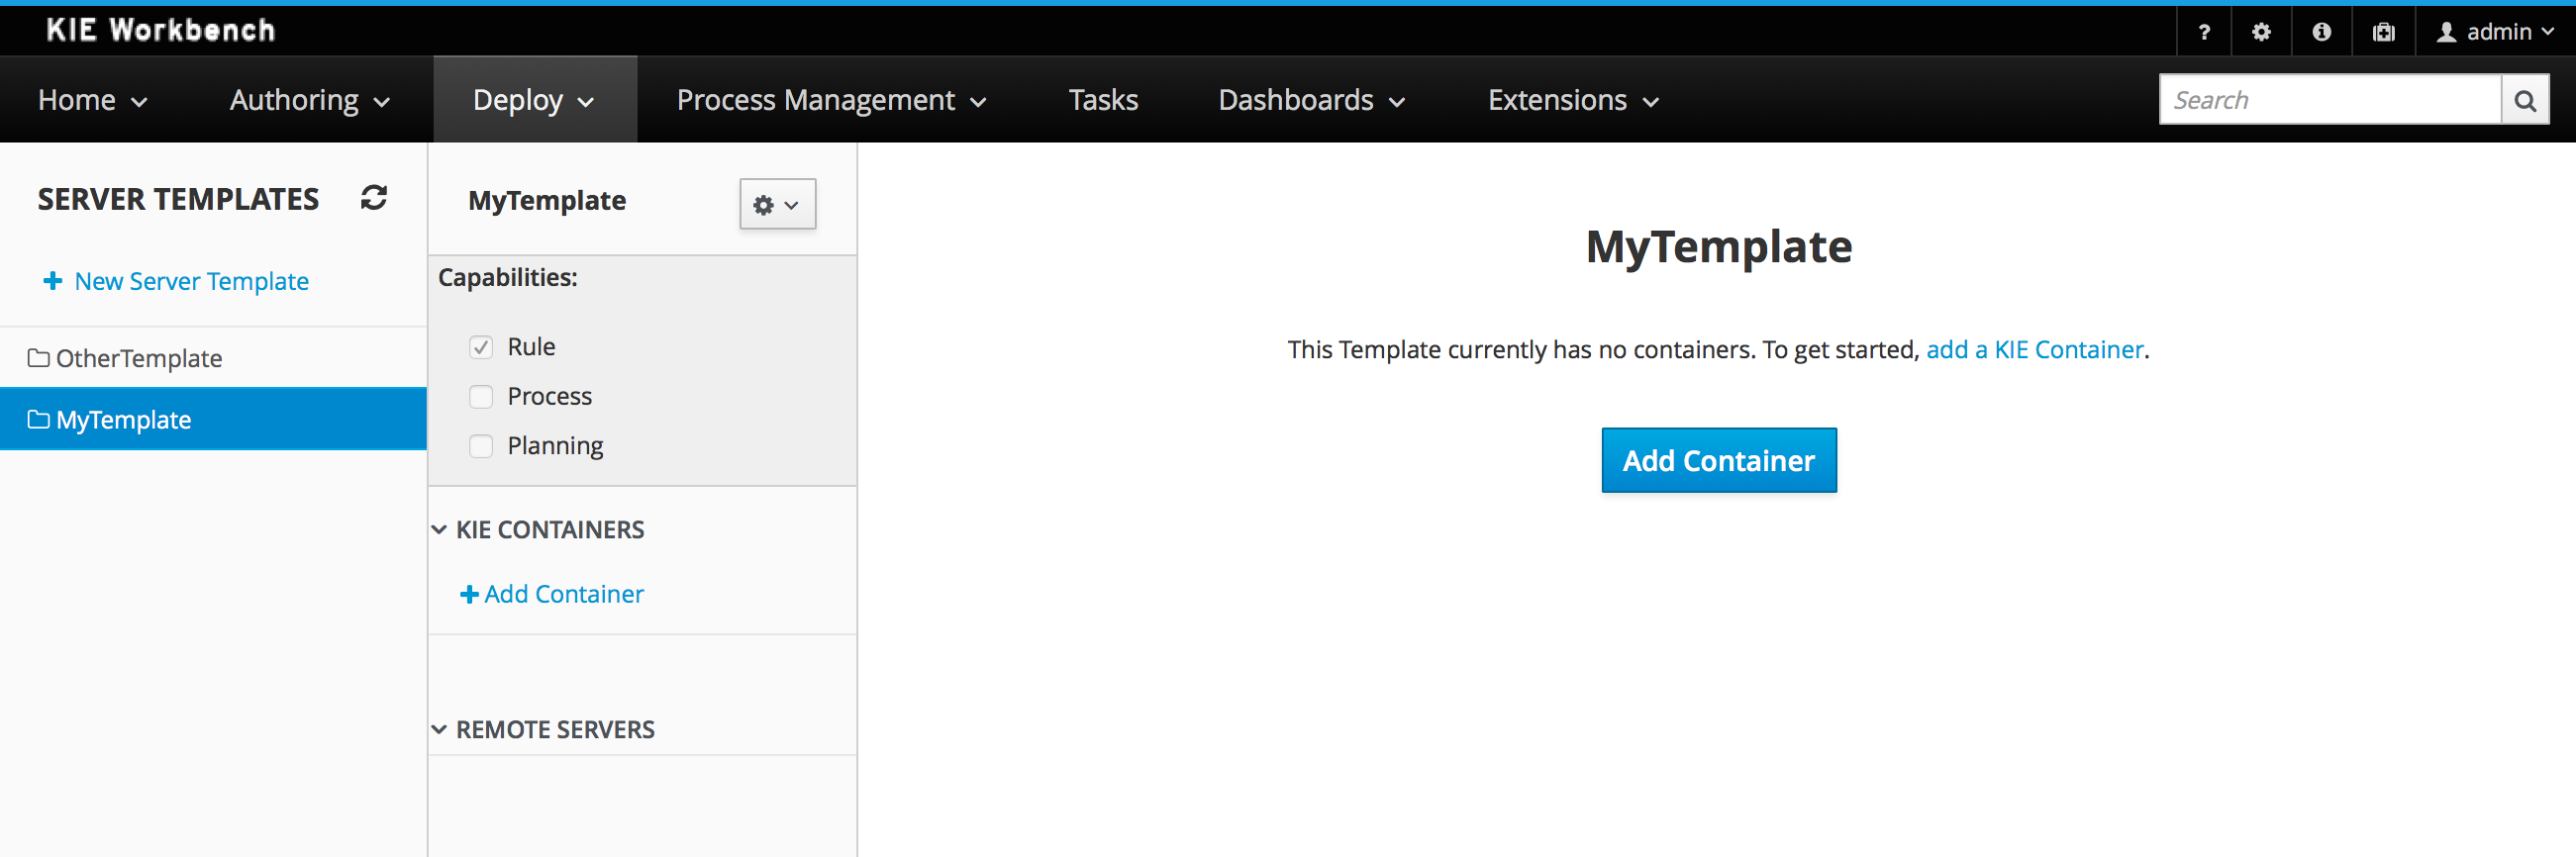
On top of the navigation is also possible to delete the current Server Template or create a copy of it.
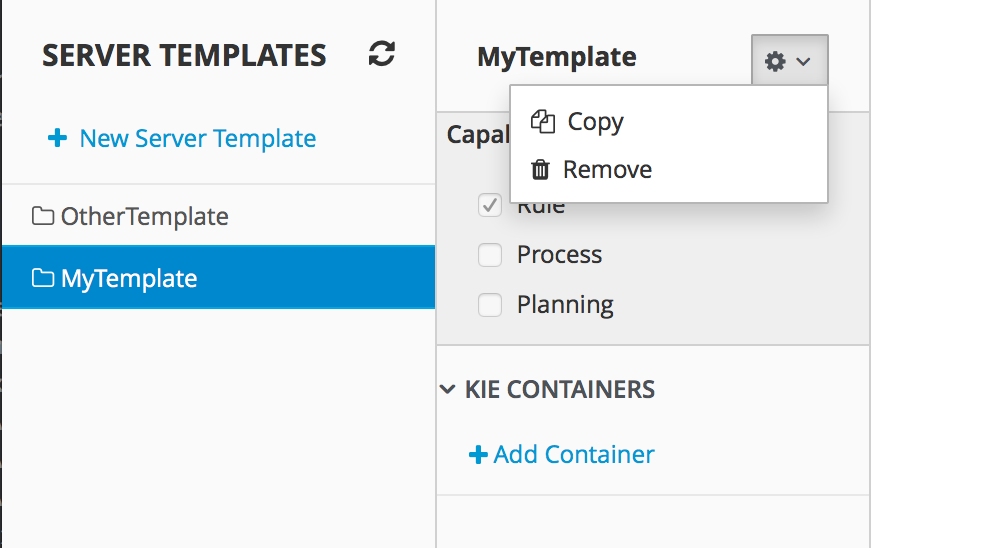
13.13.2. Container
A Container is a KIE Container configuration of the Server Template. Click the Add Container button to create a new container for the current Server Template.
The search area can help users find a specific KJAR that they are looking for.
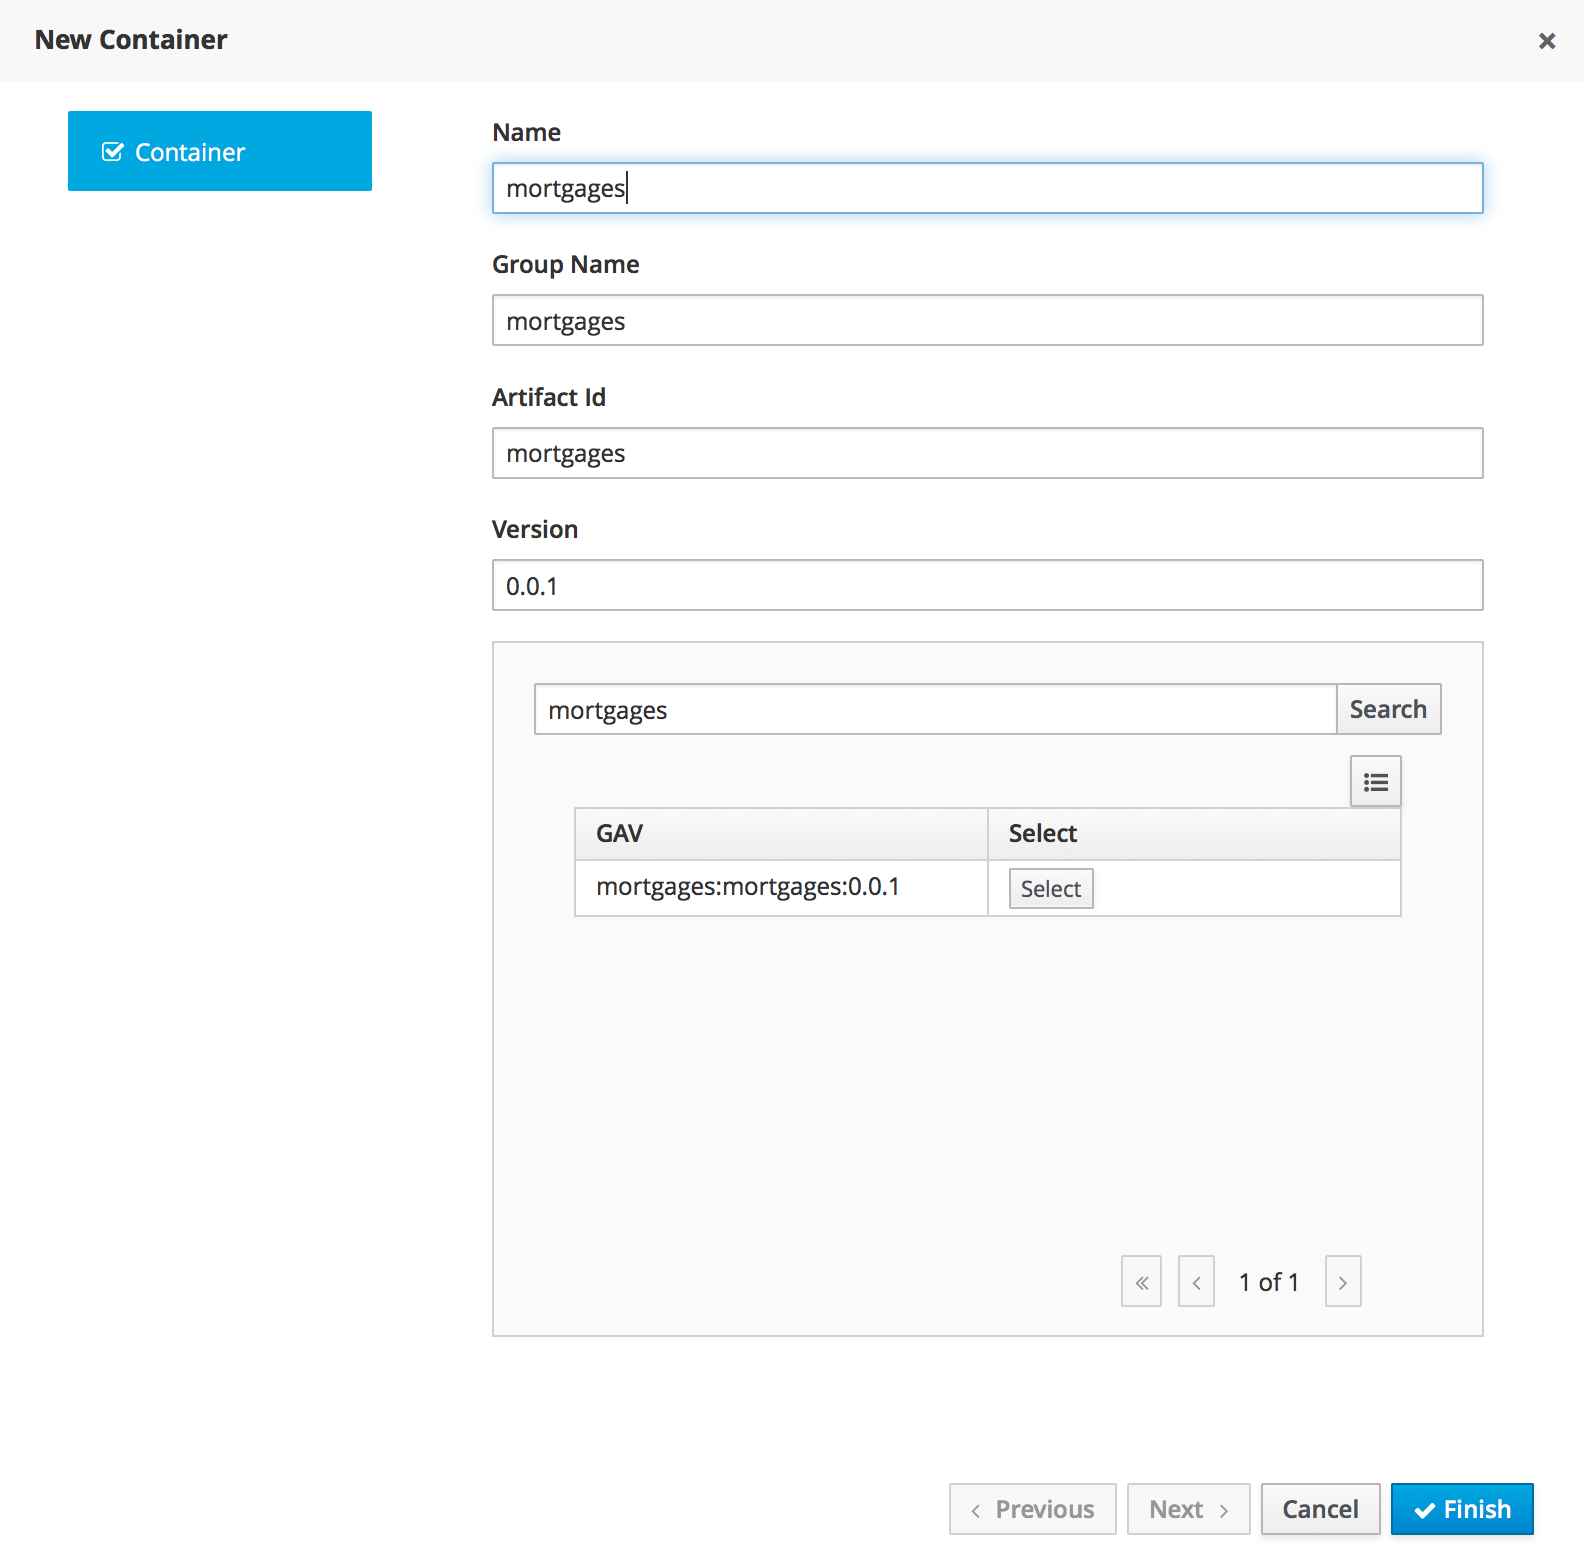
For Server Templates that have Process capabilities enabled, the Wizard has a 2nd optional step where users can configure some process related behaviors.
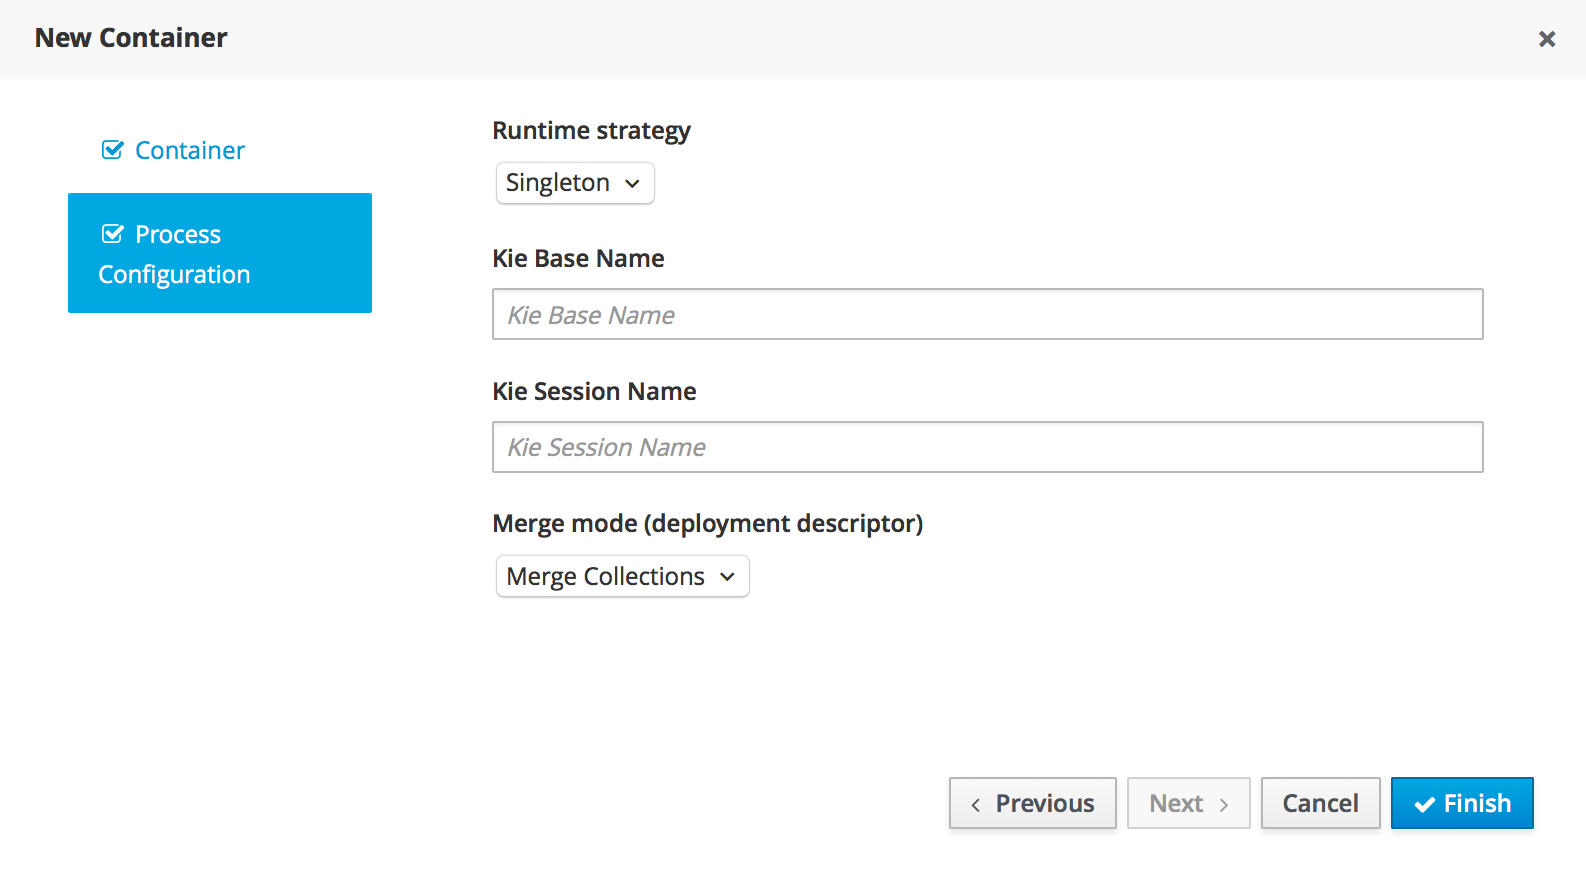
Kie Base Name determines which Kie Base of the deployed artifact will be used.
Kie Session Name determines which Kie Session of the selected Kie Base will be used.
|
Please notice that configurations on this tab take effect only if the deployed project contains some business processes. It is not enough if the server template has the extension for processes enabled. |
Once created the new Container will be displayed on the containers list just above the list of remote servers. Just after created a container is by default Stopped which is the only state that allows users to remove it.
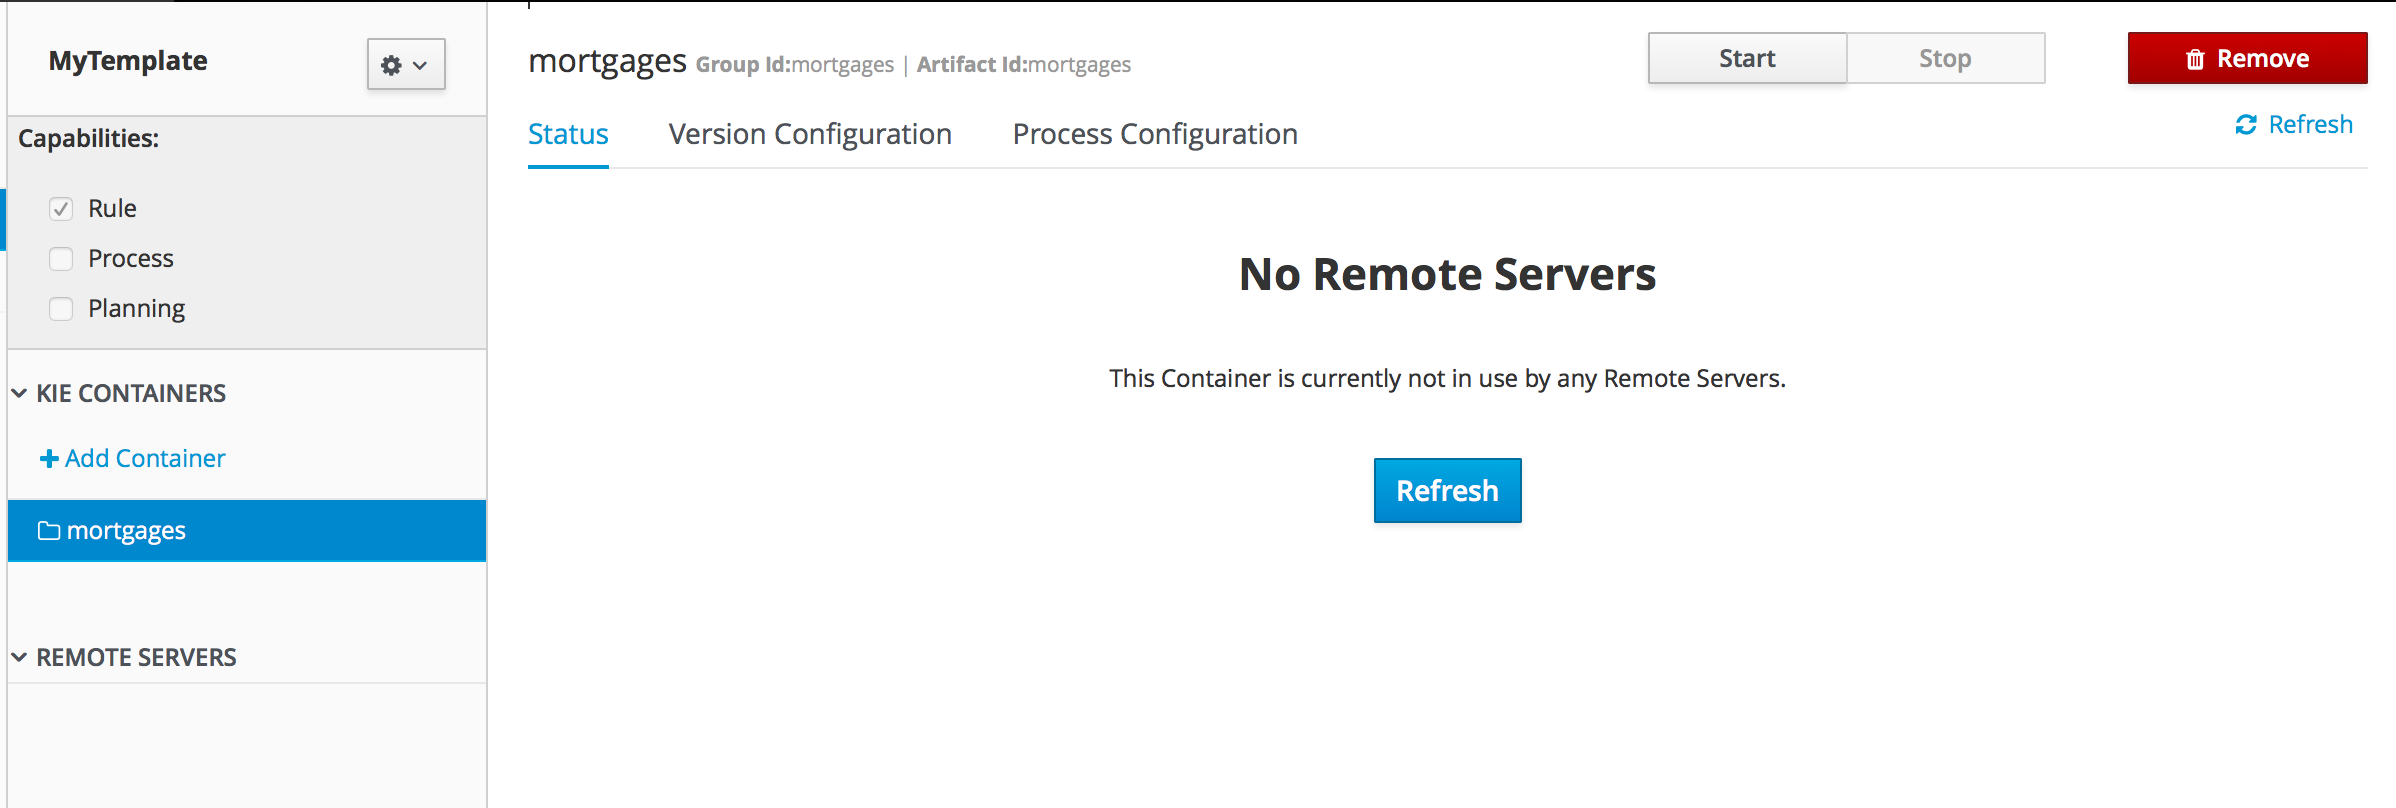
A Container has the following tabs available for management and/or configuration:
-
Status
-
Version Configuration
-
Process Configuration
Status tab lists all the Remote Servers that are running the active Container. Each Remote Server is rendered as a Card, which displays to users status and endpoint.
|
Only started Containers are deployed to remote servers. |
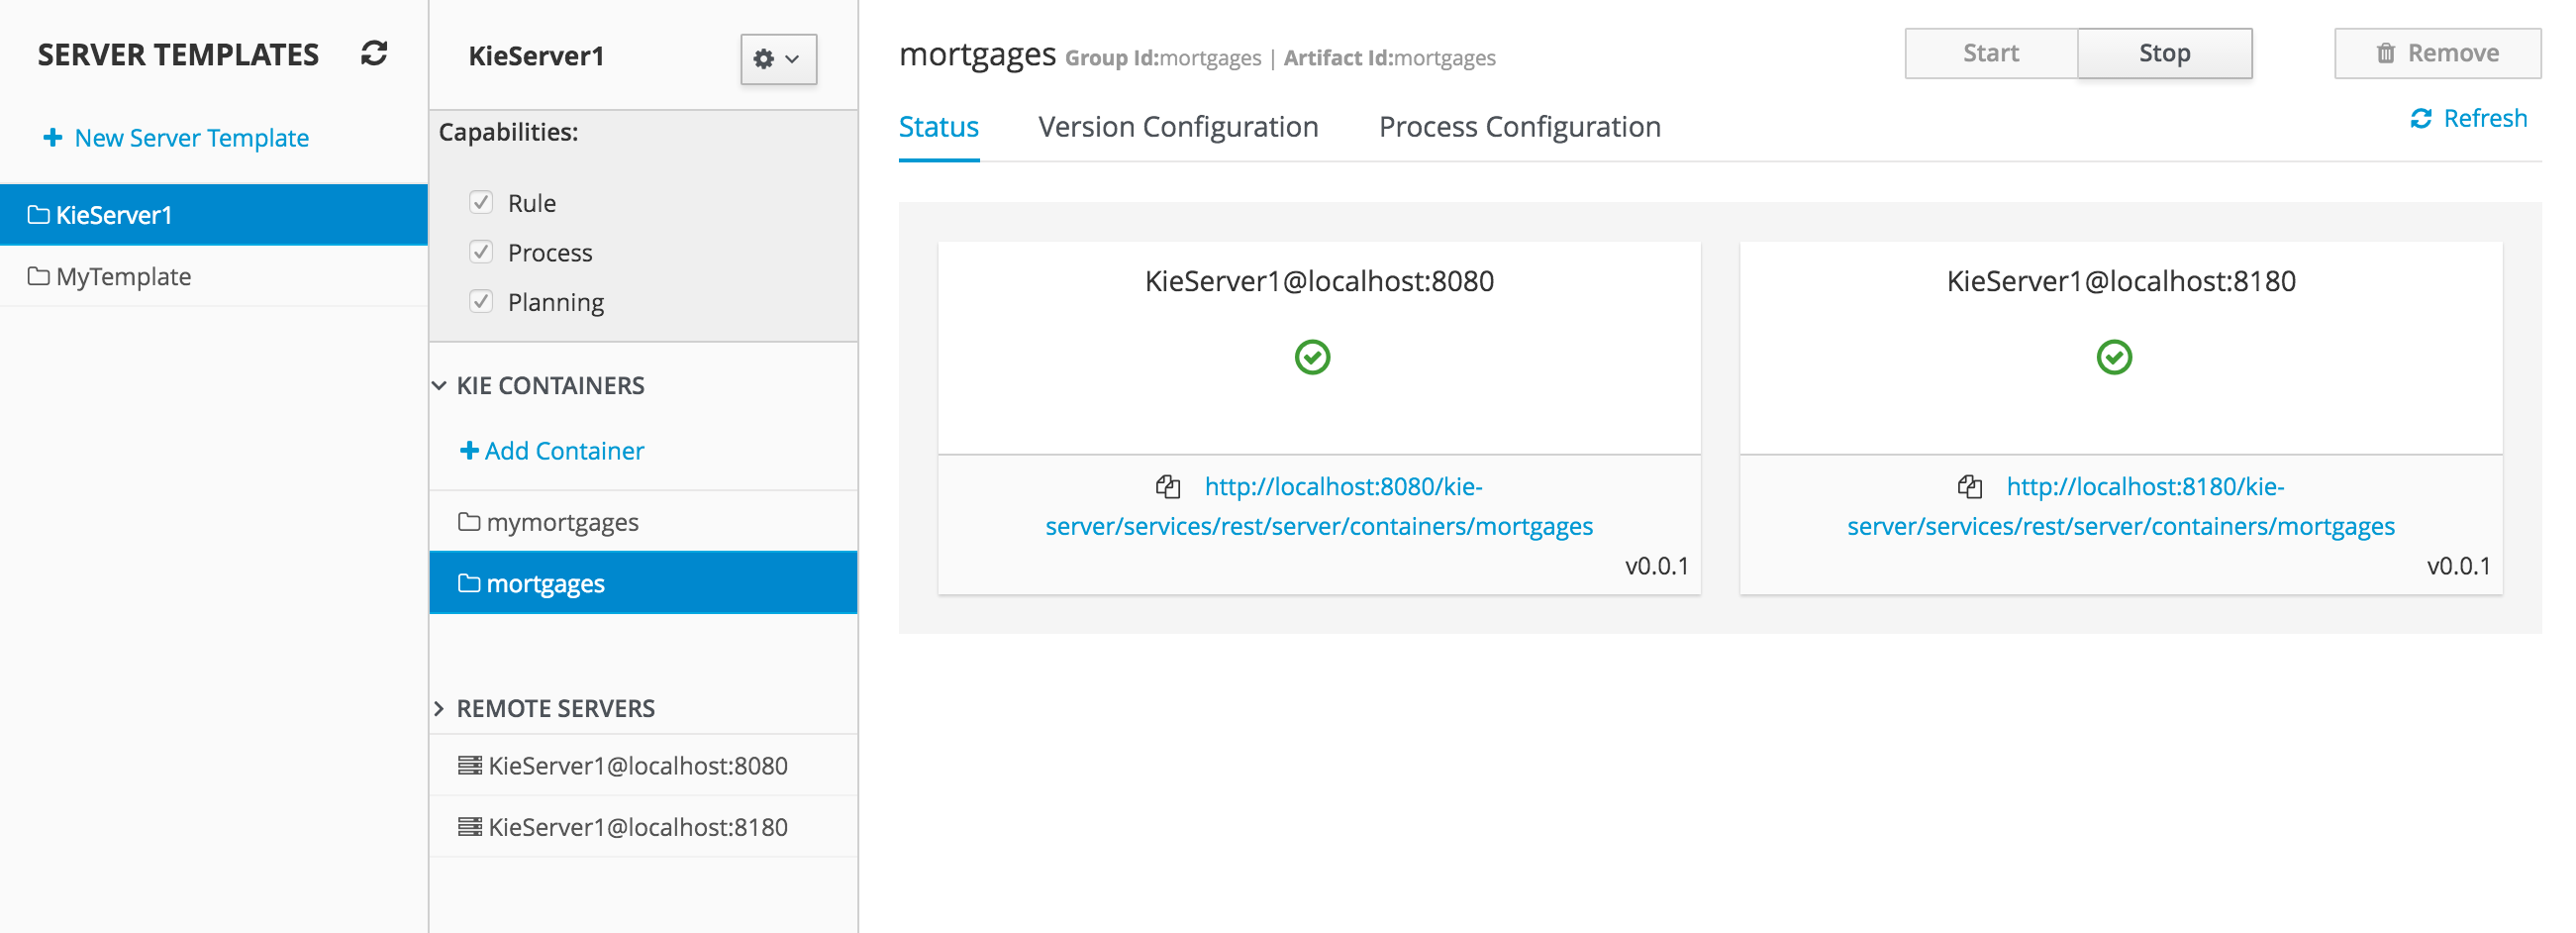
For containers that do not have process capability the Version Configuration tab allows users to change the current version of the Container. Users can upgrade manually to a specific version using the "Upgrade" button or enable/disable the Scanner. It’s also possible to execute a Scan Now operation that will scan for new versions only once.
To redeploy SNAPSHOT kjars with your latest changes all existing containers with that version must first be removed. Executing 'build and deploy' will then create a container with the latest SNAPSHOT kjar. However, this is not possible for release versions. Following maven release conventions if the GAV of a kjar is anything but SNAPSHOT, the GAV will need to be updated to the newer release version and deployed to its own container. The new release version can also be used to upgrade an existing container as described previously provided the container does not have process capability.
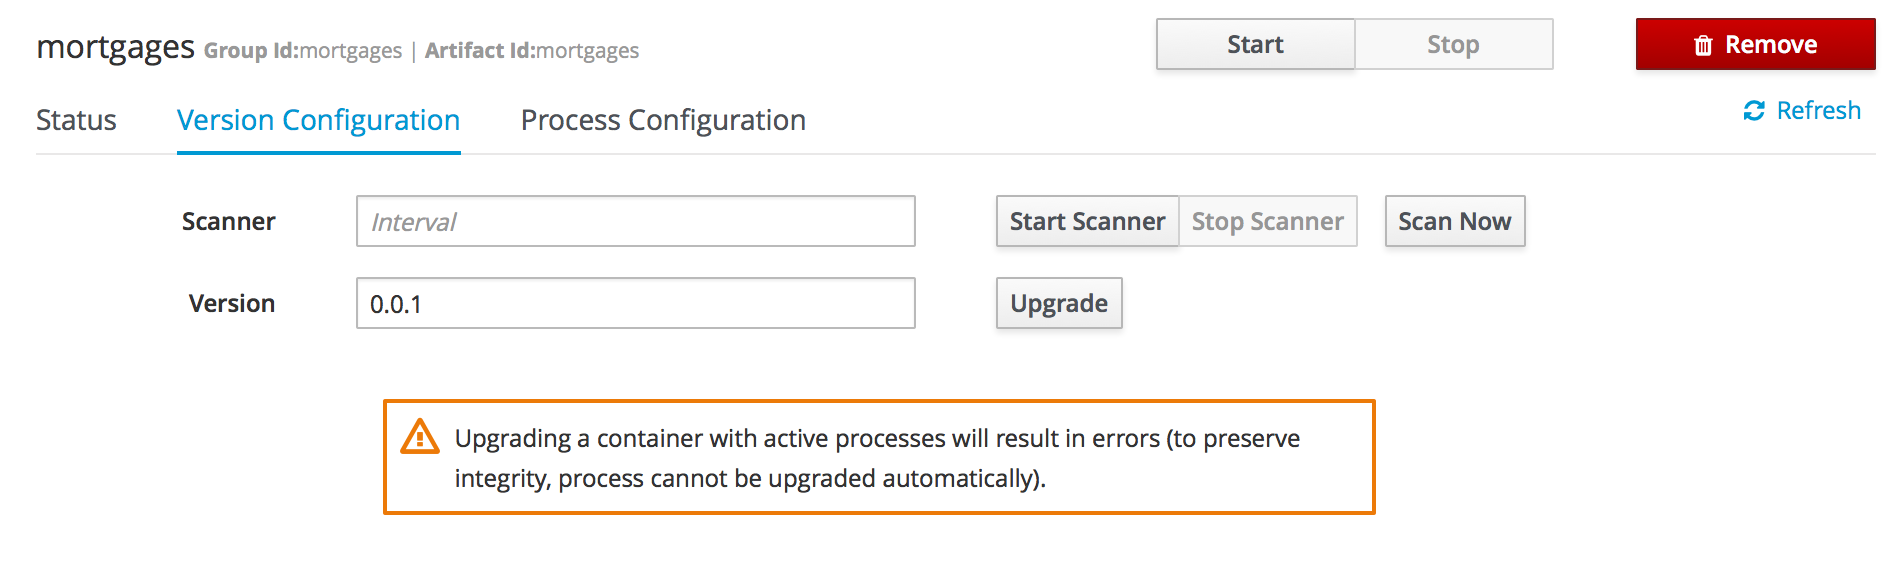
Process Configuration is the same form that is displayed during New Container Wizard for Template Servers that have Process Capability. If Template Server doesn’t have such capability, the action buttons will be disabled.
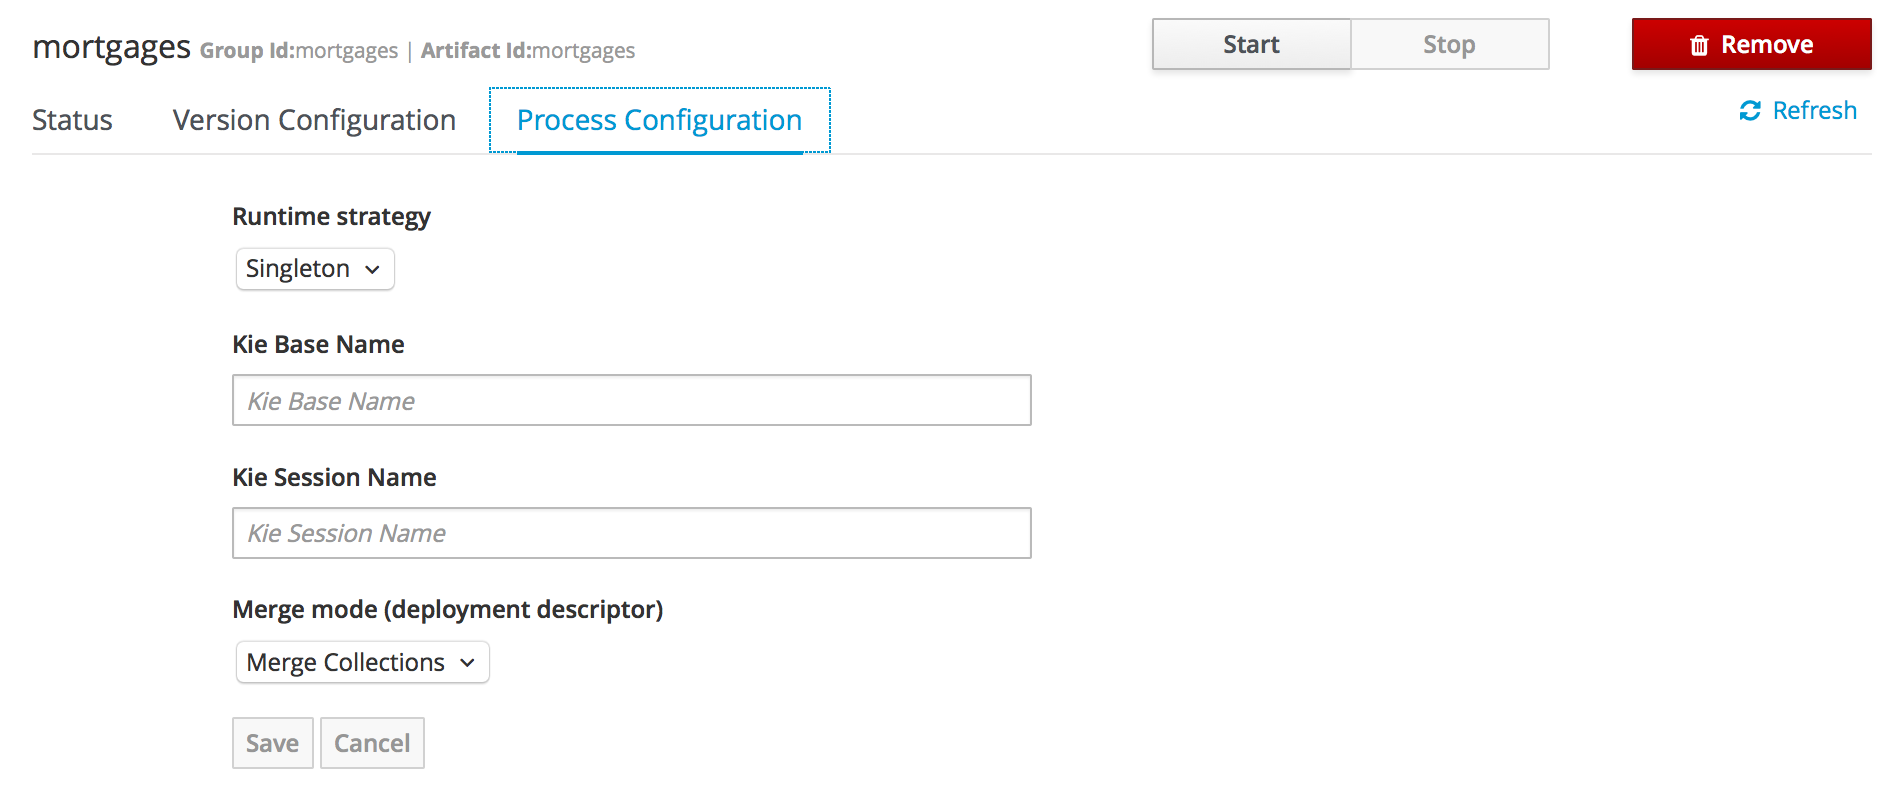
13.13.3. Remote Server
Remote Server is a Managed KIE Server instance running that has a jBPM controller configured.
|
By default, Business Central comes with a jBPM controller embedded. |
The list of Remote Servers is displayed just under the list of Containers. Once selected the screens reveals the Remote Server details and a list of cards, each card represents a running Container.
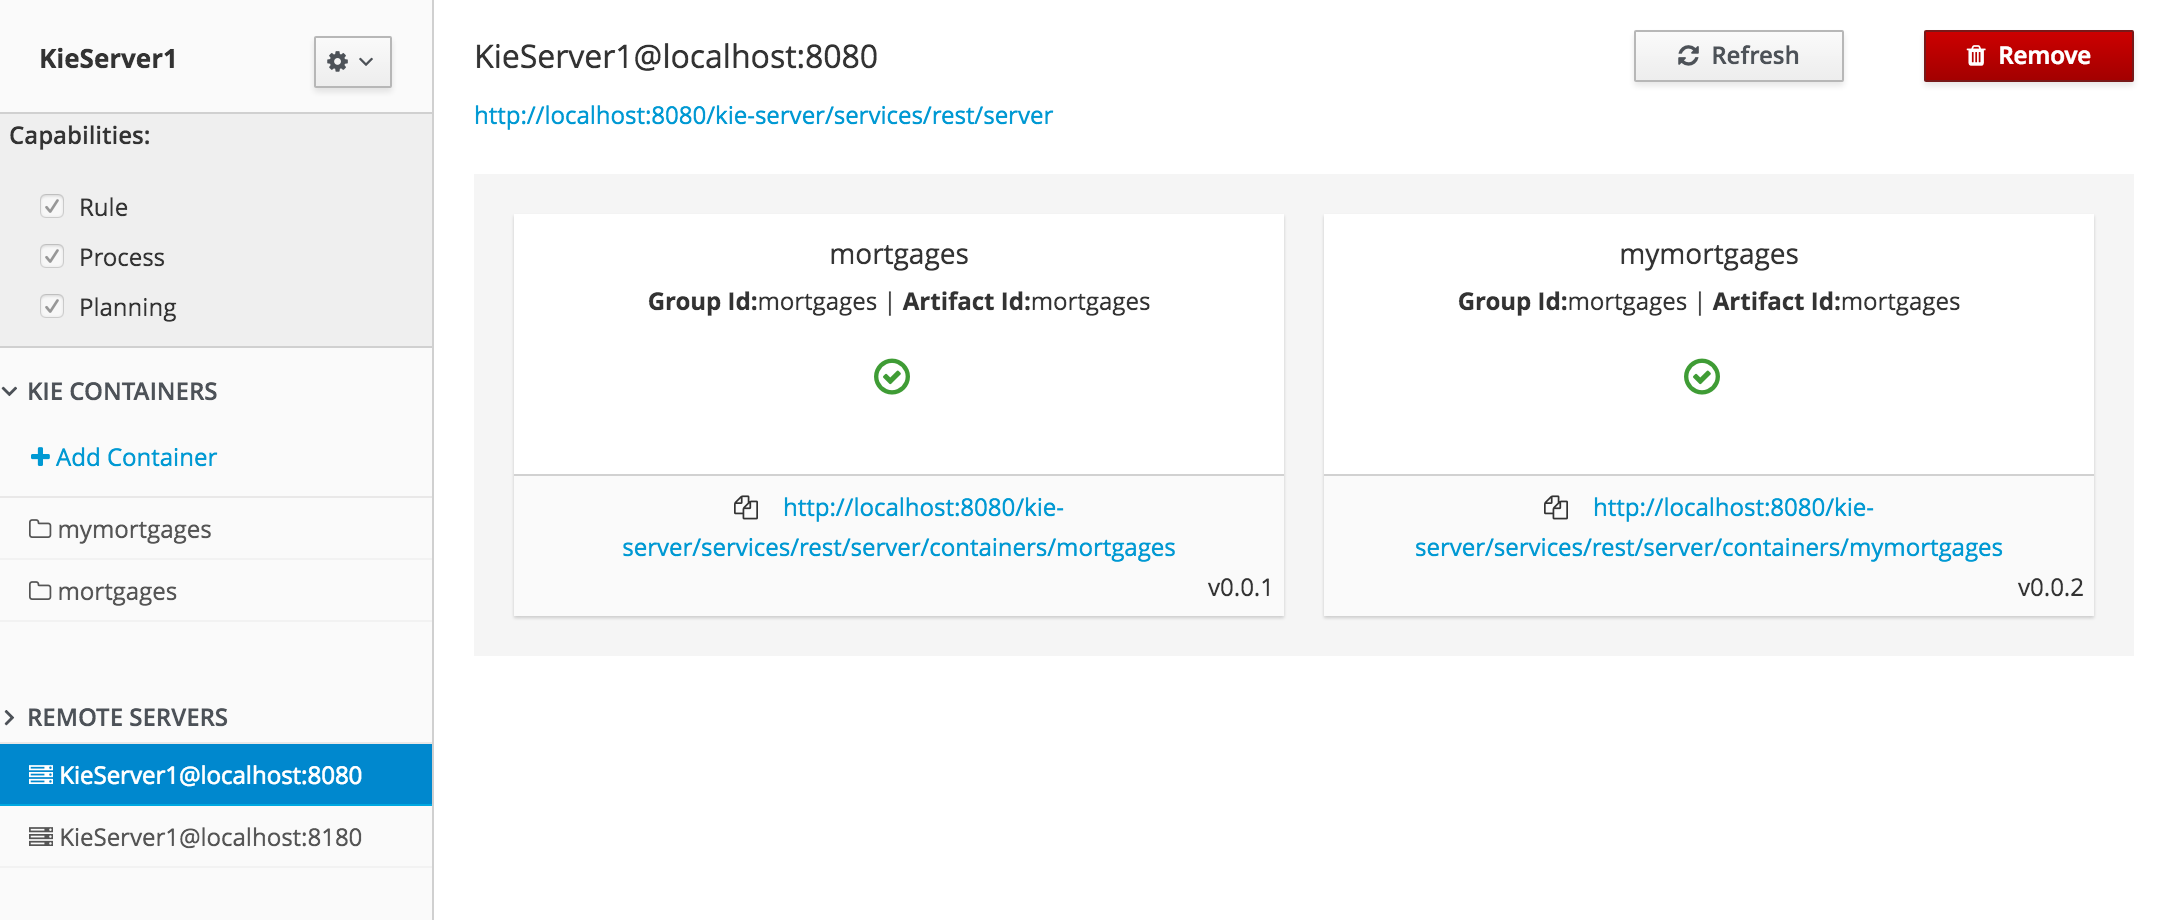
13.14. Experimental Features Framework
This section describes the Experimental Features Framework functionality and how to use it.
13.14.1. Introduction
The Experimental Features Framework is a platform service that allows developers to deliver features which are still not part of Business Central (for example, ongoing developments, tech previews, POCs…) and expose these features to users to let them have a preview of what is coming in the future.
The Experimental Features Framework provides the following features:
-
New Editor UI, accessible on the Admin page, where users can enable and disable Experimental Features.
-
Support for user-level features (stored as system preferences for each user) and global features (only available to
adminusers, in the editor) -
Ability to dynamically handle the visibility for different Experimental Resources on Business Central.
-
Business Central Perspectives
-
Business Central Screens
-
Business Central Editors
-
Library Asset Types
-
Page Builder Layout Components
-
13.14.2. Types of Experimental Features
There are two types of Experimental Features, each with different scopes:
-
User: This type of feature can be enabled or disabled for any platform user, making the feature available for a single user without affecting other users, storing the feature state as a user preference.
-
Global: This type of feature is global for all users. Only users with administrator permissions user can enable them.
13.14.3. Experimental Features Editor
The Experimental Features Framework provides an editor where users can configure the features that they want to use. To open the editor, navigate to the Admin page and click the Experimental menu option.
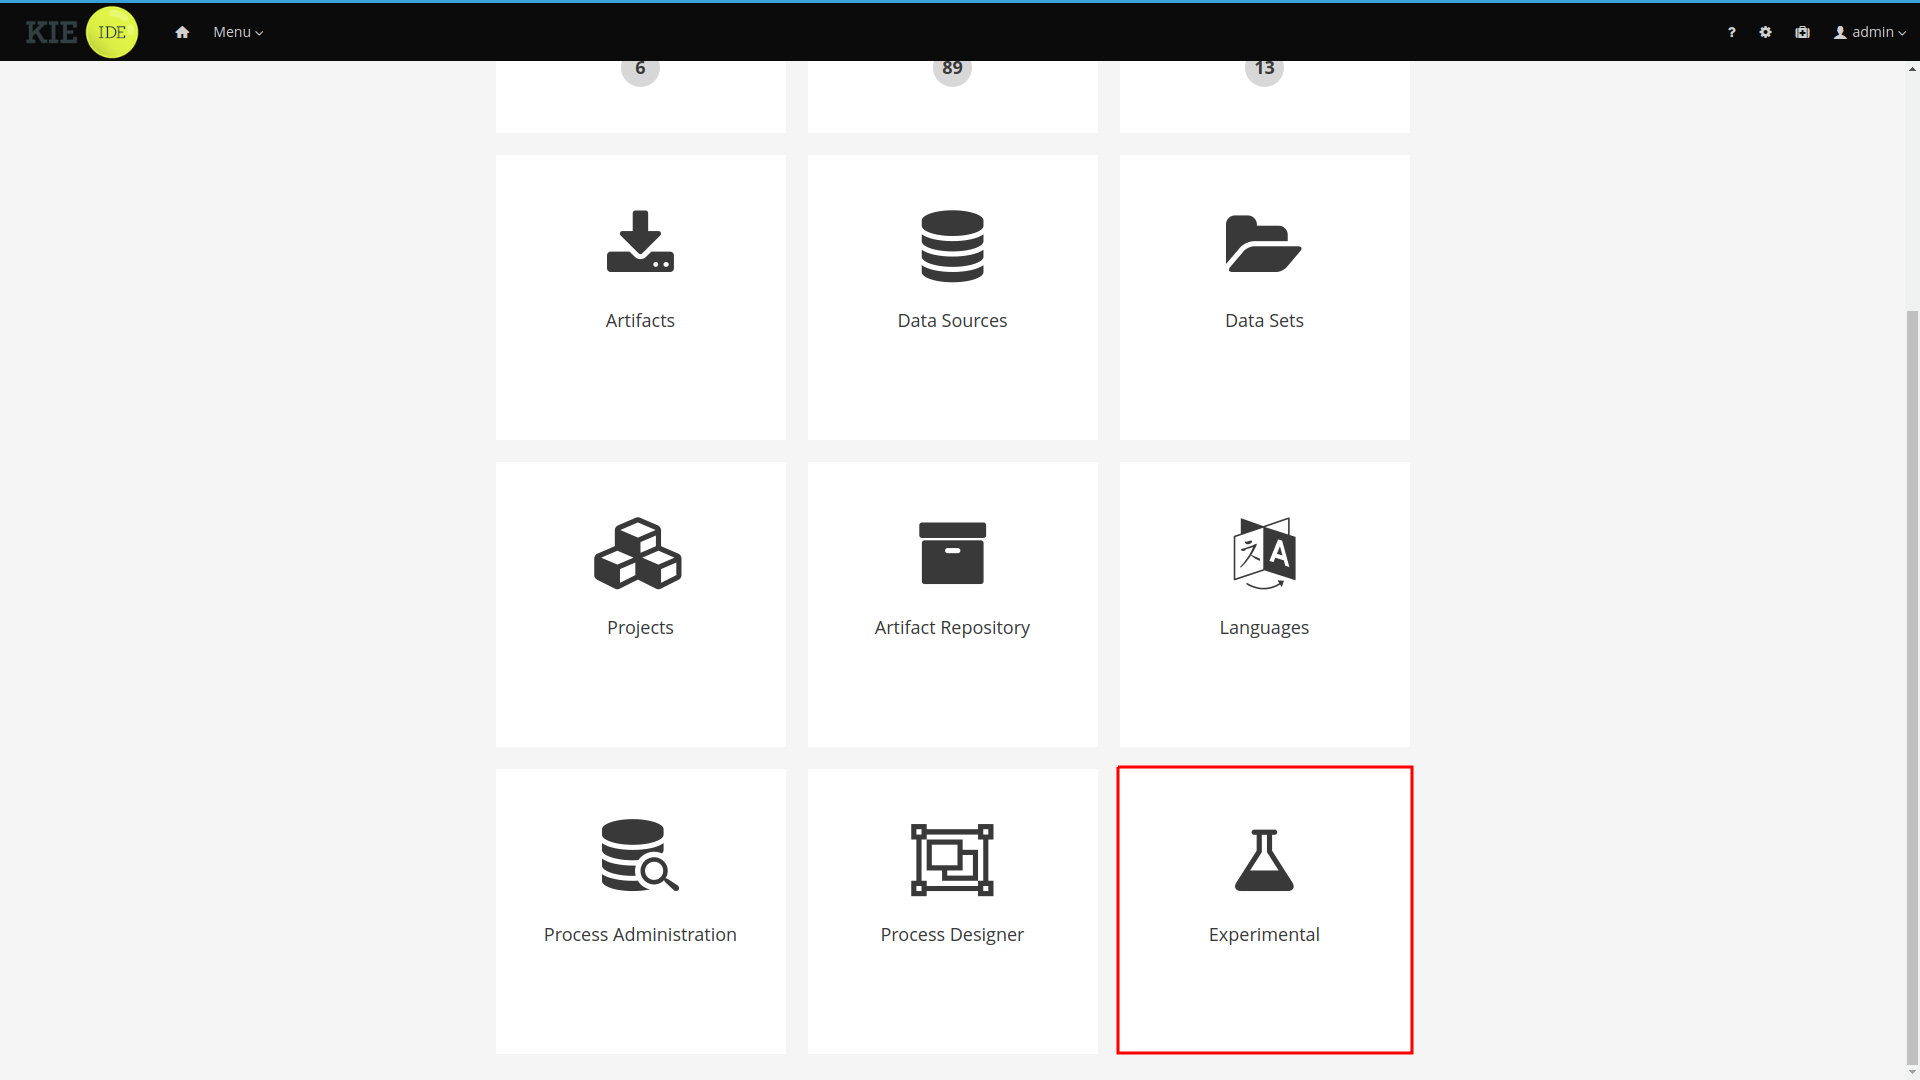
|
The Experimental menu option only appears if the Experimental Features Framework is enabled and there are Experimental Features installed on Business Central |
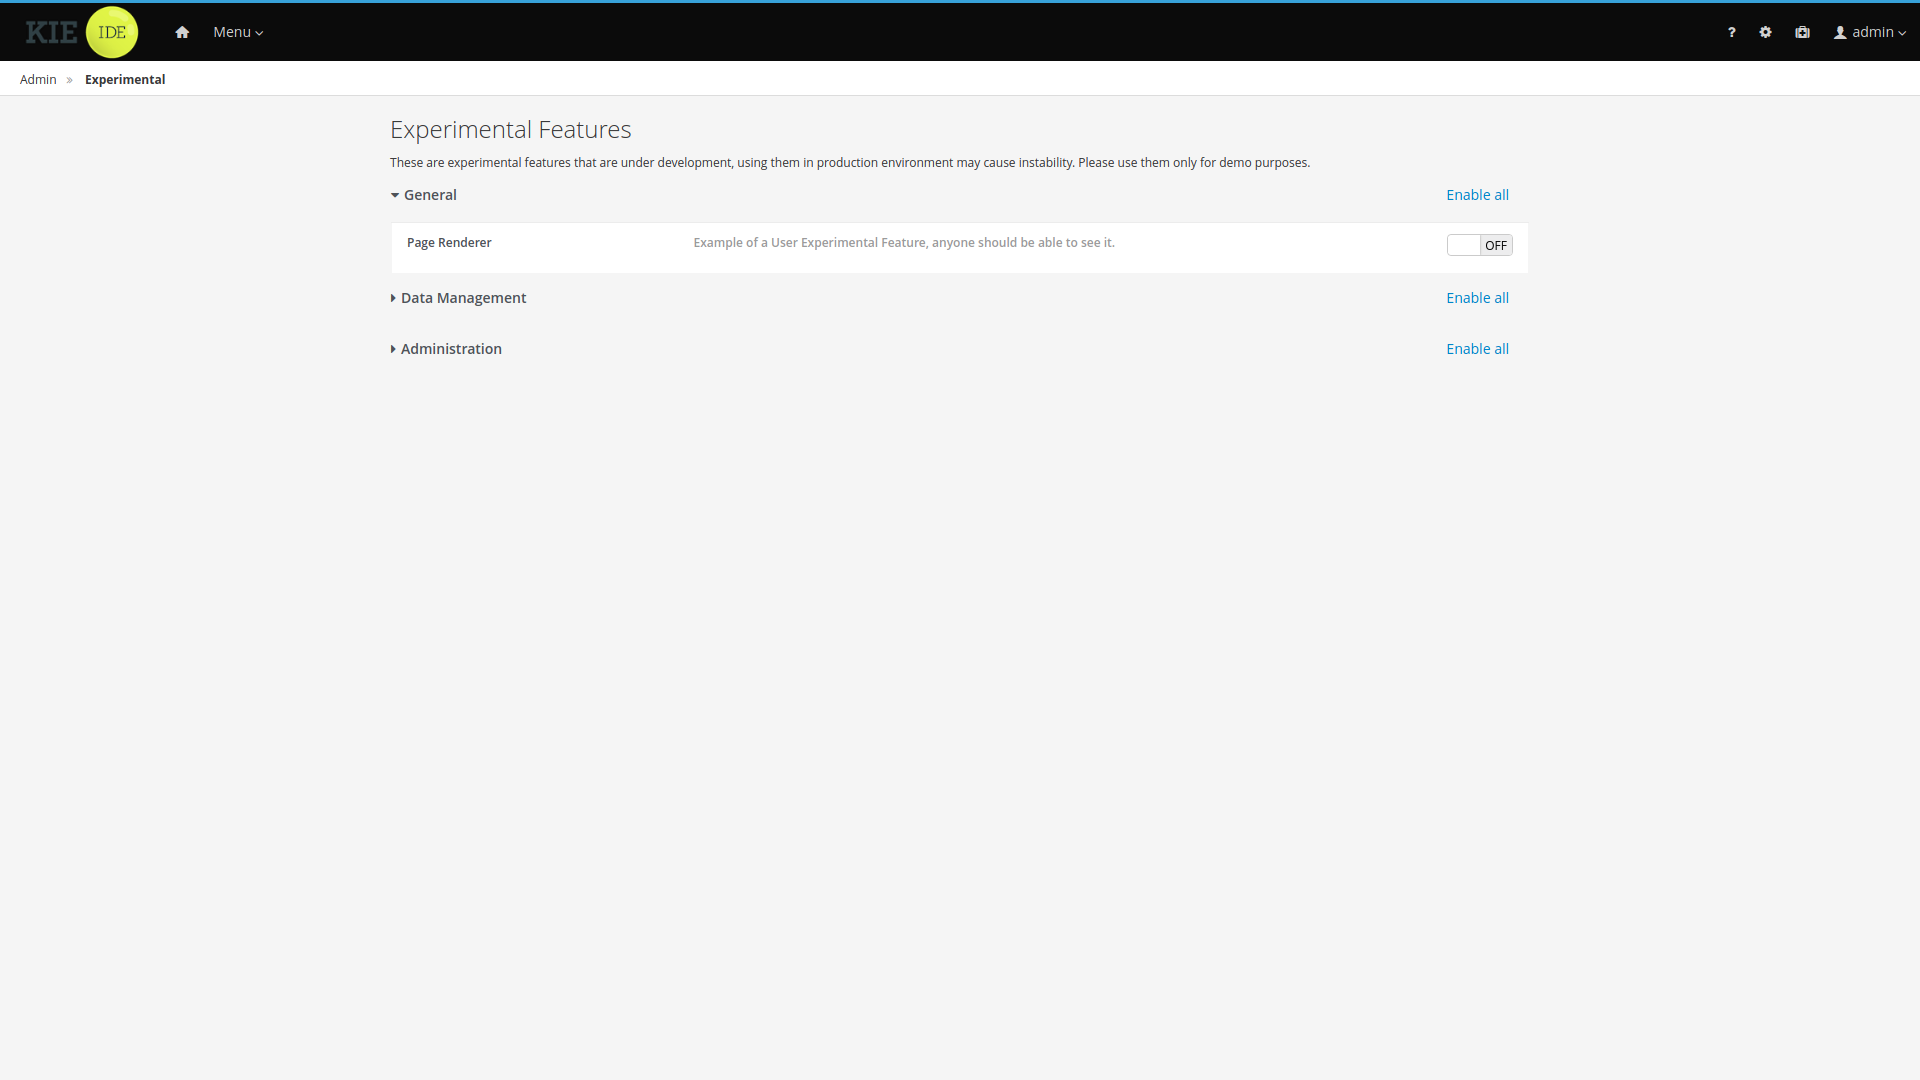
|
The features and groups displayed on this documentation are examples. |
The Experimental Features Editor displays all the Experimental Features installed on Business Central. For a better user experience these features are organized in collapsible groups. Click a label to expand or collapse a group.

Each row inside of the group corresponds to an experimental feature. Click toggle button to enable or disable the feature.
You can also enable or disable all group features by clicking the group’s *Enable all" / "Disable all" button.

13.14.4. Enabling the Experimental Features Framework
By default, the Experimental Features Framework is disabled. You can enable it by starting Business Central
and setting the system property appformer.experimental.features=true.
Any Experimental Feature present on Business Central will not be accessible to users while the Experimental Features Framework is disabled.
13.15. Business Central profiles
Starting on 7.15.0.Final, KIE Workbench is renamed to Business Central. Business Central contains all KIE Workbench features. To select between the set of available features, the concept of profiles is introduced. This chapter describes profiles and show how you can configure them in Business Central.
13.15.1. Introduction
When you start the Business Central application, all the features are available to you by default. To configure a set of features, you can select from a list of profile.
A profile is a set of features which contains:
-
Menus
-
Resources that it can handle
-
Specific home page
Currently, we have two profiles: * Full: All workbench features will be enabled (default); * Planner and Rules: Only Optaplanner and Drools features will be available.
13.15.2. Selecting a profile
Profiles can be selected on Administration page, by selecting the Profiles preference.
|
Only admin users have access to the Profiles preference. |
It is also possible to select a profile using the system property org.kie.workbench.profile, which can have the values FULL (for Full profile) and PLANNER_AND_RULES (For Planner and Rules profile).
13.16. Performance tuning considerations with Business Central
The following key concepts or suggested practices can help you optimize Business Central configuration and jBPM performance. These concepts are summarized in this section as a convenience and are explained in more detail in the cross-referenced documentation, where applicable. This section will expand or change as needed with new releases of jBPM.
- Ensure that development mode is enabled during development
-
You can set KIE Server or specific projects in Business Central to use
productionmode ordevelopmentmode. By default, KIE Server and all new projects in Business Central are in development mode. This mode provides features that facilitate your development experience, such as flexible project deployment policies, and features that optimize KIE Server performance during development, such as disabled duplicate GAV detection. Use development mode until your jBPM environment is established and completely ready for production mode.For more information about configuring the environment mode or duplicate GAV detection, see the following resources:
- Disable verification and validation of complex guided decision tables
-
The decision table verification and validation feature of Business Central is enabled by default. This feature helps you validate your guided decision tables, but with complex guided decision tables, this feature can hinder Drools engine performance. You can disable this feature by setting the
org.kie.verification.disable-dtable-realtime-verificationsystem property value totrue.For more information about guided decision table validation, see [guided-decision-tables-validation-disable-proc]
- Disable automatic builds if you have many large projects
-
In Business Central, when you navigate between projects in the Project Explorer side panel, the selected project is built automatically so that the Alerts window is updated to show any build errors for the project. If you have large projects or frequently switch between many projects that are under active development, this feature can hinder Business Central and Drools engine performance.
To disable automatic project builds, set the
org.kie.build.disable-project-explorersystem property totrue.
14. Business Central integration
14.1. Knowledge Store REST API for Business Central spaces and projects
jBPM provides a Knowledge Store REST API that you can use to interact with your projects and spaces in jBPM without using the Business Central user interface. The Knowledge Store is the artifact repository for assets in jBPM. This API support enables you to facilitate and automate maintenance of Business Central projects and spaces.
With the Knowledge Store REST API, you can perform the following actions:
-
Retrieve information about all projects and spaces
-
Create, update, or delete projects and spaces
-
Build, deploy, and test projects
-
Retrieve information about previous Knowledge Store REST API requests, or jobs
Knowledge Store REST API requests require the following components:
- Authentication
-
The Knowledge Store REST API requires HTTP Basic authentication or token-based authentication for the user role
rest-all. To view configured user roles for your jBPM distribution, navigate to~/$SERVER_HOME/standalone/configuration/application-roles.propertiesand~/application-users.properties.To add a user with the
rest-allrole, navigate to~/$SERVER_HOME/binand run the following command:$ ./add-user.sh -a --user <USERNAME> --password <PASSWORD> --role rest-allFor more information about user roles and jBPM installation options, see Installing the KIE Server.
- HTTP headers
-
The Knowledge Store REST API requires the following HTTP headers for API requests:
-
Accept: Data format accepted by your requesting client:-
application/json(JSON)
-
-
Content-Type: Data format of yourPOSTorPUTAPI request data:-
application/json(JSON)
-
-
- HTTP methods
-
The Knowledge Store REST API supports the following HTTP methods for API requests:
-
GET: Retrieves specified information from a specified resource endpoint -
POST: Creates or updates a resource -
PUT: Updates a resource -
DELETE: Deletes a resource
-
- Base URL
-
The base URL for Knowledge Store REST API requests is
http://SERVER:PORT/business-central/rest/, such ashttp://localhost:8080/business-central/rest/.The REST API base URL for the Knowledge Store and for the jBPM controller built in to Business Central are the same because both are considered part of Business Central REST services. - Endpoints
-
Knowledge Store REST API endpoints, such as
/spaces/{spaceName}for a specified space, are the URIs that you append to the Knowledge Store REST API base URL to access the corresponding resource or type of resource in jBPM.Example request URL for/spaces/{spaceName}endpointhttp://localhost:8080/business-central/rest/spaces/MySpace - Request data
-
HTTP
POSTrequests in the Knowledge Store REST API may require a JSON request body with data to accompany the request.Example POST request URL and JSON request body datahttp://localhost:8080/business-central/rest/spaces/MySpace/projects{ "name": "Employee_Rostering", "groupId": "employeerostering", "version": "1.0.0-SNAPSHOT", "description": "Employee rostering problem optimisation using Planner. Assigns employees to shifts based on their skill." }
14.1.1. Sending requests with the Knowledge Store REST API using a REST client or curl utility
The Knowledge Store REST API enables you to interact with your projects and spaces in jBPM without using the Business Central user interface. You can send Knowledge Store REST API requests using any REST client or curl utility.
-
Business Central is installed and running.
-
You have
rest-alluser role access to Business Central.
-
Identify the relevant API endpoint to which you want to send a request, such as
[GET] /spacesto retrieve spaces in Business Central. -
In a REST client or curl utility, enter the following components for a
GETrequest to/spaces. Adjust any request details according to your use case.For REST client:
-
Authentication: Enter the user name and password of the Business Central user with the
rest-allrole. -
HTTP Headers: Set the following header:
-
Accept:application/json
-
-
HTTP method: Set to
GET. -
URL: Enter the Knowledge Store REST API base URL and endpoint, such as
http://localhost:8080/business-central/rest/spaces.
For curl utility:
-
-u: Enter the user name and password of the Business Central user with therest-allrole. -
-H: Set the following header:-
Accept:application/json
-
-
-X: Set toGET. -
URL: Enter the Knowledge Store REST API base URL and endpoint, such as
http://localhost:8080/business-central/rest/spaces.
curl -u 'baAdmin:password@1' -H "Accept: application/json" -X GET "http://localhost:8080/business-central/rest/spaces" -
-
Execute the request and review the KIE Server response.
Example server response (JSON):
[ { "name": "MySpace", "description": null, "projects": [ { "name": "Employee_Rostering", "spaceName": "MySpace", "groupId": "employeerostering", "version": "1.0.0-SNAPSHOT", "description": "Employee rostering problem optimisation using Planner. Assigns employees to shifts based on their skill.", "publicURIs": [ { "protocol": "git", "uri": "git://localhost:9418/MySpace/example-Employee_Rostering" }, { "protocol": "ssh", "uri": "ssh://localhost:8001/MySpace/example-Employee_Rostering" } ] }, { "name": "Mortgage_Process", "spaceName": "MySpace", "groupId": "mortgage-process", "version": "1.0.0-SNAPSHOT", "description": "Getting started loan approval process in BPMN2, decision table, business rules, and forms.", "publicURIs": [ { "protocol": "git", "uri": "git://localhost:9418/MySpace/example-Mortgage_Process" }, { "protocol": "ssh", "uri": "ssh://localhost:8001/MySpace/example-Mortgage_Process" } ] } ], "owner": "admin", "defaultGroupId": "com.myspace" }, { "name": "MySpace2", "description": null, "projects": [ { "name": "IT_Orders", "spaceName": "MySpace", "groupId": "itorders", "version": "1.0.0-SNAPSHOT", "description": "Case Management IT Orders project", "publicURIs": [ { "protocol": "git", "uri": "git://localhost:9418/MySpace/example-IT_Orders-1" }, { "protocol": "ssh", "uri": "ssh://localhost:8001/MySpace/example-IT_Orders-1" } ] } ], "owner": "admin", "defaultGroupId": "com.myspace" } ] -
In your REST client or curl utility, send another API request with the following components for a
POSTrequest to/spaces/{spaceName}/projectsto create a project within a space. Adjust any request details according to your use case.For REST client:
-
Authentication: Enter the user name and password of the Business Central user with the
rest-allrole. -
HTTP Headers: Set the following header:
-
Accept:application/json -
Accept-Language:en-US -
Content-Type:application/json
-
-
HTTP method: Set to
POST. -
URL: Enter the Knowledge Store REST API base URL and endpoint, such as
http://localhost:8080/business-central/rest/spaces/MySpace/projects. -
Request body: Add a JSON request body with the identification data for the new project:
{ "name": "Employee_Rostering", "groupId": "employeerostering", "version": "1.0.0-SNAPSHOT", "description": "Employee rostering problem optimisation using Planner. Assigns employees to shifts based on their skill." }For curl utility:
-
-u: Enter the user name and password of the Business Central user with therest-allrole. -
-H: Set the following headers:-
Accept:application/json -
Accept-Language:en-US(If not defined, the default locale from the JVM is reflected) -
Content-Type:application/json
-
-
-X: Set toPOST. -
URL: Enter the Knowledge Store REST API base URL and endpoint, such as
http://localhost:8080/business-central/rest/spaces/MySpace/projects. -
-d: Add a JSON request body or file (@file.json) with the identification data for the new project:
curl -u 'baAdmin:password@1' -H "Accept: application/json" -H "Accept-Language: en-US" -H "Content-Type: application/json" -X POST "http://localhost:8080/business-central/rest/spaces/MySpace/projects" -d "{ \"name\": \"Employee_Rostering\", \"groupId\": \"employeerostering\", \"version\": \"1.0.0-SNAPSHOT\", \"description\": \"Employee rostering problem optimisation using Planner. Assigns employees to shifts based on their skill.\"}"curl -u 'baAdmin:password@1' -H "Accept: application/json" -H "Accept-Language: en-US" -H "Content-Type: application/json" -X POST "http://localhost:8080/business-central/rest/spaces/MySpace/projects" -d @my-project.json -
-
Execute the request and review the KIE Server response.
Example server response (JSON):
{
  "jobId": "1541017411591-6",
  "status": "APPROVED",
  "spaceName": "MySpace",
  "projectName": "Employee_Rostering",
  "projectGroupId": "employeerostering",
  "projectVersion": "1.0.0-SNAPSHOT",
  "description": "Employee rostering problem optimisation using Planner. Assigns employees to shifts based on their skill."
}
If you encounter request errors, review the returned error code messages and adjust your request accordingly.
14.1.2. Supported Knowledge Store REST API endpoints
The Knowledge Store REST API provides endpoints for managing spaces and projects in jBPM and for retrieving information about previous Knowledge Store REST API requests, or jobs.
14.1.2.1. Spaces
The Knowledge Store REST API supports the following endpoints for managing spaces in Business Central. The Knowledge Store REST API base URL is http://SERVER:PORT/business-central/rest/. All requests require HTTP Basic authentication or token-based authentication for the rest-all user role.
- [GET] /spaces
-
Returns all spaces in Business Central.
Example server response (JSON)[ { "name": "MySpace", "description": null, "projects": [ { "name": "Employee_Rostering", "spaceName": "MySpace", "groupId": "employeerostering", "version": "1.0.0-SNAPSHOT", "description": "Employee rostering problem optimisation using Planner. Assigns employees to shifts based on their skill.", "publicURIs": [ { "protocol": "git", "uri": "git://localhost:9418/MySpace/example-Employee_Rostering" }, { "protocol": "ssh", "uri": "ssh://localhost:8001/MySpace/example-Employee_Rostering" } ] }, { "name": "Mortgage_Process", "spaceName": "MySpace", "groupId": "mortgage-process", "version": "1.0.0-SNAPSHOT", "description": "Getting started loan approval process in BPMN2, decision table, business rules, and forms.", "publicURIs": [ { "protocol": "git", "uri": "git://localhost:9418/MySpace/example-Mortgage_Process" }, { "protocol": "ssh", "uri": "ssh://localhost:8001/MySpace/example-Mortgage_Process" } ] } ], "owner": "admin", "defaultGroupId": "com.myspace" }, { "name": "MySpace2", "description": null, "projects": [ { "name": "IT_Orders", "spaceName": "MySpace", "groupId": "itorders", "version": "1.0.0-SNAPSHOT", "description": "Case Management IT Orders project", "publicURIs": [ { "protocol": "git", "uri": "git://localhost:9418/MySpace/example-IT_Orders-1" }, { "protocol": "ssh", "uri": "ssh://localhost:8001/MySpace/example-IT_Orders-1" } ] } ], "owner": "admin", "defaultGroupId": "com.myspace" } ] - [GET] /spaces/{spaceName}
-
Returns information about a specified space.
Table 48. Request parameters Name Description Type Requirement spaceNameName of the space to be retrieved
String
Required
Example server response (JSON){ "name": "MySpace", "description": null, "projects": [ { "name": "Mortgage_Process", "spaceName": "MySpace", "groupId": "mortgage-process", "version": "1.0.0-SNAPSHOT", "description": "Getting started loan approval process in BPMN2, decision table, business rules, and forms.", "publicURIs": [ { "protocol": "git", "uri": "git://localhost:9418/MySpace/example-Mortgage_Process" }, { "protocol": "ssh", "uri": "ssh://localhost:8001/MySpace/example-Mortgage_Process" } ] }, { "name": "Employee_Rostering", "spaceName": "MySpace", "groupId": "employeerostering", "version": "1.0.0-SNAPSHOT", "description": "Employee rostering problem optimisation using Planner. Assigns employees to shifts based on their skill.", "publicURIs": [ { "protocol": "git", "uri": "git://localhost:9418/MySpace/example-Employee_Rostering" }, { "protocol": "ssh", "uri": "ssh://localhost:8001/MySpace/example-Employee_Rostering" } ] }, { "name": "Evaluation_Process", "spaceName": "MySpace", "groupId": "evaluation", "version": "1.0.0-SNAPSHOT", "description": "Getting started Business Process for evaluating employees", "publicURIs": [ { "protocol": "git", "uri": "git://localhost:9418/MySpace/example-Evaluation_Process" }, { "protocol": "ssh", "uri": "ssh://localhost:8001/MySpace/example-Evaluation_Process" } ] }, { "name": "IT_Orders", "spaceName": "MySpace", "groupId": "itorders", "version": "1.0.0-SNAPSHOT", "description": "Case Management IT Orders project", "publicURIs": [ { "protocol": "git", "uri": "git://localhost:9418/MySpace/example-IT_Orders" }, { "protocol": "ssh", "uri": "ssh://localhost:8001/MySpace/example-IT_Orders" } ] } ], "owner": "admin", "defaultGroupId": "com.myspace" } - [POST] /spaces
-
Creates a space in Business Central.
Table 49. Request parameters Name Description Type Requirement body
The
name,description,owner,defaultGroupId, and any other components of the new spaceRequest body
Required
Example request body (JSON){ "name": "NewSpace", "description": "My new space.", "owner": "admin", "defaultGroupId": "com.newspace" }Example server response (JSON){ "jobId": "1541016978154-3", "status": "APPROVED", "spaceName": "NewSpace", "owner": "admin", "defaultGroupId": "com.newspace", "description": "My new space." } - [PUT] /spaces
-
Updates
description,owner, anddefaultGroupIdof a space in Business Central.Example request body (JSON){ "name": "MySpace", "description": "This is updated description", "owner": "admin", "defaultGroupId": "com.updatedGroupId" }Example server response (JSON){ "jobId": "1592214574454-1", "status": "APPROVED", "spaceName": "MySpace", "owner": "admin", "defaultGroupId": "com.updatedGroupId", "description": "This is updated description" } - [DELETE] /spaces/{spaceName}
-
Deletes a specified space from Business Central.
Table 50. Request parameters Name Description Type Requirement spaceNameName of the space to be deleted
String
Required
Example server response (JSON){ "jobId": "1541127032997-8", "status": "APPROVED", "spaceName": "MySpace", "owner": "admin", "description": "My deleted space.", "repositories": null }
14.1.2.2. Projects
The Knowledge Store REST API supports the following endpoints for managing, building, and deploying projects in Business Central. The Knowledge Store REST API base URL is http://SERVER:PORT/business-central/rest/. All requests require HTTP Basic authentication or token-based authentication for the rest-all user role.
- [GET] /spaces/{spaceName}/projects
-
Returns projects in a specified space.
Table 51. Request parameters Name Description Type Requirement spaceNameName of the space for which you are retrieving projects
String
Required
Example server response (JSON)[ { "name": "Mortgage_Process", "spaceName": "MySpace", "groupId": "mortgage-process", "version": "1.0.0-SNAPSHOT", "description": "Getting started loan approval process in BPMN2, decision table, business rules, and forms.", "publicURIs": [ { "protocol": "git", "uri": "git://localhost:9418/MySpace/example-Mortgage_Process" }, { "protocol": "ssh", "uri": "ssh://localhost:8001/MySpace/example-Mortgage_Process" } ] }, { "name": "Employee_Rostering", "spaceName": "MySpace", "groupId": "employeerostering", "version": "1.0.0-SNAPSHOT", "description": "Employee rostering problem optimisation using Planner. Assigns employees to shifts based on their skill.", "publicURIs": [ { "protocol": "git", "uri": "git://localhost:9418/MySpace/example-Employee_Rostering" }, { "protocol": "ssh", "uri": "ssh://localhost:8001/MySpace/example-Employee_Rostering" } ] }, { "name": "Evaluation_Process", "spaceName": "MySpace", "groupId": "evaluation", "version": "1.0.0-SNAPSHOT", "description": "Getting started Business Process for evaluating employees", "publicURIs": [ { "protocol": "git", "uri": "git://localhost:9418/MySpace/example-Evaluation_Process" }, { "protocol": "ssh", "uri": "ssh://localhost:8001/MySpace/example-Evaluation_Process" } ] }, { "name": "IT_Orders", "spaceName": "MySpace", "groupId": "itorders", "version": "1.0.0-SNAPSHOT", "description": "Case Management IT Orders project", "publicURIs": [ { "protocol": "git", "uri": "git://localhost:9418/MySpace/example-IT_Orders" }, { "protocol": "ssh", "uri": "ssh://localhost:8001/MySpace/example-IT_Orders" } ] } ] - [GET] /spaces/{spaceName}/projects/{projectName}
-
Returns information about a specified project in a specified space.
Table 52. Request parameters Name Description Type Requirement spaceNameName of the space where the project is located
String
Required
projectNameName of the project to be retrieved
String
Required
Example server response (JSON){ "name": "Employee_Rostering", "spaceName": "MySpace", "groupId": "employeerostering", "version": "1.0.0-SNAPSHOT", "description": "Employee rostering problem optimisation using Planner. Assigns employees to shifts based on their skill.", "publicURIs": [ { "protocol": "git", "uri": "git://localhost:9418/MySpace/example-Employee_Rostering" }, { "protocol": "ssh", "uri": "ssh://localhost:8001/MySpace/example-Employee_Rostering" } ] } - [POST] /spaces/{spaceName}/projects
-
Creates a project in a specified space.
Table 53. Request parameters Name Description Type Requirement spaceNameName of the space in which the new project will be created
String
Required
body
The
name,groupId,version,description, and any other components of the new projectRequest body
Required
Example request body (JSON){ "name": "Employee_Rostering", "groupId": "employeerostering", "version": "1.0.0-SNAPSHOT", "description": "Employee rostering problem optimisation using Planner. Assigns employees to shifts based on their skill." }Example server response (JSON){ "jobId": "1541017411591-6", "status": "APPROVED", "spaceName": "MySpace", "projectName": "Employee_Rostering", "projectGroupId": "employeerostering", "projectVersion": "1.0.0-SNAPSHOT", "description": "Employee rostering problem optimisation using Planner. Assigns employees to shifts based on their skill." } - [DELETE] /spaces/{spaceName}/projects/{projectName}
-
Deletes a specified project from a specified space.
Table 54. Request parameters Name Description Type Requirement spaceNameName of the space where the project is located
String
Required
projectNameName of the project to be deleted
String
Required
Example server response (JSON){ "jobId": "1541128617727-10", "status": "APPROVED", "projectName": "Employee_Rostering", "spaceName": "MySpace" } - [POST] /spaces/{spaceName}/git/clone
-
Clones a project into a specified space from a specified Git address.
Table 55. Request parameters Name Description Type Requirement spaceNameName of the space to which you are cloning a project
String
Required
body
The
name,description, and Git repositoryuserName,password, andgitURLfor the project to be clonedRequest body
Required
Example request body (JSON){ "name": "Employee_Rostering", "description": "Employee rostering problem optimisation using Planner. Assigns employees to shifts based on their skill.", "userName": "baAdmin", "password": "password@1", "gitURL": "git://localhost:9418/MySpace/example-Employee_Rostering" }Example server response (JSON){ "jobId": "1541129488547-13", "status": "APPROVED", "cloneProjectRequest": { "name": "Employee_Rostering", "description": "Employee rostering problem optimisation using Planner. Assigns employees to shifts based on their skill.", "userName": "baAdmin", "password": "password@1", "gitURL": "git://localhost:9418/MySpace/example-Employee_Rostering" }, "spaceName": "MySpace2" } - [POST] /spaces/{spaceName}/projects/{projectName}/maven/compile
-
Compiles a specified project in a specified space (equivalent to
mvn compile).Table 56. Request parameters Name Description Type Requirement spaceNameName of the space where the project is located
String
Required
projectNameName of the project to be compiled
String
Required
Example server response (JSON){ "jobId": "1541128617727-10", "status": "APPROVED", "projectName": "Employee_Rostering", "spaceName": "MySpace" } - [POST] /spaces/{spaceName}/projects/{projectName}/maven/test
-
Tests a specified project in a specified space (equivalent to
mvn test).Table 57. Request parameters Name Description Type Requirement spaceNameName of the space where the project is located
String
Required
projectNameName of the project to be tested
String
Required
Example server response (JSON){ "jobId": "1541132591595-19", "status": "APPROVED", "projectName": "Employee_Rostering", "spaceName": "MySpace" } - [POST] /spaces/{spaceName}/projects/{projectName}/maven/install
-
Installs a specified project in a specified space (equivalent to
mvn install).Table 58. Request parameters Name Description Type Requirement spaceNameName of the space where the project is located
String
Required
projectNameName of the project to be installed
String
Required
Example server response (JSON){ "jobId": "1541132668987-20", "status": "APPROVED", "projectName": "Employee_Rostering", "spaceName": "MySpace" } - [POST] /spaces/{spaceName}/projects/{projectName}/maven/deploy
-
Deploys a specified project in a specified space (equivalent to
mvn deploy).Table 59. Request parameters Name Description Type Requirement spaceNameName of the space where the project is located
String
Required
projectNameName of the project to be deployed
String
Required
Example server response (JSON){ "jobId": "1541132816435-21", "status": "APPROVED", "projectName": "Employee_Rostering", "spaceName": "MySpace" }
14.1.2.3. Jobs (API requests)
All POST and DELETE requests in the Knowledge Store REST API return a job ID associated with each request, in addition to the returned request details. You can use a job ID to view the request status or delete a sent request.
Knowledge Store REST API requests, or jobs, can have the following statuses:
| Status | Description |
|---|---|
|
The request was accepted and is being processed. |
|
The request contained incorrect content and was not accepted. |
|
The requested resource (path) does not exist. |
|
The resource already exists. |
|
An error occurred in KIE Server. |
|
The request finished successfully. |
|
The request failed. |
|
The request was approved. |
|
The request was denied. |
|
The job ID for the request could not be found due to one of the following reasons:
|
The Knowledge Store REST API supports the following endpoints for retrieving or deleting sent API requests. The Knowledge Store REST API base URL is http://SERVER:PORT/business-central/rest/. All requests require HTTP Basic authentication or token-based authentication for the rest-all user role.
- [GET] /jobs/{jobId}
-
Returns the status of a specified job (a previously sent API request).
Table 61. Request parameters Name Description Type Requirement jobIdID of the job to be retrieved (example:
1541010216919-1)String
Required
Example server response (JSON){ "status": "SUCCESS", "jobId": "1541010216919-1", "result": null, "lastModified": 1541010218352, "detailedResult": [ "level:INFO, path:null, text:Build of module 'Mortgage_Process' (requested by system) completed.\n Build: SUCCESSFUL" ] } - [DELETE] /jobs/{jobId}
-
Deletes a specified job (a previously sent API request). If the job is not being processed yet, this request removes the job from the job queue. This request does not cancel or stop an ongoing job.
Table 62. Request parameters Name Description Type Requirement jobIdID of the job to be deleted (example:
1541010216919-1)String
Required
Example server response (JSON){ "status": "GONE", "jobId": "1541010216919-1", "result": null, "lastModified": 1541132054916, "detailedResult": [ "level:INFO, path:null, text:Build of module 'Mortgage_Process' (requested by system) completed.\n Build: SUCCESSFUL" ] }
14.1.2.4. Branches
The Knowledge Store REST API supports the following endpoints for managing branches in Business Central. The Knowledge Store REST API base URL is http://SERVER:PORT/business-central/rest/. All requests require HTTP Basic authentication or token-based authentication for the rest-all user role.
- [GET] /spaces/{spaceName}/projects/{projectName}/branches
-
Returns all branches in a specified project and space.
Table 63. Request parameters Name Description Type Requirement spaceNameName of the space for which you are retrieving projects
String
Required
projectNameName of the project for which you are retrieving branches
String
Required
Example server response (JSON)[ { "name":"master" } ] - [POST] /spaces/{spaceName}/projects/{projectName}/branches
-
Adds a specified branch in a specified project and space.
Table 64. Request parameters Name Description Type Requirement spaceNameName of the space where the project is located
String
Required
projectNameName of the project in which the new branch needs to be created
String
Required
body
The
newBranchNameandbaseBranchNameof a projectRequest body
Required
Example request body (JSON){ "newBranchName": "branch01", "baseBranchName": "master" }Example server response (JSON){ "jobId": "1576175811141-3", "status": "APPROVED", "spaceName": "Space123", "projectName": "ProjABC", "newBranchName": "b1", "baseBranchName": "master", "userIdentifier": "bc" } - [DELETE] /spaces/{spaceName}/projects/{projectName}/branches/{branchName}
-
Deletes a specified branch in a specified project and space.
Table 65. Request parameters Name Description Type Requirement spaceNameName of the space where the project is located
String
Required
projectNameName of the project where the branch is located
String
Required
branchNameName of the branch to be deleted
String
Required
Example server response (JSON){ "jobId": "1576175811421-5", "status": "APPROVED", "spaceName": "Space123", "projectName": "ProjABC", "branchName": "b1", "userIdentifier": "bc" } - [POST] /spaces/{spaceName}/projects/{projectName}/branches/{branchName}/maven/compile
-
Compiles a specified branch in a specified project and space. If
branchNameis not specified, then request applies to the master branch.Table 66. Request parameters Name Description Type Requirement spaceNameName of the space where the project is located
String
Required
projectNameName of the project where the branch is located
String
Required
branchNameName of the branch to be compiled
String
Required
Example server response (JSON){ "jobId": "1576175811233-4", "status": "APPROVED", "spaceName": "Space123", "projectName": "ProjABC", "branchName": "b1", } - [POST] /spaces/{spaceName}/projects/{projectName}/branches/{branchName}/maven/install
-
Installs a specified branch in a specified project and space. If
branchNameis not specified, then request applies to the master branch.Table 67. Request parameters Name Description Type Requirement spaceNameName of the space where the project is located
String
Required
projectNameName of the project where the branch is located
String
Required
branchNameName of the branch to be installed
String
Required
Example server response (JSON){ "jobId": "1576175811233-4", "status": "APPROVED", "spaceName": "Space123", "projectName": "ProjABC", "branchName": "b1", } - [POST] /spaces/{spaceName}/projects/{projectName}/branches/{branchName}/maven/test
-
Tests a specified branch in a specified project and space. If
branchNameis not specified, then request applies to the master branch.Table 68. Request parameters Name Description Type Requirement spaceNameName of the space where the project located
String
Required
projectNameName of the project where the branch is located
String
Required
branchNameName of the branch to be tested
String
Required
Example server response (JSON){ "jobId": "1576175811233-4", "status": "APPROVED", "spaceName": "Space123", "projectName": "ProjABC", "branchName": "b1", } - [POST] /spaces/{spaceName}/projects/{projectName}/branches/{branchName}/maven/deploy
-
Deploys a specified branch in a specified project and space. If
branchNameis not specified, then request applies to the master branch.Table 69. Request parameters Name Description Type Requirement spaceNameName of the space where the project is located
String
Required
projectNameName of the project where the branch is located
String
Required
branchNameName of the branch to be deployed
String
Required
Example server response (JSON){ "jobId": "1576175811233-4", "status": "APPROVED", "spaceName": "Space123", "projectName": "ProjABC", "branchName": "b1", }
14.2. Embedded jBPM controller calls
When running Business Central with the embedded jBPM controller mode, a series of endpoints related to managing all aspects of KIE Server templates, instances, and containers are also available. For more details, see jBPM controller REST API. A Java client API is also available for interacting with these endpoints.
14.3. Keycloak SSO integration
Single Sign On (SSO) and related token exchange mechanisms are becoming the most common scenario for the authentication and authorization in different environments on the web, especially when moving into the cloud.
This section talks about the integration of Keycloak with jBPM or Drools applications in order to use all the features provided on Keycloak. Keycloak is an integrated SSO and IDM for browser applications and RESTful web services. Lean more about it in the Keycloak’s home page.
The result of the integration with Keycloak has lots of advantages such as:
-
Provide an integrated SSO and IDM environment for different clients, including Business Central
-
Social logins - use your Facebook, Google, LinkedIn, etc accounts
-
User session management
-
And much more…
Next sections cover the following integration points with Keycloak:
-
Business Central authentication through a Keycloak server
It basically consists of securing both web client and remote service clients through the Keycloak SSO. So either web interface or remote service consumers (whether a user or a service) will authenticate into trough KC.
-
Execution server authentication through a Keycloak server
Consists of securing the remote services provided by the execution server (as it does not provide web interface). Any remote service consumer (whether a user or a service) will authenticate trough KC.
-
Consuming remote services
This section describes how a third party clients can consume the remote service endpoints provided by both Business Central and Execution Server, such as the REST API or remote file system services.
-
Keycloak and Business Central’s security administration area
14.3.1. Scenario
Consider the following diagram as the environment for this document’s example:
Keycloak is a standalone process that provides remote authentication, authorization and administration services that can be potentially consumed by one or more jBPM applications over the network.
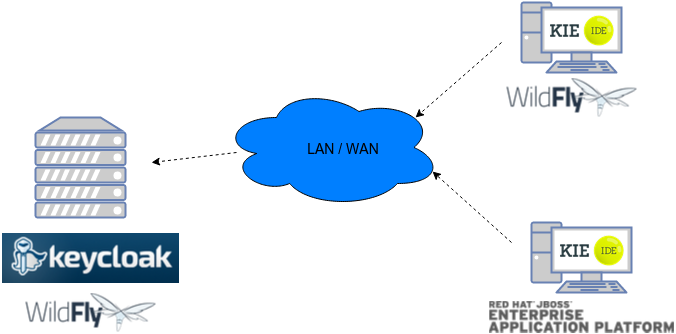
Consider these main steps for building this environment:
-
Install and set up a Keycloak server
-
Create and set up a Realm for this example - Configure realm’s clients, users and roles
-
Install and set up the SSO client adapter & jBPM application
Note: The resulting environment and the different configurations for this document are based on Business Central.
14.3.2. Install and set up a Keycloak server
Keycloak provides an extensive documentation and several articles about the installation on different environments. This section describes the minimal setup for being able to build an integrated environment for the example. Please refer to the Keycloak documentation if you need more information.
Here are the steps for a minimal Keycloak installation and set up:
-
Download the latest version of Keycloak from the Downloads section. This example is based on Keycloak 1.9.0.Final
-
Unzip the downloaded distribution of Keycloak into a folder, let’s refer to it as
$KC_HOME -
Run the KC server - This example is based on running both Keycloak and jBPM on same host. In order to avoid port conflicts you can use a port offset for the Keycloak’s server as:
$KC_HOME/bin/standalone.sh -Djboss.socket.binding.port-offset=100 -
Create a Keycloak’s administration 'admin' user by navigating to http://localhost:8180/auth/
The Keycloak administration console will be available at http://localhost:8180/auth/admin/.
14.3.3. Create and set up the demo realm
Security realms are used to restrict the access for the different application’s resources.
Once the Keycloak server is running next step is about creating a realm. This realm will provide the different users, roles, sessions, etc for the jBPM application/s.
Keycloak provides several examples for the realm creation and management, from the official examples to different articles with more examples.
Follow these steps in order to create the demo realm used later in this document:
-
Go to the Keycloak administration console and click Add realm button. Give it the name demo.
-
Go to the Clients section (from the main admin console menu) and create a new client for the demo realm:
-
Client ID: kie
-
Client protocol: openid-connect
-
Access type: confidential
-
Root URL: http://localhost:8080
-
Base URL: /business-central-x.y.z.Final
-
Redirect URIs: /business-central-x.y.z.Final/*
-
The resulting kie client settings screen:
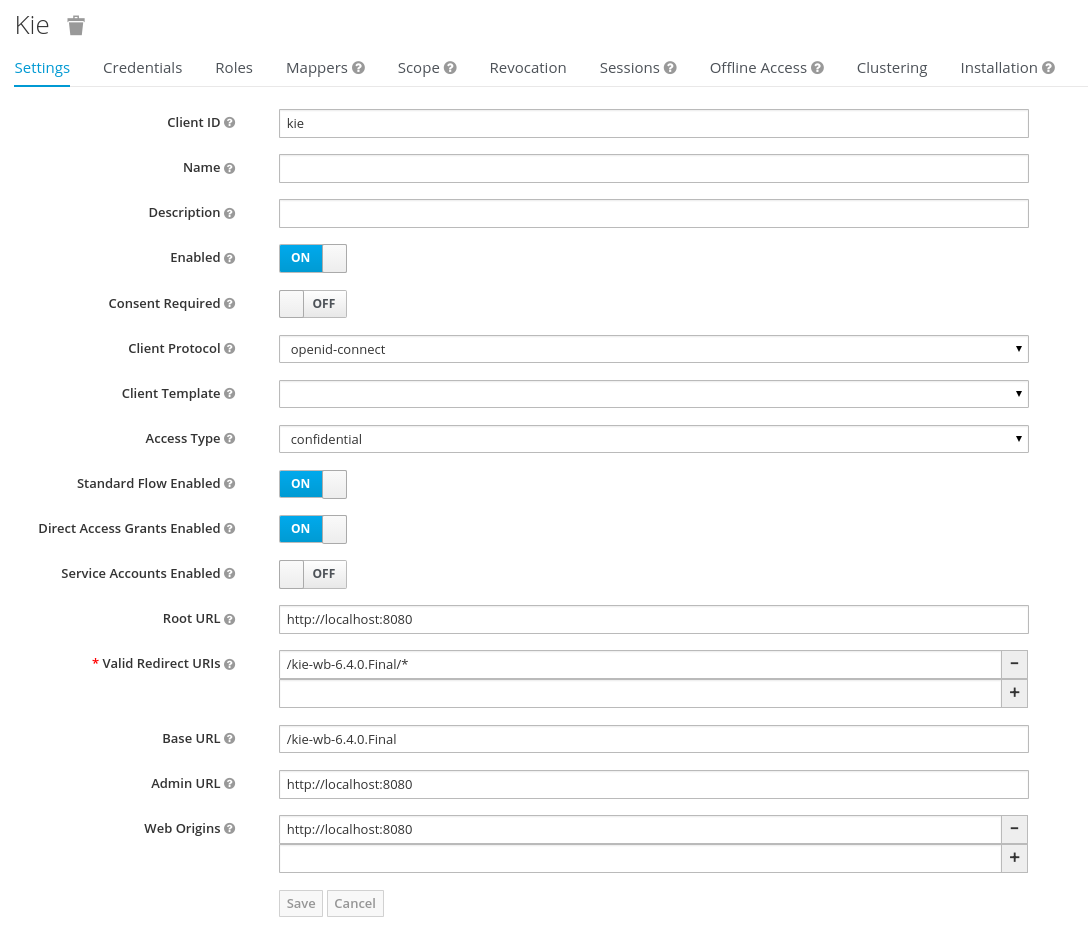
|
As you can see in the above settings it’s being considered the value business-central-x.y.z.Final for the application’s context path. If your jBPM application will be deployed on a different context path, host or port, just use your concrete settings here. |
Last step for being able to use the demo realm from Business Central is to create the application’s user and roles:
-
Go to the Roles section and create the roles admin, kiemgmt and rest-all
-
Go to the Users section and create the admin user. Set the password with value password in the credentials tab, unset the temporary switch.
-
In the Users section navigate to the Role Mappings tab and assign the admin, kiemgmt and rest-all roles to the admin user
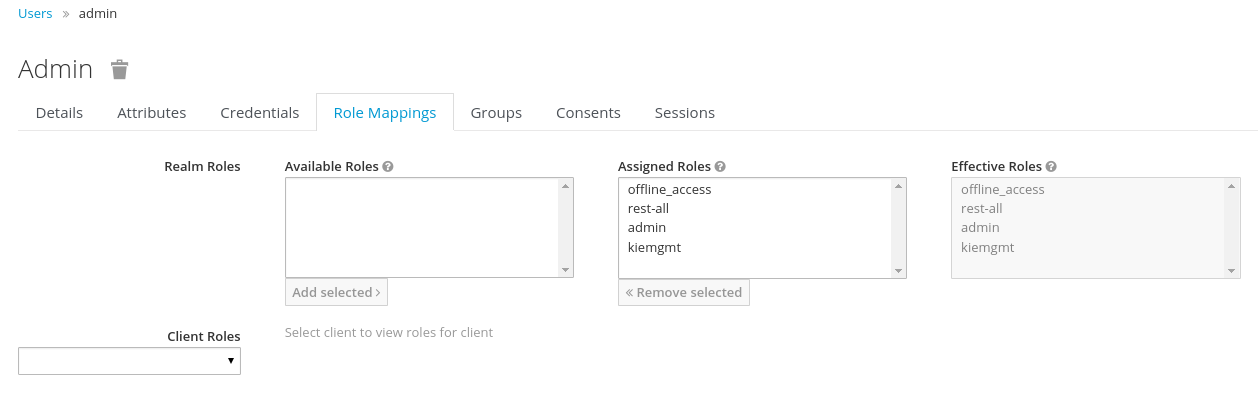
At this point a Keycloak server is running on the host, set up with a minimal configuration set. Let’s move to Business Central set up.
14.3.4. Install and set up Business Central
For this tutorial let’s use a Wildfly as the application server for Business Central, as the jBPM installer does by default.
Let’s assume, after running the jBPM installer, the $JBPM_HOME as the root path for the Wildfly server where the application has been deployed.
14.3.4.1. Install the KC adapter
In order to use the Keycloak’s authentication and authorization modules from the jBPM application, the Keycloak JBoss EAP/Wildfly Adapter must be installed on our server at $JBPM_HOME. Keycloak provides multiple adapters for different containers out of the box, if you are using another container or need to use another adapter, please take a look at the Securing Applications section from the Keycloak docs. Here are the steps to install and set up the adapter for Wildfly 11/10/9:
-
Download the adapter from Keycloak Client Adapter for Wildfly 11/10/9
-
Execute the following commands on your shell:
cd $JBPM_HOME unzip keycloak-wildfly-adapter-dist-3.4.3.Final.zip // Install the KC client adapter cd $JBPM_HOME/bin ./standalone.sh -c standalone-full.xml // set up the KC client adapter. // ** Once server is up, open a new command line terminal and run: cd $JBPM_HOME/bin ./jboss-cli.sh -c --file=adapter-install.cli
14.3.4.2. Configure the KC adapter
Once installed the KC adapter into Wildfly, next step is to configure the adapter in order to specify different settings such as the location for the authentication server, the realm to use and so on.
Keycloak provides two ways of configuring the adapter:
-
Per WAR configuration
-
Via Keycloak subsystem
In this example let’s use the second option, use the Keycloak subsystem, so our WAR is free from this kind of settings. If you want to use the per WAR approach, please take a look Required Per WAR Configuration.
Edit the configuration file $JBPM_HOME/standalone/configuration/standalone-full.xml and locate the subsystem configuration section. Add the following content:
<subsystem xmlns="urn:jboss:domain:keycloak:1.1">
<secure-deployment name="business-central-x.y.z.Final.war">
<realm>demo</realm>
<realm-public-key>MIIBIjANBgkqhkiG9w0BAQEFAAOCA...</realm-public-key>
<auth-server-url>http://localhost:8180/auth</auth-server-url>
<ssl-required>external</ssl-required>
<resource>kie</resource>
<enable-basic-auth>true</enable-basic-auth>
<credential name="secret">925f9190-a7c1-4cfd-8a3c-004f9c73dae6</credential>
<principal-attribute>preferred_username</principal-attribute>
</secure-deployment>
</subsystem>If you have imported the example json files from this document in step 2, you can just use the same configuration as above by using your concrete deployment name. Otherwise please use your values for these configurations:
-
Name for the secure deployment - Use your concrete application’s WAR file name
-
Realm - Is the realm that the applications will use, in our example, the demo realm created in the previous step.
-
Realm Public Key - Provide here the public key for the demo realm. It’s not mandatory, if it’s not specified, it will be retrieved from the server. Otherwise, you can find it in the Keycloak admin console → Realm settings (for demo realm) → Keys
-
Authentication server URL - The URL for the Keycloak’s authentication server
-
Resource - The name for the client created on step 2. In our example, use the value kie.
-
Enable basic auth - For this example let’s enable Basic authentication mechanism as well, so clients can use both Token (Bearer) and Basic approaches to perform the requests.
-
Credential - Use the password value for the kie client. You can find it in the Keycloak admin console → Clients → kie → Credentials tab → Copy the value for the secret.
For this example you have to take care about using your concrete values for secure-deployment name, realm-public-key and credential password.
|
Ensure the following tag is NOT present in the Wildfly/EAP profile’s configuration file (eg: standalone.xml): It’s enabled by default in some server versions. If present, it must be removed/disabled in order to allow Keycloak to properly handle the clients. |
14.3.4.3. Run the environment
At this point a Keycloak server is up and running on the host, and the KC adapter is installed and configured for the jBPM application server. You can run the application using:
$JBPM_HOME/bin/standalone.sh -c standalone-full.xmlYou can navigate into the application once the server is up at:
http://localhost:8080/business-central-x.y.z.Final
Use your Keycloak’s admin user credentials to login: admin/password.
14.3.5. Securing Business Central remote services via Keycloak
Business Central provides different remote service endpoints that can be consumed by third party clients using the Knowledge Store REST API.
In order to authenticate those services through Keycloak, apply those modifications for the WEB-INF/web.xml file (app deployment descriptor) from jBPM’s WAR file:
-
Constraint the remote services URL patterns as:
<security-constraint> <web-resource-collection> <web-resource-name>remote-services</web-resource-name> <url-pattern>/rest/*</url-pattern> <url-pattern>/maven2/*</url-pattern> <url-pattern>/ws/*</url-pattern> </web-resource-collection> <auth-constraint> <role-name>rest-all</role-name> </auth-constraint> </security-constraint>
|
The user that consumes the remote services must be member of role rest-all. As described in previous steps, the admin user in this example is already a member of the rest-all role. |
14.3.6. Securing Business Central’s file system services via Keycloak
In order to consume other remote services such as the file system ones (e.g. remote GIT), a specific Keycloak login module must be used for the application’s security domain in the $JBPM_HOME/standalone/configuration/standalone-full.xml file. By default Business Central uses the other security domain, so the resulting configuration on the $JBPM_HOME/standalone/configuration/standalone-full.xml should be such as:
<security-domain name="other" cache-type="default">
<authentication>
<login-module code="org.keycloak.adapters.jaas.DirectAccessGrantsLoginModule" flag="required">
<!-- Parameter value can be a file system absolute path or a classpath (e.g. "classpath:/some-path/kie-git.json")-->
<module-option name="keycloak-config-file" value="$JBPM_HOME/kie-git.json"/>
</login-module>
</authentication>
</security-domain>Note that:
-
The login modules on the other security domain in the $JBPM_HOME/standalone/configuration/standalone-full.xml file must be REPLACED by the above given one.
-
Replace $JBPM_HOME/kie-git.json by the path (on file system) or the classpath (e.g. classpath:/some-path/kie-git.json) for the json configuration file used for the remote services client. Please continue reading in order to create this Keycloak client and how to obtain this json file.
At this point, remote services that use JAAS for the authentication process, such as the file system ones (e.g. GIT), are secured by Keycloak using the client specified in the above json configuration file. So let’s create this client on Keycloak and generate the required JSON file:
-
Navigate to the KC administration console and create a new client for the demo realm using kie-git as name.
-
Enable Direct Access Grants Enabled option
-
Disable Standard Flow Enabled option
-
Use a confidential access type for this client. See below image as example:
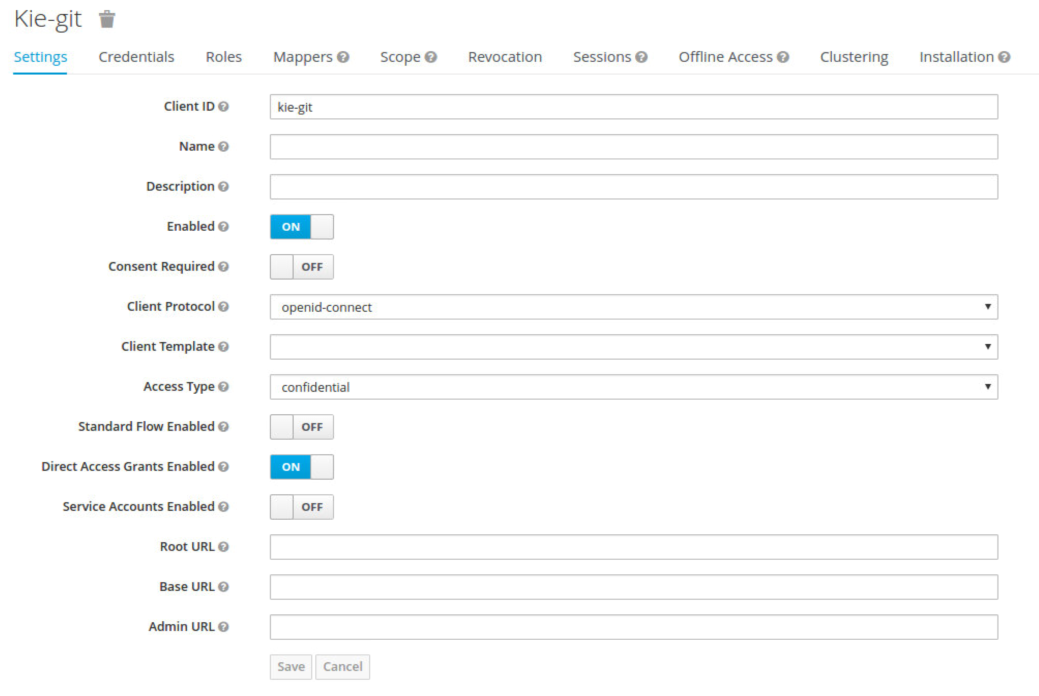
-
Go to the Installation tab in same kie-git client configuration screen and export using the Keycloak OIDC JSON type.
-
Finally copy this generated JSON file into an accessible directory on the server’s file system or add it in the application’s classpath. Use this path value as the keycloak-config-file argument for the above configuration of the org.keycloak.adapters.jaas.DirectAccessGrantsLoginModule login module.
-
More information about Keycloak JAAS Login modules can be found Keycloak JAAS plugin.
At this point, the internal Git repositories can be cloned by all users authenticated via the Keycloak server:
# Command example:
git clone ssh://admin@localhost:8001/system14.3.7. Execution server
The KIE Execution Server provides a REST API that can be consumed for any third party clients. This section is about how to integrate the KIE Execution Server with the Keycloak SSO in order to delegate the third party clients identity management to the SSO server.
Consider the above environment running, so consider having:
-
A Keycloak server running and listening on http://localhost:8180/auth
-
A realm named demo with a client named kie for Business Central
-
A Business Central running at http://localhost:8080/business-central-x.y.z.Final
Follow these steps in order to add an execution server into this environment:
-
Create the client for the execution server on Keycloak
-
Install set up and the Execution server (with the KC client adapter)
14.3.7.1. Create the execution server’s client on Keycloak
As per each execution server is going to be deployed, you have to create a new client on the demo realm in Keycloak:
-
Go to the KC admin console → Clients → New client
-
Name: kie-execution-server
-
Root URL: http://localhost:8280/
-
Client protocol: openid-connect
-
Access type: confidential (or public if you want so, but not recommended for production environments)
-
Valid redirect URIs: /kie-server-x.y.z.Final/*
-
Base URL: /kie-server-x.y.z.Final
In this example the admin user already created on previous steps is the one used for the client requests. So ensure that the admin user is a member of the role kie-server in order to use the execution server’s remote services. If the role does not exist, create it.
Note: This example considers that the execution server will be configured to run using a port offset of 200, so the HTTP port will be available at localhost:8280.
14.3.7.2. Install and set up the KC adapter on the execution server
At this point, a client named kie-execution-server is ready on the KC server to use from the execution server.
Let’s install, set up and deploy the execution server:
-
Install another Wildfly server to use for the execution server and the KC client adapter as well. You can follow above instructions for Business Central or follow the securing applications guide
-
Edit the standalone-full.xml file from the Wildfly server’s configuration path and configure the KC subsystem adapter as:
<secure-deployment name="kie-server-x.y.z.Final.war"> <realm>demo</realm> <realm-public-key>MIGfMA0GCSqGSIb...</realm-public-key> <auth-server-url>http://localhost:8180/auth</auth-server-url> <ssl-required>external</ssl-required> <resource>kie-execution-server</resource> <enable-basic-auth>true</enable-basic-auth> <credential name="secret">e92ec68d-6177-4239-be05-28ef2f3460ff</credential> <principal-attribute>preferred_username</principal-attribute> </secure-deployment>
Consider your concrete environment settings if different from this example:
-
Secure deployment name → use the name of the execution server war file being deployed
-
Public key → Use the demo realm public key or leave it blank, the server will provide one if so
-
Resource → This time, instead of the kie client used in the Business Central configuration, use the kie-execution-server client
-
Enable basic auth → Up to you. You can enable Basic auth for third party service consumers
-
Credential → Use the secret key for the kie-execution-server client. You can find it in the Credentials tab of the KC admin console
14.3.7.3. Deploy and run the execution server
Just deploy the execution server in Wildfly using any of the available mechanisms. Run the execution server using this command:
$EXEC_SERVER_HOME/bin/standalone.sh -c standalone-full.xml -Djboss.socket.binding.port-offset=200 -Dorg.kie.server.id=<ID> -Dorg.kie.server.user=<USER> -Dorg.kie.server.pwd=<PWD> -Dorg.kie.server.location=<LOCATION_URL> -Dorg.kie.server.controller=<CONTROLLER_URL> -Dorg.kie.server.controller.user=<CONTROLLER_USER> -Dorg.kie.server.controller.pwd=<CONTOLLER_PASSWORD>Example:
$EXEC_SERVER_HOME/bin/standalone.sh -c standalone-full.xml -Djboss.socket.binding.port-offset=200 -Dorg.kie.server.id=kieserver1 -Dorg.kie.server.user=admin -Dorg.kie.server.pwd=password -Dorg.kie.server.location=http://localhost:8280/kie-server-x.y.z.Final/services/rest/server -Dorg.kie.server.controller=http://localhost:8080/business-central-x.y.z.Final/rest/controller -Dorg.kie.server.controller.user=admin -Dorg.kie.server.controller.pwd=password|
The users that will consume the execution server remote service endpoints must have the role kie-server assigned. So create and assign this role in the KC admin console for the users that will consume the execution server remote services. |
Once up, you can check the server status as (considered using Basic authentication for this request, see next Consuming remote services for more information):
curl http://admin:password@localhost:8280/kie-server-x.y.z.Final/services/rest/server/14.3.8. Consuming remote services
In order to use the different remote services provided by Business Central or by an Execution Server, your client must be authenticated on the KC server and have a valid token to perform the requests.
Remember that in order to use the remote services, the authenticated user must have assigned:
-
The role rest-all for using the Business Central remote services
-
The role kie-server for using the Execution Server remote services
Please ensure necessary roles are created and assigned to the users that will consume the remote services on the Keycloak admin console.
You have two options to consume the different remove service endpoints:
-
Using basic authentication, if the application’s client supports it
-
Using Bearer (token) based authentication
14.3.8.1. Using basic authentication
If the KC client adapter configuration has the Basic authentication enabled, as proposed in this guide for both Business Central (step 3.2) and Execution Server, you can avoid the token grant/refresh calls and just call the services as the following examples.
Example for a Business Central remote repositories endpoint:
curl http://admin:password@localhost:8080/business-central-x.y.z.Final/rest/repositoriesExample to check the status for the Execution Server:
curl http://admin:password@localhost:8280/kie-server-x.y.z.Final/services/rest/server/14.3.8.2. Using token-based authentication
First step is to create a new client on Keycloak that allows the third party remote service clients to obtain a token. It can be done as:
-
Go to the KC admin console and create a new client using this configuration:
-
Client id: kie-remote
-
Client protocol: openid-connect
-
Access type: public
-
Valid redirect URIs: http://localhost/
-
-
As we are going to manually obtain a token and invoke the service let’s increase the lifespan of tokens slightly. In production access tokens should have a relatively low timeout, ideally less than 5 minutes:
-
Go to the KC admin console
-
Click your Realm Settings
-
Click Tokens tab
-
Change the value for Access Token Lifespan to 15 minutes. That should give us plenty of time to obtain a token and invoke the service before it expires.
-
Once a public client for our remote clients has been created, you can now obtain the token by performing an HTTP request to the KC server’s tokens endpoint. Here is an example for command line:
RESULT=`curl --data "grant_type=password&client_id=kie-remote&username=admin&password=password" http://localhost:8180/auth/realms/demo/protocol/openid-connect/token`TOKEN=`echo $RESULT | sed 's/.*access_token":"//g' | sed 's/".*//g'`At this point, if you echo the $TOKEN it will output the token string obtained from the KC server, that can be now used to authorize further calls to the remote endpoints. For example, if you want to check the internal jBPM repositories:
curl -H "Authorization: bearer $TOKEN" http://localhost:8080/business-central-x.y.z.Final/rest/repositories14.3.9. Keycloak and the Business Central’s security administration area
Business Central provides an administration area which provides user, group and role management features. For more information, see User and group management and Security management sections.
By default the application’s security management system points to the application’s server realm. For instance, in case of using the packaged distribution for Wildfly, it points to the Wildfly’s ApplicationRealm (properties based). It means the entities from the realm presented in the administration area are not the ones from the Keycloak realm that the application is using. There exist the following options in order to change this default behavior:
-
Disable the user system administration
-
Use the built-in Keycloak security management provider instead of the default one
In order to customize an existing jBPM application (WAR file) for using the Keycloak security management provider replace the content for WEB-INF/classes/security-management.properties by:
org.uberfire.ext.security.management.api.userManagementServices=KCAdapterUserManagementService
org.uberfire.ext.security.management.keycloak.authServer=<authz_server_url>
# eg: org.uberfire.ext.security.management.keycloak.authServer=http://localhost:8180/auth|
The properties |
|
The jar artifacts required in the steps above can be either downloaded from JBoss Nexus or either build from sources. |
Once applying the above changes, the security administration area uses the access token present in the user’s session in order to authorize and manage the specific Keycloak realm data.
|
In order to be able to manage Keycloak realms remotely, please ensure the user has the realm-management client role assigned |
15. Business Central High Availability
15.1. VFS clustering
The VFS repositories (usually git repositories) stores all the assets (such as rules, decision tables, process definitions, forms, etc). If that VFS is located on each local server, then it must be kept in sync between all servers of a cluster.
Use Apache Zookeeper and Apache Helix to accomplish this. Zookeeper glues all the parts together. Helix is the cluster management component that registers all cluster details (nodes, resources and the cluster itself). Uberfire (on top of which Business Central is built) uses those 2 components to provide VFS clustering.
To create a VFS cluster:
-
Download Apache Zookeeper and Apache Helix.
-
Install both:
-
Unzip Zookeeper into a directory (
$ZOOKEEPER_HOME). -
In
$ZOOKEEPER_HOME, copyzoo_sample.conftozoo.conf -
Edit
zoo.conf. Adjust the settings if needed. Usually only these 2 properties are relevant:# the directory where the snapshot is stored. dataDir=/tmp/zookeeper # the port at which the clients will connect clientPort=2181 -
Unzip Helix into a directory (
$HELIX_HOME).
-
-
Configure the cluster in Zookeeper:
-
Go to its
bindirectory:$ cd $ZOOKEEPER_HOME/bin -
Start the Zookeeper server:
$ sudo ./zkServer.sh startIf the server fails to start, verify that the
dataDir(as specified inzoo.conf) is accessible. -
To review Zookeeper’s activities, open
zookeeper.out:$ cat $ZOOKEEPER_HOME/bin/zookeeper.out
-
-
Configure the cluster in Helix:
-
Go to its
bindirectory:$ cd $HELIX_HOME/bin -
Create the cluster:
$ ./helix-admin.sh --zkSvr localhost:2181 --addCluster kie-clusterThe
zkSvrvalue must match the used Zookeeper server. The cluster name (kie-cluster) can be changed as needed. -
Add nodes to the cluster:
# Node 1 $ ./helix-admin.sh --zkSvr localhost:2181 --addNode kie-cluster nodeOne:12345 # Node 2 $ ./helix-admin.sh --zkSvr localhost:2181 --addNode kie-cluster nodeTwo:12346 ...Usually the number of nodes in a cluster equal the number of application servers in the cluster. The node names (
nodeOne:12345, …) can be changed as needed.nodeOne:12345is the unique identifier of the node, which will be referenced later on when configuring application servers. It is not a host and port number, but instead it is used to uniquely identify the logical node. -
Add resources to the cluster:
$ ./helix-admin.sh --zkSvr localhost:2181 --addResource kie-cluster vfs-repo 1 LeaderStandby AUTO_REBALANCEThe resource name (
vfs-repo) can be changed as needed. -
Rebalance the cluster to initialize it:
$ ./helix-admin.sh --zkSvr localhost:2181 --rebalance kie-cluster vfs-repo 2 -
Start the Helix controller to manage the cluster:
$ ./run-helix-controller.sh --zkSvr localhost:2181 --cluster kie-cluster 2>&1 > /tmp/controller.log &
-
-
Configure the security domain correctly on the application server. For example on WildFly and JBoss EAP:
-
Edit the file
$JBOSS_HOME/domain/configuration/domain.xml.For simplicity sake, presume we use the default domain configuration which uses the profile
fullthat defines two server nodes as part ofmain-server-group. -
Locate the profile
fulland add a new security domain by copying the other security domain already defined there by default:<security-domain name="kie-ide" cache-type="default"> <authentication> <login-module code="Remoting" flag="optional"> <module-option name="password-stacking" value="useFirstPass"/> </login-module> <login-module code="RealmDirect" flag="required"> <module-option name="password-stacking" value="useFirstPass"/> </login-module> </authentication> </security-domain>The security-domain name is a magic value.
-
-
Configure the system properties for the cluster on the application server. For example on WildFly and JBoss EAP:
-
Edit the file
$JBOSS_HOME/domain/configuration/host.xml. -
Locate the XML elements
serverthat belong to themain-server-groupand add the necessary system property.For example for nodeOne:
<system-properties> <property name="jboss.node.name" value="nodeOne" boot-time="false"/> <property name="org.uberfire.nio.git.dir" value="/tmp/kie/nodeone" boot-time="false"/> <property name="org.uberfire.metadata.index.dir" value="/tmp/kie/nodeone" boot-time="false"/> <property name="org.uberfire.cluster.id" value="kie-cluster" boot-time="false"/> <property name="org.uberfire.cluster.zk" value="localhost:2181" boot-time="false"/> <property name="org.uberfire.cluster.local.id" value="nodeOne_12345" boot-time="false"/> <property name="org.uberfire.cluster.vfs.lock" value="vfs-repo" boot-time="false"/> <!-- If you're running both nodes on the same machine: --> <property name="org.uberfire.nio.git.daemon.port" value="9418" boot-time="false"/> </system-properties>And for nodeTwo:
<system-properties> <property name="jboss.node.name" value="nodeTwo" boot-time="false"/> <property name="org.uberfire.nio.git.dir" value="/tmp/kie/nodetwo" boot-time="false"/> <property name="org.uberfire.metadata.index.dir" value="/tmp/kie/nodetwo" boot-time="false"/> <property name="org.uberfire.cluster.id" value="kie-cluster" boot-time="false"/> <property name="org.uberfire.cluster.zk" value="localhost:2181" boot-time="false"/> <property name="org.uberfire.cluster.local.id" value="nodeTwo_12346" boot-time="false"/> <property name="org.uberfire.cluster.vfs.lock" value="vfs-repo" boot-time="false"/> <!-- If you're running both nodes on the same machine: --> <property name="org.uberfire.nio.git.daemon.port" value="9419" boot-time="false"/> </system-properties>Make sure the cluster, node and resource names match those configured in Helix.
-
15.2. jBPM clustering
In addition to the information above, jBPM clustering requires additional configuration. See this blog post to configure the database etc correctly.
16. Designer
Designer is a graphical web-based BPMN2 editor. It allows users to model and simulate executable BPMN2 processes. The main goal of Designer is to provide intuitive means to both technical and non-technical users to quickly create their executable business processes. This chapter intends to describe all feature Designer offers currently.
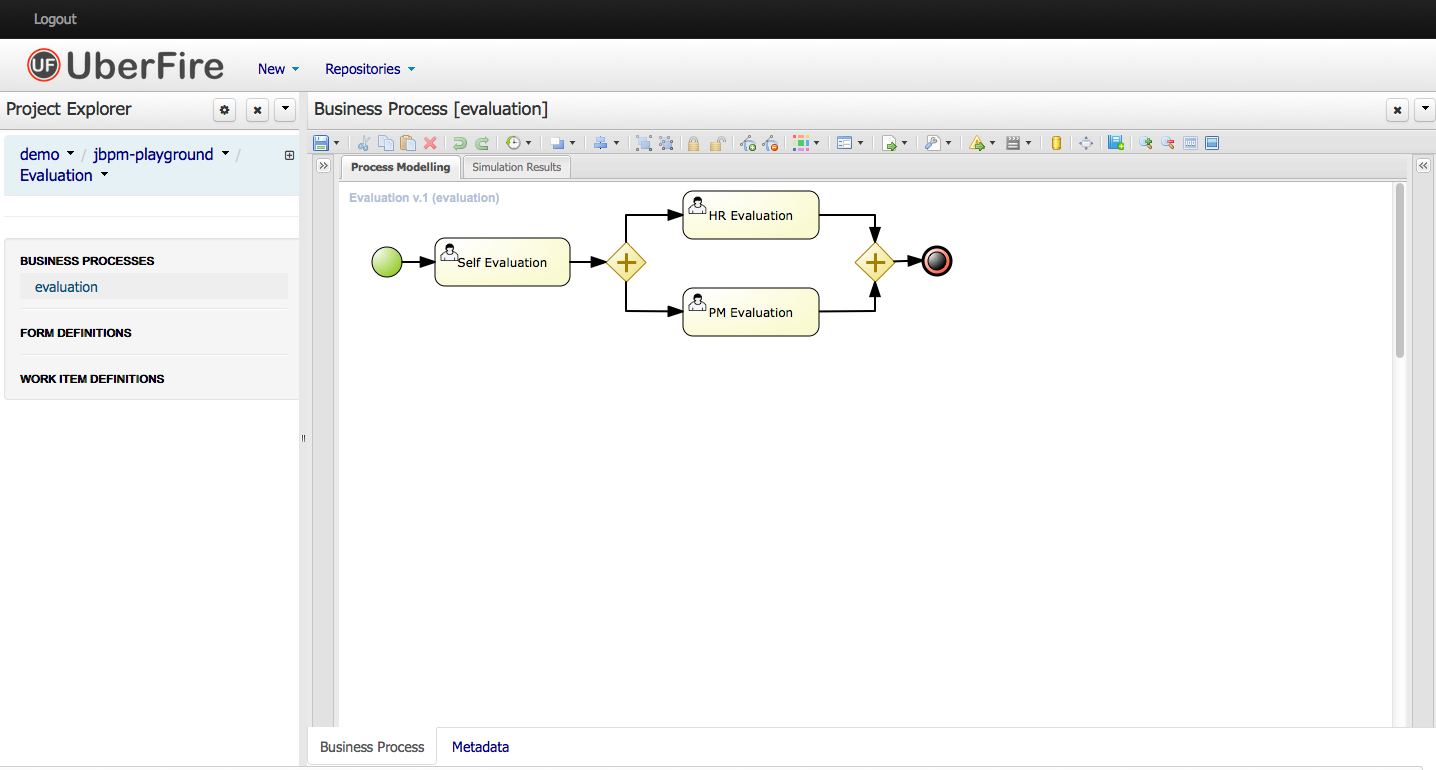
Designer targets the following business process modelling scenarios:
-
View and/or edit existing BPMN2 processes: Designer allows you to open existing BPMN2 processes (for example created using the BPMN2 Eclipse editor or any other tooling that exports BPMN2 XML).
-
Create fully executable BPMN2 processes: A user can create a new BPMN2 process in the Designer and use the editing capabilities (drag and drop and filling in properties in the properties panel) to fill in the details. This for example allows business users to create complete business processes all inside a browser. The integration with Drools Guvnor allows for your business processes as wells as other business assets such as business rules, process forms/images, etc. to be stored and versioned inside a content repository.
-
View and/or edit Human Task forms during process modelling (using the in-line form editor or the Form Modeller).
-
Simulate your business process models. Business Process Simulation is based on the BPSIM 1.0 specification.
Designer supports all BPMN2 elements that are also supported by jBPM as well as all jBPM-specific BPMN2 extension elements and attributes.
16.1. Designer UI Explained
Designer UI is composed of a number of sections as shown below:
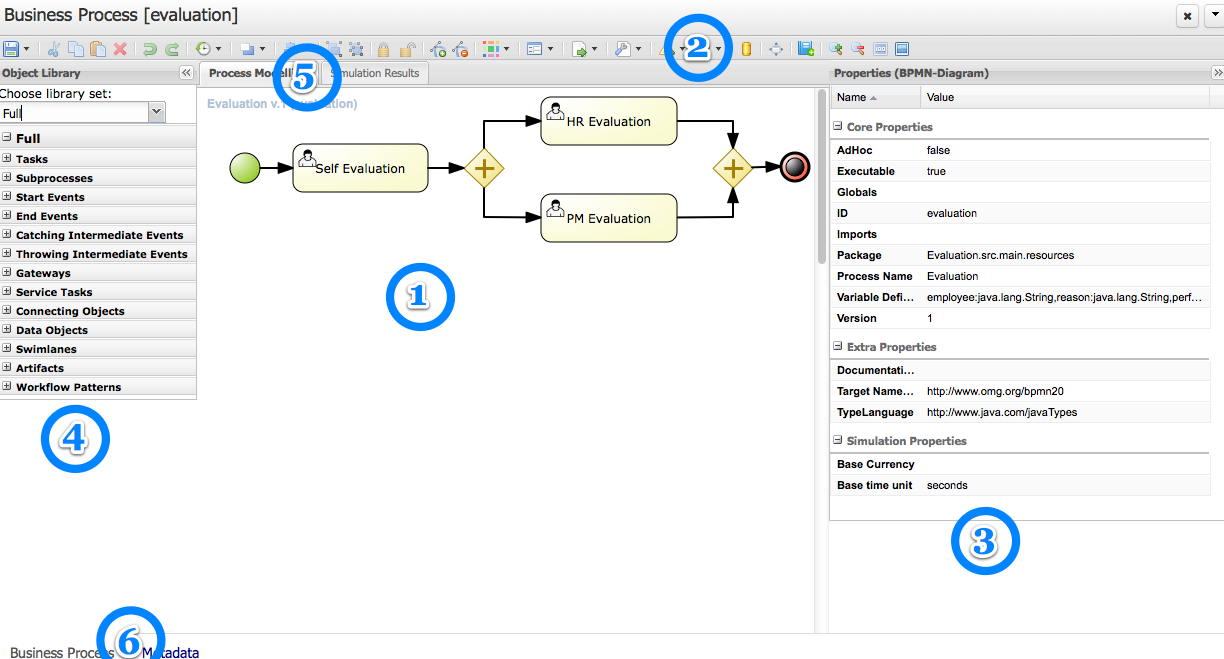
-
(1) Modelling Canvas - this is your process drawing board. After dropping different shapes onto the canvas, you can move them around, connect them, etc. Clicking on a shape on the canvas allows you to set its properties in the expandable Properties Window (3) (as well as create connecting shapes and morph the shape into other shapes).
-
(2) Toolbar - the toolbar contains a vast number of functions offered by Designer (described later). These include operations that can be performed on shapes present on the Canvas. Individual operations are disabled or enabled depending on what is selected. For example, if no shapes are selected, the Cut/Paste/Delete operations are disabled, and become enabled once you select a shape. Hovering over the icons in the Toolbar displays the description text of the operation.
-
(3) Properties Panel - this expandable section on the right side of Designer allows you to set both process and shape properties. It is divided into four sections, namely "Core properties", "Extra Properties, "Graphical Settings" and "Simulation Properties". After clicking on a shape in the Canvas, this panel is reloaded to show properties specific to that shape type. If you click the canvas itself (not on a shape) the panel displays general process properties.
-
(4) Object Library Panel - the expandable section on the left side of Designer shows the jBPM BPMN2 (default) shape repository tree. It includes all shapes of the jBPM BPMN2 stencil set which can be used to assemble your processes. If you expand each section sub-group you can see the BPMN2 elements that can be placed onto the Designer Canvas (1) by dragging and dropping the shape onto it.
-
(5) View Tabs - currently Designer offers three tabs for Process Modelling, Simulation and Documentation. Process Modelling is the default tab. When users run process simulation, its results are presented in the Simulation tab. Process Documentation tab displays documentation generated from process definition.
-
(6) Info Tabs - there are two additional tabs at the top of Designer. The Editor tab includes the process modeling while the Overview tab displays the process metadata such as version history, creation date, last modification date etc.
16.2. Getting started with Modelling
The Object Library panel provide means for users to select and drag/drop BPMN2 shapes onto the modelling canvas. Shapes are divided into sections as shown below:
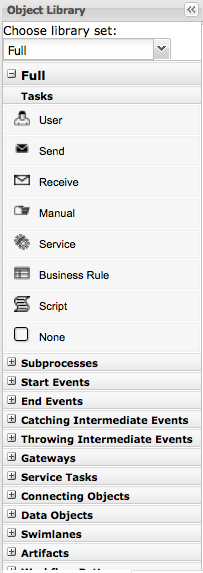
Once a shape is dropped onto the canvas users have a much faster way of continuing modelling without having to go back to the Object Library panel. This is realized through the shape morphing menu which is presented when a shape on the drawing canvas is clicked on. This menu allows users to either select a connecting shape (next shape) or morph the selected node into another node type. In addition this menu includes means to store the shape name as a dictionary item (explained later), view the specific BPMN2 code of the selected shape, as well as create/edit the task form (in the case of user tasks only).
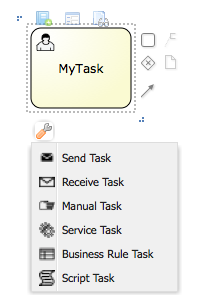
When connecting shapes Designer applies connection rules that follow the BPMN2 specification. The connection shapes presented in the morphing menu only show shapes that are allowed to be connections. Similarly same rules are applied when dropping a shape from the Object Library from the canvas and trying to connect an existing shape to it. Additional connection rules for boundary events are also available (explained later) and applied when for example moving an intermediate event node onto the edge of a task node.
Users can give names to every shape on the drawing canvas. This is done by double-clicking on the shape as shown below.
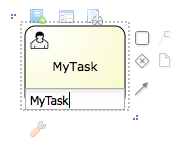
The name of a shape can be pulled from the Process Dictionary. If terms are set up in the dictionary, auto-complete can be used for the node names:
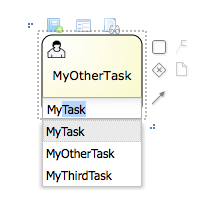
Designer also shows five buttons on top of a clicked shape as shown below.
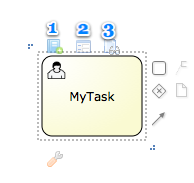
These include: * (1) Show in process Documentation - scrolls to the section of Process Documentation tab that corresponds to the shape clicked * (2) Add To Dictionary - allows users to add the name of the task to the Process Dictionary (explained in more details later) * (3) Edit Task Form - allows users to create/edit the Task Form. This option is only available for User Tasks * (4) Edit Data I/O - opens dialog for editing data input / output assignments for given node * (5) View Node Source - shows the BPMN2 for this particular shape only
The section should get you started with creating simple business process models by dragging/dropping BPMN2 shapes onto the drawing canvas. Next sections will dive deeper into many other aspects of Designer.
16.3. Designer Toolbar
The Designer toolbar contains many different functions which can be used during process modelling.

We will now go through each of the buttons in the Designer Toolbar and give a brief overview of what it does.
(1) Save - allows users to save, copy, rename and delete the business process model. In addition users can turn on auto-save which will automatically save the business process within a defined time interval.
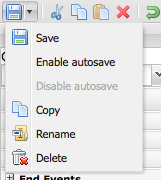
(2) Cut - enabled when a portion of the model is selected.
(3) Copy - enabled when a portion of the model is selected.
(4) Paste - paste the copied portion of the model onto the drawing board.
(5) Delete - enabled when there is a portion of the model is selected and removes it.
(6, 7) Undo/Redo - undo the last performed operation on the drawing canvas.
(8) Local History - local history allows continuous storage of your business process onto your browsers internal storage. Stored version of the business process can persist internet outages or browser crashes so your work will not be lost. This feature is disabled by default and must be enabled by users. Once local history has been enabled users are able to view all previously stored snapshots of their business model, clear local history, configure the snapshot interval, or disable local history. Note that local history will only take a snapshot of your business process on the set storing interval if there were some changes done in the model. If at the end of the snapshot interval Designer detects that there were no changes since the last local history save, no new snapshot will be created.
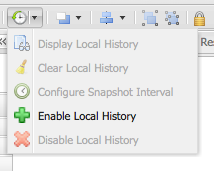
The Local History results screen allows users to select a stored snapshot of the model, view its process image and restore it back onto their drawing board.

(9) Object positioning - allows users to position one or more nodes in the business process. Note that at last one shape must be selected first, otherwise these options are disable. Contains options "Bring to Front", "Bring to back", "Bring forward" and "Bring Backward".
(10) Alignment: enabled when a portion of the model is selected. Includes options "Align Bottom", "Align Middle", "Align Top", "Align Left", "Align Center", "Align Right" and "Align Same Size".
(11, 12) Group and Ungroup - allows grouping and ungrouping of selected shapes on the drawing board.
(13, 14) Locking and Unlocking - allows parts of the business model to be locked and unlocked. Locked parts of the model cannot be edited (visual display and properties are both locked). Locked nodes are displayed in a light blue color. This feature fosters collaboration of process modelling by allowing users to set parts of their model as "completed" and preventing any further changes to that portion. Other parts of the model can continue to be edited.
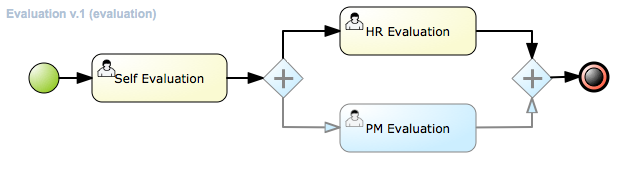
(15, 16) Add/Remove Docker - this allows users to add or remove Dockers, or edge points, to sequence flows in the model. Enabled when a sequence flow (connector) is selected. It allows users to create very customized connection points from one shape to another. Users can add and remove as many dockers as they would like on a single sequence flow.
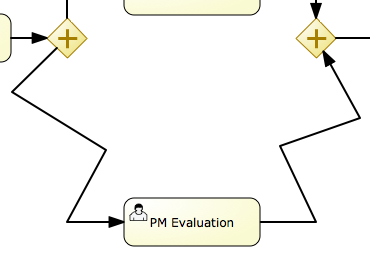
(17) Color Themes - Colors are a big part or process modelling as they help with expressing intent as well as help allowing visually impaired users to better view the model. Designer provides two default color themes out of the box named "jBPM" and "High Contrast". The jBPM theme is the default theme used for all new business processes created. Users can switch color themes and the changes will be applied to all nodes that are currently on the model, as well as any new shapes added. Users have the ability to add new custom color themes by adding their own definitions in the Designer themes.json file. Color theme selection is persisted over browser close or possible crash/internet loss.

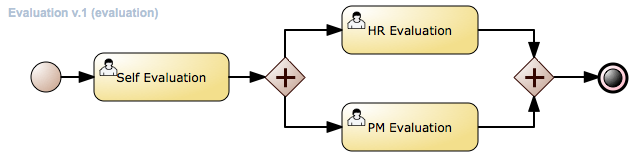
(18) Process and Task forms - here users have the ability to generate/edit process and task forms. When no user task is selected the default enabled options are "Edit Process Form" and "Generate all Forms". Generate all forms will apply the current model information such as process variables, data objects, and the user tasks data input/output parameters and associations to generate default executable input forms. Upon editing a process and task form, users have the choice between two form editors, the jBPM Form Modeler, and the Designer in-line meta editor. The Designer meta editor is targeted more to technical users as it is text based with the ability for live preview. When the user selects a user task in the model, the "Edit Task Form" and "Generate Task Form" options are enabled which allow users to edit the particular task form, or choose to apply the same generation logic to create a task form for the selected task only. Users have the ability to extend the default form generation templates in designer to create fully customized templates. Node that in the case of the Designer meta editor for forms, generating forms will overwrite existing forms for the process and user tasks. In the case of Form Modeler form generation, a merging algorithm is applied when generating.
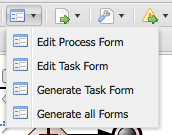
When selecting a task, users have the ability to edit the selected tasks form via the form button shown above the user task node.
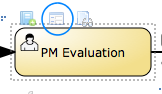
When editing forms, users are asked to choose between the Form Modeler and the Designer in-line meta editor. If the user selects Form Modeler the form is shown in a new asset tab separately from Designer. Designer meta editor is in-line and part of the Designer application.
The Designer in-line meta form editor is a powerful text-based editor with a live preview feature as well as auto-completion on process variables and user task data inputs/outputs.

(19) Process Information Sharing - this section includes many functions that help with sharing information of your model. These include:
-
Share process image - generates a stand-alone HTML image tag which contains a Base64 encoded image source of the current model on the canvas. This link can be shared with team members or other parties and embedded in any HTML content or email that allows HTML content embedding.
-
Share process PDF - generates a stand-alone HTML object tag which contains a Base64 encoded PDF source of the current model on the canvas. This can similarly be shared and embedded in any HTML content.
-
Download process PNG - generates a PNG image of the current process on the drawing board which users can download and share.
-
Download process PDF - generates a PDF of the current process on the drawing board which can be downloaded and shared.
-
View Process Sources - displays the current process sources in various formats, namely BPMN2, JSON, SVG, and ERDF. Also has the option to download the BPMN2 sources.
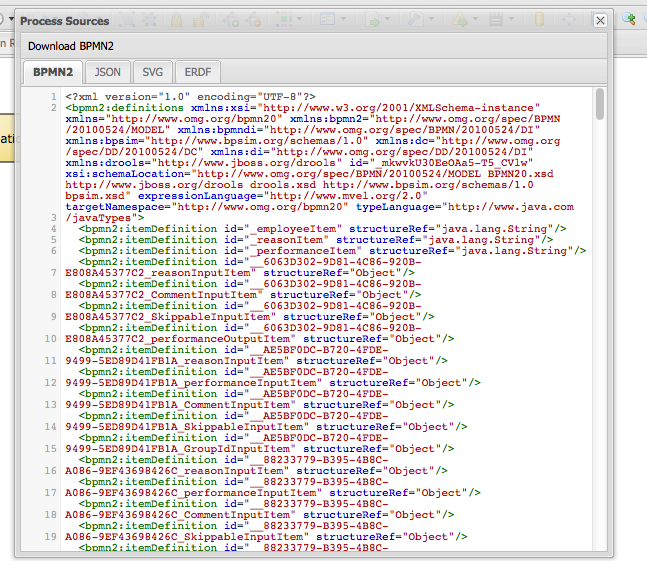
(20) Extra tooling - this section allows users to import their existing BPMN2 processes into designer as well as be able to migrate their old jPDL based processes to BPMN2. For BPMN2 or JSON imports users can choose to add the import on top of the existing model on the drawing board or choose to replace the current one with the import.
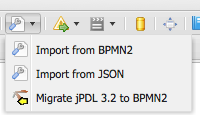
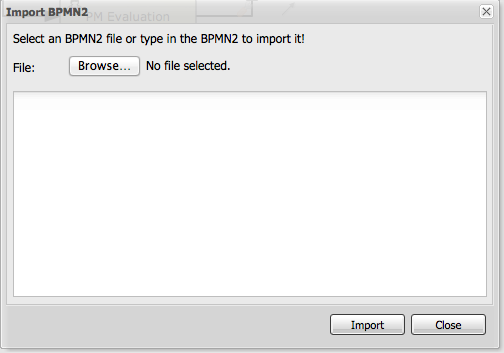
(21) Visual Validation - Designer includes over 100 validation checks and this list is growing. It allows users to view validation issues in real-time as they are modelling their business process. Users can enable visual validation, disable it, as well as view all validation issues at once. If Visual Validation is turned on, Designer with set the shape border of shapes that do not pass validation to red color. Users can then click that particular shape to view the validation issues for that particular shape only. Alternatively "View All Issues" present a combined list of all validation errors currently found. Note that you do not have to periodically save your business process in order for validation to update. It will do so on its own short intervals during modelling. Users can extend the list of validation issues to include their own types of validation on certain elements of their business model.
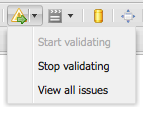
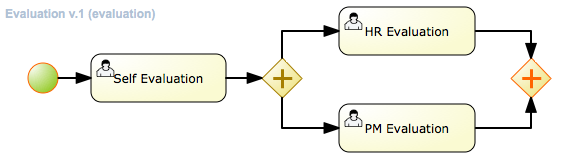
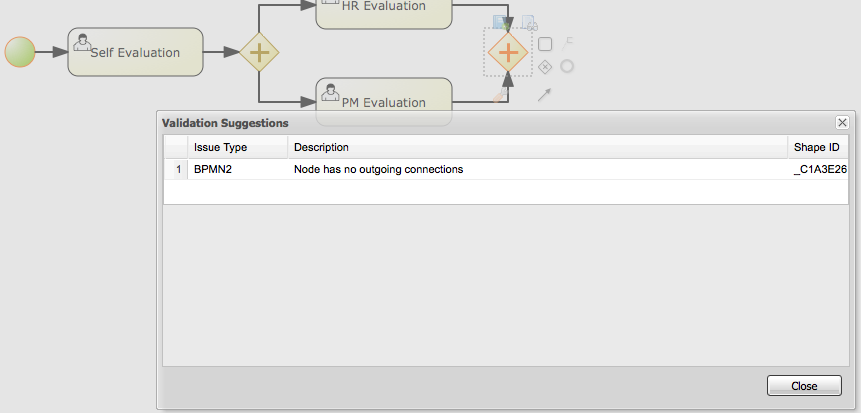
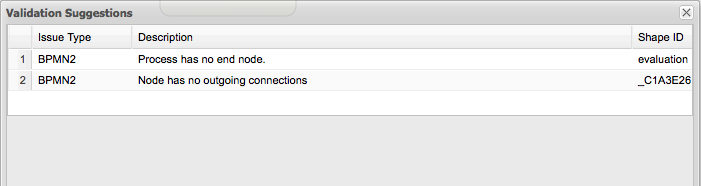
(22) Process Simulation - Business Process Simulation deals with statistical analysis of process models over time. It’s main goals include
-
Pre-execution and post-execution optimization
-
Reducing the risk of change in business processes
-
Predict business process performance
-
Foster continuous improvements of performance, quality and resource utilization of business processes
Designer includes a powerful simulation engine which is based on jBPM and Drools and a graphical user interface to view and interpret simulation results. In addition users are able to view all process paths included in their current model on the drawing board. Designer Process Simulation is based on the BPSim 1.0 specification. Details of Process Simulation capabilities in Designer are can be found in its Simulation documentation chapter. Here we just give a brief overview of all features it contains.
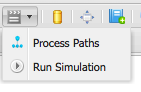
When selecting Process Paths, the simulation engine find all possible paths in the business model. Users can choose certain found paths and choose to display them. The chosen path is marked with given colors as shown below.
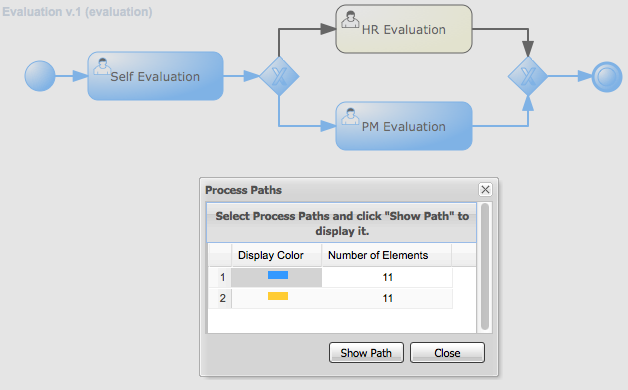
When selecting "Run Simulation", users have to enter in simulation runtime properties. These include the number of instances of this business process to simulate and the interval time and units. This interval is the time in-between consecutive simulation.
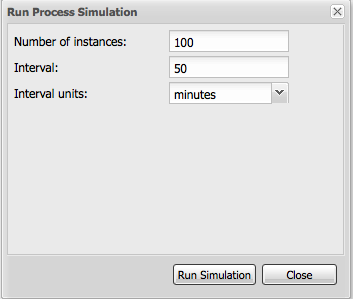
Each shape on the drawing board includes Simulation properties (properties panel) where users can set numerous simulation properties for that particular shape. More info on each of these properties can be found in the Simulation chapter of the documentation. Designer pre-sets some defaults for new processes, which allows business processes to be simulated by default without any modifications of these properties. Note however that the results of the default settings may not be optimal or targeted for the users particular needs.
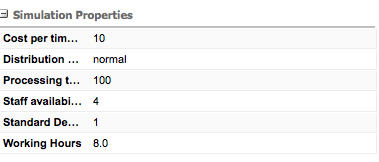
Once the simulation runtime has completed, users are shown the simulation results in the "Simulation Results" tab of Designer. The results default to the process results. Users can switch to results for each particular shape in their business process to see more specific details. In addition, the results contain process paths simulation results for each path in the business process.
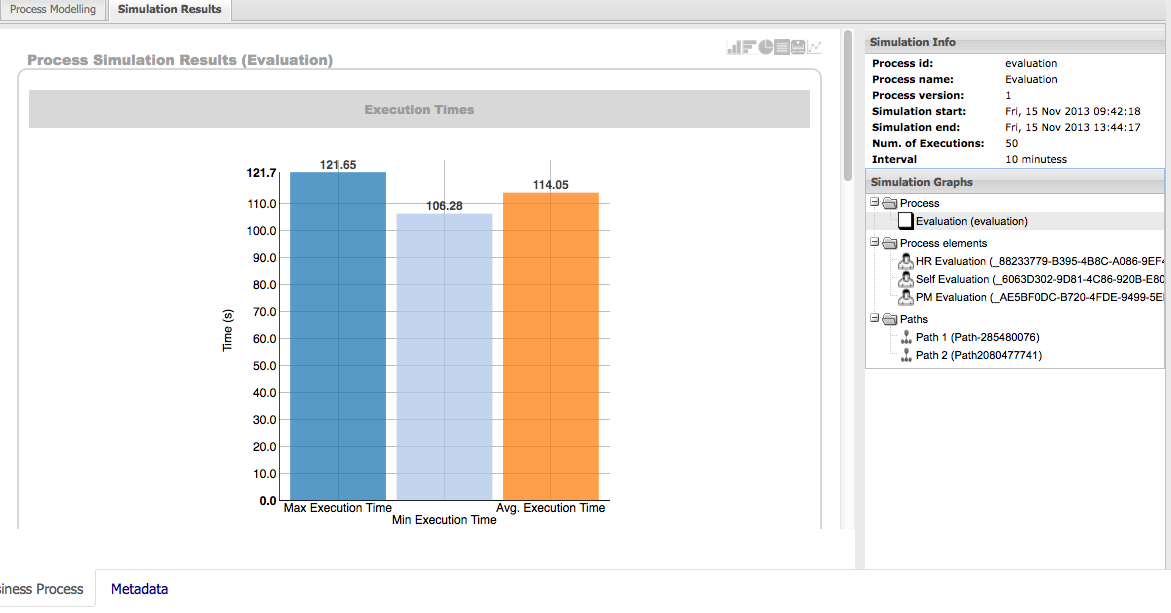
Designer simulation presents the users with many different chart types. These include:
-
Process results: Execution times, Activity instances, Total cost
-
Human Task results: Execution times, Resource Utilization, Resource Cost
-
All other nodes: Execution times
-
Process Paths: Path Execution The below image shows a number of possible chart types users can view after process simulation has completed.
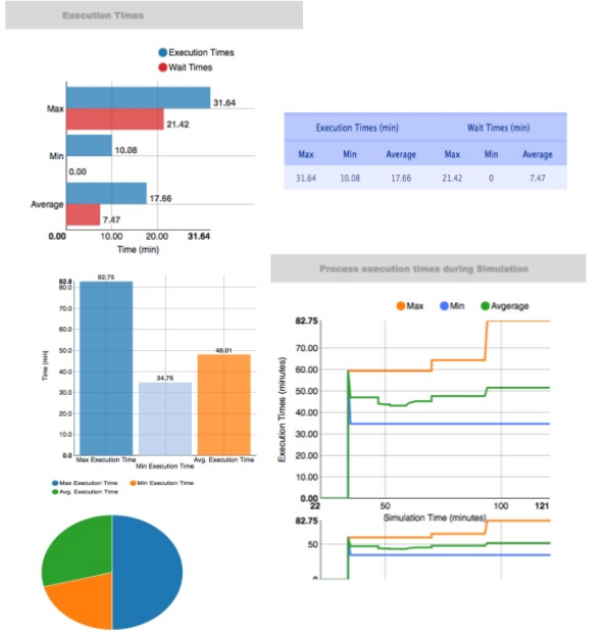
In addition to the chart results, Designer simulation also offers a full timeline display that includes all details of what happened during simulation. This timeline allows users to navigate through each event that happened during process simulation and select a particular node to display results at that particular point in time.
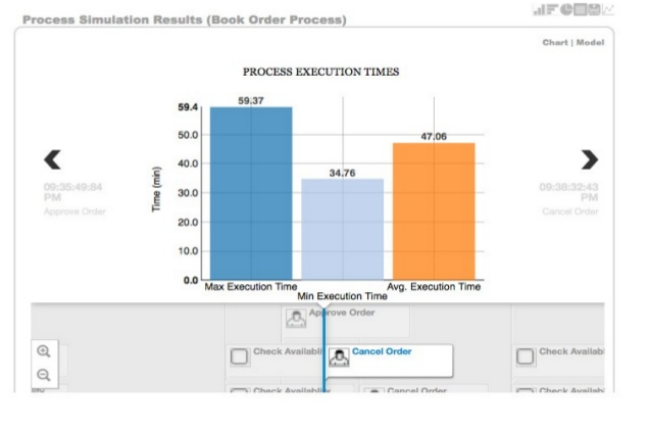
The simulation timeline can be switched to the Model view. This view displays the process model with the currently selected node in the timeline highlighted. The highlighted node displays the simulation results at that particular point in time of the simulation.
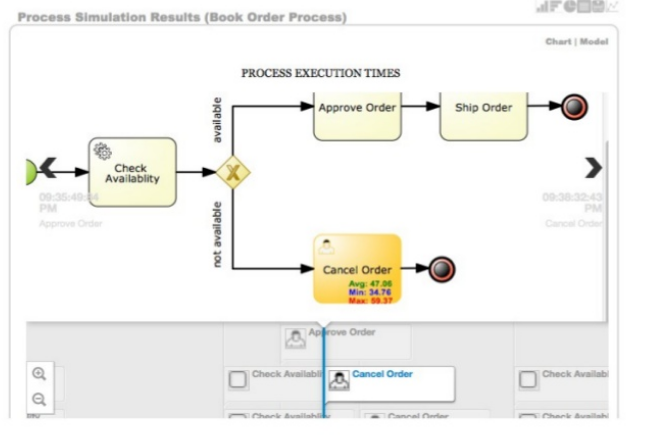
Path execution results shows a chart displaying the chosen path as well as path instance execution details.
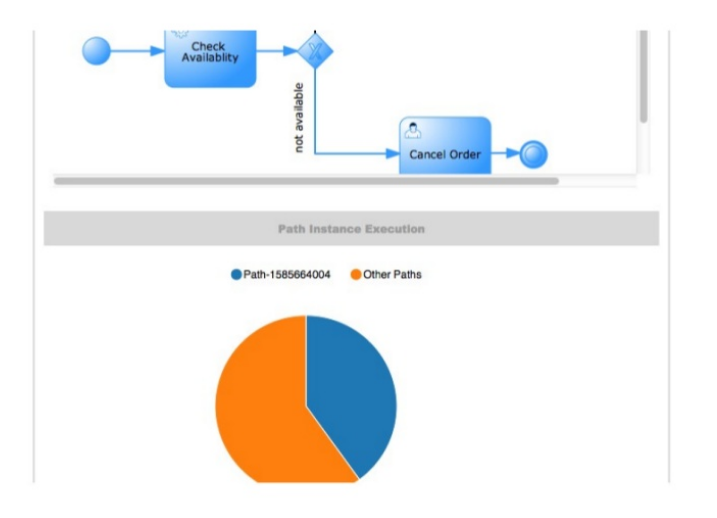
(23) Service Repository - Allows users to connect to a service repository via its URL and see the list of available services it provides. Each of the listed services can then be installed into the users project by clicking on the "wrench" icon next to each listed service. Installing a service does the following things:
-
Installs the service configuration (wid) into the users Business Central project. This can later be edited via the Workitem Definitions Editor.
-
Installs the service icon (defined in the service configuration) and if one does not exist a default one will be provided.
-
Installs the service maven dependencies into the project POM.
-
Installs the service default handler into the project Deployment Descriptor.
Users will be notified when the service is successfully installed. After the install users have to re-open the business process to be able to start using the installed services.
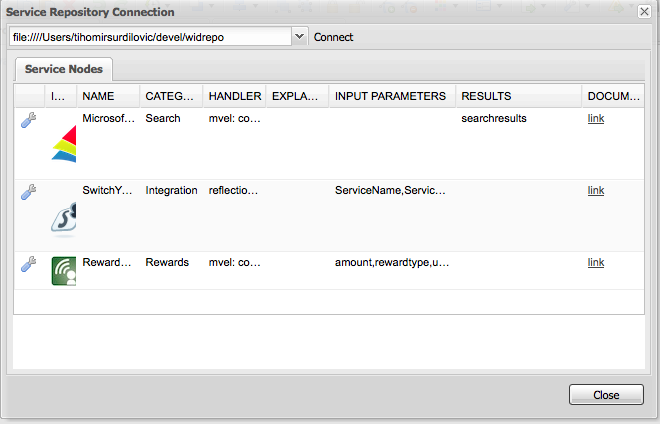
(24) Full screen Mode - allows users to place the drawing board of Designer into full-screen mode. This can help with better visualizing larger business processes without having to scroll. Note that this feature is possible only if your browser has full screen mode capabilities. If it does not designer will show a message stating this to the user.
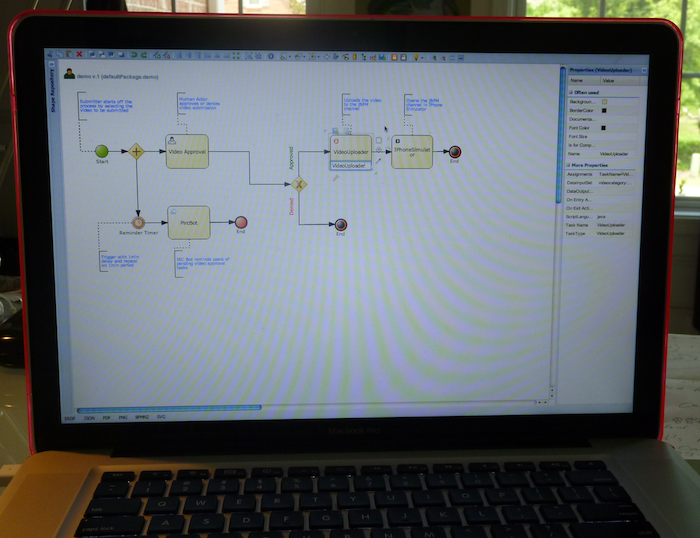
(25) Process Dictionary - Designer Dictionary Editor allows users to create their own dictionary entries or harvest from process documentation or business requirement documents. Process Dictionary entries can be used as auto-completion for shape names. This will be expanded in future versions to allow mapping of node patterns to specific dictionary entries as well. Users can add entries to the dictionary in the Dictionary Editor or from the selected shapes directly.
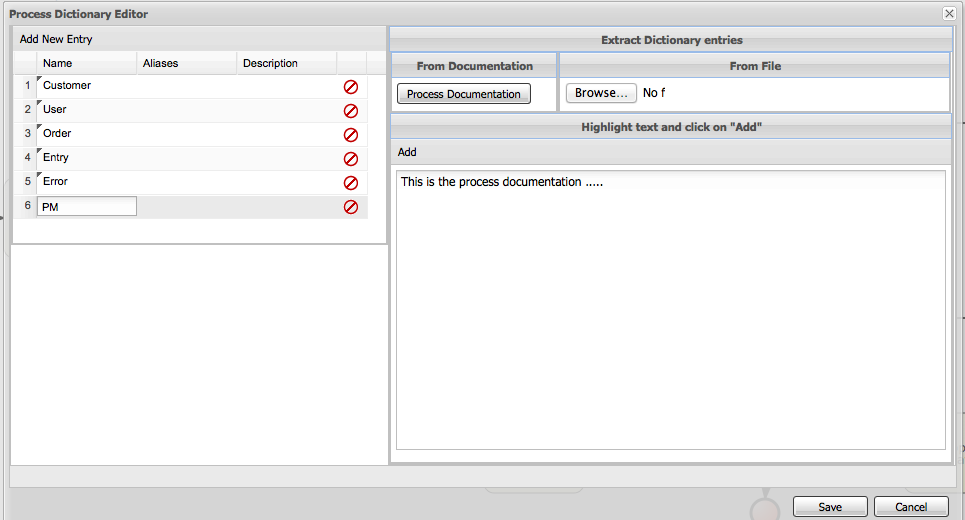
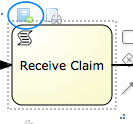
(26, 27, 28, 29) Zooming - zooming allows users to zoom in/out of the model, zoom in/out back to the original setting as well as zoom the process model on the drawing board to fit the currently dimensions of the drawing board.
16.4. Designer keyboard shortcuts overview
Designer includes a number of keyboard shortcuts you can use as an alternative to the mouse when modeling your business processes. These include some core functionalities such as copy, paste, delete, as well as utility shortcuts such as opening/closing menus and the property panel for example. Note that the Designer keyboard shortcuts may be somewhat different than the "traditional" shortcut options for similar operations you may encounter when dealing with browsers or word editors. This is done so that Designer does not replace or overwrite some of the keyboard shortcuts already used and claimed by different browsers you may use Designer in.
Below is the complete list of Designer keyboard shortcuts and their description.
| Press | To |
|---|---|
CTRL-C |
Copy one selected or multiple selected shapes from the Designer canvas. Note that copy and paste commands work across multiple opened business processes in the same browser (same tab or multiple tabs) as well as across multiple windows of the same browser type. |
CTRL-V |
Paste the copied node(s). Note that copy and paste commands work across multiple opened business processes in the same browser (same tab or multiple tabs) as well as across multiple windows of the same browser type. |
CTRL-X |
Cut one selected or multiple selected shapes from the Designer canvas. |
CTRL-Y |
Redo the last action such as a paste or node drag/resize/move/edit/cut. |
CTRL-Z |
Undo the last action such as a paste or node drag/resize/move/edit/cut/delete. |
ALT-A |
Select all shapes on the canvas. |
ALT-D |
Delete one selected or multiple selected shapes from the canvas. At least one shape must be selected. |
ALT-M |
Open/close the shape menu. |
ALT-P |
Open/close the properties panel. If a shape is selected it will open the properties for that shape. If no shape is selected the property panel for the canvas (process properties) will be opened. |
ALT-UP (up arrow) |
Move the selected shape(s) upward on the canvas. Note that all connections to the nodes being moved will be adjusted according to the move. |
ALT-DOWN (down arrow) |
Move the selected shape(s) downward on the canvas. Note that all connections to the nodes being moved will be adjusted according to the move. |
ALT-LEFT (left arrow) |
Move the selected shape(s) to the left on the canvas. Note that all connections to the nodes being moved will be adjusted according to the move. |
ALT-RIGHT (right arrow) |
Move the selected shape(s) to the right on the canvas. Note that all connections to the nodes being moved will be adjusted according to the move. |
F2 |
When a shape is selected you can use F2 to change the shapes name without having to double-click it first. |
16.5. Designer Customization
Designer includes a number of system properties which you can use to customize its functionality. In this section we go through each one and explain what it does and how you can use it.
16.5.1. System Properties
System properties and their values can be set on the application server’s startup with the
-DpropertyName=propertyValuesettings. There are several system properties you can set:
| System Property | Description | Values |
|---|---|---|
designer.dev |
Enables/disables additional logging. Default is false. |
true / false |
designer.useolddataassignments |
Replaces the new Data IO editor with the old style Data Assignments editor. Default is false. |
true / false |
designer.showpdfdoc |
Enables/disables the display of PDF docs link in Process Documentation tab. |
true / false |
org.jbpm.designer.perspective |
Use to pre-select a perspective in the Shape Menu. Default is "full" |
"full" / "simple" / "ruleflow" |
org.jbpm.designer.bpsimdisplay |
Enables/disables the display of BPSim (simulation) options in the menu bar as well as generation of BPSim BPMN2 elements in the generated process sources. Default is true. |
true / false |
org.jbpm.designer.formstype |
Sets the type of process/task forms to be generated/edited. If not set Designer will ask users to choose the type (".form", ".frm"). By setting this property you declare to use one of these two form types and users will no longer be asked to choose. |
"form" / "frm" |
designer.preprocess |
Designer performs a number of pre-processing steps before it displays the process model. These include installation of default workitem definitions, icons, etc. Allows you to completely disable these pre-processing steps. Use caution when setting this to false as it will affect Designer functioning properly within Business Central. Default is true. |
true / false |
designer.skin |
Allows users to choose between pre-defined Designer color themes. Default is "default". |
"default" / "olive" / "purple" / "slickness" |
org.jbpm.service.repository |
You can preinstall a number of custom workitems on server startup so they are available for the users in addition to the default ones Designer installs during the pre-processing steps. This property allows you to set a location to your service repository. |
location to your repository, for example http://www.myservicerepository.org/repo or file://my/service/repo |
org.jbpm.service.servicetasknames |
Comma-separated list of custom workitem names which you would like to be installed on server startup. Names have to match the "name" attribute as defined in your workitem definition and exist in the repository defined by system property org.jbpm.service.repository |
comma-separated string, for example "MyWorkitem, MyOtherWorkitem, …" |
designerdataobjects |
Can be used to enable/disable of BPMN2 Data Object nodes to be present or not in the shape menu. Default is "true". |
"true" / "false" |
org.jbpm.designer.storesvgonsave |
Designer stores the process SVG when a business process is saved during modeling. This property allows you to enable/disable this feature. Default is "true". |
"true" / "false" |
16.5.2. Development System Properties
These system properties are designed for development purposes only. It is recommended not to set/change them in production environments. Designer includes an API abstraction on top of the Business Central file repository. Via these development properties you can define an alternative repository for business process data. Again in order for Designer to play along nicely in Business Central it is recommended not to set these unless in a development environment.
| System Property | Description | Values |
|---|---|---|
designer.repository.protocol |
Set the repository protocol. |
String defining the repository protocol |
designer.repository.host |
Set the repository host. |
String defining the repository host |
designer.repository.subdomain |
Set the repository subdomain |
String defining the repository subdomain if one exists |
designer.repository.usr |
In the case custom repository needs authentication this one defines the user name for it. |
String defining the user name for authentication |
designer.repository.pwd |
In the case custom repository needs authentication this one defines the user password. |
String defining the user password for authentication |
17. Runtime Management
17.1. Deployments
In version 5.x processes were stored in so-called packages produced by Guvnor and next downloaded by Business Central for execution using KnowledgeAgent. Alternatively one could drop their process files (bpmn2 files) into a predefined directory that was scanned on Business Central start. That was it. That enforces users to always use Guvnor when dynamic deployment was needed. Although there is nothing wrong with it, actually that was recommended approach but not everytime it was desired.
Version 6, on the other hand moves away from proprietary packages in favor of, well known and mature, Apache Maven based packaging - known as knowledge archives - kjar. Processes, rules etc (aka business assets) are now part of a simple jar file built and managed by Maven. Along the business assets, java classes and other file types are stored in the jar file too. Moreover, as any other maven artifact, kjar can have defined dependencies on other artifacts including other kjars. What makes the kjar special when compared with regular jars is a single descriptor file kept inside META-INF directory of the kjar - kmodule.xml. That descriptor allows to define:
-
KIE bases and their properties
-
KIE sessions and their properties
-
work item handlers
-
event listeners
By default, this descriptor is empty (just kmodule root element) and is considered as marker file. Whenever a runtime component (such as Business Central) is about to process kjar it looks up kmodule.xml to build its runtime representation. In addition to kmodule.xml a deployment descriptor (that provides fine grained control over deployment) is available (since 6.1).
17.1.1. Deployment descriptors
While kmodule is mainly targeting on KIE base and KIE session basic configuration, deployment descriptors are considered more technical configuration. Following are the items available for configuration via deployment descriptors:
-
persistence unit name for runtime data
-
persistence unit for audit data
-
persistence mode (JPA or NONE)
-
audit mode (JPA, JMS, NONE)
-
runtime strategy (SINGLETON, PER_REQUEST, PER_PROCESS_INSTANCE)
-
list of event listeners to be registered
-
list of task event listeners to be registered
-
list of work item handlers to be registered
-
list of globals to be registered
-
marshalling strategies to be registered (for pluggable variable persistence)
-
required roles to be granted access to resources of the kjar
-
additional configuration options of KIE session
-
additional environment entries for KIE session
-
list of fully qualified class names that shall be added to the classes used for serialization by remote services
-
whether or not to limit the classes from the deployment used for serialization by the remote services
Deployment descriptor is an xml file that is placed inside META-INF folder of the kjar, although it is an optional file and deployments will succeed even when such descriptor is missing.
<deployment-descriptor xsi:schemaLocation="http://www.jboss.org/jbpm deployment-descriptor.xsd" xmlns:xsi="http://www.w3.org/2001/XMLSchema-instance">
<persistence-unit>org.jbpm.domain</persistence-unit>
<audit-persistence-unit>org.jbpm.domain</audit-persistence-unit>
<audit-mode>JPA</audit-mode>
<persistence-mode>JPA</persistence-mode>
<runtime-strategy>PER_PROCESS_INSTANCE</runtime-strategy>
<marshalling-strategies/>
<event-listeners/>
<task-event-listeners/>
<globals/>
<work-item-handlers/>
<environment-entries/>
<configurations/>
<required-roles/>
<remoteable-classes/>
<limit-serialization-classes/>
</deployment-descriptor>It provides more configuration options than the standard deployment has. Deployment descriptors are used in hierarchical way meaning they can be placed on various levels of the system and merged on runtime. jBPM supports following levels of deployment descriptors:
-
server level - this is the main and considered default deployment descriptors that apply to all deployments on given server
-
kjar level - this is dedicated deployment descriptor to given kjar
-
deploy time level - this is deployment descriptor that is given at the time of deployment
Deployment descriptors on different levels are merged on deployment time where the master is considered descriptor lower in the hierarchy and slave one that is higher in hierarchy. To give an example, when a kjar is deployed and it contains deployment descriptor kjar’s deployment descriptor is considered slave and server level descriptor is considered master. With default merge mode it will override all master entries with slave ones as long as they are not empty and combine all collections.
Since kjar can have dependencies to other kjars, and in turn that dependencies might have deployment descriptors as well, they will be placed in deployment descriptors hierarchy lower than the actual kjar that is being deployed. With that said, this is how it will look like from hierarchy point of view, starting with master (server level):
-
server level
-
dependency kjar level
-
kjar level
That in default merging mode will result in deployment descriptor where with non empty values from kjar’s deployment descriptors and merged collection from all levels.
So far all merging was done with default mode, which is MERGE_COLLECTIONS but that’s not the only mode that is available:
-
KEEP_ALL - meaning that the master wins - all configuration defined in master will be retained
-
OVERRIDE_ALL - meaning that slave wins - all configuration defined in master will be retained
-
OVERRIDE_EMPTY - meaning all non empty configuration items from slave will replace those in master, including collections
-
MERGE_COLLECTIONS - meaning all non empty configuration items from slave will replace those in master but collections will me merged (combined)
|
Deployment descriptors can be given as partial xml documents, meaning they do not need to be complete set of all configuration items, e.g. if user would like to override only the audit mode in kjar, it’s enough to have following deployment descriptor: Although it’s worth noting that when using OVERRIDE_ALL merge mode all configuration items should be specified since it will always use them and do not merge with any other deployment descriptor in the hierarchy. |
Default deployment descriptor
There is always a default deployment descriptor available, even if it was not explicitly configured, when running in business-central (kie-workbench) the default values are as follows:
-
persistence-unit is set to org.jbpm.domain
-
audit-persistence-unit is set to org.jbpm.domain
-
persistence-mode is set to JPA
-
audit-mode is set to JPA
-
runtime-strategy is set to SINGLETON
-
all collection based configuration items are left empty
|
Regardless of collection elements in default deployment descriptor are empty there will be some work item handlers/listeners registered that are required to support functionality of Business Central such as BAM listeners or human task work item handler. |
Default deployment descriptor can be altered by specifying valid URL location to an xml file that will provide fully defined deployment descriptor. By fully defined we mean that all elements should be specified as this deployment descriptor will become server level deployment descriptor.
-Dorg.kie.deployment.desc.location=file:/my/custom/location/deployment-descriptor.xmlCollection configuration items
Deployment descriptor consists of collection based items (event listeners, work item handlers, globals, etc) that usually require definition of an object that should be created on runtime. There are two types of collection based configuration items:
-
object model - that is clear definition of the object to be built or looked up in available registry
-
named object model - that is an extension to object model and allows to provide the name of the object which will be used to register the object
Object model consists of:
-
identifier - defines main information about the object, such as fully qualified class name, spring bean id, mvel expression
-
parameters - optional parameters that should be used while creating object instance from the model
-
resolver - identifier of the resolver that will be used to create object instances from the model - (reflection, mvel, spring)
| Configuration item | Type of collection items |
|---|---|
event-listeners |
ObjectModel |
task-event-listeners |
ObjectModel |
marshalling-strategies |
ObjectModel |
work-item-handlers |
NamedObjectModel |
globals |
NamedObjectModel |
environment-entries |
NamedObjectModel |
configurations |
NamedObjectModel |
required-roles |
String |
Depending on resolver type, creation or look up of the object will be performed. The default (and easiest) is reflection that will use both parameters and identifier (in this case is FQCN) to construct the object. Parameters in this case can be a String or another object model for representing other types than String. Following is an example of an object model that will create an instance of org.jbpm.test.CustomStrategy using reflection resolver that will use the constructor of that class with two String parameters. Note that String parameters are created in different ways (using object model - first param, directly by giving String - second param).
...
<marshalling-strategy>
<resolver>reflection</resolver>
<identifier>org.jbpm.test.CustomStrategy</identifier>
<parameters>
<parameter xsi:type="objectModel">
<resolver>reflection</resolver>
<identifier>java.lang.String</identifier>
<parameters>
<parameter xsi:type="xs:string" xmlns:xs="http://www.w3.org/2001/XMLSchema">param1</parameter>
</parameters>
</parameter>
<parameter xsi:type="xs:string" xmlns:xs="http://www.w3.org/2001/XMLSchema">param2</parameter>
</parameters>
</marshalling-strategy>
...Same can be done by using DeploymentDescriptor fluent API:
// create instance of DeploymentDescriptor with default persistence unit name
DeploymentDescriptor descriptor = new DeploymentDescriptorImpl("org.jbpm.domain");
// get builder and modify the descriptor
descriptor.getBuilder()
.addMarshalingStrategy(new ObjectModel("org.jbpm.testCustomStrategy",
new Object[]{
new ObjectModel("java.lang.String", new Object[]{"param1"}),
"param2"}));Reflection based object model resolver is the most verbose in case there are parameters involved but there are few parameters that are available out of the box and do not need to be created, they are simply referenced by name:
-
entityManagerFactory (type of this parameter is javax.persistence.EntityManagerFactory)
-
runtimeManager (type of this parameter is org.kie.api.runtime.manager.RuntimeManager)
-
kieSession (type of this parameter is org.kie.api.KieServices)
-
taskService (type of this parameter is org.kie.api.task.TaskService)
-
executorService (type of this parameter is org.kie.internal.executor.api.ExecutorService)
So to be able to use one of these it’s enough to reference them by name and make sure that proper object type is used within your class:
...
<marshalling-strategy>
<resolver>reflection</resolver>
<identifier>org.jbpm.test.CustomStrategy</identifier>
<parameters>
<parameter xsi:type="xs:string" xmlns:xs="http://www.w3.org/2001/XMLSchema">runtimeManager</parameter>
</parameters>
</marshalling-strategy>
...In case reflection based resolver is not enough, more advanced resolver can be used that utilizes power of MVEL language. It’s much easier in the configuration as it expects mvel expression as identifier of the object model. It will provide the out of the box parameters (listed above: runtime manager, kie session, etc) into the mvel context while evaluating expression. To define object model with mvel resolver use the following xml (that will be equivalent to reflection-based mentioned above):
...
<marshalling-strategy>
<resolver>mvel</resolver>
<identifier>new org.jbpm.test.CustomStrategy(runtimeManager)</identifier>
</marshalling-strategy>
...Last but not least, there is Spring based resolver available as well that allows to simply look up a bean by its identifier from spring application context. This resolver is not used in Business Central (kie-workbench) as it does not use spring but whenever jBPM is used together with Spring it might become handy when deploying kjars into the runtime. It’s very simple definition in xml, again equivalent to the other one assuming org.jbpm.test.CustomStrategy is registered in spring application context under customStrategy id.
...
<marshalling-strategy>
<resolver>spring</resolver>
<identifier>customStrategy</identifier>
</marshalling-strategy>
...Manage deployment descriptor
Deployment descriptor is created as soon as a project is created. It contains the most basic deployment descriptor that is based on the default one. Meaning all settings present in default deployment descriptor will be copied into the one placed in the project. Further changes can be done directly in the xml content (in next versions more user friendly editor will most likely be provided). It is accessible from Administration perspective as this is considered technical administration task rather than business related activity.
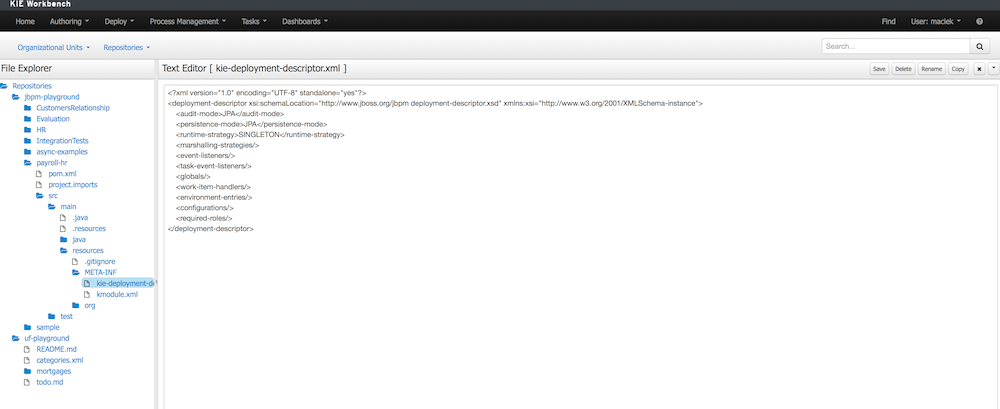
Restrict access to runtime engine
Business Central enables configuration of access restrictions to repositories. For more information, see Security management section. This protects repositories in the authoring page based on roles membership. Deployment descriptors moves this capability to the runtime engine by ensuring that access to processes will be granted only to users that belong to groups defined in the deployment descriptor as required roles. By default when project is created (at the same time deployment descriptor is created as well) required roles are automatically filled in based on repository restrictions. These roles can be still altered by editing deployment descriptor via Administration page as presented in Manage deployment descriptor section.
Security is enforced on two levels:
-
user interface - user will see only process definitions that are available for his/her roles
-
runtime manager - each access to get RuntimeEngine out of RuntimeManager is protected based on the role membership, in case unauthorized access is attempted SecurityException will be thrown
Required roles are defined as simple strings that should match actual roles defined in security realm. Following is an XML snippet that shows definition of required roles in deployment descriptor:
<deployment-descriptor>
...
<required-roles>
<required-role>experts</required-role>
</required-roles>
...
</deployment-descriptor>In case fine grained control is required defined roles can be prefixed with one of the following to control it on further level:
-
view:
to restrict access to be able to see given process definitions/instances on UI
-
execute:
to restrict access to be able to execute given process definitions
-
all:
applies to both view and execute restrictions and this is the default when no prefix is given.
For example to restrict access to show process from given kjar only to group 'management' but still allow them to be executed by anyone (sort of system processes) one could define it as follows:
<deployment-descriptor>
...
<required-roles>
<required-role>view:management</required-role>
</required-roles>
...
</deployment-descriptor>Classes used for serialization in the remote services
When processes make use of custom types (or in general non primitive types) and there is a use case to include remote API invocations (REST, SOAP, JMS) such types must be available to the remote services marshalling mechanism that is based on JAXB for XML type. By default all types defined in kjar will be automatically included in JAXB context and therefore will be available for remote interaction. Though there might be more classes (like from dependent model) that shall be included there too.
Upon deployment, jBPM will scan classpath of given kjar to automatically register classes that might be needed for remote interaction. This is done based on following rules:
-
all classes included in kjar project itself
-
all classes included as dependency of projects type kjar
-
classes that are annotated with @XmlRootElement (JAXB annotation) and included as regular dependency of the kjar
-
classes that are annotated with @Remotable (kie annotation) and included as regular dependency of the kjar
If that is not enough deployment descriptor allows to manually specify classes that shall be added to the JAXB context via remoteable-classes element:
<remoteable-classes>
...
<remoteable-class>org.jbpm.test.CustomClass</remoteable-class>
<remoteable-class>org.jbpm.test.AnotherCustomClass</remoteable-class>
...
</remoteable-classes>With this all classes can be added to the JAXB context to properly marshal and unmarshal data types when interacting with jBPM remotely.
Limiting classes used for serialization in the remote services
When there are classes in the kjar project or in the dependencies of the kjar project that would cause problems when used for serialization, the limit-serialization-classes property can be used to limit which classes are used for serialization.
<limit-serialization-classes>true</limit-serialization-classes>This property limits classes used for serialization to classes which fulfill both of the following "location" and "annotation" criteria:
Classes that:
-
are located in the kjar project
-
are in a direct dependency of the kjar project
-
are listed in the
remoteable-classeselement and are available on the classpath of the kjar
These classes must also be annotated with one of the following type annotations:
-
javax.xml.bind.annotation.XmlRootElement -
javax.xml.bind.annotation.XmlType -
org.kie.api.remote.Remotable
Additionally, classes will be excluded if they are any of the following: interfaces, local classes, member classes or anonymous classes.
17.2. Process Deployments
You can access to the Process Deployments List under the Deploy top level menu of Business Central.
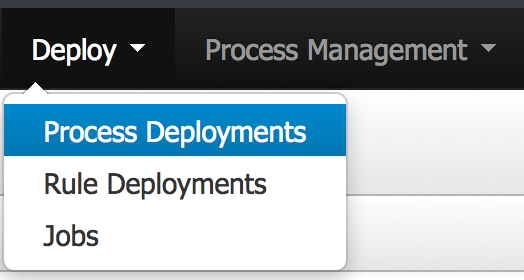
The Deployed Unit list shows all the Process Deployed Units into the platform that are already enabled to be used. Each deployment unit can contain multiple business processes and business rules. In order to have your process and rules deployed and listed in this list, you need to build and deploy your KIE projects from the Authoring Page or via the Remote Endpoints. If your processes and rules are in a KIE Project listed in this list and you have correspondent the rights you should be able to see the process definitions in the Process Definitions Page.

From the Authoring Page (Build and Deploy), a default deployment will be performed, for a more advanced deployments you can trigger a custom deployment with other options from this screen.
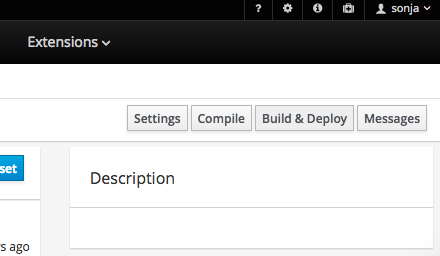
By clicking the New Deployment Unit (+) button you will be able to select a different KIE Base, KIE Session, Strategy and Merge Mode for your deployment. By default the "DEFAULT" KIE Base and KIE Sessions are used, the SINGLETON Strategy is selected and the Merge Mode is set to "Merge Collection".

18. Designing and building cases for case management
As a developer, you can use Business Central to configure jBPM assets for case management.
Case management differs from Business Process Management (BPM). It focuses more on the actual data being handled throughout the case rather than on the sequence of steps taken to complete a goal. Case data is the most important piece of information in automated case handling, while business context and decision-making are in the hands of the human case worker.
jBPM includes the IT_Orders sample project in Business Central. This document refers to the sample project to explain case management concepts and provide examples.
The Getting started with case management tutorial describes how to create and test a new IT_Orders project in Business Central. After reviewing the concepts in this guide, follow the procedures in the tutorial to ensure that you are able to successfully create, deploy, and test your own case project.
-
Red Hat JBoss Enterprise Application Platform 7.3 is installed. For information about installing Red Hat JBoss Enterprise Application Platform 7.3, see Red Hat JBoss Enterprise Application Platform 7.3 Installation Guide.
-
jBPM is installed. For information about installing jBPM, see Planning a jBPM installation.
-
jBPM is running and you can log in to Business Central with the
userrole. For information about users and permissions, see Planning a jBPM installation. -
The Showcase application is deployed. For information about how to install and log in to the Showcase application, see Using the Showcase application for case management.
18.1. Case management
Case management is an extension of Business Process Management (BPM) that enables you to manage adaptable business processes.
BPM is a management practice used to automate tasks that are repeatable and have a common pattern, with a focus on optimization by perfecting a process. Business processes are usually modeled with clearly defined paths leading to a business goal. This requires a lot of predictability, usually based on mass-production principles. However, many real-world applications cannot be described completely from start to finish (including all possible paths, deviations, and exceptions). Using a process-oriented approach in certain cases can lead to complex solutions that are hard to maintain.
Case management provides problem resolution for non-repeatable, unpredictable processes as opposed to the efficiency-oriented approach of BPM for routine, predictable tasks. It manages one-off situations when the process cannot be predicted in advance. A case definition usually consists of loosely coupled process fragments that can be connected directly or indirectly to lead to certain milestones and ultimately a business goal, while the process is managed dynamically in response to changes that occur during run time.
In jBPM, case management includes the following core jBPM engine features:
-
Case file instance
-
A per case runtime strategy
-
Case comments
-
Milestones
-
Stages
-
Ad hoc fragments
-
Dynamic tasks and processes
-
Case identifier (correlation key)
-
Case lifecycle (close, reopen, cancel, destroy)
A case definition is always an ad hoc process definition and does not require an explicit start node. The case definition is the main entry point for the business use case.
A process definition is introduced as a supporting construct of the case and can be invoked either as defined in the case definition or dynamically to bring in additional processing when required. A case definition defines the following new objects:
-
Activities (required)
-
Case file (required)
-
Milestones
-
Roles
-
Stages
18.2. Case Management Model and Notation
You can use Business Central to import, view, and modify the content of Case Management Model and Notation (CMMN) files. When authoring a project, you can import your case management model and then select it from the asset list to view or modify it in a standard XML editor.
The following CMMN constructs are currently available:
-
Tasks (human task, process task, decision task, case task)
-
Discretionary tasks (same as above)
-
Stages
-
Milestones
-
Case file items
-
Sentries (entry and exit)
The following tasks are not supported:
-
Required
-
Repeat
-
Manual activation
Sentries for individual tasks are limited to entry criteria while entry and exit criteria are supported for stages and milestones. Decision tasks map by default to a DMN decision. Event listeners are not supported.
jBPM does not provide any modeling capabilities for CMMN and focuses solely on the execution of the model.
18.3. Case files
A case instance is a single instance of a case definition and encapsulates the business context. All case instance data is stored in the case file, which is accessible to all process instances that might participate in the particular case instance. Each case instance and its case file are completely isolated from the other cases. Only users assigned to a required case role can access the case file.
A case file is used in case management as a repository of data for the entire case instance. It contains all roles, data objects, the data map, and any other data. The case can be closed and reopened at a later date with the same case file attached. A case instance can be closed at any time and does not require a specific resolution to be completed.
The case file can also include embedded documentation, references, PDF attachments, web links, and other options.
18.3.1. Configuring case ID prefixes
The caseId parameter is a string value that is the identifier of the case instance. You can configure the Case ID Prefix in jBPM designer to distinguish different types of cases.
The following procedures uses the IT_Orders sample project to demonstrate how to create unique case ID prefixes for specific business needs.
-
The IT_Orders sample project is open in Business Central.
-
In Business Central, go to Menu → Design → Projects. If there are existing projects, you can access the samples by clicking the MySpace default space and selecting Try Samples from the Add Project drop-down menu. If there are no existing projects, click Try samples.
-
Select IT_Orders and click Ok.
-
In the Assets window, click the orderhardware business process to open the designer.
-
Click on an empty space on the canvas and in the upper-right corner, click the Properties
icon. -
Scroll down and expand Case Management.
-
In the Case ID Prefix field, enter an ID value. The ID format is internally defined as
ID-XXXXXXXXXX, whereXXXXXXXXXXis a generated number that provides a unique ID for the case instance.If a prefix is not provided, the default prefix is
CASEwith the following identifiers:CASE-0000000001CASE-0000000002CASE-0000000003You can specify any prefix. For example, if you specify the prefix
IT, the following identifiers are generated:IT-0000000001IT-0000000002IT-0000000003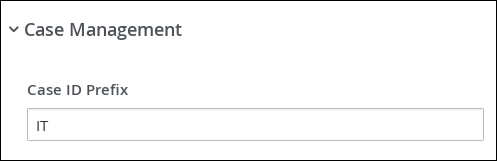 Figure 206. Case ID Prefix field
18.3.2. Configuring case ID expressions
The following procedures uses the IT_Orders sample project to demonstrate how set metadata attribute keys to customize expressions for generating the caseId.
-
The IT_Orders sample project is open in Business Central.
-
In Business Central, go to Menu → Design → Projects. If there are existing projects, you can access the samples by clicking the MySpace default space and selecting Try Samples from the Add Project drop-down menu. If there are no existing projects, click Try samples.
-
Select IT_Orders and click Ok.
-
In the Assets window, click the orderhardware business process to open the designer.
-
Click on an empty space on the canvas and in the upper-right corner, click the Properties
icon. -
Expand the Advanced menu to access the Metadata Attributes fields.
-
Specify one of the following functions for the
customCaseIdPrefixmetadata attribute:-
LPAD: Left padding
-
RPAD: Right padding
-
TRUNCATE: Truncate
-
UPPER: Upper case
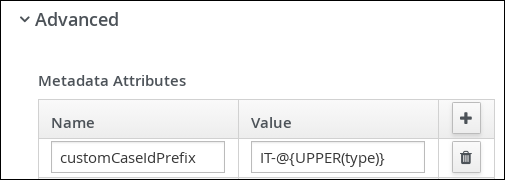 Figure 207. Setting the UPPER function for the customCaseIdPrefix metadata attribute
In this example,
typeis a variable set in the Case File Variables field, which during runtime a user may define to it the valuetype1.UPPERis a pre-built function to uppercase a variable, andIT-is a static prefix. The results are dynamic case IDs such asIT-TYPE1-0000000001,IT-TYPE1-0000000002, andIT-TYPE1-0000000003.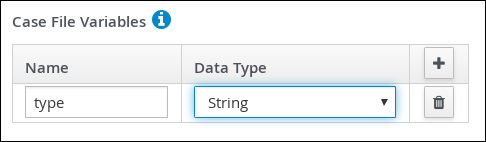 Figure 208. Case File Variables
If the
customCaseIdPrefixIsSequencecase metadata attribute is set tofalse(default value istrue), the case instance will not create any sequence and thecaseIdPrefixexpression is the case ID. For example, if generating case IDs based on social security numbers, no specific sequence or instance identifiers are required.The
customCaseIdPrefixIsSequencemetadata attribute is optionally added and set tofalse(default value istrue) to disable the numeric sequences for the case IDs. This is useful if an expression used for custom case IDs already contains a case file variable to express unique business identifiers instead of the generic sequence values. For example, if generating case IDs based on social security numbers, no specific sequence or instance identifiers are required. For the example below,SOCIAL_SECURITY_NUMBERis also a variable declared as a case file variable.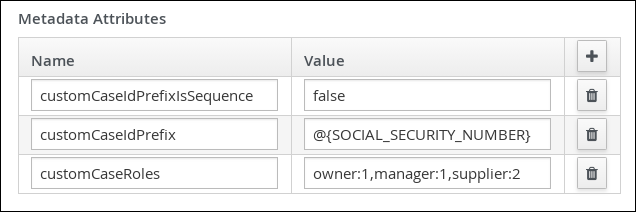 Figure 209. customCaseIdPrefixIsSequence metadata attribute
The
IS_PREFIX_SEQUENCEcase file variable is optionally added as a flag during runtime to disable or enable the sequence generation for case IDs. For example, there is no need to create a sequence suffix for medical insurance coverage for an individual. For a multi-family insurance policy, the company might set theIS_PREFIX_SEQUENCEcase variable totrueto aggregate a sequence number for each member of the family.The result of using the
customCaseIdPrefixIsSequencemetadata attribute statically asfalseor using theIS_PREFIX_SEQUENCEcase file variable and setting during runtime for it the valuefalse, is the same.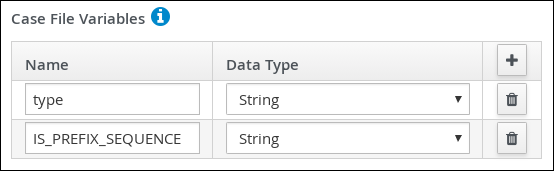 Figure 210. IS_PREFIX_SEQUENCE case variable
 -
18.4. Subcases
Subcases provide the flexibility to compose complex cases that consist of other cases. This means that you can split large and complex cases into multiple layers of abstraction and even multiple case projects. This is similar to splitting a process into multiple sub-processes.
A subcase is another case definition that is invoked from within another case instance or a regular process instance. It has all of the capabilities of a regular case instance:
-
It has a dedicated case file.
-
It is isolated from any other case instance.
-
It has its own set of case roles.
-
It has its own case prefix.
You can use the process designer to add subcases to your case definition. A subcase is a case within your case project, similar to having a sub-process within your process. Subcases can also be added to a regular business process. Doing this enables you to start a case from within a process instance.
For more information about adding a subcase to your case definition, see Getting started with case management.
The Sub Case Data I/O window supports the following set of input parameters that enable you to configure and start the subcase:
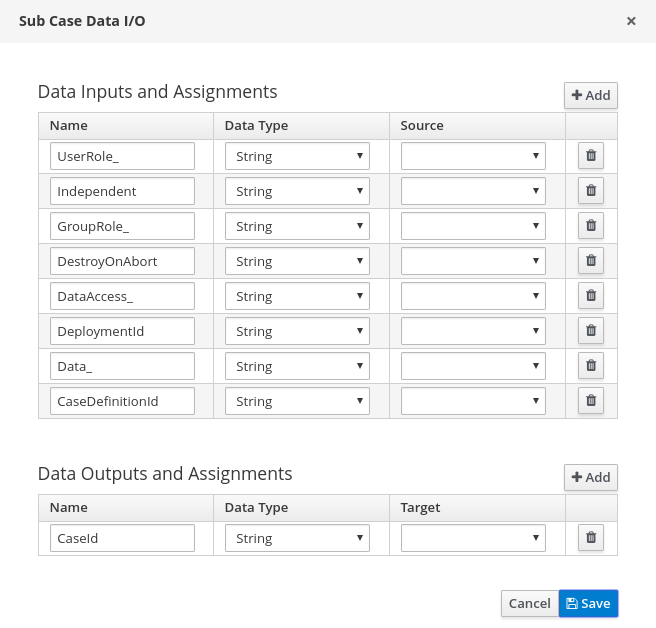
- Independent
-
Optional indicator that tells the jBPM engine whether or not the case instance is independent. If it is independent, the main case instance does not wait for its completion. The value of this property is
falseby default. - GroupRole_XXX
-
Optional group to case role mapping. The role names belonging to this case instance can be referenced here, meaning that participants of the main case can be mapped to participants of the subcase. This means that the group assigned to the main case is automatically assigned to the subcase, where
XXXis the role name and the value of the property is the value of the group role assignment. - DataAccess_XXX
-
Optional data access restrictions where
XXXis the name of the data item and the value of the property is the access restrictions. - DestroyOnAbort
-
Optional indicator that tells the jBPM engine whether to cancel or destroy the subcase when the subcase activity is aborted. The default value is
true. - UserRole_XXX
-
Optional user to case role mapping. You can reference the case instance role names here, meaning that an owner of the main case can be mapped to an owner of the subcase. The person assigned to the main case is automatically assigned to the subcase, where
XXXis the role name and the value of the property is the value of the user role assignment. - Data_XXX
-
Optional data mapping from this case instance or business process to a subcase, where
XXXis the name of the data in the subcase being targeted. This parameter can be provided as many times as needed. - DeploymentId
-
Optional deployment ID (or container ID in the context of KIE Server) that indicates where the targeted case definition is located.
- CaseDefinitionId
-
The mandatory case definition ID to be started.
- CaseId
-
The case instance ID of the subcase after it is started.
18.5. Ad hoc and dynamic tasks
You can use case management to carry out tasks ad hoc, rather than following a strict end-to-end process. You can also add tasks to a case dynamically during run time.
Ad hoc tasks are defined in the case modeling phase. Ad hoc tasks that are not configured as AdHoc Autostart are optional and might not be used during a case. Therefore, they must be triggered by a signal event or by a Java API.
Dynamic tasks are defined during the case execution and are not present in the case definition model. Dynamic tasks address specific needs that arise during the case. They can be added to the case and worked on at any time using a case application, as demonstrated in the jBPM Showcase application. Dynamic tasks can also be added by Java and Remote API calls.
Dynamic tasks can be user or service activities, while ad hoc tasks can be any type of task. For more information about task types, see "BPMN2 tasks in process designer" in Designing business processes using BPMN models.
Dynamic processes are any reusable sub-process from a case project.
Ad hoc nodes with no incoming connections are configured in the node’s AdHoc Autostart property and are triggered automatically when the case instance is started.
Ad hoc tasks are optional tasks that are configured in a case definition. Because they are ad hoc, they must be triggered in some way, usually by a signal event or Java API call.
18.6. Adding dynamic tasks and processes to a case using the KIE Server REST API
You can add dynamic tasks and processes to a case during run time to address unforeseen changes that can occur during the lifecycle of a case. Dynamic activities are not defined in the case definition and therefore they cannot be signaled the way that a defined ad hoc task or process can.
You can add the following dynamic activities to a case:
-
User tasks
-
Service tasks (any type that is implemented as a work item)
-
Reusable sub-processes
Dynamic user and service tasks are added to a case instance and immediately executed. Depending on the nature of a dynamic task, it might start and wait for completion (user task) or directly complete after execution (service task). For dynamic sub-processes, the jBPM engine requires a KJAR containing the process definition for that dynamic process to locate the process by its ID and execute it. This sub-process belongs to the case and has access to all of the data in the case file.
You can use the Swagger REST API application to create dynamic tasks and sub-processes.
-
You are logged in to Business Central and a case instance has been started using the Showcase application. For more information about using Showcase, see Using the Showcase application for case management.
-
In a web browser, open the following URL:
-
Open the list of available endpoints under Case instances :: Case Management.
-
Locate the
POSTmethod endpoints for creating dynamic activities.POST /server/containers/{id}/cases/instances/{caseId}/tasksAdds a dynamic task (user or service depending on the payload) to the case instance.
POST /server/containers/{id}/cases/instances/{caseId}/stages/{caseStageId}/tasksAdds a dynamic task (user or service depending on the payload) to specific stage within the case instance.
POST /server/containers/{id}/cases/instances/{caseId}/processes/{pId}Adds a dynamic sub-process identified by the process ID to case instance.
POST /server/containers/{id}/cases/instances/{caseId}/stages/{caseStageId}/processes/{pId}Adds a dynamic sub-process identified by process ID to stage within a case instance.

-
To open the Swagger UI, click the REST endpoint required to create the dynamic task or process.
-
Click Try it out and enter the parameters and body required to create the dynamic activity.
-
Click Execute to create the dynamic task or sub-process using the REST API.
18.6.1. Creating a dynamic user task using the KIE Server REST API
You can create a dynamic user task during case run time using the REST API. To create a dynamic user task, you must provide the following information:
-
Task name
-
Task subject (optional, but recommended)
-
Actors or groups (or both)
-
Input data
Use the following procedure to create a dynamic user task for the IT_Orders sample project available in Business Central using the Swagger REST API tool. The same endpoint can be used for REST API without Swagger.
-
You are logged in to Business Central and an IT Orders case instance has been started using the Showcase application. For more information about using Showcase, see Using the Showcase application for case management.
-
In a web browser, open the following URL:
-
Open the list of available endpoints under Case instances :: Case Management.
-
Click click the following
POSTmethod endpoint to open the details:/server/containers/{id}/cases/instances/{caseId}/tasks -
Click Try it out and then input the following parameters:
Table 74. Parameters Name Description iditorderscaseIdIT-0000000001Request body{ "name" : "RequestManagerApproval", "data" : { "reason" : "Fixed hardware spec", "caseFile_hwSpec" : "#{caseFile_hwSpec}" }, "subject" : "Ask for manager approval again", "actors" : "manager", "groups" : "" } -
In the Swagger application, click Execute to create the dynamic task.
This procedure creates a new user task associated with case IT-000000001. The task is assigned to the person assigned to the manager case role. This task has two input variables:
-
reason -
caseFile_hwSpec: defined as an expression to allow run time capturing of a process or case data.
Some tasks include a form that provides a user-friendly UI for the task, which you can locate by task name. In the IT Orders case, the RequestManagerApproval task includes the form RequestManagerApproval-taskform.form in its KJAR.
After it is created, the task appears in the assignee’s Task Inbox in Business Central.
18.6.2. Creating a dynamic service task using the KIE Server REST API
Service tasks are usually less complex than user tasks, although they might need more data to execute properly. Service tasks require the following information:
-
name: The name of the activity -
nodeType: The type of node that will be used to find the work item handler -
data: The map of the data to properly deal with execution
During case run time, you can create a dynamic service task with the same endpoint as a user task, but with a different body payload.
Use the following procedure using the Swagger REST API to create a dynamic service task for the IT_Orders sample project available in Business Central. You can use the same endpoint for REST API without Swagger.
-
You are logged in to Business Central and an IT Orders case instance has been started using the Showcase application. For more information about using Showcase, see Using the Showcase application for case management.
-
In a web browser, open the following URL:
-
Open the list of available endpoints under Case instances :: Case Management.
-
Click the following
POSTmethod endpoint to open the details:/server/containers/{id}/cases/instances/{caseId}/stages/{caseStageId}/tasks -
Click Try it out and then enter the following parameters:
Table 75. Parameters Name Description iditorderscaseIdIT-0000000001Request body{ "name" : "InvokeService", "data" : { "Parameter" : "Fixed hardware spec", "Interface" : "org.jbpm.demo.itorders.services.ITOrderService", "Operation" : "printMessage", "ParameterType" : "java.lang.String" }, "nodeType" : "Service Task" } -
In the Swagger application, click Execute to create the dynamic task.
In this example, a Java-based service is executed. It consists of an interface with the public class org.jbpm.demo.itorders.services.ITOrderService and the public printMessage method with a single String argument. When executed, the parameter value is passed to the method for execution.
Numbers, names, and other types of data given to create service tasks depend on the implementation of a service task’s handler. In the example provided, the org.jbpm.process.workitem.bpmn2.ServiceTaskHandler handler is used.
For any custom service tasks, ensure the handler is registered in the deployment descriptor in the Work Item Handlers section, where the name is the same as the nodeType used for creating a dynamic service task. For more information about registering the deployment descriptor, see Developing process services in jBPM.
|
18.6.3. Creating a dynamic sub-process using the KIE Server REST API
When creating a dynamic sub-process, only optional data is provided. There are no special parameters as there are when creating dynamic tasks.
The following procedure describes how to use the Swagger REST API to create a dynamic sub-process task for the IT_Orders sample project available in Business Central. The same endpoint can be used for REST API without Swagger.
-
You are logged in to Business Central and an IT Orders case instance has been started using the Showcase application. For more information about using Showcase, see Using the Showcase application for case management.
-
In a web browser, open the following URL:
-
Open the list of available endpoints under Case instances :: Case Management.
-
Click the following
POSTmethod endpoint to open the details:/server/containers/{id}/cases/instances/{caseId}/processes/{pId} -
Click Try it out and enter the following parameters:
Table 76. Parameters Name Description iditorderscaseIdIT-0000000001pIditorders-data.place-orderThe
pIdis the process ID of the sub-process to be created.Request body{ "placedOrder" : "Manually" } -
In the Swagger application, click Execute to start the dynamic sub-process.
In this example, the place-order sub-process has been started in the IT Orders case with the case ID IT-0000000001. You can see this process in Business Central under Menu → Manage → Process Instances.
If the described example has executed correctly, the place-order process appears in the list of process instances. Open the details of the process and note that the correlation key for the process includes the IT Orders case instance ID, and the Process Variables list includes the variable placedOrder with the value Manually, as delivered in the REST API body.
18.7. Comments
In case management, comments facilitate collaboration within the case instance, and allow case workers to easily communicate with each other to exchange information.
Comments are bound to the case instance. Case instances are part of the case file, so you can use comments to take action on the instances. Basic text-based comments can have a complete operations set, similar to CRUD (create, read, update, and delete).
18.8. Case roles
Case roles provide an additional layer of abstraction for user participation in case handling. Roles, users, and groups are used for different purposes in case management.
- Roles
-
Roles drive the authorization for a case instance and are used for user activity assignments. A user or one or more groups can be assigned to the owner role. The owner is whoever the case belongs to. Roles are not restricted to a single set of people or groups as part of a case definition. Use roles to specify task assignments instead of assigning a specific user or group to a task assignment to ensure that the case remains dynamic.
- Groups
-
A group is a collection of users who are able to carry out a particular task or have a set of specified responsibilities. You can assign any number of people to a group and assign any group to a role. You can add or change members of a group at any time. Do not hard code a group to a particular task.
- Users
-
A user is an individual who can be given a particular task when you assign them a role or add them to a group.
Do not create a user called
unknownin jBPM engine or KIE Server. Theunknownuser account is a reserved system name with superuser access. Theunknownuser account performs tasks related to the SLA violation listener when there are no users logged in.
The following example illustrates how the preceding case management concepts apply to a hotel reservation with the following information:
-
Role:
Guest -
Group:
Receptionist,Maid -
User:
Marilyn
The Guest role assignment affects the specific work of the associated case and is unique to all case instances. Every case instance will have its own role assignments. The number of users or groups that can be assigned to a role is limited by the case Cardinality, which is set during role creation in the process designer and case definition. For example, the hotel reservation case has only one guest while the IT_Orders sample project has two suppliers of IT hardware.
When roles are defined, ensure that roles are not hard-coded to a single set of people or groups as part of case definition and that they can differ for each case instance. This is why case role assignments are important.
Role assignments can be assigned or removed when a case starts or at any time when a case is active. Although roles are optional, use roles in case definitions to maintain an organized workflow.
|
Always use roles for task assignments instead of actual user or group names. This ensures that the case and user or group assignments can be made as late as required. |
Roles are assigned to users or groups and authorized to perform tasks when a case instance is started.
18.8.1. Creating case roles
You can create and define case roles in the case definition when you design the case in the process designer. Case roles are configured on the case definition level to keep them separate from the actors involved in handling the case instance. Roles can be assigned to user tasks or used as contact references throughout the case lifecycle, but they are not defined in the case as a specific user or group of users.
Case instances include the individuals that are actually handling the case work. Assign roles when starting a new case instance. In order to keep cases flexible, you can modify case role assignment during case run time, although doing this has no effect on tasks already created based on the previous role assignment. The actor assigned to a role is flexible but the role itself remains the same for each case.
-
A case project that has a case definition exists in Business Central.
-
The case definition asset is open in the process designer.
-
To define the roles involved in the case, click on an empty space in the editor’s canvas, and click
to open the Properties menu. -
Expand Case Management to add a case role.
The case role requires a name for the role and a case cardinality. Case cardinality is the number of actors that are assigned to the role in any case instance. For example, the IT_Orders sample case management project includes the following roles:
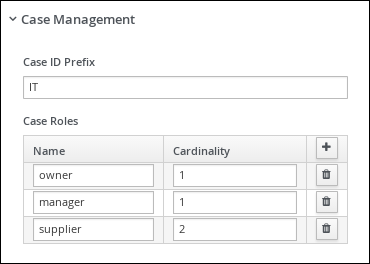 Figure 211. ITOrders Case Roles
In this example, you can assign only one actor (a user or a group) as the case
ownerand assign only one actor to themanagerrole. Thesupplierrole can have two actors assigned. Depending on the case, you can assign any number of actors to a particular role based on the configured case cardinality of the role.
18.8.2. Role authorization
Roles are authorized to perform specific case management tasks when starting a new case instance using the Showcase application or the REST API.
Use the following procedure to start a new IT Orders case using the REST API.
-
The IT_Orders sample project has been imported in Business Central and deployed to the KIE Server.
-
Create a
POSTREST API call with the following endpoint:http://host:port/kie-server/services/rest/server/containers/itorders/cases/itorders.orderhardware/instances-
itorders: The container alias that has been deployed to the KIE Server. -
itorders.orderhardware: The name of the case definition.
-
-
Provide the following role configuration in the request body:
{ "case-data" : { }, "case-user-assignments" : { "owner" : "cami", "manager" : "cami" }, "case-group-assignments" : { "supplier" : "IT" } }This starts a new case with defined roles, as well as autostart activities, which are started and ready to be worked on. Two of the roles are user assignments (
ownerandmanager) and the third is a group assignment (supplier).After the case instance is successfully started, the case instance returns the
IT-0000000001case ID.
For information about how to start a new case instance using the Showcase application, see Using the Showcase application for case management.
18.8.3. Assigning a task to a role
Case management processes need to be as flexible as possible to accommodate changes that can happen dynamically during run time. This includes changing user assignments for new case instances or for active cases. For this reason, ensure that you do not hard code roles to a single set of users or groups in the case definition. Instead, role assignments can be defined on the task nodes in the case definition, with users or groups assigned to the roles on case creation.
jBPM contains a predefined selection of node types to simplify business process creation. The predefined node panel is located on the left side of the diagram editor.
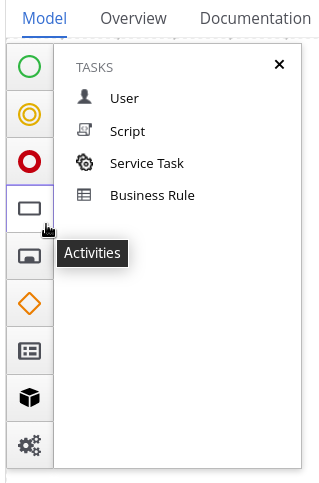
-
A case definition has been created with case roles configured at the case definition level. For more information about creating case roles, see Creating case roles.
-
Open the Activities menu in the designer palette and drag the user or service task that you want to add to your case definition onto the process designer canvas.
-
With the task node selected, click
to open the Properties panel on the right side of the designer. -
Expand Implementation/Execution, click Add below the Actors property and either select or type the name of the role to which the task will be assigned. You can use the Groups property in the same way for group assignments.
For example, in the IT_Orders sample project, the
Manager approvaluser task is assigned to themanagerrole: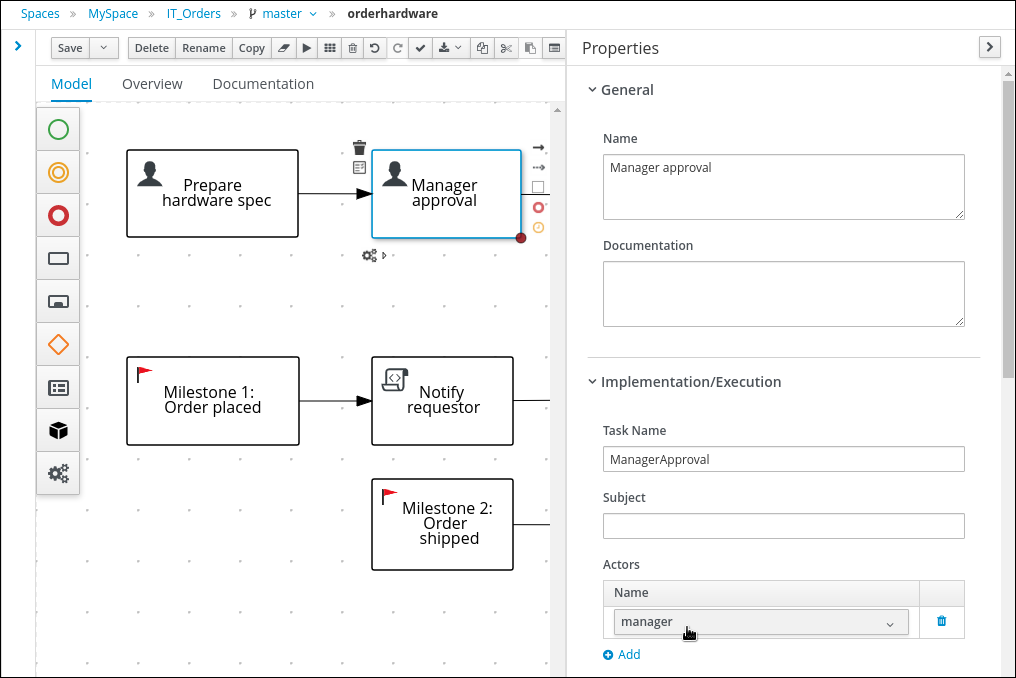
In this example, after the
Prepare hardware specuser task has been completed, the user assigned to themanagerrole will receive theManager approvaltask in their Task Inbox in Business Central.
The user assigned to the role can be changed during the case run time, but the task itself continues to have the same role assignment. For example, the person originally assigned to the manager role might need to take time off (if they become ill, for example), or they might unexpectedly leave the company. To respond to this change in circumstances, you can edit the manager role assignment so that someone else can be assigned the tasks associated with that role.
For information about how to change role assignments during case run time, see Modifying case role assignments during run time using Showcase or Modifying case role assignments during run time using REST API.
18.8.4. Modifying case role assignments during run time using Showcase
You can change case instance role assignments during case run time using the Showcase application. Roles are defined in the case definition and assigned to tasks in the case lifecycle. Roles cannot change during run time because they are predefined, but you can change the actors assigned to the roles to change who is responsible for carrying out case tasks.
-
An active case instance with users or groups is already assigned to at least one case role.
-
In the Showcase application, click the case you want to work on in the Case list to open the case overview.
-
Locate the role assignment that you want to change in the Roles box in the lower-right corner of the page.
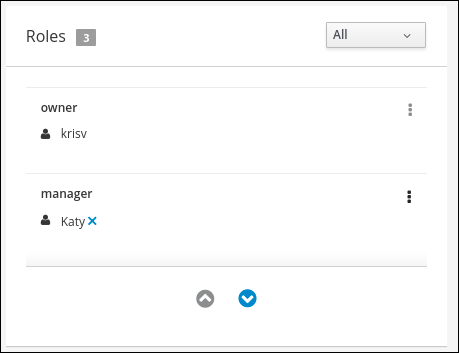
-
To remove a single user or group from the role assignment, click the
 next to the assignment. In the confirmation window, click Remove to remove the user or group from the role.
 -
To remove all role assignments from a role, click the
 next to the role and select the Remove all assignments option. In the confirmation window, click Remove to remove all user and group assignments from the role.
 -
To change the role assignment from one user or group to another, click the
next to the role and select the Edit option. -
In the Edit role assignment window, delete the name of the assignee that you want to remove from the role assignment. Type the name of the user you want to assign to the role into the User field or the group you want to assign in the Group field.
At least one user or group must be assigned when editing a role assignment.
-
Click Assign to complete the role assignment.
18.8.5. Modifying case role assignments during run time using REST API
You can change case instance role assignments during case run time using the REST API or Swagger application. Roles are defined in the case definition and assigned to tasks in the case life cycle. Roles cannot change during run time because they are predefined, but you can change the actors assigned to the roles to change who is responsible for carrying out case tasks.
The following procedure includes examples based on the IT_Orders sample project. You can use the same REST API endpoints in the Swagger application or any other REST API client, or using Curl.
-
An IT Orders case instance has been started with
owner,manager, andsupplierroles already assigned to actors.
-
Retrieve the list of current role assignments using a
GETrequest on the following endpoint:http://localhost:8080/kie-server/services/rest/server/containers/{id}/cases/instances/{caseId}/rolesTable 77. Parameters Name Description iditorderscaseIdIT-0000000001This returns the following response:
<?xml version="1.0" encoding="UTF-8" standalone="yes"?> <case-role-assignment-list> <role-assignments> <name>owner</name> <users>Aimee</users> </role-assignments> <role-assignments> <name>manager</name> <users>Katy</users> </role-assignments> <role-assignments> <name>supplier</name> <groups>Lenovo</groups> </role-assignments> </case-role-assignment-list> -
To change the user assigned to the
managerrole, you must first remove the role assignment from the userKatyusingDELETE./server/containers/{id}/cases/instances/{caseId}/roles/{caseRoleName}Include the following information in the Swagger client request:
Table 78. Parameters Name Description iditorderscaseIdIT-0000000001caseRoleNamemanageruserKatyClick Execute.
-
Execute the
GETrequest from the first step again to check that themanagerrole no longer has a user assigned:<?xml version="1.0" encoding="UTF-8" standalone="yes"?> <case-role-assignment-list> <role-assignments> <name>owner</name> <users>Aimee</users> </role-assignments> <role-assignments> <name>manager</name> </role-assignments> <role-assignments> <name>supplier</name> <groups>Lenovo</groups> </role-assignments> </case-role-assignment-list> -
Assign the user
Camito themanagerrole using aPUTrequest on the following endpoint:/server/containers/{id}/cases/instances/{caseId}/roles/{caseRoleName}Include the following information in the Swagger client request:
Table 79. Parameters Name Description iditorderscaseIdIT-0000000001caseRoleNamemanageruserCamiClick Execute.
-
Execute the
GETrequest from the first step again to check that themanagerrole is now assigned toCami:<?xml version="1.0" encoding="UTF-8" standalone="yes"?> <case-role-assignment-list> <role-assignments> <name>owner</name> <users>Aimee</users> </role-assignments> <role-assignments> <name>manager</name> <users>Cami</users> </role-assignments> <role-assignments> <name>supplier</name> <groups>Lenovo</groups> </role-assignments> </case-role-assignment-list>
18.9. Stages
Case management stages are a collection of tasks. A stage is an ad hoc sub-process that can be defined using the process designer and may include other case management nodes, such as a milestone. A milestone can also be configured as completed when a stage or a number of stages are completed. Therefore, a milestone may be activated or achieved by the completion of a stage, and a stage may include a milestone or a number of milestones.
For example, in a patient triage case, the first stage may consist of observing and noting any obvious physical symptoms or a description from the patient of what their symptoms are, followed by a second stage for tests, and a third for diagnosis and treatment.
There are three ways to complete a stage:
-
By completion condition.
-
By terminal end event.
-
By setting the
Completion Conditiontoautocomplete, which will automatically complete the stage when there are no active tasks left in the stage.
18.9.1. Defining a stage
A stage can be modeled in BPMN2 using the process designer. Stages are a way of grouping related tasks in a way that clearly defines activities that, if the stage is activated, must complete before the next stage of the case commences. For example, the IT_Orders case definition can also be defined using stages in the following way:
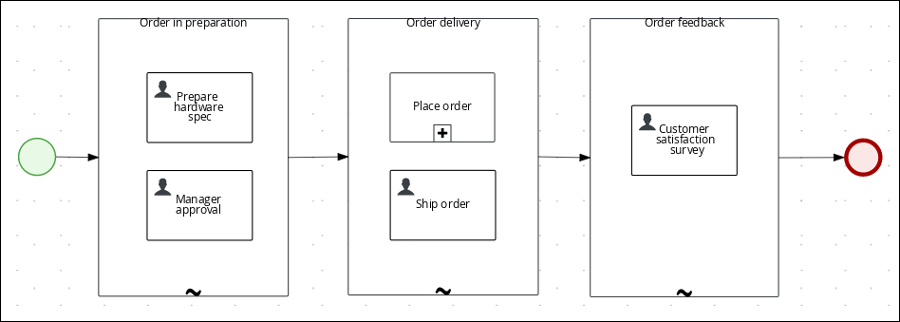
-
From the predefined node panel located on the left side of the diagram editor, drag and drop an Adhoc sub-process node onto the design canvas and provide a name for the stage node.
-
Define how the stage is activated:
-
If the stage is being activated by an incoming node, connect the stage with a sequence flow line from the incoming node.
-
If the stage is instead being activated by a signal event, configure the
SignalRefon the signal node with the name of the stage that you configured in the first step. -
Alternatively, configure the
AdHocActivationConditionproperty to activate the stage when the condition has been met.
-
-
Re-size the node as required to provide room to add the task nodes for the stage.
-
Add the relevant tasks to the stage and configure them as required.
-
Optional: Configure a completion condition for the stage. As an ad hoc sub-process, stages are configured as
autocompleteby default, which means that the stage will automatically complete and trigger the next activity in the case definition once all instances in the stage are no longer active.To change the completion condition, select the stage node and open the Properties panel on the right, expand Implementation/Execution, and modify the
AdHocCompletionConditionproperty field with a free-form Drools expression for the completion condition you require. For more information about stage completion conditions, see Configuring stage activation and completion conditions. -
Once the stage has been configured, connect it to the next activity in the case definition using a sequence flow line.
18.9.2. Configuring stage activation and completion conditions
Stages can be triggered by a start node, intermediate node, or manually using an API call.
You can configure stages with both activation and completion conditions using free-form Drools rules, the same way that milestone completion conditions are configured. For example, in the IT_Orders sample project, the Milestone 2: Order shipped completion condition (org.kie.api.runtime.process.CaseData(data.get("shipped") == true)) can also be used as the completion condition for the Order delivery stage represented here:
IT_Orders project stages exampleActivation conditions can also be configured using a free-form Drools rule to configure the AdHocActivationCondition property to activate a stage.
-
You have created a case definition in the Business Central process designer.
-
You have added an ad hoc sub-process to the case definition that is to be used as a stage.
-
With the stage selected, click
to open the Properties panel on the right side of the designer. -
Expand Implementation/Execution and in the
AdHocActivationConditionproperty editor define an activation condition for the start node. For example, setautostart: trueto make the stage automatically activated when a new case instance is started. -
The
AdHocCompletionConditionis set toautocompleteby default. To change this, input a completion condition using a free-form Drools expression. For example, setorg.kie.api.runtime.process.CaseData(data.get("ordered") == true)to activate the second stage in the example shown previously.
For more examples and information about the conditions used in the IT_Orders sample project, see Getting started with case management.
18.9.3. Adding a dynamic task to a stage
Dynamic tasks can be added to a case stage during run time using a REST API request. This is similar to adding a dynamic task to a case instance, but you must also define the caseStageId of the stage to which the task is added.
Use the following procedure to add a dynamic task to a stage in the IT_Orders sample project available in Business Central using the Swagger REST API tool. The same endpoint can be used for the REST API without Swagger.
-
The IT_Orders sample project BPMN2 case definition has been reconfigured to use stages instead of milestones, as demonstrated in the provided example. For information about configuring stages for case management, see Defining a stage.
-
Start a new case using the Showcase application. For more information about using Showcase, see Using the Showcase application for case management.
Because this case is designed using stages, the case details page shows stage tracking:
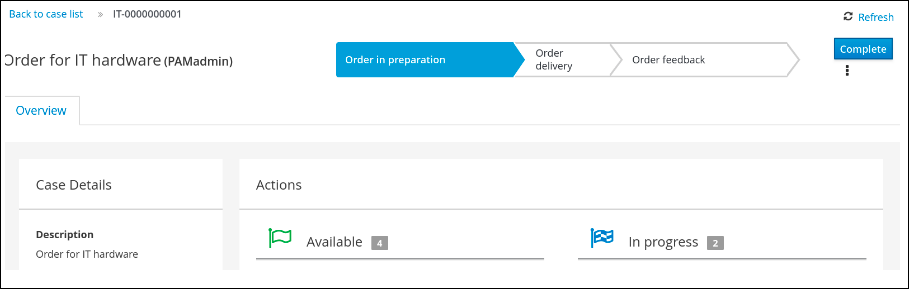
The first stage starts automatically when the case instance is created.
-
As a
manageruser, approve the hardware specification in Business Central under Menu → Track → Task Inbox, then check the progress of the case.-
In Business Central, click Menu → Manage → Process Instances and open the active case instance
IT-0000000001. -
Click Diagram to see the case progress.
-
-
In a web browser, open the following URL:
-
Open the list of available endpoints under Case instances :: Case Management.
-
Click click the following
POSTmethod endpoint to open the details:/server/containers/{id}/cases/instances/{caseId}/stages/{caseStageId}/tasks -
Click Try it out to complete the following parameters:
Table 80. Parameters Name Description iditorderscaseIdIT-0000000001caseStageIdOrder deliveryThe
caseStageIdis the name of the stage in the case definition where the dynamic task is to be created. This can be any dynamic or service task payload. See Creating a dynamic sub-process using the KIE Server REST API or Creating a dynamic service task using the KIE Server REST API for examples.
After the dynamic task has been added to the stage, it must be completed in order for the stage to complete and for the case process to move on to the next item in the case flow.
18.10. Milestones
Milestones are a special service task that can be configured in the case definition designer by adding the milestone node to the process designer palette. When creating a new case definition, a milestone configured as AdHoc Autostart is included on the design palette by default. Newly created milestones are not set to AdHoc Autostart by default.
Case management milestones generally occur at the end of a stage, but they can also be the result of achieving other milestones. A milestone always requires a condition to be defined in order to track progress. Milestones react to case file data when data is added to a case. A milestone represents a single point of achievement within the case instance. It can be used to flag certain events, which can be useful for Key Performance Indicator (KPI) tracking or identifying the tasks that are still to be completed.
Milestones can be in any of the following states during case execution:
-
Active: The condition has been defined on the milestone but it has not been met. -
Completed: The milestone condition has been met, the milestone has been achieved, and the case can proceed to the next task. -
Terminated: The milestone is no longer a part of the case process and is no longer required.
While a milestone is available or completed it can be triggered manually by a signal or automatically if AdHoc Autostart is configured when a case instance starts. Milestones can be triggered as many times as required, however, it is directly achieved when the condition is met.
18.10.1. Configuring and triggering milestones
Case milestones can be configured to start automatically when a case instance starts or they can triggered using a signal, which is configured manually during the case design.
-
A case project has been created in Business Central.
-
A case definition has been created.
-
From the predefined node panel located on the left side of the diagram editor, drag and drop a
Milestoneobject onto the palette.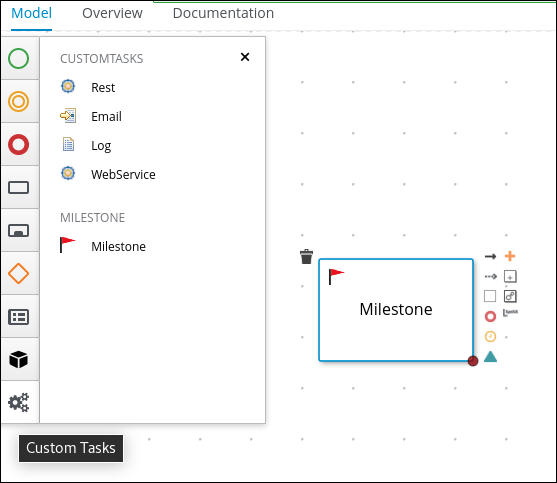
-
With the milestone selected, click
to open the Properties panel on the right side of the designer. -
Expand Data Assignments to add a completion condition. Milestones include a
Conditionparameter by default. -
To define the completion condition for the milestone, select
Constantfrom the Source list. The condition must be provided using the Drools syntax. -
Expand Implementation/Execution to configure the
AdHoc Autostartproperty.-
Click the check box to set this property to
truefor milestones that are required to start automatically when a case instance starts. -
Leave the check box empty to set this property to
falsefor milestones that are to be triggered by a signal event.
-
-
Optional: Configure a signal event to trigger a milestone once a case goal has been reached.
-
With the signal event selected in the case design palette, open the Properties panel on the right.
-
Set the
Signal Scopeproperty toProcess Instance. -
Open the
SignalRefexpression editor and type the name of the milestone to be triggered.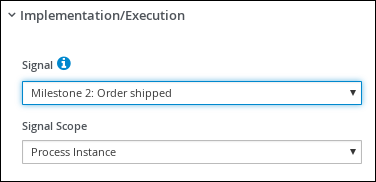
-
-
Click Save.
18.11. Variable tags
Variables store data that is used during runtime. For greater control over variable behavior, you can tag case variables and local variables in the BPMN case file. Tags are simple string values that you add as metadata to a specific variable.
jBPM supports the following tags for case and local variables:
-
required: Sets the variable as a requirement in order to start a case. If a case starts without the required variable, jBPM generates a
VariableViolationExceptionerror. -
readonly: Indicates that the variable is for informational purposes only and can be set only once during case execution. If the value of a read-only variable is modified at any time, jBPM generates a
VariableViolationExceptionerror. -
restricted: A tag that is used with the
VariableGuardProcessEventListenerto indicate that permission is granted to modify the variable based on the existing role. The restricted tag can be replaced by any other tag name if using the second constructor that passes the new tag name.
The VariableGuardProcessEventListener class is extended from the DefaultProcessEventListener class and supports two different constructors:
-
VariableGuardProcessEventListenerpublic VariableGuardProcessEventListener(String requiredRole, IdentityProvider identityProvider) { this("restricted", requiredRole, identityProvider); } -
VariableGuardProcessEventListenerpublic VariableGuardProcessEventListener(String tag, String requiredRole, IdentityProvider identityProvider) { this.tag = tag; this.requiredRole = requiredRole; this.identityProvider = identityProvider; }Therefore, you must add an event listener to the session with the allowed role name and identity provider that returns the user role as shown in the following example:
ksession.addEventListener(new VariableGuardProcessEventListener("AdminRole", myIdentityProvider));In the previous example, the
VariableGuardProcessEventListenermethod verifies if a variable is tagged with a security constraint tag (restricted). If the user does not have the required role (for example,AdminRole), then jBPM generates aVariableViolationExceptionerror. NOTE: The variable tags that appear in the Business Central UI, for exampleinternal,input,output,business-relevant, andtrackedare not supported in jBPM.
You can add the tag directly to the BPMN process source file as a customTags metadata property with the tag value defined in the format ![CDATA[TAG_NAME]].
For example, the following BPMN process applies the required tag to an approved process variable:
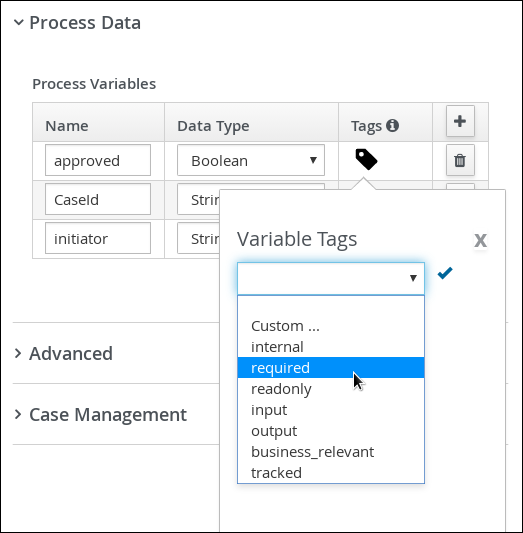
<bpmn2:property id="approved" itemSubjectRef="ItemDefinition_9" name="approved">
<bpmn2:extensionElements>
<tns:metaData name="customTags">
<tns:metaValue><![CDATA[required]]></tns:metaValue>
</tns:metaData>
</bpmn2:extensionElements>
</bpmn2:property>You can use more than one tag for a variable where applicable. You can also define custom variable tags in your BPMN files to make variable data available to jBPM process event listeners. Custom tags do not influence the jBPM runtime as the standard variable tags do and are for informational purposes only. You define custom variable tags in the same customTags metadata property format that you use for standard jBPM variable tags.
18.12. Case event listener
The CaseEventListener listener is used to initiate notifications for case-related events and operations that are invoked on a case instance. Implement the case event listener by overriding the methods as needed for your particular use case.
You can configure the listener using the deployment descriptors located in Business Central in Menu → Design → PROJECT_NAME → Settings → Deployments.
When a new project is created, a kie-deployment-descriptor.xml file is generated with default values.
public interface CaseEventListener extends EventListener {
default void beforeCaseStarted(CaseStartEvent event) {
};
default void afterCaseStarted(CaseStartEvent event) {
};
default void beforeCaseClosed(CaseCloseEvent event) {
};
default void afterCaseClosed(CaseCloseEvent event) {
};
default void beforeCaseCancelled(CaseCancelEvent event) {
};
default void afterCaseCancelled(CaseCancelEvent event) {
};
default void beforeCaseDestroyed(CaseDestroyEvent event) {
};
default void afterCaseDestroyed(CaseDestroyEvent event) {
};
default void beforeCaseReopen(CaseReopenEvent event) {
};
default void afterCaseReopen(CaseReopenEvent event) {
};
default void beforeCaseCommentAdded(CaseCommentEvent event) {
};
default void afterCaseCommentAdded(CaseCommentEvent event) {
};
default void beforeCaseCommentUpdated(CaseCommentEvent event) {
};
default void afterCaseCommentUpdated(CaseCommentEvent event) {
};
default void beforeCaseCommentRemoved(CaseCommentEvent event) {
};
default void afterCaseCommentRemoved(CaseCommentEvent event) {
};
default void beforeCaseRoleAssignmentAdded(CaseRoleAssignmentEvent event) {
};
default void afterCaseRoleAssignmentAdded(CaseRoleAssignmentEvent event) {
};
default void beforeCaseRoleAssignmentRemoved(CaseRoleAssignmentEvent event) {
};
default void afterCaseRoleAssignmentRemoved(CaseRoleAssignmentEvent event) {
};
default void beforeCaseDataAdded(CaseDataEvent event) {
};
default void afterCaseDataAdded(CaseDataEvent event) {
};
default void beforeCaseDataRemoved(CaseDataEvent event) {
};
default void afterCaseDataRemoved(CaseDataEvent event) {
};
default void beforeDynamicTaskAdded(CaseDynamicTaskEvent event) {
};
default void afterDynamicTaskAdded(CaseDynamicTaskEvent event) {
};
default void beforeDynamicProcessAdded(CaseDynamicSubprocessEvent event) {
};
default void afterDynamicProcessAdded(CaseDynamicSubprocessEvent event) {
};
}18.13. Rules in case management
Cases are data-driven, rather than following a sequential flow. The steps required to resolve a case rely on data, which is provided by people involved in the case, or the system can be configured to trigger further actions based on the data available. In the latter case, you can use business rules to decide what further actions are required for the case to continue or reach a resolution.
Data can be inserted into the case file at any point during the case. The Drools engine constantly monitors case file data, meaning that rules react to data that is contained in the case file. Using rules to monitor and respond to changes in the case file data provides a level of automation that drives cases forward.
18.13.1. Using rules to drive cases
Refer to the case management IT_Orders sample project in Business Central.
Suppose that the particular hardware specification provided by the supplier is incorrect or invalid. The supplier needs to provide a new, valid order so that the case can continue. Rather than wait for the manager to reject the invalid specification and create a new request for the supplier, you can create a business rule that will react immediately when the case data indicates that the provided specification is invalid. It can then create a new hardware specification request for the supplier.
The following procedure demonstrates how to create and use a business rule to execute this scenario.
-
The IT_Orders sample project is open in Business Central, but it is not deployed to the KIE Server.
-
The
ServiceRegistryis part of thejbpm-services-apimodule, and must be available on the class path.If building the project outside of Business Central, the following dependencies must be added to the project:
-
org.jbpm:jbpm-services-api -
org.jbpm:jbpm-case-mgmt-api
-
-
Create the following business rule file called
validate-document.drl:package defaultPackage; import java.util.Map; import java.util.HashMap; import org.jbpm.casemgmt.api.CaseService; import org.jbpm.casemgmt.api.model.instance.CaseFileInstance; import org.jbpm.document.Document; import org.jbpm.services.api.service.ServiceRegistry; rule "Invalid document name - reupload" when $caseData : CaseFileInstance() Document(name == "invalid.pdf") from $caseData.getData("hwSpec") then System.out.println("Hardware specification is invalid"); $caseData.remove("hwSpec"); update($caseData); CaseService caseService = (CaseService) ServiceRegistry.get().service(ServiceRegistry.CASE_SERVICE); caseService.triggerAdHocFragment($caseData.getCaseId(), "Prepare hardware spec", null); endThis business rule detects when a file named
invalid.pdfis uploaded to the case file. It then removes theinvalid.pdfdocument and creates a new instance of thePrepare hardware specuser task. -
Click Deploy to build the IT_Orders project and deploy it to a KIE Server.
You can also select the Build & Install option to build the project and publish the KJAR file to the configured Maven repository without deploying to a KIE Server. In a development environment, you can click Deploy to deploy the built KJAR file to a KIE Server without stopping any running instances (if applicable), or click Redeploy to deploy the built KJAR file and replace all instances. The next time you deploy or redeploy the built KJAR, the previous deployment unit (KIE container) is automatically updated in the same target KIE Server. In a production environment, the Redeploy option is disabled and you can click Deploy only to deploy the built KJAR file to a new deployment unit (KIE container) on a KIE Server.
To configure the KIE Server environment mode, set the
org.kie.server.modesystem property toorg.kie.server.mode=developmentororg.kie.server.mode=production. To configure the deployment behavior for a corresponding project in Business Central, go to project Settings → General Settings → Version and toggle the Development Mode option. By default, KIE Server and all new projects in Business Central are in development mode. You cannot deploy a project with Development Mode turned on or with a manually addedSNAPSHOTversion suffix to a KIE Server that is in production mode. -
Create a file called
invalid.pdfand save it locally. -
Create a file called
valid-spec.pdfand save it locally. -
In Business Central, go to Menu → Projects → IT_Orders to open the IT_Orders project.
-
Click Import Asset in the upper-right corner of the page.
-
Upload the
validate-document.drlfile to thedefaultpackage (src/main/resources) and click Ok.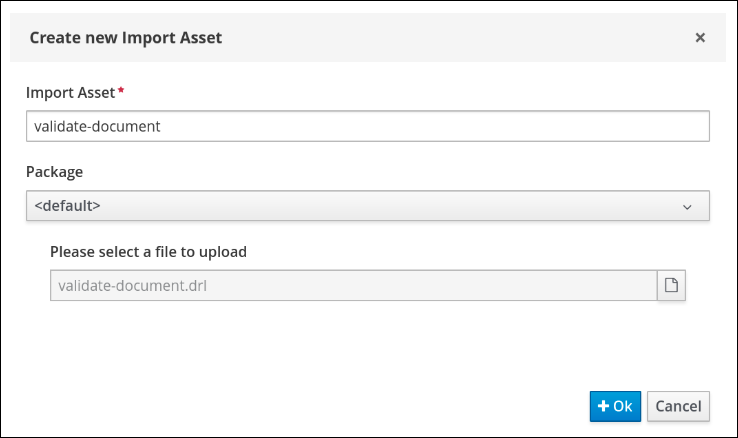
The
validate-document.drlrule is shown in the rule editor. Click Save or close to exit the rule editor. -
Open the Showcase application by either clicking the Apps launcher (if it is installed), or go to
http://localhost:8080/rhpam-case-mgmt-showcase/jbpm-cm.html. -
Click Start Case for the IT_Orders project.
In this example, Aimee is the case
owner, Katy is themanager, and the supplier group issupplier.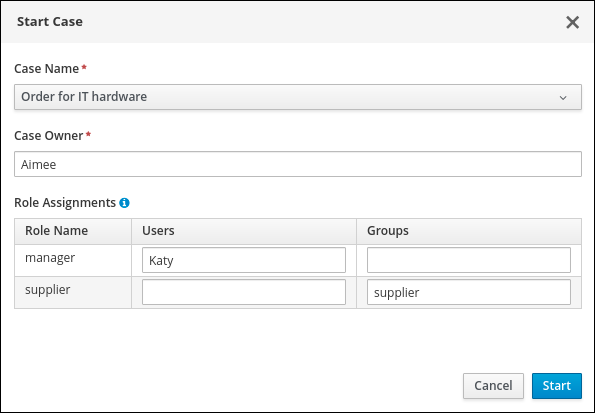
-
Log out of Business Central, and log back in as a user that belongs to the
suppliergroup. -
Go to Menu → Track → Task Inbox.
-
Open the
Prepare hardware spectask and click Claim. This assigns the task to the logged in user. -
Click Start and click
 to locate the
 invalid.pdfhardware specification file. Click to upload the file.
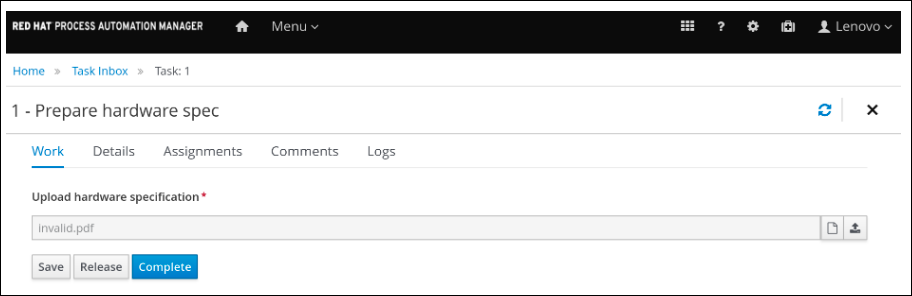
-
Click Complete.
The value in the Task Inbox for the
Prepare hardware specisReady. -
In Showcase, click Refresh in the upper-right corner. Notice that a
Prepare hardware taskmessage appears in the Completed column and another appears in the In Progress column.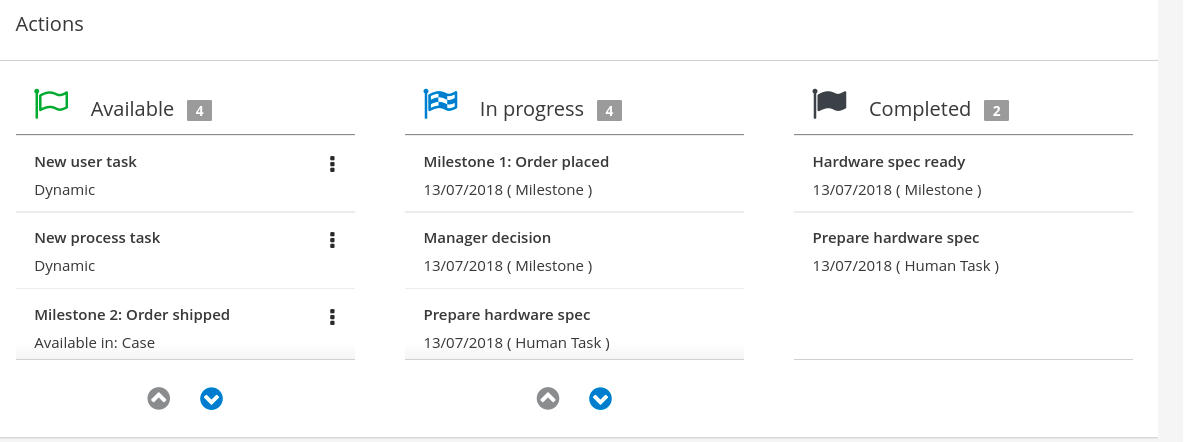
This is because the first
Prepare hardware spectask has been completed with the specification fileinvalid.pdf. As a result, the business rule causes the task and file to be discarded, and a new user task created. -
In the Business Central Task Inbox, repeat the previous steps to upload the
valid-spec.pdffile instead ofinvalid.pdf.
18.14. Case management security
Cases are configured at the case definition level with case roles. These are generic participants that are involved in case handling. These roles can be assigned to user tasks or used as contact references. Roles are not hard-coded to specific users or groups to keep the case definition independent of the actual actors involved in any given case instance. You can modify case role assignments at any time as long as case instance is active, though modifying a role assignment does not affect tasks already created based on the previous role assignment.
Case instance security is enabled by default. The case definition prevents case data from being accessed by users who do not belong to the case. Unless a user has a case role assignment (either assigned as user or a group member) then they are not able to access the case instance.
Case security is one of the reasons why it is recommended that you assign case roles when starting a case instance, as this will prevent tasks being assigned to users who should not have access to the case.
18.14.1. Configuring security for case management
You can turn off case instance authorization by setting the following system property to false:
org.jbpm.cases.auth.enabled
This system property is just one of the security components for case instances. In addition, you can configure case operations at the execution server level using the case-authorization.properties file, available at the root of the class path of the execution server application (kie-server.war/WEB-INF/classes).
Using a simple configuration file for all possible case definitions encourages you to think about case management as domain-specific. AuthorizationManager for case security is pluggable, which allows you to include custom code for specific security handling.
You can restrict the following case instance operations to case roles:
-
CANCEL_CASE -
DESTROY_CASE -
REOPEN_CASE -
ADD_TASK_TO_CASE -
ADD_PROCESS_TO_CASE -
ADD_DATA -
REMOVE_DATA -
MODIFY_ROLE_ASSIGNMENT -
MODIFY_COMMENT
-
The jBPM KIE Server is not running.
-
Open the
JBOSS_HOME/standalone/deployments/kie-server.war/WEB-INF/classes/case-authorization.propertiesfile in your preferred editor.By default, the file contains the following operation restrictions:
CLOSE_CASE=owner,admin CANCEL_CASE=owner,admin DESTROY_CASE=owner,admin REOPEN_CASE=owner,admin -
Add or remove role permissions for these operations as needed:
-
To remove permission for a role to perform an operation, remove it from the list of authorized roles for that operation in the
case-authorization.propertiesfile. For example, removing theadminrole from theCLOSE_CASEoperation restricts permission to close a case to the case owner for all cases. -
To give a role permission to perform a case operation, add it to the list of authorized roles for that operation in the
case-authorization.propertiesfile. For example, to allow anyone with themanagerrole to perform aCLOSE_CASEoperation, add it to the list of roles, separated by a comma:CLOSE_CASE=owner,admin,manager
-
-
To add role restrictions to other case operations listed in the file, remove the
#from the line and list the role names in the following format:OPERATION=role1,role2,roleNOperations in the file that begin with
#have restrictions ignored and can be performed by anyone involved in the case. -
When you have finished assigning role permissions, save and close the
case-authorization.propertiesfile. -
Start the execution server.
The case authorization settings apply to all cases on the execution server.
18.15. Closing cases
A case instance can be completed when there are no more activities to be performed and the business goal is achieved, or it can be closed prematurely. Usually the case owner closes the case when all work is completed and the case goals have been met. When you close a case, consider adding a comment about why the case instance is being closed.
A closed case can be reopened later with the same case ID if required. When a case is reopened, stages that were active when the case was closed will be active when the case is reopened.
You can close case instances remotely using KIE Server REST API requests or directly in the Showcase application.
18.15.1. Closing a case using the KIE Server REST API
You can use a REST API request to close a case instance. jBPM includes the Swagger client, which includes endpoints and documentation for REST API requests. Alternatively, you can use the same endpoints to make API calls using your preferred client or Curl.
-
A case instance has been started using Showcase.
-
You are able to authenticate API requests as a user with the
adminrole.
-
Open the Swagger REST API client in a web browser:
-
Under Case Instances :: Case Management, open the
POSTrequest with the following endpoint:/server/containers/{id}/cases/instances/{caseId} -
Click Try it out and fill in the required parameters:
Table 81. Parameters Name Description iditorderscaseIdIT-0000000001 -
Optional: Include a comment to be included in the case file. To leave a comment, type it into the
bodytext field as aString. -
Click Execute to close the case.
-
To confirm the case is closed, open the Showcase application and change the case list status to Closed.
18.15.2. Closing a case in the Showcase application
A case instance is complete when no more activities need to be performed and the business goal has been achieved. After a case is complete, you can close the case to indicate that the case is complete and that no further work is required. When you close a case, consider adding a specific comment about why you are closing the case. If needed, you can reopen the case later with the same case ID.
You can use the Showcase application to close a case instance at any time. From Showcase, you can easily view the details of the case or leave a comment before closing it.
-
You are logged in to the Showcase application and are the owner or administrator for a case instance that you want to close.
-
In the Showcase application, locate the case instance you want to close from the list of case instances.
-
To close the case without viewing the details first, click Close.
-
To close the case from the case details page, click the case in the list to open it.
From the case overview page you can add comments to the case and verify that you are closing the correct case based on the case information.
-
Click Close to close the case.
-
Click Back to Case List in the upper-left corner of the page to return to the Showcase case list view.
-
Click the drop-down list next to Status and select Canceled to view the list of closed and canceled cases.
18.16. Canceling or destroying a case
Cases can be canceled if they are no longer required and do not require any case work to be performed. Cases that are canceled can be reopened later with the same case instance ID and case file data. In some cases, you might want to permanently destroy a case so that it cannot be reopened.
Cases can only be canceled or destroyed using an API request. jBPM includes the Swagger client, which includes endpoints and documentation for REST API requests. Alternatively, you can use the same endpoints to make API calls using your preferred client or Curl.
-
A case instance has been started using Showcase.
-
You are able to authenticate API requests as a user with the
adminrole.
-
Open the Swagger REST API client in a web browser:
-
Under Case Instances :: Case Management, open the
DELETErequest with the following endpoint:/server/containers/{id}/cases/instances/{caseId}You can cancel a case using the
DELETErequest. Optionally, you can also destroy the case using thedestroyparameter. -
Click Try it out and fill in the required parameters:
Table 82. Parameters Name Description iditorderscaseIdIT-0000000001destroytrue(Optional. Permanently destroys the case. This parameter is
falseby default.) -
Click Execute to cancel (or destroy) the case.
-
To confirm the case is canceled, open the Showcase application and change the case list status to Canceled. If the case has been destroyed, it will no longer appear in any case list.
18.16.1. Case log removal from the database
Use the CaseLogCleanupCommand to clean up cases, such as canceled cases that are using up database space. The CaseLogCleanupCommand command contains logic to automatically clean-up all or selected cases.
You can use the following configuration options with the CaseLogCleanupCommand command:
| Name | Description | Is Exclusive |
|---|---|---|
SkipProcessLog |
Indicates whether or not the process and node instances, along with the process variable log clean-up will be skipped when the command runs. Default value: |
No, can be used with other parameters |
SkipTaskLog |
Indicates whether or not the task audit, the task event, and the task variable log clean-up will be skipped when the command runs. Default value: |
No, can be used with other parameters |
SkipExecutorLog |
Indicates if the jBPM executor entries clean-up will be skipped when the command runs. Default value: |
No, can be used with other parameters |
SingleRun |
Indicates if the job routine will run only once. Default value: |
No, can be used with other parameters |
NextRun |
Schedules the next job execution. For example, set to |
No, can be used with other parameters |
OlderThan |
Logs older than the specified date are removed. The date format is |
Yes, cannot be used when the |
OlderThanPeriod |
Logs older than the specified timer expression are removed. For example, set 30d to remove logs older than 30 days. |
Yes, cannot be used when the |
ForCaseDefId |
Specifies the case definition ID of the logs that are removed. |
No, can be used with other parameters |
ForDeployment |
Specifies the deployment ID of the logs that are removed. |
No, can be used with other parameters |
EmfName |
The persistence unit name used to perform the delete operation. Default value: |
N/A |
DateFormat |
Specifies the date format for time-related parameters. Default value: |
No, can be used with other parameters |
Status |
Status of the case instances of the logs that are removed. |
No, can be used with other parameters |
19. Using the Showcase application for case management
As a case worker or process administrator, you can use the Showcase application to manage and monitor case management applications while case work is carried out in Business Central.
Case management differs from business process management (BPM) in that it focuses on the actual data being handled throughout the case and less on the sequence of steps taken to complete a goal. Case data is the most important piece of information in case handling, while business context and decision-making is in the hands of the human case worker.
Use this document to install the Showcase application and start a case instance using the IT_Orders sample case management project in Business Central. Use Business Central to complete the tasks required to complete an IT Orders case.
-
Red Hat JBoss Enterprise Application Platform 7.3 is installed. For installation information, see Red Hat JBoss Enterprise Application Platform 7.3 Installation Guide.
-
jBPM is installed on Red Hat JBoss EAP and configured with KIE Server. For more information see Installing and configuring jBPM on Red Hat JBoss EAP 7.3.
-
KieLoginModuleis configured instandalone-full.xml. This required to connect to the KIE Server. For more information about configuring the KIE Server, see Planning a jBPM installation. -
jBPM is running and you can log in to Business Central with a user that has both
kie-serveranduserroles. For more information about roles, see Planning a jBPM installation. -
The IT_Orders sample project has been imported in Business Central and deployed to the KIE Server. For more information about case management, see Getting started with case management.
19.1. Case management
Case management is an extension of Business Process Management (BPM) that enables you to manage adaptable business processes.
BPM is a management practice used to automate tasks that are repeatable and have a common pattern, with a focus on optimization by perfecting a process. Business processes are usually modeled with clearly defined paths leading to a business goal. This requires a lot of predictability, usually based on mass-production principles. However, many real-world applications cannot be described completely from start to finish (including all possible paths, deviations, and exceptions). Using a process-oriented approach in certain cases can lead to complex solutions that are hard to maintain.
Case management provides problem resolution for non-repeatable, unpredictable processes as opposed to the efficiency-oriented approach of BPM for routine, predictable tasks. It manages one-off situations when the process cannot be predicted in advance. A case definition usually consists of loosely coupled process fragments that can be connected directly or indirectly to lead to certain milestones and ultimately a business goal, while the process is managed dynamically in response to changes that occur during run time.
In jBPM, case management includes the following core jBPM engine features:
-
Case file instance
-
A per case runtime strategy
-
Case comments
-
Milestones
-
Stages
-
Ad hoc fragments
-
Dynamic tasks and processes
-
Case identifier (correlation key)
-
Case lifecycle (close, reopen, cancel, destroy)
A case definition is always an ad hoc process definition and does not require an explicit start node. The case definition is the main entry point for the business use case.
A process definition is introduced as a supporting construct of the case and can be invoked either as defined in the case definition or dynamically to bring in additional processing when required. A case definition defines the following new objects:
-
Activities (required)
-
Case file (required)
-
Milestones
-
Roles
-
Stages
19.2. Case management Showcase application
The Showcase application is included in the jBPM distribution to demonstrate the capabilities of case management in an application environment. Showcase is intended to be used as a proof of concept that aims to show the interaction between business process management (BPM) and case management. You can use the application to start, close, monitor, and interact with cases.
Showcase must be installed in addition to the Business Central application and KIE Server. The Showcase application is required to start new case instances, however the case work is still performed in Business Central.
After a case instance is created and is being worked on, you can monitor the case in the Showcase application by clicking the case in the Case List to open the case Overview page.
Showcase Support
The Showcase application is not an integral part of jBPM and is intended for demonstration purposes for case management. Showcase is provided to encourage customers to adopt and modify it to work for their specific needs. The content of the application itself does not carry product-specific Service Level Agreements (SLAs). We encourage you to report issues, request for enhancements, and any other feedback for consideration in Showcase updates.
Red Hat Support will provide guidance on the use of this template on a commercially reasonable basis for its intended use, excluding the provided example UI code provided within.
|
Production support is limited to the jBPM distribution. |
19.3. Installing and logging in to the Showcase application
The Showcase application is included with the jBPM 7.52 distribution in the add-ons Zip file. The purpose of this application is to demonstrate the functionality of case management in jBPM and enable you to interact with cases created in Business Central. You can install the Showcase application in a Red Hat JBoss Enterprise Application Platform instance or on OpenShift. This procedure describes how to install the Showcase application in Red Hat JBoss EAP.
-
Business Central and KIE Server are installed in an Red Hat JBoss EAP instance.
-
You have created a user with
kie-serveranduserroles. Only users with theuserrole are able to log in to the Showcase application. Users also require thekie-serverrole to perform remote operations on the running KIE Server. -
Business Central is not running.
-
Navigate to the Software Downloads page in the Red Hat Customer Portal (login required), and select the product and version from the drop-down options:
-
Product: jBPM
-
Version: 7.52
-
-
Download jBPM 7.52 Add Ons
-
Extract the file. The file is in the unzipped directory.
-
Extract the archive to a temporary directory. In the following examples this directory is called
TEMP_DIR. -
Copy the contents of the directory to
EAP_HOME.When asked to overwrite files or merge directories, select Yes.
Ensure the names of the jBPM deployments you copy do not conflict with your existing deployments in the Red Hat JBoss EAP instance. -
Add the following system property to your deployment’s
7.3/jboss-eap-7.3/standalone/configuration/standalone-full.xmlfile:<property name="org.jbpm.casemgmt.showcase.url" value="/rhpam-case-mgmt-showcase"/> -
In a terminal application, navigate to EAP_HOME/bin and run the standalone configuration to start Business Central:
./standalone.sh -c standalone-full.xml -
In a web browser, enter
If jBPM has been configured to run from a domain name, replace
localhostwith the domain name, for example: -
In the upper-right corner in Business Central, click the Apps launcher button to launch the Case Management Showcase in a new browser window.
-
Log in to the Showcase application using your Business Central user credentials.
19.4. Case roles
Case roles provide an additional layer of abstraction for user participation in case handling. Roles, users, and groups are used for different purposes in case management.
- Roles
-
Roles drive the authorization for a case instance and are used for user activity assignments. A user or one or more groups can be assigned to the owner role. The owner is whoever the case belongs to. Roles are not restricted to a single set of people or groups as part of a case definition. Use roles to specify task assignments instead of assigning a specific user or group to a task assignment to ensure that the case remains dynamic.
- Groups
-
A group is a collection of users who are able to carry out a particular task or have a set of specified responsibilities. You can assign any number of people to a group and assign any group to a role. You can add or change members of a group at any time. Do not hard code a group to a particular task.
- Users
-
A user is an individual who can be given a particular task when you assign them a role or add them to a group.
Do not create a user called
unknownin jBPM engine or KIE Server. Theunknownuser account is a reserved system name with superuser access. Theunknownuser account performs tasks related to the SLA violation listener when there are no users logged in.
The following example illustrates how the preceding case management concepts apply to a hotel reservation with the following information:
-
Role:
Guest -
Group:
Receptionist,Maid -
User:
Marilyn
The Guest role assignment affects the specific work of the associated case and is unique to all case instances. Every case instance will have its own role assignments. The number of users or groups that can be assigned to a role is limited by the case Cardinality, which is set during role creation in the process designer and case definition. For example, the hotel reservation case has only one guest while the IT_Orders sample project has two suppliers of IT hardware.
When roles are defined, ensure that roles are not hard-coded to a single set of people or groups as part of case definition and that they can differ for each case instance. This is why case role assignments are important.
Role assignments can be assigned or removed when a case starts or at any time when a case is active. Although roles are optional, use roles in case definitions to maintain an organized workflow.
|
Always use roles for task assignments instead of actual user or group names. This ensures that the case and user or group assignments can be made as late as required. |
Roles are assigned to users or groups and authorized to perform tasks when a case instance is started.
19.5. Starting dynamic tasks and processes
You can add dynamic tasks and processes to a case during run time. Dynamic actions are a way to address changing situations, where an unanticipated change during the case requires a new task or process to be incorporated into the case.
Use a case application to add a dynamic task during run time. For demonstration purposes, the Business Central distribution includes a Showcase application where you can start a new dynamic task or process for the IT Orders application.
-
KIE Server is deployed and connected to Business Central.
-
The IT Orders project is deployed to KIE Server.
-
The Showcase application
.warfile has been deployed alongside Business Central.
-
With the IT_Orders_New project deployed and running in the KIE Server, in a web browser, navigate to the Showcase login page
http://localhost:8080/rhpam-case-mgmt-showcase/.Alternatively, if you have configured Business Central to display the Apps launcher button, use it to open a new browser window with the Showcase login page.
-
Log in to the Showcase application using your Business Central login credentials.
-
Select an active case instance from the list to open it.
-
Under Overview → Actions → Available, click the
button next to New user task or New process task to add a new task or process task.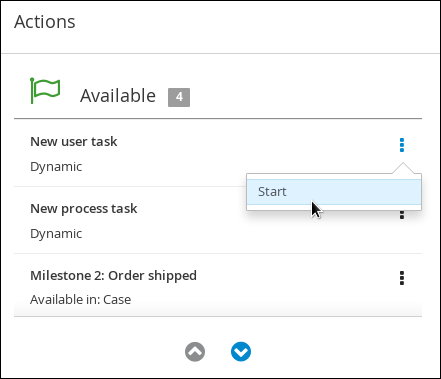 Figure 215. Showcase dynamic actions
-
To create a dynamic user task, start a New user task and complete the required information:
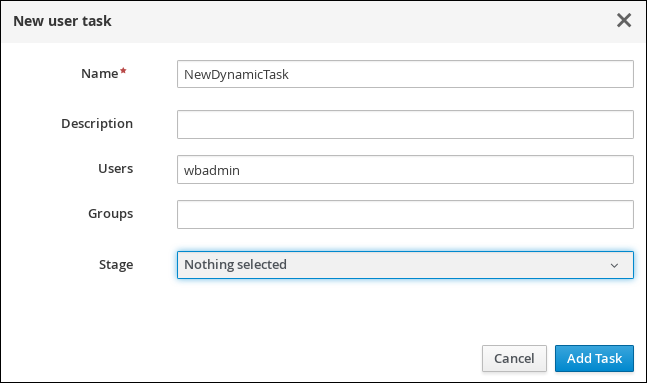
-
To create a dynamic process task, start a New process task and complete the required information:
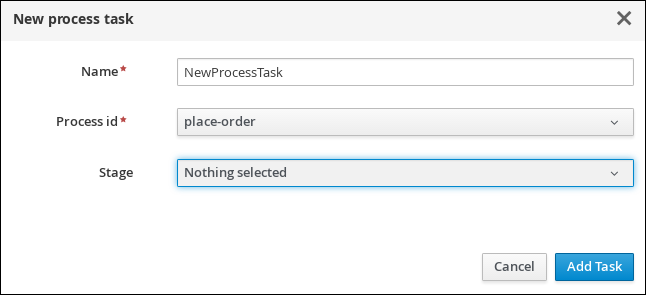
-
-
To view a dynamic user task in Business Central, click Menu → Track → Task Inbox. The user task that was added dynamically using the Showcase application appears in the Task Inbox of users assigned to the task during task creation.

-
Click the dynamic task in the Task Inbox to open the task. A number of action tabs are available from this page.
-
Using the actions available under the task tabs, you can begin working on the task.
-
In the Showcase application, click the refresh button in the upper-right corner. Case tasks and processes that are in progress appear under Overview → Actions → In progress.
-
When you have completed working on the task, click the Complete button under the Work tab.
-
In the Showcase application, click the refresh button in the upper-right corner. The completed task appears under Overview → Actions → Completed.
-
-
To view a dynamic process task in Business Central, click Menu → Manage → Process Instances.
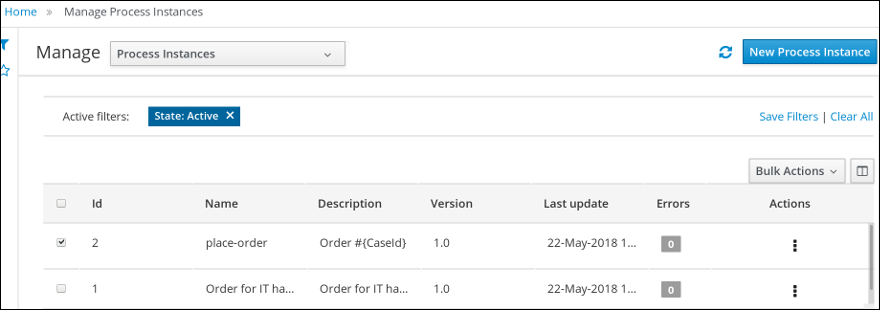
-
Click the dynamic process instance in the list of available process instances to view information about the process instance.
-
In the Showcase application, click the refresh button in the upper-right corner. Case tasks and processes that are in progress appear under Overview → Actions → In progress.
-
19.6. Starting an IT Orders case in the Showcase application
You can start a new case instance for the IT Orders sample case management project in the Showcase application.
The IT Orders sample case management project includes the following roles:
-
owner: The employee who is making the hardware order request. There can be only one of these roles. -
manager: The employee’s manager; the person who will approve or deny the requested hardware. There is only one manager in the IT Orders project. -
supplier: The available suppliers of IT hardware in the system. There is usually more than one supplier.
These roles are configured at the case definition level:
Assign users or groups to these roles when starting a new case file instance.
-
You have imported and deployed the IT Orders sample project in Business Central.
-
You have installed and logged in to the Showcase application as instructed in Installing and logging in to the Showcase application.
-
In the Showcase application, start a new case instance by clicking the Start Case button.
-
Select the
Order for IT hardwarecase name from the list and complete the role information as shown:
In this example, Aimee is the case
owner, Katy is themanager, and the supplier group issupplier. -
Click Start to start the case instance.
-
Select the case from the Case List. The Overview page opens.
From the Overview page, you can monitor the case progress, add comments, start new dynamic tasks and processes, and complete and close cases.

|
Cases can be started and closed using the Showcase application, but they cannot be reopened using this application. You can only reopen a case using a JMS or REST API call. |
19.7. Completing the IT_Orders case using Showcase and Business Central
When a case instance is started using the Showcase application, tasks that are configured as AdHoc Autostart in the case definition are automatically assigned and made available to users with the role assignment for each task. Case workers can then work on the tasks in Business Central and complete them to move the case forward.
In the IT_Orders case project, the following case definition nodes are configured with the AdHoc Autostart property:
-
Prepare hardware spec -
Hardware spec ready -
Manager decision -
Milestone 1: Order placed
Of these, the only user task is Prepare hardware spec, which is assigned to the supplier group. This is the first human task to be completed in the IT Orders case. When this task is complete, the Manager approval task becomes available to the user assigned to the manager role, and after the rest of the case work is finished, the Customer satisfaction survey task is assigned to the case owner for completion.
-
As the
wbadminuser, you have started an IT_Orders case in the Showcase application.
-
Log out of Business Central and log back in as a user that belongs to the
suppliergroup. -
Go to Menu → Track → Task Inbox.
-
Open the
Prepare hardware spectask and click Claim. This assigns the task to the logged in user. -
Click Start and click
to locate the hardware specification file. Click to upload the file.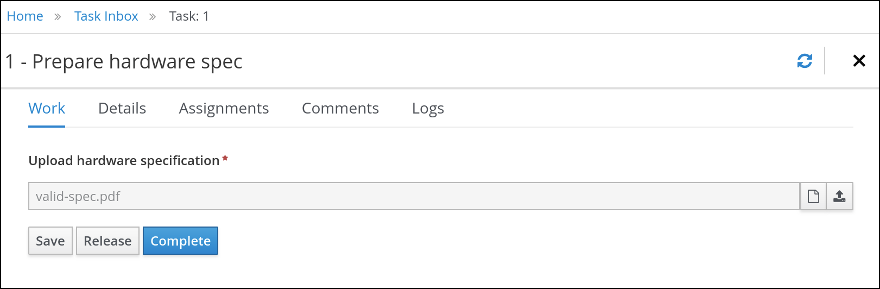
-
Click Complete.
-
In Showcase, click Refresh in the upper-right corner. Notice that the
Prepare hardware taskuser task and theHardware spec readymilestone appear in the Completed column.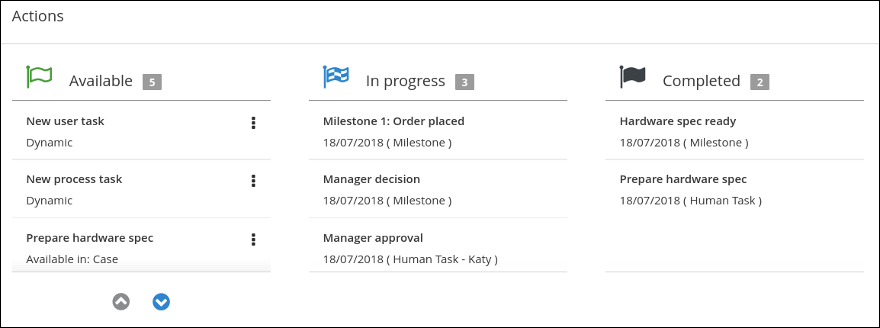
-
In Business Central, go to Menu → Track → Task Inbox. Open the
Manager approvaltask for wbadmin.-
Click Claim and then click Start.
-
Check the
approvebox for the task that includes thevalid-spec.pdffile, then click Complete.
-
-
Go to Menu → Manage → Process Instances and open the Order for IT hardware process instance.
-
Open the Diagram tab. Note that the
Place ordertask is complete. -
Refresh the Showcase page to see that the
Manager approvaltask and theManager decisionmilestone are in the Completed column. The Milestones pane in the lower-left corner of the Showcase overview page also shows the completed and pending milestones.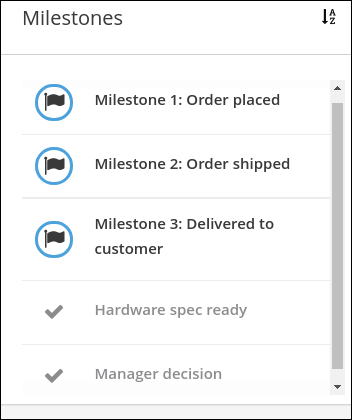
-
-
In Business Central go to Menu → Manage → Tasks. Click the
Place ordertask to open it.-
Click Claim and then click Start.
-
Select the
Is order placedcheck box and click Complete.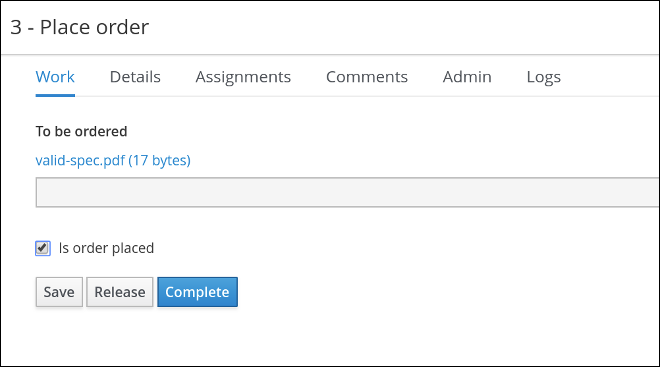
The process instance diagram now shows the Milestones 2: Order shipped case progress:
-
Refresh the Showcase page to view the case progress.
-
-
Go to Menu → Manage → Process Instances and open the Order for IT hardware.
-
Open the Process Variables tab. Locate the
caseFile_shippedvariable and click Edit. -
In the Edit window, type
trueand click Save.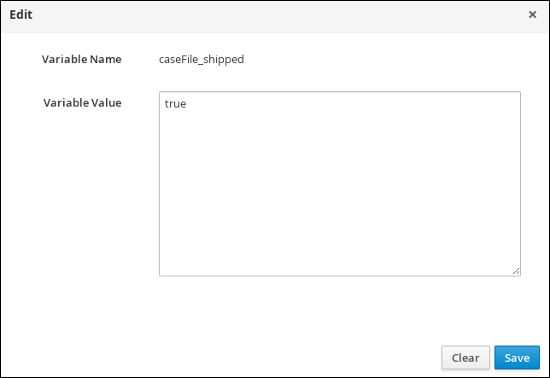
-
Refresh the Showcase page. Note that the
Milestone 2: Order shippedmilestone is shown as Completed.The final milestone,
Milestone 3: Delivered to customeris In progress.
-
-
Go to Menu → Manage → Process Instances and open the Order for IT hardware.
-
Open the Process Variables tab. Locate the
caseFile_deliveredvariable and click Edit. -
In the Edit window, type
trueand click Save. -
Refresh the Showcase page. Note that the
Milestone 3: Delivered to customermilestone is shown as Completed. All milestones under the Milestones pane in the lower-left corner are shown as complete.The final task of the IT Orders case,
Customer satisfaction surveyis shown under In progress.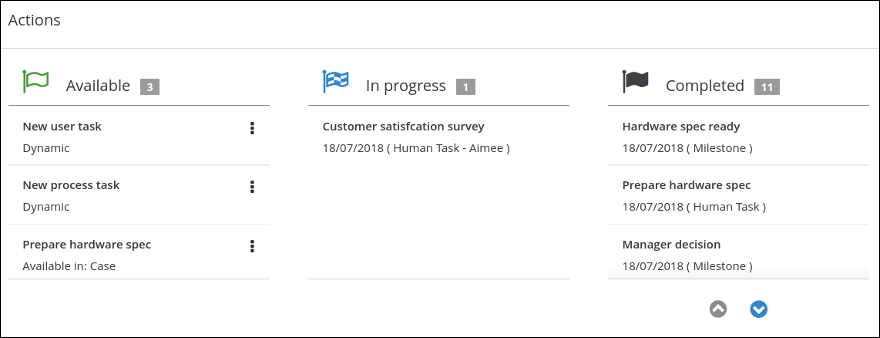
-
-
In Business Central go to Menu → Track → Task Inbox. Click the
Customer satisfaction surveytask to open it.This task is already reserved for wbadmin.
-
Click Start and fill out the survey.
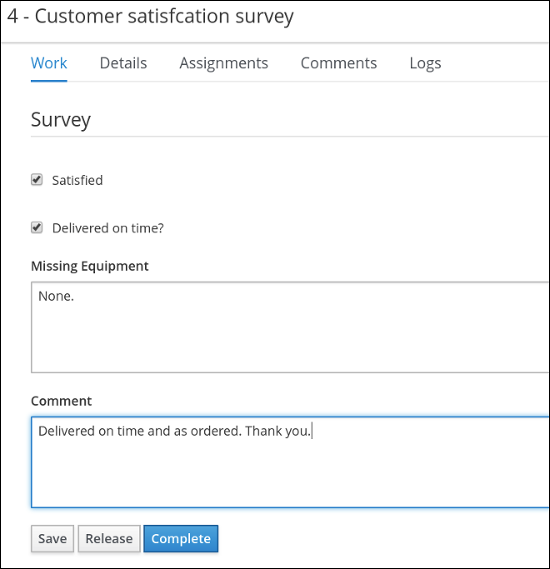
-
Click Complete.
-
Go to Menu → Manage → Process Instances and open the Order for IT hardware process instance.
-
Open the Diagram tab. This shows that all required case process nodes are complete and there is nothing left to do for this case instance.
-
Refresh the Showcase page and note that there are no actions under In progress.
-
-
In Showcase, type a comment in to the field under Comments. Click
 to add the comment to the case file.
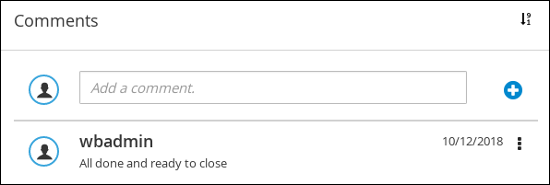
-
Click Close in the upper-right corner of the Showcase page to complete and close the case.
20. Process Management
20.1. Management Screens Overview
Before we get into the details for the different management concepts, let’s explore the common features available in all areas. We consider this kind of view as a set of visualization parameters that modify which items can be displayed and what information should be shown.
Common features include:
-
Columns to be shown
-
Items by page
-
Sorting by column criteria
-
Restrictions over the displayed items list provided by:
-
Quick filter creation
-
Saved filters management.
-
-
General actions shared by all item list like 'Refresh'
-
Specific actions depending on each screen.
We find here different areas with different purposes: Filtering, general section configuration and specific view parameter setting in the data grid presentation:
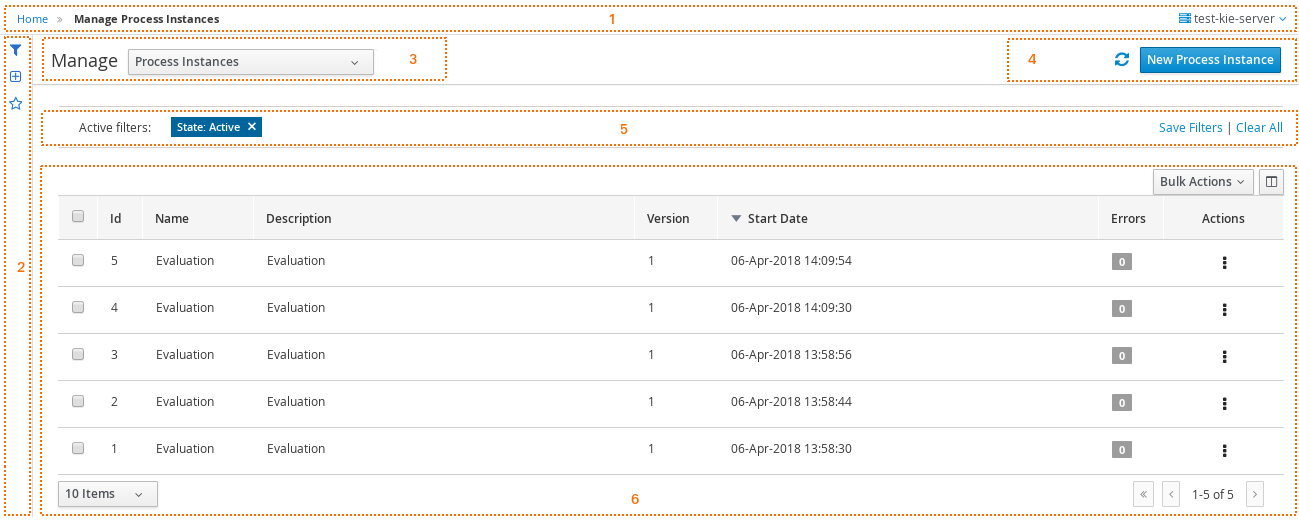
-
(1) Breadcrumb area: Contains breadcrumbs and the server configuration selector.
-
(2) Filters area: Contains a dock for basic filter creation, a dock for advanced filter creation and a dock with saved filters. The docks are placed in the expandable panel on the left side of the screen. The selections made inside any of the docks are immediately reflected in the table on the right. That panels can be expanded or collapsed using the standard Business Central docks controls.
-
(3) Manage screen selector. The drop-down offers navigation to the all manage screens: Process Definitions, Process Instances, Tasks, Execution Errors and Jobs have been created. This selector allows the user to switch process admin screens quickly and easily.
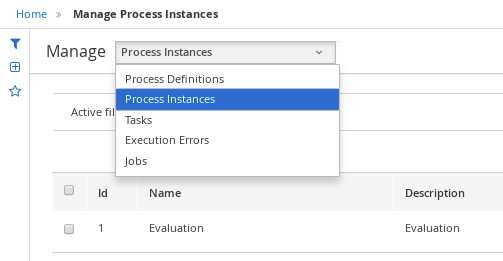
-
(4) Toolbar area. This toolbar has been designed to contain each screen specific actions and provides different kinds of visualizations: icons for common actions like 'Refresh' that are self-explained, buttons for primary actions and it’s prepared for containing kebab with a list of available actions.
-
(5) Filter status area. Shows the currently applied filters and provides options to clear individual filters or to clear them all. The user has the ability to save the currently applied filter as a new saved filter, which becomes available in Saved filters dock (see Filters area)
-
(6) The list table area.
20.1.1. Table preferences
By default, table preferences are persisted according to changes made by users. That includes, adding or removing columns as well as changing the number of items to be displayed for each result page.
20.1.1.1. System level preferences
Users with the Edit Global Preferences permission are able to define the default pagination option to be used for all users under the Manage items ( Process Definition, Process Instances, Tasks, Jobs and Execution Errors ) and Task Inbox. The new preference ( Process Administration ) is available in the global settings page and after a new default is applied it is effective for all users which still do not have a custom preference saved for these items.
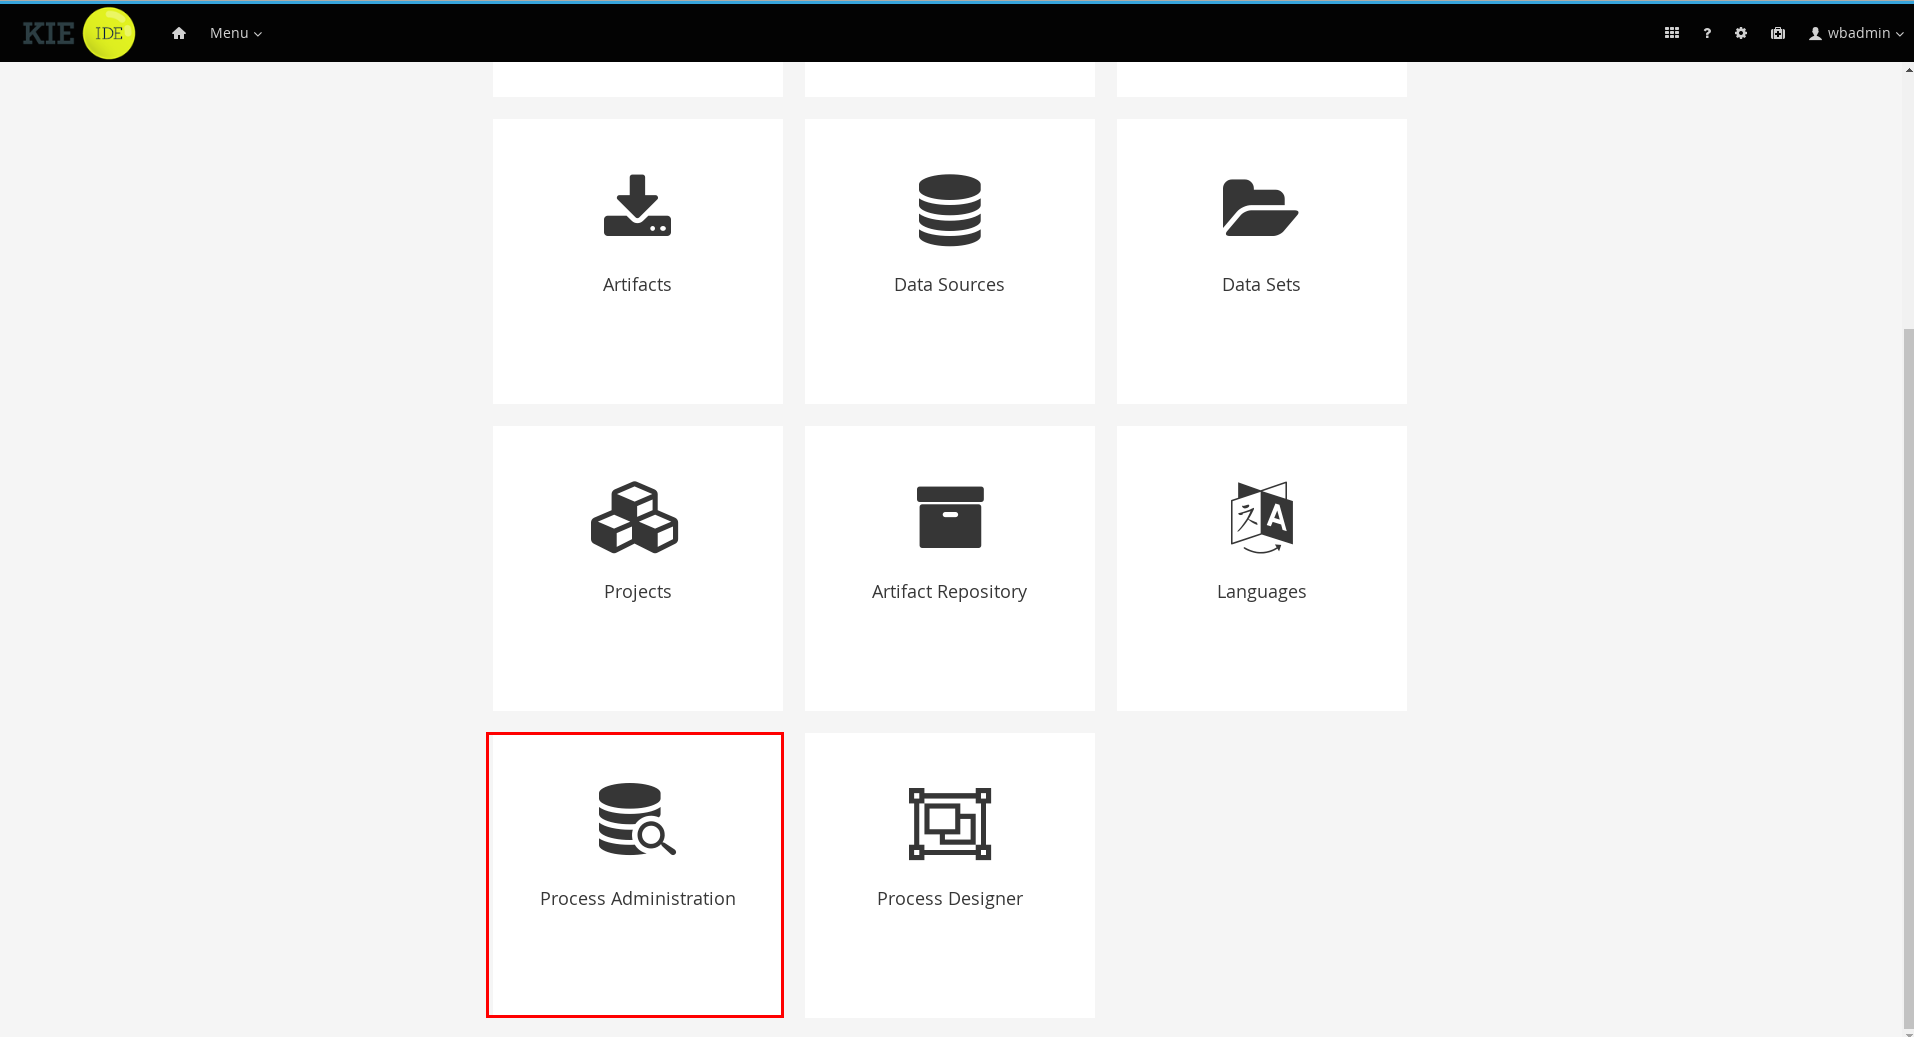
20.1.2. Filter dock
Contains a set of available filters to create quick filters over the left side panel list. Allows you to quickly find data related to Process Instances, Jobs, Tasks and Execution Errors. A set of pre-defined filters are defined into the related views. The user is able to restrict the data by adding new active filters. This can be done by either selecting values from the dropdown list or providing values to the different attributes in the input box.
You will notice that the data is filtered as you add or remove any of the active filters.

There are different types of filters:
— Checkboxes (state and errors on the image):
Allow to select multiple values for one specific field. Any action on checkbox generate and applies that restriction on the active filter.
— Filter by:
Dropdown with the available fields to filter. Depending on the kind of field the input box have different allowed values (numeric or any text)
— Dropdown filled with specific values. (ie: in this process instances list it is filled with the available Process names)
— Date fields filter:
Once of the filter box is selected a list of date predefined filters like 'Last Hour', 'Today',.. are displayed, and also the possibility of define a custom range of dates
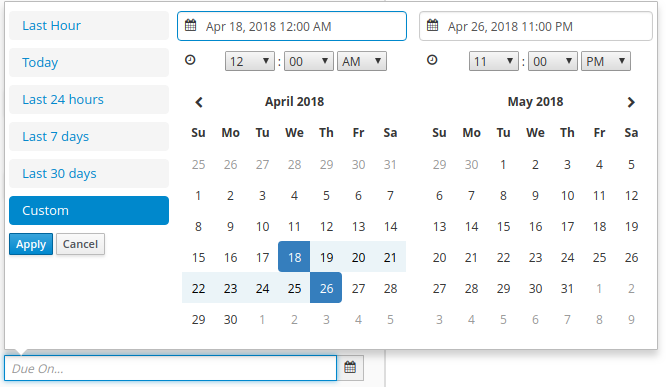
20.1.3. Advanced filter dock
Provides the ability to create more complex filters, allowing to select any item (process instance, task,..) field available (not only the pre-defined provided at 'Filters') and defining more complex restrictions. Any advanced filter have to be identified by the name and once it is saved it will be included at saved filters to be re-used. When the user is creating an advanced filter, parameters related with the new filter like the name, description and the filter restrictions can be introduced in this space.
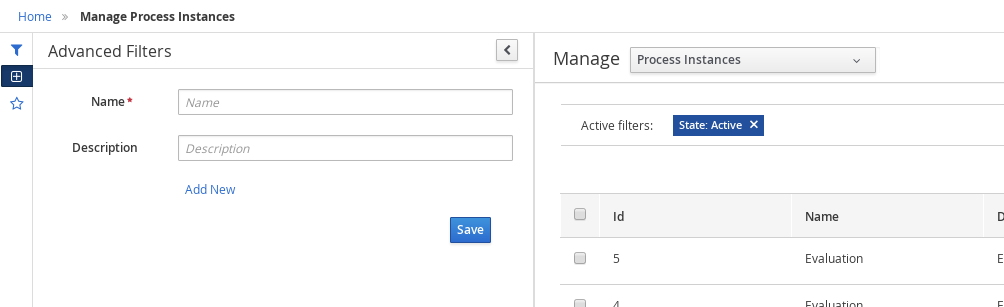
If the view has to include a restriction over a specific column, then the link 'Add new' has to be selected. A drop down list with all the columns to create restrictions
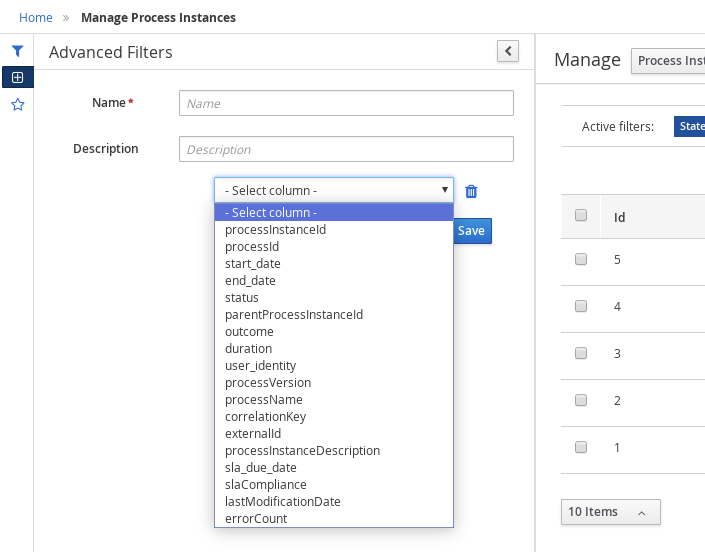
Once the column is selected, depending on its type, a new dropdown list is opened with the kind of restrictions available for the selected column and the necessary form to add them.
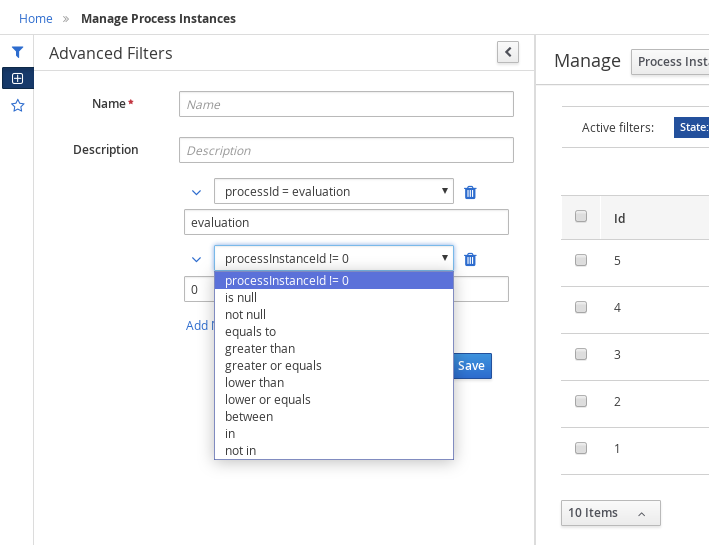
One filter can include a list of different conditions over different columns and the editor allows remove each one by clicking the trash button near them
Once the view creation parameters are defined, the 'Save' button launches the defined filter saving and applying that on the list.
20.1.4. Saved Filter dock
The 'Saved filters' dock allows manage the stored filters: It present a list with the current stored filters
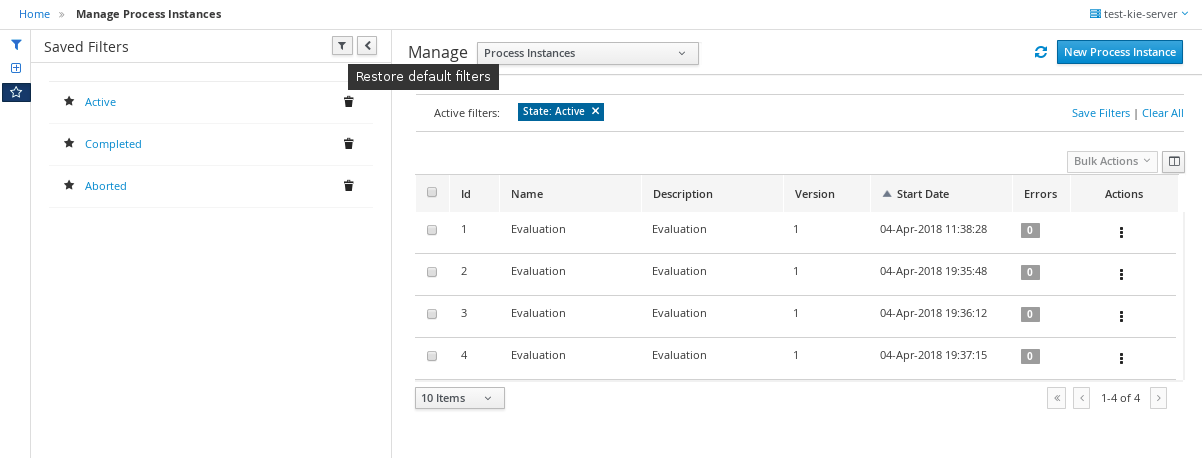
-
Filters can be deleted
-
The defaults filters can always be restored as in the previous version with the 'Restore default filters' button.
-
Filters can be applied: When a user selects one filter, that is applied on the current list and the 'Active filters' displays the restrictions contained in that filter.
-
The user has the ability to modify/complete filters and save it to be reused later. The new way to save filter is selecting 'Save filters' at 'Active filters' area. A name for the new saved filter is requested and a new filter with the current restrictions is added to 'Saved filters' list.
It’s not allowed to have filters with the same name. When the user tries to save a filter with an existing name, currently an error is shown.
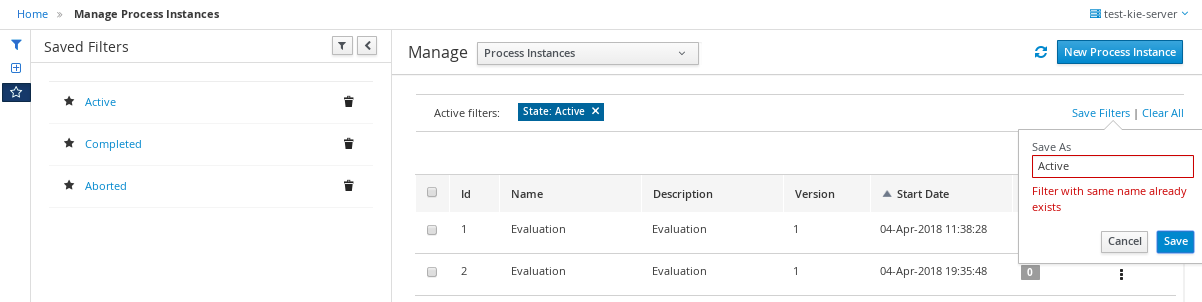
20.1.5. The list table area
In this area can be done:
-
Specific view configuration like. selecting visible columns, specify the number of items by page. In this area the user can change dynamically the view editable parameters like visible columns, set the sorting column (ASC/DESC) or set the number of items to show on a page.
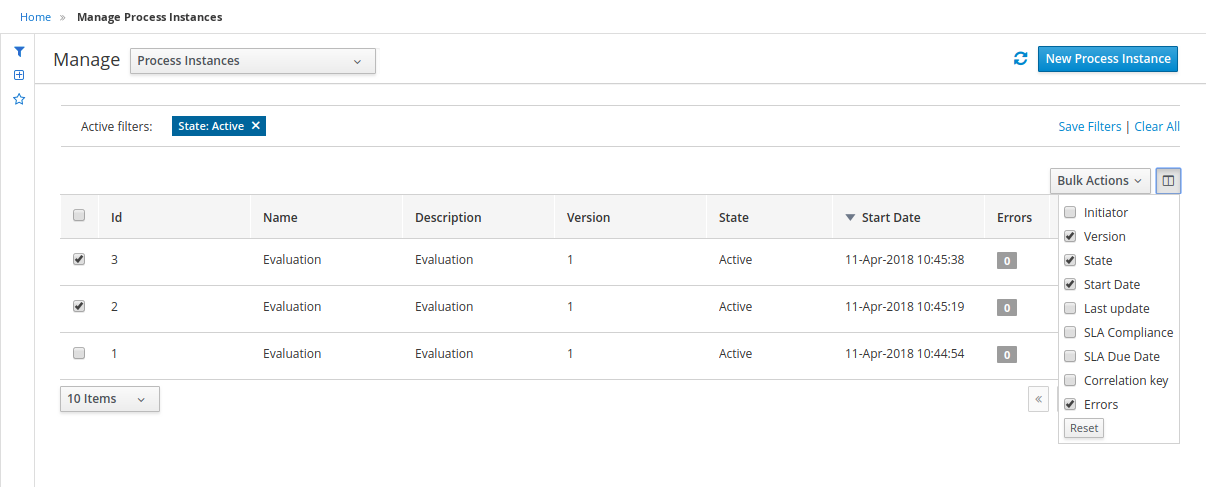
The number of items to show in a page can be configurable too, from the page size dropdown list
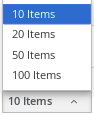
-
Bulk actions in some of the management screens like Process Instances, Execution errors the possibility of bulk action is provided over the selected items. In this case the available actions are 'Abort' or 'Signal'
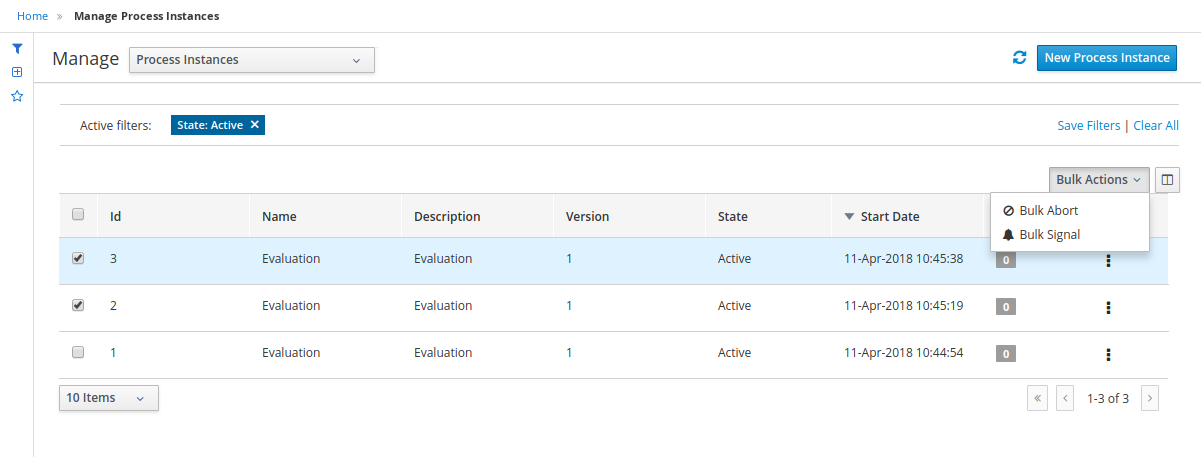
-
Perform actions on individual list item using the kebab button control. When there are more than one available actions the kebab groups the available actions. There are different areas at kebab: primary actions first and separately the navigation to other screens ones.

20.2. Process Management
This chapter describes the screens related to the creation and management of process definitions and process instances.
Once you have modelled, configured all the technical details and build and deployed your projects containing your business processes you should be able to see all the available process definitions in the Manage Process Definitions section. For all the process definitions listed in there you will be able to inspect the Process Definition details and start as many Process Instances as needed. The following sections describes most features available to manage process definitions and process instances from Business Central. You can find these screens under the Manage menu: Process Definitions or Process Instances, in Business Central.
You can find the source code related to the process definition and instances screens in the jbpm-wb-process-runtime module. Feel free to report issues, send Pull Requests and get in contact with the team via comments in github.

20.2.1. Process Definitions Management
The process definition section is composed by two main screens: the Process Definition Lists and the Process Definition Details.
20.2.1.1. Process Definition List
The process definition list shows all the available process definitions that were deployed into the platform. Look at the Deployments section for more information about how to check all the deployment units available in the platform runtime.
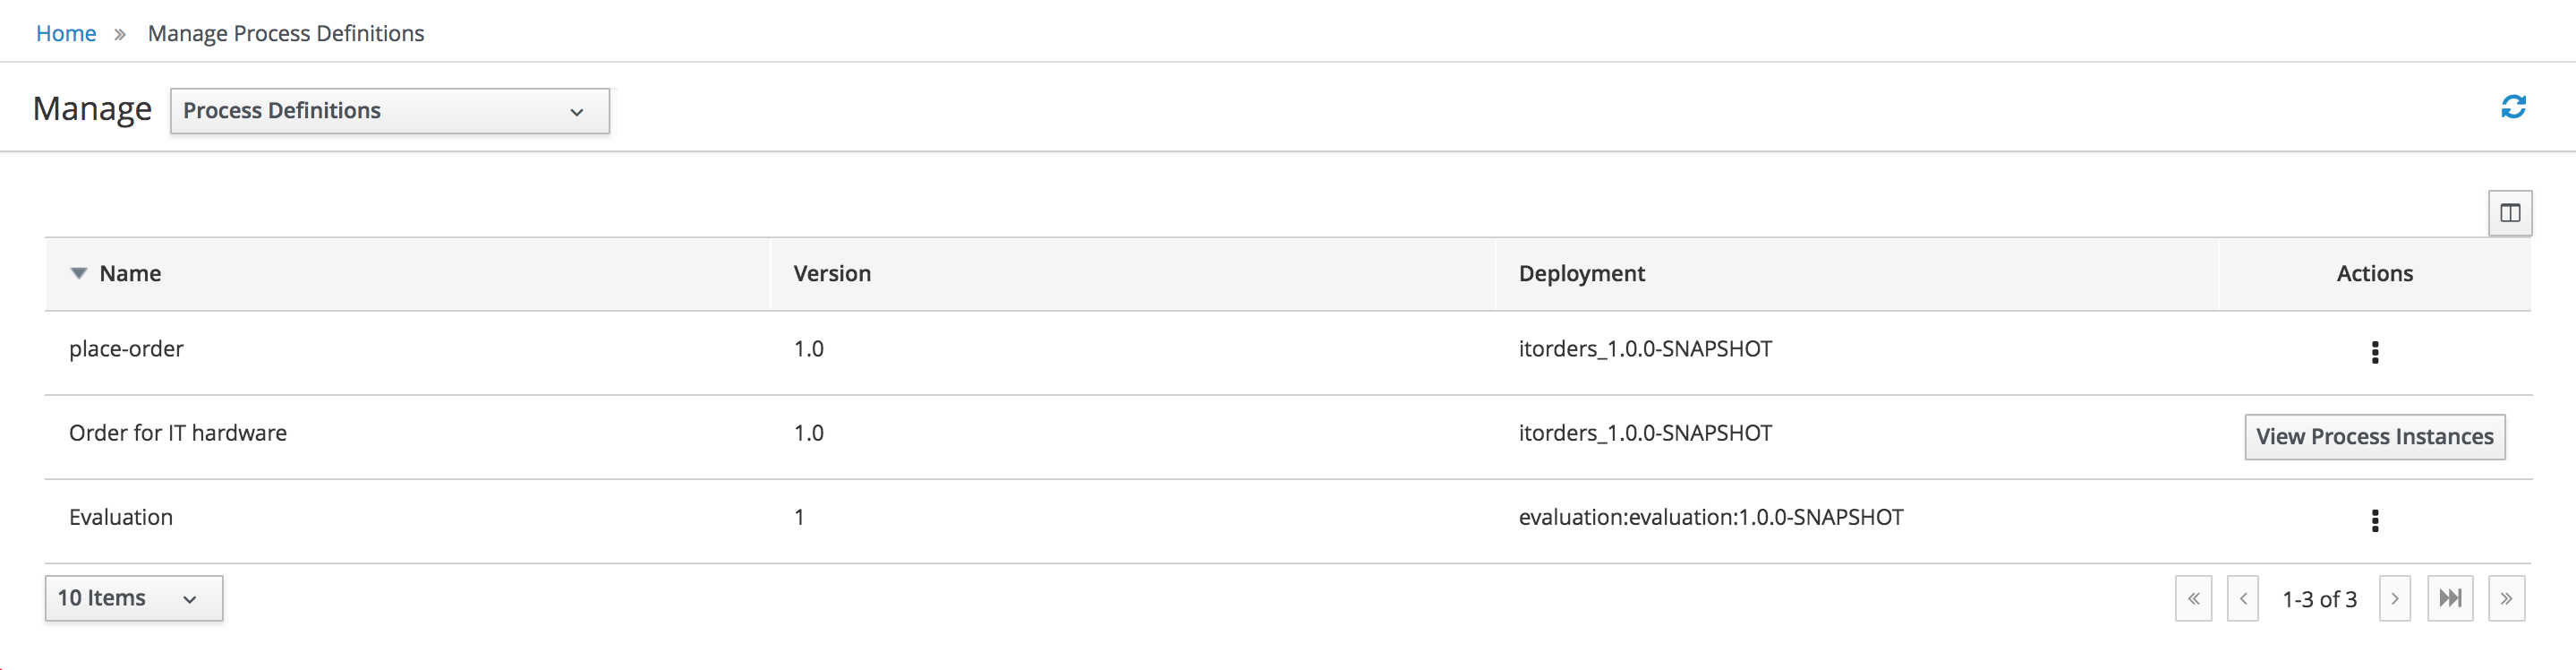
You can click on the items in the list to access the details of the process definition. You can also look at all the process instances for the selected process definition selecting 'View Process Instances' action.
20.2.1.2. Process Definition Details
The process definition details shows all the available information about the process definition. You can consider this screen as a brief about the process model. You can quickly see if there is a Sub Process associated with it, or how many users and groups are participating in the selected definition.
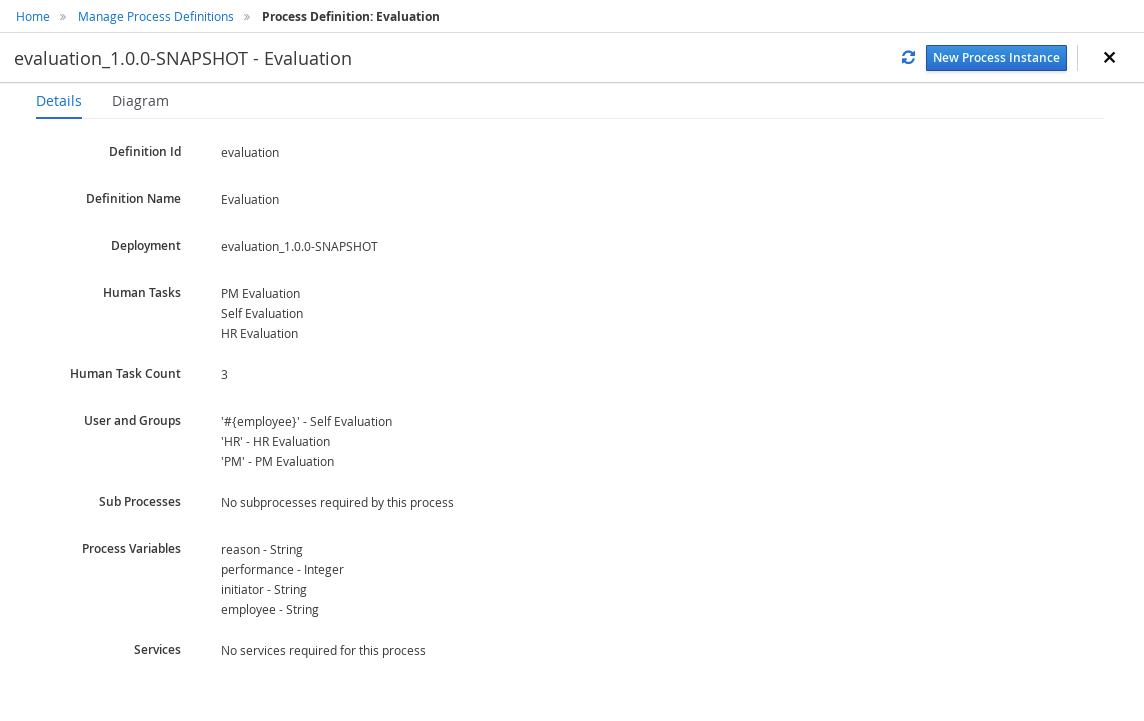
Notice that you can View the Process Model (Read Only mode) selecting 'Diagram' tab .
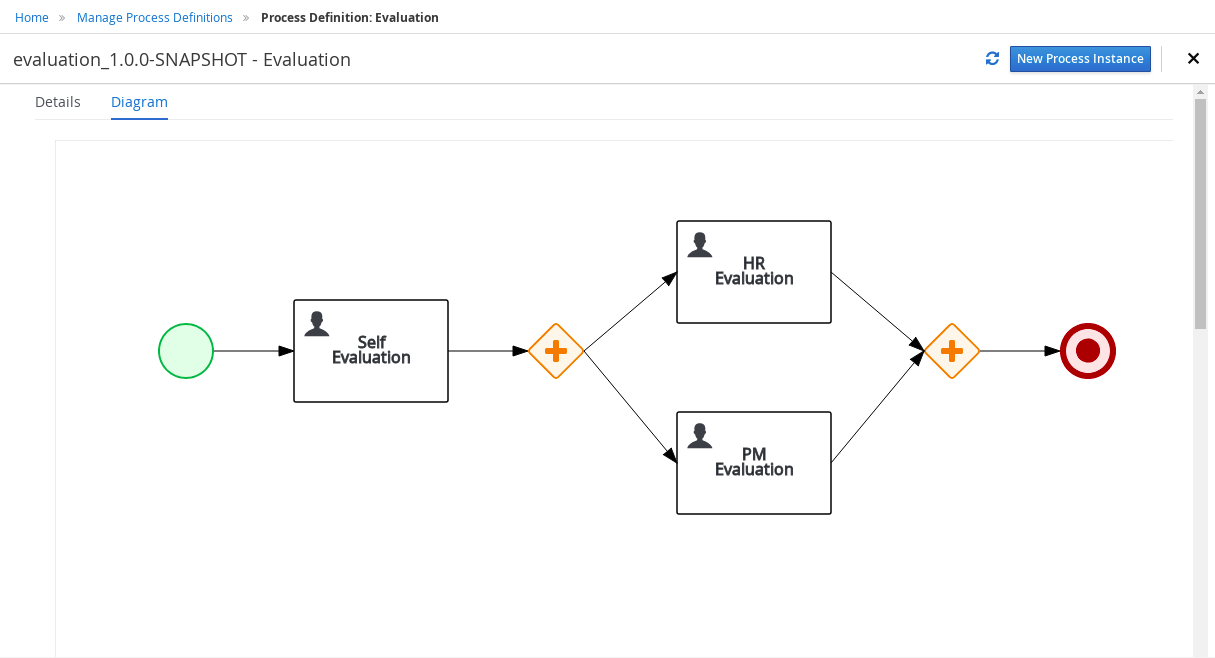
20.2.1.3. Creating new Process Instances
You can create new Process Instances from the Process Definition List (Action Column), from the Process Definition Detail view or from the Process Instance section.
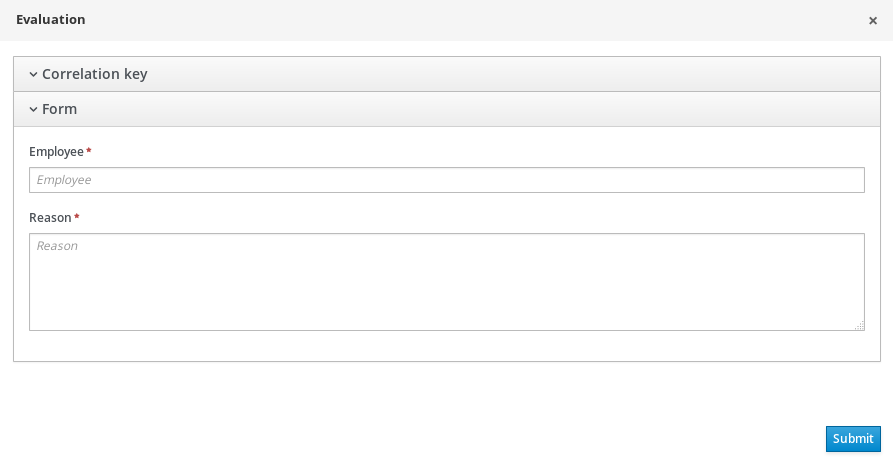
When you create a Process Instance usually a Form will be presented to introduce the information required by the process to be started. Once you complete the required information and click the Submit button, the instance will be created and the details of the Process Instance will be displayed on top of the Process Definition Details.
20.2.2. Process Instances Management
The process instances section is composed by two main screens: the Process Instance Lists and the Process Instance Details. In this case the Process Instance Details provides several tabs with the runtime information related with the process.
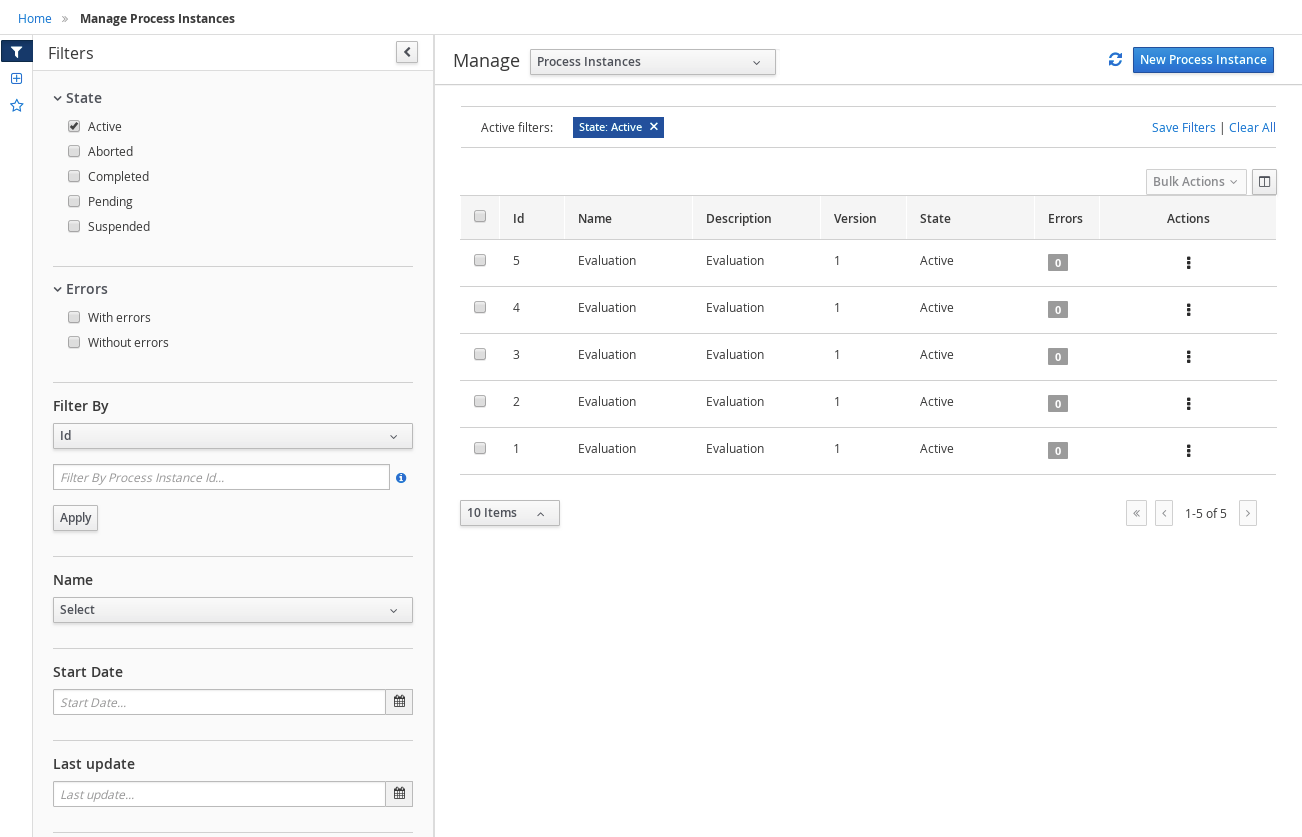
Each row inside the process instance list represent a running process instance from a particular Process Definition. Each execution is differentiated from all the others by the internal state of the information that the process is manipulating. In order to inspect this information you can click in each row to see the process instance details in full screen mode.
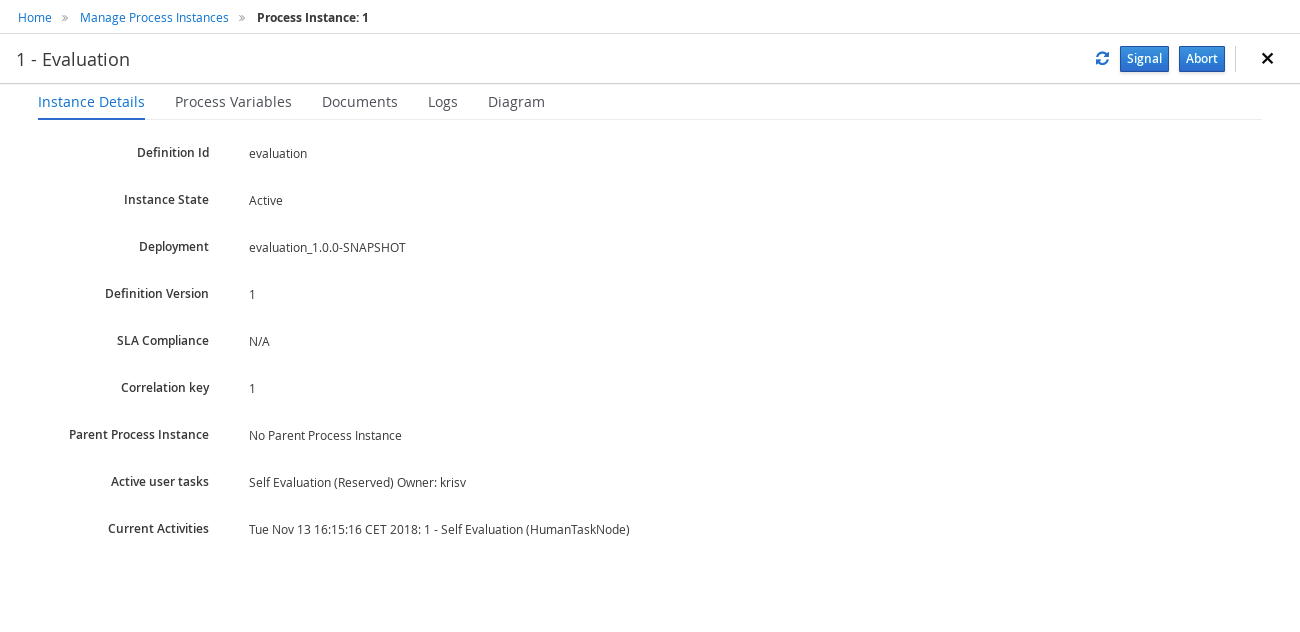
20.2.2.1. Specific actions
The user can perform the following specific action over the process instances:
-
Navigate to related tasks
-
Navigate to related jobs
-
In case there are related errors, navigate to them
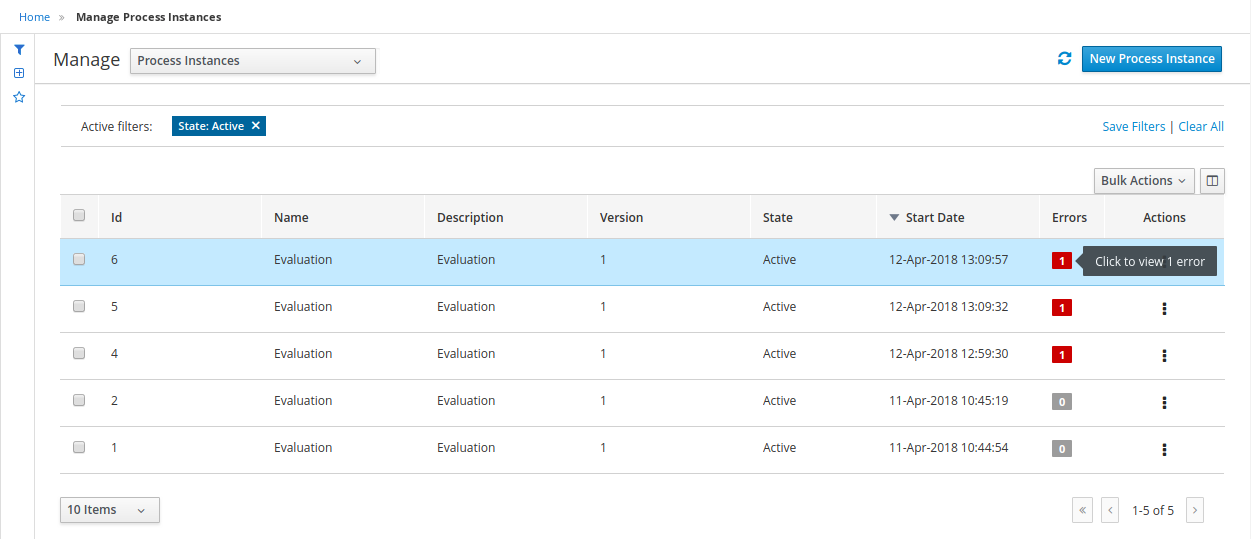
-
Abort process instance(s). This action requires a double confirmation before aborting the instance(s).
-
Signal process instance(s). When the action signaling a process instance is performed, a popup is opened asking for the signal name and signal data. (When this signal is done in a bulk action, the defined signal is used for all selected process instances.
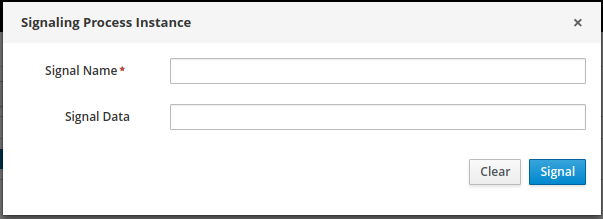
20.2.2.2. Displaying Process Instance variables
There is a specific restriction that makes the process instance list view to behave differently. This happens when a filter over the column 'PROCESSID' is defined.
Users can simply select any Process Id from the quick filter section or alternatively, create a new Advanced Filter.
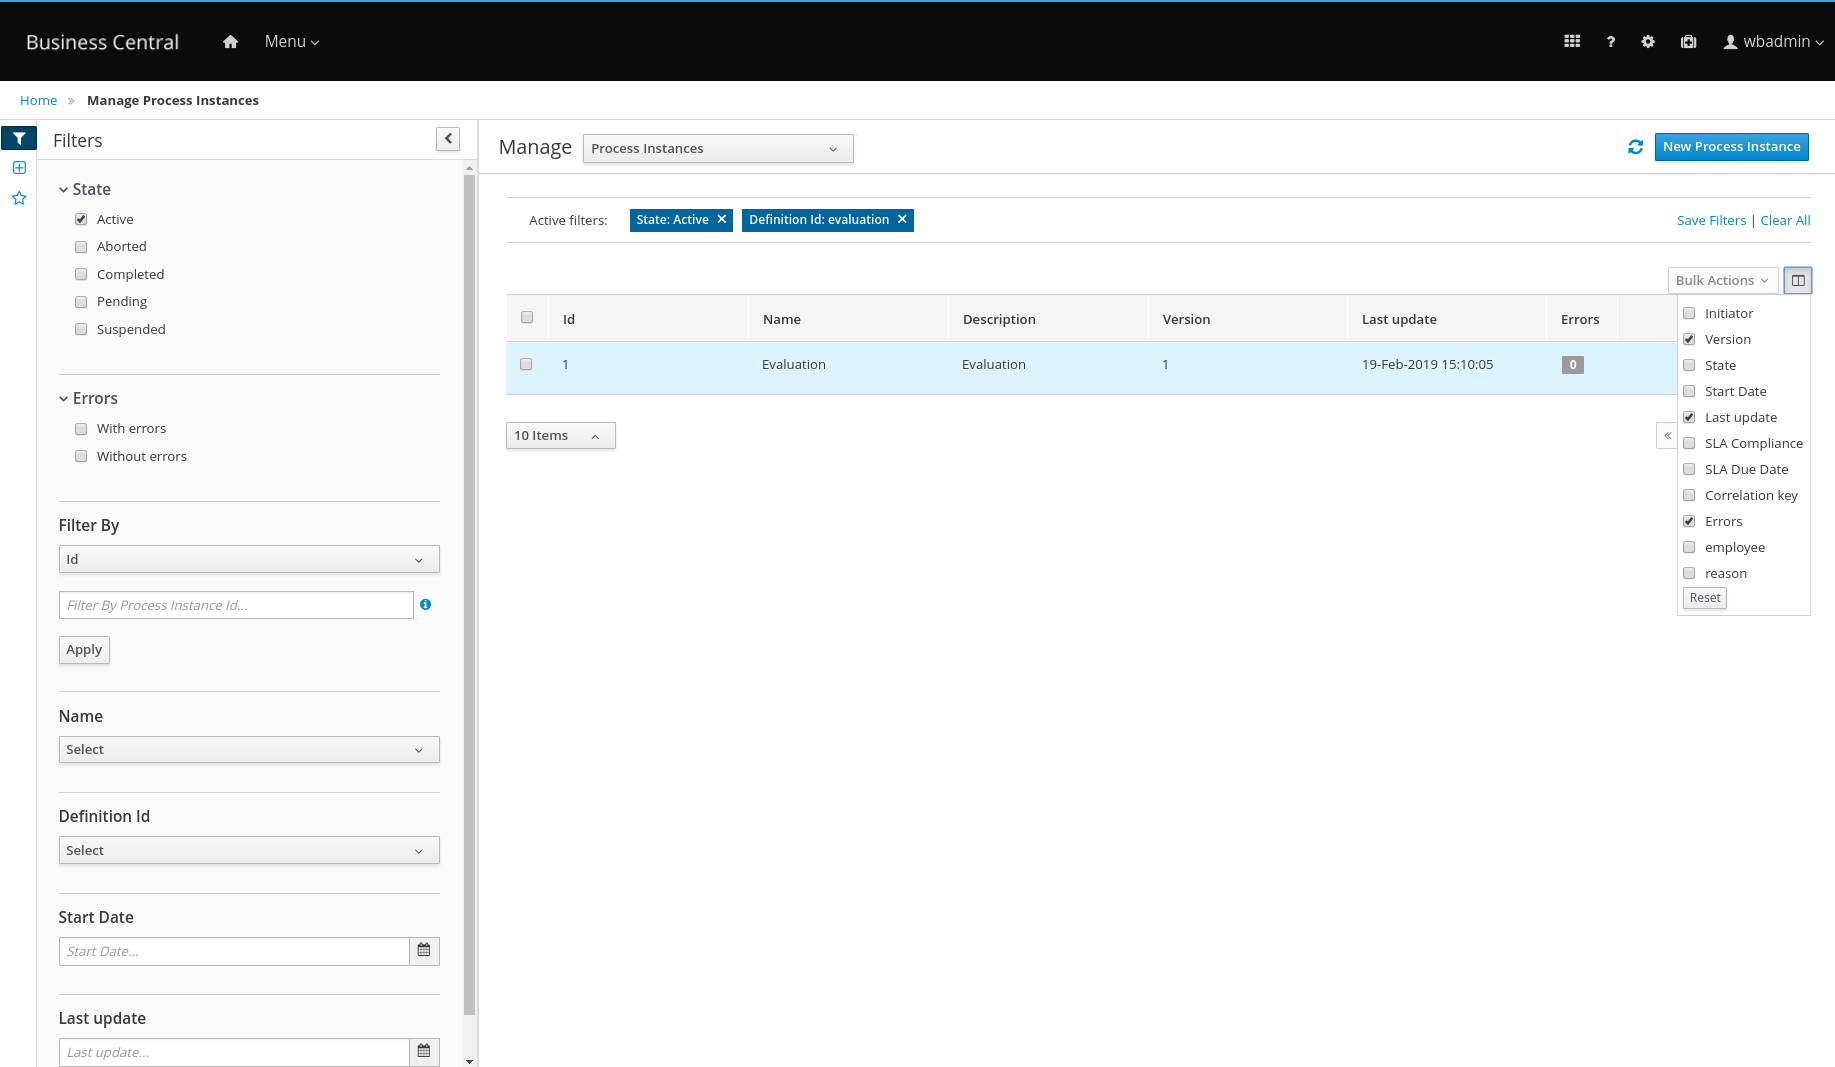
In this case, the columns available to show have been incremented with the specified process variables which have value. The user can then, view process instance variables from a specific process id, in the same grid of the process instances.
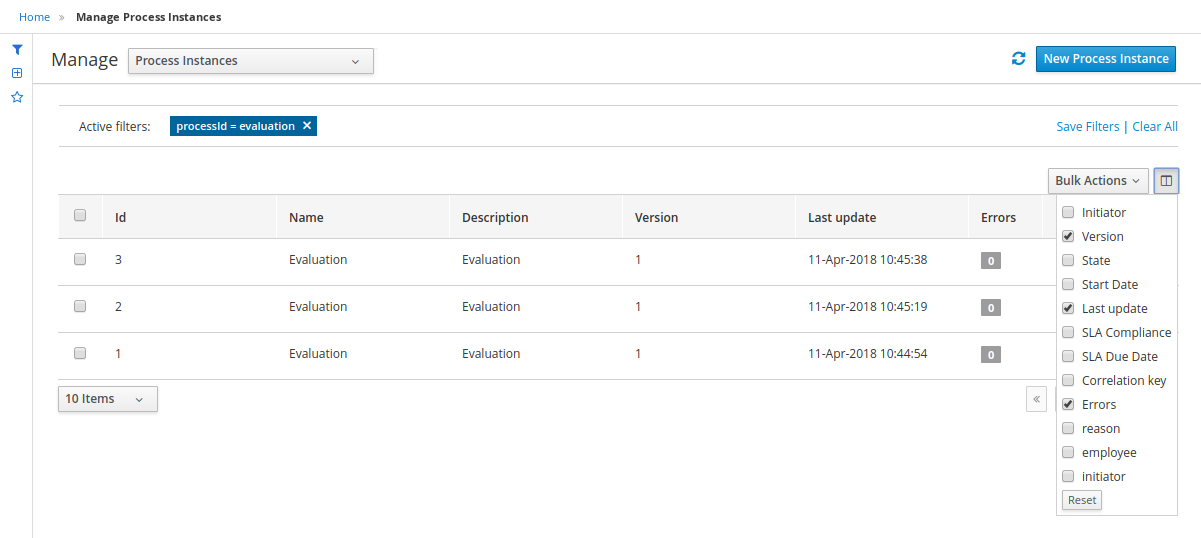
20.2.2.3. Process Instance Details
Let’s go through the different tabs to see what kind of information is provided:
As you can see the Instance Details tab gives you a quick overview about what is going on inside the process. This is by showing the current state of the instance and also the current activity that is being executed. The Process Variables tab displays all the process variables that are being manipulated by the instance with the exception of the variables that contains documents.
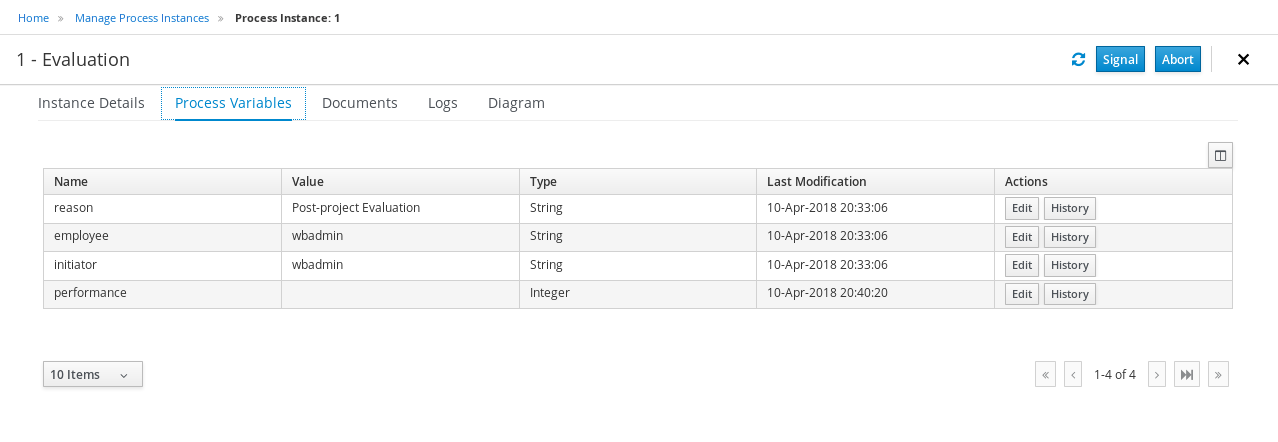
If the process contains a variable of the type: org.jbpm.Document it will be listed in the Documents tab, for easy access, download and manipulation of the attached documents. Please note that at this point you cannot attach new documents to currently running instances, but this feature will be added in future versions. See JBPM-7572.

The Logs tab allows users to easily visualize the events related to a specific process instance based on a timeline Node entered events are highlighted in blue whereas completed ones have a grey out indication.
By default, the latest 10 events are presented in the timeline but users can load more data all the way back to the starting point of the process instance.
This tab also provides filtering capabilities that allow users to narrow down the timeline results according to their needs. There are two filter categories that allow the user to filter process instances logs based on event types such as either Node Entered or Node Completed or process nodes types, such as Human Task, Start and End nodes,..
When the event is related to a Human task, a link to 'Details' appears to show the basic task data.
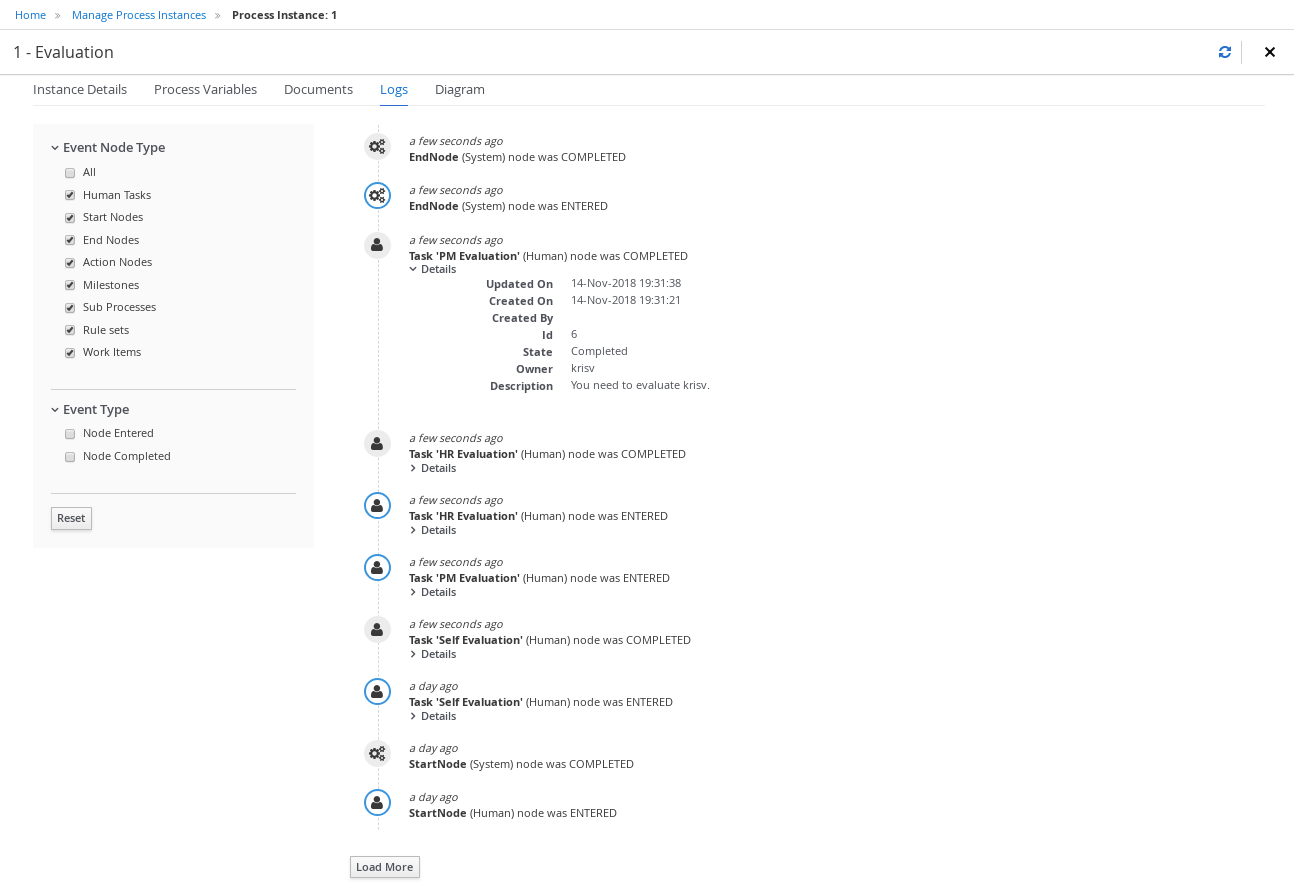
Finally, to complement the process logs you can open the Diagram tab that shows the completed activities in grey and the current activities highlighted in red.
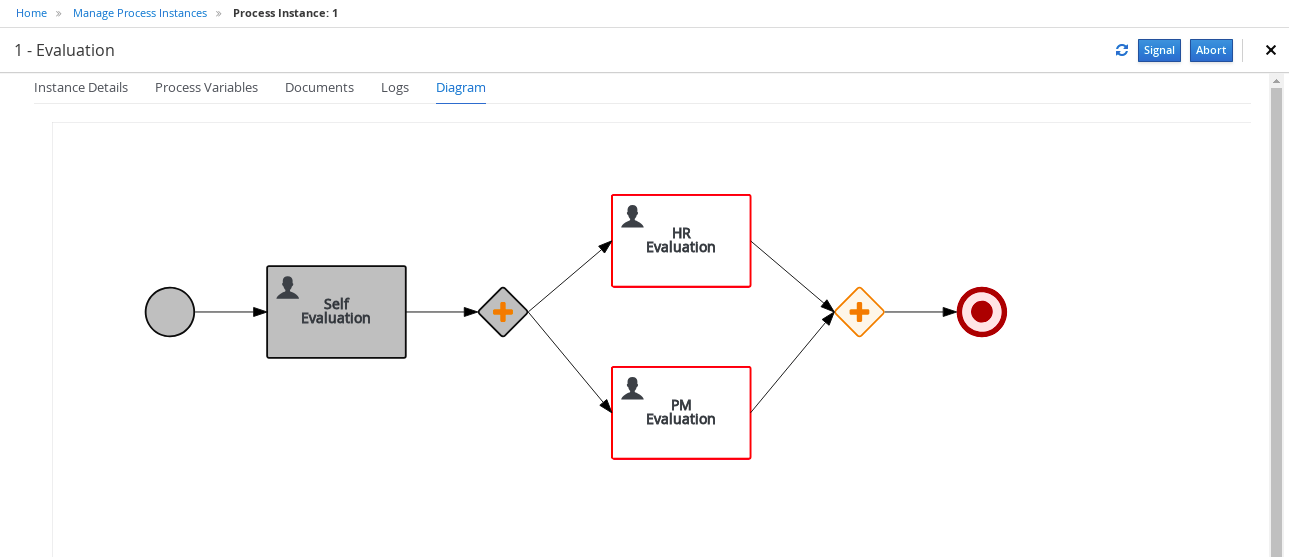
20.3. Tasks Management
This chapter introduces the Task Management screens and its integration with the Form Modeller component to allow users to work on their assigned tasks. You can find the source code of these screens here. Feel free to report issues, send Pull Requests and get in contact with the team via comments in github. At the end of this section you will find a technical description about how to customize these views.
Designed to be used by task and business process administrators, which can manage tasks belonging to other users and see extra task management data like related execution errors.
The Task management is available in the main menu under Manage then Tasks:

In this screen the management screens selector is included to allow to navigate to the other management screens described in Process Instance List section. In this list there is a column showing the related errors, that in case there are any related execution errors allow to navigate to them.
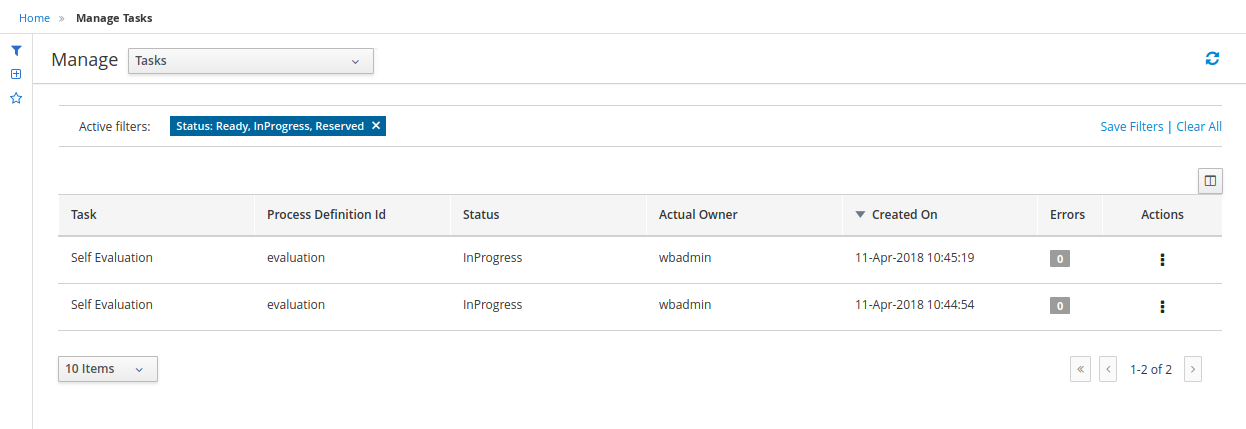
By default, this page is only available for users with Business Central roles admin and process-admin.
20.3.1. Tasks visible to the current user
The tasks which are displayed on the tasks page are determined by the current user permissions. When the user has been declared (via system property) as 'task admin user' or belongs to the tasks administrators group, this list shows all tasks. Otherwise, if the user is not declared as a business administrator, this list will show only the tasks where the user have been declared business process administrator.
By default the system associates all tasks to the user |
| Notice that the mentioned roles and group configurations are related to the KIE Server, not to Business Central (in case they have separate user configurations). |
20.3.2. Task Inbox
This screen not belongs to the management group, but have been designed following the same patterns but for being used, by any user (not administrator) to track the tasks. For this reason, the management screens selector is not included.
Every user with access to the platform will have access to its personal task inbox where tasks assigned to him/her will be displayed. Each user will be able to create its own personal tasks or work on tasks that were created as a result of a business process execution.
You can access to the user Task List accessing Tasks Inbox main menu:

20.3.2.1. Tasks visible to the current user (Personal and Group Tasks)
Pending tasks for each user will be displayed in their task list screen. Notice that you will not be able to see assigned tasks from another user different from the one that is currently logged in.
The list will show all the tasks that match with the defined restrictions ordered by the columns presented. You can change the default ordering clicking on the column header. This view offers a more traditional BPM Task List view where you can sort the data based on different columns.
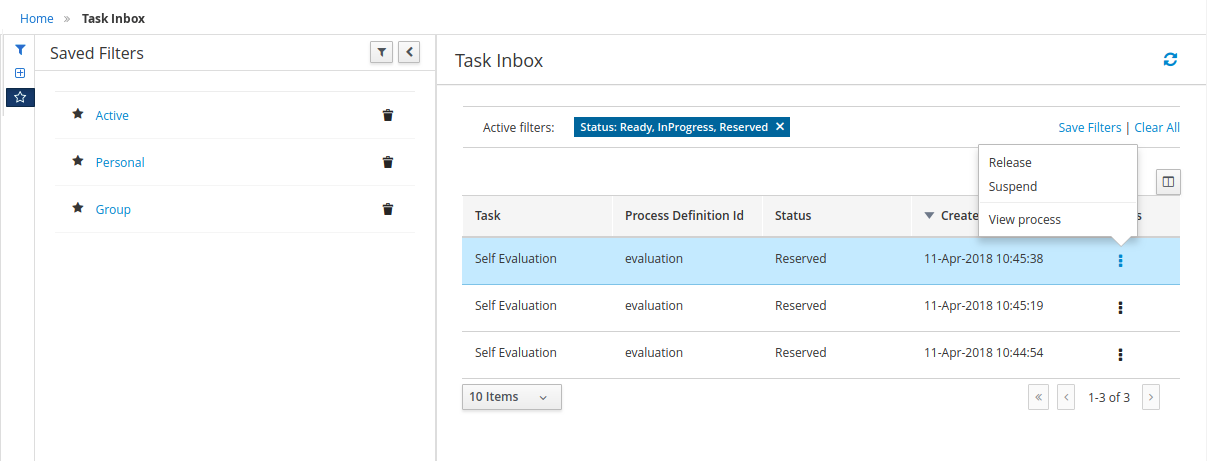
Here appears again the concept of view versus just filtering as we explained in the process instance list. The default filters have the following restrictions over the tasks to show:
-
Active: all the Active tasks that user can work on. That means Personal and Group Tasks.
-
Personal: all the personal tasks that already belong to the user.
-
Group: all the group tasks that needs to be claimed by the user in order to start working on them. It will show completed tasks as well with the exception of completed tasks that belongs to a process that is already finished. In such cases the tasks are cleaned up after the process is completed and for that reason they will not be displayed.
Specific actions in Tasks Inbox.
The user can perform the following specific action over the task:
-
Task available actions depending on it’s status: Claim, release,..
-
Navigate to related processInstance
|
The user can always restore the default filters selecting the option 'Restore default filters' on Saved filters dock |
20.3.2.2. Task Details
You can access to the Task Details by clicking in a task row. The details associated with a task can be changed, like for example the Due Date, the Priority or the task description.
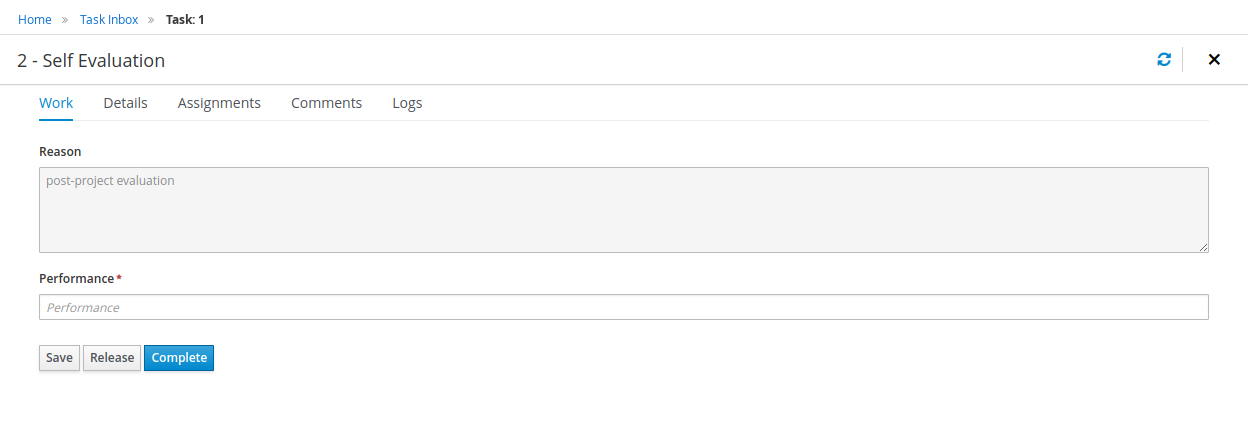
The task details appear in a new region with different sections that allow view the task associated information:
Work In this tab the associated form is displayed if the task has one. In this section is where the user can interact with the process, executing the available actions in each moment.
Details Here the basic task data is accessible: priority, status, description, data related with the process instance associated.
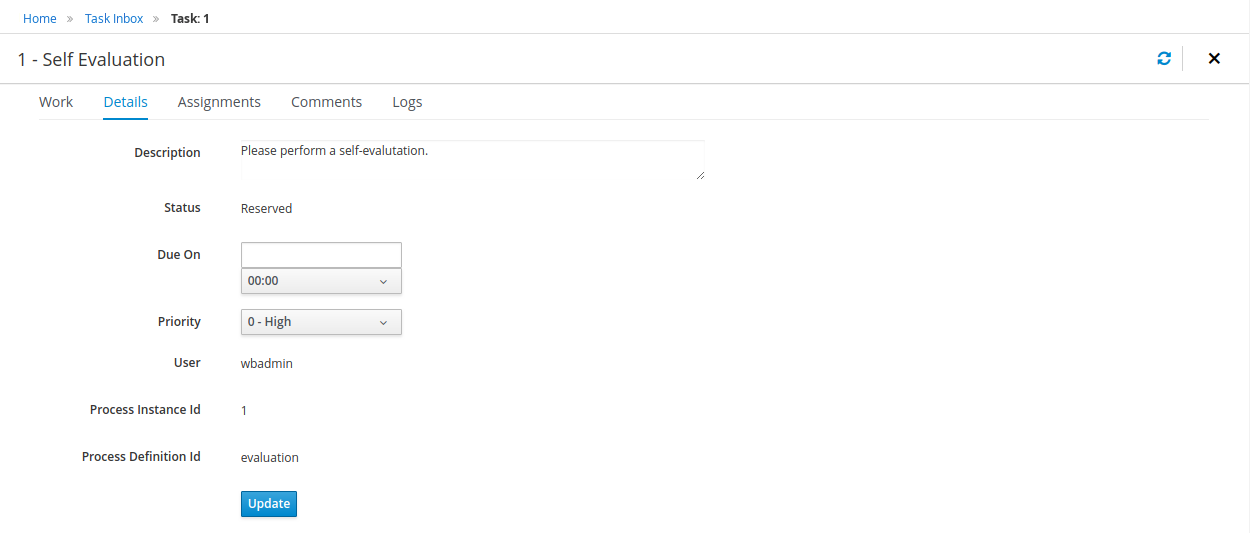
Assignments The Task Assignments tab allows you to delegate the task to another person or group if you are not able to continue working on it.
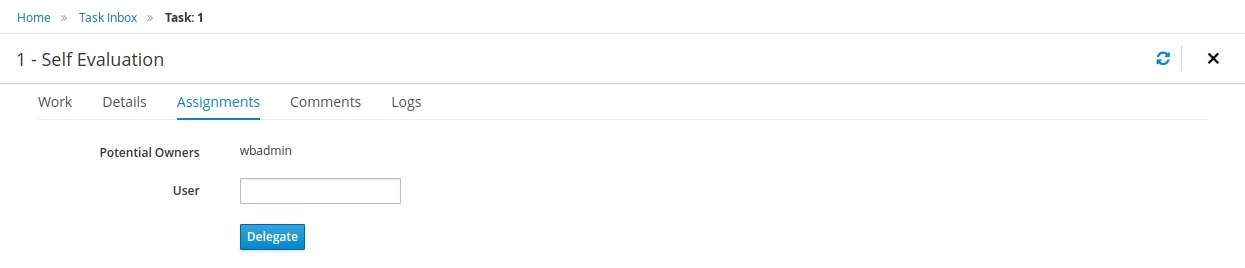
Comments You can also add while you are working on a task comments about the progress.
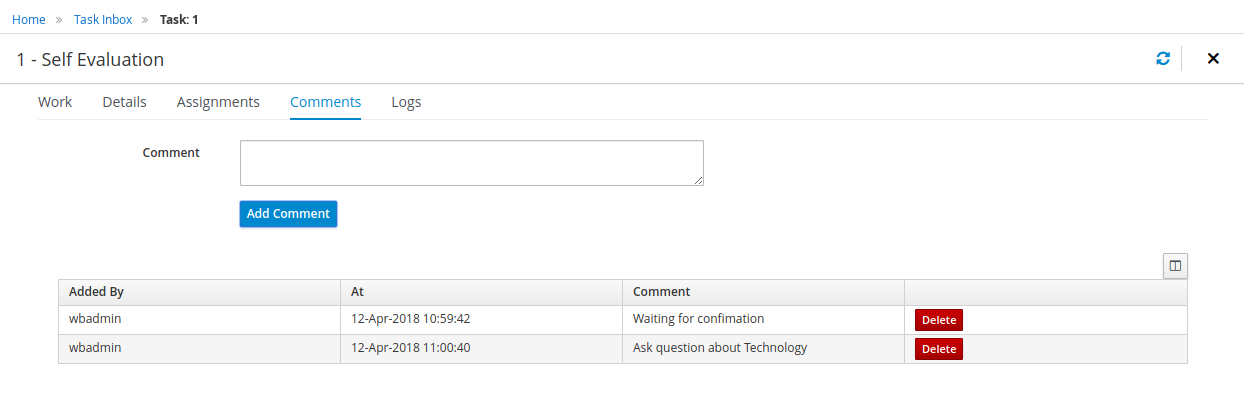
Logs allows users to easily visualize the events related to a specific task based on a timeline. Events are highlighted in blue to indicate a transition in the Task lifecycle for events like 'Claim' and 'Start' and have a grey out highlight to indicate the completion of the task or a user releasing it.
By default, the latest 10 events are presented in the timeline but users can load more data all the way back to the task creation.
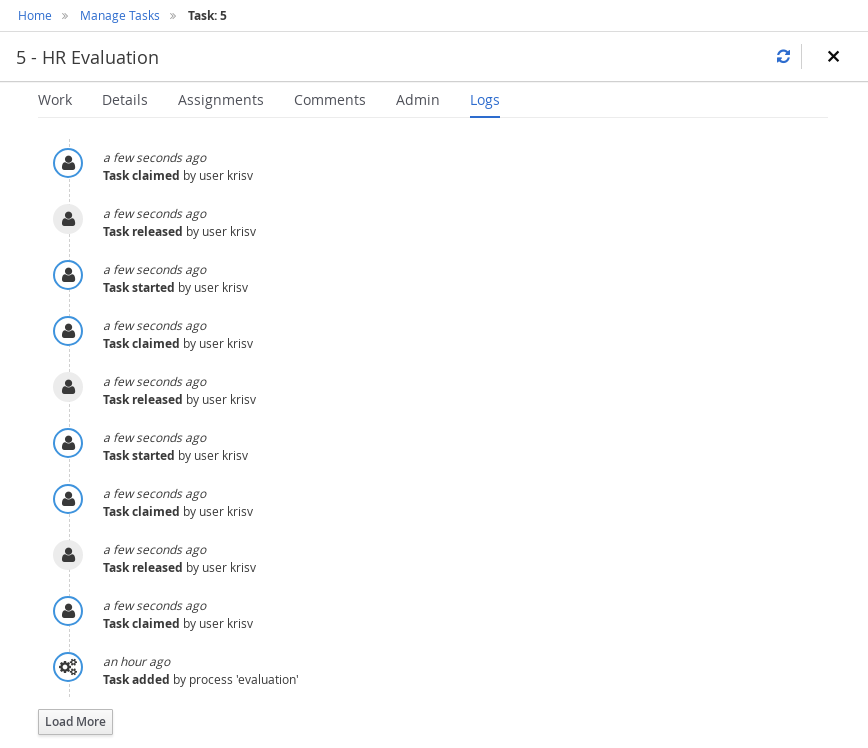
Admin This tab only appears when the user is a business process administrator, it allows to forward the task to another user or send a reminder to the actual owner
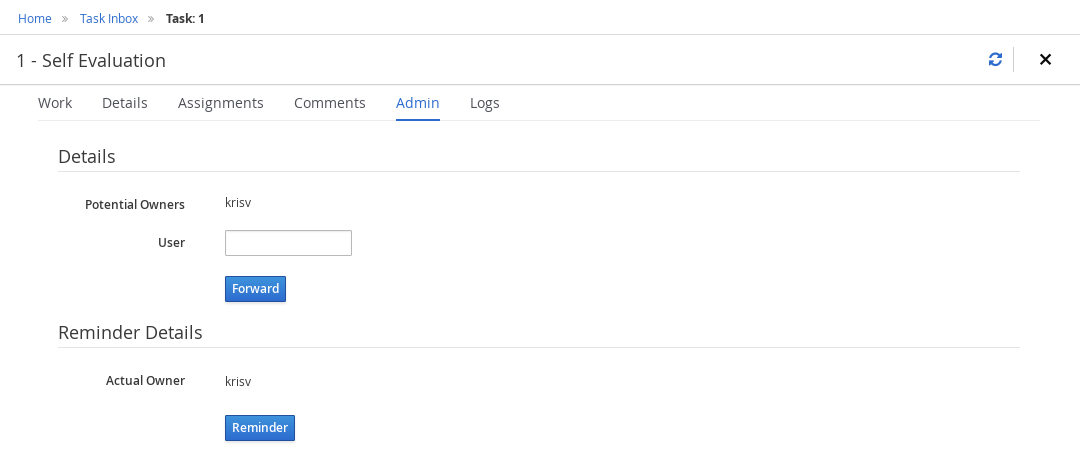
20.3.2.3. Work on a Task
Tasks can have associated a Form to store data. If tasks are part of a Business Process, usually some data needs to be collected and propagated to the business process for further usage. For that reason, tasks has to provide a way to gather and store data. Forms can be created for specific tasks using the Form Modeller. If no form is provided a dynamic form will be created based on the information that the task needs to handle.
20.3.2.4. Task Forms generated by the Form Modeller
As part of your projects you can model your forms for your human tasks, providing a rich interface for collecting data. This shows the Form Modeller canvas while designing the previously Task Form.
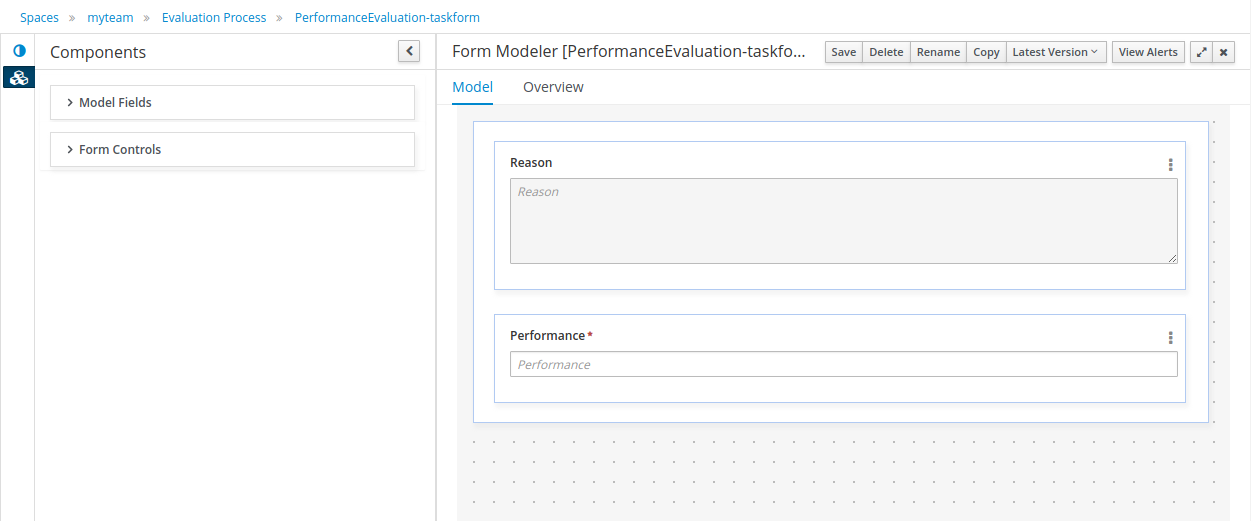
20.3.2.5. Available actions for a Task.
The user can perform the following specific action over the task:
-
Task available actions depending on it’s status: Claim, release,..
-
Navigate to related processInstance
-
In case there are related errors, like in the process instance list, navigate to them.
20.3.3. Displaying Task variables in Task Inbox and Manage Tasks
As previously explained in the process instance list, this screen has been designed as a Console Management list view, providing content to the 'Filter' and 'Saved Filters' docks working over task items.
The user can create a specific filter that provides domain specific columns to be added to a task list.
Users can select any Task Name from the quick filter section or alternately, create a new Advanced Filter to display task variables as additional columns.
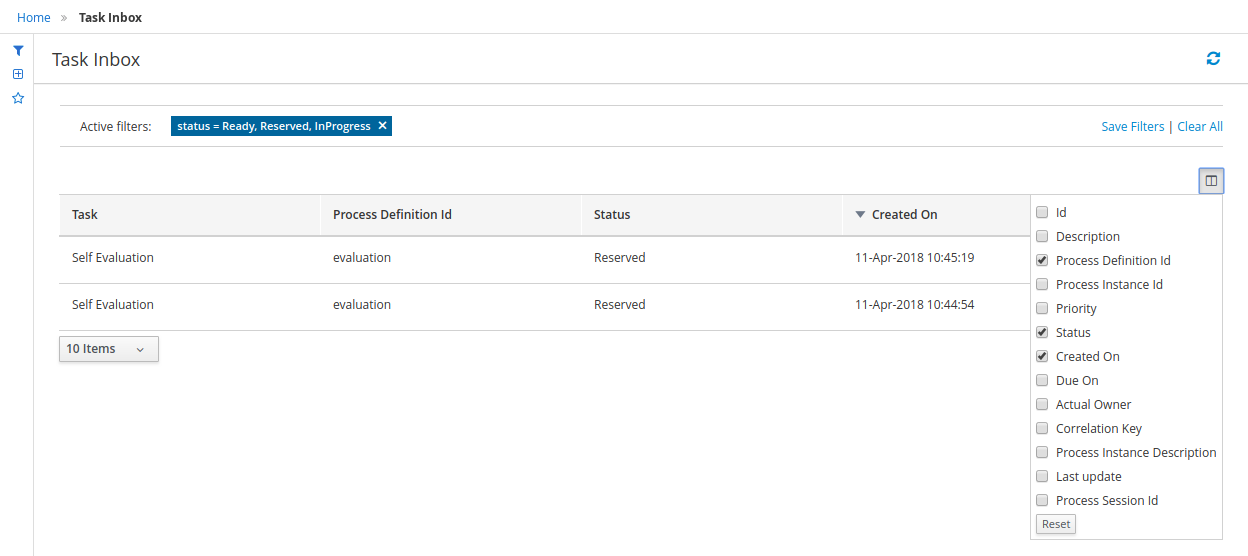
The custom filter that activates the capability to display task variables as columns is set a filter with the restriction Name="taskName".
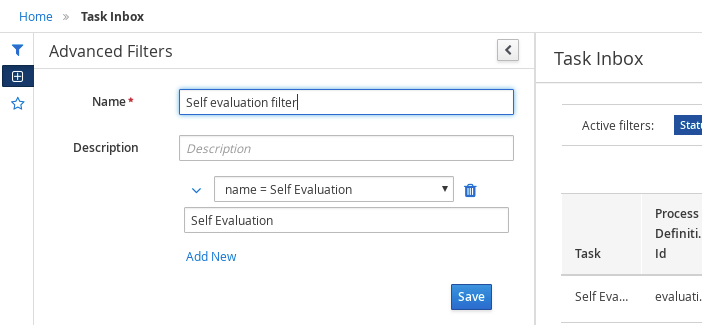
When the filter with the restriction over a specific task name is applied, the task associated variables appear as a selectable columns, to the task list.
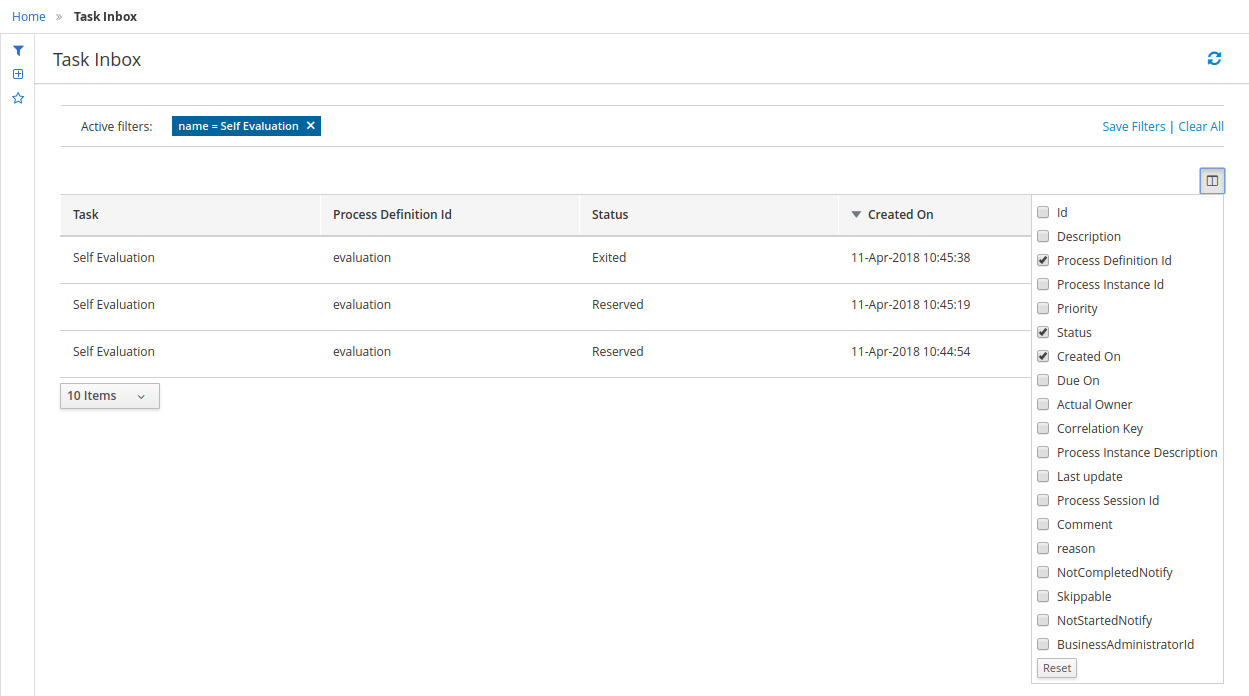
20.4. Jobs Management
The Jobs page allows you to monitor and trigger Asynchronous Jobs scheduled to the jBPM Executor Service. You can access to the Jobs option from the Manage top level menu of Business Central.

The Jobs List shows all the Jobs that were scheduled and their status. The Filter on top of the table helps the administrator to monitor the Jobs execution and take corrective actions in case of Failure. Check the jBPM Executor section of the documentation for more information.
20.4.1. Bulk actions
The jobs list provides now a way to perform actions over multiple jobs, in a single operation. After one or more jobs are selected from the list, the bulk actions menu becomes available, with all supported actions. The available operations in this screen are 'Cancel' and 'Requeue'. If that operation is not allowed, regarding the job status, over any of the selected item, a notification is displayed and the operation is not executed on that item.
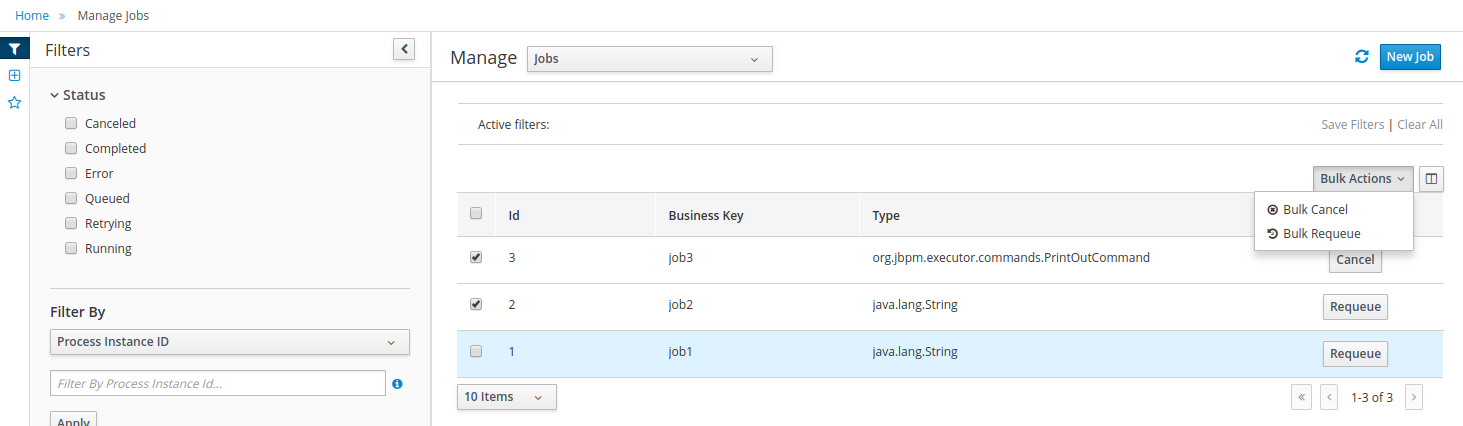
Administrators can also manually schedule new Jobs from the User Interface via the New Job option. By specifying the command class name and the parameters needed to run the command a new Job can be scheduled to run immediately or at a later time. Any job created manually, will not be associated with any process instance. Notice also that the Due Date parameter allows the execution to be deferred for a later time in the future. If the Due Date is set to Run now, the jBPM Executor Service will execute the command as soon as there is an Executor Thread available. The number of retries will help the command to be executed more than once if it fails. This can help in situations when the business logic requires an external service to be called where the runtime cannot rely on that service to be available 100% of the time.
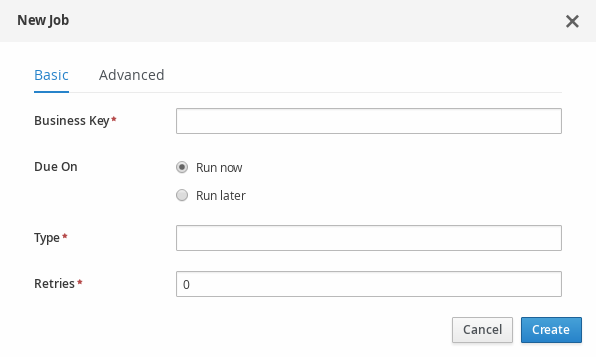
20.5. Execution Errors Management
This view allows to explore and acknowledge the generated execution error. It follows the same Console Management list view structure and behaviour, providing its own quick filters like error type, acknowledged or not, id and more.
You can access execution errors management through Execution Errors main menu:

The Execution Errors view shows the list of execution errors. The purpose of this list is to equip administrators with tools to track down the errors that might have happened during execution. The errors have two basic states: Acknowledged or New, which helps the administrator to keep track of new events in the system which need higher attention.
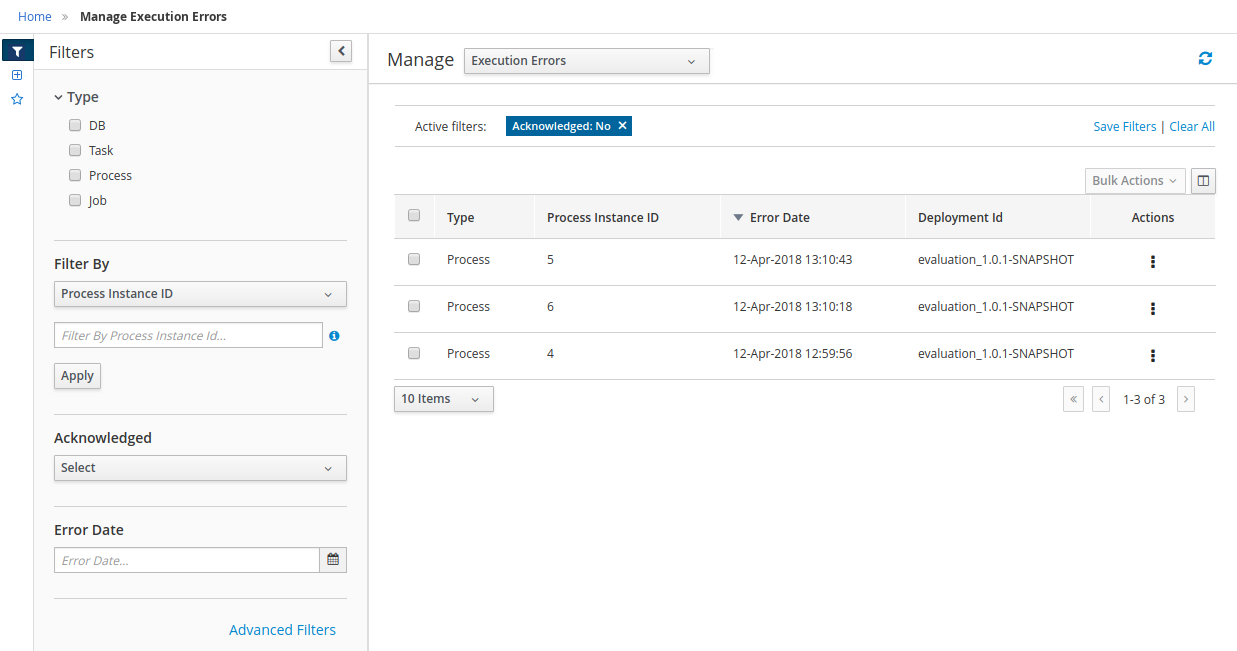
This view also provides a set of predefined saved filters: New (pending of acknowledgement), and Acknowledged.
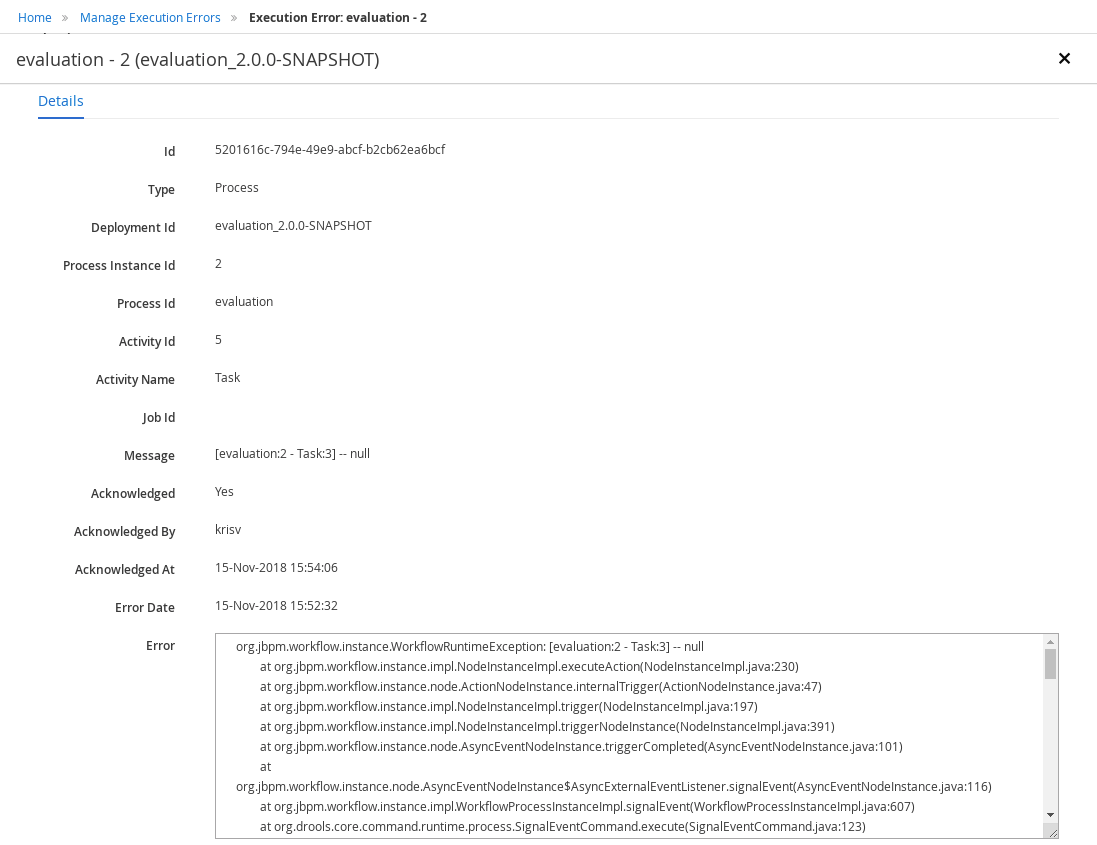
An error item have the basic data of the happened error like the error Date, the source of the error ( Job, Process, Task or Database) and also provide the error trace to help the administrator to know what happened and how to fix it.
20.5.1. Specific actions for Execution Errors.
-
Acknowledge the error if it’s not acknowledged.
-
Navigate to related processInstance, task, job depending on the error type
-
Bulk Acknowledge. You can acknowledge the unacknowledged errors by selecting the related error action. To acknowledge multiple errors at once, select all the errors you wish to acknowledge and use the 'Bulk Acknowledge' button.
21. Forms in Business Central
A form is a layout definition for a page, defined as HTML, that is displayed as a dialog window to the user during process and task instantiation. Task forms acquire data from a user for both the process and task instance execution, whereas process forms take input and output from process variables.
The input is then mapped to the task using the data input assignment, which you can use inside of a task. When the task is completed, the data is mapped as a data output assignment to provide the data to the parent process instance.
21.1. Form Modeler
jBPM provides a custom editor for defining forms called Form Modeler. With Form Modeler, you can generate forms for data objects, task forms, and process start forms without writing code. Form Modeler includes a widget library for binding multiple data types and a callback mechanism to send notifications when form values change. Form Modeler uses bean-based validation and supports binding form fields to static or dynamic models.
Form Modeler includes the following features:
-
Form modeling user interface for forms
-
Form auto-generation from the data model or Java objects
-
Data binding for Java objects
-
Formula and expressions
-
Customized forms layouts
-
Forms embedding
Form Modeler comes with predefined field types that you place onto the canvas to create a form.
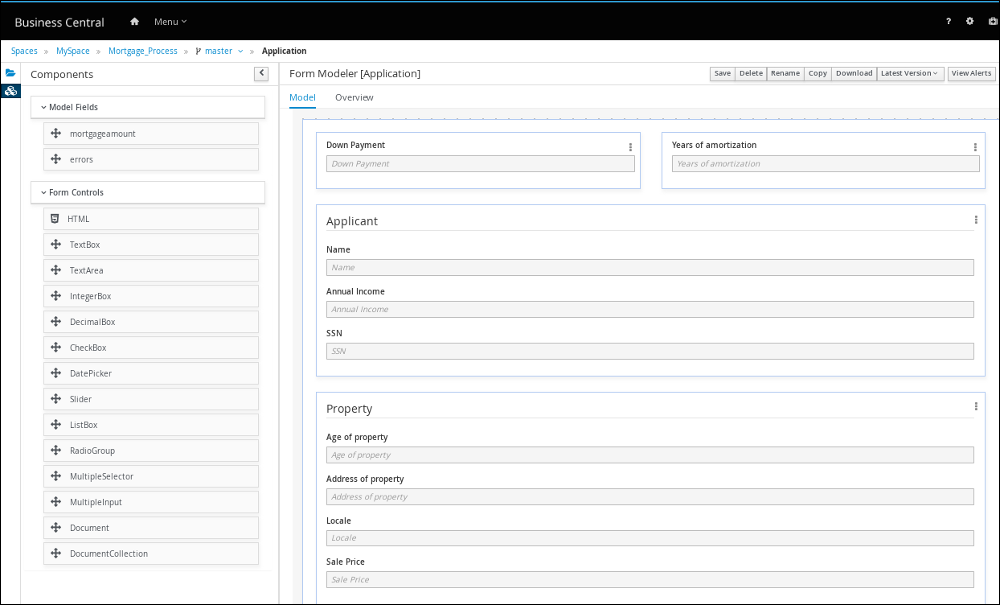
21.2. Generating process and task forms in Business Central
You can generate a process form from your business process that is displayed at process instantiation to the user who instantiated the process. You can also generate a task form from your business process that is displayed at user task instantiation, when the execution flow reaches the task, to the actor of the user task.
-
In Business Central, go to Menu → Design → Projects.
-
Click the project name to open the asset view and then click the business process name.
-
In the process designer, click the process task that you want to create a form for (if applicable).
-
In the upper-right toolbar, click the Form Generation icon and select the forms that you want to generate:
-
Generate process form: Generates the form for the entire process. This is the initial form that a user must complete when the process instance is started.
-
Generate all forms: Generates the form for the entire process and for all user tasks.
-
Generate forms for selection: Generates the forms for the selected user task nodes.
 Figure 237. Form generation menu
The forms are created in the root directory of your project.
-
-
Go to the root directory of your project in Business Central, click the new form name, and use the Form Modeler to customize the form to meet your requirements.
21.3. Manually creating forms in Business Central
You can create task and process forms manually from your project asset view. This is another way to generate a form without selecting to generate forms from your business process. For example, the Form Modeler now supports creating forms from external data objects.
-
In Business Central, go to Menu → Design → Projects and click the project name.
-
Click Add Asset → Form.
-
Provide the following information in the Create new Form window:
-
Form name (must be unique)
-
Package name
-
Model type: Select either Business Process or Data Object.
-
For the Business Process model type, select your business process from the Select Process drop-down menu, and then select the form that you want to create from the Select Form drop-down menu.
-
For the Data Object model type, select one of your project data objects from the Select Data Object from Project drop-down menu.
-
-
-
Click Ok to open the Form Modeler.
-
In the Components view on the left side of the Form Modeler, expand the Model Fields and Form Controls menus and create a new form by dragging your required fields and form controls to the canvas.
-
Click Save to save your changes.
21.4. Document attachments in a form or process
jBPM supports document attachments in forms using the Document form field. With the Document form field, you can upload documents that are required as part of a form or process.
To enable document attachments in forms and processes, complete the following procedures:
-
Set the document marshalling strategy.
-
Create a document variable in the business process.
-
Map the task inputs and outputs to the document variable.
21.4.1. Setting the document marshalling strategy
The document marshalling strategy for your project determines where documents are stored for use with forms and processes. The default document marshalling strategy in jBPM is org.jbpm.document.marshalling.DocumentMarshallingStrategy. This strategy uses a DocumentStorageServiceImpl class that stores documents locally in your PROJECT_HOME/.docs folder. You can set this document marshalling strategy or a custom document marshalling strategy for your project in Business Central or in the kie-deployment-descriptor.xml file.
-
In Business Central, go to Menu → Design → Projects.
-
Select a project. The project Assets window opens.
-
Click the Settings tab.
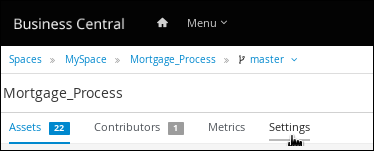 Figure 238. Settings tab
 -
Click Deployments → Marshalling Strategies→ Add Marshalling Strategy.
-
In the Name field, enter the identifier of a document marshalling strategy, and in the Resolver drop-down menu, select the corresponding resolver type:
-
For single documents: Enter
org.jbpm.document.marshalling.DocumentMarshallingStrategyas the document marshalling strategy and set the resolver type to Reflection. -
For multiple documents: Enter
new org.jbpm.document.marshalling.DocumentCollectionImplMarshallingStrategy(new org.jbpm.document.marshalling.DocumentMarshallingStrategy())as the document marshalling strategy and set the resolver type to MVEL. -
For custom document support: Enter the identifier of the custom document marshalling strategy and select the relevant resolver type.
-
-
Click Test to validate your deployment descriptor file.
-
Click Deploy to build and deploy the updated project.
Alternatively, if you are not using Business Central, you can navigate to
PROJECT_HOME/src/main/resources/META_INF/kie-deployment-descriptor.xml(if applicable) and edit the deployment descriptor file with the required<marshalling-strategies>elements. -
Click Save.
<deployment-descriptor
xsi:schemaLocation="http://www.jboss.org/jbpm deployment-descriptor.xsd"
xmlns:xsi="http://www.w3.org/2001/XMLSchema-instance">
<persistence-unit>org.jbpm.domain</persistence-unit>
<audit-persistence-unit>org.jbpm.domain</audit-persistence-unit>
<audit-mode>JPA</audit-mode>
<persistence-mode>JPA</persistence-mode>
<runtime-strategy>SINGLETON</runtime-strategy>
<marshalling-strategies>
<marshalling-strategy>
<resolver>mvel</resolver>
<identifier>new org.jbpm.document.marshalling.DocumentCollectionImplMarshallingStrategy(new org.jbpm.document.marshalling.DocumentMarshallingStrategy());</identifier>
</marshalling-strategy>
</marshalling-strategies>21.4.1.1. Using a custom document marshalling strategy for a content management system (CMS)
The document marshalling strategy for your project determines where documents are stored for use with forms and processes. The default document marshalling strategy in jBPM is org.jbpm.document.marshalling.DocumentMarshallingStrategy. This strategy uses a DocumentStorageServiceImpl class that stores documents locally in your PROJECT_HOME/.docs folder. If you want to store form and process documents in a custom location, such as in a centralized content management system (CMS), add a custom document marshalling strategy to your project. You can set this document marshalling strategy in Business Central or in the kie-deployment-descriptor.xml file directly.
-
Create a custom marshalling strategy
.javafile that includes an implementation of theorg.kie.api.marshalling.ObjectMarshallingStrategyinterface. This interface enables you to implement the variable persistence required for your custom document marshalling strategy.The following methods in this interface help you create your strategy:
-
boolean accept(Object object): Determines if the specified object can be marshalled by the strategy -
byte[] marshal(Context context, ObjectOutputStream os, Object object): Marshals the specified object and returns the marshalled object asbyte[] -
Object unmarshal(Context context, ObjectInputStream is, byte[] object, ClassLoader classloader): Reads the object received asbyte[]and returns the unmarshalled object -
void write(ObjectOutputStream os, Object object): Same as themarshalmethod, provided for backward compatibility -
Object read(ObjectInputStream os): Same as theunmarshalmethod, provided for backward compatibility
The following code sample is an example
ObjectMarshallingStrategyimplementation for storing and retrieving data from a Content Management Interoperability Services (CMIS) system:Example implementation for storing and retrieving data from a CMIS systempackage org.jbpm.integration.cmis.impl; import java.io.ByteArrayInputStream; import java.io.ByteArrayOutputStream; import java.io.IOException; import java.io.ObjectInputStream; import java.io.ObjectOutputStream; import java.util.HashMap; import org.apache.chemistry.opencmis.client.api.Folder; import org.apache.chemistry.opencmis.client.api.Session; import org.apache.chemistry.opencmis.commons.data.ContentStream; import org.apache.commons.io.IOUtils; import org.drools.core.common.DroolsObjectInputStream; import org.jbpm.document.Document; import org.jbpm.integration.cmis.UpdateMode; import org.kie.api.marshalling.ObjectMarshallingStrategy; public class OpenCMISPlaceholderResolverStrategy extends OpenCMISSupport implements ObjectMarshallingStrategy { private String user; private String password; private String url; private String repository; private String contentUrl; private UpdateMode mode = UpdateMode.OVERRIDE; public OpenCMISPlaceholderResolverStrategy(String user, String password, String url, String repository) { this.user = user; this.password = password; this.url = url; this.repository = repository; } public OpenCMISPlaceholderResolverStrategy(String user, String password, String url, String repository, UpdateMode mode) { this.user = user; this.password = password; this.url = url; this.repository = repository; this.mode = mode; } public OpenCMISPlaceholderResolverStrategy(String user, String password, String url, String repository, String contentUrl) { this.user = user; this.password = password; this.url = url; this.repository = repository; this.contentUrl = contentUrl; } public OpenCMISPlaceholderResolverStrategy(String user, String password, String url, String repository, String contentUrl, UpdateMode mode) { this.user = user; this.password = password; this.url = url; this.repository = repository; this.contentUrl = contentUrl; this.mode = mode; } public boolean accept(Object object) { if (object instanceof Document) { return true; } return false; } public byte[] marshal(Context context, ObjectOutputStream os, Object object) throws IOException { Document document = (Document) object; Session session = getRepositorySession(user, password, url, repository); try { if (document.getContent() != null) { String type = getType(document); if (document.getIdentifier() == null || document.getIdentifier().isEmpty()) { String location = getLocation(document); Folder parent = findFolderForPath(session, location); if (parent == null) { parent = createFolder(session, null, location); } org.apache.chemistry.opencmis.client.api.Document doc = createDocument(session, parent, document.getName(), type, document.getContent()); document.setIdentifier(doc.getId()); document.addAttribute("updated", "true"); } else { if (document.getContent() != null && "true".equals(document.getAttribute("updated"))) { org.apache.chemistry.opencmis.client.api.Document doc = updateDocument(session, document.getIdentifier(), type, document.getContent(), mode); document.setIdentifier(doc.getId()); document.addAttribute("updated", "false"); } } } ByteArrayOutputStream buff = new ByteArrayOutputStream(); ObjectOutputStream oos = new ObjectOutputStream( buff ); oos.writeUTF(document.getIdentifier()); oos.writeUTF(object.getClass().getCanonicalName()); oos.close(); return buff.toByteArray(); } finally { session.clear(); } } public Object unmarshal(Context context, ObjectInputStream ois, byte[] object, ClassLoader classloader) throws IOException, ClassNotFoundException { DroolsObjectInputStream is = new DroolsObjectInputStream( new ByteArrayInputStream( object ), classloader ); String objectId = is.readUTF(); String canonicalName = is.readUTF(); Session session = getRepositorySession(user, password, url, repository); try { org.apache.chemistry.opencmis.client.api.Document doc = (org.apache.chemistry.opencmis.client.api.Document) findObjectForId(session, objectId); Document document = (Document) Class.forName(canonicalName).newInstance(); document.setAttributes(new HashMap<String, String>()); document.setIdentifier(objectId); document.setName(doc.getName()); document.setLastModified(doc.getLastModificationDate().getTime()); document.setSize(doc.getContentStreamLength()); document.addAttribute("location", getFolderName(doc.getParents()) + getPathAsString(doc.getPaths())); if (doc.getContentStream() != null && contentUrl == null) { ContentStream stream = doc.getContentStream(); document.setContent(IOUtils.toByteArray(stream.getStream())); document.addAttribute("updated", "false"); document.addAttribute("type", stream.getMimeType()); } else { document.setLink(contentUrl + document.getIdentifier()); } return document; } catch(Exception e) { throw new RuntimeException("Cannot read document from CMIS", e); } finally { is.close(); session.clear(); } } public Context createContext() { return null; } // For backward compatibility with previous serialization mechanism public void write(ObjectOutputStream os, Object object) throws IOException { Document document = (Document) object; Session session = getRepositorySession(user, password, url, repository); try { if (document.getContent() != null) { String type = document.getAttribute("type"); if (document.getIdentifier() == null) { String location = document.getAttribute("location"); Folder parent = findFolderForPath(session, location); if (parent == null) { parent = createFolder(session, null, location); } org.apache.chemistry.opencmis.client.api.Document doc = createDocument(session, parent, document.getName(), type, document.getContent()); document.setIdentifier(doc.getId()); document.addAttribute("updated", "false"); } else { if (document.getContent() != null && "true".equals(document.getAttribute("updated"))) { org.apache.chemistry.opencmis.client.api.Document doc = updateDocument(session, document.getIdentifier(), type, document.getContent(), mode); document.setIdentifier(doc.getId()); document.addAttribute("updated", "false"); } } } ByteArrayOutputStream buff = new ByteArrayOutputStream(); ObjectOutputStream oos = new ObjectOutputStream( buff ); oos.writeUTF(document.getIdentifier()); oos.writeUTF(object.getClass().getCanonicalName()); oos.close(); } finally { session.clear(); } } public Object read(ObjectInputStream os) throws IOException, ClassNotFoundException { String objectId = os.readUTF(); String canonicalName = os.readUTF(); Session session = getRepositorySession(user, password, url, repository); try { org.apache.chemistry.opencmis.client.api.Document doc = (org.apache.chemistry.opencmis.client.api.Document) findObjectForId(session, objectId); Document document = (Document) Class.forName(canonicalName).newInstance(); document.setIdentifier(objectId); document.setName(doc.getName()); document.addAttribute("location", getFolderName(doc.getParents()) + getPathAsString(doc.getPaths())); if (doc.getContentStream() != null) { ContentStream stream = doc.getContentStream(); document.setContent(IOUtils.toByteArray(stream.getStream())); document.addAttribute("updated", "false"); document.addAttribute("type", stream.getMimeType()); } return document; } catch(Exception e) { throw new RuntimeException("Cannot read document from CMIS", e); } finally { session.clear(); } } } -
-
In Business Central, go to Menu → Design → Projects.
-
Click the project name and click Settings.
Figure 239. Settings tab -
Click Deployments → Marshalling Strategies→ Add Marshalling Strategy.
-
In the Name field, enter the identifier of the custom document marshalling strategy, such as
org.jbpm.integration.cmis.impl.OpenCMISPlaceholderResolverStrategyin this example. -
Select the relevant option from the Resolver drop-down menu, such as Reflection in this example.
-
Click Test to validate your deployment descriptor file.
-
Click Deploy to build and deploy the updated project.
Alternatively, if you are not using Business Central, you can navigate to
PROJECT_HOME/src/main/resources/META_INF/kie-deployment-descriptor.xml(if applicable) and edit the deployment descriptor file with the required<marshalling-strategies>elements.Example deployment descriptor file with custom document marshalling strategy<deployment-descriptor xsi:schemaLocation="http://www.jboss.org/jbpm deployment-descriptor.xsd" xmlns:xsi="http://www.w3.org/2001/XMLSchema-instance"> <persistence-unit>org.jbpm.domain</persistence-unit> <audit-persistence-unit>org.jbpm.domain</audit-persistence-unit> <audit-mode>JPA</audit-mode> <persistence-mode>JPA</persistence-mode> <runtime-strategy>SINGLETON</runtime-strategy> <marshalling-strategies> <marshalling-strategy> <resolver>reflection</resolver> <identifier> org.jbpm.integration.cmis.impl.OpenCMISPlaceholderResolverStrategy </identifier> </marshalling-strategy> </marshalling-strategies> -
To enable documents stored in a custom location to be attached to forms and processes, create a document variable in the relevant processes and map task inputs and outputs to that document variable in Business Central.
21.4.2. Creating a document variable in a business process
After you set a document marshalling strategy, create a document variable in the related process to upload documents to a human task and for the document or documents to be visible in the Process Instances view in Business Central.
-
You have set a document marshalling strategy as described in Setting the document marshalling strategy.
-
In Business Central, go to Menu → Design → Projects.
-
Click the project name to open the asset view and click the business process name.
-
Click the canvas and click
on the right side of the window to open the Properties panel. -
Expand Process Data and click
 and enter the following values:
-
Name:
document -
Custom Type:
org.jbpm.document.Documentfor a single document ororg.jbpm.document.DocumentCollectionfor multiple documents
-
21.4.3. Mapping task inputs and outputs to the document variable
If you want to view or modify the attachments inside of task forms, create assignments inside of the task inputs and outputs.
-
You have a project that contains a business process asset that has at least one user task.
-
In Business Central, go to Menu → Design → Projects.
-
Click the project name to open the asset view and click the business process name.
-
Click a user task and click
on the right side of the window to open the Properties panel. -
Expand Implementation/Execution and next to Assignments, click
to open the Data I/O window. -
Next to Data Inputs and Assignments, click Add and enter the following values:
-
Name:
taskdoc_in -
Data Type:
org.jbpm.document.Documentfor a single document ororg.jbpm.document.DocumentCollectionfor multiple documents -
Source:
document
-
-
Next to Data Outputs and Assignments, click Add and enter the following values:
-
Name:
taskdoc_out -
Data Type:
org.jbpm.document.Documentfor a single document ororg.jbpm.document.DocumentCollectionfor multiple documents -
Target:
document
The
SourceandTargetfields contain the name of the process variable you created earlier. -
-
Click Save.
22. Business Activity Monitoring
22.1. Overview
Imagine you are developing a BPM solution which mixes process with business data. Imagine also you need some forms to be used within processes in order to let the users enter data. Moreover, you’ll likely want to have some kind of dashboards to display metrics and key performance indicators in order to quickly assess how your processes are doing. So far so good.
jBPM brings you all the ingredients you need to develop end-to-end business process solutions. The jBPM’s BAM module (also known as Dashbuilder) allows for composing custom business dashboards by mixing data coming from heterogeneous sources of information. The module is now fully integrated into Business Central. A new specific section for dealing with reports has been added and it can be accessed either from the home page or from the menu bar, as shown in the next figure.
In the figure, within the highlighted sections, there exists two options:
-
Business Dashboards: This option is intended to give users access to a generic dashboard tooling for the composition of brand new dashboards.
-
Process & Task Reports: It opens up the Process related reports pages which contains several performance indicators related to the jBPM engine.
22.2. Business Dashboards
BPM solutions are not only made up with processes, rules or forms but also with data belonging to the customer business domain. Such data is handled in the forms, the rules and, of course, the dashboards that are part of the solution. Usually, dashboards feed with data coming from several sources of information, from business domain entities persisted into relational databases to data hold in legacy systems. In order to cope with this kind of scenarios a generic highly customizable dashboard tooling is needed.
It’s obviously expected that a customer building a BPM solution want to track how its processes are performing. To do so the customer need a monitoring and reporting tool. This is the main reason why the Dashbuilder project has been included as a core module of the jBPM ecosystem. Notice also that Dashbuilder, as an independent project, is not only used by jBPM but also by many other projects like, for example, JBoss Teiid a data virtualization system that allows applications to use data from multiple, heterogeneous data stores.
The Content Manager page gives you access to a rich environment where it is possible to author new content as well as configuring which entries are displayed in the top menu bar. You can access Content Manager using the menu Pages.
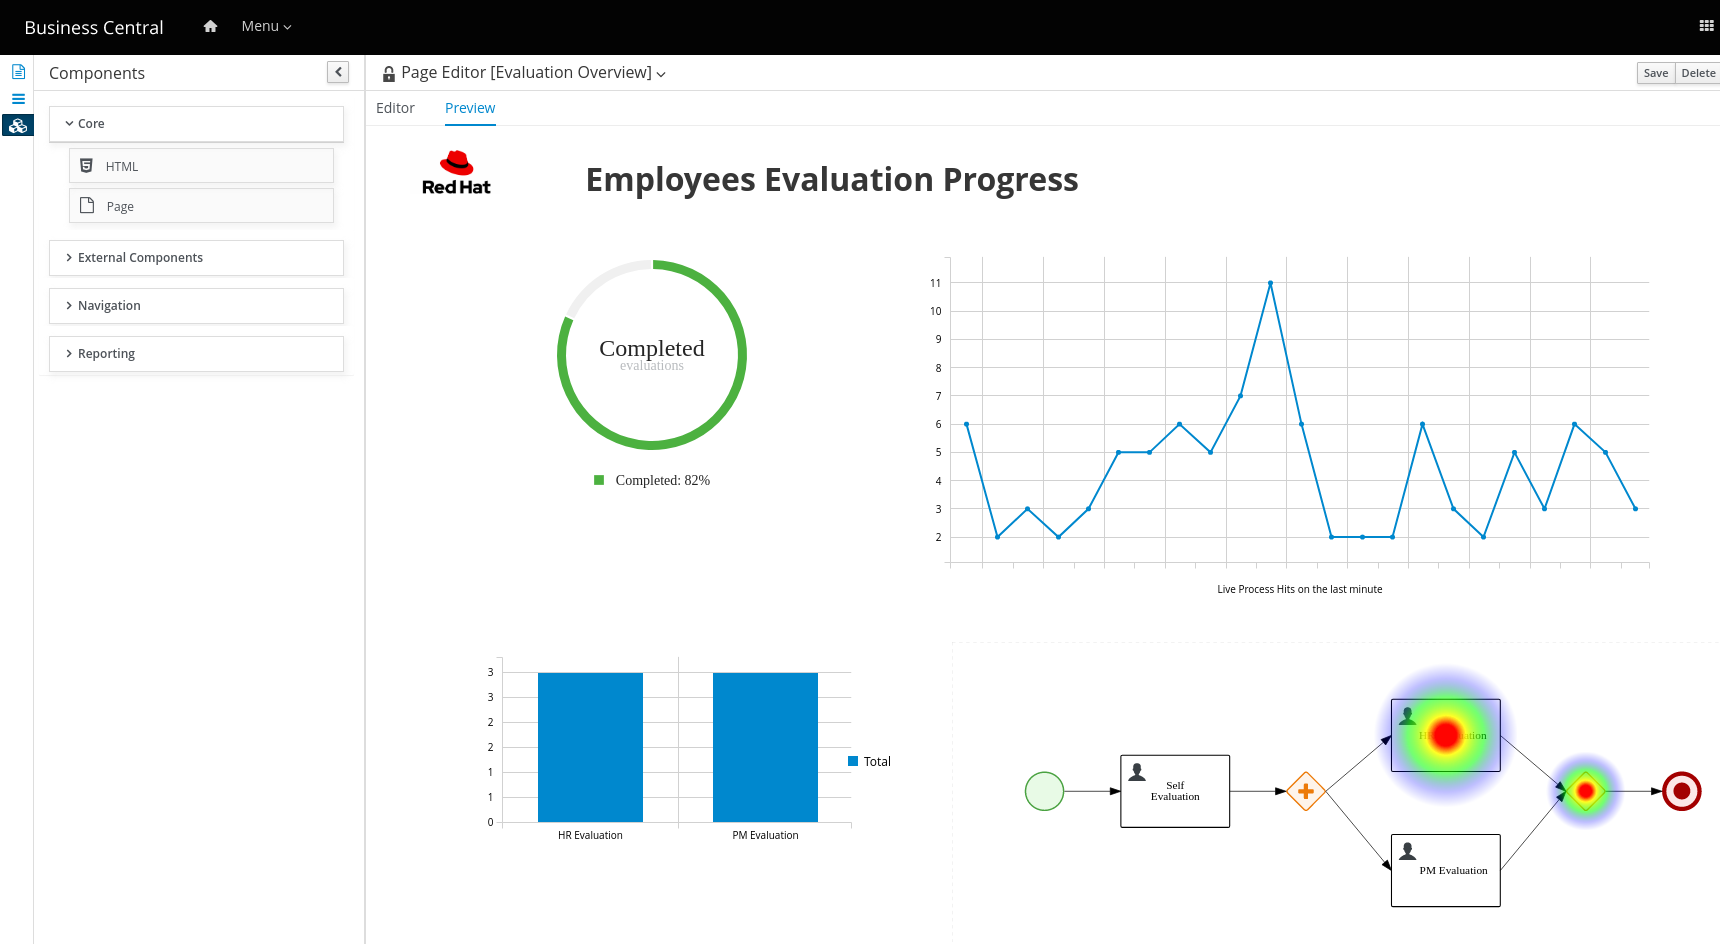
|
By default, Business Central uses a C3 Renderer API for chart libraries and no longer uses the Google Charts library. To revert to Google Charts, build it from sources and add it to Business Central (see the |
22.2.1. Authoring Pages
In Content Manager users can create pages which are be composed of components organized in a row and column layout. Components can be dragged to the page editor and a pop-up will be displayed with the component settings that can be modified by the user.
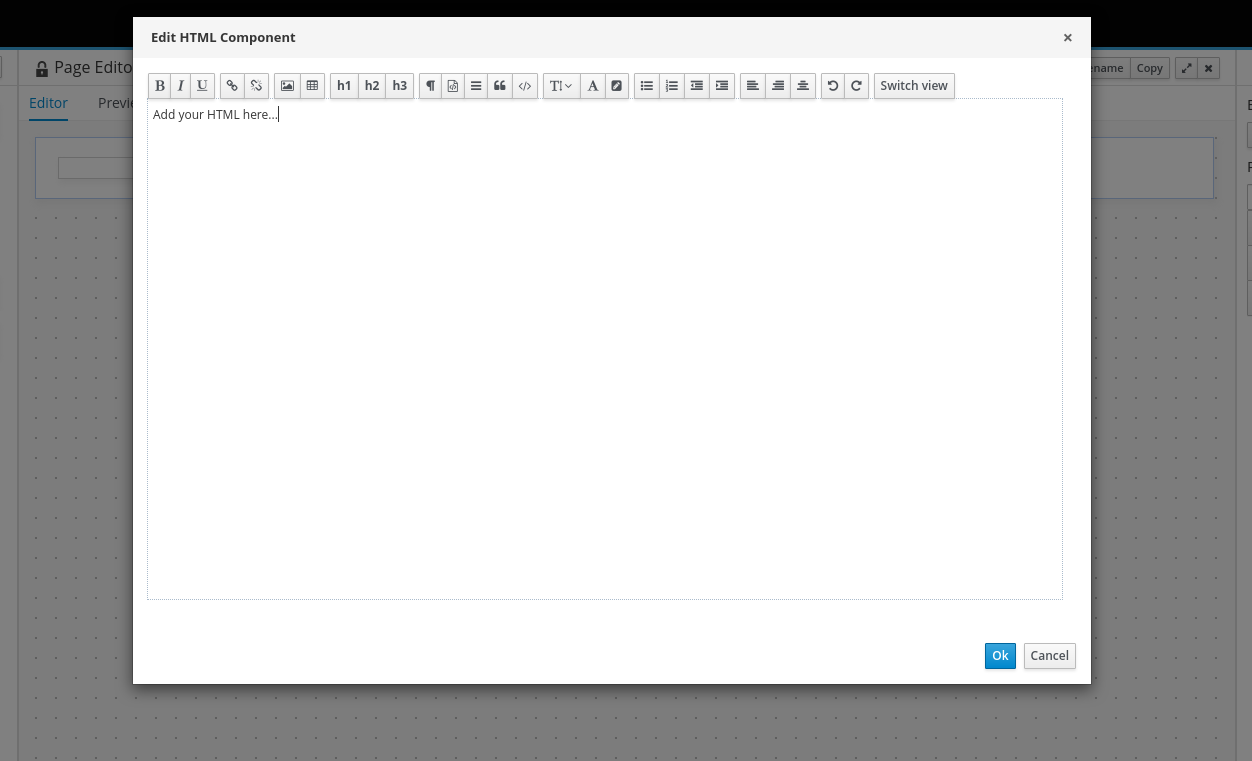
22.2.2. Heatmaps
Heatmaps components are used to display heat information over a process diagram. You can retrieve the heat information from an execution server dataset which you can use with some of the heatmap components. You can use any kind of information to build the heatmap including process node execution time and hits.
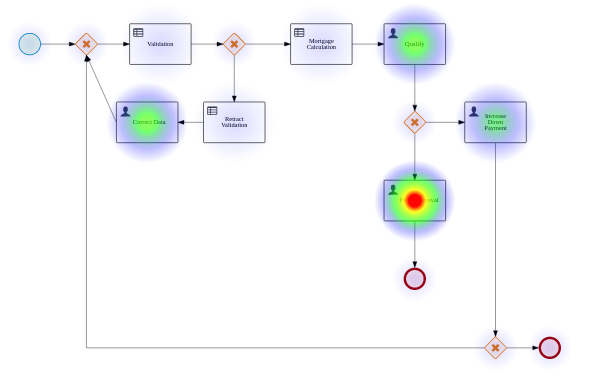
The dataset used with the heatmap is a crucial part to build a meaningful visualization. The Process Heatmap requires users to provide two columns: node id and heat value. In component properties users must provide the server template, container and process id.
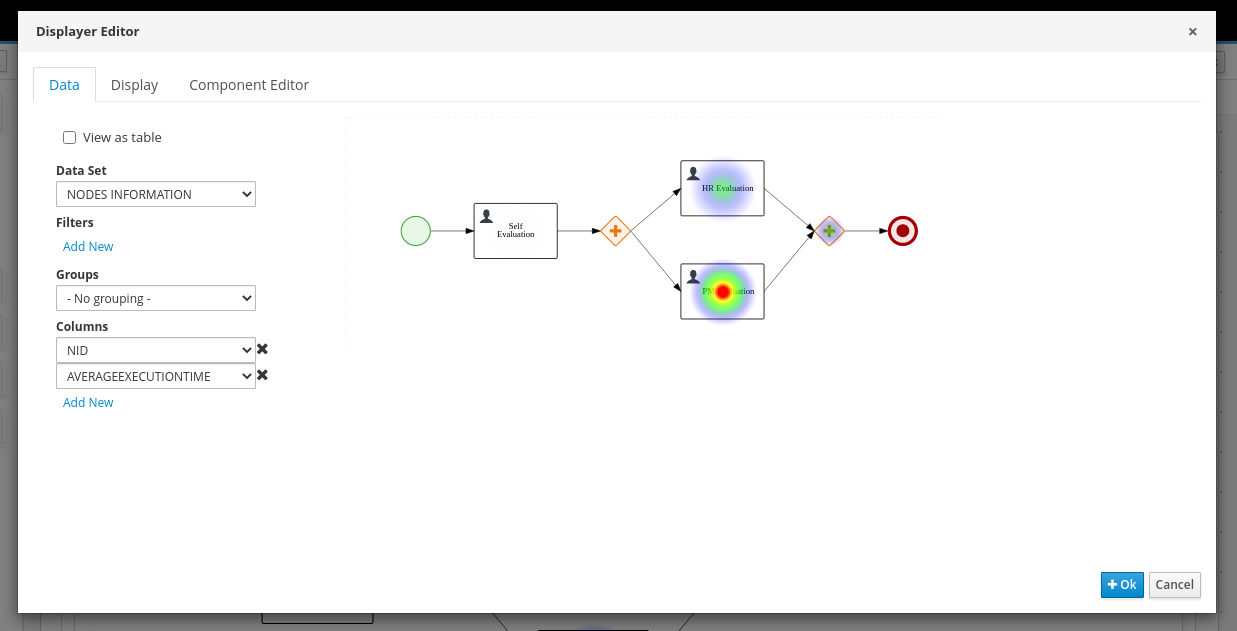
The Processes Heatmaps is a generic component which dataset must provide container, process and node id with the heat value. The only required property is server template. The component allows users to select a process to be displayed
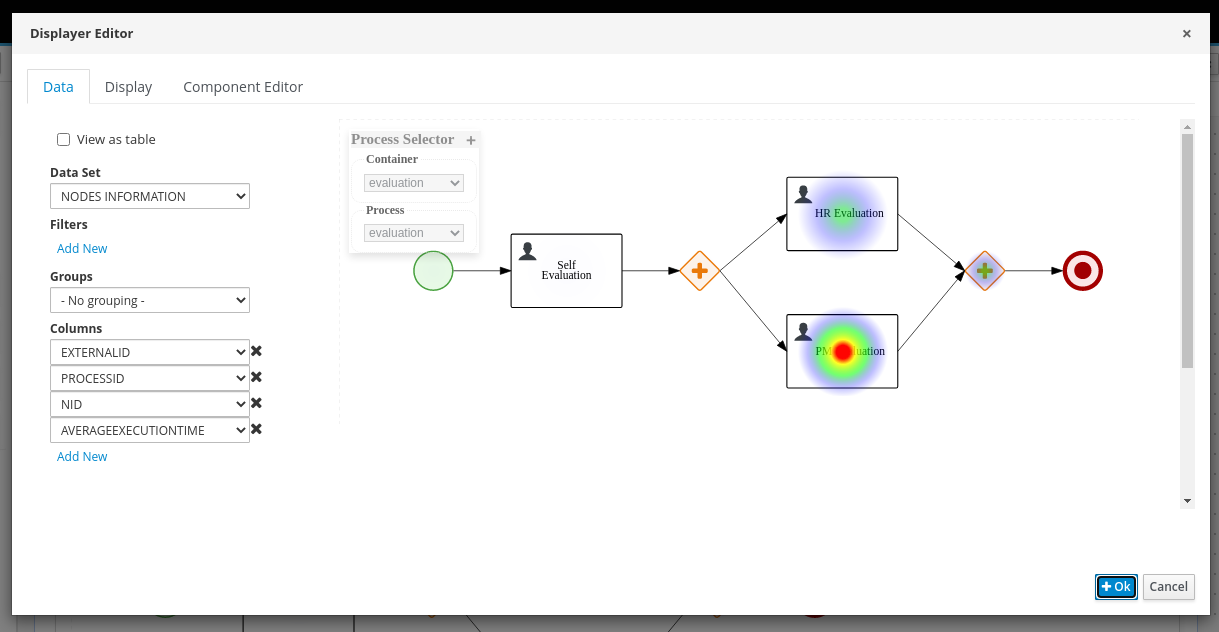
22.2.3. Components
A page contains different types of components. You can use the following component types on a page using the Components panel:
-
Core components
-
Navigation components
-
Reporting components
22.2.4. Core components
You can use the Core components to specify custom HTML information or display existing pages. There are three types of core components.
|
Core components are not mandatory. |
| Core component sub-types | Description |
|---|---|
HTML |
This component opens an HTML editor widget that is used to create HTML pages using text, images, tables, links, and colors. You can also customize an HTML page if required. |
Page |
This component enables you to add previously created HTML pages to a new dashboard. You can use this component to nest custom pages that you have already created in your dashboard. |
Logo |
This component enables you to add images on the page. To add images on a page, you can provide a URL for the image and set the width and height of the image as per your requirements. The default image is the logo of Dashbuilder. The Logo URL field is mandatory. |
22.2.5. Navigation components
The Navigation components are used to navigate between the pages. There are six types of navigation components.
| Navigation component sub-types | Description |
|---|---|
Target Div |
This component displays the entries of the tab list, menu bar, and navigation tree. Also, it keeps the track of the last clicked item. |
Menu Bar |
This component displays the entries of a navigation tree in the form of a menu bar. There is no limit to the number of levels supported by Business Central. |
Tile Navigator |
This component displays the navigation group in the form of tiles. The groups are displayed as folders but for single entries and the content is displayed instead when selected. |
Tree |
This component displays the entries in a vertical tree structure form. |
Carousel |
This component displays the selected pages in a carousel or a slide show form. |
Tab List |
This component displays the selected menu pages as tabs at the top of the component. |
|
The Target Div setting is not needed for non-target div components such as carousel or tile navigator. |
22.2.6. Reporting components
The Reporting components are used to display the data from data sets in the form of graphs, tables, maps. There are eleven types of reporting components. For more information about the data sets, see Data sets authoring section.
You can configure the reporting components using the New Displayer widget, which contains the following tabs:
-
Type: Enables you to select how to display custom data graphically.
-
Data: Enables you to select a data set from the list of custom data sets that you created from the Data Sets section available in the Settings menu.
-
Display: Enables you to select and customize how the content is displayed by adding titles, changing colors, size.
| For Time Series Chart component, the New Displayer widget contains the Data, Display, and Component Editor tabs. |
| Reporting component sub-types | Description |
|---|---|
Bar |
This component is used to display the data from data sets in a bar chart form. |
Pie |
This component is used to display the data from data sets in the form of pie chart form. In a pie chart, the arc length of each slice is proportional to the represented quantity. |
Line |
This component is used to display the data from data sets as a series of data points connected by straight line segments on two axes. |
Area |
This component combines a line chart and a bar chart to display the data from data sets. |
Bubble |
This component displays multiple circles (bubbles) in a two-dimensional plot. It is a generalization of the scatter plot that replaces the dots with bubbles. |
Meter |
This component is used to display the data from data sets in a meter form. |
Map |
This component enables you to o position your data in a context, often geographical, using different layers. The data values are displayed as markers on the map. The data values can act as coordinates or addresses. |
Metric |
This component is used to display the data from data sets in a metric form. You can use the Preview, HTML, or Javascript tab to edit your data. |
Table |
This component is used to display the data from data sets in a table form. You can hide or display the columns if required. |
Filter |
This component allows you to filter the data from data sets. |
Time Series Chart |
This component is used to display the data from data sets in a time series form. |
22.2.7. Component properties
The components used in a page have different properties associated with them. The Properties panel enables you to customize a component by editing the following properties:
-
Panel properties: Used to customize component panel properties such as Width, Height, and Background Color.
-
Margin properties: Used to customize component margin properties such as Top, Bottom, Left, and Right.
-
Padding properties: Used to customize component padding properties such as Top, Bottom, Left, and Right.
22.2.8. Placing components on the page editor to create a page
To create pages, you must drag the components to the Editor canvas of the Pages perspective. After placing all of the required components on the page, click Save.
22.2.9. Using the Preview tab to preview pages
While creating or editing pages, click the Preview tab on the Page Editor to preview a page before saving it.
22.2.10. Adding a time series chart component on a page
You can use the Time Series Chart component to represent any time series data. You can create your own dashboards that can be connected to your time series data sets.
You can export the time series components to Dashbuilder Runtime and retrieve the information from a KIE Server or any Prometheus data set. You can also create, edit, and build a dashboard using a time series chart component.
-
KIE Server is deployed and connected to Business Central.
-
Create a new KIE Server data set using the following steps:
-
In Business Central, go to Admin → Data Sets.
The Data Set Explorer page opens.
-
Click New Data Set and select any provider type as per your requirements.
The Data Set Creation Wizard page opens.
-
Enter required details in the Data Set Creation Wizard of your selected provider type and click Test.
-
Click Save.
-
-
In Business Central, go to Menu → Design → Pages.
-
In the Pages panel, click New.
-
Click OK.
-
In the New Page dialog box, enter a name in the Name field and select the required style.
The new page opens in the Page Editor.
-
In the Components panel, expand the Reporting components and drag the Time Series Chart to the Page Editor.
-
In the Displayer editor wizard, click the Data tab and select the data set that you created.
-
In the Data tab, select the values from the Columns field as per your requirements.
-
Click the Display tab and edit the value of Chart, Margins, Filter, Refresh, and Columns if needed.
-
Click the Component Editor tab and update the following component properties into the Component Properties field:
Table 87. Time series component properties Component properties Description Transpose dataset
Define that the provided data set uses the time series as separate columns or as rows.
Show Area
Select the checkbox to set the type as a line chart or an area chart.
Date Categories
Select the category, datetime, or numeric option from the drop-down list.
Labels
Select the checkbox to enable or disable the data labels on data points.
Zoom type
Select the x, y, or xy option from the drop-down list.
Zoom enabled
Select the checkbox to enable zooming in axis charts. By default, the checkbox is checked.
Zoom autoscale Y axis
Select the checkbox to re-scale highs and lows based on visible area.
Toolbar Auto Selected
Select the zoom, selection, or pan option from the drop-down list.
Title text
Edit the title of the time series chart component.
Title align
Select the left, center, or right option from the drop-down list to change the title alignment.
Show toolbar
It is a checkbox to enable or disable the toolbar on the upper-right corner of the chart. By default, this checkbox is checked. If this component property is enabled, you can use the zoom in, zoom out, selection zoom, and panning functions of the time series chart component.
Chart Name
Set the chart name as per your requirements. By default, the chart name is set as Newchart.
-
Optional: Click the sandwich menu icon in the upper-right corner of the chart to download the data set in CSV, PNG, or SVG format.
-
Click OK.
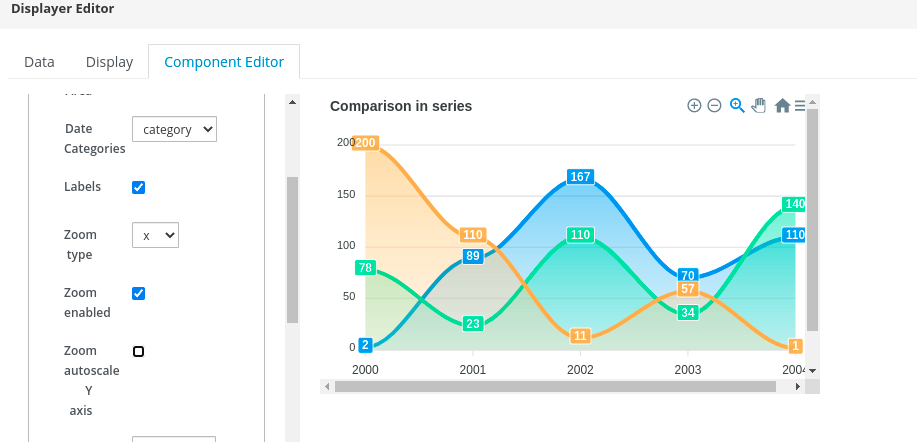 Figure 247. Example time series component
22.3. Process & Task Reports
You can access to the reports accessing Process Reports and Task Reports main menu:

22.3.1. Process Reports
The jBPM Process Process Reports is a specific use case of a dashboard feed from data coming from a relational database via SQL queries. In this case, the database tables consumed are: processinstancelog and bamtasksummary both belonging to the jBPM engine.
Every time the jBPM runtime updates the information stored into such tables the data becomes automatically available to the dashboard indicators. The following picture shows the main screen that users get when navigating to the Process Reports.

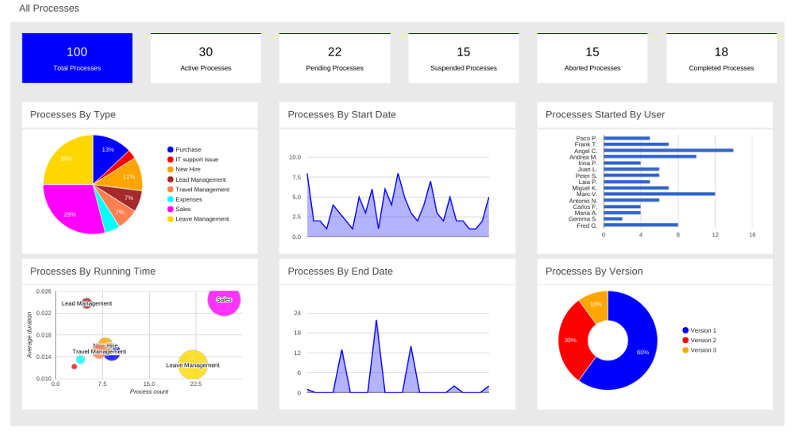
|
Notice, those are generic metrics not tied to any specific business process. Nonetheless, it’s worth to mention that it would be very easy for customers to modify, extend or adapt this generic dashboard for custom needs. A customer could take the jBPM Process Reports as the base template for building a custom dashboard which mixes data coming from the jBPM engine plus data coming from its own business domain. |
To filter through the data users can click the charts in order to select, for instance, a given process, a given status, etc… Every time a filter is applied, all the indicators are automatically updated and synced according to the criteria set. The next picture shows, for instance, what happens when both the process Sales and the status Active are selected.
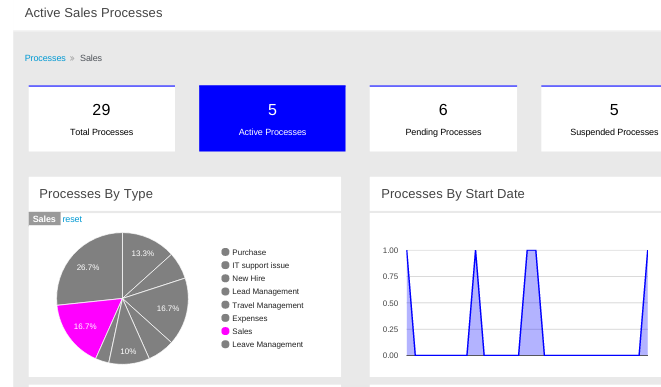
Using the built-in filter features is a good way to select the process instances the users want to look into. Additionally, at any time, no matter whether there is any active filter or not, users can also navigate to the actual list of instances the dashboard indicators are showing. The View table link at the top right side on the screen can be used to display those process instances details. Once clicked, the view is switched to the screen shown in the next picture:
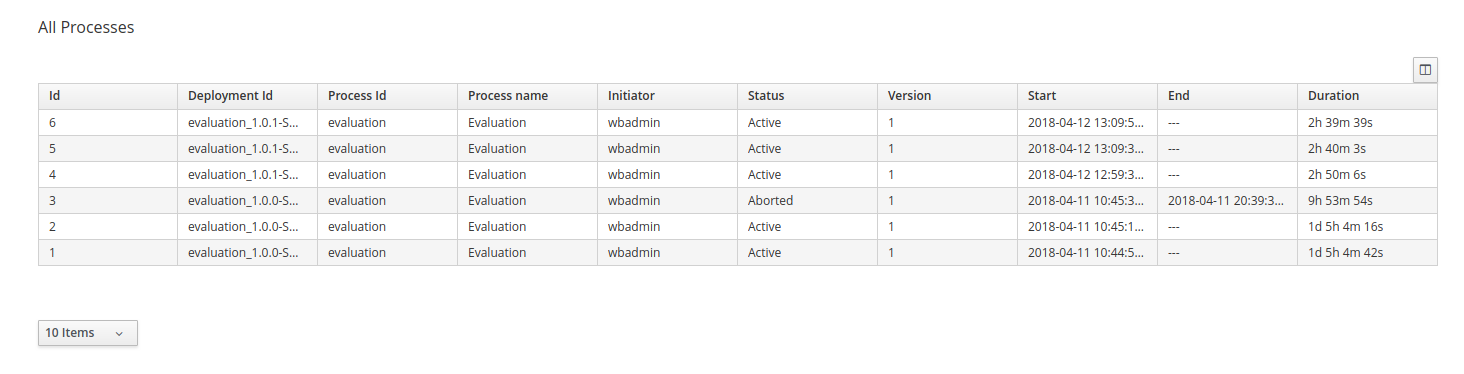
From this view, users can access to process instances details just clicking on the desired row as well.
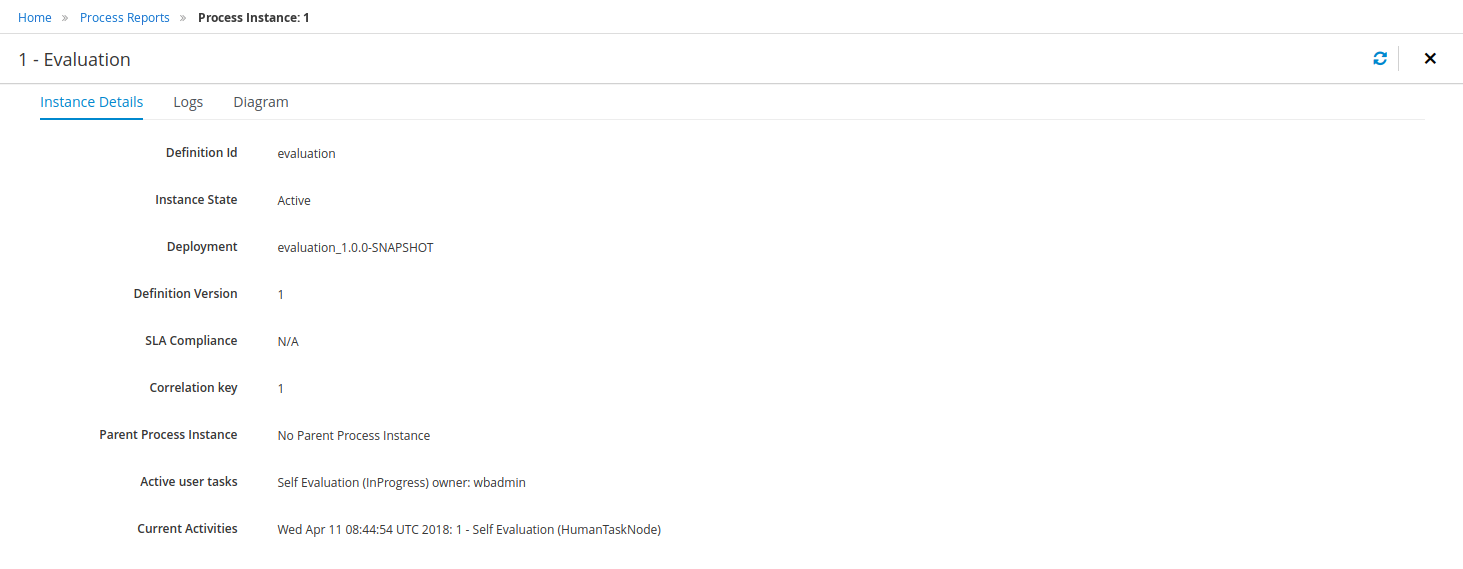
Notice this is a read only view, just for monitoring purposes. After identifying a target process instance the next step is to use the jBPM Process Instance Console in case the user needs to manage such process instance.
22.3.2. Task Reports
The task reports section only contains indicators related to tasks. It basically provides the same features introduced above for process instances (filters, show instances, get details), this time related to tasks instead of process though.
The following picture shows the Task reports header that users get when navigating to the Task Reports.

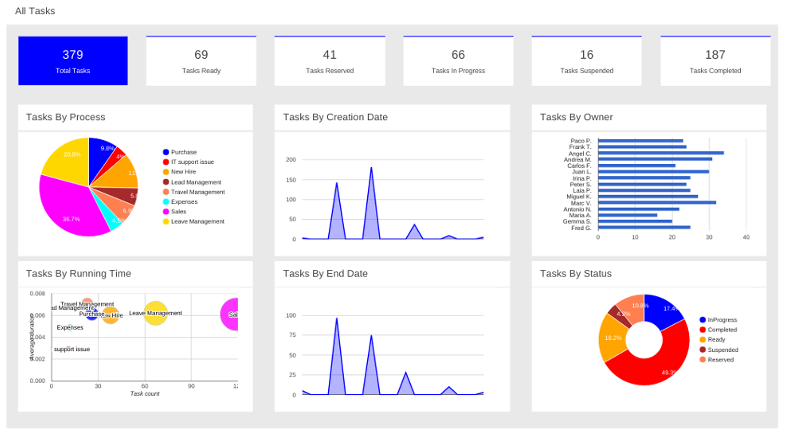
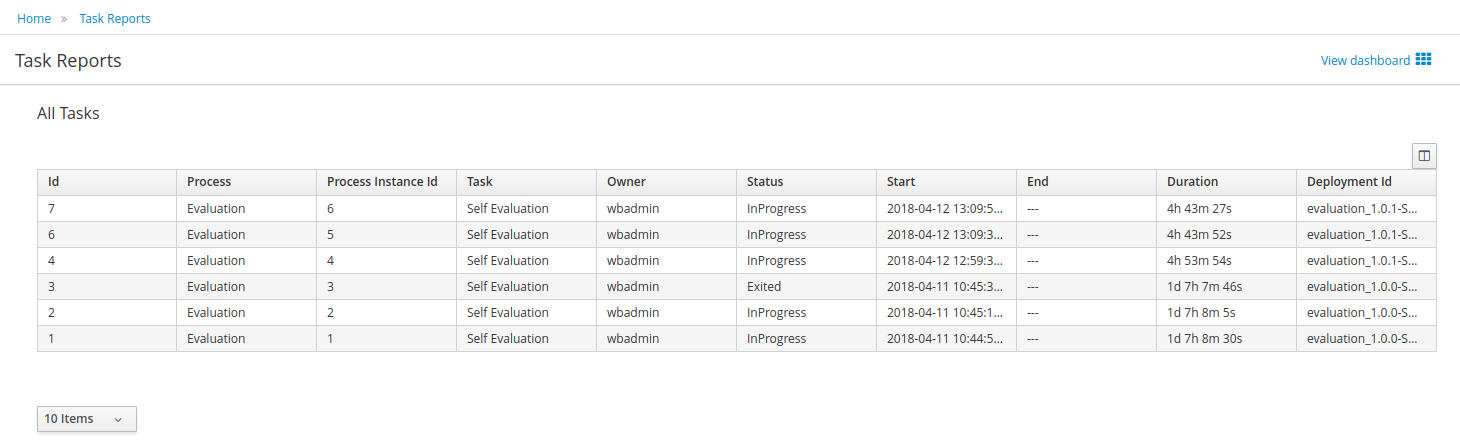
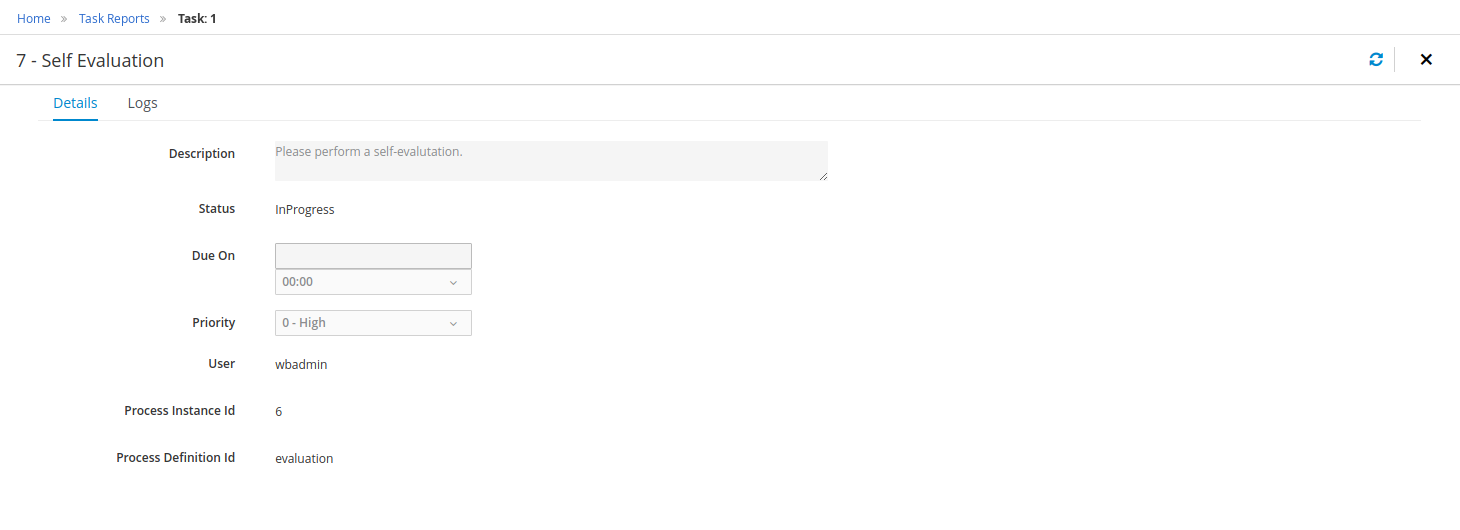
To sum up, the jBPM Process & Task Reports let users:
-
To monitor their process and tasks
-
To apply the proper filters in order quickly identify problematic instances
-
To get the required information about a given instance in order to be able to fix any unexpected issue
22.4. Dashbuilder Runtime
Dashbuilder Runtime is a standalone dashbuilder distribution that can run dashboards built in Business Central. By default dashboards live inside Business Central, meaning that users must access it to interact with dashboards. Dashbuilder Runtime aims to focus on dashboards execution, users can author dashboards in Business Central, export and import on Dashbuilder Runtime to execute it.
22.4.1. Installation
Dashbuilder Runtime is a small Web Application distributed in WAR format that can be downloaded from Maven repository. Search for the war artifact for the jBPM version you are using.
Dashbuilder Runtime WAR can be installed in the latest Widlfly release, just copy the WAR in standalone/deployments and start Widlfly.
To login create a user with admin role and access context root for the Widlfly location (e.g. http://localhost:8080). By default Dashbuilder Runtime is installed on root context, this can be modified by changing dashbuilder-runtime.war/WEB-INF/jboss-web.xml.
After login, users may upload dashboard files exported from Business Central
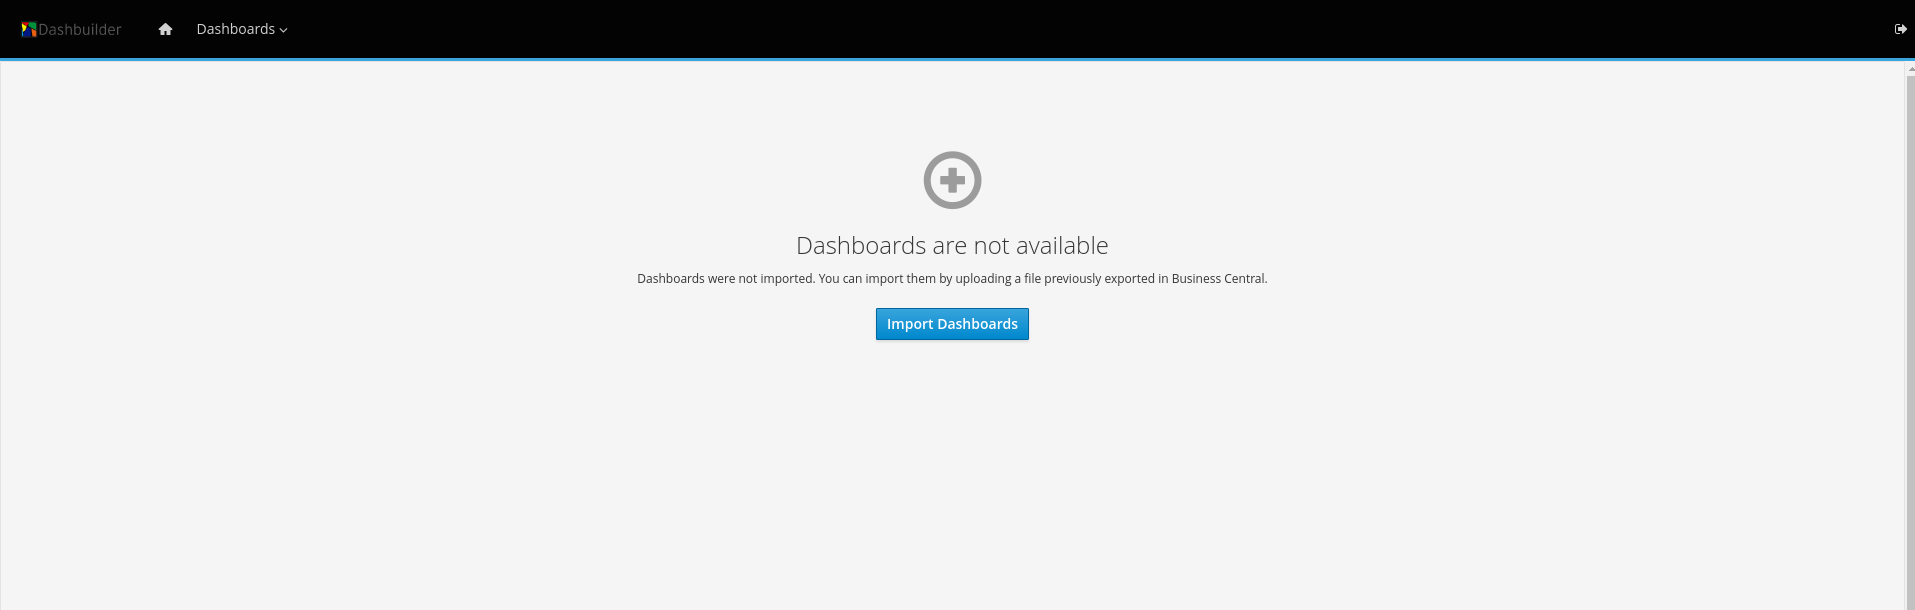
22.4.2. Execution modes
Dashbuilder Runtime has execution modes, which are:
-
SINGLE: This is the default mode. In single mode, the dashboard is used in runtime when uploaded. You can refer to dashboards under the directory configured using the
dashbuilder.import.base.dirsystem property (default value is/tmp/dashbuilder/models). If a file is in themodelsdirectory, then it is possible to load it usingRUNTIME_URL?import=FILE_NAMEin the URL. For example, the filesales_dashboard.zip, placed in themodelsdirectory, can be loaded usingRUNTIME_URL?import=sales_dashboard(notice that the file extension is not necessary). -
STATIC: In static mode, the Dashbuilder Runtime does not prompt you to upload and use the model file that is configured using the
dashbuilder.runtime.importsystem property. -
MULTI: In multi-mode, you can upload multiple dashboards in the same Dashbuilder Runtime installation. To enable it, set the
dashbuilder.runtime.multisystem property as true.
22.4.3. Embedding dashboards
Dashboards running in Dashbuilder Runtime can be embedded in third-party applications using an iframe. To embed dashboards, the standalone query parameter must be added to the URL along with the dashboard page name using the perspective parameter:
RUNTIME_URL?standalone&perspective=PAGE_NAME
In case of multi-mode, it is also required to specify the import ID, for example:
RUNTIME_URL?standalone&perspective=PAGE_NAME&import=IMPORT_NAME
In case of multi-mode, you must specify which dashboard you want to use by using the import={dashboard_name} property, for example:
RUNTIME_URL?standalone&import=DASHBOARD_NAME&perspective=PAGE_NAME
22.4.4. REST API
Third-party applications can interact with Dashbuilder Runtime using its REST API. All endpoints use Basic authentication:
-
GET /api: Provides server information: Runtime Mode and list of available models. Example:
curl -u 'admin:admin' http://localhost:8080/rest/api "mode":"SINGLE_IMPORT","availableModels":[],"acceptingNewImports":true}
-
POST /api/dashboard/: Received a POST ZIP with dashboards and register it for use (upload), returns the dashboard id. Example:
curl -u 'admin:admin' -F 'selectedFile=@/path/to/your/dashboard.zip' http://localhost:8080/rest/api/dashboard 1592937606409
-
GET /api/dashboard/{id}: Retrieves information about the dashboard {id}
curl -u 'admin:admin' http://localhost:8080/rest/api/dashboard/{id returned from upload}
{"runtimeModelId":"1592937606409","pages":["covid19_cases_share","covid19_confirmed_share","covid19_deaths_share","covid19_evolution_summary","covid19_recovered_share","covid19_selected_cases_evolution","covid19_selected_deaths_evolution","covid19_selected_recovers_evolution","life_expectancy","world_population"]}
-
DELETE /dashboard: Unregister all models. Example:
curl -X DELETE -u 'admin:admin' http://localhost:8080/rest/api/dashboard/
-
DELETE /dashboard/{id}: Unregisters the model with the given id. Example:
curl -X DELETE -u 'admin:admin' http://localhost:8080/rest/api/dashboard/{model id}
22.4.5. Business Central integration
In order to open Business Central dashboards in Dashbuilder Runtime the following requirements must be met:
-
Dashbuilder must be in multi mode and with model update enabled (see Configuration and Bootstrap switches)
-
On Business Central set the system property dashbuilder.export.dir to point to the Dashbuilder models directory
-
Also on Business Central set the Dashbuilder location using the system property dashbuilder.runtime.location. Sample value: http://localhost:8080
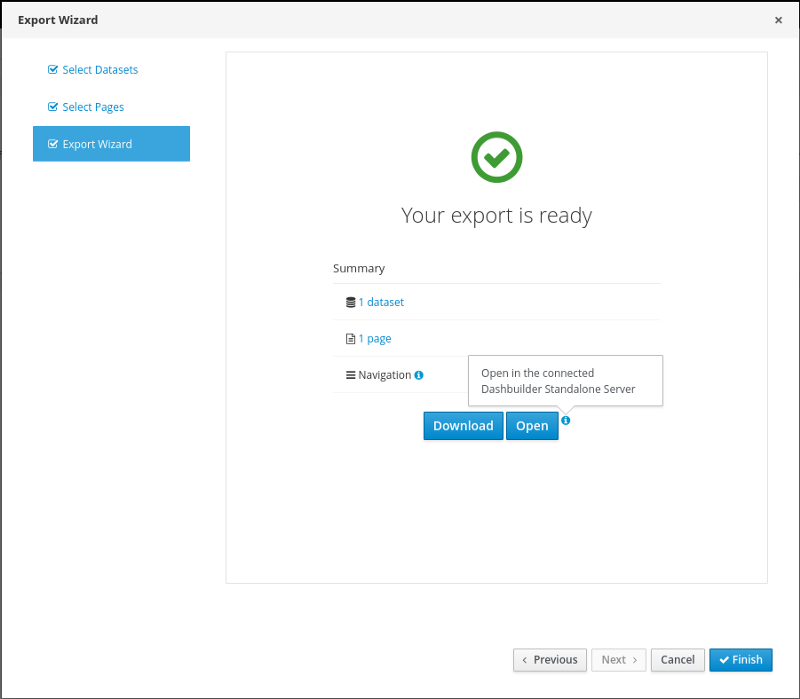
Once it is done a button will allow users to open the exported dashboard in Business Central using the Gradual Export from import/export tool. A model will be created for the user and it will be updated when you click Open, but if the system property dashbuilder.shareOpenModel is true then all users will open the same model.
22.4.6. Kie Server Integration
In Business Central dashboards that uses Kie Server datasets will reuse the remote server mechanism to build Kie Server clients. Such mechanism is not available in Dashbuilder Runtime, which means that you need to configure Kie Server credentials in Dashbuilder Runtime as well.
The configuration can be done for server template. In the exported dataset we have a reference to the server template, to configure credentials and server location for this template one should use the following properties:
dashbuilder.kieserver.serverTemplate.{SERVER_TEMPLATE_NAME}.location={LOCATION}
dashbuilder.kieserver.serverTemplate.{SERVER_TEMPLATE_NAME}.user={USER}
dashbuilder.kieserver.serverTemplate.{SERVER_TEMPLATE_NAME}.password={PASSWORD}
dashbuilder.kieserver.serverTemplate.{SERVER_TEMPLATE_NAME}.token={TOKEN} * not used if user provides credentials
If you are using dashboards on a new Kie Server instance where queries were not created, the replace_query option will automatically create queries:
org.dashbuilder.kieserver.serverTemplate.{SERVER_TEMPLATE_NAME}.replace_query=true
The server template is a generic way to configure Kie Server for multiple datasets that uses the same template. It is also possible to make the same setting by dataset:
dashbuilder.kieserver.dataset.{DATA_SET_NAME}.location={LOCATION}
dashbuilder.kieserver.dataset.{DATA_SET_NAME}.user={USER}
dashbuilder.kieserver.dataset.{DATA_SET_NAME}.password={PASSWORD}
dashbuilder.kieserver.dataset.{DATA_SET_NAME}.token={TOKEN} * not used if user provides credentials
The configuration should be either by dataset or template name. If both are set, then the configuration by dataset name is used.
22.4.7. Configuration and bootstrap switches
There are multiple configuration for Dashbuilder Runtime which can be done using system properties
| System Property | Description | Values |
|---|---|---|
dashbuilder.import.base.dir |
Sets the directory where ZIP models must be placed.
Default is |
a path in your system to a directory |
dashbuilder.runtime.import |
Path to a dashboard export that will be statically used in Dashbuilder Runtime. Also makes Dashbuilder Runtime in static mode. |
a path in your system to a exported zip file |
dashbuilder.runtime.upload.size |
Max dashboard size used in upload in kb. Default value is 10 * 1024 * 1024 bytes. |
number: bytes upload limit in kb |
dashbuilder.runtime.allowExternal |
If true uploads from other servers can be downloaded when using import. Example: |
true / false |
dashbuilder.runtime.multi |
Enables or disables multi-mode. Default is false. |
true / false |
dashbuilder.dataset.partition |
Enables/disables datasets partition by import in Multi mode. Default is true. |
true / false |
dashbuilder.components.partition |
Enables/disables components partition by import in Multi mode. Default is true. |
true / false |
dashbuilder.removeModelFile |
Enables/disables model file removal when unregistered. When true the file model will also be removed when unregistered. Default is false. |
true / false |
dashbuilder.model.update |
Enables/disables model update. When true models will be updated according to the model file changes. Default is true. |
true / false |
22.4.8. Dashboard data management in Business Central
Business Central contains dashboard and reporting tools that you can access from the data sets editor and the page editor. You can use these tools to work with the following types of items:
-
Data sets
-
Pages
-
Navigation
You can export, import, and deploy dashboard data as ZIP files to and from Business Central.
| This feature is only accessible by administrator users. |
22.4.8.1. Exporting Business Central dashboard data
You can export dashboard data such as data sets, pages, and navigation from Business Central as a ZIP file.
-
In Business Central, select the Admin icon in the upper-right corner of the screen and select Dashbuilder Data Transfer.
-
To export the dashboard data, complete any of the following tasks:
If you want to export all of the dashboard data as a ZIP file, complete the following tasks:
-
On the Dashbuilder Data Transfer page, click Export all.
An
export.zipfile containing all of the dashboard data is downloaded. Theexport.zipfile structure is separated by data type, as shown in the following example:dashbuilder/datasets/definitions/dataset-example1.dset dashbuilder/datasets/definitions/dataset-example2.dset dashbuilder/datasets/readme.md dashbuilder/perspectives/page1/perspective_layout dashbuilder/perspectives/page1/perspective_layout.plugin dashbuilder/perspectives/page2/perspective_layout dashbuilder/perspectives/page2/perspective_layout.plugin dashbuilder/perspectives/readme.md dashbuilder/navigation/navigation/navtree.json dashbuilder/navigation/readme.md VERSION
If you want to export the customized user created and provide dashboard data as a ZIP file, complete the following tasks:
-
On the Dashbuilder Data Transfer page, click Custom export.
-
Select the datasets and pages that you want to include in a ZIP file in the Export Wizard panel and click Next.
The Export Wizard panel validates the selected data sets and pages. The summary of the data sets and pages is available on the panel.
Navigation is always included in the exported ZIP file. -
If your export is ready, click Download.
An
export.zipfile containing customized dashboard data is downloaded.You must select the associated pages and data sets in the Export Wizard panel. If you fail to select both data sets and pages, then an error is generated and you cannot download the export.zipfile. Therefore, you must select at least one page. -
Click Finish.
-
22.4.8.2. Importing Business Central dashboard data
You can use a ZIP file to import dashboard data that you created in Business Central to another Business Central instance if the archive is structured as shown in the following example:
dashbuilder/datasets/definitions/dataset-example1.dset
dashbuilder/datasets/definitions/dataset-example2.dset
dashbuilder/datasets/readme.md
dashbuilder/perspectives/page1/perspective_layout
dashbuilder/perspectives/page1/perspective_layout.plugin
dashbuilder/perspectives/page2/perspective_layout
dashbuilder/perspectives/page2/perspective_layout.plugin
dashbuilder/perspectives/readme.md
dashbuilder/navigation/navigation/navtree.json
dashbuilder/navigation/readme.md
VERSION-
In Business Central, select the Admin icon in the upper-right corner of the screen and select Dashbuilder Data Transfer.
You must import dashboard data to a clean installation of jBPM in order to avoid overwriting data on an existing system. -
On the Dashbuilder Data Transfer page, click the Choose File icon.
-
Navigate to the ZIP file you want to import and select the file.
-
Click the Upload icon.
-
Click Import.
22.4.8.3. Deploying dashboards from Business Central on Dashbuilder Runtime
You can automatically deploy the dashboards from Business Central on Dashbuilder Runtime. Business Central is linked to Dashbuilder Runtime using a gradual export feature.
-
Dashbuilder Runtime is configured on your system.
-
You have set the
dashbuilder.runtime.multisystem property totruein thestandalone.xmlfile. -
You have set the value of
dashbuilder.runtime.locationsystem property to the Dashbuilder Runtime URL, as shown in the following example:<property name="dashbuilder.runtime.location" value=" http://localhost:8080" -
You have set the
dashbuilder.export.dirsystem property to the shared directory where Dashbuilder Runtime reads its model, as shown in the following example:<property name="dashbuilder.export.dir" value="/tmp/dashbuilder/models/"
-
In Business Central, go to Menu → Design → Pages.
-
In the Components panel, drag and edit the required component types to the canvas as needed and click Save to finish.
-
Select the Admin icon in the upper-right corner of the screen and select Dashbuilder Data Transfer.
-
On the Dashbuilder Data Transfer page, click Custom export.
-
Select the pages that you want to include in the ZIP file in the Export Wizard panel, and click Next.
-
Select Export Wizard and click Open.
You can see the Dashbuilder Runtime home page. If you are not logged in, you are redirected to the login page.
-
Go to Dashboards → Runtime Dashboards and you can see the pages.
The selected data is exported and Dashbuilder Runtime updates the model content when it is opened.
22.5. Custom Components
It is possible to extend Business Central capabilities by creating custom components and using them in pages.
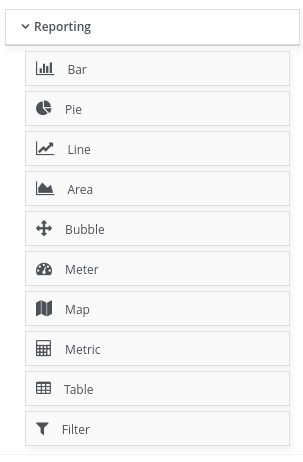
22.5.1. Creating Custom Components
Components are disabled by default. To enable components, change the system property dashbuilder.components.enable value to true. The custom external component location is set with the dashbuilder.components.dir system property. The default value is /tmp/dashbuilder/components. This must be set when using a Windows environment.
The component should be placed under components directory with a parent directory, which will be the component’s id. For example, if the component id is mycomp and the components dir is /tmp/dashbuilder/components then the component base directory is /tmp/dashbuilder/components/mycomp.
Business Central then scans all components directory looking for files named manifest.json. Manifest files must have at least the text parameter called "name", but other parameters are supported:
-
name: The component name that will be displayed in the component pallet;
-
icon: Icon that will be displayed in the component pallet;
-
noData: A flag that indicates that the component does not require a dataset;
-
parameters: A list of parameters that the components need to be collected by the user.
The list of parameters supported by the component uses ComponentParameter type, which has the following:
-
name: The parameter internal name;
-
type: Parameter type. Possible values are: text, natural_number, combo and color. When using combo type you must set comboValues;
-
category: The category which the field property will be grouped into;
-
defaultValue: The initial value presented to the user;
-
label: The label used in the component parameters UI;
-
comboValues: A list of text values for combo parameters;
-
mandatory: A flag that indicates that this parameter is mandatory;
{
"name": "Heat Map Experiment",
"icon": "fa fa-bell-o",
"parameters": [
{
"name": "svg",
"type": "text",
"defaultValue": "",
"label": "SVG XML",
"category": "SVG Content",
"mandatory": true
},
{
"name": "svgUrl",
"type": "text",
"defaultValue": "",
"label": "SVG URL",
"category": "SVG URL"
}
,
{
"name": "ksContainer",
"type": "text",
"defaultValue": "",
"label": "Container ID",
"category": "Kie Server"
}
,
{
"name": "ksProcessId",
"type": "text",
"defaultValue": "",
"label": "Process ID",
"category": "Kie Server"
}
]
}
All the properties declared in manifest file will then be available so users can fill it when dragging external components to a page.
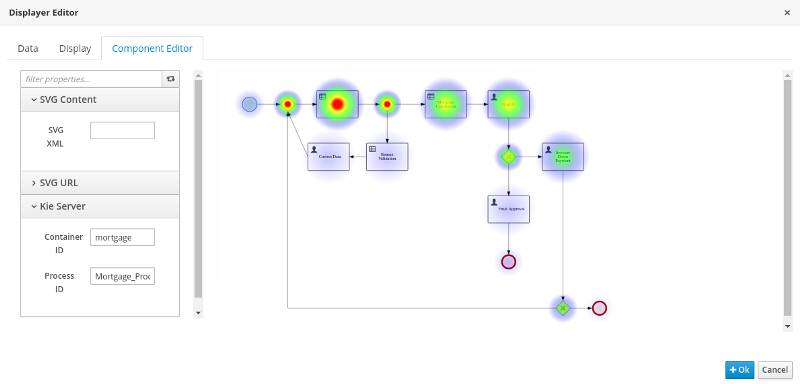
Once the component is scanned by Business Central then an index.html file will be used as the entry point to render the component.
22.5.2. Custom Components API
The information coming from Business Central can be consumed by listening messages coming to the page iframe. The event data type is ExternalComponentMessage, which has a map in property properties, which you can retrieve all the values set by the user when the component was added to the page. This translates to the following javascript code:
window.addEventListener("message", receiveMessage, false);
function receiveMessage(event) {
// consume the message
const params = new Map(event.data.properties);
}
In the above code params contains all the properties set by the user, so if a property name was declared in component’s manifest.json, then the value can be retrieved using params.get('name').
If the component supports data, i.e. noData=false, then it will be sent in the parameter dataSet, which type is ExternalDataSet and it basically contains all the dataset values in a string two-dimensional array and a list with all columns information represented by Java type ExternalColumn.
22.5.3. Exporting Components
In Business Central the Data Transfer export will include all components living in the component directory. It can be imported in another Business Central installation or in Dashbuilder Runtime, where components will be partioned by import, avoiding conflicts.
Do not share the components directory between Dashbuilder Runtime and Business Central.
|
|
Components will override existing files in Business Central. If a ZIP file contains components that are already imported in Business Central is imported again then the existing components will be overridden after the import operation. |
KIE Server
The KIE Server is a standalone execution server for rules.
23. KIE Execution Server
23.1. Overview
KIE Server is a modular, standalone server component that can be used to instantiate and execute rules and processes. It exposes this functionality via REST, JMS and Java interfaces to client application. It also provides seamless integration with the Business Central.
At its core, KIE Server is a configurable web application packaged as a WAR file. Distributions are available for pure web containers (like Tomcat) and for JEE 6 and JEE 7 containers.
Most capabilities on the Kie Server are configurable, and based on the concepts of extensions. Each extension can be enabled/disabled independently, allowing the user to configure the server to its need.
The current version of the Kie Server ships with two default extensions:
-
BRM: provides support for the execution of Business Rules using the Drools engine.
-
BPM: provides support for the execution of Business Processes using the jBPM engine. It supports:
-
process execution
-
task execution
-
asynchronous job execution
-
Both extensions enabled by default, but can be disabled by setting the corresponding property (see configuration chapter for details).
This server was designed to have a low footprint, with minimal memory consumption, and therefore, to be easily deployable on a cloud environment. Each instance of this server can open and instantiate multiple Kie Containers which allows you to execute multiple services in parallel.
23.1.1. Glossary
-
Kie Server: execution server purely focusing on providing runtime environment for both rules and processes. These capabilities are provided by Kie Server Extensions. More capabilities can be added by further extensions (e.g. customer could add his own extensions in case of missing functionality that will then use infrastructure of the KIE Server). A Kie Server instance is a standalone Kie Server executing on a given application server/web container. A Kie Server instantiates and provides support for multiple Kie Containers.
-
Kie Server Extension: a "plugin" for the Kie Server that adds capabilities to the server. The Kie Server ships with two default kie server extensions: BRM and BPM.
-
Kie Container: an in-memory instantiation of a kjar, allowing for the instantiation and usage of its assets (domain models, processes, rules, etc). A Kie Server exposes Kie Containers through a standard API over transport protocols like REST and JMS.
-
Controller: a server-backed REST endpoint that will be responsible for managing KIE Server instances. Such end point must provide following capabilities:
-
respond to connect requests
-
sync all registered containers on the corresponding Kie Server ID
-
respond to disconnect requests
-
-
Kie Server state: currently known state of given Kie Server instance. This is a local storage (by default in file) that maintains the following information:
-
list of registered jBPM controllers
-
list of known containers
-
kie server configuration
The server state is persisted upon receival of events like: Kie Container created, Kie Container is disposed, jBPM controller accepts registration of Kie Server instance, etc.
-
-
Kie Server ID: an arbitrary assigned identifier to which configurations are assigned. At boot, each Kie Server Instance is assigned an ID, and that ID is matched to a configuration on the jBPM controller. The Kie Server Instance fetches and uses that configuration to setup itself.
23.2. Installing the KIE Server
The KIE Server is distributed as a web application archive (WAR) file. The WAR file comes in three different packagings:
-
webc - WAR for ordinary Web (Servlet) containers like Tomcat
-
ee6 - WAR for JavaEE 6 containers like JBoss EAP 6.x
-
ee7 - WAR for JavaEE 7 containers like WildFly 11.x
To install the KIE Execution Server and verify it is running, complete the following steps:
-
Deploy the WAR file into your web container.
-
Create a user with the role of
kie-serveron the container. -
Test that you can access the KIE Server by navigating to the endpoint in a browser window:
http://SERVER:PORT/CONTEXT/services/rest/server/. -
When prompted for user name/password, type in the user name and password that you created in step 2.
-
Once authenticated, you will see an XML response in the form of KIE Server status, similar to this:
Example 1. Sample handshaking server response<response type="SUCCESS" msg="KIE Server info"> <kie-server-info> <version>7.55.0.Final</version> </kie-server-info> </response>
23.2.1. Installation details for different containers
23.2.1.1. Tomcat 7.x/8.x
-
Download and unzip the Tomcat distribution. Let’s call the root of the distribution
TOMCAT_HOME. This directory is named after the Tomcat version, so for exampleapache-tomcat-7.0.55. -
Download kie-server- -webc.war and place it into
TOMCAT_HOME/webapps. -
Configure user(s) and role(s). Make sure that file
TOMCAT_HOME/conf/tomcat-users.xmlcontains the following user name and role definition. You can of course choose different user name and password, just make sure that the user has rolekie-server:Example 2. User name and role definition for Tomcat<role rolename="kie-server"/> <user username="serveruser" password="my.s3cr3t.pass" roles="kie-server"/> -
Start the server by running
TOMCAT_HOME/bin/startup.[sh|bat]. You can check out the Tomcat logs inTOMCAT_HOME/logsto see if the application deployed successfully. Please read the table above for the bootstrap switches that can be used to properly configure the instance. For instance:./startup.sh -Dorg.kie.server.id=first-kie-server -Dorg.kie.server.location=http://localhost:8080/kie-server/services/rest/server -
Verify the server is running. Go to
http://SERVER:PORT/CONTEXT/services/rest/server/and type the specified user name and password. You should see simple XML message with basic information about the server.
|
You can not leverage the JMS interface when running with Tomcat, or any other Web container. The Web container version of the WAR contains only the REST interface. |
23.2.1.2. WildFly 11.x
-
Download and unzip the WildFly distribution. Let’s call the root of the distribution
WILDFLY_HOME. This directory is named after the WildFly version, so for examplewildfly-14.0.1.Final. -
Download kie-server- -ee7.war and place it into
WILDFLY_HOME/standalone/deployments. -
Configure user(s) and role(s). Execute the following command
WILDFLY_HOME/bin/add-user.[sh|bat] -a -u 'kieserver' -p 'kieserver1!' -ro 'kie-server'. You can of course choose different user name and password, just make sure that the user has rolekie-server. -
Start the server by running
WILDFLY_HOME/bin/standalone.[sh|bat] -c standalone-full.xml <bootstrap_switches>. You can check out the standard output or WildFly logs inWILDFLY_HOME/standalone/logsto see if the application deployed successfully. Please read the table above for the bootstrap switches that can be used to properly configure the instance. For instance:./standalone.sh --server-config=standalone-full.xml -Djboss.socket.binding.port-offset=150 -Dorg.kie.server.id=first-kie-server -Dorg.kie.server.location=http://localhost:8230/kie-server/services/rest/server -
Verify the server is running. Go to
http://SERVER:PORT/CONTEXT/services/rest/server/and type the specified user name and password. You should see simple XML message with basic information about the server.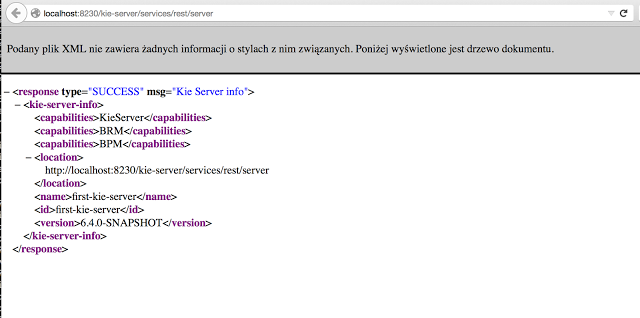
23.3. KIE Server system properties
The KIE Server accepts the following system properties (bootstrap switches) to configure the behavior of the server:
| Property | Values | Default | Description |
|---|---|---|---|
|
|
|
If set to |
|
|
|
If set to |
|
|
|
If set to |
|
|
|
If set to |
|
|
|
If set to |
|
|
|
If set to |
|
|
|
If set to |
|
|
|
If set to |
|
|
|
If set to |
| Some jBPM controller properties listed in the following table are marked as required. Set these properties when you create or remove KIE Server containers in Business Central. If you use the KIE Server separately without any interaction with Business Central, you do not need to set the required properties. |
| Property | Values | Default | Description |
|---|---|---|---|
|
String |
N/A |
An arbitrary ID to be assigned to the server. If a headless jBPM controller is configured outside of Business Central, this is the ID under which the server connects to the headless jBPM controller to fetch the KIE container configurations. If not provided, the ID is automatically generated. |
|
String |
|
The user name used to connect with the KIE Server from the jBPM controller, required when running in managed mode. Set this property in Business Central system properties. Set this property when using a jBPM controller. |
|
String |
|
The password used to connect with the KIE Server from the jBPM controller, required when running in managed mode. Set this property in Business Central system properties. Set this property when using a jBPM controller. |
|
String |
N/A |
A property that enables you to use token-based authentication between the jBPM controller and the KIE Server instead of the basic user name and password authentication. The jBPM controller sends the token as a parameter in the request header. The server requires long-lived access tokens because the tokens are not refreshed. |
|
URL |
N/A |
The URL of the KIE Server instance used by the jBPM controller to call back on this server, for example, |
|
Comma-separated list |
N/A |
A comma-separated list of URLs to the jBPM controller REST endpoints, for example, |
|
String |
|
The user name to connect to the jBPM controller REST API. Setting this property is required when using a jBPM controller. |
|
String |
|
The password to connect to the jBPM controller REST API. Setting this property is required when using a jBPM controller. |
|
String |
N/A |
A property that enables you to use token-based authentication between the KIE Server and the jBPM controller instead of the basic user name and password authentication. The server sends the token as a parameter in the request header. The server requires long-lived access tokens because the tokens are not refreshed. |
|
Long |
|
The waiting time in milliseconds between repeated attempts to connect the KIE Server to the jBPM controller when the server starts. |
| Property | Values | Default | Description |
|---|---|---|---|
|
String |
N/A |
A data source JNDI name. Set this property when enabling the BPM support. |
|
String |
N/A |
A transaction manager platform for Hibernate properties. Set this property when enabling the BPM support. |
|
String |
N/A |
The Hibernate dialect to be used. Set this property when enabling the BPM support. |
|
String |
N/A |
The database schema to be used. |
| Property | Values | Default | Description |
|---|---|---|---|
|
Integer |
|
The time between the moment the jBPM executor finishes a job and the moment it starts a new one, in a time unit specified in the |
|
|
|
The time unit in which the |
|
Integer |
|
The number of threads used by the jBPM executor. |
|
Integer |
|
The number of retries the jBPM executor attempts on a failed job. |
|
String |
|
Job executor JMS queue for KIE Server. |
|
|
|
If set to |
| Property | Values | Default | Description |
|---|---|---|---|
|
|
|
A property that specifies the implementation of user group callback to be used:
|
|
Fully qualified name |
N/A |
A custom implementation of the |
|
|
|
Enables task cleanup job listener to remove tasks once the process instance is completed. |
|
|
|
Enables task BAM module to store task related information. |
|
String |
|
User who can access all the tasks from KIE Server. |
|
String |
|
The group that users must belong to in order to view all the tasks from KIE Server. |
| Property | Values | Default | Description |
|---|---|---|---|
|
URL |
N/A |
The URL is used to load a Java Cryptography Extension KeyStore (JCEKS). For example, |
|
String |
N/A |
The password is used for the JCEKS. |
|
String |
N/A |
The alias name of the key for REST services where the password is stored. |
|
String |
N/A |
The password of an alias for REST services. |
|
String |
N/A |
The alias of the key for default REST jBPM controller. |
|
String |
N/A |
The password of an alias for default REST jBPM controller. |
| Property | Values | Default | Description |
|---|---|---|---|
|
Integer |
5 |
This property describes how many times the process engine retries a transaction before failing permanently. |
|
Integer |
50 |
The delay time before the first retry, in milliseconds. |
|
Integer |
4 |
The multiplier for increasing the delay time for each subsequent retry. With the default values, the process engine waits 50 milliseconds before the first retry, 200 milliseconds before the second retry, 800 milliseconds before the third retry, and so on. |
| Property | Values | Default | Description |
|---|---|---|---|
|
Path |
N/A |
The location of a custom |
|
String |
|
The response queue JNDI name for JMS. |
|
|
|
When set to |
|
|
|
A property that enables you to bypass the authenticated user for task-related operations, for example queries. |
|
Integer |
|
This property specifies the maximum number of executed rules to avoid situations where rules run into an infinite loop and make the server completely unresponsive. |
|
|
|
This property turns off the EJB Timers local cache. |
|
String |
N/A |
The JAAS |
|
Path |
|
The location where KIE Server state files are stored. |
|
|
|
A property that instructs the KIE Server to hold the deployment until the jBPM controller provides the container deployment configuration. This property only affects servers running in managed mode. The following options are available: * |
|
|
|
The Startup strategy of KIE Server used to control the KIE containers that are deployed and the order in which they are deployed. |
|
|
|
When set to |
|
Java packages like |
N/A |
A property that specifies additional packages to allowlist for marshalling using XStream. |
|
String |
|
Fully qualified name of the class that implements |
|
|
|
While using JSON marshalling, if the property is set to |
|
|
|
When the value of this property is set to |
23.4. KIE Server capabilities and extensions
The capabilities in KIE Server are determined by plug-in extensions that you can enable, disable, or further extend to meet your business needs. KIE Server supports the following default capabilities and extensions:
| Capability name | Extension name | Description |
|---|---|---|
|
|
Provides the core capabilities of KIE Server, such as creating and disposing KIE containers on your server instance |
|
|
Provides the Business Rule Management (BRM) capabilities, such as inserting facts and executing business rules |
|
|
Provides the Business Process Management (BPM) capabilities, such as managing user tasks and executing business processes |
|
|
Provides additional user-interface capabilities related to business processes, such as rendering XML forms and SVG images in process diagrams |
|
|
Provides the case management capabilities for business processes, such as managing case definitions and milestones |
|
|
Provides the Business Resource Planning (BRP) capabilities, such as implementing solvers |
|
|
Provides the Decision Model and Notation (DMN) capabilities, such as managing DMN data types and executing DMN models |
|
|
Provides the Swagger web-interface capabilities for interacting with the KIE Server REST API |
To view the supported extensions of a running KIE Server instance, send a GET request to the following REST API endpoint and review the XML or JSON server response:
http://SERVER:PORT/kie-server/services/rest/server{
"type": "SUCCESS",
"msg": "Kie Server info",
"result": {
"kie-server-info": {
"id": "test-kie-server",
"version": "7.26.0.20190818-050814",
"name": "test-kie-server",
"location": "http://localhost:8080/kie-server/services/rest/server",
"capabilities": [
"KieServer",
"BRM",
"BPM",
"CaseMgmt",
"BPM-UI",
"BRP",
"DMN",
"Swagger"
],
"messages": [
{
"severity": "INFO",
"timestamp": {
"java.util.Date": 1566169865791
},
"content": [
"Server KieServerInfo{serverId='test-kie-server', version='7.26.0.20190818-050814', name='test-kie-server', location='http:/localhost:8080/kie-server/services/rest/server', capabilities=[KieServer, BRM, BPM, CaseMgmt, BPM-UI, BRP, DMN, Swagger]', messages=null', mode=DEVELOPMENT}started successfully at Sun Aug 18 23:11:05 UTC 2019"
]
}
],
"mode": "DEVELOPMENT"
}
}
}To enable or disable KIE Server extensions, configure the related *.server.ext.disabled KIE Server system property. For example, to disable the BRM capability, set the system property org.drools.server.ext.disabled=true. For all KIE Server system properties, see
KIE Server system properties.
By default, KIE Server extensions are exposed through REST or JMS data transports and use predefined client APIs. You can extend existing KIE Server capabilities with additional REST endpoints, extend supported transport methods beyond REST or JMS, or extend functionality in the KIE Server client.
This flexibility in KIE Server functionality enables you to adapt your KIE Server instances to your business needs, instead of adapting your business needs to the default KIE Server capabilities.
23.4.1. Extending an existing KIE Server capability with a custom REST API endpoint
The KIE Server REST API enables you to interact with your KIE containers and business assets (such as business rules, processes, and solvers) in jBPM without using the Business Central user interface. The available REST endpoints are determined by the capabilities enabled in your KIE Server system properties (for example, org.drools.server.ext.disabled=false for the BRM capability). You can extend an existing KIE Server capability with a custom REST API endpoint to further adapt the KIE Server REST API to your business needs.
As an example, this procedure extends the Drools KIE Server extension (for the BRM capability) with the following custom REST API endpoint:
/server/containers/instances/{containerId}/ksession/{ksessionId}This example custom endpoint accepts a list of facts to be inserted into the working memory of the Drools engine, automatically executes all rules, and retrieves all objects from the KIE session in the specified KIE container.
-
Create an empty Maven project and define the following packaging type and dependencies in the
pom.xmlfile for the project:Example pom.xml file in the sample project<packaging>jar</packaging> <properties> <version.org.kie>7.52.0.Final</version.org.kie> </properties> <dependencies> <dependency> <groupId>org.kie</groupId> <artifactId>kie-api</artifactId> <version>${version.org.kie}</version> </dependency> <dependency> <groupId>org.kie</groupId> <artifactId>kie-internal</artifactId> <version>${version.org.kie}</version> </dependency> <dependency> <groupId>org.kie.server</groupId> <artifactId>kie-server-api</artifactId> <version>${version.org.kie}</version> </dependency> <dependency> <groupId>org.kie.server</groupId> <artifactId>kie-server-services-common</artifactId> <version>${version.org.kie}</version> </dependency> <dependency> <groupId>org.kie.server</groupId> <artifactId>kie-server-services-drools</artifactId> <version>${version.org.kie}</version> </dependency> <dependency> <groupId>org.kie.server</groupId> <artifactId>kie-server-rest-common</artifactId> <version>${version.org.kie}</version> </dependency> <dependency> <groupId>org.drools</groupId> <artifactId>drools-core</artifactId> <version>${version.org.kie}</version> </dependency> <dependency> <groupId>org.drools</groupId> <artifactId>drools-compiler</artifactId> <version>${version.org.kie}</version> </dependency> <dependency> <groupId>org.slf4j</groupId> <artifactId>slf4j-api</artifactId> <version>1.7.25</version> </dependency> </dependencies> -
Implement the
org.kie.server.services.api.KieServerApplicationComponentsServiceinterface in a Java class in your project, as shown in the following example:Sample implementation of theKieServerApplicationComponentsServiceinterfacepublic class CusomtDroolsKieServerApplicationComponentsService implements KieServerApplicationComponentsService { (1) private static final String OWNER_EXTENSION = "Drools"; (2) public Collection<Object> getAppComponents(String extension, SupportedTransports type, Object... services) { (3) // Do not accept calls from extensions other than the owner extension: if ( !OWNER_EXTENSION.equals(extension) ) { return Collections.emptyList(); } RulesExecutionService rulesExecutionService = null; (4) KieServerRegistry context = null; for( Object object : services ) { if( RulesExecutionService.class.isAssignableFrom(object.getClass()) ) { rulesExecutionService = (RulesExecutionService) object; continue; } else if( KieServerRegistry.class.isAssignableFrom(object.getClass()) ) { context = (KieServerRegistry) object; continue; } } List<Object> components = new ArrayList<Object>(1); if( SupportedTransports.REST.equals(type) ) { components.add(new CustomResource(rulesExecutionService, context)); (5) } return components; } }1 Delivers REST endpoints to the KIE Server infrastructure that is deployed when the application starts. 2 Specifies the extension that you are extending, such as the Droolsextension in this example.3 Returns all resources that the REST container must deploy. Each extension that is enabled in your KIE Server instance calls the getAppComponentsmethod, so theif ( !OWNER_EXTENSION.equals(extension) )call returns an empty collection for any extensions other than the specifiedOWNER_EXTENSIONextension.4 Lists the services from the specified extension that you want to use, such as the RulesExecutionServiceandKieServerRegistryservices from theDroolsextension in this example.5 Specifies the transport type for the extension, either RESTorJMS(RESTin this example), and theCustomResourceclass that returns the resource as part of thecomponentslist. -
Implement the
CustomResourceclass that the KIE Server can use to provide the additional functionality for the new REST resource, as shown in the following example:Sample implementation of theCustomResourceclass// Custom base endpoint: @Path("server/containers/instances/{containerId}/ksession") public class CustomResource { private static final Logger logger = LoggerFactory.getLogger(CustomResource.class); private KieCommands commandsFactory = KieServices.Factory.get().getCommands(); private RulesExecutionService rulesExecutionService; private KieServerRegistry registry; public CustomResource() { } public CustomResource(RulesExecutionService rulesExecutionService, KieServerRegistry registry) { this.rulesExecutionService = rulesExecutionService; this.registry = registry; } // Supported HTTP method, path parameters, and data formats: @POST @Path("/{ksessionId}") @Consumes({MediaType.APPLICATION_XML, MediaType.APPLICATION_JSON}) @Produces({MediaType.APPLICATION_XML, MediaType.APPLICATION_JSON}) public Response insertFireReturn(@Context HttpHeaders headers, @PathParam("containerId") String id, @PathParam("ksessionId") String ksessionId, String cmdPayload) { Variant v = getVariant(headers); String contentType = getContentType(headers); // Marshalling behavior and supported actions: MarshallingFormat format = MarshallingFormat.fromType(contentType); if (format == null) { format = MarshallingFormat.valueOf(contentType); } try { KieContainerInstance kci = registry.getContainer(id); Marshaller marshaller = kci.getMarshaller(format); List<?> listOfFacts = marshaller.unmarshall(cmdPayload, List.class); List<Command<?>> commands = new ArrayList<Command<?>>(); BatchExecutionCommand executionCommand = commandsFactory.newBatchExecution(commands, ksessionId); for (Object fact : listOfFacts) { commands.add(commandsFactory.newInsert(fact, fact.toString())); } commands.add(commandsFactory.newFireAllRules()); commands.add(commandsFactory.newGetObjects()); ExecutionResults results = rulesExecutionService.call(kci, executionCommand); String result = marshaller.marshall(results); logger.debug("Returning OK response with content '{}'", result); return createResponse(result, v, Response.Status.OK); } catch (Exception e) { // If marshalling fails, return the `call-container` response to maintain backward compatibility: String response = "Execution failed with error : " + e.getMessage(); logger.debug("Returning Failure response with content '{}'", response); return createResponse(response, v, Response.Status.INTERNAL_SERVER_ERROR); } } }In this example, the
CustomResourceclass for the custom endpoint specifies the following data and behavior:-
Uses the base endpoint
server/containers/instances/{containerId}/ksession -
Uses
POSTHTTP method -
Expects the following data to be given in REST requests:
-
The
containerIdas a path argument -
The
ksessionIdas a path argument -
List of facts as a message payload
-
-
Supports all KIE Server data formats:
-
XML (JAXB, XStream)
-
JSON
-
-
Unmarshals the payload into a
List<?>collection and, for each item in the list, creates anInsertCommandinstance followed byFireAllRulesandGetObjectcommands. -
Adds all commands to the
BatchExecutionCommandinstance that calls to the Drools engine.
-
-
To make the new endpoint discoverable for KIE Server, create a
META-INF/services/org.kie.server.services.api.KieServerApplicationComponentsServicefile in your Maven project and add the fully qualified class name of theKieServerApplicationComponentsServiceimplementation class within the file. For this example, the file contains the single lineorg.kie.server.ext.drools.rest.CusomtDroolsKieServerApplicationComponentsService. -
Build your project and copy the resulting JAR file into the
~/kie-server.war/WEB-INF/libdirectory of your project. -
Start the KIE Server and deploy the built project to the running KIE Server. You can deploy the project using either the Business Central interface or the KIE Server REST API (a
PUTrequest tohttp://SERVER:PORT/kie-server/services/rest/server/containers/{containerId}).After your project is deployed on a running KIE Server, you can start interacting with your new REST endpoint.
For this example, you can use the following information to invoke the new endpoint:
-
Example request URL:
http://localhost:8080/kie-server/services/rest/server/containers/instances/demo/ksession/defaultKieSession -
HTTP method:
POST -
HTTP headers:
-
Content-Type: application/json -
Accept: application/json
-
-
Example message payload:
[ { "org.jbpm.test.Person": { "name": "john", "age": 25 } }, { "org.jbpm.test.Person": { "name": "mary", "age": 22 } } ] -
Example server response:
200(success) -
Example server log output:
13:37:20,347 INFO [stdout] (default task-24) Hello mary 13:37:20,348 INFO [stdout] (default task-24) Hello john
-
23.4.2. Extending KIE Server to use a custom data transport
By default, KIE Server extensions are exposed through REST or JMS data transports. You can extend KIE Server to support a custom data transport to adapt KIE Server transport protocols to your business needs.
As an example, this procedure adds a custom data transport to KIE Server that uses the Drools extension and that is based on Apache MINA, an open-source Java network-application framework. The example custom MINA transport exchanges string-based data that relies on existing marshalling operations and supports only JSON format.
-
Create an empty Maven project and define the following packaging type and dependencies in the
pom.xmlfile for the project:Example pom.xml file in the sample project<packaging>jar</packaging> <properties> <version.org.kie>7.52.0.Final</version.org.kie> </properties> <dependencies> <dependency> <groupId>org.kie</groupId> <artifactId>kie-api</artifactId> <version>${version.org.kie}</version> </dependency> <dependency> <groupId>org.kie</groupId> <artifactId>kie-internal</artifactId> <version>${version.org.kie}</version> </dependency> <dependency> <groupId>org.kie.server</groupId> <artifactId>kie-server-api</artifactId> <version>${version.org.kie}</version> </dependency> <dependency> <groupId>org.kie.server</groupId> <artifactId>kie-server-services-common</artifactId> <version>${version.org.kie}</version> </dependency> <dependency> <groupId>org.kie.server</groupId> <artifactId>kie-server-services-drools</artifactId> <version>${version.org.kie}</version> </dependency> <dependency> <groupId>org.drools</groupId> <artifactId>drools-core</artifactId> <version>${version.org.kie}</version> </dependency> <dependency> <groupId>org.drools</groupId> <artifactId>drools-compiler</artifactId> <version>${version.org.kie}</version> </dependency> <dependency> <groupId>org.slf4j</groupId> <artifactId>slf4j-api</artifactId> <version>1.7.25</version> </dependency> <dependency> <groupId>org.apache.mina</groupId> <artifactId>mina-core</artifactId> <version>2.1.3</version> </dependency> </dependencies> -
Implement the
org.kie.server.services.api.KieServerExtensioninterface in a Java class in your project, as shown in the following example:Sample implementation of theKieServerExtensioninterfacepublic class MinaDroolsKieServerExtension implements KieServerExtension { private static final Logger logger = LoggerFactory.getLogger(MinaDroolsKieServerExtension.class); public static final String EXTENSION_NAME = "Drools-Mina"; private static final Boolean disabled = Boolean.parseBoolean(System.getProperty("org.kie.server.drools-mina.ext.disabled", "false")); private static final String MINA_HOST = System.getProperty("org.kie.server.drools-mina.ext.port", "localhost"); private static final int MINA_PORT = Integer.parseInt(System.getProperty("org.kie.server.drools-mina.ext.port", "9123")); // Taken from dependency on the `Drools` extension: private KieContainerCommandService batchCommandService; // Specific to MINA: private IoAcceptor acceptor; public boolean isActive() { return disabled == false; } public void init(KieServerImpl kieServer, KieServerRegistry registry) { KieServerExtension droolsExtension = registry.getServerExtension("Drools"); if (droolsExtension == null) { logger.warn("No Drools extension available, quitting..."); return; } List<Object> droolsServices = droolsExtension.getServices(); for( Object object : droolsServices ) { // If the given service is null (not configured), continue to the next service: if (object == null) { continue; } if( KieContainerCommandService.class.isAssignableFrom(object.getClass()) ) { batchCommandService = (KieContainerCommandService) object; continue; } } if (batchCommandService != null) { acceptor = new NioSocketAcceptor(); acceptor.getFilterChain().addLast( "codec", new ProtocolCodecFilter( new TextLineCodecFactory( Charset.forName( "UTF-8" )))); acceptor.setHandler( new TextBasedIoHandlerAdapter(batchCommandService) ); acceptor.getSessionConfig().setReadBufferSize( 2048 ); acceptor.getSessionConfig().setIdleTime( IdleStatus.BOTH_IDLE, 10 ); try { acceptor.bind( new InetSocketAddress(MINA_HOST, MINA_PORT) ); logger.info("{} -- Mina server started at {} and port {}", toString(), MINA_HOST, MINA_PORT); } catch (IOException e) { logger.error("Unable to start Mina acceptor due to {}", e.getMessage(), e); } } } public void destroy(KieServerImpl kieServer, KieServerRegistry registry) { if (acceptor != null) { acceptor.dispose(); acceptor = null; } logger.info("{} -- Mina server stopped", toString()); } public void createContainer(String id, KieContainerInstance kieContainerInstance, Map<String, Object> parameters) { // Empty, already handled by the `Drools` extension } public void disposeContainer(String id, KieContainerInstance kieContainerInstance, Map<String, Object> parameters) { // Empty, already handled by the `Drools` extension } public List<Object> getAppComponents(SupportedTransports type) { // Nothing for supported transports (REST or JMS) return Collections.emptyList(); } public <T> T getAppComponents(Class<T> serviceType) { return null; } public String getImplementedCapability() { return "BRM-Mina"; } public List<Object> getServices() { return Collections.emptyList(); } public String getExtensionName() { return EXTENSION_NAME; } public Integer getStartOrder() { return 20; } @Override public String toString() { return EXTENSION_NAME + " KIE Server extension"; } }The
KieServerExtensioninterface is the main extension interface that KIE Server can use to provide the additional functionality for the new MINA transport. The interface consists of the following components:Overview of theKieServerExtensioninterfacepublic interface KieServerExtension { boolean isActive(); void init(KieServerImpl kieServer, KieServerRegistry registry); void destroy(KieServerImpl kieServer, KieServerRegistry registry); void createContainer(String id, KieContainerInstance kieContainerInstance, Map<String, Object> parameters); void disposeContainer(String id, KieContainerInstance kieContainerInstance, Map<String, Object> parameters); List<Object> getAppComponents(SupportedTransports type); <T> T getAppComponents(Class<T> serviceType); String getImplementedCapability(); (1) List<Object> getServices(); String getExtensionName(); (2) Integer getStartOrder(); (3) }1 Specifies the capability that is covered by this extension. The capability must be unique within KIE Server. 2 Defines a human-readable name for the extension. 3 Determines when the specified extension should be started. For extensions that have dependencies on other extensions, this setting must not conflict with the parent setting. For example, in this case, this custom extension depends on the Droolsextension, which hasStartOrderset to0, so this custom add-on extension must be greater than0(set to20in the sample implementation).In the previous
MinaDroolsKieServerExtensionsample implementation of this interface, theinitmethod is the main element for collecting services from theDroolsextension and for bootstrapping the MINA server. All other methods in theKieServerExtensioninterface can remain with the standard implementation to fulfill interface requirements.The
TextBasedIoHandlerAdapterclass is the handler on the MINA server that reacts to incoming requests. -
Implement the
TextBasedIoHandlerAdapterhandler for the MINA server, as shown in the following example:Sample implementation of theTextBasedIoHandlerAdapterhandlerpublic class TextBasedIoHandlerAdapter extends IoHandlerAdapter { private static final Logger logger = LoggerFactory.getLogger(TextBasedIoHandlerAdapter.class); private KieContainerCommandService batchCommandService; public TextBasedIoHandlerAdapter(KieContainerCommandService batchCommandService) { this.batchCommandService = batchCommandService; } @Override public void messageReceived( IoSession session, Object message ) throws Exception { String completeMessage = message.toString(); logger.debug("Received message '{}'", completeMessage); if( completeMessage.trim().equalsIgnoreCase("quit") || completeMessage.trim().equalsIgnoreCase("exit") ) { session.close(false); return; } String[] elements = completeMessage.split("\\|"); logger.debug("Container id {}", elements[0]); try { ServiceResponse<String> result = batchCommandService.callContainer(elements[0], elements[1], MarshallingFormat.JSON, null); if (result.getType().equals(ServiceResponse.ResponseType.SUCCESS)) { session.write(result.getResult()); logger.debug("Successful message written with content '{}'", result.getResult()); } else { session.write(result.getMsg()); logger.debug("Failure message written with content '{}'", result.getMsg()); } } catch (Exception e) { } } }In this example, the handler class receives text messages and executes them in the
Droolsservice.Consider the following handler requirements and behavior when you use the
TextBasedIoHandlerAdapterhandler implementation:-
Anything that you submit to the handler must be a single line because each incoming transport request is a single line.
-
You must pass a KIE container ID in this single line so that the handler expects the format
containerID|payload. -
You can set a response in the way that it is produced by the marshaller. The response can be multiple lines.
-
The handler supports a stream mode that enables you to send commands without disconnecting from a KIE Server session. To end a KIE Server session in stream mode, send either an
exitorquitcommand to the server.
-
-
To make the new data transport discoverable for KIE Server, create a
META-INF/services/org.kie.server.services.api.KieServerExtensionfile in your Maven project and add the fully qualified class name of theKieServerExtensionimplementation class within the file. For this example, the file contains the single lineorg.kie.server.ext.mina.MinaDroolsKieServerExtension. -
Build your project and copy the resulting JAR file and the
mina-core-2.0.9.jarfile (which the extension depends on in this example) into the~/kie-server.war/WEB-INF/libdirectory of your project. -
Start the KIE Server and deploy the built project to the running KIE Server. You can deploy the project using either the Business Central interface or the KIE Server REST API (a
PUTrequest tohttp://SERVER:PORT/kie-server/services/rest/server/containers/{containerId}).After your project is deployed on a running KIE Server, you can view the status of the new data transport in your KIE Server log and start using your new data transport:
New data transport in the server logDrools-Mina KIE Server extension -- Mina server started at localhost and port 9123 Drools-Mina KIE Server extension has been successfully registered as server extensionFor this example, you can use Telnet to interact with the new MINA-based data transport in KIE Server:
Starting Telnet and connecting to KIE Server on port 9123 in a command terminaltelnet 127.0.0.1 9123Example interactions with KIE Server in a command terminalTrying 127.0.0.1... Connected to localhost. Escape character is '^]'. # Request body: demo|{"lookup":"defaultKieSession","commands":[{"insert":{"object":{"org.jbpm.test.Person":{"name":"john","age":25}}}},{"fire-all-rules":""}]} # Server response: { "results" : [ { "key" : "", "value" : 1 } ], "facts" : [ ] } demo|{"lookup":"defaultKieSession","commands":[{"insert":{"object":{"org.jbpm.test.Person":{"name":"mary","age":22}}}},{"fire-all-rules":""}]} { "results" : [ { "key" : "", "value" : 1 } ], "facts" : [ ] } demo|{"lookup":"defaultKieSession","commands":[{"insert":{"object":{"org.jbpm.test.Person":{"name":"james","age":25}}}},{"fire-all-rules":""}]} { "results" : [ { "key" : "", "value" : 1 } ], "facts" : [ ] } exit Connection closed by foreign host.Example server log output16:33:40,206 INFO [stdout] (NioProcessor-2) Hello john 16:34:03,877 INFO [stdout] (NioProcessor-2) Hello mary 16:34:19,800 INFO [stdout] (NioProcessor-2) Hello james
23.4.3. Extending the KIE Server client with a custom client API
KIE Server uses predefined client APIs that you can interact with to use KIE Server services. You can extend the KIE Server client with a custom client API to adapt KIE Server services to your business needs.
As an example, this procedure adds a custom client API to KIE Server to accommodate a custom data transport (configured previously for this scenario) that is based on Apache MINA, an open-source Java network-application framework.
-
Create an empty Maven project and define the following packaging type and dependencies in the
pom.xmlfile for the project:Example pom.xml file in the sample project<packaging>jar</packaging> <properties> <version.org.kie>7.52.0.Final</version.org.kie> </properties> <dependencies> <dependency> <groupId>org.kie.server</groupId> <artifactId>kie-server-api</artifactId> <version>${version.org.kie}</version> </dependency> <dependency> <groupId>org.kie.server</groupId> <artifactId>kie-server-client</artifactId> <version>${version.org.kie}</version> </dependency> <dependency> <groupId>org.drools</groupId> <artifactId>drools-compiler</artifactId> <version>${version.org.kie}</version> </dependency> </dependencies> -
Implement the relevant
ServicesClientinterface in a Java class in your project, as shown in the following example:SampleRulesMinaServicesClientinterfacepublic interface RulesMinaServicesClient extends RuleServicesClient { }A specific interface is required because you must register client implementations based on the interface, and you can have only one implementation for a given interface.
For this example, the custom MINA-based data transport uses the
Droolsextension, so this exampleRulesMinaServicesClientinterface extends the existingRuleServicesClientclient API from theDroolsextension. -
Implement the
RulesMinaServicesClientinterface that the KIE Server can use to provide the additional client functionality for the new MINA transport, as shown in the following example:Sample implementation of theRulesMinaServicesClientinterfacepublic class RulesMinaServicesClientImpl implements RulesMinaServicesClient { private String host; private Integer port; private Marshaller marshaller; public RulesMinaServicesClientImpl(KieServicesConfiguration configuration, ClassLoader classloader) { String[] serverDetails = configuration.getServerUrl().split(":"); this.host = serverDetails[0]; this.port = Integer.parseInt(serverDetails[1]); this.marshaller = MarshallerFactory.getMarshaller(configuration.getExtraJaxbClasses(), MarshallingFormat.JSON, classloader); } public ServiceResponse<String> executeCommands(String id, String payload) { try { String response = sendReceive(id, payload); if (response.startsWith("{")) { return new ServiceResponse<String>(ResponseType.SUCCESS, null, response); } else { return new ServiceResponse<String>(ResponseType.FAILURE, response); } } catch (Exception e) { throw new KieServicesException("Unable to send request to KIE Server", e); } } public ServiceResponse<String> executeCommands(String id, Command<?> cmd) { try { String response = sendReceive(id, marshaller.marshall(cmd)); if (response.startsWith("{")) { return new ServiceResponse<String>(ResponseType.SUCCESS, null, response); } else { return new ServiceResponse<String>(ResponseType.FAILURE, response); } } catch (Exception e) { throw new KieServicesException("Unable to send request to KIE Server", e); } } protected String sendReceive(String containerId, String content) throws Exception { // Flatten the content to be single line: content = content.replaceAll("\\n", ""); Socket minaSocket = null; PrintWriter out = null; BufferedReader in = null; StringBuffer data = new StringBuffer(); try { minaSocket = new Socket(host, port); out = new PrintWriter(minaSocket.getOutputStream(), true); in = new BufferedReader(new InputStreamReader(minaSocket.getInputStream())); // Prepare and send data: out.println(containerId + "|" + content); // Wait for the first line: data.append(in.readLine()); // Continue as long as data is available: while (in.ready()) { data.append(in.readLine()); } return data.toString(); } finally { out.close(); in.close(); minaSocket.close(); } } }This example implementation specifies the following data and behavior:
-
Uses socket-based communication for simplicity
-
Relies on default configurations from the KIE Server client and uses
ServerUrlfor providing the host and port of the MINA server -
Specifies JSON as the marshalling format
-
Requires received messages to be JSON objects that start with an open bracket
{ -
Uses direct socket communication with a blocking API while waiting for the first line of the response and then reads all lines that are available
-
Does not use stream mode and therefore disconnects the KIE Server session after invoking a command
-
-
Implement the
org.kie.server.client.helper.KieServicesClientBuilderinterface in a Java class in your project, as shown in the following example:Sample implementation of theKieServicesClientBuilderinterfacepublic class MinaClientBuilderImpl implements KieServicesClientBuilder { (1) public String getImplementedCapability() { (2) return "BRM-Mina"; } public Map<Class<?>, Object> build(KieServicesConfiguration configuration, ClassLoader classLoader) { (3) Map<Class<?>, Object> services = new HashMap<Class<?>, Object>(); services.put(RulesMinaServicesClient.class, new RulesMinaServicesClientImpl(configuration, classLoader)); return services; } }1 Enables you to provide additional client APIs to the generic KIE Server client infrastructure 2 Defines the KIE Server capability (extension) that the client uses 3 Provides a map of the client implementations, where the key is the interface and the value is the fully initialized implementation -
To make the new client API discoverable for the KIE Server client, create a
META-INF/services/org.kie.server.client.helper.KieServicesClientBuilderfile in your Maven project and add the fully qualified class name of theKieServicesClientBuilderimplementation class within the file. For this example, the file contains the single lineorg.kie.server.ext.mina.client.MinaClientBuilderImpl. -
Build your project and copy the resulting JAR file into the
~/kie-server.war/WEB-INF/libdirectory of your project. -
Start the KIE Server and deploy the built project to the running KIE Server. You can deploy the project using either the Business Central interface or the KIE Server REST API (a
PUTrequest tohttp://SERVER:PORT/kie-server/services/rest/server/containers/{containerId}).After your project is deployed on a running KIE Server, you can start interacting with your new KIE Server client. You use your new client in the same way as the standard KIE Server client, by creating the client configuration and client instance, retrieving the service client by type, and invoking client methods.
For this example, you can create a
RulesMinaServiceClientclient instance and invoke operations on KIE Server through the MINA transport:Sample implementation to create theRulesMinaServiceClientclientprotected RulesMinaServicesClient buildClient() { KieServicesConfiguration configuration = KieServicesFactory.newRestConfiguration("localhost:9123", null, null); List<String> capabilities = new ArrayList<String>(); // Explicitly add capabilities (the MINA client does not respond to `get-server-info` requests): capabilities.add("BRM-Mina"); configuration.setCapabilities(capabilities); configuration.setMarshallingFormat(MarshallingFormat.JSON); configuration.addJaxbClasses(extraClasses); KieServicesClient kieServicesClient = KieServicesFactory.newKieServicesClient(configuration); RulesMinaServicesClient rulesClient = kieServicesClient.getServicesClient(RulesMinaServicesClient.class); return rulesClient; }Sample configuration to invoke operations on KIE Server through the MINA transportRulesMinaServicesClient rulesClient = buildClient(); List<Command<?>> commands = new ArrayList<Command<?>>(); BatchExecutionCommand executionCommand = commandsFactory.newBatchExecution(commands, "defaultKieSession"); Person person = new Person(); person.setName("mary"); commands.add(commandsFactory.newInsert(person, "person")); commands.add(commandsFactory.newFireAllRules("fired")); ServiceResponse<String> response = rulesClient.executeCommands(containerId, executionCommand); Assert.assertNotNull(response); Assert.assertEquals(ResponseType.SUCCESS, response.getType()); String data = response.getResult(); Marshaller marshaller = MarshallerFactory.getMarshaller(extraClasses, MarshallingFormat.JSON, this.getClass().getClassLoader()); ExecutionResultImpl results = marshaller.unmarshall(data, ExecutionResultImpl.class); Assert.assertNotNull(results); Object personResult = results.getValue("person"); Assert.assertTrue(personResult instanceof Person); Assert.assertEquals("mary", ((Person) personResult).getName()); Assert.assertEquals("JBoss Community", ((Person) personResult).getAddress()); Assert.assertEquals(true, ((Person) personResult).isRegistered());
23.5. Kie Server setup
|
Server setup and registration changed significantly from versions 6.2 and before. The following applies only to version 6.3 and forward. |
23.5.1. Managed Kie Server
A managed instance is one that requires a jBPM controller to be available to properly start up the Kie Server instance.
The jBPM controller is a component responsible for keeping and managing a Kie Server Configuration in centralized way. Each jBPM controller can manage multiple configurations at once and there can be multiple jBPM controllers in the environment. Managed KIE Servers can be configured with a list of jBPM controllers but will connect to only one at a time.
|
It’s important to mention that even though there can be multiple jBPM controllers they should be kept in sync to make sure that regardless which one of them is contacted by KIE Server instance it will provide same set of configuration. |
At startup, if a Kie Server is configured with a list of jBPM controllers, it will try successively to connect to each of them until a connection is successfully established with one of them. If for any reason a connection can’t be established, the server will not start, even if there is local storage available with configuration. This happens by design in order to ensure consistency. For instance, if the Kie Server was down and the configuration has changed, this restriction guarantees that it will run with up to date configuration or not at all.
|
In order to run the Kie Server in standalone mode, without connecting to any jBPM controllers, please see "Unmanaged Kie Server". |
The configuration sets, among other things:
-
kie containers to be deployed and started
-
configuration items - currently this is a placeholder for further enhancements that will allow remotely configure KIE Execution Server components - timers, persistence, etc
The jBPM controller, besides providing configuration management, is also responsible for overall management of Kie Servers. It provides a REST api that is divided into two parts:
-
the jBPM controller itself that is exposed to interact with KIE Execution Server instances
-
an administration API that allows to remotely manage Kie Server instances:
-
add/remove servers
-
add/remove containers to/from the servers
-
start/stop containers on servers
-
The jBPM controller deals only with the Kie Server configuration or definition to put it differently. It does not handle any runtime components of KIE Execution Server instances. They are always considered remote to jBPM controller. The jBPM controller is responsible for persisting the configuration to preserve restarts of the jBPM controller itself. It should manage the synchronization as well in case multiple jBPM controllers are configured to keep all definitions up to date on all instances of the jBPM controller.
By default jBPM controller is shipped with Business Central and provides a fully featured management interface (both REST api and UI). It uses underlying git repository as persistent store and thus when GIT repositories are clustered (using Apache Zookeeper and Apache Helix) it will cover the jBPM controllers synchronization as well.
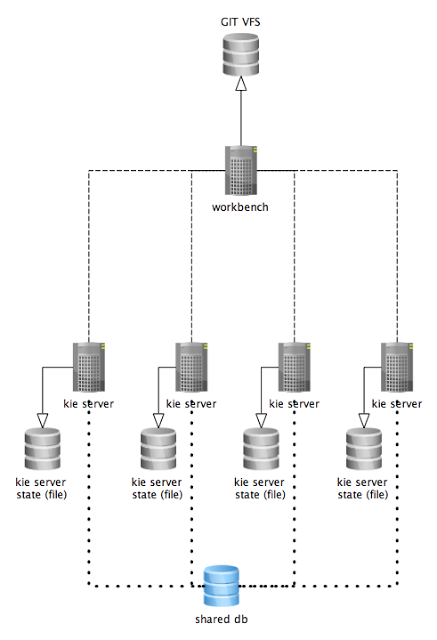
The diagram above illustrates the single jBPM controller (Business Central) setup with multiple Kie Server instances managed by it.
The diagram below illustrates the clustered setup where there are multiple instances of jBPM controller synchronized over Zookeeper.
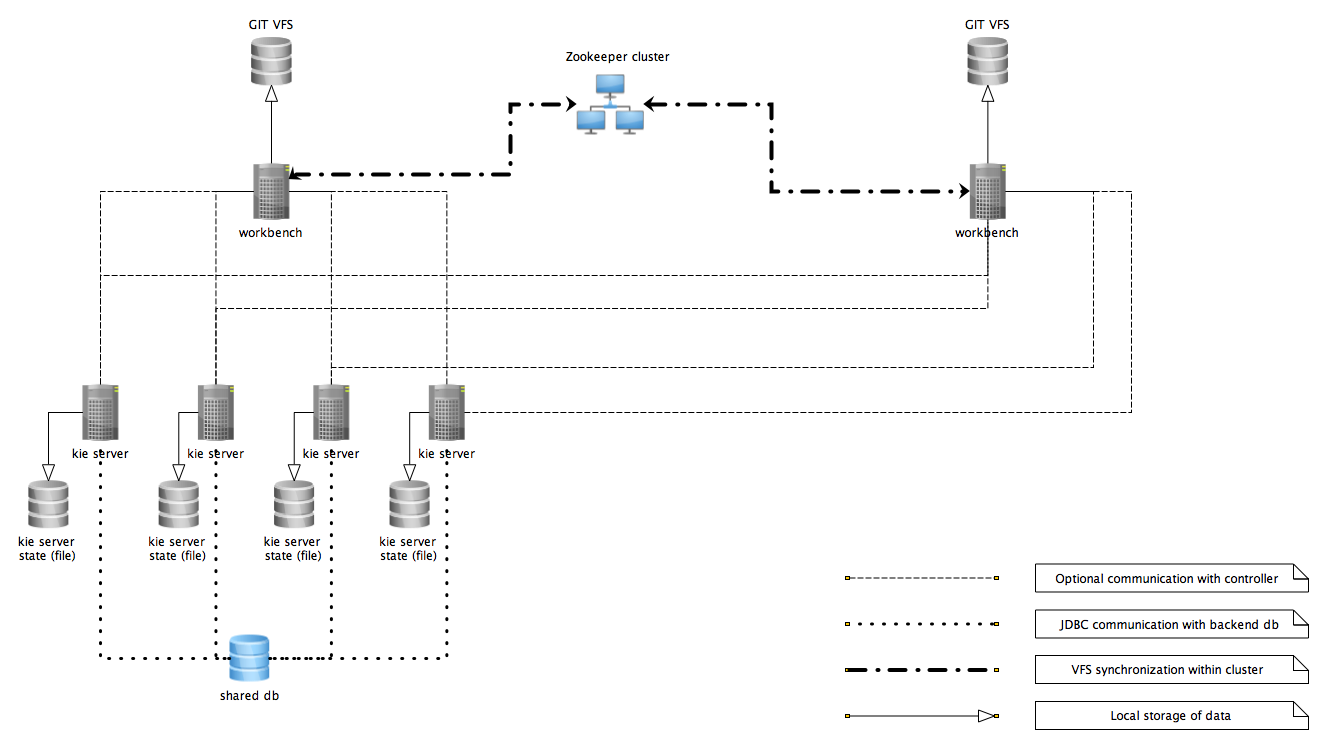
In the above diagram we can see that the Kie Server instances are capable of connecting to any jBPM controllers, but they will connect to only one. Each instance will attempt to connect to jBPM controller as long as it can reach one. Once connection is established with one of the jBPM controllers it will skip the others.
23.5.1.1. Working with managed servers
There are two approaches that users can take when working with managed KIE Server instances:
-
Configuration first: with this approach, a user will start working with the jBPM controller (either UI or REST api) and create and configure Kie Server definitions. That consists basically of an identification for the server definition (id and name + optionally version for improved readability) and the configuration for the Kie Containers to run on the server.
-
Registration first: with this approach, the Kie Server instances are started first and auto register themselves on jBPM controller. The user then can configure the Kie Containers. This option simply skips the registration step done in the first approach and populates it with server id, name and version directly upon auto registration. There are no other differences between the two approaches.
23.5.2. Unmanaged KIE Execution Server
An unmanaged Kie Server is in turn just a standalone instance, and thus must be configured individually using REST/JMS api from the Kie Server itself. There is no jBPM controller involved. The configuration is automatically persisted by the server into a file and that is used as the internal server state, in case of restarts.
The configuration is updated during the following operations:
-
deploy Kie Container
-
undeploy Kie Container
-
start Kie Container
-
stop Kie Container
|
If the Kie Server is restarted, it will try to establish the same state that was persisted before shutdown. That means that Kie Containers that were running, will be started, but the ones that were stopped/disposed before, will not. |
In most use cases, the Kie Server should be executed in managed mode as that provides some benefits, like a web user interface (if using Business Central as a jBPM controller) and some facilities for clustering.
23.6. Creating a Kie Container
Once your Execution Server is registered, you can start adding Kie Containers to it.
Kie Containers are self contained environments that have been provisioned to hold instances of your packaged and deployed rule instances.
-
Start by clicking the \+ icon next to the Execution Server where you want to deploy your Container. This will bring up the New Container screen.
-
If you know the Group Name, Artifact Id and Version (GAV) of your deployed package, then you can enter those details and click the Ok button to select that instance (and provide a name for the Container);
-
If you don’t know these values, you can search Business Central for all packages that can be deployed. Click the Search button without entering any value in the search field (you can narrow your search by entering any term that you know exists in the package that you want to deploy).
INSERT SCREENSHOT HERE
The figure above shows that there are three deployable packages available to be used as containers on the Execution Server. Select the one that you want by clicking the Select button. This will auto-populate the GAV and you can then click the Ok button to use this deployable as the new Container.
-
Enter a name for this Container at the top and then press the Ok button.
The Container name must be unique inside each execution server and must not contain any spaces.
|
Just below the GAV row, you will see an uneditable row that shows you the URL for your Container against which you will be able to execute REST commands. |
23.7. Managing Containers
Containers within the Execution Server can be started, stopped and updated from within Business Central.
23.7.1. Starting a Container
Once registered, a Container is in the 'Stopped' mode. It can be started by first selecting it and then clicking the Start button. You can also select multiple Containers and start them all at the same time.
Once the Container is in the 'Running' mode, a green arrow appears next to it. If there are any errors starting the Container(s), red icons appear next to Containers and the Execution Server that they are deployed on.
You should check the logs of both the Execution Server and the current Business Central to see what the errors are before redeploying the Containers (and possibly the Execution Server).
23.7.2. Stopping and Deleting a Container
Similar to starting a Container, select the Container(s) that you want to stop (or delete) and click the Stop button (which replaces the Start button for that Container once it has entered the 'Running' mode) or the Delete button.
23.7.3. Updating a Container
You can update deployed KieContainers without restarting the Execution Server.
This is useful in cases where the Business Rules change, creating new versions of packages to be provisioned.
You can have multiple versions of the same package provisioned and deployed, each to a different KieContainer.
To update deployments in a KieContainer dynamically, click the icon next to the Container.
This will open up the Container Info screen.
An example of this screen is shown here:
|
INSERT SCREENSHOT HERE |
The Container Info screen is a useful tool because it not only allows you to see the endpoint for this KieContainer, but it also allows you to either manually or automatically refresh the provision if an update is available.
The update can be manual or automatic:
Manual Update: To manually update a KieContainer, enter the new Version number in the Version box and click the Update button.
You can of course, update the Group Id or the Artifact Id , if these have changed as well.
Once updated, the Execution server updates the container and shows you the resolved GAV attributes at the bottom of the screen in the Resolved Release Id section.
Automatic Update: If you want a deployed Container to always have the latest version of your deployment without manually editing it, you will need to set the Version property to the value of LATEST and start a Scanner.
This will ensure that the deployed provision always contains the latest version.
The Scanner can be started just once on demand by clicking the Scan Now button or you can start it in the background with scans happening at a specified interval (in milliseconds).You can also set this value to LATEST when you are first creating this deployment.
The Resolved Release
Id in this case will show you the actual, latest version number.
23.8. KIE Server REST API for KIE containers and business assets
jBPM provides a KIE Server REST API that you can use to interact with your KIE containers and business assets (such as business rules, processes, and solvers) in jBPM without using the Business Central user interface. This API support enables you to maintain your jBPM resources more efficiently and optimize your integration and development with jBPM.
With the KIE Server REST API, you can perform the following actions:
-
Deploy or dispose KIE containers
-
Retrieve and update KIE container information
-
Return KIE Server status and basic information
-
Retrieve and update business asset information
-
Execute business assets (such as rules and processes)
KIE Server REST API requests require the following components:
- Authentication
-
The KIE Server REST API requires HTTP Basic authentication or token-based authentication for the user role
kie-server. To view configured user roles for your jBPM distribution, navigate to~/$SERVER_HOME/standalone/configuration/application-roles.propertiesand~/application-users.properties.To add a user with the
kie-serverrole, navigate to~/$SERVER_HOME/binand run the following command:$ ./add-user.sh -a --user <USERNAME> --password <PASSWORD> --role kie-serverFor more information about user roles and jBPM installation options, see Installing the KIE Server.
- HTTP headers
-
The KIE Server REST API requires the following HTTP headers for API requests:
-
Accept: Data format accepted by your requesting client:-
application/json(JSON) -
application/xml(XML, for JAXB or XSTREAM)
-
-
Content-Type: Data format of yourPOSTorPUTAPI request data:-
application/json(JSON) -
application/xml(XML, for JAXB or XSTREAM)
-
-
X-KIE-ContentType: Required header forapplication/xmlXSTREAM API requests and responses:-
XSTREAM
-
-
- HTTP methods
-
The KIE Server REST API supports the following HTTP methods for API requests:
-
GET: Retrieves specified information from a specified resource endpoint -
POST: Updates a resource or resource instance -
PUT: Updates or creates a resource or resource instance -
DELETE: Deletes a resource or resource instance
-
- Base URL
-
The base URL for KIE Server REST API requests is
http://SERVER:PORT/kie-server/services/rest/, such ashttp://localhost:8080/kie-server/services/rest/. - Endpoints
-
KIE Server REST API endpoints, such as
/server/containers/{containerId}for a specified KIE container, are the URIs that you append to the KIE Server REST API base URL to access the corresponding resource or type of resource in jBPM.Example request URL for/server/containers/{containerId}endpointhttp://localhost:8080/kie-server/services/rest/server/containers/MyContainer - Request parameters and request data
-
Many KIE Server REST API requests require specific parameters in the request URL path to identify or filter specific resources and to perform specific actions. You can append URL parameters to the endpoint in the format
?<PARAM>=<VALUE>&<PARAM>=<VALUE>.Example GET request URL with parametershttp://localhost:8080/kie-server/services/rest/server/containers?groupId=com.redhat&artifactId=Project1&version=1.0&status=STARTEDHTTP
POSTandPUTrequests may additionally require a request body or file with data to accompany the request.Example POST request URL and JSON request body datahttp://localhost:8080/kie-server/services/rest/server/containers/MyContainer/release-id{ "release-id": { "artifact-id": "Project1", "group-id": "com.redhat", "version": "1.1" } }
23.8.1. Sending requests with the KIE Server REST API using a REST client or curl utility
The KIE Server REST API enables you to interact with your KIE containers and business assets (such as business rules, processes, and solvers) in jBPM without using the Business Central user interface. You can send KIE Server REST API requests using any REST client or curl utility.
-
KIE Server is installed and running.
-
You have
kie-serveruser role access to KIE Server.
-
Identify the relevant API endpoint to which you want to send a request, such as
[GET] /server/containersto retrieve KIE containers from KIE Server. -
In a REST client or curl utility, enter the following components for a
GETrequest to/server/containers. Adjust any request details according to your use case.For REST client:
-
Authentication: Enter the user name and password of the KIE Server user with the
kie-serverrole. -
HTTP Headers: Set the following header:
-
Accept:application/json
-
-
HTTP method: Set to
GET. -
URL: Enter the KIE Server REST API base URL and endpoint, such as
http://localhost:8080/kie-server/services/rest/server/containers.
For curl utility:
-
-u: Enter the user name and password of the KIE Server user with thekie-serverrole. -
-H: Set the following header:-
Accept:application/json
-
-
-X: Set toGET. -
URL: Enter the KIE Server REST API base URL and endpoint, such as
http://localhost:8080/kie-server/services/rest/server/containers.
curl -u 'baAdmin:password@1' -H "Accept: application/json" -X GET "http://localhost:8080/kie-server/services/rest/server/containers" -
-
Execute the request and review the KIE Server response.
Example server response (JSON):
{ "type": "SUCCESS", "msg": "List of created containers", "result": { "kie-containers": { "kie-container": [ { "container-id": "itorders_1.0.0-SNAPSHOT", "release-id": { "group-id": "itorders", "artifact-id": "itorders", "version": "1.0.0-SNAPSHOT" }, "resolved-release-id": { "group-id": "itorders", "artifact-id": "itorders", "version": "1.0.0-SNAPSHOT" }, "status": "STARTED", "scanner": { "status": "DISPOSED", "poll-interval": null }, "config-items": [], "container-alias": "itorders" } ] } } } -
For this example, copy or note the project
group-id,artifact-id, andversion(GAV) data from one of the deployed KIE containers returned in the response. -
In your REST client or curl utility, send another API request with the following components for a
PUTrequest to/server/containers/{containerId}to deploy a new KIE container with the copied project GAV data. Adjust any request details according to your use case.For REST client:
-
Authentication: Enter the user name and password of the KIE Server user with the
kie-serverrole. -
HTTP Headers: Set the following headers:
-
Accept:application/json -
Content-Type:application/json
-
-
HTTP method: Set to
PUT. -
URL: Enter the KIE Server REST API base URL and endpoint, such as
http://localhost:8080/kie-server/services/rest/server/containers/MyContainer. -
Request body: Add a JSON request body with the configuration items for the new KIE container:
{ "config-items": [ { "itemName": "RuntimeStrategy", "itemValue": "SINGLETON", "itemType": "java.lang.String" }, { "itemName": "MergeMode", "itemValue": "MERGE_COLLECTIONS", "itemType": "java.lang.String" }, { "itemName": "KBase", "itemValue": "", "itemType": "java.lang.String" }, { "itemName": "KSession", "itemValue": "", "itemType": "java.lang.String" } ], "release-id": { "group-id": "itorders", "artifact-id": "itorders", "version": "1.0.0-SNAPSHOT" }, "scanner": { "poll-interval": "5000", "status": "STARTED" } }For curl utility:
-
-u: Enter the user name and password of the KIE Server user with thekie-serverrole. -
-H: Set the following headers:-
Accept:application/json -
Content-Type:application/json
-
-
-X: Set toPUT. -
URL: Enter the KIE Server REST API base URL and endpoint, such as
http://localhost:8080/kie-server/services/rest/server/containers/MyContainer. -
-d: Add a JSON request body or file (@file.json) with the configuration items for the new KIE container:
curl -u 'baAdmin:password@1' -H "Accept: application/json" -H "Content-Type: application/json" -X PUT "http://localhost:8080/kie-server/services/rest/server/containers/MyContainer" -d "{ \"config-items\": [ { \"itemName\": \"RuntimeStrategy\", \"itemValue\": \"SINGLETON\", \"itemType\": \"java.lang.String\" }, { \"itemName\": \"MergeMode\", \"itemValue\": \"MERGE_COLLECTIONS\", \"itemType\": \"java.lang.String\" }, { \"itemName\": \"KBase\", \"itemValue\": \"\", \"itemType\": \"java.lang.String\" }, { \"itemName\": \"KSession\", \"itemValue\": \"\", \"itemType\": \"java.lang.String\" } ], \"release-id\": { \"group-id\": \"itorders\", \"artifact-id\": \"itorders\", \"version\": \"1.0.0-SNAPSHOT\" }, \"scanner\": { \"poll-interval\": \"5000\", \"status\": \"STARTED\" }}"curl -u 'baAdmin:password@1' -H "Accept: application/json" -H "Content-Type: application/json" -X PUT "http://localhost:8080/kie-server/services/rest/server/containers/MyContainer" -d @my-container-configs.json -
-
Execute the request and review the KIE Server response.
Example server response (JSON):
{ "type": "SUCCESS", "msg": "Container MyContainer successfully deployed with module itorders:itorders:1.0.0-SNAPSHOT.", "result": { "kie-container": { "container-id": "MyContainer", "release-id": { "group-id": "itorders", "artifact-id": "itorders", "version": "1.0.0-SNAPSHOT" }, "resolved-release-id": { "group-id": "itorders", "artifact-id": "itorders", "version": "1.0.0-SNAPSHOT" }, "status": "STARTED", "scanner": { "status": "STARTED", "poll-interval": 5000 }, "config-items": [], "messages": [ { "severity": "INFO", "timestamp": { "java.util.Date": 1540584717937 }, "content": [ "Container MyContainer successfully created with module itorders:itorders:1.0.0-SNAPSHOT." ] } ], "container-alias": null } } }If you encounter request errors, review the returned error code messages and adjust your request accordingly.
REST API requests for process instancesFor REST API requests that send complex data objects to the process instance endpoint
/server/containers/{containerId}/processes/{processId}/instances, ensure that you include either the fully qualified class name (such ascom.myspace.Person) or the simple class name (such asPerson) in the request body. The class name is required for the request body to be mapped to the correct business object in jBPM. If you exclude the class name from the request, KIE Server does not unmarshall the object to the expected type.Correct request body for process instance{ "id": 4, "lease": { "com.myspace.restcall.LeaseModel": { "annualRent": 109608, "isAutoApproved": false } } }Incorrect request body for process instance{ "id": 4, "lease": { "annualRent": 109608, "isAutoApproved": false } }
23.8.2. Sending requests with the KIE Server REST API using the Swagger interface
The KIE Server REST API supports a Swagger web interface that you can use instead of a standalone REST client or curl utility to interact with your KIE containers and business assets (such as business rules, processes, and solvers) in jBPM without using the Business Central user interface.
By default, the Swagger web interface for KIE Server is enabled by the org.kie.swagger.server.ext.disabled=false system property. To disable the Swagger web interface in KIE Server, set this system property to true.
|
-
KIE Server is installed and running.
-
You have
kie-serveruser role access to KIE Server.
-
In a web browser, navigate to
http://SERVER:PORT/kie-server/docs, such ashttp://localhost:8080/kie-server/docs, and log in with the user name and password of the KIE Server user with thekie-serverrole. -
In the Swagger page, select the relevant API endpoint to which you want to send a request, such as KIE Server and KIE containers → [GET] /server/containers to retrieve KIE containers from KIE Server.
-
Click Try it out and provide any optional parameters by which you want to filter results, if needed.
-
In the Response content type drop-down menu, select the desired format of the server response, such as application/json for JSON format.
-
Click Execute and review the KIE Server response.
Example server response (JSON):
{ "type": "SUCCESS", "msg": "List of created containers", "result": { "kie-containers": { "kie-container": [ { "container-id": "itorders_1.0.0-SNAPSHOT", "release-id": { "group-id": "itorders", "artifact-id": "itorders", "version": "1.0.0-SNAPSHOT" }, "resolved-release-id": { "group-id": "itorders", "artifact-id": "itorders", "version": "1.0.0-SNAPSHOT" }, "status": "STARTED", "scanner": { "status": "DISPOSED", "poll-interval": null }, "config-items": [], "container-alias": "itorders" } ] } } } -
For this example, copy or note the project
group-id,artifact-id, andversion(GAV) data from one of the deployed KIE containers returned in the response. -
In the Swagger page, navigate to the KIE Server and KIE containers → [PUT] /server/containers/{containerId} endpoint to send another request to deploy a new KIE container with the copied project GAV data. Adjust any request details according to your use case.
-
Click Try it out and enter the following components for the request:
-
containerId: Enter the ID of the new KIE container, such as
MyContainer. -
body: Set the Parameter content type to the desired request body format, such as application/json for JSON format, and add a request body with the configuration items for the new KIE container:
{ "config-items": [ { "itemName": "RuntimeStrategy", "itemValue": "SINGLETON", "itemType": "java.lang.String" }, { "itemName": "MergeMode", "itemValue": "MERGE_COLLECTIONS", "itemType": "java.lang.String" }, { "itemName": "KBase", "itemValue": "", "itemType": "java.lang.String" }, { "itemName": "KSession", "itemValue": "", "itemType": "java.lang.String" } ], "release-id": { "group-id": "itorders", "artifact-id": "itorders", "version": "1.0.0-SNAPSHOT" }, "scanner": { "poll-interval": "5000", "status": "STARTED" } } -
-
In the Response content type drop-down menu, select the desired format of the server response, such as application/json for JSON format.
-
Click Execute and review the KIE Server response.
Example server response (JSON):
{ "type": "SUCCESS", "msg": "Container MyContainer successfully deployed with module itorders:itorders:1.0.0-SNAPSHOT.", "result": { "kie-container": { "container-id": "MyContainer", "release-id": { "group-id": "itorders", "artifact-id": "itorders", "version": "1.0.0-SNAPSHOT" }, "resolved-release-id": { "group-id": "itorders", "artifact-id": "itorders", "version": "1.0.0-SNAPSHOT" }, "status": "STARTED", "scanner": { "status": "STARTED", "poll-interval": 5000 }, "config-items": [], "messages": [ { "severity": "INFO", "timestamp": { "java.util.Date": 1540584717937 }, "content": [ "Container MyContainer successfully created with module itorders:itorders:1.0.0-SNAPSHOT." ] } ], "container-alias": null } } }If you encounter request errors, review the returned error code messages and adjust your request accordingly.
REST API requests for process instancesFor REST API requests that send complex data objects to the process instance endpoint
/server/containers/{containerId}/processes/{processId}/instances, ensure that you include either the fully qualified class name (such ascom.myspace.Person) or the simple class name (such asPerson) in the request body. The class name is required for the request body to be mapped to the correct business object in jBPM. If you exclude the class name from the request, KIE Server does not unmarshall the object to the expected type.Correct request body for process instance{ "id": 4, "lease": { "com.myspace.restcall.LeaseModel": { "annualRent": 109608, "isAutoApproved": false } } }Incorrect request body for process instance{ "id": 4, "lease": { "annualRent": 109608, "isAutoApproved": false } }
23.8.3. Supported KIE Server REST API endpoints
The KIE Server REST API provides endpoints for the following types of resources in jBPM:
-
KIE Server and KIE containers
-
KIE session assets (for runtime commands)
-
DMN assets
-
Planning solvers
-
Processes
-
Process images
-
Process and task forms
-
Tasks
-
Cases
-
Documents
-
Jobs
-
Queries for processes, tasks, and cases
-
Custom queries
The KIE Server REST API base URL is http://SERVER:PORT/kie-server/services/rest/. All requests require HTTP Basic authentication or token-based authentication for the kie-server user role.
For the full list of KIE Server REST API endpoints and descriptions, use one of the following resources:
-
Execution Server REST API on the jBPM Documentation page (static)
-
Swagger UI for the KIE Server REST API at
http://SERVER:PORT/kie-server/docs(dynamic, requires running KIE Server)By default, the Swagger web interface for KIE Server is enabled by the org.kie.swagger.server.ext.disabled=falsesystem property. To disable the Swagger web interface in KIE Server, set this system property totrue.
Endpoint requirements
Note the following requirements for some of the KIE Server REST API endpoints:
-
Process images: For API access to process images, the system property
<storesvgonsave enabled="true"/>must be configured for your jBPM project in$SERVER_HOME/standalone/deployments/business-central.war/org.kie.workbench.KIEWebapp/profiles/jbpm.xml. If this property is not set or set tofalse, set it totrue, restart your KIE Server, modify the relevant process and save it, and then build and deploy your project. This property enables SVG images to be stored so that they can be retrieved by the KIE Server REST API. -
Custom queries: Some custom query requests with the KIE Server REST API require a query
mapperdefinition to map the query results to concrete objects. You can implement your own query result mappers or use the mappers provided with jBPM. The query mappers in jBPM are similar to other object-relational mapping (ORM) providers, such as Hibernate, which maps tables to entities. For example, you can use theorg.jbpm.kie.services.impl.query.mapper.ProcessInstanceQueryMapper, also registered asProcessInstances, in custom query endpoints for returning process instance data.Example POST endpoint with
ProcessInstancesmapper parameter:http://localhost:8080/kie-server/services/rest/server/queries/definitions/jbpmProcessInstances?mapper=ProcessInstances
For a list of available query mappers in jBPM, see the jBPM services source in GitHub.
23.9. KIE Server Java client API for KIE containers and business assets
jBPM provides a KIE Server Java client API that enables you to connect to KIE Server using REST protocol from your Java client application. You can use the KIE Server Java client API as an alternative to the KIE Server REST API to interact with your KIE containers and business assets (such as business rules, processes, and solvers) in jBPM without using the Business Central user interface. This API support enables you to maintain your jBPM resources more efficiently and optimize your integration and development with jBPM.
With the KIE Server Java client API, you can perform the following actions also supported by the KIE Server REST API:
-
Deploy or dispose KIE containers
-
Retrieve and update KIE container information
-
Return KIE Server status and basic information
-
Retrieve and update business asset information
-
Execute business assets (such as rules and processes)
KIE Server Java client API requests require the following components:
- Authentication
-
The KIE Server Java client API requires HTTP Basic authentication for the user role
kie-server. To view configured user roles for your jBPM distribution, navigate to~/$SERVER_HOME/standalone/configuration/application-roles.propertiesand~/application-users.properties.To add a user with the
kie-serverrole, navigate to~/$SERVER_HOME/binand run the following command:$ ./add-user.sh -a --user <USERNAME> --password <PASSWORD> --role kie-serverFor more information about user roles and jBPM installation options, see Installing the KIE Server.
- Project dependencies
-
The KIE Server Java client API requires the following dependencies on the relevant classpath of your Java project:
<!-- For remote execution on KIE Server --> <dependency> <groupId>org.kie.server</groupId> <artifactId>kie-server-client</artifactId> <version>${jbpm.version}</version> </dependency> <!-- For runtime commands --> <dependency> <groupId>org.drools</groupId> <artifactId>drools-compiler</artifactId> <scope>runtime</scope> <version>${jbpm.version}</version> </dependency> <!-- For debug logging (optional) --> <dependency> <groupId>ch.qos.logback</groupId> <artifactId>logback-classic</artifactId> <version>${logback.version}</version> </dependency>The
<version>for jBPM dependencies is the Maven artifact version for jBPM currently used in your project (for example, 7.52.0.Final). - Client request configuration
-
All Java client requests with the KIE Server Java client API must define at least the following server communication components:
-
Credentials of the
kie-serveruser -
KIE Server location, such as
http://localhost:8080/kie-server/services/rest/server -
Marshalling format for API requests and responses (JSON, JAXB, or XSTREAM)
-
A
KieServicesConfigurationobject and aKieServicesClientobject, which serve as the entry point for starting the server communication using the Java client API -
A
KieServicesFactoryobject defining REST protocol and user access -
Any other client services used, such as
RuleServicesClient,ProcessServicesClient, orQueryServicesClient
The following are examples of basic and advanced client configurations with these components:
Basic client configuration exampleimport org.kie.server.api.marshalling.MarshallingFormat; import org.kie.server.client.KieServicesClient; import org.kie.server.client.KieServicesConfiguration; import org.kie.server.client.KieServicesFactory; public class MyConfigurationObject { private static final String URL = "http://localhost:8080/kie-server/services/rest/server"; private static final String USER = "baAdmin"; private static final String PASSWORD = "password@1"; private static final MarshallingFormat FORMAT = MarshallingFormat.JSON; private static KieServicesConfiguration conf; private static KieServicesClient kieServicesClient; public static void initialize() { conf = KieServicesFactory.newRestConfiguration(URL, USER, PASSWORD); //If you use custom classes, such as Obj.class, add them to the configuration. Set<Class<?>> extraClassList = new HashSet<Class<?>>(); extraClassList.add(Obj.class); conf.addExtraClasses(extraClassList); conf.setMarshallingFormat(FORMAT); kieServicesClient = KieServicesFactory.newKieServicesClient(conf); } }Advanced client configuration example with additional client servicesimport org.kie.server.api.marshalling.MarshallingFormat; import org.kie.server.client.CaseServicesClient; import org.kie.server.client.DMNServicesClient; import org.kie.server.client.DocumentServicesClient; import org.kie.server.client.JobServicesClient; import org.kie.server.client.KieServicesClient; import org.kie.server.client.KieServicesConfiguration; import org.kie.server.client.KieServicesFactory; import org.kie.server.client.ProcessServicesClient; import org.kie.server.client.QueryServicesClient; import org.kie.server.client.RuleServicesClient; import org.kie.server.client.SolverServicesClient; import org.kie.server.client.UIServicesClient; import org.kie.server.client.UserTaskServicesClient; import org.kie.server.api.model.instance.ProcessInstance; import org.kie.server.api.model.KieContainerResource; import org.kie.server.api.model.ReleaseId; public class MyAdvancedConfigurationObject { // REST API base URL, credentials, and marshalling format private static final String URL = "http://localhost:8080/kie-server/services/rest/server"; private static final String USER = "baAdmin"; private static final String PASSWORD = "password@1";; private static final MarshallingFormat FORMAT = MarshallingFormat.JSON; private static KieServicesConfiguration conf; // KIE client for common operations private static KieServicesClient kieServicesClient; // Rules client private static RuleServicesClient ruleClient; // Process automation clients private static CaseServicesClient caseClient; private static DocumentServicesClient documentClient; private static JobServicesClient jobClient; private static ProcessServicesClient processClient; private static QueryServicesClient queryClient; private static UIServicesClient uiClient; private static UserTaskServicesClient userTaskClient; // DMN client private static DMNServicesClient dmnClient; // Planning client private static SolverServicesClient solverClient; public static void main(String[] args) { initializeKieServerClient(); initializeDroolsServiceClients(); initializeJbpmServiceClients(); initializeSolverServiceClients(); } public static void initializeKieServerClient() { conf = KieServicesFactory.newRestConfiguration(URL, USER, PASSWORD); conf.setMarshallingFormat(FORMAT); kieServicesClient = KieServicesFactory.newKieServicesClient(conf); } public static void initializeDroolsServiceClients() { ruleClient = kieServicesClient.getServicesClient(RuleServicesClient.class); dmnClient = kieServicesClient.getServicesClient(DMNServicesClient.class); } public static void initializeJbpmServiceClients() { caseClient = kieServicesClient.getServicesClient(CaseServicesClient.class); documentClient = kieServicesClient.getServicesClient(DocumentServicesClient.class); jobClient = kieServicesClient.getServicesClient(JobServicesClient.class); processClient = kieServicesClient.getServicesClient(ProcessServicesClient.class); queryClient = kieServicesClient.getServicesClient(QueryServicesClient.class); uiClient = kieServicesClient.getServicesClient(UIServicesClient.class); userTaskClient = kieServicesClient.getServicesClient(UserTaskServicesClient.class); } public static void initializeSolverServiceClients() { solverClient = kieServicesClient.getServicesClient(SolverServicesClient.class); } } -
23.9.1. Sending requests with the KIE Server Java client API
The KIE Server Java client API enables you to connect to KIE Server using REST protocol from your Java client application. You can use the KIE Server Java client API as an alternative to the KIE Server REST API to interact with your KIE containers and business assets (such as business rules, processes, and solvers) in jBPM without using the Business Central user interface.
-
KIE Server is installed and running.
-
You have
kie-serveruser role access to KIE Server. -
You have a Java project with jBPM resources.
-
In your client application, ensure that the following dependencies have been added to the relevant classpath of your Java project:
<!-- For remote execution on KIE Server --> <dependency> <groupId>org.kie.server</groupId> <artifactId>kie-server-client</artifactId> <version>${jbpm.version}</version> </dependency> <!-- For runtime commands --> <dependency> <groupId>org.drools</groupId> <artifactId>drools-compiler</artifactId> <scope>runtime</scope> <version>${jbpm.version}</version> </dependency> <!-- For debug logging (optional) --> <dependency> <groupId>ch.qos.logback</groupId> <artifactId>logback-classic</artifactId> <version>${logback.version}</version> </dependency> -
In the
~/kie/server/clientfolder of the Java client API in GitHub , identify the relevant Java client for the request you want to send, such asKieServicesClientto access client services for KIE containers and other assets in KIE Server. -
In your client application, create a
.javaclass for the API request. The class must contain the necessary imports, KIE Server location and user credentials, aKieServicesClientobject, and the client method to execute, such ascreateContaineranddisposeContainerfrom theKieServicesClientclient. Adjust any configuration details according to your use case.Creating and disposing a containerimport org.kie.server.api.marshalling.MarshallingFormat; import org.kie.server.client.KieServicesClient; import org.kie.server.client.KieServicesConfiguration; import org.kie.server.client.KieServicesFactory; import org.kie.server.api.model.KieContainerResource; import org.kie.server.api.model.ServiceResponse; public class MyConfigurationObject { private static final String URL = "http://localhost:8080/kie-server/services/rest/server"; private static final String USER = "baAdmin"; private static final String PASSWORD = "password@1"; private static final MarshallingFormat FORMAT = MarshallingFormat.JSON; private static KieServicesConfiguration conf; private static KieServicesClient kieServicesClient; public static void initialize() { conf = KieServicesFactory.newRestConfiguration(URL, USER, PASSWORD); public void disposeAndCreateContainer() { System.out.println("== Disposing and creating containers =="); // Retrieve list of KIE containers List<KieContainerResource> kieContainers = kieServicesClient.listContainers().getResult().getContainers(); if (kieContainers.size() == 0) { System.out.println("No containers available..."); return; } // Dispose KIE container KieContainerResource container = kieContainers.get(0); String containerId = container.getContainerId(); ServiceResponse<Void> responseDispose = kieServicesClient.disposeContainer(containerId); if (responseDispose.getType() == ResponseType.FAILURE) { System.out.println("Error disposing " + containerId + ". Message: "); System.out.println(responseDispose.getMsg()); return; } System.out.println("Success Disposing container " + containerId); System.out.println("Trying to recreate the container..."); // Re-create KIE container ServiceResponse<KieContainerResource> createResponse = kieServicesClient.createContainer(containerId, container); if(createResponse.getType() == ResponseType.FAILURE) { System.out.println("Error creating " + containerId + ". Message: "); System.out.println(responseDispose.getMsg()); return; } System.out.println("Container recreated with success!"); } } }You define service responses using the
org.kie.server.api.model.ServiceResponse<T>object, whereTrepresents the type of returned response. TheServiceResponseobject has the following attributes:-
String message: Returns the response message -
ResponseType type: Returns eitherSUCCESSorFAILURE -
T result: Returns the requested object
In this example, when you dispose a container, the
ServiceResponsereturns aVoidresponse. When you create a container, theServiceResponsereturns aKieContainerResourceobject.A conversation between a client and a specific KIE Server container in a clustered environment is secured by a unique conversationID. TheconversationIDis transferred using theX-KIE-ConversationIdREST header. If you update the container, unset the previousconversationID. UseKieServiesClient.completeConversation()to unset theconversationIDfor Java API. -
-
Run the configured
.javaclass from your project directory to execute the request, and review the KIE Server response.If you enabled debug logging, KIE Server responds with a detailed response according to your configured marshalling format, such as JSON.
Example server response for a new KIE container (log):
10:23:35.194 [main] INFO o.k.s.a.m.MarshallerFactory - Marshaller extensions init 10:23:35.396 [main] DEBUG o.k.s.client.balancer.LoadBalancer - Load balancer RoundRobinBalancerStrategy{availableEndpoints=[http://localhost:8080/kie-server/services/rest/server]} selected url 'http://localhost:8080/kie-server/services/rest/server' 10:23:35.398 [main] DEBUG o.k.s.c.i.AbstractKieServicesClientImpl - About to send GET request to 'http://localhost:8080/kie-server/services/rest/server' 10:23:35.440 [main] DEBUG o.k.s.c.i.AbstractKieServicesClientImpl - About to deserialize content: '{ "type" : "SUCCESS", "msg" : "Kie Server info", "result" : { "kie-server-info" : { "id" : "default-kieserver", "version" : "7.11.0.Final-redhat-00003", "name" : "default-kieserver", "location" : "http://localhost:8080/kie-server/services/rest/server", "capabilities" : [ "KieServer", "BRM", "BPM", "CaseMgmt", "BPM-UI", "BRP", "DMN", "Swagger" ], "messages" : [ { "severity" : "INFO", "timestamp" : { "java.util.Date" : 1540814906533 }, "content" : [ "Server KieServerInfo{serverId='default-kieserver', version='7.11.0.Final-redhat-00003', name='default-kieserver', location='http://localhost:8080/kie-server/services/rest/server', capabilities=[KieServer, BRM, BPM, CaseMgmt, BPM-UI, BRP, DMN, Swagger], messages=null}started successfully at Mon Oct 29 08:08:26 EDT 2018" ] } ] } } }' into type: 'class org.kie.server.api.model.ServiceResponse' 10:23:35.653 [main] DEBUG o.k.s.c.impl.KieServicesClientImpl - KieServicesClient connected to: default-kieserver version 7.11.0.Final-redhat-00003 10:23:35.653 [main] DEBUG o.k.s.c.impl.KieServicesClientImpl - Supported capabilities by the server: [KieServer, BRM, BPM, CaseMgmt, BPM-UI, BRP, DMN, Swagger] 10:23:35.653 [main] DEBUG o.k.s.c.impl.KieServicesClientImpl - Building services client for server capability KieServer 10:23:35.653 [main] DEBUG o.k.s.c.impl.KieServicesClientImpl - No builder found for 'KieServer' capability 10:23:35.654 [main] DEBUG o.k.s.c.impl.KieServicesClientImpl - Building services client for server capability BRM 10:23:35.654 [main] DEBUG o.k.s.c.impl.KieServicesClientImpl - Builder 'org.kie.server.client.helper.DroolsServicesClientBuilder@6b927fb' for capability 'BRM' 10:23:35.655 [main] DEBUG o.k.s.c.impl.KieServicesClientImpl - Capability implemented by {interface org.kie.server.client.RuleServicesClient=org.kie.server.client.impl.RuleServicesClientImpl@4a94ee4} 10:23:35.655 [main] DEBUG o.k.s.c.impl.KieServicesClientImpl - Building services client for server capability BPM 10:23:35.656 [main] DEBUG o.k.s.c.impl.KieServicesClientImpl - Builder 'org.kie.server.client.helper.JBPMServicesClientBuilder@4cc451f2' for capability 'BPM' 10:23:35.672 [main] DEBUG o.k.s.c.impl.KieServicesClientImpl - Capability implemented by {interface org.kie.server.client.JobServicesClient=org.kie.server.client.impl.JobServicesClientImpl@1189dd52, interface org.kie.server.client.admin.ProcessAdminServicesClient=org.kie.server.client.admin.impl.ProcessAdminServicesClientImpl@36bc55de, interface org.kie.server.client.DocumentServicesClient=org.kie.server.client.impl.DocumentServicesClientImpl@564fabc8, interface org.kie.server.client.admin.UserTaskAdminServicesClient=org.kie.server.client.admin.impl.UserTaskAdminServicesClientImpl@16d04d3d, interface org.kie.server.client.QueryServicesClient=org.kie.server.client.impl.QueryServicesClientImpl@49ec71f8, interface org.kie.server.client.ProcessServicesClient=org.kie.server.client.impl.ProcessServicesClientImpl@1d2adfbe, interface org.kie.server.client.UserTaskServicesClient=org.kie.server.client.impl.UserTaskServicesClientImpl@36902638} 10:23:35.672 [main] DEBUG o.k.s.c.impl.KieServicesClientImpl - Building services client for server capability CaseMgmt 10:23:35.672 [main] DEBUG o.k.s.c.impl.KieServicesClientImpl - Builder 'org.kie.server.client.helper.CaseServicesClientBuilder@223d2c72' for capability 'CaseMgmt' 10:23:35.676 [main] DEBUG o.k.s.c.impl.KieServicesClientImpl - Capability implemented by {interface org.kie.server.client.admin.CaseAdminServicesClient=org.kie.server.client.admin.impl.CaseAdminServicesClientImpl@2b662a77, interface org.kie.server.client.CaseServicesClient=org.kie.server.client.impl.CaseServicesClientImpl@7f0eb4b4} 10:23:35.676 [main] DEBUG o.k.s.c.impl.KieServicesClientImpl - Building services client for server capability BPM-UI 10:23:35.676 [main] DEBUG o.k.s.c.impl.KieServicesClientImpl - Builder 'org.kie.server.client.helper.JBPMUIServicesClientBuilder@5c33f1a9' for capability 'BPM-UI' 10:23:35.677 [main] DEBUG o.k.s.c.impl.KieServicesClientImpl - Capability implemented by {interface org.kie.server.client.UIServicesClient=org.kie.server.client.impl.UIServicesClientImpl@223191a6} 10:23:35.678 [main] DEBUG o.k.s.c.impl.KieServicesClientImpl - Building services client for server capability BRP 10:23:35.678 [main] DEBUG o.k.s.c.impl.KieServicesClientImpl - Builder 'org.kie.server.client.helper.OptaplannerServicesClientBuilder@49139829' for capability 'BRP' 10:23:35.679 [main] DEBUG o.k.s.c.impl.KieServicesClientImpl - Capability implemented by {interface org.kie.server.client.SolverServicesClient=org.kie.server.client.impl.SolverServicesClientImpl@77fbd92c} 10:23:35.679 [main] DEBUG o.k.s.c.impl.KieServicesClientImpl - Building services client for server capability DMN 10:23:35.679 [main] DEBUG o.k.s.c.impl.KieServicesClientImpl - Builder 'org.kie.server.client.helper.DMNServicesClientBuilder@67c27493' for capability 'DMN' 10:23:35.680 [main] DEBUG o.k.s.c.impl.KieServicesClientImpl - Capability implemented by {interface org.kie.server.client.DMNServicesClient=org.kie.server.client.impl.DMNServicesClientImpl@35e2d654} 10:23:35.680 [main] DEBUG o.k.s.c.impl.KieServicesClientImpl - Building services client for server capability Swagger 10:23:35.680 [main] DEBUG o.k.s.c.impl.KieServicesClientImpl - No builder found for 'Swagger' capability 10:23:35.681 [main] DEBUG o.k.s.client.balancer.LoadBalancer - Load balancer RoundRobinBalancerStrategy{availableEndpoints=[http://localhost:8080/kie-server/services/rest/server]} selected url 'http://localhost:8080/kie-server/services/rest/server' 10:23:35.701 [main] DEBUG o.k.s.c.i.AbstractKieServicesClientImpl - About to send PUT request to 'http://localhost:8080/kie-server/services/rest/server/containers/employee-rostering3' with payload '{ "container-id" : null, "release-id" : { "group-id" : "employeerostering", "artifact-id" : "employeerostering", "version" : "1.0.0-SNAPSHOT" }, "resolved-release-id" : null, "status" : null, "scanner" : null, "config-items" : [ ], "messages" : [ ], "container-alias" : null }' 10:23:38.071 [main] DEBUG o.k.s.c.i.AbstractKieServicesClientImpl - About to deserialize content: '{ "type" : "SUCCESS", "msg" : "Container employee-rostering3 successfully deployed with module employeerostering:employeerostering:1.0.0-SNAPSHOT.", "result" : { "kie-container" : { "container-id" : "employee-rostering3", "release-id" : { "group-id" : "employeerostering", "artifact-id" : "employeerostering", "version" : "1.0.0-SNAPSHOT" }, "resolved-release-id" : { "group-id" : "employeerostering", "artifact-id" : "employeerostering", "version" : "1.0.0-SNAPSHOT" }, "status" : "STARTED", "scanner" : { "status" : "DISPOSED", "poll-interval" : null }, "config-items" : [ ], "messages" : [ { "severity" : "INFO", "timestamp" : { "java.util.Date" : 1540909418069 }, "content" : [ "Container employee-rostering3 successfully created with module employeerostering:employeerostering:1.0.0-SNAPSHOT." ] } ], "container-alias" : null } } }' into type: 'class org.kie.server.api.model.ServiceResponse'If you encounter request errors, review the returned error code messages and adjust your Java configurations accordingly.
23.9.2. Supported KIE Server Java clients
The following are some of the Java client services available in the org.kie.server.client package of your jBPM distribution. You can use these services to interact with related resources in KIE Server similarly to the KIE Server REST API.
-
KieServicesClient: Used as the entry point for other KIE Server Java clients, and used to interact with KIE containers -
JobServicesClient: Used to schedule, cancel, re-queue, and get job requests -
RuleServicesClient: Used to send commands to the server to perform rule-related operations, such as executing rules or inserting objects into the KIE session -
SolverServicesClient: Used to perform all Red Hat build of OptaPlanner operations, such as getting the solver state and the best solution, or disposing a solver -
ProcessServicesClient: Used to start, signal, and abort processes or work items -
QueryServicesClient: Used to query processes, process nodes, and process variables -
UserTaskServicesClient: Used to perform all user-task operations, such as starting, claiming, or canceling a task, and to query tasks by a specified field, such as by user or by process instances ID -
UIServicesClient: Used to get String representation of forms (XML or JSON) and of a process image (SVG) -
ProcessAdminServicesClient: Provides an interface for operations with process instances (found in~/org/kie/server/client/admin) -
UserTaskAdminServicesClient: Provides an interface for operations with user tasks (found in~/org/kie/server/client/admin)
The getServicesClient method provides access to any of these clients:
RuleServicesClient rulesClient = kieServicesClient.getServicesClient(RuleServicesClient.class);For the full list of available KIE Server Java clients, see the Java client API source in GitHub.
23.9.3. Example requests with the KIE Server Java client API
The following are examples of KIE Server Java client API requests for basic interactions with KIE Server. For the full list of available KIE Server Java clients, see the Java client API source in GitHub.
- Listing KIE Server capabilities
-
You can use the
org.kie.server.api.model.KieServerInfoobject to identify server capabilities. TheKieServicesClientclient requires the server capability information to correctly produce service clients. You can specify the capabilities globally inKieServicesConfiguration; otherwise they are automatically retrieved from KIE Server.Example request to return KIE Server capabilitiespublic void listCapabilities() { KieServerInfo serverInfo = kieServicesClient.getServerInfo().getResult(); System.out.print("Server capabilities:"); for (String capability : serverInfo.getCapabilities()) { System.out.print(" " + capability); } System.out.println(); } - Listing KIE containers in KIE Server
-
KIE containers are represented by the
org.kie.server.api.model.KieContainerResourceobject. The list of resources is represented by theorg.kie.server.api.model.KieContainerResourceListobject.Example request to return KIE containers from KIE Serverpublic void listContainers() { KieContainerResourceList containersList = kieServicesClient.listContainers().getResult(); List<KieContainerResource> kieContainers = containersList.getContainers(); System.out.println("Available containers: "); for (KieContainerResource container : kieContainers) { System.out.println("\t" + container.getContainerId() + " (" + container.getReleaseId() + ")"); } }You can optionally filter the KIE container results using an instance of the
org.kie.server.api.model.KieContainerResourceFilterclass, which is passed to theorg.kie.server.client.KieServicesClient.listContainers()method.Example request to return KIE containers by release ID and statuspublic void listContainersWithFilter() { // Filter containers by releaseId "org.example:container:1.0.0.Final" and status FAILED KieContainerResourceFilter filter = new KieContainerResourceFilter.Builder() .releaseId("org.example", "container", "1.0.0.Final") .status(KieContainerStatus.FAILED) .build(); // Using previously created KieServicesClient KieContainerResourceList containersList = kieServicesClient.listContainers(filter).getResult(); List<KieContainerResource> kieContainers = containersList.getContainers(); System.out.println("Available containers: "); for (KieContainerResource container : kieContainers) { System.out.println("\t" + container.getContainerId() + " (" + container.getReleaseId() + ")"); } } - Creating and disposing KIE containers in KIE Server
-
You can use the
createContaineranddisposeContainermethods in theKieServicesClientclient to dispose and create KIE containers. In this example, when you dispose a container, theServiceResponsereturns aVoidresponse. When you create a container, theServiceResponsereturns aKieContainerResourceobject.Example request to dispose and re-create a KIE containerpublic void disposeAndCreateContainer() { System.out.println("== Disposing and creating containers =="); // Retrieve list of KIE containers List<KieContainerResource> kieContainers = kieServicesClient.listContainers().getResult().getContainers(); if (kieContainers.size() == 0) { System.out.println("No containers available..."); return; } // Dispose KIE container KieContainerResource container = kieContainers.get(0); String containerId = container.getContainerId(); ServiceResponse<Void> responseDispose = kieServicesClient.disposeContainer(containerId); if (responseDispose.getType() == ResponseType.FAILURE) { System.out.println("Error disposing " + containerId + ". Message: "); System.out.println(responseDispose.getMsg()); return; } System.out.println("Success Disposing container " + containerId); System.out.println("Trying to recreate the container..."); // Re-create KIE container ServiceResponse<KieContainerResource> createResponse = kieServicesClient.createContainer(containerId, container); if(createResponse.getType() == ResponseType.FAILURE) { System.out.println("Error creating " + containerId + ". Message: "); System.out.println(responseDispose.getMsg()); return; } System.out.println("Container recreated with success!"); } - Executing runtime commands in KIE Server
-
jBPM supports runtime commands that you can send to KIE Server for asset-related operations, such as inserting or retracting objects in a KIE session or firing all rules. The full list of supported runtime commands is located in the
org.drools.core.command.runtimepackage in your jBPM instance.You can use the
org.kie.api.command.KieCommandsclass to insert commands, and useorg.kie.api.KieServices.get().getCommands()to instantiate theKieCommandsclass. If you want to add multiple commands, use theBatchExecutionCommandwrapper.Example request to insert an object and fire all rulesimport org.kie.api.command.Command; import org.kie.api.command.KieCommands; import org.kie.server.api.model.ServiceResponse; import org.kie.server.client.RuleServicesClient; import org.kie.server.client.KieServicesClient; import org.kie.api.KieServices; import java.util.Arrays; ... public void executeCommands() { String containerId = "hello"; System.out.println("== Sending commands to the server =="); RuleServicesClient rulesClient = kieServicesClient.getServicesClient(RuleServicesClient.class); KieCommands commandsFactory = KieServices.Factory.get().getCommands(); Command<?> insert = commandsFactory.newInsert("Some String OBJ"); Command<?> fireAllRules = commandsFactory.newFireAllRules(); Command<?> batchCommand = commandsFactory.newBatchExecution(Arrays.asList(insert, fireAllRules)); ServiceResponse<String> executeResponse = rulesClient.executeCommands(containerId, batchCommand); if(executeResponse.getType() == ResponseType.SUCCESS) { System.out.println("Commands executed with success! Response: "); System.out.println(executeResponse.getResult()); } else { System.out.println("Error executing rules. Message: "); System.out.println(executeResponse.getMsg()); } }A conversation between a client and a specific KIE Server container in a clustered environment is secured by a unique conversationID. TheconversationIDis transferred using theX-KIE-ConversationIdREST header. If you update the container, unset the previousconversationID. UseKieServiesClient.completeConversation()to unset theconversationIDfor Java API. - Listing available business processes in a KIE container
-
You can use the
QueryServicesClientclient to list available process definitions. TheQueryServicesClientmethods use pagination, so in addition to the query you make, you must provide the current page and the number of results per page. In this example, the query starts on page0and lists the first1000results.Example request to list business processes in KIE Serverpublic void listProcesses() { System.out.println("== Listing Business Processes =="); QueryServicesClient queryClient = kieServicesClient.getServicesClient(QueryServicesClient.class); List<ProcessDefinition> findProcessesByContainerId = queryClient.findProcessesByContainerId("rewards", 0, 1000); for (ProcessDefinition def : findProcessesByContainerId) { System.out.println(def.getName() + " - " + def.getId() + " v" + def.getVersion()); } } - Starting a business process in a KIE container
-
You can use the
ProcessServicesClientclient to start a business process. Ensure that any custom classes that you require for your process are added into theKieServicesConfigurationobject, using theaddExtraClasses()method.Example request to start a business processimport java.util.HashMap; import java.util.HashSet; import java.util.Map; import java.util.Set; import javax.xml.bind.JAXBContext; import javax.xml.bind.JAXBException; import javax.xml.bind.Marshaller; import org.kie.server.api.marshalling.MarshallingFormat; import org.kie.server.client.KieServicesClient; import org.kie.server.client.KieServicesConfiguration; import org.kie.server.client.KieServicesFactory; import org.kie.server.client.ProcessServicesClient; ... public static void startProcess() { //Client configuration setup KieServicesConfiguration config = KieServicesFactory.newRestConfiguration(SERVER_URL, LOGIN, PASSWORD); //Add custom classes, such as Obj.class, to the configuration Set<Class<?>> extraClassList = new HashSet<Class<?>>(); extraClassList.add(Obj.class); config.addExtraClasses(extraClassList); config.setMarshallingFormat(MarshallingFormat.JSON); // ProcessServicesClient setup KieServicesClient client = KieServicesFactory.newKieServicesClient(config); ProcessServicesClient processServicesClient = client.getServicesClient(ProcessServicesClient.class); // Create an instance of the custom class Obj obj = new Obj(); obj.setOk("ok"); Map<String, Object> variables = new HashMap<String, Object>(); variables.put("test", obj); // Start the process with custom class processServicesClient.startProcess(CONTAINER, processId, variables); } - Running a custom query
-
You can use the
QueryDefinitionobject of theQueryServicesClientclient to register and execute custom queries in KIE Server.Example request to register and execute a custom query in KIE Server// Client setup KieServicesConfiguration conf = KieServicesFactory.newRestConfiguration(SERVER_URL, LOGIN, PASSWORD); KieServicesClient client = KieServicesFactory.newKieServicesClient(conf); // Get the QueryServicesClient QueryServicesClient queryClient = client.getServicesClient(QueryServicesClient.class); // Build the query QueryDefinition queryDefinition = QueryDefinition.builder().name(QUERY_NAME) .expression("select * from Task t") .source("java:jboss/datasources/ExampleDS") .target("TASK").build(); // Specify that two queries cannot have the same name queryClient.unregisterQuery(QUERY_NAME); // Register the query queryClient.registerQuery(queryDefinition); // Execute the query with parameters: query name, mapping type (to map the fields to an object), page number, page size, and return type List<TaskInstance> query = queryClient.query(QUERY_NAME, QueryServicesClient.QUERY_MAP_TASK, 0, 100, TaskInstance.class); // Read the result for (TaskInstance taskInstance : query) { System.out.println(taskInstance); }In this example, the
targetinstructs the query service to apply default filters. Alternatively, you can set filter parameters manually. TheTargetclass supports the following values:public enum Target { PROCESS, TASK, BA_TASK, PO_TASK, JOBS, CUSTOM; }
23.10. KIE Server and KIE container commands in jBPM
jBPM supports server commands that you can send to KIE Server for server-related or container-related operations, such as retrieving server information or creating or deleting a container. The full list of supported KIE Server configuration commands is located in the org.kie.server.api.commands package in your jBPM instance.
In the KIE Server REST API, you use the org.kie.server.api.commands commands as the request body for POST requests to http://SERVER:PORT/kie-server/services/rest/server/config. For more information about using the KIE Server REST API, see KIE Server REST API for KIE containers and business assets.
In the KIE Server Java client API, you use the corresponding method in the parent KieServicesClient Java client as an embedded API request in your Java application. All KIE Server commands are executed by methods provided in the Java client API, so you do not need to embed the actual KIE Server commands in your Java application. For more information about using the KIE Server Java client API, see KIE Server Java client API for KIE containers and business assets.
23.10.1. Sample KIE Server and KIE container commands
The following are sample KIE Server commands that you can use with the KIE Server REST API or Java client API for server-related or container-related operations in KIE Server:
-
GetServerInfoCommand -
GetServerStateCommand -
CreateContainerCommand -
GetContainerInfoCommand -
ListContainersCommand -
CallContainerCommand -
DisposeContainerCommand -
GetScannerInfoCommand -
UpdateScannerCommand -
UpdateReleaseIdCommand
For the full list of supported KIE Server configuration and management commands, see the org.kie.server.api.commands package in your jBPM instance.
You can run KIE Server commands individually or together as a batch REST API request or batch Java API request:
{
"commands": [
{
"create-container": {
"container": {
"status": "STARTED",
"container-id": "command-script-container",
"release-id": {
"version": "1.0",
"group-id": "com.redhat",
"artifact-id": "Project1"
}
}
}
},
{
"call-container": {
"payload": "{\n \"commands\" : [ {\n \"fire-all-rules\" : {\n \"max\" : -1,\n \"out-identifier\" : null\n }\n } ]\n}",
"container-id": "command-script-container"
}
},
{
"dispose-container": {
"container-id": "command-script-container"
}
}
]
}public void disposeAndCreateContainer() {
System.out.println("== Disposing and creating containers ==");
// Retrieve list of KIE containers
List<KieContainerResource> kieContainers = kieServicesClient.listContainers().getResult().getContainers();
if (kieContainers.size() == 0) {
System.out.println("No containers available...");
return;
}
// Dispose KIE container
KieContainerResource container = kieContainers.get(0);
String containerId = container.getContainerId();
ServiceResponse<Void> responseDispose = kieServicesClient.disposeContainer(containerId);
if (responseDispose.getType() == ResponseType.FAILURE) {
System.out.println("Error disposing " + containerId + ". Message: ");
System.out.println(responseDispose.getMsg());
return;
}
System.out.println("Success Disposing container " + containerId);
System.out.println("Trying to recreate the container...");
// Re-create KIE container
ServiceResponse<KieContainerResource> createResponse = kieServicesClient.createContainer(containerId, container);
if(createResponse.getType() == ResponseType.FAILURE) {
System.out.println("Error creating " + containerId + ". Message: ");
System.out.println(responseDispose.getMsg());
return;
}
System.out.println("Container recreated with success!");
}Each command in this section includes a REST request body example (JSON) for the KIE Server REST API and an embedded method example from the KieServicesClient Java client for the KIE Server Java client API.
- GetServerInfoCommand
-
Returns information about the KIE Server.
Example REST request body (JSON){ "commands" : [ { "get-server-info" : { } } ] }Example Java client methodKieServerInfo serverInfo = kieServicesClient.getServerInfo();Example server response (JSON){ "response": [ { "type": "SUCCESS", "msg": "Kie Server info", "result": { "kie-server-info": { "id": "default-kieserver", "version": "7.11.0.Final-redhat-00001", "name": "default-kieserver", "location": "http://localhost:8080/kie-server/services/rest/server", "capabilities": [ "KieServer", "BRM", "BPM", "CaseMgmt", "BPM-UI", "BRP", "DMN", "Swagger" ], "messages": [ { "severity": "INFO", "timestamp": { "java.util.Date": 1538502533321 }, "content": [ "Server KieServerInfo{serverId='default-kieserver', version='7.11.0.Final-redhat-00001', name='default-kieserver', location='http://localhost:8080/kie-server/services/rest/server', capabilities=[KieServer, BRM, BPM, CaseMgmt, BPM-UI, BRP, DMN, Swagger], messages=null}started successfully at Tue Oct 02 13:48:53 EDT 2018" ] } ] } } } ] } - GetServerStateCommand
-
Returns information about the current state and configurations of the KIE Server.
Example REST request body (JSON){ "commands" : [ { "get-server-state" : { } } ] }Example Java client methodKieServerStateInfo serverStateInfo = kieServicesClient.getServerState();Example server response (JSON){ "response": [ { "type": "SUCCESS", "msg": "Successfully loaded server state for server id default-kieserver", "result": { "kie-server-state-info": { "controller": [ "http://localhost:8080/business-central/rest/controller" ], "config": { "config-items": [ { "itemName": "org.kie.server.location", "itemValue": "http://localhost:8080/kie-server/services/rest/server", "itemType": "java.lang.String" }, { "itemName": "org.kie.server.controller.user", "itemValue": "controllerUser", "itemType": "java.lang.String" }, { "itemName": "org.kie.server.controller", "itemValue": "http://localhost:8080/business-central/rest/controller", "itemType": "java.lang.String" } ] }, "containers": [ { "container-id": "employee-rostering", "release-id": { "group-id": "employeerostering", "artifact-id": "employeerostering", "version": "1.0.0-SNAPSHOT" }, "resolved-release-id": null, "status": "STARTED", "scanner": { "status": "STOPPED", "poll-interval": null }, "config-items": [ { "itemName": "KBase", "itemValue": "", "itemType": "BPM" }, { "itemName": "KSession", "itemValue": "", "itemType": "BPM" }, { "itemName": "MergeMode", "itemValue": "MERGE_COLLECTIONS", "itemType": "BPM" }, { "itemName": "RuntimeStrategy", "itemValue": "SINGLETON", "itemType": "BPM" } ], "messages": [], "container-alias": "employeerostering" } ] } } } ] } - CreateContainerCommand
-
Creates a KIE container in the KIE Server.
Table 97. Command attributes Name Description Requirement containerMap containing the
container-id,release-iddata (group ID, artifact ID, version),status, and any other components of the new KIE containerRequired
Example REST request body (JSON){ "commands" : [ { "create-container" : { "container" : { "status" : null, "messages" : [ ], "container-id" : "command-script-container", "release-id" : { "version" : "1.0", "group-id" : "com.redhat", "artifact-id" : "Project1" }, "config-items" : [ ] } } } ] }Example Java client methodServiceResponse<KieContainerResource> response = kieServicesClient.createContainer("command-script-container", resource);Example server response (JSON){ "response": [ { "type": "SUCCESS", "msg": "Container command-script-container successfully deployed with module com.redhat:Project1:1.0.", "result": { "kie-container": { "container-id": "command-script-container", "release-id": { "version" : "1.0", "group-id" : "com.redhat", "artifact-id" : "Project1" }, "resolved-release-id": { "version" : "1.0", "group-id" : "com.redhat", "artifact-id" : "Project1" }, "status": "STARTED", "scanner": { "status": "DISPOSED", "poll-interval": null }, "config-items": [], "messages": [ { "severity": "INFO", "timestamp": { "java.util.Date": 1538762455510 }, "content": [ "Container command-script-container successfully created with module com.redhat:Project1:1.0." ] } ], "container-alias": null } } } ] } - GetContainerInfoCommand
-
Returns information about a specified KIE container in KIE Server.
Table 98. Command attributes Name Description Requirement container-idID of the KIE container
Required
Example REST request body (JSON){ "commands" : [ { "get-container-info" : { "container-id" : "command-script-container" } } ] }Example Java client methodServiceResponse<KieContainerResource> response = kieServicesClient.getContainerInfo("command-script-container");Example server response (JSON){ "response": [ { "type": "SUCCESS", "msg": "Info for container command-script-container", "result": { "kie-container": { "container-id": "command-script-container", "release-id": { "group-id": "com.redhat", "artifact-id": "Project1", "version": "1.0" }, "resolved-release-id": { "group-id": "com.redhat", "artifact-id": "Project1", "version": "1.0" }, "status": "STARTED", "scanner": { "status": "DISPOSED", "poll-interval": null }, "config-items": [ ], "container-alias": null } } } ] } - ListContainersCommand
-
Returns a list of KIE containers that have been created in the KIE Server.
Table 99. Command attributes Name Description Requirement kie-container-filterOptional map containing
release-id-filter,container-status-filter, and any other KIE container properties by which you want to filter resultsOptional
Example REST request body (JSON){ "commands" : [ { "list-containers" : { "kie-container-filter" : { "release-id-filter" : { }, "container-status-filter" : { "accepted-status" : ["FAILED"] } } } } ] }Example Java client methodKieContainerResourceFilter filter = new KieContainerResourceFilter.Builder() .status(KieContainerStatus.FAILED) .build(); KieContainerResourceList containersList = kieServicesClient.listContainers(filter);Example server response (JSON){ "response": [ { "type": "SUCCESS", "msg": "List of created containers", "result": { "kie-containers": { "kie-container": [ { "container-id": "command-script-container", "release-id": { "group-id": "com.redhat", "artifact-id": "Project1", "version": "1.0" }, "resolved-release-id": { "group-id": "com.redhat", "artifact-id": "Project1", "version": "1.0" }, "status": "STARTED", "scanner": { "status": "STARTED", "poll-interval": 5000 }, "config-items": [ { "itemName": "RuntimeStrategy", "itemValue": "SINGLETON", "itemType": "java.lang.String" }, { "itemName": "MergeMode", "itemValue": "MERGE_COLLECTIONS", "itemType": "java.lang.String" }, { "itemName": "KBase", "itemValue": "", "itemType": "java.lang.String" }, { "itemName": "KSession", "itemValue": "", "itemType": "java.lang.String" } ], "messages": [ { "severity": "INFO", "timestamp": { "java.util.Date": 1538504619749 }, "content": [ "Container command-script-container successfully created with module com.redhat:Project1:1.0." ] } ], "container-alias": null } ] } } } ] } - CallContainerCommand
-
Calls a KIE container and executes one or more runtime commands. For information about jBPM runtime commands, see Runtime commands in jBPM.
Table 100. Command attributes Name Description Requirement container-idID of the KIE container to be called
Required
payloadOne or more commands in a
BatchExecutionCommandwrapper to be executed on the KIE containerRequired
Example REST request body (JSON){ "commands" : [ { "call-container" : { "payload" : "{\n \"lookup\" : \"defaultKieSession\",\n \"commands\" : [ {\n \"fire-all-rules\" : {\n \"max\" : -1,\n \"out-identifier\" : null\n }\n } ]\n}", "container-id" : "command-script-container" } } ] }Example Java client methodList<Command<?>> commands = new ArrayList<Command<?>>(); BatchExecutionCommand batchExecution1 = commandsFactory.newBatchExecution(commands, "defaultKieSession"); commands.add(commandsFactory.newFireAllRules()); ServiceResponse<ExecutionResults> response1 = ruleClient.executeCommandsWithResults("command-script-container", batchExecution1);Example server response (JSON){ "response": [ { "type": "SUCCESS", "msg": "Container command-script-container successfully called.", "result": "{\n \"results\" : [ ],\n \"facts\" : [ ]\n}" } ] } - DisposeContainerCommand
-
Disposes a specified KIE container in the KIE Server.
Table 101. Command attributes Name Description Requirement container-idID of the KIE container to be disposed
Required
Example REST request body (JSON){ "commands" : [ { "dispose-container" : { "container-id" : "command-script-container" } } ] }Example Java client methodServiceResponse<Void> response = kieServicesClient.disposeContainer("command-script-container");Example server response (JSON){ "response": [ { "type": "SUCCESS", "msg": "Container command-script-container successfully disposed.", "result": null } ] } - GetScannerInfoCommand
-
Returns information about the KIE scanner used for automatic updates in a specified KIE container, if applicable.
Table 102. Command attributes Name Description Requirement container-idID of the KIE container where the KIE scanner is used
Required
Example REST request body (JSON){ "commands" : [ { "get-scanner-info" : { "container-id" : "command-script-container" } } ] }Example Java client methodServiceResponse<KieScannerResource> response = kieServicesClient.getScannerInfo("command-script-container");Example server response (JSON){ "response": [ { "type": "SUCCESS", "msg": "Scanner info successfully retrieved", "result": { "kie-scanner": { "status": "DISPOSED", "poll-interval": null } } } ] } - UpdateScannerCommand
-
Starts or stops a KIE scanner that controls polling for updated KIE container deployments.
Avoid using a KIE scanner with business processes. Using a KIE scanner with processes can lead to unforeseen updates that can then cause errors in long-running processes when changes are not compatible with running process instances. Table 103. Command attributes Name Description Requirement container-idID of the KIE container where the KIE scanner is used
Required
statusStatus to be set on the KIE scanner (
STARTED,STOPPED)Required
poll-intervalPermitted polling duration in milliseconds
Required only when starting scanner
Example REST request body (JSON){ "commands" : [ { "update-scanner" : { "scanner" : { "status" : "STARTED", "poll-interval" : 10000 }, "container-id" : "command-script-container" } } ] }Example Java client methodKieScannerResource scannerResource = new KieScannerResource(); scannerResource.setPollInterval(10000); scannerResource.setStatus(KieScannerStatus. STARTED); ServiceResponse<KieScannerResource> response = kieServicesClient.updateScanner("command-script-container", scannerResource);Example server response (JSON){ "response": [ { "type": "SUCCESS", "msg": "Kie scanner successfully created.", "result": { "kie-scanner": { "status": "STARTED", "poll-interval": 10000 } } } ] } - UpdateReleaseIdCommand
-
Updates the release ID data (group ID, artifact ID, version) for a specified KIE container.
Table 104. Command attributes Name Description Requirement container-idID of the KIE container to be updated
Required
releaseIdUpdated GAV (group ID, artifact ID, version) data to be applied to the KIE container
Required
Example REST request body (JSON){ "commands" : [ { "update-release-id" : { "releaseId" : { "version" : "1.1", "group-id" : "com.redhat", "artifact-id" : "Project1" }, "container-id" : "command-script-container" } } ] }Example Java client methodServiceResponse<ReleaseId> response = kieServicesClient.updateReleaseId("command-script-container", "com.redhat:Project1:1.1");Example server response (JSON){ "response": [ { "type": "SUCCESS", "msg": "Release id successfully updated", "result": { "release-id": { "group-id": "com.redhat", "artifact-id": "Project1", "version": "1.1" } } } ] }
23.11. Runtime commands in jBPM
jBPM supports runtime commands that you can send to KIE Server for asset-related operations, such as executing all rules or inserting or retracting objects in a KIE session. The full list of supported runtime commands is located in the org.drools.core.command.runtime package in your jBPM instance.
In the KIE Server REST API, you use the global org.drools.core.command.runtime commands or the rule-specific org.drools.core.command.runtime.rule commands as the request body for POST requests to http://SERVER:PORT/kie-server/services/rest/server/containers/instances/{containerId}. For more information about using the KIE Server REST API, see KIE Server REST API for KIE containers and business assets.
In the KIE Server Java client API, you can embed these commands in your Java application along with the relevant Java client. For example, for rule-related commands, you use the RuleServicesClient Java client with the embedded commands. For more information about using the KIE Server Java client API, see KIE Server Java client API for KIE containers and business assets.
23.11.1. Sample runtime commands in jBPM
The following are sample runtime commands that you can use with the KIE Server REST API or Java client API for asset-related operations in KIE Server:
-
BatchExecutionCommand -
InsertObjectCommand -
RetractCommand -
ModifyCommand -
GetObjectCommand -
GetObjectsCommand -
InsertElementsCommand -
FireAllRulesCommand -
StartProcessCommand -
SignalEventCommand -
CompleteWorkItemCommand -
AbortWorkItemCommand -
QueryCommand -
SetGlobalCommand -
GetGlobalCommand
For the full list of supported runtime commands, see the org.drools.core.command.runtime package in your jBPM instance.
Each command in this section includes a REST request body example (JSON) for the KIE Server REST API and an embedded Java command example for the KIE Server Java client API. The Java examples use an object org.drools.compiler.test.Person with the fields name (String) and age (Integer).
- BatchExecutionCommand
-
Contains multiple commands to be executed together.
Table 105. Command attributes Name Description Requirement commandsList of commands to be executed.
Required
lookupSets the KIE session ID on which the commands will be executed. For stateless KIE sessions, this attribute is required. For stateful KIE sessions, this attribute is optional and if not specified, the default KIE session is used.
Required for stateless KIE session, optional for stateful KIE session
KIE session IDs are in the kmodule.xmlfile of your jBPM project. To view or add a KIE session ID in Business Central to use with thelookupcommand attribute, navigate to the relevant project in Business Central and go to project Settings → KIE bases → KIE sessions. If no KIE bases exist, click Add KIE base → KIE sessions to define the new KIE base and KIE sessions.Example JSON request body{ "lookup": "ksession1", "commands": [ { "insert": { "object": { "org.drools.compiler.test.Person": { "name": "john", "age": 25 } } } }, { "fire-all-rules": { "max": 10, "out-identifier": "firedActivations" } } ] }Example Java commandInsertObjectCommand insertCommand = new InsertObjectCommand(new Person("john", 25)); FireAllRulesCommand fireCommand = new FireAllRulesCommand(); BatchExecutionCommand batch = new BatchExecutionCommandImpl(Arrays.asList(insertCommand, fireCommand), "ksession1");Example server response (JSON){ "response": [ { "type": "SUCCESS", "msg": "Container command-script-container successfully called.", "result": { "execution-results": { "results": [ { "value": 0, "key": "firedActivations" } ], "facts": [] } } } ] } - InsertObjectCommand
-
Inserts an object into the KIE session.
Table 106. Command attributes Name Description Requirement objectThe object to be inserted
Required
out-identifierID of the
FactHandlecreated from the object insertion and added to the execution resultsOptional
return-objectBoolean to determine whether the object must be returned in the execution results (default:
true)Optional
entry-pointEntry point for the insertion
Optional
Example JSON request body{ "commands": [ { "insert": { "entry-point": "my stream", "object": { "org.drools.compiler.test.Person": { "age": 25, "name": "john" } }, "out-identifier": "john", "return-object": false } } ] }Example Java commandCommand insertObjectCommand = CommandFactory.newInsert(new Person("john", 25), "john", false, null); ksession.execute(insertObjectCommand);Example server response (JSON){ "response": [ { "type": "SUCCESS", "msg": "Container command-script-container successfully called.", "result": { "execution-results": { "results": [], "facts": [ { "value": { "org.drools.core.common.DefaultFactHandle": { "external-form": "0:4:436792766:-2127720265:4:DEFAULT:NON_TRAIT:java.util.LinkedHashMap" } }, "key": "john" } ] } } } ] } - RetractCommand
-
Retracts an object from the KIE session.
Table 107. Command attributes Name Description Requirement fact-handleThe
FactHandleassociated with the object to be retractedRequired
Example JSON request body{ "commands": [ { "retract": { "fact-handle": "0:4:436792766:-2127720265:4:DEFAULT:NON_TRAIT:java.util.LinkedHashMap" } } ] }Example Java command: UseFactHandleFromStringRetractCommand retractCommand = new RetractCommand(); retractCommand.setFactHandleFromString("123:234:345:456:567");Example Java command: UseFactHandlefrom inserted objectRetractCommand retractCommand = new RetractCommand(factHandle);Example server response (JSON){ "response": [ { "type": "SUCCESS", "msg": "Container employee-rostering successfully called.", "result": { "execution-results": { "results": [], "facts": [] } } } ] } - ModifyCommand
-
Modifies a previously inserted object in the KIE session.
Table 108. Command attributes Name Description Requirement fact-handleThe
FactHandleassociated with the object to be modifiedRequired
settersList of setters for object modifications
Required
Example JSON request body{ "commands": [ { "modify": { "fact-handle": "0:4:436792766:-2127720265:4:DEFAULT:NON_TRAIT:java.util.LinkedHashMap", "setters": { "accessor": "age", "value": 25 } } } ] }Example Java commandModifyCommand modifyCommand = new ModifyCommand(factHandle); List<Setter> setters = new ArrayList<Setter>(); setters.add(new SetterImpl("age", "25")); modifyCommand.setSetters(setters);Example server response (JSON){ "response": [ { "type": "SUCCESS", "msg": "Container employee-rostering successfully called.", "result": { "execution-results": { "results": [], "facts": [] } } } ] } - GetObjectCommand
-
Retrieves an object from a KIE session.
Table 109. Command attributes Name Description Requirement fact-handleThe
FactHandleassociated with the object to be retrievedRequired
out-identifierID of the
FactHandlecreated from the object insertion and added to the execution resultsOptional
Example JSON request body{ "commands": [ { "get-object": { "fact-handle": "0:4:436792766:-2127720265:4:DEFAULT:NON_TRAIT:java.util.LinkedHashMap", "out-identifier": "john" } } ] }Example Java commandGetObjectCommand getObjectCommand = new GetObjectCommand(); getObjectCommand.setFactHandleFromString("123:234:345:456:567"); getObjectCommand.setOutIdentifier("john");Example server response (JSON){ "response": [ { "type": "SUCCESS", "msg": "Container command-script-container successfully called.", "result": { "execution-results": { "results": [ { "value": null, "key": "john" } ], "facts": [] } } } ] } - GetObjectsCommand
-
Retrieves all objects from the KIE session as a collection.
Table 110. Command attributes Name Description Requirement object-filterFilter for the objects returned from the KIE session
Optional
out-identifierIdentifier to be used in the execution results
Optional
Example JSON request body{ "commands": [ { "get-objects": { "out-identifier": "objects" } } ] }Example Java commandGetObjectsCommand getObjectsCommand = new GetObjectsCommand(); getObjectsCommand.setOutIdentifier("objects");Example server response (JSON){ "response": [ { "type": "SUCCESS", "msg": "Container command-script-container successfully called.", "result": { "execution-results": { "results": [ { "value": [ { "org.apache.xerces.dom.ElementNSImpl": "<?xml version=\"1.0\" encoding=\"UTF-16\"?>\n<object xmlns:xsi=\"http://www.w3.org/2001/XMLSchema-instance\" xsi:type=\"person\"><age>25</age><name>john</name>\n <\/object>" }, { "org.drools.compiler.test.Person": { "name": "john", "age": 25 } } ], "key": "objects" } ], "facts": [] } } } ] } - InsertElementsCommand
-
Inserts a list of objects into the KIE session.
Table 111. Command attributes Name Description Requirement objectsThe list of objects to be inserted into the KIE session
Required
out-identifierID of the
FactHandlecreated from the object insertion and added to the execution resultsOptional
return-objectBoolean to determine whether the object must be returned in the execution results. Default value:
true.Optional
entry-pointEntry point for the insertion
Optional
Example JSON request body{ "commands": [ { "insert-elements": { "objects": [ { "containedObject": { "@class": "org.drools.compiler.test.Person", "age": 25, "name": "john" } }, { "containedObject": { "@class": "Person", "age": 35, "name": "sarah" } } ] } } ] }Example Java commandList<Object> objects = new ArrayList<Object>(); objects.add(new Person("john", 25)); objects.add(new Person("sarah", 35)); Command insertElementsCommand = CommandFactory.newInsertElements(objects);Example server response (JSON){ "response": [ { "type": "SUCCESS", "msg": "Container command-script-container successfully called.", "result": { "execution-results": { "results": [], "facts": [ { "value": { "org.drools.core.common.DefaultFactHandle": { "external-form": "0:4:436792766:-2127720265:4:DEFAULT:NON_TRAIT:java.util.LinkedHashMap" } }, "key": "john" }, { "value": { "org.drools.core.common.DefaultFactHandle": { "external-form": "0:4:436792766:-2127720266:4:DEFAULT:NON_TRAIT:java.util.LinkedHashMap" } }, "key": "sarah" } ] } } } ] } - FireAllRulesCommand
-
Executes all rules in the KIE session.
Table 112. Command attributes Name Description Requirement maxMaximum number of rules to be executed. The default is
-1and does not put any restriction on execution.Optional
out-identifierID to be used for retrieving the number of fired rules in execution results.
Optional
agenda-filterAgenda Filter to be used for rule execution.
Optional
Example JSON request body{ "commands" : [ { "fire-all-rules": { "max": 10, "out-identifier": "firedActivations" } } ] }Example Java commandFireAllRulesCommand fireAllRulesCommand = new FireAllRulesCommand(); fireAllRulesCommand.setMax(10); fireAllRulesCommand.setOutIdentifier("firedActivations");Example server response (JSON){ "response": [ { "type": "SUCCESS", "msg": "Container command-script-container successfully called.", "result": { "execution-results": { "results": [ { "value": 0, "key": "firedActivations" } ], "facts": [] } } } ] } - StartProcessCommand
-
Starts a process using the process ID. You can also pass parameters and initial data to be inserted.
Table 113. Command attributes Name Description Requirement processIdID of the process to be started
Required
parametersA
Map <String,Object>argument to pass parameters in the process startupOptional
dataList of objects to be inserted into the KIE session before the process startup
Optional
Example JSON request body{ "commands": [ { "start-process": { "processId": "myProject.myProcess", "data": null, "parameter": [], "out-identifier": null } } ] }Example Java commandStartProcessCommand startProcessCommand = new StartProcessCommand(); startProcessCommand.setProcessId("org.drools.task.processOne");Example server response (JSON){ "type": "SUCCESS", "msg": "Container stateful-session successfully called.", "result": { "execution-results": { "results": [], "facts": [] } } } - SignalEventCommand
-
Sends a signal event to the KIE session.
Table 114. Command attributes Name Description Requirement event-typeType of the incoming event
Required
process-instance-idID of the process instance to be signalled
Optional
eventData of the incoming event
Optional
Example JSON request body{ "commands": [ { "signal-event": { "process-instance-id": 1001, "correlation-key": null, "event-type": "start", "event": { "org.kie.server.testing.Person": { "fullname": "john", "age": 25 } } } } ] }Example Java commandSignalEventCommand signalEventCommand = new SignalEventCommand(); signalEventCommand.setProcessInstanceId(1001); signalEventCommand.setEventType("start"); signalEventCommand.setEvent(new Person("john", 25));Example server response (JSON){ "type": "SUCCESS", "msg": "Container stateful-session successfully called.", "result": { "execution-results": { "results": [], "facts": [] } } } - CompleteWorkItemCommand
-
Completes a work item in the KIE session.
Table 115. Command attributes Name Description Requirement workItemIdID of the work item to be completed
Required
resultsResult of the work item
Optional
Example JSON request body{ "commands": [ { "complete-work-item": { "id": 1001 } } ] }Example Java commandCompleteWorkItemCommand completeWorkItemCommand = new CompleteWorkItemCommand(); completeWorkItemCommand.setWorkItemId(1001);Example server response (JSON){ "response": [ { "type": "SUCCESS", "msg": "Container employee-rostering successfully called.", "result": { "execution-results": { "results": [], "facts": [] } } } ] } - AbortWorkItemCommand
-
Aborts a work item in the KIE session in the same way as
ksession.getWorkItemManager().abortWorkItem(workItemId).Table 116. Command attributes Name Description Requirement workItemIdID of the work item to be aborted
Required
Example JSON request body{ "commands": [ { "abort-work-item": { "id": 1001 } } ] }Example Java commandAbortWorkItemCommand abortWorkItemCommand = new AbortWorkItemCommand(); abortWorkItemCommand.setWorkItemId(1001);Example server response (JSON){ "response": [ { "type": "SUCCESS", "msg": "Container employee-rostering successfully called.", "result": { "execution-results": { "results": [], "facts": [] } } } ] } - QueryCommand
-
Executes a query defined in the KIE base.
Table 117. Command attributes Name Description Requirement nameQuery name.
Required
out-identifierID of the query results. The query results are added in the execution results with this identifier.
Optional
argumentsList of objects to be passed as a query parameter.
Optional
Example JSON request body{ "commands": [ { "query": { "name": "persons", "arguments": [], "out-identifier": "persons" } } ] }Example Java commandQueryCommand queryCommand = new QueryCommand(); queryCommand.setName("persons"); queryCommand.setOutIdentifier("persons");Example server response (JSON){ "type": "SUCCESS", "msg": "Container stateful-session successfully called.", "result": { "execution-results": { "results": [ { "value": { "org.drools.core.runtime.rule.impl.FlatQueryResults": { "idFactHandleMaps": { "type": "LIST", "componentType": null, "element": [ { "type": "MAP", "componentType": null, "element": [ { "value": { "org.drools.core.common.DisconnectedFactHandle": { "id": 1, "identityHashCode": 1809949690, "objectHashCode": 1809949690, "recency": 1, "object": { "org.kie.server.testing.Person": { "fullname": "John Doe", "age": 47 } }, "entryPointId": "DEFAULT", "traitType": "NON_TRAIT", "external-form": "0:1:1809949690:1809949690:1:DEFAULT:NON_TRAIT:org.kie.server.testing.Person" } }, "key": "$person" } ] } ] }, "idResultMaps": { "type": "LIST", "componentType": null, "element": [ { "type": "MAP", "componentType": null, "element": [ { "value": { "org.kie.server.testing.Person": { "fullname": "John Doe", "age": 47 } }, "key": "$person" } ] } ] }, "identifiers": { "type": "SET", "componentType": null, "element": [ "$person" ] } } }, "key": "persons" } ], "facts": [] } } } - SetGlobalCommand
-
Sets an object to a global state.
Table 118. Command attributes Name Description Requirement identifierID of the global variable defined in the KIE base
Required
objectObject to be set into the global variable
Optional
outBoolean to exclude the global variable you set from the execution results
Optional
out-identifierID of the global execution result
Optional
Example JSON request body{ "commands": [ { "set-global": { "identifier": "helper", "object": { "org.kie.server.testing.Person": { "fullname": "kyle", "age": 30 } }, "out-identifier": "output" } } ] }Example Java commandSetGlobalCommand setGlobalCommand = new SetGlobalCommand(); setGlobalCommand.setIdentifier("helper"); setGlobalCommand.setObject(new Person("kyle", 30)); setGlobalCommand.setOut(true); setGlobalCommand.setOutIdentifier("output");Example server response (JSON){ "type": "SUCCESS", "msg": "Container stateful-session successfully called.", "result": { "execution-results": { "results": [ { "value": { "org.kie.server.testing.Person": { "fullname": "kyle", "age": 30 } }, "key": "output" } ], "facts": [] } } } - GetGlobalCommand
-
Retrieves a previously defined global object.
Table 119. Command attributes Name Description Requirement identifierID of the global variable defined in the KIE base
Required
out-identifierID to be used in the execution results
Optional
Example JSON request body{ "commands": [ { "get-global": { "identifier": "helper", "out-identifier": "helperOutput" } } ] }Example Java commandGetGlobalCommand getGlobalCommand = new GetGlobalCommand(); getGlobalCommand.setIdentifier("helper"); getGlobalCommand.setOutIdentifier("helperOutput");Example server response (JSON){ "response": [ { "type": "SUCCESS", "msg": "Container command-script-container successfully called.", "result": { "execution-results": { "results": [ { "value": null, "key": "helperOutput" } ], "facts": [] } } } ] }
23.12. jBPM controller REST API for KIE Server templates and instances
jBPM provides a jBPM controller REST API that you can use to interact with your KIE Server templates (configurations), KIE Server instances (remote servers), and associated KIE containers (deployment units) in jBPM without using the Business Central user interface. This API support enables you to maintain your jBPM servers and resources more efficiently and optimize your integration and development with jBPM.
With the jBPM controller REST API, you can perform the following actions:
-
Retrieve information about KIE Server templates, instances, and associated KIE containers
-
Update, start, or stop KIE containers associated with KIE Server templates and instances
-
Create, update, or delete KIE Server templates
-
Create, update, or delete KIE Server instances
Requests to the jBPM controller REST API require the following components:
- Authentication
-
The jBPM controller REST API requires HTTP Basic authentication or token-based authentication for the following user roles, depending on controller type:
-
rest-alluser role if you installed Business Central and you want to use the built-in jBPM controller -
kie-serveruser role if you installed the headless jBPM controller separately from Business Central
To view configured user roles for your jBPM distribution, navigate to
~/$SERVER_HOME/standalone/configuration/application-roles.propertiesand~/application-users.properties.To add a user with the
kie-serverrole or therest-allrole or both, navigate to~/$SERVER_HOME/binand run the following command with the role or roles specified:$ ./add-user.sh -a --user <USERNAME> --password <PASSWORD> --role kie-server,rest-allTo configure the
kie-serverorrest-alluser with jBPM controller access, navigate to~/$SERVER_HOME/standalone/configuration/standalone-full.xml, uncomment theorg.kie.serverproperties (if applicable), and add the controller user login credentials and controller location (if needed):<property name="org.kie.server.location" value="http://localhost:8080/kie-server/services/rest/server"/> <property name="org.kie.server.controller" value="http://localhost:8080/business-central/rest/controller"/> <property name="org.kie.server.controller.user" value="baAdmin"/> <property name="org.kie.server.controller.pwd" value="password@1"/> <property name="org.kie.server.id" value="default-kieserver"/>For more information about user roles and jBPM installation options, see Installing the KIE Server.
-
- HTTP headers
-
The jBPM controller REST API requires the following HTTP headers for API requests:
-
Accept: Data format accepted by your requesting client:-
application/json(JSON) -
application/xml(XML, for JAXB)
-
-
Content-Type: Data format of yourPOSTorPUTAPI request data:-
application/json(JSON) -
application/xml(XML, for JAXB)
-
-
- HTTP methods
-
The jBPM controller REST API supports the following HTTP methods for API requests:
-
GET: Retrieves specified information from a specified resource endpoint -
POST: Updates a resource or resource instance -
PUT: Creates a resource or resource instance -
DELETE: Deletes a resource or resource instance
-
- Base URL
-
The base URL for jBPM controller REST API requests is
http://SERVER:PORT/CONTROLLER/rest/, such ashttp://localhost:8080/business-central/rest/if you are using the jBPM controller built in to Business Central. - Endpoints
-
jBPM controller REST API endpoints, such as
/controller/management/servers/{serverTemplateId}for a specified KIE Server template, are the URIs that you append to the jBPM controller REST API base URL to access the corresponding server resource or type of server resource in jBPM.Example request URL for/controller/management/servers/{serverTemplateId}endpointhttp://localhost:8080/business-central/rest/controller/management/servers/default-kieserver - Request parameters and request data
-
Some jBPM controller REST API requests require specific parameters in the request URL path to identify or filter specific resources and to perform specific actions. You can append URL parameters to the endpoint in the format
?<PARAM>=<VALUE>&<PARAM>=<VALUE>.Example DELETE request URL with parametershttp://localhost:8080/business-central/rest/controller/server/new-kieserver-instance?location=http://localhost:8080/kie-server/services/rest/serverHTTP
POSTandPUTrequests may additionally require a request body or file with data to accompany the request.Example PUT request URL and JSON request body datahttp://localhost:8080/business-central/rest/controller/management/servers/new-kieserver{ "server-id": "new-kieserver", "server-name": "new-kieserver", "container-specs": [], "server-config": {}, "capabilities": [ "RULE", "PROCESS", "PLANNING" ] }
23.12.1. Sending requests with the jBPM controller REST API using a REST client or curl utility
The jBPM controller REST API enables you to interact with your KIE Server templates (configurations), KIE Server instances (remote servers), and associated KIE containers (deployment units) in jBPM without using the Business Central user interface. You can send jBPM controller REST API requests using any REST client or curl utility.
-
KIE Server is installed and running.
-
The jBPM controller or headless jBPM controller is installed and running.
-
You have
rest-alluser role access to the jBPM controller if you installed Business Central, orkie-serveruser role access to the headless jBPM controller installed separately from Business Central.
-
Identify the relevant API endpoint to which you want to send a request, such as
[GET] /controller/management/serversto retrieve KIE Server templates from the jBPM controller. -
In a REST client or curl utility, enter the following components for a
GETrequest tocontroller/management/servers. Adjust any request details according to your use case.For REST client:
-
Authentication: Enter the user name and password of the jBPM controller user with the
rest-allrole or the headless jBPM controller user with thekie-serverrole. -
HTTP Headers: Set the following header:
-
Accept:application/json
-
-
HTTP method: Set to
GET. -
URL: Enter the jBPM controller REST API base URL and endpoint, such as
http://localhost:8080/business-central/rest/controller/management/servers.
For curl utility:
-
-u: Enter the user name and password of the jBPM controller user with therest-allrole or the headless jBPM controller user with thekie-serverrole. -
-H: Set the following header:-
Accept:application/json
-
-
-X: Set toGET. -
URL: Enter the jBPM controller REST API base URL and endpoint, such as
http://localhost:8080/business-central/rest/controller/management/servers.
curl -u 'baAdmin:password@1' -H "Accept: application/json" -X GET "http://localhost:8080/business-central/rest/controller/management/servers" -
-
Execute the request and review the jBPM controller response.
Example server response (JSON):
{ "server-template": [ { "server-id": "default-kieserver", "server-name": "default-kieserver", "container-specs": [ { "container-id": "employeerostering_1.0.0-SNAPSHOT", "container-name": "employeerostering", "server-template-key": { "server-id": "default-kieserver", "server-name": "default-kieserver" }, "release-id": { "group-id": "employeerostering", "artifact-id": "employeerostering", "version": "1.0.0-SNAPSHOT" }, "configuration": { "RULE": { "org.kie.server.controller.api.model.spec.RuleConfig": { "pollInterval": null, "scannerStatus": "STOPPED" } }, "PROCESS": { "org.kie.server.controller.api.model.spec.ProcessConfig": { "runtimeStrategy": "SINGLETON", "kbase": "", "ksession": "", "mergeMode": "MERGE_COLLECTIONS" } } }, "status": "STARTED" }, { "container-id": "mortgage-process_1.0.0-SNAPSHOT", "container-name": "mortgage-process", "server-template-key": { "server-id": "default-kieserver", "server-name": "default-kieserver" }, "release-id": { "group-id": "mortgage-process", "artifact-id": "mortgage-process", "version": "1.0.0-SNAPSHOT" }, "configuration": { "RULE": { "org.kie.server.controller.api.model.spec.RuleConfig": { "pollInterval": null, "scannerStatus": "STOPPED" } }, "PROCESS": { "org.kie.server.controller.api.model.spec.ProcessConfig": { "runtimeStrategy": "PER_PROCESS_INSTANCE", "kbase": "", "ksession": "", "mergeMode": "MERGE_COLLECTIONS" } } }, "status": "STARTED" } ], "server-config": {}, "server-instances": [ { "server-instance-id": "default-kieserver-instance@localhost:8080", "server-name": "default-kieserver-instance@localhost:8080", "server-template-id": "default-kieserver", "server-url": "http://localhost:8080/kie-server/services/rest/server" } ], "capabilities": [ "RULE", "PROCESS", "PLANNING" ] } ] } -
In your REST client or curl utility, send another API request with the following components for a
PUTrequest to/controller/management/servers/{serverTemplateId}to create a new KIE Server template. Adjust any request details according to your use case.For REST client:
-
Authentication: Enter the user name and password of the jBPM controller user with the
rest-allrole or the headless jBPM controller user with thekie-serverrole. -
HTTP Headers: Set the following headers:
-
Accept:application/json -
Content-Type:application/json
-
-
HTTP method: Set to
PUT. -
URL: Enter the jBPM controller REST API base URL and endpoint, such as
http://localhost:8080/business-central/rest/controller/management/servers/new-kieserver. -
Request body: Add a JSON request body with the configurations for the new KIE Server template:
{ "server-id": "new-kieserver", "server-name": "new-kieserver", "container-specs": [], "server-config": {}, "capabilities": [ "RULE", "PROCESS", "PLANNING" ] }For curl utility:
-
-u: Enter the user name and password of the jBPM controller user with therest-allrole or the headless jBPM controller user with thekie-serverrole. -
-H: Set the following headers:-
Accept:application/json -
Content-Type:application/json
-
-
-X: Set toPUT. -
URL: Enter the jBPM controller REST API base URL and endpoint, such as
http://localhost:8080/business-central/rest/controller/management/servers/new-kieserver. -
-d: Add a JSON request body or file (@file.json) with the configurations for the new KIE Server template:
curl -u 'baAdmin:password@1' -H "Accept: application/json" -H "Content-Type: application/json" -X PUT "http://localhost:8080/business-central/rest/controller/management/servers/new-kieserver" -d "{ \"server-id\": \"new-kieserver\", \"server-name\": \"new-kieserver\", \"container-specs\": [], \"server-config\": {}, \"capabilities\": [ \"RULE\", \"PROCESS\", \"PLANNING\" ]}"curl -u 'baAdmin:password@1' -H "Accept: application/json" -H "Content-Type: application/json" -X PUT "http://localhost:8080/business-central/rest/controller/management/servers/new-kieserver" -d @my-server-template-configs.json -
-
Execute the request and confirm the successful jBPM controller response.
If you encounter request errors, review the returned error code messages and adjust your request accordingly.
23.12.2. Sending requests with the jBPM controller REST API using the Swagger interface
The jBPM controller REST API supports a Swagger web interface that you can use instead of a standalone REST client or curl utility to interact with your KIE Server templates, instances, and associated KIE containers in jBPM without using the Business Central user interface.
By default, the Swagger web interface for the jBPM controller is enabled by the org.kie.workbench.swagger.disabled=false system property. To disable the Swagger web interface for the jBPM controller, set this system property to true.
|
-
The jBPM controller is installed and running.
-
You have
rest-alluser role access to the jBPM controller if you installed Business Central, orkie-serveruser role access to the headless jBPM controller installed separately from Business Central.
-
In a web browser, navigate to
http://SERVER:PORT/CONTROLLER/docs, such ashttp://localhost:8080/business-central/docs, and log in with the user name and password of the jBPM controller user with therest-allrole or the headless jBPM controller user with thekie-serverrole.If you are using the jBPM controller built in to Business Central, the Swagger page associated with the jBPM controller is identified as the "Business Central API" for Business Central REST services. If you are using the headless jBPM controller without Business Central, the Swagger page associated with the headless jBPM controller is identified as the "Controller API". In both cases, the jBPM controller REST API endpoints are the same. -
In the Swagger page, select the relevant API endpoint to which you want to send a request, such as Controller :: KIE Server templates and KIE containers → [GET] /controller/management/servers to retrieve KIE Server templates from the jBPM controller.
-
Click Try it out and provide any optional parameters by which you want to filter results, if applicable.
-
In the Response content type drop-down menu, select the desired format of the server response, such as application/json for JSON format.
-
Click Execute and review the KIE Server response.
Example server response (JSON):
{ "server-template": [ { "server-id": "default-kieserver", "server-name": "default-kieserver", "container-specs": [ { "container-id": "employeerostering_1.0.0-SNAPSHOT", "container-name": "employeerostering", "server-template-key": { "server-id": "default-kieserver", "server-name": "default-kieserver" }, "release-id": { "group-id": "employeerostering", "artifact-id": "employeerostering", "version": "1.0.0-SNAPSHOT" }, "configuration": { "RULE": { "org.kie.server.controller.api.model.spec.RuleConfig": { "pollInterval": null, "scannerStatus": "STOPPED" } }, "PROCESS": { "org.kie.server.controller.api.model.spec.ProcessConfig": { "runtimeStrategy": "SINGLETON", "kbase": "", "ksession": "", "mergeMode": "MERGE_COLLECTIONS" } } }, "status": "STARTED" }, { "container-id": "mortgage-process_1.0.0-SNAPSHOT", "container-name": "mortgage-process", "server-template-key": { "server-id": "default-kieserver", "server-name": "default-kieserver" }, "release-id": { "group-id": "mortgage-process", "artifact-id": "mortgage-process", "version": "1.0.0-SNAPSHOT" }, "configuration": { "RULE": { "org.kie.server.controller.api.model.spec.RuleConfig": { "pollInterval": null, "scannerStatus": "STOPPED" } }, "PROCESS": { "org.kie.server.controller.api.model.spec.ProcessConfig": { "runtimeStrategy": "PER_PROCESS_INSTANCE", "kbase": "", "ksession": "", "mergeMode": "MERGE_COLLECTIONS" } } }, "status": "STARTED" } ], "server-config": {}, "server-instances": [ { "server-instance-id": "default-kieserver-instance@localhost:8080", "server-name": "default-kieserver-instance@localhost:8080", "server-template-id": "default-kieserver", "server-url": "http://localhost:8080/kie-server/services/rest/server" } ], "capabilities": [ "RULE", "PROCESS", "PLANNING" ] } ] } -
In the Swagger page, navigate to the Controller :: KIE Server templates and KIE containers → [GET] /controller/management/servers/{serverTemplateId} endpoint to send another request to create a new KIE Server template. Adjust any request details according to your use case.
-
Click Try it out and enter the following components for the request:
-
serverTemplateId: Enter the ID of the new KIE Server template, such as
new-kieserver. -
body: Set the Parameter content type to the desired request body format, such as application/json for JSON format, and add a request body with the configurations for the new KIE Server template:
{ "server-id": "new-kieserver", "server-name": "new-kieserver", "container-specs": [], "server-config": {}, "capabilities": [ "RULE", "PROCESS", "PLANNING" ] } -
-
In the Response content type drop-down menu, select the desired format of the server response, such as application/json for JSON format.
-
Click Execute and confirm the successful jBPM controller response.
If you encounter request errors, review the returned error code messages and adjust your request accordingly.
23.12.3. Supported jBPM controller REST API endpoints
The jBPM controller REST API provides endpoints for interacting with KIE Server templates (configurations), KIE Server instances (remote servers), and associated KIE containers (deployment units). The jBPM controller REST API base URL is http://SERVER:PORT/CONTROLLER/rest/. All requests require HTTP Basic authentication or token-based authentication for the rest-all user role if you installed Business Central and you want to use the built-in jBPM controller, or the kie-server user role if you installed the headless jBPM controller separately from Business Central.
For the full list of jBPM controller REST API endpoints and descriptions, use one of the following resources:
-
Controller REST API on the jBPM Documentation page (static)
-
Swagger UI for the jBPM controller REST API at
http://SERVER:PORT/CONTROLLER/docs(dynamic, requires running jBPM controller)By default, the Swagger web interface for the jBPM controller is enabled by the
org.kie.workbench.swagger.disabled=falsesystem property. To disable the Swagger web interface for the jBPM controller, set this system property totrue.If you are using the jBPM controller built in to Business Central, the Swagger page associated with the jBPM controller is identified as the "Business Central API" for Business Central REST services. If you are using the headless jBPM controller without Business Central, the Swagger page associated with the headless jBPM controller is identified as the "Controller API". In both cases, the jBPM controller REST API endpoints are the same.
23.13. jBPM controller Java client API for KIE Server templates and instances
jBPM provides a jBPM controller Java client API that enables you to connect to the jBPM controller using REST or WebSocket protocol from your Java client application. You can use the jBPM controller Java client API as an alternative to the jBPM controller REST API to interact with your KIE Server templates (configurations), KIE Server instances (remote servers), and associated KIE containers (deployment units) in jBPM without using the Business Central user interface. This API support enables you to maintain your jBPM servers and resources more efficiently and optimize your integration and development with jBPM.
With the jBPM controller Java client API, you can perform the following actions also supported by the jBPM controller REST API:
-
Retrieve information about KIE Server templates, instances, and associated KIE containers
-
Update, start, or stop KIE containers associated with KIE Server templates and instances
-
Create, update, or delete KIE Server templates
-
Create, update, or delete KIE Server instances
jBPM controller Java client API requests require the following components:
- Authentication
-
The jBPM controller Java client API requires HTTP Basic authentication for the following user roles, depending on controller type:
-
rest-alluser role if you installed Business Central and you want to use the built-in jBPM controller -
kie-serveruser role if you installed the headless jBPM controller separately from Business Central
To view configured user roles for your jBPM distribution, navigate to
~/$SERVER_HOME/standalone/configuration/application-roles.propertiesand~/application-users.properties.To add a user with the
kie-serverrole or therest-allrole or both (assuming a Keystore is already set), navigate to~/$SERVER_HOME/binand run the following command with the role or roles specified:$ ./add-user.sh -a --user <USERNAME> --password <PASSWORD> --role kie-server,rest-allIn case the Keystore is not set, then execute the following command to create a Keystore:
$ keytool -importpassword -keystore $SERVER_HOME/standalone/configuration/kie_keystore.jceks -keypass <SECRETKEYPASSWORD> -alias kieserver -storepass <SECRETSTOREPASSWORD> -storetype JCEKSAlso, add the following properties to
~/$SERVER_HOME/standalone/configuration/standalone-full.xml:<property name="kie.keystore.keyStoreURL" value="file:///data/jboss/rhpam780/standalone/configuration/kie_keystore.jceks"/> <property name="kie.keystore.keyStorePwd" value="<SECRETSTOREPASSWORD>"/> <property name="kie.keystore.key.server.alias" value="kieserver"/> <property name="kie.keystore.key.server.pwd" value="<SECRETKEYPASSWORD>"/> <property name="kie.keystore.key.ctrl.alias" value="kieserver"/> <property name="kie.keystore.key.ctrl.pwd" value="<SECRETKEYPASSWORD>"/>To configure the
kie-serverorrest-alluser with jBPM controller access, navigate to~/$SERVER_HOME/standalone/configuration/standalone-full.xml, uncomment theorg.kie.serverproperties (if applicable), and add the controller user login credentials and controller location (if needed):<property name="org.kie.server.location" value="http://localhost:8080/kie-server/services/rest/server"/> <property name="org.kie.server.controller" value="http://localhost:8080/business-central/rest/controller"/> <property name="org.kie.server.controller.user" value="<USERNAME>"/> <property name="org.kie.server.id" value="default-kieserver"/>For more information about user roles and jBPM installation options, see Installing the KIE Server.
-
- Project dependencies
-
The jBPM controller Java client API requires the following dependencies on the relevant classpath of your Java project:
<!-- For remote execution on controller --> <dependency> <groupId>org.kie.server</groupId> <artifactId>kie-server-controller-client</artifactId> <version>${jbpm.version}</version> </dependency> <!-- For REST client --> <dependency> <groupId>org.jboss.resteasy</groupId> <artifactId>resteasy-client</artifactId> <version>${resteasy.version}</version> </dependency> <!-- For WebSocket client --> <dependency> <groupId>io.undertow</groupId> <artifactId>undertow-websockets-jsr</artifactId> <version>${undertow.version}</version> </dependency> <!-- For debug logging (optional) --> <dependency> <groupId>ch.qos.logback</groupId> <artifactId>logback-classic</artifactId> <version>${logback.version}</version> </dependency>The
<version>for jBPM dependencies is the Maven artifact version for jBPM currently used in your project (for example, 7.52.0.Final). - Client request configuration
-
All Java client requests with the jBPM controller Java client API must define at least the following controller communication components:
-
Credentials of the
rest-alluser if you installed Business Central, or thekie-serveruser if you installed the headless jBPM controller separately from Business Central -
jBPM controller location for REST or WebSocket protocol:
-
Example REST URL:
http://localhost:8080/business-central/rest/controller -
Example WebSocket URL:
ws://localhost:8080/headless-controller/websocket/controller
-
-
Marshalling format for API requests and responses (JSON or JAXB)
-
A
KieServerControllerClientobject, which serves as the entry point for starting the server communication using the Java client API -
A
KieServerControllerClientFactorydefining REST or WebSocket protocol and user access -
The jBPM controller client service or services used, such as
listServerTemplates,getServerTemplate, orgetServerInstances
The following are examples of REST and WebSocket client configurations with these components:
Client configuration example with RESTimport org.kie.server.api.marshalling.MarshallingFormat; import org.kie.server.controller.api.model.spec.ServerTemplateList; import org.kie.server.controller.client.KieServerControllerClient; import org.kie.server.controller.client.KieServerControllerClientFactory; public class ListServerTemplatesExample { private static final String URL = "http://localhost:8080/business-central/rest/controller"; private static final String USER = "baAdmin"; private static final String PASSWORD = "password@1"; private static final MarshallingFormat FORMAT = MarshallingFormat.JSON; public static void main(String[] args) { KieServerControllerClient client = KieServerControllerClientFactory.newRestClient(URL, USER, PASSWORD); final ServerTemplateList serverTemplateList = client.listServerTemplates(); System.out.println(String.format("Found %s server template(s) at controller url: %s", serverTemplateList.getServerTemplates().length, URL)); } }Client configuration example with WebSocketimport org.kie.server.api.marshalling.MarshallingFormat; import org.kie.server.controller.api.model.spec.ServerTemplateList; import org.kie.server.controller.client.KieServerControllerClient; import org.kie.server.controller.client.KieServerControllerClientFactory; public class ListServerTemplatesExample { private static final String URL = "ws://localhost:8080/my-controller/websocket/controller"; private static final String USER = "baAdmin"; private static final String PASSWORD = "password@1"; private static final MarshallingFormat FORMAT = MarshallingFormat.JSON; public static void main(String[] args) { KieServerControllerClient client = KieServerControllerClientFactory.newWebSocketClient(URL, USER, PASSWORD); final ServerTemplateList serverTemplateList = client.listServerTemplates(); System.out.println(String.format("Found %s server template(s) at controller url: %s", serverTemplateList.getServerTemplates().length, URL)); } } -
23.13.1. Sending requests with the jBPM controller Java client API
The jBPM controller Java client API enables you to connect to the jBPM controller using REST or WebSocket protocols from your Java client application. You can use the jBPM controller Java client API as an alternative to the jBPM controller REST API to interact with your KIE Server templates (configurations), KIE Server instances (remote servers), and associated KIE containers (deployment units) in jBPM without using the Business Central user interface.
-
KIE Server is installed and running.
-
The jBPM controller or headless jBPM controller is installed and running.
-
You have
rest-alluser role access to the jBPM controller if you installed Business Central, orkie-serveruser role access to the headless jBPM controller installed separately from Business Central. -
You have a Java project with jBPM resources.
-
In your client application, ensure that the following dependencies have been added to the relevant classpath of your Java project:
<!-- For remote execution on controller --> <dependency> <groupId>org.kie.server</groupId> <artifactId>kie-server-controller-client</artifactId> <version>${jbpm.version}</version> </dependency> <!-- For REST client --> <dependency> <groupId>org.jboss.resteasy</groupId> <artifactId>resteasy-client</artifactId> <version>${resteasy.version}</version> </dependency> <!-- For WebSocket client --> <dependency> <groupId>io.undertow</groupId> <artifactId>undertow-websockets-jsr</artifactId> <version>${undertow.version}</version> </dependency> <!-- For debug logging (optional) --> <dependency> <groupId>ch.qos.logback</groupId> <artifactId>logback-classic</artifactId> <version>${logback.version}</version> </dependency> -
In the
~/kie/server/controller/clientfolder of the Java client API in GitHub , identify the relevant Java client implementation for the request you want to send, such as theRestKieServerControllerClientimplementation to access client services for KIE Server templates and KIE containers in REST protocol. -
In your client application, create a
.javaclass for the API request. The class must contain the necessary imports, the jBPM controller location and user credentials, aKieServerControllerClientobject, and the client method to execute, such ascreateServerTemplateandcreateContainerfrom theRestKieServerControllerClientimplementation. Adjust any configuration details according to your use case.Creating and interacting with a KIE Server template and KIE containersimport java.util.Arrays; import java.util.HashMap; import java.util.Map; import org.kie.server.api.marshalling.MarshallingFormat; import org.kie.server.api.model.KieContainerStatus; import org.kie.server.api.model.KieScannerStatus; import org.kie.server.api.model.ReleaseId; import org.kie.server.controller.api.model.spec.*; import org.kie.server.controller.client.KieServerControllerClient; import org.kie.server.controller.client.KieServerControllerClientFactory; public class RestTemplateContainerExample { private static final String URL = "http://localhost:8080/business-central/rest/controller"; private static final String USER = "baAdmin"; private static final String PASSWORD = "password@1"; private static KieServerControllerClient client; public static void main(String[] args) { KieServerControllerClient client = KieServerControllerClientFactory.newRestClient(URL, USER, PASSWORD, MarshallingFormat.JSON); // Create server template and KIE container, start and stop KIE container, and delete server template ServerTemplate serverTemplate = createServerTemplate(); ContainerSpec container = createContainer(serverTemplate); client.startContainer(container); client.stopContainer(container); client.deleteServerTemplate(serverTemplate.getId()); } // Re-create and configure server template protected static ServerTemplate createServerTemplate() { ServerTemplate serverTemplate = new ServerTemplate(); serverTemplate.setId("example-client-id"); serverTemplate.setName("example-client-name"); serverTemplate.setCapabilities(Arrays.asList(Capability.PROCESS.name(), Capability.RULE.name(), Capability.PLANNING.name())); client.saveServerTemplate(serverTemplate); return serverTemplate; } // Re-create and configure KIE containers protected static ContainerSpec createContainer(ServerTemplate serverTemplate){ Map<Capability, ContainerConfig> containerConfigMap = new HashMap(); ProcessConfig processConfig = new ProcessConfig("PER_PROCESS_INSTANCE", "kieBase", "kieSession", "MERGE_COLLECTION"); containerConfigMap.put(Capability.PROCESS, processConfig); RuleConfig ruleConfig = new RuleConfig(500l, KieScannerStatus.SCANNING); containerConfigMap.put(Capability.RULE, ruleConfig); ReleaseId releaseId = new ReleaseId("org.kie.server.testing", "stateless-session-kjar", "1.0.0-SNAPSHOT"); ContainerSpec containerSpec = new ContainerSpec("example-container-id", "example-client-name", serverTemplate, releaseId, KieContainerStatus.STOPPED, containerConfigMap); client.saveContainerSpec(serverTemplate.getId(), containerSpec); return containerSpec; } } -
Run the configured
.javaclass from your project directory to execute the request, and review the jBPM controller response.If you enabled debug logging, KIE Server responds with a detailed response according to your configured marshalling format, such as JSON. If you encounter request errors, review the returned error code messages and adjust your Java configurations accordingly.
23.13.2. Supported jBPM controller Java clients
The following are some of the Java client services available in the org.kie.server.controller.client package of your jBPM distribution. You can use these services to interact with related resources in the jBPM controller similarly to the jBPM controller REST API.
-
KieServerControllerClient: Used as the entry point for communicating with the jBPM controller -
RestKieServerControllerClient: Implementation used to interact with KIE Server templates and KIE containers in REST protocol (found in~/org/kie/server/controller/client/rest) -
WebSocketKieServerControllerClient: Implementation used to interact with KIE Server templates and KIE containers in WebSocket protocol (found in~/org/kie/server/controller/client/websocket)
For the full list of available jBPM controller Java clients, see the Java client API source in GitHub.
23.13.3. Example requests with the jBPM controller Java client API
The following are examples of jBPM controller Java client API requests for basic interactions with the jBPM controller. For the full list of available jBPM controller Java clients, see the Java client API source in GitHub.
- Creating and interacting with KIE Server templates and KIE containers
-
You can use the
ServerTemplateandContainerSpecservices in the REST or WebSocket jBPM controller clients to create, dispose, and update KIE Server templates and KIE containers, and to start and stop KIE containers, as illustrated in this example.Example request to create and interact with a KIE Server template and KIE containersimport java.util.Arrays; import java.util.HashMap; import java.util.Map; import org.kie.server.api.marshalling.MarshallingFormat; import org.kie.server.api.model.KieContainerStatus; import org.kie.server.api.model.KieScannerStatus; import org.kie.server.api.model.ReleaseId; import org.kie.server.controller.api.model.spec.*; import org.kie.server.controller.client.KieServerControllerClient; import org.kie.server.controller.client.KieServerControllerClientFactory; public class RestTemplateContainerExample { private static final String URL = "http://localhost:8080/business-central/rest/controller"; private static final String USER = "baAdmin"; private static final String PASSWORD = "password@1"; private static KieServerControllerClient client; public static void main(String[] args) { KieServerControllerClient client = KieServerControllerClientFactory.newRestClient(URL, USER, PASSWORD, MarshallingFormat.JSON); // Create server template and KIE container, start and stop KIE container, and delete server template ServerTemplate serverTemplate = createServerTemplate(); ContainerSpec container = createContainer(serverTemplate); client.startContainer(container); client.stopContainer(container); client.deleteServerTemplate(serverTemplate.getId()); } // Re-create and configure server template protected static ServerTemplate createServerTemplate() { ServerTemplate serverTemplate = new ServerTemplate(); serverTemplate.setId("example-client-id"); serverTemplate.setName("example-client-name"); serverTemplate.setCapabilities(Arrays.asList(Capability.PROCESS.name(), Capability.RULE.name(), Capability.PLANNING.name())); client.saveServerTemplate(serverTemplate); return serverTemplate; } // Re-create and configure KIE containers protected static ContainerSpec createContainer(ServerTemplate serverTemplate){ Map<Capability, ContainerConfig> containerConfigMap = new HashMap(); ProcessConfig processConfig = new ProcessConfig("PER_PROCESS_INSTANCE", "kieBase", "kieSession", "MERGE_COLLECTION"); containerConfigMap.put(Capability.PROCESS, processConfig); RuleConfig ruleConfig = new RuleConfig(500l, KieScannerStatus.SCANNING); containerConfigMap.put(Capability.RULE, ruleConfig); ReleaseId releaseId = new ReleaseId("org.kie.server.testing", "stateless-session-kjar", "1.0.0-SNAPSHOT"); ContainerSpec containerSpec = new ContainerSpec("example-container-id", "example-client-name", serverTemplate, releaseId, KieContainerStatus.STOPPED, containerConfigMap); client.saveContainerSpec(serverTemplate.getId(), containerSpec); return containerSpec; } } - Listing KIE Server templates and specifying connection timeout (REST)
-
When you use REST protocol for jBPM controller Java client API requests, you can provide your own
javax.ws.rs.core.Configurationspecification to modify the underlying REST client API, such as connection timeout.Example REST request to return server templates and specify connection timeoutimport java.util.concurrent.TimeUnit; import javax.ws.rs.core.Configuration; import org.jboss.resteasy.client.jaxrs.ResteasyClientBuilder; import org.kie.server.api.marshalling.MarshallingFormat; import org.kie.server.controller.api.model.spec.ServerTemplateList; import org.kie.server.controller.client.KieServerControllerClient; import org.kie.server.controller.client.KieServerControllerClientFactory; public class RESTTimeoutExample { private static final String URL = "http://localhost:8080/business-central/rest/controller"; private static final String USER = "baAdmin"; private static final String PASSWORD = "password@1"; public static void main(String[] args) { // Specify connection timeout final Configuration configuration = new ResteasyClientBuilder() .establishConnectionTimeout(10, TimeUnit.SECONDS) .socketTimeout(60, TimeUnit.SECONDS) .getConfiguration(); KieServerControllerClient client = KieServerControllerClientFactory.newRestClient(URL, USER, PASSWORD, MarshallingFormat.JSON, configuration); // Retrieve list of server templates final ServerTemplateList serverTemplateList = client.listServerTemplates(); System.out.println(String.format("Found %s server template(s) at controller url: %s", serverTemplateList.getServerTemplates().length, URL)); } } - Listing KIE Server templates and specifying event notifications (WebSocket)
-
When you use WebSocket protocol for jBPM controller Java client API requests, you can enable event notifications based on changes that happen in the particular jBPM controller to which the client API is connected. For example, you can receive notifications when KIE Server templates or instances are connected to or updated in the jBPM controller.
Example WebSocket request to return server templates and specify event notificationsimport org.kie.server.api.marshalling.MarshallingFormat; import org.kie.server.controller.api.model.events.*; import org.kie.server.controller.api.model.spec.ServerTemplateList; import org.kie.server.controller.client.KieServerControllerClient; import org.kie.server.controller.client.KieServerControllerClientFactory; import org.kie.server.controller.client.event.EventHandler; public class WebSocketEventsExample { private static final String URL = "ws://localhost:8080/my-controller/websocket/controller"; private static final String USER = "baAdmin"; private static final String PASSWORD = "password@1"; public static void main(String[] args) { KieServerControllerClient client = KieServerControllerClientFactory.newWebSocketClient(URL, USER, PASSWORD, MarshallingFormat.JSON, new TestEventHandler()); // Retrieve list of server templates final ServerTemplateList serverTemplateList = client.listServerTemplates(); System.out.println(String.format("Found %s server template(s) at controller url: %s", serverTemplateList.getServerTemplates().length, URL)); try { Thread.sleep(60 * 1000); } catch (Exception e) { e.printStackTrace(); } } // Set up event notifications static class TestEventHandler implements EventHandler { @Override public void onServerInstanceConnected(ServerInstanceConnected serverInstanceConnected) { System.out.println("serverInstanceConnected = " + serverInstanceConnected); } @Override public void onServerInstanceDeleted(ServerInstanceDeleted serverInstanceDeleted) { System.out.println("serverInstanceDeleted = " + serverInstanceDeleted); } @Override public void onServerInstanceDisconnected(ServerInstanceDisconnected serverInstanceDisconnected) { System.out.println("serverInstanceDisconnected = " + serverInstanceDisconnected); } @Override public void onServerTemplateDeleted(ServerTemplateDeleted serverTemplateDeleted) { System.out.println("serverTemplateDeleted = " + serverTemplateDeleted); } @Override public void onServerTemplateUpdated(ServerTemplateUpdated serverTemplateUpdated) { System.out.println("serverTemplateUpdated = " + serverTemplateUpdated); } @Override public void onServerInstanceUpdated(ServerInstanceUpdated serverInstanceUpdated) { System.out.println("serverInstanceUpdated = " + serverInstanceUpdated); } @Override public void onContainerSpecUpdated(ContainerSpecUpdated containerSpecUpdated) { System.out.println("onContainerSpecUpdated = " + containerSpecUpdated); } } }
23.14. EJB API for KIE sessions and task services
jBPM provides an Enterprise JavaBeans (EJB) API that you can use for embedded use cases to access KieSession and TaskService objects remotely from an application. The EJB API enables close transaction integration between the jBPM engine in jBPM and remote customer applications.
Although KIE Server does not support EJB, you can use EJB as a remote protocol for the jBPM engine similar to remote REST or JMS operations with KIE Server.
The implementation of the EJB interface is a single framework-independent and container-agnostic API that you can use with framework-specific code. The EJB services are exposed through the org.jbpm.services.api and org.jbpm.services.ejb packages in jBPM. The implementation does not support the RuleService class, but the ProcessService class exposes an execute method that enables you to use various rule-related commands, such as InsertCommand and FireAllRulesCommand.
Contexts and Dependency Injection (CDI) is also supported through the org.jbpm.services.cdi package in jBPM. However, to avoid conflicts in your EJB integration, do not use EJB and CDI together.
|
For more information about jBPM integration with EJB, see [_ejb].
23.14.1. Supported EJB services
For the full list of available Enterprise JavaBeans (EJB) services in jBPM, see the EJB services source in GitHub.
The artifacts that provide the EJB interface to the jBPM services are in the following packages:
-
org.jbpm.services.ejb.api: Contains extensions of the jBPM services API for the EJB interface -
org.jbpm.services.ejb.impl: Contains EJB wrappers on top of the core service implementation -
org.jbpm.services.ejb.client: Contains the EJB remote client implementation, supported on Wildfly only
The org.jbpm.services.ejb.api package contains the following service interfaces that you can use with remote EJB clients:
-
DefinitionServiceEJBRemote: Use this interface to gather information about processes (ID, name, and version), process variables (name and type), defined reusable sub-processes, domain-specific services, user tasks, and user task inputs and outputs. -
DeploymentServiceEJBRemote: Use this interface to initiate deployments and undeployments. The interface includes the methodsdeploy,undeploy,getRuntimeManager,getDeployedUnits,isDeployed,activate,deactivate, andgetDeployedUnit. Calling thedeploymethod with an instance ofDeploymentUnitdeploys the unit into the runtime engine by building aRuntimeManagerinstance. After a successful deployment, an instance ofDeployedUnitis created and cached for further use. (To use these methods, you must install the artifacts of the project in a Maven repository.) -
ProcessServiceEJBRemote: Use this interface to control the life cycle of one or more processes and work items. -
RuntimeDataServiceEJBRemote: Use this interface to retrieve data related to the run time, such as process instances, process definitions, node instance information, and variable information. The interface includes several convenience methods for gathering task information based on owner, status, and time. -
UserTaskServiceEJBRemote: Use this interface to control the life cycle of a user task. The interface includes several convenience methods for interacting with user tasks, such asactivate,start,stop, andexecute. -
QueryServiceEJBRemote: Use this interface for advanced queries. -
ProcessInstanceMigrationServiceEJBRemote: Use this interface to migrate process instances when a new version of a process definition is deployed.
If you run EJB applications and Business Central on the same KIE Server instance, you can synchronize the information between EJB and Business Central at a specified interval by setting the org.jbpm.deploy.sync.int system property. After the service finishes the synchronization, you can access the updated information using REST operations.
EJB services in jBPM are intended for embedded use cases. If you run EJB applications and Business Central on the same KIE Server instance, you must also add the kie-services package on the class path of your EJB application.
|
23.14.2. Deploying an EJB services WAR file
You can use the Enterprise JavaBeans (EJB) interface to create and deploy an EJB services WAR file that you want to use as part of your jBPM distribution.
-
Register a human task callback using a startup Java class, such as the following example:
@Singleton @Startup public class StartupBean { @PostConstruct public void init() { System.setProperty("org.jbpm.ht.callback", "jaas"); } } -
Build your EJB project to generate the WAR file according to your project configuration.
-
Deploy the generated file on the Wildfly instance where jBPM is running.
Avoid using the
Singletonstrategy for your runtime sessions. TheSingletonstrategy can cause applications to load the sameksessioninstance multiple times from the underlying file system and cause optimistic lock exceptions.If you want to deploy the EJB WAR file on a Wildfly instance separate from the one where jBPM is running, configure your application or the application server to invoke a remote EJB and to propagate the security context.
If you are using Hibernate to create a database schema for jBPM, update the
persistence.xmlfile in Business Central and set the value of thehibernate.hbm2ddl.autoproperty toupdateinstead ofcreate. -
Test the deployment locally by creating a basic web application and injecting the EJB services, as shown in the following example:
@EJB(lookup = "ejb:/sample-war-ejb-app/ProcessServiceEJBImpl!org.jbpm.services.ejb.api.ProcessServiceEJBRemote") private ProcessServiceEJBRemote processService; @EJB(lookup = "ejb:/sample-war-ejb-app/UserTaskServiceEJBImpl!org.jbpm.services.ejb.api.UserTaskServiceEJBRemote") private UserTaskServiceEJBRemote userTaskService; @EJB(lookup = "ejb:/sample-war-ejb-app/RuntimeDataServiceEJBImpl!org.jbpm.services.ejb.api.RuntimeDataServiceEJBRemote") private RuntimeDataServiceEJBRemote runtimeDataService;
23.15. Securing password using key store
KIE server is using for some communication (e.g. REST api) basic authentication with passwords. From a security perspective it is not safe to store such passwords in clear text form on the disc. For this purpose a mechanism was developed to store passwords in a key store and then use it in the application.
23.15.1. Simple use case
User wants to secure his password for communicating via REST client. He creates new keystore where he will put his password, he will setup system variables with the info to the keystore and KIE will automatically load the keystore and will use the password for securing the communication.
23.15.2. Implementation and business logic
Current implementation is using key store if it is defined. If not, the functionality is falling back to old behavior using config parameters.
23.15.3. System requirements
To use a key store we need to create it first. As JKS is not supporting symmetric keys we have to create JCEKS key store. Moreover, password can be stored in a key store only for Java 8 and above. For generating a key store you can use standard tool KeyTool which is part of JDK installation.
23.15.4. Initialization of a key store
For keystore initialization we recommend to use keytool. Syntax is the following:
${JAVA_HOME}/bin/keytool -importpassword -keystore _keystore_url_ -keypass _alias_key_password_ -alias _password_alias_ -storepass _keystore_password_ -storetype JCEKS-
alias - alias name of the entry to process
-
keypass - key password
-
keystore - keystore name
-
storepass - keystore password
-
storetype - keystore type
After running this command user will be asked to enter the password which he wants to store.
23.15.5. System parameters for loading key store
-
kie.keystore.keyStoreURL - URL to a keystore which should be used
-
kie.keystore.keyStorePwd - password to a keystore
-
kie.keystore.key.server.alias - alias of the key for REST services where password is stored
-
kie.keystore.key.server.pwd - password of an alias for REST services with stored password
-
kie.keystore.key.ctrl.alias - alias of the key for default REST jBPM controller where password is stored
-
kie.keystore.key.ctrl.pwd - password of an alias for default REST jBPM controller with stored password
23.15.6. Example
-
create user and password in application server (it has to have kie-server role)
${EAP_HOME}/add-user.sh -a -e -u kieserver -p "kiePassword1!" -g kie-server
-
use key tool to create keystore with password in it
${JAVA_HOME}/bin/keytool -importpassword -keystore /home/kie/keystores/droolsServer.jceks -keypass keypwd -alias droolsKey -storepass serverpwd -storetype JCEKS
Enter the password to be stored:
Re-enter password:
${JAVA_HOME}/bin/keytool -importpassword -keystore /home/kie/keystores/droolsServer.jceks -keypass keypwd -alias restKey -storepass serverpwd -storetype JCEKS
Enter the password to be stored:
Re-enter password:-
set following system properties on application server that will let the KIE Server or jBPM controller to read password from keystore
<system-properties>
<property name="kie.keystore.keyStoreURL" value="file:///home/kie/keystores/droolsServer.jceks"/>
<property name="kie.keystore.keyStorePwd" value="serverpwd"/>
<property name="kie.keystore.key.server.alias" value="restKey"/>
<property name="kie.keystore.key.server.pwd" value="keypwd"/>
<property name="kie.keystore.key.ctrl.alias" value="droolsKey"/>
<property name="kie.keystore.key.ctrl.pwd" value="keypwd"/>
</system-properties>
-
start server to verify configuration
23.16. Prometheus metrics monitoring in jBPM
Prometheus is an open-source systems monitoring toolkit that you can use with jBPM to collect and store metrics related to the execution of business rules, processes, Decision Model and Notation (DMN) models, and other jBPM assets. You can access the stored metrics through a REST API call to the KIE Server, through the Prometheus expression browser, or using a data-graphing tool such as Grafana.
You can configure Prometheus metrics monitoring for an on-premise KIE Server instance, for KIE Server on Spring Boot, or for a KIE Server deployment on Red Hat OpenShift Container Platform.
For the list of available metrics that KIE Server exposes with Prometheus, see the KIE Server Prometheus Extension page in GitHub.
23.16.1. Configuring Prometheus metrics monitoring for KIE Server
You can configure your KIE Server instances to use Prometheus to collect and store metrics related to your business asset activity in jBPM. For the list of available metrics that KIE Server exposes with Prometheus, see the KIE Server Prometheus Extension page in GitHub.
-
KIE Server is installed.
-
You have
kie-serveruser role access to KIE Server. -
Prometheus is installed. For information about downloading and using Prometheus, see the Prometheus documentation page.
-
In your KIE Server instance, set the
org.kie.prometheus.server.ext.disabledsystem property tofalseto enable the Prometheus extension. You can define this property when you start KIE Server or in thestandalone.xmlorstandalone-full.xmlfile of jBPM distribution. -
If you are running jBPM on Spring Boot, configure the required key in the
application.propertiessystem property:Spring Boot application.properties key for jBPM and Prometheuskieserver.jbpm.enabled=true kieserver.drools.enabled=true kieserver.dmn.enabled=true kieserver.prometheus.enabled=true -
In the
prometheus.yamlfile of your Prometheus distribution, add the following settings in thescrape_configssection to configure Prometheus to scrape metrics from KIE Server:Scrape configurations in prometheus.yaml filescrape_configs: - job_name: 'kie-server' metrics_path: /SERVER_PATH/services/rest/metrics basicAuth: username: USER_NAME password: PASSWORD static_configs: - targets: ["HOST:PORT"]Scrape configurations in prometheus.yaml file for Spring Boot (if applicable)scrape_configs: - job_name: 'kie' metrics_path: /rest/metrics static_configs: - targets: ["HOST:PORT"]Replace the values according to your KIE Server location and settings.
-
Start the KIE Server instance.
After you start the configured KIE Server instance, Prometheus begins collecting metrics and KIE Server publishes the metrics to the REST API endpoint
http://HOST:PORT/SERVER/services/rest/metrics(or on Spring Boot, tohttp://HOST:PORT/rest/metrics). -
In a REST client or curl utility, send a REST API request with the following components to verify that KIE Server is publishing the metrics:
For REST client:
-
Authentication: Enter the user name and password of the KIE Server user with the
kie-serverrole. -
HTTP Headers: Set the following header:
-
Accept:application/json
-
-
HTTP method: Set to
GET. -
URL: Enter the KIE Server REST API base URL and metrics endpoint, such as
http://localhost:8080/kie-server/services/rest/metrics(or on Spring Boot,http://localhost:8080/rest/metrics).
For curl utility:
-
-u: Enter the user name and password of the KIE Server user with thekie-serverrole. -
-H: Set the following header:-
accept:application/json
-
-
-X: Set toGET. -
URL: Enter the KIE Server REST API base URL and metrics endpoint, such as
http://localhost:8080/kie-server/services/rest/metrics(or on Spring Boot,http://localhost:8080/rest/metrics).
Example curl command for jBPM on Wildflycurl -u 'baAdmin:password@1' -X GET "http://localhost:8080/kie-server/services/rest/metrics"Example curl command for jBPM on Spring Bootcurl -u 'baAdmin:password@1' -X GET "http://localhost:8080/rest/metrics"
Example server response# HELP kie_server_container_started_total Kie Server Started Containers # TYPE kie_server_container_started_total counter kie_server_container_started_total{container_id="task-assignment-kjar-1.0",} 1.0 # HELP solvers_running Number of solvers currently running # TYPE solvers_running gauge solvers_running 0.0 # HELP dmn_evaluate_decision_nanosecond DMN Evaluation Time # TYPE dmn_evaluate_decision_nanosecond histogram # HELP solver_duration_seconds Time in seconds it took solver to solve the constraint problem # TYPE solver_duration_seconds summary solver_duration_seconds_count{solver_id="100tasks-5employees.xml",} 1.0 solver_duration_seconds_sum{solver_id="100tasks-5employees.xml",} 179.828255925 solver_duration_seconds_count{solver_id="24tasks-8employees.xml",} 1.0 solver_duration_seconds_sum{solver_id="24tasks-8employees.xml",} 179.995759653 # HELP drl_match_fired_nanosecond Drools Firing Time # TYPE drl_match_fired_nanosecond histogram # HELP dmn_evaluate_failed_count DMN Evaluation Failed # TYPE dmn_evaluate_failed_count counter # HELP kie_server_start_time Kie Server Start Time # TYPE kie_server_start_time gauge kie_server_start_time{name="myapp-kieserver",server_id="myapp-kieserver",location="http://myapp-kieserver-demo-monitoring.127.0.0.1.nip.io:80/services/rest/server",version="7.4.0.redhat-20190428",} 1.557221271502E12 # HELP kie_server_container_running_total Kie Server Running Containers # TYPE kie_server_container_running_total gauge kie_server_container_running_total{container_id="task-assignment-kjar-1.0",} 1.0 # HELP solver_score_calculation_speed Number of moves per second for a particular solver solving the constraint problem # TYPE solver_score_calculation_speed summary solver_score_calculation_speed_count{solver_id="100tasks-5employees.xml",} 1.0 solver_score_calculation_speed_sum{solver_id="100tasks-5employees.xml",} 6997.0 solver_score_calculation_speed_count{solver_id="24tasks-8employees.xml",} 1.0 solver_score_calculation_speed_sum{solver_id="24tasks-8employees.xml",} 19772.0 # HELP kie_server_case_started_total Kie Server Started Cases # TYPE kie_server_case_started_total counter kie_server_case_started_total{case_definition_id="itorders.orderhardware",} 1.0 # HELP kie_server_case_running_total Kie Server Running Cases # TYPE kie_server_case_running_total gauge kie_server_case_running_total{case_definition_id="itorders.orderhardware",} 2.0 # HELP kie_server_data_set_registered_total Kie Server Data Set Registered # TYPE kie_server_data_set_registered_total gauge kie_server_data_set_registered_total{name="jbpmProcessInstanceLogs::CUSTOM",uuid="jbpmProcessInstanceLogs",} 1.0 kie_server_data_set_registered_total{name="jbpmRequestList::CUSTOM",uuid="jbpmRequestList",} 1.0 kie_server_data_set_registered_total{name="tasksMonitoring::CUSTOM",uuid="tasksMonitoring",} 1.0 kie_server_data_set_registered_total{name="jbpmHumanTasks::CUSTOM",uuid="jbpmHumanTasks",} 1.0 kie_server_data_set_registered_total{name="jbpmHumanTasksWithUser::FILTERED_PO_TASK",uuid="jbpmHumanTasksWithUser",} 1.0 kie_server_data_set_registered_total{name="jbpmHumanTasksWithVariables::CUSTOM",uuid="jbpmHumanTasksWithVariables",} 1.0 kie_server_data_set_registered_total{name="jbpmProcessInstancesWithVariables::CUSTOM",uuid="jbpmProcessInstancesWithVariables",} 1.0 kie_server_data_set_registered_total{name="jbpmProcessInstances::CUSTOM",uuid="jbpmProcessInstances",} 1.0 kie_server_data_set_registered_total{name="jbpmExecutionErrorList::CUSTOM",uuid="jbpmExecutionErrorList",} 1.0 kie_server_data_set_registered_total{name="processesMonitoring::CUSTOM",uuid="processesMonitoring",} 1.0 kie_server_data_set_registered_total{name="jbpmHumanTasksWithAdmin::FILTERED_BA_TASK",uuid="jbpmHumanTasksWithAdmin",} 1.0 # HELP kie_server_execution_error_total Kie Server Execution Errors # TYPE kie_server_execution_error_total counter # HELP kie_server_task_completed_total Kie Server Completed Tasks # TYPE kie_server_task_completed_total counter # HELP kie_server_container_running_total Kie Server Running Containers # TYPE kie_server_container_running_total gauge kie_server_container_running_total{container_id="itorders_1.0.0-SNAPSHOT",} 1.0 # HELP kie_server_job_cancelled_total Kie Server Cancelled Jobs # TYPE kie_server_job_cancelled_total counter # HELP kie_server_process_instance_started_total Kie Server Started Process Instances # TYPE kie_server_process_instance_started_total counter kie_server_process_instance_started_total{container_id="itorders_1.0.0-SNAPSHOT",process_id="itorders.orderhardware",} 1.0 # HELP solver_duration_seconds Time in seconds it took solver to solve the constraint problem # TYPE solver_duration_seconds summary # HELP kie_server_task_skipped_total Kie Server Skipped Tasks # TYPE kie_server_task_skipped_total counter # HELP kie_server_data_set_execution_time_seconds Kie Server Data Set Execution Time # TYPE kie_server_data_set_execution_time_seconds summary kie_server_data_set_execution_time_seconds_count{uuid="jbpmProcessInstances",} 8.0 kie_server_data_set_execution_time_seconds_sum{uuid="jbpmProcessInstances",} 0.05600000000000001 # HELP kie_server_job_scheduled_total Kie Server Started Jobs # TYPE kie_server_job_scheduled_total counter # HELP kie_server_data_set_execution_total Kie Server Data Set Execution # TYPE kie_server_data_set_execution_total counter kie_server_data_set_execution_total{uuid="jbpmProcessInstances",} 8.0 # HELP kie_server_process_instance_completed_total Kie Server Completed Process Instances # TYPE kie_server_process_instance_completed_total counter # HELP kie_server_job_running_total Kie Server Running Jobs # TYPE kie_server_job_running_total gauge # HELP kie_server_task_failed_total Kie Server Failed Tasks # TYPE kie_server_task_failed_total counter # HELP kie_server_task_exited_total Kie Server Exited Tasks # TYPE kie_server_task_exited_total counter # HELP dmn_evaluate_decision_nanosecond DMN Evaluation Time # TYPE dmn_evaluate_decision_nanosecond histogram # HELP kie_server_data_set_lookups_total Kie Server Data Set Running Lookups # TYPE kie_server_data_set_lookups_total gauge kie_server_data_set_lookups_total{uuid="jbpmProcessInstances",} 0.0 # HELP kie_server_process_instance_duration_seconds Kie Server Process Instances Duration # TYPE kie_server_process_instance_duration_seconds summary # HELP kie_server_case_duration_seconds Kie Server Case Duration # TYPE kie_server_case_duration_seconds summary # HELP dmn_evaluate_failed_count DMN Evaluation Failed # TYPE dmn_evaluate_failed_count counter # HELP kie_server_task_added_total Kie Server Added Tasks # TYPE kie_server_task_added_total counter kie_server_task_added_total{deployment_id="itorders_1.0.0-SNAPSHOT",process_id="itorders.orderhardware",task_name="Prepare hardware spec",} 1.0 # HELP drl_match_fired_nanosecond Drools Firing Time # TYPE drl_match_fired_nanosecond histogram # HELP kie_server_container_started_total Kie Server Started Containers # TYPE kie_server_container_started_total counter kie_server_container_started_total{container_id="itorders_1.0.0-SNAPSHOT",} 1.0 # HELP kie_server_process_instance_sla_violated_total Kie Server Process Instances SLA Violated # TYPE kie_server_process_instance_sla_violated_total counter # HELP kie_server_task_duration_seconds Kie Server Task Duration # TYPE kie_server_task_duration_seconds summary # HELP kie_server_job_executed_total Kie Server Executed Jobs # TYPE kie_server_job_executed_total counter # HELP kie_server_deployments_active_total Kie Server Active Deployments # TYPE kie_server_deployments_active_total gauge kie_server_deployments_active_total{deployment_id="itorders_1.0.0-SNAPSHOT",} 1.0 # HELP kie_server_process_instance_running_total Kie Server Running Process Instances # TYPE kie_server_process_instance_running_total gauge kie_server_process_instance_running_total{container_id="itorders_1.0.0-SNAPSHOT",process_id="itorders.orderhardware",} 2.0 # HELP solvers_running Number of solvers currently running # TYPE solvers_running gauge solvers_running 0.0 # HELP kie_server_work_item_duration_seconds Kie Server Work Items Duration # TYPE kie_server_work_item_duration_seconds summary # HELP kie_server_job_duration_seconds Kie Server Job Duration # TYPE kie_server_job_duration_seconds summary # HELP solver_score_calculation_speed Number of moves per second for a particular solver solving the constraint problem # TYPE solver_score_calculation_speed summary # HELP kie_server_start_time Kie Server Start Time # TYPE kie_server_start_time gauge kie_server_start_time{name="sample-server",server_id="sample-server",location="http://localhost:8080/kie-server/services/rest/server",version="7.55.0-SNAPSHOT",} 1.557285486469E12If the metrics are not available in KIE Server, review and verify the KIE Server and Prometheus configurations described in this section.
You can also interact with your collected metrics in the Prometheus expression browser at
http://HOST:PORT/graph, or integrate your Prometheus data source with a data-graphing tool such as Grafana: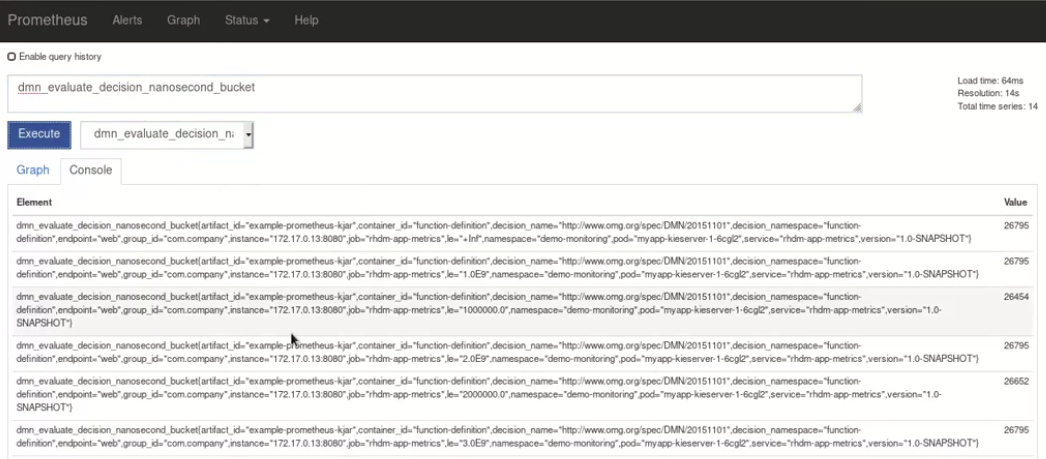 Figure 258. Prometheus expression browser with KIE Server metrics
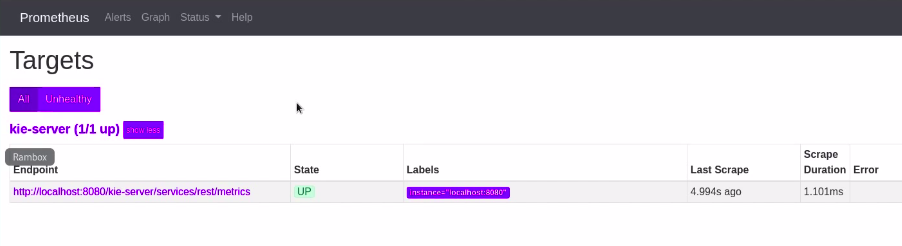 Figure 259. Prometheus expression browser with KIE Server target
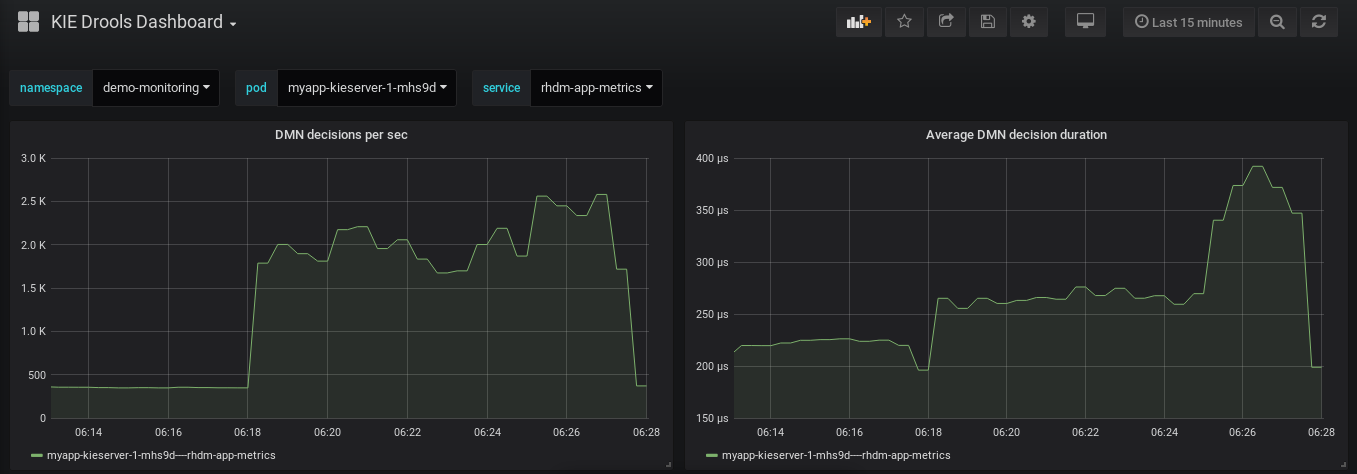 Figure 260. Grafana dashboard with KIE Server metrics for DMN models
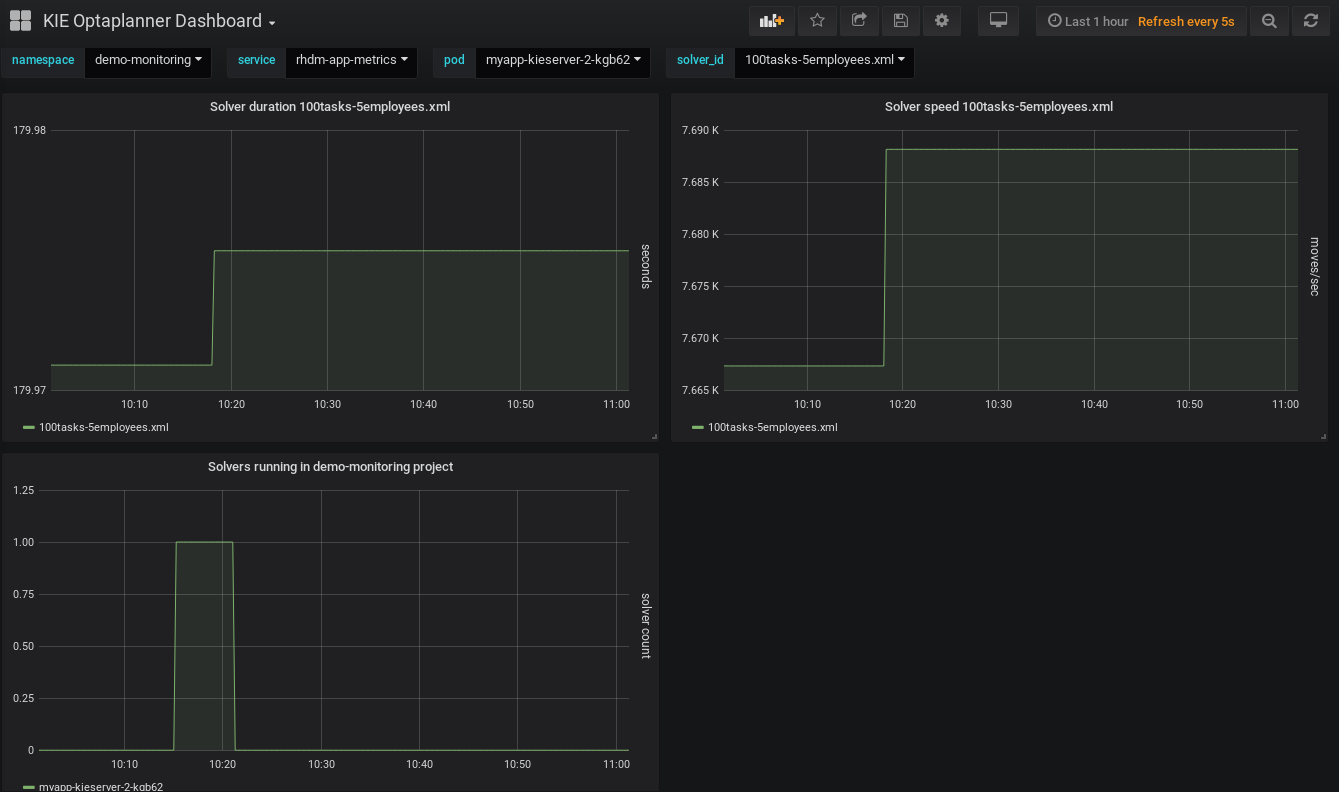 Figure 261. Grafana dashboard with KIE Server metrics for solvers
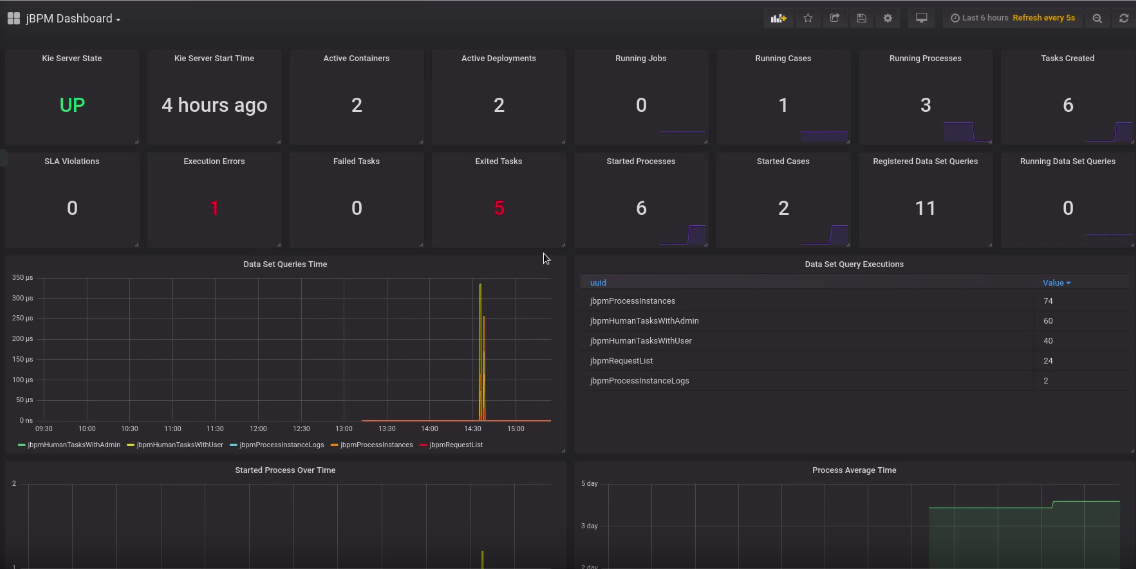 Figure 262. Grafana dashboard with KIE Server metrics for processes, cases, and tasks
 -
23.16.2. Extending Prometheus metrics monitoring in KIE Server with custom metrics
After you configure your KIE Server instance to use Prometheus metrics monitoring, you can extend the Prometheus functionality in KIE Server to use custom metrics according to your business needs. Prometheus then collects and stores your custom metrics along with the default metrics that KIE Server exposes with Prometheus.
As an example, this procedure defines custom Decision Model and Notation (DMN) metrics to be collected and stored by Prometheus.
-
Prometheus metrics monitoring is configured for your KIE Server instance. For information about Prometheus configuration with KIE Server on-premise, see Configuring Prometheus metrics monitoring for KIE Server.
-
Create an empty Maven project and define the following packaging type and dependencies in the
pom.xmlfile for the project:Example pom.xml file in the sample project<packaging>jar</packaging> <properties> <version.org.kie>7.52.0.Final</version.org.kie> </properties> <dependencies> <dependency> <groupId>org.kie</groupId> <artifactId>kie-api</artifactId> <version>${version.org.kie}</version> </dependency> <dependency> <groupId>org.kie.server</groupId> <artifactId>kie-server-api</artifactId> <version>${version.org.kie}</version> </dependency> <dependency> <groupId>org.kie.server</groupId> <artifactId>kie-server-services-common</artifactId> <version>${version.org.kie}</version> </dependency> <dependency> <groupId>org.kie.server</groupId> <artifactId>kie-server-services-drools</artifactId> <version>${version.org.kie}</version> </dependency> <dependency> <groupId>org.kie.server</groupId> <artifactId>kie-server-services-prometheus</artifactId> <version>${version.org.kie}</version> </dependency> <dependency> <groupId>org.kie</groupId> <artifactId>kie-dmn-api</artifactId> <version>${version.org.kie}</version> </dependency> <dependency> <groupId>org.kie</groupId> <artifactId>kie-dmn-core</artifactId> <version>${version.org.kie}</version> </dependency> <dependency> <groupId>org.jbpm</groupId> <artifactId>jbpm-services-api</artifactId> <version>${version.org.kie}</version> </dependency> <dependency> <groupId>org.jbpm</groupId> <artifactId>jbpm-executor</artifactId> <version>${version.org.kie}</version> </dependency> <dependency> <groupId>org.optaplanner</groupId> <artifactId>optaplanner-core</artifactId> <version>${version.org.kie}</version> </dependency> <dependency> <groupId>io.prometheus</groupId> <artifactId>simpleclient</artifactId> <version>0.5.0</version> </dependency> </dependencies> -
Implement the relevant listener from the
org.kie.server.services.prometheus.PrometheusMetricsProviderinterface as part of the custom listener class that defines your custom Prometheus metrics, as shown in the following example:Sample implementation of theDMNRuntimeEventListenerlistener in a custom listener classpackage org.kie.server.ext.prometheus; import io.prometheus.client.Gauge; import org.kie.dmn.api.core.ast.DecisionNode; import org.kie.dmn.api.core.event.AfterEvaluateBKMEvent; import org.kie.dmn.api.core.event.AfterEvaluateContextEntryEvent; import org.kie.dmn.api.core.event.AfterEvaluateDecisionEvent; import org.kie.dmn.api.core.event.AfterEvaluateDecisionServiceEvent; import org.kie.dmn.api.core.event.AfterEvaluateDecisionTableEvent; import org.kie.dmn.api.core.event.BeforeEvaluateBKMEvent; import org.kie.dmn.api.core.event.BeforeEvaluateContextEntryEvent; import org.kie.dmn.api.core.event.BeforeEvaluateDecisionEvent; import org.kie.dmn.api.core.event.BeforeEvaluateDecisionServiceEvent; import org.kie.dmn.api.core.event.BeforeEvaluateDecisionTableEvent; import org.kie.dmn.api.core.event.DMNRuntimeEventListener; import org.kie.server.api.model.ReleaseId; import org.kie.server.services.api.KieContainerInstance; public class ExampleCustomPrometheusMetricListener implements DMNRuntimeEventListener { private final KieContainerInstance kieContainer; private final Gauge randomGauge = Gauge.build() .name("random_gauge_nanosecond") .help("Random gauge as an example of custom KIE Prometheus metric") .labelNames("container_id", "group_id", "artifact_id", "version", "decision_namespace", "decision_name") .register(); public ExampleCustomPrometheusMetricListener(KieContainerInstance containerInstance) { kieContainer = containerInstance; } public void beforeEvaluateDecision(BeforeEvaluateDecisionEvent e) { } public void afterEvaluateDecision(AfterEvaluateDecisionEvent e) { DecisionNode decisionNode = e.getDecision(); ReleaseId releaseId = kieContainer.getResource().getReleaseId(); randomGauge.labels(kieContainer.getContainerId(), releaseId.getGroupId(), releaseId.getArtifactId(), releaseId.getVersion(), decisionNode.getModelName(), decisionNode.getModelNamespace()) .set((int) (Math.random() * 100)); } public void beforeEvaluateBKM(BeforeEvaluateBKMEvent event) { } public void afterEvaluateBKM(AfterEvaluateBKMEvent event) { } public void beforeEvaluateContextEntry(BeforeEvaluateContextEntryEvent event) { } public void afterEvaluateContextEntry(AfterEvaluateContextEntryEvent event) { } public void beforeEvaluateDecisionTable(BeforeEvaluateDecisionTableEvent event) { } public void afterEvaluateDecisionTable(AfterEvaluateDecisionTableEvent event) { } public void beforeEvaluateDecisionService(BeforeEvaluateDecisionServiceEvent event) { } public void afterEvaluateDecisionService(AfterEvaluateDecisionServiceEvent event) { } }The
PrometheusMetricsProviderinterface contains the required listeners for collecting Prometheus metrics. The interface is incorporated by thekie-server-services-prometheusdependency that you declared in your projectpom.xmlfile.In this example, the
ExampleCustomPrometheusMetricListenerclass implements theDMNRuntimeEventListenerlistener (from thePrometheusMetricsProviderinterface) and defines the custom DMN metrics to be collected and stored by Prometheus. -
Implement the
PrometheusMetricsProviderinterface as part of a custom metrics provider class that associates your custom listener with thePrometheusMetricsProviderinterface, as shown in the following example:Sample implementation of thePrometheusMetricsProviderinterface in a custom metrics provider classpackage org.kie.server.ext.prometheus; import org.jbpm.executor.AsynchronousJobListener; import org.jbpm.services.api.DeploymentEventListener; import org.kie.api.event.rule.AgendaEventListener; import org.kie.api.event.rule.DefaultAgendaEventListener; import org.kie.dmn.api.core.event.DMNRuntimeEventListener; import org.kie.server.services.api.KieContainerInstance; import org.kie.server.services.prometheus.PrometheusMetricsProvider; import org.optaplanner.core.impl.phase.event.PhaseLifecycleListener; import org.optaplanner.core.impl.phase.event.PhaseLifecycleListenerAdapter; public class MyPrometheusMetricsProvider implements PrometheusMetricsProvider { public DMNRuntimeEventListener createDMNRuntimeEventListener(KieContainerInstance kContainer) { return new ExampleCustomPrometheusMetricListener(kContainer); } public AgendaEventListener createAgendaEventListener(String kieSessionId, KieContainerInstance kContainer) { return new DefaultAgendaEventListener(); } public PhaseLifecycleListener createPhaseLifecycleListener(String solverId) { return new PhaseLifecycleListenerAdapter() { }; } public AsynchronousJobListener createAsynchronousJobListener() { return null; } public DeploymentEventListener createDeploymentEventListener() { return null; } }In this example, the
MyPrometheusMetricsProviderclass implements thePrometheusMetricsProviderinterface and includes your customExampleCustomPrometheusMetricListenerlistener class. -
To make the new metrics provider discoverable for KIE Server, create a
META-INF/services/org.kie.server.services.prometheus.PrometheusMetricsProviderfile in your Maven project and add the fully qualified class name of thePrometheusMetricsProviderimplementation class within the file. For this example, the file contains the single lineorg.kie.server.ext.prometheus.MyPrometheusMetricsProvider. -
Build your project and copy the resulting JAR file into the
~/kie-server.war/WEB-INF/libdirectory of your project. -
Start the KIE Server and deploy the built project to the running KIE Server. You can deploy the project using the Business Central interface or the KIE Server REST API (a
PUTrequest tohttp://SERVER:PORT/kie-server/services/rest/server/containers/{containerId}).After your project is deployed on a running KIE Server, Prometheus begins collecting metrics and KIE Server publishes the metrics to the REST API endpoint
http://HOST:PORT/SERVER/services/rest/metrics(or on Spring Boot, tohttp://HOST:PORT/rest/metrics).
23.17. Performance tuning considerations with KIE Server
The following key concepts or suggested practices can help you optimize KIE Server performance. These concepts are summarized in this section as a convenience and are explained in more detail in the cross-referenced documentation, where applicable. This section will expand or change as needed with new releases of jBPM.
- Ensure that development mode is enabled during development
-
You can set KIE Server or specific projects in Business Central to use
productionmode ordevelopmentmode. By default, KIE Server and all new projects in Business Central are in development mode. This mode provides features that facilitate your development experience, such as flexible project deployment policies, and features that optimize KIE Server performance during development, such as disabled duplicate GAV detection. Use development mode until your jBPM environment is established and completely ready for production mode.For more information about configuring the environment mode or duplicate GAV detection, see the following resources:
- Adapt KIE Server capabilities and extensions to your specific needs
-
The capabilities in KIE Server are determined by plug-in extensions that you can enable, disable, or further extend to meet your business needs. By default, KIE Server extensions are exposed through REST or JMS data transports and use predefined client APIs. You can extend existing KIE Server capabilities with additional REST endpoints, extend supported transport methods beyond REST or JMS, or extend functionality in the KIE Server client.
This flexibility in KIE Server functionality enables you to adapt your KIE Server instances to your business needs, instead of adapting your business needs to the default KIE Server capabilities.
For information about enabling, disabling, or extending KIE Server capabilities, see KIE Server capabilities and extensions.
23.18. KIE Server Task Assigning
23.18.1. Introduction to business processes
Business process management systems (BPMS) products such as jBPM have the ability to model and execute multiple business processes. A business process is typically composed of nodes such as events, gateways, and tasks that are connected to each other for defining the process flow. Every type of node has a specific semantic and is instantiated by the process runtime engine when a process instance is executed. Business processes that require human interaction are modelled by using human task nodes.
The following image shows a process where three tasks require human interaction:

It is usual for a system that executes several process instances to have many human task instances that are waiting for an external human action.
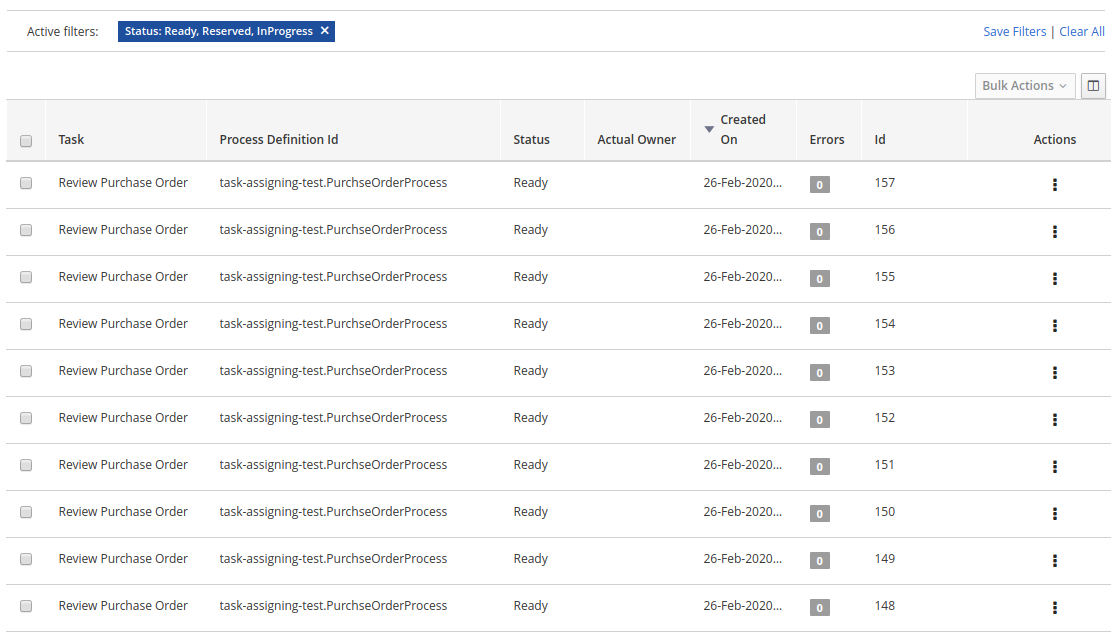
Red Hat build of OptaPlanner integrates with jBPM to provide the ability to assign human tasks to users as part of an optimized plan.
This is referred to as task assigning integration.
23.18.1.1. BPM standard task assigning
In general, business process runtime engines assign human tasks to users on a group basis. The target audience is usually included as part of the human task configuration.
The following image shows how the Review Purchase Order human task is configured with the PurchaseDepartment group:
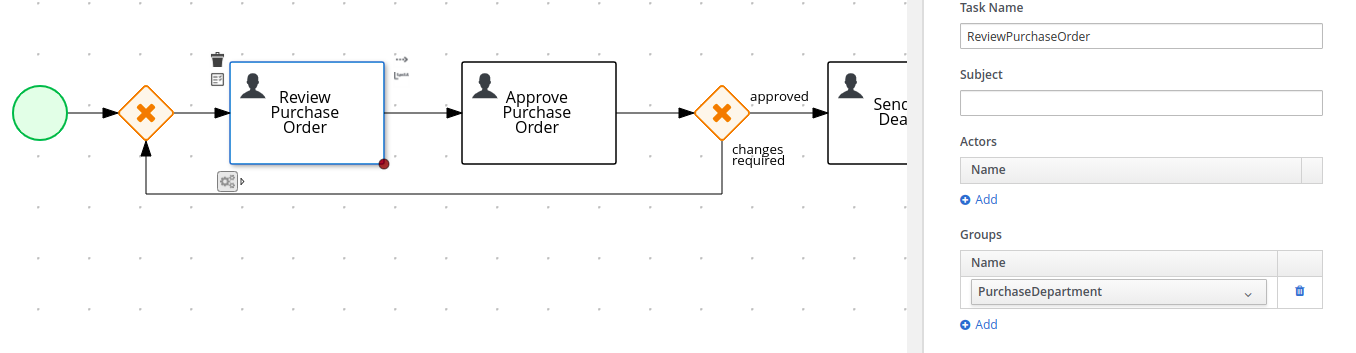
At runtime, every time a new instance of the Review Purchase Order task is created it is automatically assigned to the PurchaseDepartment group with the status Ready. This makes the task automatically available to all users that belong to the group. All users in the group see it on their respective Task Inbox but none are the actual owner or responsible for the task. To be able to work with a particular task, a user must execute the claim operation to reserve the task for that user.
The following image shows an example of the claim operation execution for the task #152:

When the claim operation is executed, the task status is changed to Reserved and the task is assigned to the claiming user.
In the preceding example, the claimer of the task is wbadmin user. After the user claims the task, he is known as the task "actual owner”.

Although this is the standard procedure for most BPMS products, it is not flexible enough for all use cases. For example, this procedure does not work well with scenarios where an optimal distribution of a huge set of tasks between users by given criteria is required. In these cases, users usually find a large list of tasks up-front but do not have the knowledge to claim and execute them in the best way.
23.18.1.2. Red Hat build of OptaPlanner driven task assigning
Red Hat build of OptaPlanner and jBPM integration provides the ability to assign the human tasks produced by the process runtime engine between users according to an optimized plan. Instead of users having to claim the tasks, the tasks are assigned to them.
The following image shows how the tasks are assigned when integration is enabled.
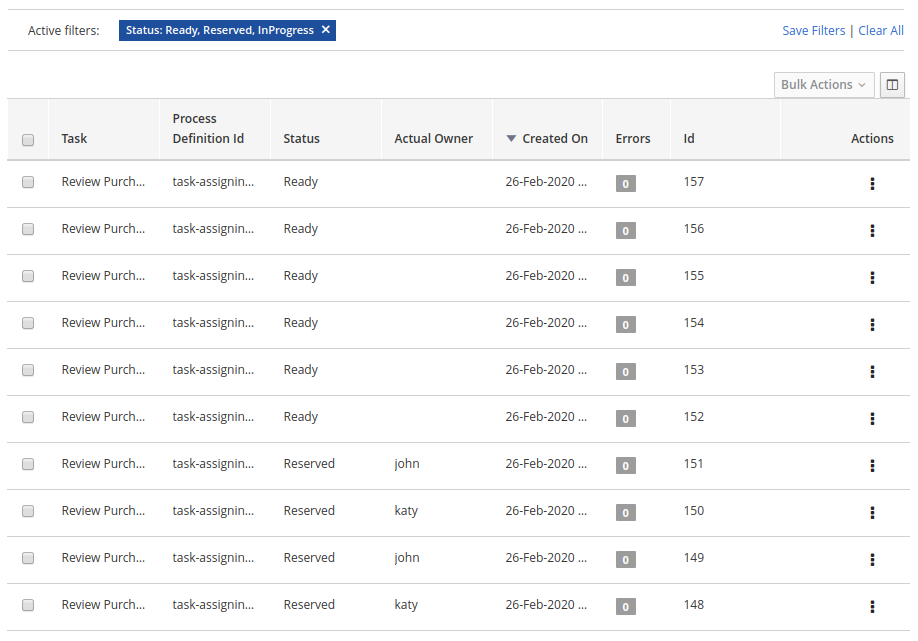
The following assignments are shown:
-
User katy is assigned to tasks #150 and #148
-
User john is assigned to tasks #151 and #149
-
Tasks #152, #153, #154, #155, #156 and #157 are left un-assigned (these tasks will be analysed later)
Behind the scenes the following actions took place:
-
All of the available tasks with the status "Ready" consumed by Red Hat build of OptaPlanner.
-
The users john and katy were identified as belonging to the "PurchaseDepartment" users group.
-
It was identified that the "Review Purchase Order" tasks were identified as defined for the "PurchaseDepartment" group.
-
An optimized plan was calculated and all of the tasks (including the "un-assigned" tasks) were assigned according to their configuration, for example group condition and Red Hat build of OptaPlanner optimization rules. The resulting plan stated that:
-
Tasks #150 and #148 must be assigned to katy
-
Tasks #151 and #149 must be assigned to john
-
-
Red Hat build of OptaPlanner executed the correct process runtime actions to make these assignments happen. Note that the users were not required to execute the "claim" operation. Instead they can focus on completing their respective assigned work and leave the distribution and assignment work to Red Hat build of OptaPlanner.
This simple example shows the main concept behind integration:
"Red Hat build of OptaPlanner analyses the available work, calculates an optimized plan, and produces the necessary assignments in the process runtime. Users then rely on that plan and focus on executing their assigned work".
Unassigned tasks
Usually, a running BPM creates many process instances and many human tasks. At the same time, users are working and completing these human tasks. This cycle is repeated over and over.
Red Hat build of OptaPlanner addresses this situation by re-calculating the optimized plan when new human tasks are created a/or completed and produce "new assignments" to reflect the new optimized plan. This is often achieved by combining different "Repeated Planning and Real Time Planning" techniques. For detailed information see the Red Hat build of OptaPlanner documentation.
Additionally it might be the case that a plan that was optimal at time N is no longer optimal at time N+1. For example, a higher priority task has arrived and must be performed as soon as possible. The direct impact of this situation is that the programmed assignments at time N might change at time N+1, which means that tasks are routinely re-assigned many times when the new optimized plans are calculated. One of Red Hat build of OptaPlanner’s strengths is the ability to react to a changing context.
User impact
If not controlled, continuous task re-assignment might negatively impact the user’s experience because they might feel that tasks come in and out of their workload randomly. This situation is present in other types of optimization problems as well and is usually managed by combining different repeated and continuous planning techniques. For detailed information see the "Repeated Planning" section of the Red Hat build of OptaPlanner documentation.
A simple strategy is to introduce the concept of a planning window which is a defined subset of the available work that will not be changed or re-assigned even when new plans are calculated. Only this subset is available to users. The tasks in the planning window are called published tasks.
The previous example contains a planning window with a size of two. This means that only two tasks from the optimized plan are assigned in the processes runtime for each user so that users have at most two tasks assigned to them and they must focus on those two tasks. As soon they start completing these tasks Red Hat build of OptaPlanner assigns them additional tasks according to the last optimized plan. However, internally Red Hat build of OptaPlanner maintains information about the best assignments for all of the tasks and not only the published tasks.
This is how the assignments are distributed in the preceding example:
-
User katy is assigned to tasks #150 and #148 which belong to the planning window
-
User john is assigned to tasks #151 and #149 which belong to the planning window
-
The un-assigned tasks are outside of the planning window which means they are assigned only internally by Red Hat build of OptaPlanner. As long as these tasks remain unpublished they can be reassigned if necessary during the different optimized plans calculation.
23.18.2. Configuring the integration
23.18.2.1. Product version
The current task assigning integration implementation is provided for the Red Hat build of OptaPlanner, jBPM, and KIE Server 7.38.x+ series.
|
KIE Server provides many installation alternatives, for example controller driven servers, standalone servers, high availability, etc. The purpose of this guide is to show you how to configure your KIE Server installation for the task assigning integration. |
For KIE Server and jBPM configuration information see their respective product documentation.
The following procedure is recommended:
-
Install the KIE Servers topology that you require.
-
If you are using the jBPM schema generation scripts be sure to execute the following sql script corresponding to the target database management system:
jBPM installer → /db/ddl-scripts/<dbms_vendor>/task_assigning_tables_<dbms_vendor>.sql
For example, in the case of a db2 database you must execute the following script:
jBPM installer → /db/ddl-scripts/db2/task_assigning_tables_db2.sql
For more information related to these scripts see jBPM documentation.
Note: the reverse script in cases where the generated schema needs to be deleted can be found in the same location and has the following name: task_assigning_tables_drop_<dbms_vendor>.sql
-
Be sure the process runtime is executing well.
-
Install a dedicated Planning kie-server (see next topics).
-
Complete the task assigning integration specific configuration parameters in all of the associated Process Runtime kie-servers and the Planning kie-server.
23.18.2.2. Simplified architecture
The following simplified architecture identifies the key components and configuration parameters for the task assigning integration.
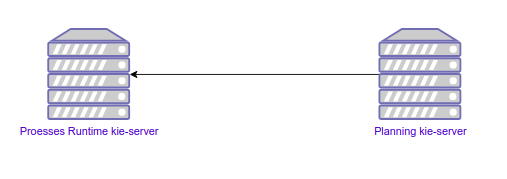
Process Runtime kie-server
This is the KIE Server instance where the business processes execute. In clustered and high-availability configurations, multiple instances can be used.
|
The task assigning integration can manage multiple process runtime KIE Servers as long they share the same database where the process instances, human tasks instances, and so forth are stored and have the same set of deployed containers. In topologies where a KIE Server controller is configured this usually happens when they belong to the same KIE Server template. Be sure these statements are true before running the task assigning integration. |
Planning kie-server
This is the KIE Server instance where OptaPlanner will execute, for example where the optimized plans and so forth, will be calculated and where the UserSystemService integration component will run. The task assigning integration requires a single dedicated KIE Server instance for this purpose. Be sure no other KIE Server extensions are enabled on this server.
23.18.2.3. Configuration parameters setup
All of the configuration parameters that are defined in the next topics are defined through the Java system properties. In Wildfly and Red Hat Enterprise Application Server (EAP) installations, these parameters are usually configured in the <system-properties> section of the selected configuration file, for example:
<server xmlns="urn:jboss:domain:8.0">
...
<system-properties>
...
<property name="org.kie.server.taskAssigning.runtime.ext.disabled" value="false"/>
...
</system-properties>
...
</server>You can also use other methods of setting system properties, for example passing JVM parameters on the command line:
-Dorg.kie.server.taskAssigning.runtime.ext.disabled=false|
It is recommended to use the same configuration method for all KIE Server required parameters. |
23.18.2.4. Process Runtime kie-server configuration
The following table shows the only parameter that must be configured in all of the Process Runtime kie-servers in the target topology.
| Parameter | Requirement | Description |
|---|---|---|
org.kie.server.taskAssigning.runtime.ext.disabled |
Not required |
The default value is "true", meaning that the task assigning integration is always disabled. Must be set to "false" for making it work. |
Process Runtime kie-server Wildfly/EAP configuration example
<server>
...
<system-properties>
...
<property name="org.kie.server.taskAssigning.runtime.ext.disabled" value="false"/>
...
</system-properties>
...
</server>23.18.2.5. Planning kie-server configuration
The following topics explain the parameters that you must configure in the Planning kie-server. Whatever the target topology is, only one instance of this server will exist.
|
The parameters tagged as "Required" must be set only in cases where the task assigning integration is enabled. Some of them have a default value that automatically applies when not set. |
Global configuration parameters
| Parameter | Requirement | Description |
|---|---|---|
org.kie.server.taskAssigning.planning.ext.disabled |
Not required |
The default value is "true", meaning that the task assigning integration is always disabled. Must be set to "false" for making it work. |
org.kie.server.services.taskAssigning.core.model.planningUserId |
Required |
The default value is "planninguser". This value configures the user for being assigned with the tasks that no other user in the system can be assigned to. For example If a task has a required skill "astronaut" and no user can be found with this skill, it will be assigned to the planninguser. But it is not only restricted to skills, another example might be a task configured for a users group "Finance". If no user exists in that group it will be assigned to the planning user. It is strongly recommended that the planning user has the required human tasks administration grants in all of the target Process Runtime kie-servers. By doing so it can easily proceed to track and eventually re-assign the tasks that couldn’t be managed by the tasks assigning integration. Note: it is recommended to keep this name. |
org.kie.server.taskAssigning.processRuntime.url |
Required |
The default value is http://localhost:8080/kie-server/services/rest/server This value configures the URL for connecting to the Process Runtime kie-server rest services. In a clustered environment a list of "|" separated urls can be used for doing load balancing between the different Process Runtime kie-servers. |
org.kie.server.taskAssigning.processRuntime.user |
Required |
The default value is wbadmin This value configures the user id for connecting to the Process Runtime kie-server. In a clustered environment it must exist in all of the configured target servers. The configured user must belong to the human tasks administration group. This group is usually found by looking at the target Process Runtine kie-server configuration parameter: <property name="org.jbpm.ht.admin.group" value="process-admin"/> Following the example above the configured user must belong to the group "process-admin" |
org.kie.server.taskAssigning.processRuntime.pwd |
Required |
No default value is set. This value configures the password for the user configured in org.kie.server.taskAssigning.processRuntime.user parameter. |
org.kie.server.taskAssigning.processRuntime.targetUser |
Required |
No default value is set. This value configures the user ID used to execute the process runtime operations "on behalf of", and is usually the same as the value of the org.kie.server.taskAssigning.processRuntime.user parameter |
org.kie.server.taskAssigning.processRuntime.key.alias |
Not Required |
No default value is set. This parameter can be used in cases where it is required to get the runtime user password from the KIE Server keystore and represents the alias for locating it. |
org.kie.server.taskAssigning.processRuntime.key.pwd |
Not Required |
No default value is set. This parameter must be used in cases where the runtime user password is stored in the KIE Server keystore, and represents the password for accessing the corresponding keystore entry. |
kie.keystore.keyStoreURL |
Not Required |
No default value is set. URL for the JCEKS that you want to use, for example file:///home/kie/keystores/keystore.jceks |
kie.keystore.keyStorePwd |
Not Required |
No default value is set. Password for the JCEKS |
org.kie.server.taskAssigning.processRuntime.timeout |
Not Required |
The default value is 90000. This value configures the timeout in milliseconds for the operation invocations on the Process runtime kie-server. |
org.kie.server.taskAssigning.runtimeDelegate.pageSize |
Not Required |
The default value is 3000. This value configures the page size for the paged queries. The default value is good for most scenarios and it’s not recommended to be modified unless specific fine tunings are required. |
org.kie.server.taskAssigning.solutionSyncInterval |
Required |
The default value is "PT2S" (two seconds). This value configures the time interval for the tasks information refreshing from the Process Runtime kie-server. The accepted format is based on the ISO-8601 duration format PnDTnHnMn.nS with days considered to be exactly 24 hours. For example: "PT1.500S": configures 1500 milliseconds. "PT0.500S": configures 500 milliseconds. "PT3S": configures 3000 milliseconds. |
org.kie.server.taskAssigning.solutionSyncQueriesShift |
Required |
The default value is "PT10M" This value configures a timeshift for adjusting the tasks information refreshing queries. In most cases it should never be modified and should not be less than PT5M (five minutes). The accepted format is based on the ISO-8601 duration format PnDTnHnMn.nS with days considered to be exactly 24 hours. |
org.kie.server.taskAssigning.publishWindowSize |
Required |
The default value is 2. This value configures the maximum amount of tasks per user that will be assigned to it in the Process Runtime kie-server when an optimized plan is calculated. See "published tasks" This value should usually be low 2, 3, or 4, since it is expected that the tasks will be assigned to the users according to an optimized plan that is changing over the time. High values might lead into the BPM Standard task assigning which could make the tasks assigning integration senseless. |
org.kie.server.taskAssigning.usersSyncInterval |
Required |
The default value is "PT2H" (two hours) This value configures the time interval for the user’s information refreshing from the UserSystemService integration component. The accepted format is based on the ISO-8601 duration format PnDTnHnMn.nS with days considered to be exactly 24 hours. |
org.kie.server.taskAssigning.waitForImprovedSolutionDuration |
Not Required |
The default value is "PT0S" (no wait) This value configures the time interval to improve a solution before the corresponding optimized plan is sent to the Process Runtime kie-server. Because this wait time is applied every time a new set of changes is processed it should usually be short, for example "PT0.500" (500 milliseconds). Use it in cases when early improvements are desired. The accepted format is based on the ISO-8601 duration format PnDTnHnMn.nS with days considered to be exactly 24 hours. |
org.kie.server.taskAssigning.improveSolutionOnBackgroundDuration |
Not Required |
The default value is "PT1M" (one minute) This value configures the time interval for doing a background optimization of the current solution after the corresponding optimized plan is sent to the Process Runtime kie-server. In situations where no changes in the processes are produced and a better solution is calculated during that period, the new optimized plan is automatically sent to the Process Runtime kie-server. The accepted format is based on the ISO-8601 duration format PnDTnHnMn.nS with days considered to be exactly 24 hours. |
Solver configuration parameters
As it was mentioned, the task assigning integration delegates the calculation of "which tasks must be assigned to whom" to Red Hat build of OptaPlanner and it will resolve this requirement by producing an optimized plan. This plan is calculated by using a Solver with a set of configured constraints. See Red Hat build of OptaPlanner product documentation for more information.
Two mechanisms are available for configuring the Red Hat build of OptaPlanner’s Solver specifics.
Note: The parameter tagged as "Required" must have a value independently of the selected Solver configuration mechanism.
Class path based solver configuration
This mechanism implements the ability of configuring the Solver by using a class path resource.
| Parameter | Requirement | Description |
|---|---|---|
org.kie.server.taskAssigning.solver.configResource |
Required |
The default value is: "org/kie/server/services/taskassigning/solver/taskAssigningDefaultSolverConfig.xml" This value configures the path to a class-path resource with the Solver configuration. If the resource can’t be found or the configuration is wrong, a controlled error will be added to the Planning kie-server error messages and the task assigning integration won’t be initialized. The KIE Server’s APIs can be used for querying these error messages and checking the status. |
org.kie.server.taskAssigning.solver.moveThreadCount |
Not Required |
The default value is AUTO. This value configures the solver’s ability of using multithreaded incremental solving. For more information see Red Hat build of OptaPlanner documentation. Note: when the container based solver configuration is used this value is not considered, the configuration provided in the KJAR is used instead. |
org.kie.server.taskAssigning.solver.moveThreadBufferSize |
Not Required |
No default value is set. This value power tweaks the number of moves that are selected but won’t be foraged when multithreaded incremental solving is used. Setting it too low reduces performance, but setting it too high too. Unless you’re deeply familiar with the inner workings of multithreaded solving, don’t configure this parameter. For more information see Red Hat build of OptaPlanner documentation. Note: when the container based solver configuration is used this value is not considered, the configuration provided in the KJAR is used instead. |
org.kie.server.taskAssigning.solver.threadFactoryClass |
Not Required |
No default value is set. The threadFactoryClass allows you to plug in a custom ThreadFactory for environments where arbitrary thread creation should be avoided. For more information see Red Hat build of OptaPlanner documentation. Note: when the container based solver configuration is used this value is not considered, the configuration provided in the KJAR is used instead. |
|
The default solver configuration includes a set of constraints for implementing optimized task assigning, therefore it is not necessary to provide a different set of constraints in most cases. Use cases that require specific tunings, for example related to business data, can use this alternative. However it is recommended to use a Container based configuration for these purposes. |
Container based solver configuration
This mechanism implements the ability to configure the Solver by using a container. Finally, given that the KIE Server architecture is based on containers this is usually the recommended approach. However in many of the use cases the by default configuration is good enough and no container configuration is necessary see Default Constraints
The following table shows the container-based configuration parameters:
| Parameter | Requirement | Description |
|---|---|---|
org.kie.server.taskAssigning.solver.container.id |
Not Required |
No default value is set. This value configures the Identifier of the container to use. When set the container based configuration will be activated and the following container related parameters are required. |
org.kie.server.taskAssigning.solver.container.groupId |
Required if the container configuration is activated |
No default value is set. This value configures the Maven groupId of the artifact to use for creating the container when needed. |
org.kie.server.taskAssigning.solver.container.artifactId |
Required if the container configuration is activated |
No default value is set. This value configures the Maven artifactId for the artifact to use for creating the container when needed. |
org.kie.server.taskAssigning.solver.container.version |
Required if the container configuration is activated |
No default value is set. This value configures the Maven version for the artifact to use for creating the container when needed. |
org.kie.server.taskAssigning.solver.configResource |
Required if the container configuration is activated |
This value configures the path to the resource with the Solver configuration in the container class-path. |
In case of errors, analogous to the "Class path based solver configuration" proper KIE Server error messages will be generated and the task assigning integration won’t be initialized. The KIE Server’s apis can be used for querying these error messages and checking the status.
UserSystemService integration component
Calculating an optimized plan for assigning tasks to users often requires considering business related information. Common examples, included in the current task assigning integration version, are the usage of the groups, the skills that a given user has or the affinities in certain topics, etc. See Skills and Affinities. This business oriented information must be provided by each particular installation and is delegated to the UserSystemService integration component. It is up to the tasks assigning integrator to provide this component.
UserSystemService API
A user system service component must implement the following API.
public interface UserSystemService {
/**
* Invoked by the task assigning integration as part of the initialization procedure and
* before any other method is invoked.
*/
void start();
/**
* Invoked by the task assigning integration as part of the initialization procedure and
* after the start() method is invoked.
* @throws Exception if the test method failed.
*/
void test() throws Exception;
/**
* @return the name of the UserSystemService implementation.
*/
String getName();
/**
* @return the list of all users present in the external user system. This method is normally
* invoked each time the solver is initialized or when the users information is updated from
* the external user system.
*/
List<User> findAllUsers();
/**
* Get the user information for a particular user.
* @param id user identifier for querying.
* @return the User corresponding to the given identifier, null if no user was found.
*/
User findUser(String id);
}UserSystemService configuration
Analogous to the Solver configuration two mechanisms are available for configuring the UserSystemService and in both cases the standard Java SPI (Service Provider Interface) and ServiceLoader mechanisms are used for its instantiation.
Class path based UserSystemService configuration
Use the following resource for configuring the different UserSystemService provider implementations:
META-INF/services/org.kie.server.services.taskassigning.user.system.api.UserSystemService
And finally add the following configuration parameters for configuring the selected implementation:
| Parameter | Requirement | Description |
|---|---|---|
org.kie.server.taskAssigning.userSystem.name |
Required |
No default value is set. This value configures the name of the UserSystemService provider instance to use. See: UserSystemService.getName() All of the configured providers are loaded from the application class-path and the one that matches with the configured name will be used. A simple user system service implementation is provided see SimpleUserSystemService |
Container based UserSystemService configuration
Use the following resource in your Kie Module (KJAR) to configure the different UserSystemService provider implementations:
project_home/src/main/resources/META-INF/services/org.kie.server.services.taskassigning.user.system.api.UserSystemService
And finally add the following configuration parameters for configuring the selected implementation:
| Parameter | Requirement | Description |
|---|---|---|
org.kie.server.taskAssigning.userSystem.name |
Required |
No default value is set. This value configures the name of the UserSystemService provider instance to use. See: UserSystemService.getName() |
org.kie.server.taskAssigning.userSystem.container.id |
Not Required |
No default value is set. This value configures the Identifier of the container to use. When set the container based configuration will be activated and all of the potential UserSystemService providers that might be defined in the container class-path will be considered for selection, additionally to the ones in the application class-path. The following parameters will be required. |
org.kie.server.taskAssigning.userSystem.container.groupId |
Required if the container configuration is activated. |
No default value is set. This value configures the Maven groupId of the artifact to use for creating the container when needed. |
org.kie.server.taskAssigning.userSystem.container.artifactId |
Required if the container configuration is activated. |
No default value is set. This value configures the Maven artifactId for the artifact to use for creating the container when needed. |
org.kie.server.taskAssigning.userSystem.container.version |
Required if the container configuration is activated. |
No default value is set. This value configures the Maven version for the artifact to use for creating the container when needed. |
In case of errors, for example if the configured provider name was not found, the container couldn’t be instantiated, etc, a controlled error will be added to the Planning kie-server error messages and the task assigning integration won’t be initialized. The KIE Server’s apis can be used for querying these error messages and checking the status.
SimpleUserSystemService
The SimpleUserSystemService is a basic UserSystemService implementation that loads the user definitions, skills and affinities from Java properties file in the format used by the Wildfly/EAP application servers. This implementation is always present in the Planning kie-server and is intended mainly for development and testing purposes.
The following example shows a user definitions file:
katy=analyst,HR
john=IT,DeveloperIn this example, two users are defined:
-
User katy that belongs to the groups analyst and HR
-
User john that belongs to the groups IT and Developer
The following parameters can be used to configure it:
| Parameter | Requirement | Description |
|---|---|---|
org.kie.server.taskAssigning.userSystem.name |
Required |
Must be the value SimpleUserSystemService |
org.kie.server.services.taskassigning.user.system.simple.users |
Required |
This value configures a Planning kie-server web application accessible path with the user definitions file. For example in Wildfly/EAP installations can be like this. ${jboss.server.config.dir}/roles.properties Note: the configured file must have the same values as the roles.properties files of the Process Runtime kie-servers in the target topology. |
org.kie.server.services.taskassigning.user.system.simple.skills |
Not Required |
This value configures a Planning kie-server web application accessible path with the users skills definitions if desired, see Skills and Affinities. For example in Wildfly/EAP installations can be like this. ${jboss.server.config.dir}/skills.properties Note: the format is analogous to the user definitions file. katy=skill1,skill2 john=skill1,skill2 |
org.kie.server.services.taskassigning.user.system.simple.affinities |
Not Required |
This value configures a Planning kie-server web application accessible path with the users affinities definition if desired, Skills and Affinities. For example in Wildfly/EAP installations can be like this. ${jboss.server.config.dir}/affinities.properties Note: the format is analogous to the user definitions file. katy=affinity1,affinity4 In this example john has no affinities. |
Planning kie-server Wildfly/EAP configuration example
Below is an extract of the task assigning configuration parameters for a Wildfly/EAP server.
<server>
...
<system-properties>
...
<!-- the following kie-server extensions must be disabled in the Planning kie-server -->
<property name="org.optaplanner.server.ext.disabled" value="true"/>
<property name="org.jbpm.server.ext.disabled" value="true"/>
<property name="org.jbpm.ui.server.ext.disabled" value="true"/>
<property name="org.jbpm.case.server.ext.disabled" value="true"/>
<property name="org.kie.dmn.server.ext.disabled" value="true"/>
<property name="org.kie.swagger.server.ext.disabled" value="true"/>
<!-- enable the TaskAssigningPlanningKieServerExtension -->
<property name="org.kie.server.taskAssigning.planning.ext.disabled" value="false"/>
<property name="org.kie.server.taskAssigning.processRuntime.url"
value="http://localhost:8080/kie-server/services/rest/server"/>
<property name="org.kie.server.taskAssigning.processRuntime.user" value="wbadmin"/>
<property name="org.kie.server.taskAssigning.processRuntime.pwd" value="wbadmin"/>
<property name="org.kie.server.taskAssigning.processRuntime.targetUser" value="wbadmin"/>
<property name="org.kie.server.taskAssigning.solutionSyncInterval" value="PT2S"/>
<!-- example of a Solver configuration based on a user provided kjar -->
<!--
<property name="org.kie.server.taskAssigning.solver.configResource" value="org/kie/server/services/taskassigning/solver/taskAssigningDefaultSolverConfig.xml"/>
<property name="org.kie.server.taskAssigning.solver.container.id"
value="kie-server-task-assigning-default-planner-kjar-container"/>
<property name="org.kie.server.taskAssigning.solver.container.groupId" value="org.kie.server"/>
<property name="org.kie.server.taskAssigning.solver.container.artifactId"
value="kie-server-task-assigning-default-planner-kjar"/>
<property name="org.kie.server.taskAssigning.solver.container.version" value="X.XX.XXX"/>
-->
<!-- default SimpleUserSystemService configuration -->
<property name="org.kie.server.taskAssigning.userSystem.name" value="SimpleUserSystemService"/>
<property name="org.kie.server.services.taskassigning.user.system.simple.users"
value="${jboss.server.config.dir}/roles.properties"/>
<!-- un-comment and configure if skills information will be loaded -->
<!--
<property name="org.kie.server.services.taskassigning.user.system.simple.skills"
value="${jboss.server.config.dir}/skills.properties"/>
-->
<!-- un-comment and configure if affinities information will be loaded -->
<!--
<property name="org.kie.server.services.taskassigning.user.system.simple.affinities"
value="${jboss.server.config.dir}/affinities.properties"/>
-->
<!-- end of default SimpleUserSystemService configuration -->
<!-- example of a UserSystemService configuration based on a user provided kjar -->
<!--
<property name="org.kie.server.taskAssigning.userSystem.name"
value="SimpleUserSystemServiceByKjar"/>
<property name="org.kie.server.taskAssigning.userSystem.container.id"
value="task-assigning-user-system-service-simple-by-kjar-container"/>
<property name="org.kie.server.taskAssigning.userSystem.container.groupId"
value="org.kie.server"/>
<property name="org.kie.server.taskAssigning.userSystem.container.artifactId"
value="kie-server-task-assigning-user-system-simple-kjar"/>
<property name="org.kie.server.taskAssigning.userSystem.container.version" value="X.XX.XXX"/>
-->
...
</system-properties>
...
</server>Spring Boot configuration
When the KIE Server Spring Boot Starter version is used the following configuration parameters are used to configure the task assigning integration. These parameters are usually configured in the corresponding Spring Boot application.properties file. The same statements as for standard KIE Server topologies apply in this case.
| Parameter | Requirement | Description |
|---|---|---|
kieserver.taskAssigning.runtime.enabled |
Required |
Must be set to "true" in order to enable the task assigning integration in the Process Runtime kie-server |
kieserver.taskAssigning.planning.enabled |
Required |
Must be set to "true" in order to enable the task assigning integration in the Planning kie-server |
taskassigning.core.model.planningUserId |
Required |
This value is analogous to the org.kie.server.services.taskAssigning.core.model.planningUserId configuration parameter, see Global configuration parameters |
taskassigning.processRuntime.url |
Required |
This value is analogous to the org.kie.server.taskAssigning.processRuntime.url configuration parameter, see Global configuration parameters |
taskassigning.processRuntime.user |
Required |
This value is analogous to the org.kie.server.taskAssigning.processRuntime.user configuration parameter, see Global configuration parameters |
taskassigning.processRuntime.pwd |
Required |
This value is analogous to the org.kie.server.taskAssigning.processRuntime.pwd configuration parameter, see Global configuration parameters |
taskassigning.processRuntime.targetUser |
Required |
This value is analogous to the org.kie.server.taskAssigning.processRuntime.targetUser configuration parameter, see Global configuration parameters |
taskassigning.processRuntime.key.alias |
Not Required |
This value is analogous to the org.kie.server.taskAssigning.processRuntime.key.alias configuration parameter, see Global configuration parameters |
taskassigning.processRuntime.key.pwd |
Not Required |
This value is analogous to the org.kie.server.taskAssigning.processRuntime.key.pwd configuration parameter, see Global configuration parameters |
taskassigning.processRuntime.timeout |
Not Required |
This value is analogous to the org.kie.server.taskAssigning.processRuntime.timeout configuration parameter, see Global configuration parameters |
taskassigning.runtimeDelegate.pageSize |
Not Required |
This value is analogous to the org.kie.server.taskAssigning.runtimeDelegate.pageSize configuration parameter, see Global configuration parameters |
taskassigning.solutionSyncInterval |
Required |
This value is analogous to the org.kie.server.taskAssigning.solutionSyncInterval configuration parameter, see Global configuration parameters |
taskassigning.solutionSyncQueriesShift |
Required |
This value is analogous to the org.kie.server.taskAssigning.solutionSyncQueriesShift configuration parameter, see Global configuration parameters |
taskassigning.publishWindowSize |
Required |
This value is analogous to the org.kie.server.taskAssigning.publishWindowSize configuration parameter, see Global configuration parameters |
taskassigning.usersSyncInterval |
Required |
This value is analogous to the org.kie.server.taskAssigning.usersSyncInterval configuration parameter, see Global configuration parameters |
taskassigning.waitForImprovedSolutionDuration |
Not Required |
This value is analogous to the org.kie.server.taskAssigning.waitForImprovedSolutionDuration configuration parameter, see Global configuration parameters |
taskassigning.improveSolutionOnBackgroundDuration |
Not Required |
This value is analogous to the org.kie.server.taskAssigning.improveSolutionOnBackgroundDuration configuration parameter, see Global configuration parameters |
taskassigning.solver.configResource |
Required |
This value is analogous to the org.kie.server.taskAssigning.solver.configResource configuration parameter, see Solver configuration parameters |
taskassigning.solver.moveThreadCount |
Not Required |
This value is analogous to the org.kie.server.taskAssigning.solver.moveThreadCount configuration parameter, see Solver configuration parameters |
taskassigning.solver.moveThreadBufferSize |
Not Required |
This value is analogous to the org.kie.server.taskAssigning.solver.moveThreadBufferSize configuration parameter, see Solver configuration parameters |
taskassigning.solver.threadFactoryClass |
Not Required |
This value is analogous to the org.kie.server.taskAssigning.solver.threadFactoryClass configuration parameter, see Solver configuration parameters |
taskassigning.solver.container.id |
Not Required |
This value is analogous to the org.kie.server.taskAssigning.solver.container.id configuration parameter, see Container based solver configuration |
taskassigning.solver.container.groupId |
Required if the container configuration is activated |
This value is analogous to the org.kie.server.taskAssigning.solver.container.groupId configuration parameter, see Container based solver configuration |
taskassigning.solver.container.artifactId |
Required if the container configuration is activated |
This value is analogous to the org.kie.server.taskAssigning.solver.container.artifactId configuration parameter, see Container based solver configuration |
taskassigning.solver.container.version |
Required if the container configuration is activated |
This value is analogous to the org.kie.server.taskAssigning.solver.container.version configuration parameter, see Container based solver configuration |
taskassigning.solver.configResource |
Required if the container configuration is activated |
This value is analogous to the org.kie.server.taskAssigning.solver.configResource configuration parameter, see Container based solver configuration |
taskassigning.userSystem.name |
Required |
This value is analogous to the org.kie.server.taskAssigning.userSystem.name configuration parameter, see UserSystemService configuration |
taskassigning.userSystem.container.id |
Not Required |
This value is analogous to the org.kie.server.taskAssigning.userSystem.container.id configuration parameter, see Container based UserSystemService configuration |
taskassigning.userSystem.container.groupId |
Required if the container configuration is activated |
This value is analogous to the org.kie.server.taskAssigning.userSystem.container.groupId configuration parameter, see Container based UserSystemService configuration |
taskassigning.userSystem.container.artifactId |
Required if the container configuration is activated |
This value is analogous to the org.kie.server.taskAssigning.userSystem.container.artifactId configuration parameter, see Container based UserSystemService configuration |
taskassigning.userSystem.container.version |
Required if the container configuration is activated |
This value is analogous to the org.kie.server.taskAssigning.userSystem.container.version configuration parameter, see Container based UserSystemService configuration |
tastaskassigning.userSystem.simple.users |
Required if the Simple User System is configured |
This value is analogous to the org.kie.server.services.taskassigning.user.system.simple.users configuration parameter, see SimpleUserSystemService |
taskassigning.userSystem.simple.skills |
Not Required |
This value is analogous to the org.kie.server.services.taskassigning.user.system.simple.skills configuration parameter, see SimpleUserSystemService |
taskassigning.userSystem.simple.affinities |
Not Required |
This value is analogous to the org.kie.server.services.taskassigning.user.system.simple.affinities configuration parameter, see see SimpleUserSystemService |
Default Constraints
The following table gives a high level description of the set of constraints that are included in the task assigning integration. These constraints are used for the construction of the optimized plan, in other words "for determining which tasks should be assigned to whom".
In general a large set of use cases can be covered by using them and no extensions are required, but it is possible to work with a user provided-customized set of constraints if needed, see Container based solver configuration.
Optimized solutions construction is made by using a BendableLongScore with two levels of Hard constraints and six levels of Soft constraints. These constraint levels can be customized by following a set of restrictions.
| Constraint | Level/Requirement | Description |
|---|---|---|
Required Potential Owner |
Hard Constraint 0 (required) |
Determines that a task must be assigned to one of it is "Potential Owners", or to the "Planning User" in cases where no "Potential Owners" are found. User provided customizations must always include this constraint as the first level hard constraint. Otherwise the business process semantics won’t be considered by the task assigning integration, i.e., tasks might be assigned to users that are not "Potential Owners" for it. In cases where this constraint is still customized, it must always consider assigning the "Planning User" when no other user fits the customized condition. |
Required Skills |
Hard Constraint 1 |
Determines that a task can only be assigned to a user that has all of the task’s configured skills, see Skills and Affinities. If a task has configured skills but no user with all of these skills can be found it’ll be assigned to the "Planning User". If the task doesn’t have configured skills the constraint has no effect. In cases where this constraint is customized, it must always consider assigning the "Planning User" when no other user fits the customized condition. |
PlanningUser assignment |
Soft Constraint 0 (required) |
Penalizes the "Planning User" assignment. This constraint enforces the minimization of the "Planning User" assignment and ensures it’ll be assigned as the "last available option" Do not customize or change this constraint. |
High level priority |
Soft Constraint 1 |
Enforces the assignment of higher priority tasks first whenever it is possible. |
Desired Affinities |
Soft Constraint 2 |
Makes a best effort for assigning tasks according to its configured affinities, see Skills and Affinities If a task has configured affinities, whenever it is possible, a user with the most of them will be picked for its assignment. If the task doesn’t have configured affinities the constraint has no effect. |
Minimize makespan |
Soft Constraint 3 (required) |
Reduce the time to complete all tasks. This constraint must always be included. |
Medium level priority |
Soft Constraint 4 |
Medium level priority tasks are assigned after higher priority tasks whenever it is possible. |
Low level priority |
Soft Constraint 5 |
Low level priority tasks are assigned lastly whenever it is possible. |
|
The current TaskAssigningSolution implementation is based on a BendableLongScore scoring function and thus any potential extension of the provided constraints, etc., typically by using a user provided KJAR, will be based on it. However this scoring function as well as the core model classes might change in future releases. |
Constraints configuration by using a DRL file
The following example shows the key parts of the DRL file that contains the constraints configurations.
// ############################################################################
// Hard constraints
// ############################################################################
// A task can only be assigned to one of its potential owners or to the PlanningUser
rule "Required Potential Owner"
when
$task : Task(user != null, !TaskAssigningConditions.userMeetsPotentialOwnerOrPlanningUserCondition($task, user))
then
scoreHolder.addHardConstraintMatch(kcontext, 0, -1);
end
// A task with defined skills can only be assigned to users that has all of the of them or to the PlanningUser
rule "Required Skills"
when
$task : Task(user != null, !TaskAssigningConditions.userMeetsRequiredSkillsOrPlanningUserCondition($task, user))
then
scoreHolder.addHardConstraintMatch(kcontext, 1, -1);
end
// ############################################################################
// Soft constraints
// ############################################################################
// First level soft constraint for penalizing the assignment of the PLANNING_USER.
rule "PlanningUser assignment"
when
Task(user != null, ModelConstants.IS_PLANNING_USER.test(user.getEntityId()))
then
// a penalization is added each time the PLANNING_USER is assigned.
scoreHolder.addSoftConstraintMatch(kcontext, 0, -1);
end
// Second level soft constraint for penalizing the assignment of the PLANNING_USER.
rule "High level priority"
when
$task : Task(user != null, PriorityHelper.isHighLevel(priority))
then
scoreHolder.addSoftConstraintMatch(kcontext, 1, PriorityHelper.calculateWeightedPenalty($task.getPriority(), $task.getEndTimeInMinutes()));
end
// Third level soft constraint, when a task has defined affinities consider assigning users that match
// the most of them as possible.
rule "Desired Affinities"
when
$task : Task(user != null, user.isEnabled())
then
scoreHolder.addSoftConstraintMatch(kcontext, 2, TaskHelper.countMatchingLabels($task, $task.getUser(), DefaultLabels.AFFINITIES.name()));
end
// Fourth level soft constraint.
rule "Minimize makespan (starting with the latest ending user first)"
when
Task(user != null, nextTask == null, $endTimeInMinutes : endTimeInMinutes)
then
scoreHolder.addSoftConstraintMatch(kcontext, 3, - ($endTimeInMinutes * $endTimeInMinutes));
end
// Fifth level soft constraint.
rule "Medium level priority"
when
$task : Task(user != null, PriorityHelper.isMediumLevel(priority))
then
scoreHolder.addSoftConstraintMatch(kcontext, 4, PriorityHelper.calculateWeightedPenalty($task.getPriority(), $task.getEndTimeInMinutes()));
end
// Sixth level soft constraint.
rule "Low level priority"
when
$task : Task(user != null, PriorityHelper.isLowLevel(priority))
then
scoreHolder.addSoftConstraintMatch(kcontext, 5, PriorityHelper.calculateWeightedPenalty($task.getPriority(), $task.getEndTimeInMinutes()));
end|
The current by default DRL might change in future versions and thus can not be considered as part of the product public API. Any potential customization of the provided constraints might use this DRL as a start point or could also use other mechanisms as the constraints streams for implementing them. |
Skills and Affinities
The use of skills and affinities implements the ability of declaring business related data for being considered by the default provided constraints or any other user defined ones. This is a fine grained decision mechanism that you can use on top of the groups-based assignment semantics defined in the business process.
Internally, this mechanism is based on the ability to label the human tasks generated by the business processes runtime and the users information.
Labeling mechanism
The following procedure shows how the labeling mechanism converts information in human tasks, and users information to labels:
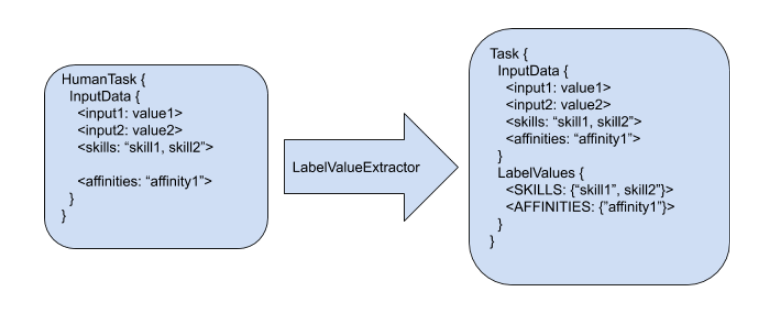
-
Any human task is created in the processes runtime.
-
When the new task is detected by the task assigning solution refreshing mechanism, a set of LabelValueExtrators is applied.
-
These LabelValueExtractors can transform any piece of information in the human task or user into a label.
-
The default constraints consider these labels.
In the preceding example,the following labels are produced:
-
The input data "skills", with the value "skill1, skill2" resulted in the label SKILLS with the following set of values {"skill1", "skill2"}
-
The input data "affinities" with the value "affinity1" resulted in the label AFFINITIES with the following set of values {"affinity1"}
|
Task labels are calculated only the first time the task is identified by the task assigning integration and can use any of the information present in the task. |
User labeling works in a similar way:
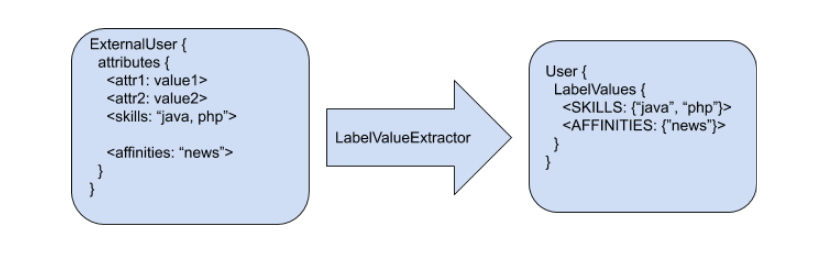
Default HumanTask and User LabelValueExtractors
Four label value extractors are provided to manage the SKILLS and AFFINITIES labels.
| Extractor Name | Description |
|---|---|
DefaultTaskDataSkillsValueExtractor |
Processes the human task "skills" input value as a string of comma separated values, and creates a java Set<Object> with tokenized String values. The resulting set is assigned to the label SKILLS. For example, the "skills" input value "english,finance" is extracted as a set with the values {"english", "finance"} and assigned to the label with name SKILLS. By default extraction can be customized by using the following system property for defining the task input value from where the SKILLS will be extracted. For example: org.kie.server.services.taskassigning.planning.data.DefaultTaskDataSkillsValueExtractor.skills=someOtherName |
DefaultTaskDataAffinitiesValueExtractor |
Processes the human task "affinities" input value, as a string comma separated values, and creates a java Set<Object> with tokenized String values. The resulting set is assigned to the label AFFINITIES. Ej. The "affinities" input value "news,history" is extracted as a set with the values {"news", "history"} and assigned to the label with name AFFINITIES. By default extraction can be customized by using the following system property for defining the task input value from where the AFFINITIES will be extracted. For example: org.kie.server.services.taskassigning.planning.data.DefaultTaskDataAffinitiesValueExtractor.affinities=someOtherName |
DefaultUserSkillsValueExtractor |
Analogous to the DefaultTaskDataSkillsValueExtractor By default extraction can be customized by using the following system property for defining the user attribute from where the SKILLS will be extracted. For example: org.kie.server.services.taskassigning.planning.data.DefaultUserSkillsValueExtractor.skills=someOtherName |
DefaultUserAffinitiesValueExtractor |
Analogous to the DefaultTaskDataAffinitiesValueExtractor By default extraction can be customized by using the following system property for defining the user attribute from where the AFFINITIES will be extracted. For example: org.kie.server.services.taskassigning.planning.data.DefaultUserAffinitiesValueExtractor.affinities=someOtherName |
|
The current core model classes like the TaskAssigningSolution, Task and User might change in future releases. |
Linking the human tasks inputs with the labels
A simple approach for labeling tasks with business related information is implemented using the task inputs configuration. The following image shows an example of such a configuration.
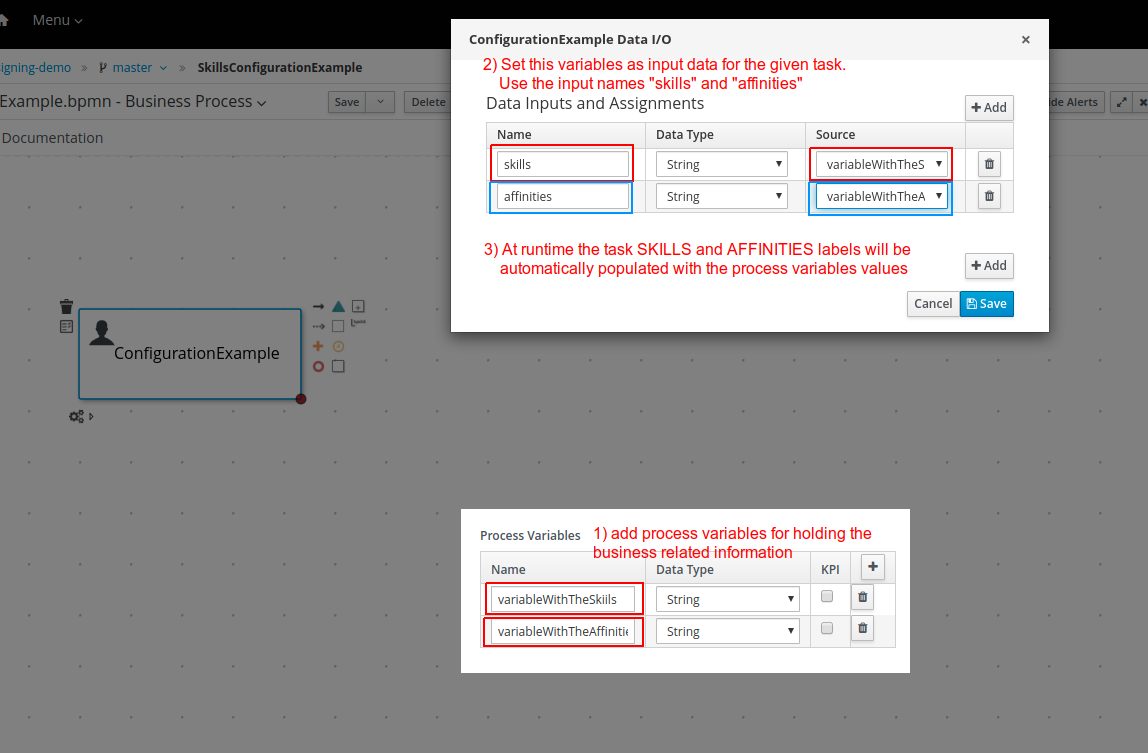
The example above links the process variable "variableWithTheSkills" with the task input name "skills", and the corresponding value will be processed by the "DefaultTaskDataSkillsValueExtractor" and automatically associated with the label name SKILLS.
This mechanism can be used for any other user provided LabelValueExtractor.
Custom extractors
Installations that require the definition of customized LabelValueExtractors can add them by providing their implementations in the customized KJARs with the UserSystemIntegration implementation or the Solver configuration.
-
Add a component in the specified KJAR that implements the following interface:
org.kie.server.api.model.taskassigning.data.LabelValueExtractor
Note: Ensure that the following dependency is added to the given KJAR:
<dependency>
<groupId>org.kie.server</groupId>
<artifactId>kie-server-api</artifactId>
<version>corresponding version</version>
<scope>provided</scope>
</dependency>-
Declare the component implementation by using the Java standard service provider mechanism in the following resource:
project_home/src/main/resources/META-INF/services/project_home/src/main/resources/META-INF/services/org.kie.server.api.model.taskassigning.data.LabelValueExtractor
When configured, the LabelValueExtractor will be processed accordingly.
The following example shows a custom LabelValueExtractor:
import org.kie.server.api.model.taskassigning.data.LabelValueExtractor;
import org.kie.server.services.taskassigning.user.system.api.User;
public class UserExampleValueExtractor implements LabelValueExtractor<User> {
public Class<User> getType() {
// consider this extractor for processing users information.
return org.kie.server.services.taskassigning.user.system.api.User.class;
}
public String getLabelName() {
return "PASSPORT";
}
public int getPriority() {
return 1;
}
public Set<Object> extract(User source) {
Map<String, Object> attributes = source.getAttributes();
Object value = attributes != null ? attributes.get("passport_number") : null;
return value != null ? new HashSet<Object>(Collections.singleton(value)) : null;
}
}Ensure that the following dependency is added to the specified KJAR:
<dependency>
<groupId>org.kie.server</groupId>
<artifactId>kie-server-services-task-assigning-user-system-api</artifactId>
<version>corresponding version</version>
<scope>provided</scope>
</dependency>|
Extractors for processing the human tasks information must use the class org.kie.server.api.model.taskassigning.TaskData as source type. |
|
The current core model classes like the TaskAssigningSolution, Task and User might change in future releases. |
23.18.3. Integration alternatives
System integrators usually consume the human tasks available in the Process Runtime kie-server for different purposes. One example is the Business Central "Task Inbox" in this case, Business Central acts as an "integrator" which means that the human tasks are consumed from the Process Runtime kie-server by using the kie-server queries APIs and applying different filtering criterias. Finally these tasks are listed in the "Task Inbox" UI, etc. In this way, Business Central is decoupled from the Process Runtime kie-server, etc.
The next topics present a set of queries similar to queries used by the Business Central "Task Inbox". These queries might facilitate integrations in cases where the task assigning integration is enabled.
23.18.3.1. Task Assigning Human Tasks Query
This query facilitates the consumption of the available human tasks. The task can integrate additional information depending on the query variant. It is up to the "integrator" to select the query variant that best supports it’s needs.
Filtering parameters
The available filtering parameters are defined in the following kie-server-api enums:
org.kie.server.api.model.definition.TaskField
org.kie.server.api.model.taskassigning.PlanningTaskFieldBoth classes are found in the following maven artifact:
<dependency>
<groupId>org.kie.server</groupId>
<artifactId>kie-server-api</artifactId>
</dependency>The following table shows the parameter name and the expected type.
| Parameter | Type | Description |
|---|---|---|
ACTIVATIONTIME |
Date |
Time when this task was activated. |
ACTUALOWNER |
String |
Actual owner assigned to this task - only set when task is claimed. |
CREATEDBY |
String |
User who created this task. |
CREATEDON |
Date |
Date when task was created. |
DEPLOYMENTID |
String |
Deployment id this task is part of, typically the KIE Server container. |
DESCRIPTION |
String |
Description of the task if any. |
DUEDATE |
Date |
Due date set on this task if any. |
NAME |
String |
Name of the task. |
PARENTID |
Long |
Parent task id if any. |
PRIORITY |
Integer |
Priority of the task. |
PROCESSID |
String |
Process definition id that this task belongs to. |
PROCESSINSTANCEID |
Long |
Process instance id that this task is associated with. |
PROCESSSESSIONID |
Long |
KieSession id used to create this task. |
STATUS |
String |
Current status of the task. |
TASKID |
Long |
Identifier of task. |
WORKITEMID |
Long |
Identifier of work item assigned on process side to this task id. |
PTTASKID |
Long |
Same value as TASKID. |
ASSIGNEDUSER |
String |
Same value as the ACTUALOWNER for published tasks. |
PUBLISHED |
Integer |
Indicates if the task is published. For example "published = 1" can be used as filtering criteria in cases of filtering by the task that are currently assigned by the task assigning integration. |
Querying the human tasks as TaskData instances
This query execution variant enables getting the result values as instances of:
org.kie.server.api.model.taskassigning.TaskDataThe following example shows how to use this variant:
Example 1)
// Create the kie-server query services client.
QueryServicesClient queryServices = createQueryServicesClient();
// Set the filtering and ordering criteria and consider only the currently published tasks.
QueryFilterSpec filter = new QueryFilterSpecBuilder()
.equalsTo(TaskField.STATUS.toString(), "Reserved", "InProgress", "Completed")
.equalsTo(PlanningTaskField.PUBLISHED.toString(), 1)
.oderBy(TaskField.TASKID.toString(), true)
.get();
// Execute the query
List<TaskData> result = queryServices.query(TaskAssigningQueries.JBPM_HUMAN_TASKS_QUERY,
TaskAssigningQueries.TASK_DATA_QUERY_MAPPER,
filter,
0, // staring page
30, // page size
TaskData.class);In this case, only the tasks currently assigned by the task assigning integration will be considered. This is the usual scenario when task assigning integration is enabled, because it is expected that the tasks are consumed and executed accordingly with the generated planning.
|
The task inputs and potential owners are not loaded by this query. |
Example 2)
// Create the kie-server query services client.
QueryServicesClient queryServices = createQueryServicesClient();
// Set the filtering and ordering criteria and consider all of the tasks.
QueryFilterSpec filter = new QueryFilterSpecBuilder()
.equalsTo(TaskField.STATUS.toString(), "Ready”, Reserved", "InProgress", "Completed")
.oderBy(TaskField.TASKID.toString(), true)
.get();
// Execute the query
List<TaskData> result = queryServices.query(TaskAssigningQueries.JBPM_HUMAN_TASKS_QUERY,
TaskAssigningQueries.TASK_DATA_QUERY_MAPPER,
filter,
0, // staring page
30, // page size
TaskData.class);In this case all of the tasks will be considered but only the property assigned by the task assigning integration will have the TaskData.planningTask filled. It means that non assigned tasks or not yet managed by the task assigning integration might be included in the results. This alternative facilitates a more advanced processing of the "potential" tasks, however it is strongly encouraged to make available to the users only the tasks that are currently assigned by the task assigning integration . i.e. the ones with TaskData.planningTask != null otherwise the integration becomes senseless.
|
The task inputs and potential owners are not loaded by this query. |
See KIE Server API documentation for more information on how to create the KIE Server clients and the query API general functioning.
23.18.4. Examples
23.18.4.1. Credit dispute process
The following credit dispute process example is intended to show a simple use case where you can use the "skills" configuration to influence the way tasks are assigned according to the solver constraints and the process data.
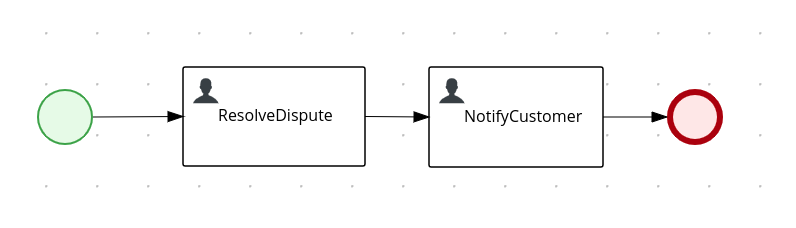
Process start
When the process starts, the user is asked to complete the information in the following image. In particular, the credit card brand for which the dispute is related to and the preferred language for receiving the process notifications are requested. This information is used for assigning the process tasks.
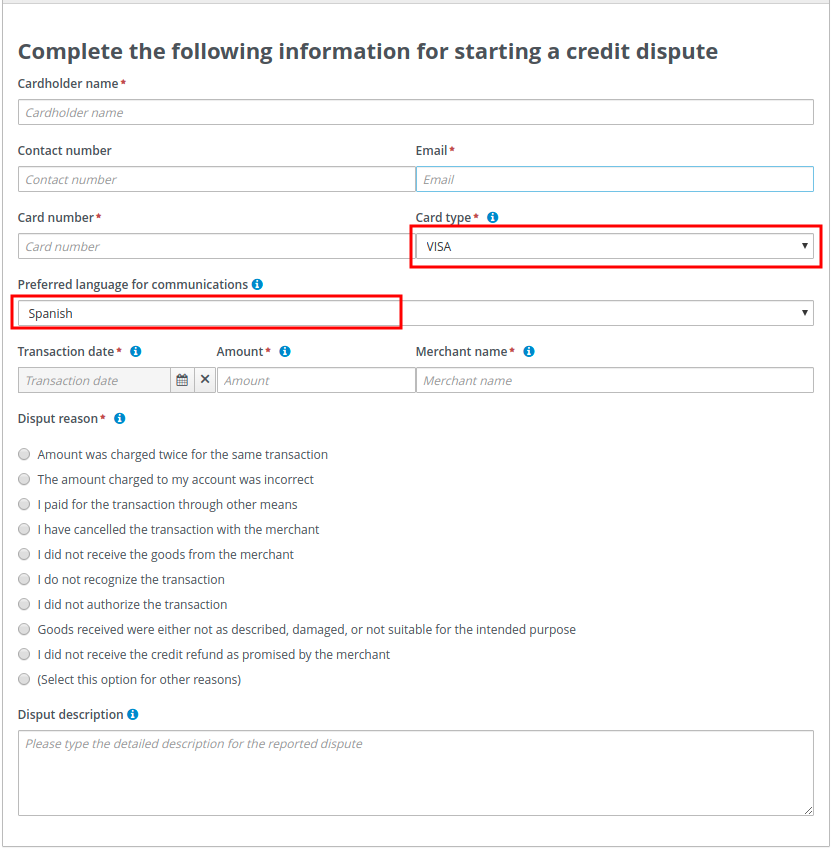
Process configuration
The following image shows the process variables that are used for holding the card brand and language respectively.
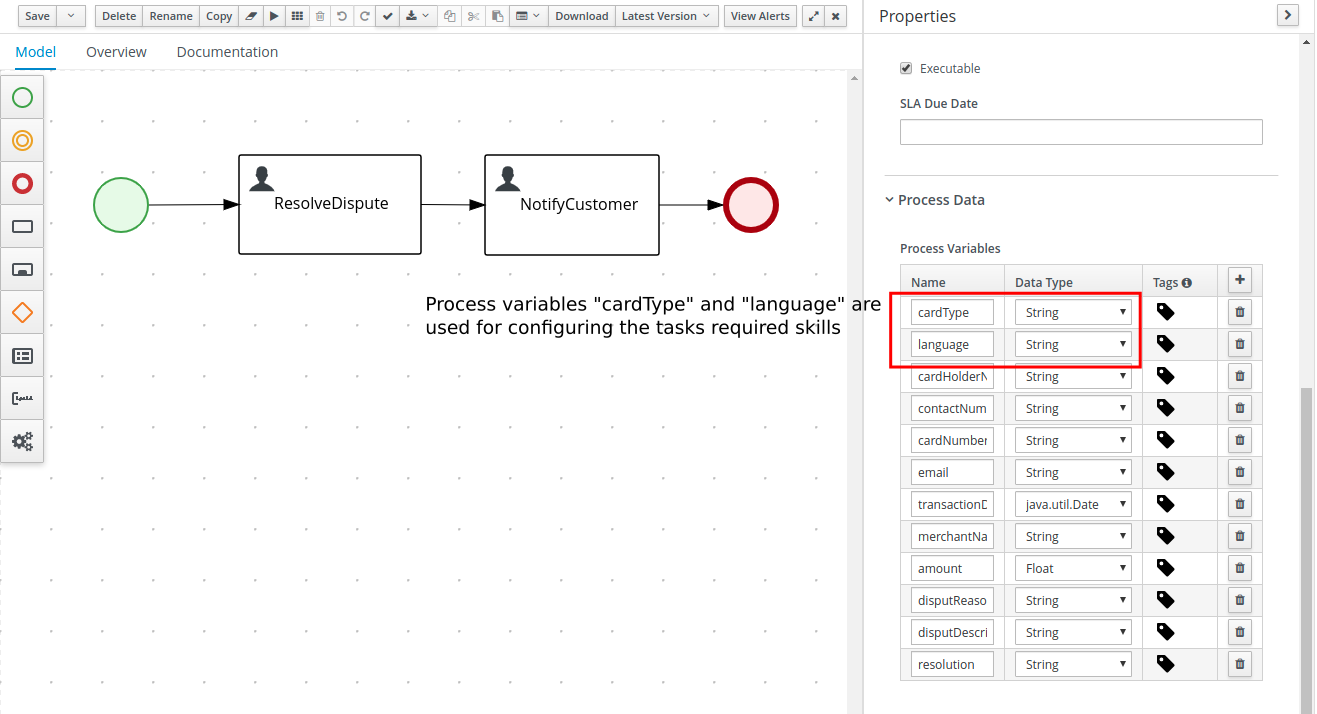
The process start form populates these variables with the user inputs.
Resolve dispute task configuration
The following image shows the ResolveDispute task configuration, which establishes that the task input parameter skills is assigned with the value of the process variable cardType.

With this configuration, Red Hat build of OptaPlanner assigns this task to users that meet the following criteria:
-
Are in the user group CreditAnalyst
-
Have all of the skills configured in the task input parameter skills
Notify customer task configuration
The following image shows the NotifyCustomer task configuration, which establishes that the task input parameter skills is assigned with the value of the process variable language.
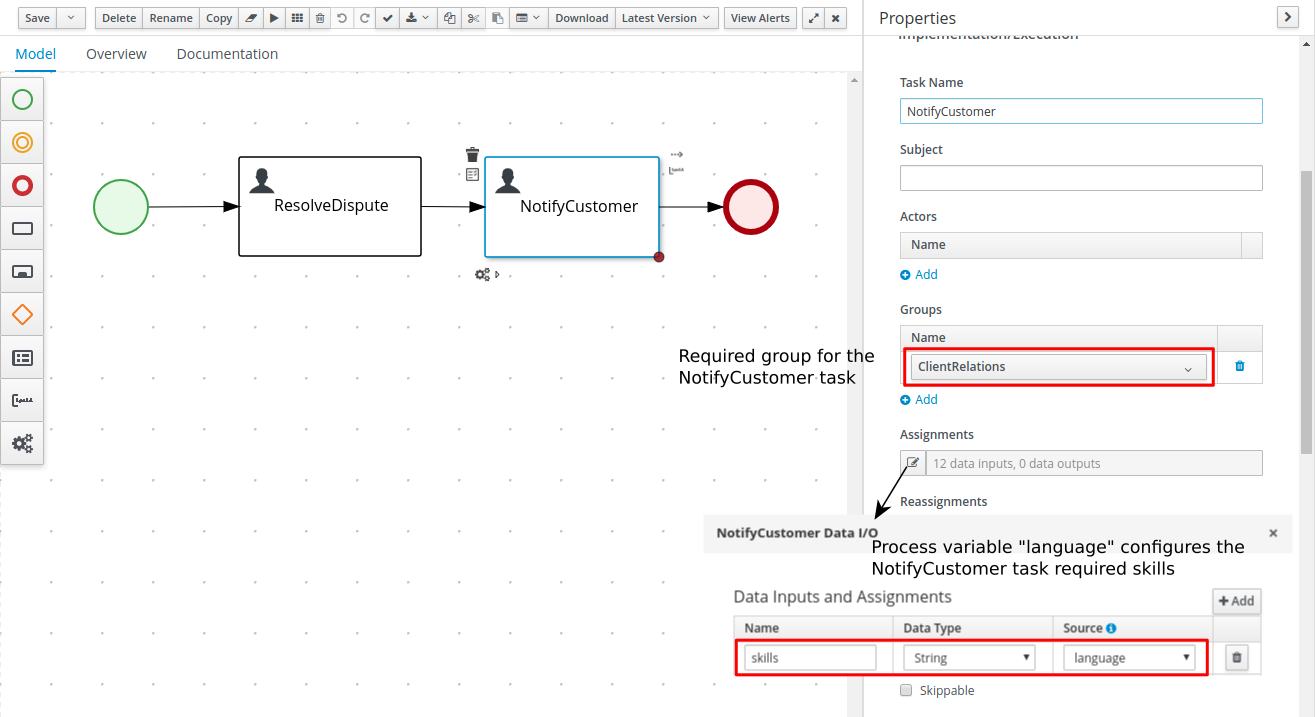
With this configuration Red Hat build of OptaPlanner assigns this task to users that meet the following criteria:
-
Are in the group ClientRelations
-
Have all of the skills configured in the task input parameter skills
-
Note that in this case the language selection is optional since the form field is not marked with "*" see the process start form, meaning that when no language is selected the task won’t have any configured skills. This implies that in such cases whatever users that are in group ClientRelations can be assigned to the task.
Process execution (example users)
Let’s assume that the following users configurations are used for executing the process.
users.properties file:
john=analyst,admin,user,Accounting,PM,ClientRelations
mary=analyst,admin,user,ClientRelations
katy=analyst,admin,user,HR,CreditAnalyst
maciek=admin,analyst,user,PM,HR,CreditAnalystskills.properties file:
john=ES,EN (has skills in the Spanish and English languages)
mary=ZH (has skills in the Chinese language)
katy=CITI,MASTER (has skills in the CITI and MASTER cards)
maciek=VISA,AMERICAN_EXPRESS (has skills in the VISA and AMERICAN EXPRESS cards)Process execution (example instances)
With the preceding configurations the following execution scenarios are expected:
Process instance #1:
1) Start process

2) ResolveDispute task
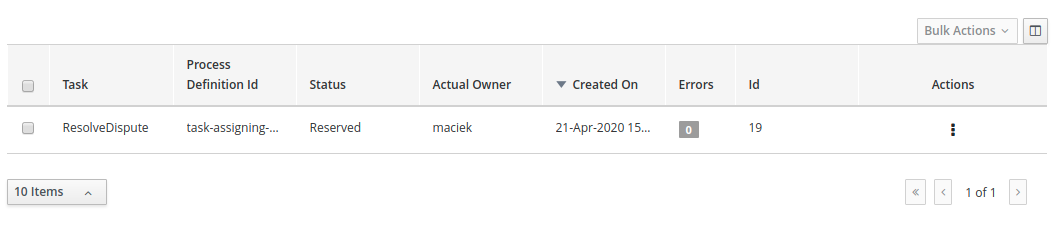
The ResolveDispute task is assigned to the user maciek since it requires VISA skills.
|
In real environments there might be many users with this skill. In this case Red Hat build of OptaPlanner assigns the new created task considering the optimized plan, which means that depending on the workload a different user could have been assigned. |
3) NotifyCustomer task

When the ResolveDispute task is completed, a new task NotifyCustomer is created and assigned to the user john because that task requires skills in Spanish.
Process instance #2:
1) Start process

2) ResolveDispute task

The ResolveDispute task is assigned to the user katy since it requires CITI skills.
3) NotifyCustomer task

When the ResolveDispute task is completed, a new task NotifyCustomer is created and assigned to the user mary because that task requires skills in Chinese.
Process instance #3:
1) Start process

2) ResolveDispute task

The ResolveDispute task is assigned to the user katy because that task requires skills in the MASTER card.
3) NotifyCustomer task

When the ResolveDispute task is completed, a new task NotifyCustomer is created and assigned to the planninguser because none of the users has the required skills in Hindi. In this case, an external interaction is required to determine the best suited user to complete the task. The planinguser must perform this action by delegating the task.
|
The planninguser assignment is used to cover edge cases and should not be part of the modelling strategy. In the preceding example, if it is known that no user will have skills in Hindi. A similar but softer constraint can be configured by using affinities. |
23.18.4.2. Customized User System Service
For creating a custom user system service implementation follow these steps:
1) Create a KJAR project structure
2) Add the following dependency
<dependency>
<!-- Kie Server, OptaPlanner, or any other product dependencies must use provided scope -->
<groupId>org.kie.server</groupId>
<artifactId>kie-server-services-task-assigning-user-system-api</artifactId>
<version>configure the proper version number aligned with the target kie-server</version>
<scope>provided</scope>
</dependency>3) Provide your UserSystemService implementation, see the following example:
public class MyDBUserSystemService implements UserSystemService {
private DataSource dataSource;
public String getName() {
return "MyDBUserSystemService";
}
public void start() {
String dataSourceName = System.getProperty("org.example.DBUserSystemService.ds",
"java:jboss/datasources/ExampleDS");
try {
InitialContext initialContext = new InitialContext();
dataSource = (DataSource) initialContext.lookup(dataSourceName);
} catch (NamingException e) {
// throw an exception if there are unrecoverable errors that prevent
// the service to start.
throw new DBUserSystemServiceException("Unable to find data source under name " +
dataSourceName, e);
}
}
public void test() throws Exception {
// test your database queries etc.
}
public List<User> findAllUsers() {
try (Connection conn = dataSource.getConnection()) {
List<User> myUsers;
// query the users information from the database.
return myUsers;
} catch (SQLException e) {
throw new DBUserSystemServiceException("An error was produced finding all users: " +
e.getMessage(), e);
}
}
public User findUser(String userId) {
if (userId == null) {
return null;
}
try (Connection conn = dataSource.getConnection()) {
User user;
// query the user information from the database.
return user;
} catch (SQLException e) {
throw new DBUserSystemServiceException("An error was produced finding user: "+
e.getMessage(), e);
}
}
}4) Add the following resource to the project and declare your user system service provider class on it.
src/main/resources/META-INF/services/org.kie.server.services.taskassigning.user.system.api.UserSystemService
org.example.MyDBUserSystemServiceFinally for using it in the Planning kie-server follow these steps:
1) Build your KJAR and be sure the corresponding maven generated artifact is installed in the maven repository used by your Planning kie-server.
2) Add a datasource configuration to your Planning kie-server pointing to the target DB (this step is only required for the example above) For example with JNDI name java:jboss/datasources/db-user-system-datasource
3) Finally add the following items to the Planning kie-server configuration file:
<server>
...
<system-properties>
<property name="org.kie.server.taskAssigning.userSystem.name"
value="MyDBUserSystemService" />
<property name="org.kie.server.taskAssigning.userSystem.container.id"
value="my-db-user-system-container" />
<property name="org.kie.server.taskAssigning.userSystem.container.groupId"
value="your KJARs groupId" />
<property name="org.kie.server.taskAssigning.userSystem.container.artifactId"
value="your KJARs artifactId" />
<property name="org.kie.server.taskAssigning.userSystem.container.version"
value="your KJARs version number" />
<property name="org.example.DBUserSystemService.ds"
value="java:jboss/datasources/db-user-system-datasource" />
</system-properties>
...
</server>Eclipse
How to use the Eclipse-based tooling
24. jBPM Eclipse Plugin
24.1. jBPM Eclipse Plugin
The jBPM Eclipse plugin provides developers (and very technical users) with an environment to edit and test processes, and integrate it deeply with their applications. It provides the following features (on top of the Eclipse IDE):
-
Wizards for creation of
-
a jBPM project
-
a BPMN2 process
-
-
jBPM Perspective (showing the most commonly used views in a predefined layout)
24.1.1. Installation
The jBPM installer is capable of downloading and installing an Eclipse installation, including the Drools and jBPM Eclipse plugin (with a full jBPM runtime preconfigured) and the Eclipse BPMN2 Modeler.
|
Using the jBPM installer is definitely the recommended starting point for most users. |
You can however also download and install the jBPM Eclipse Plugin manually. To do so, you need to:
-
Download Eclipse (Kepler recommended, but older versions like Indigo or Juno should also still work)
-
Start Eclipse
-
Select "Install New Software …" from the Help menu. Add the Drools and jBPM update site http://downloads.jboss.org/jbpm/release/6.0.1.Final/updatesite/. You should see the plugins as shown below. Note that you can also download and unzip the Drools and jBPM update site to your local file system and use that as local update site instead.
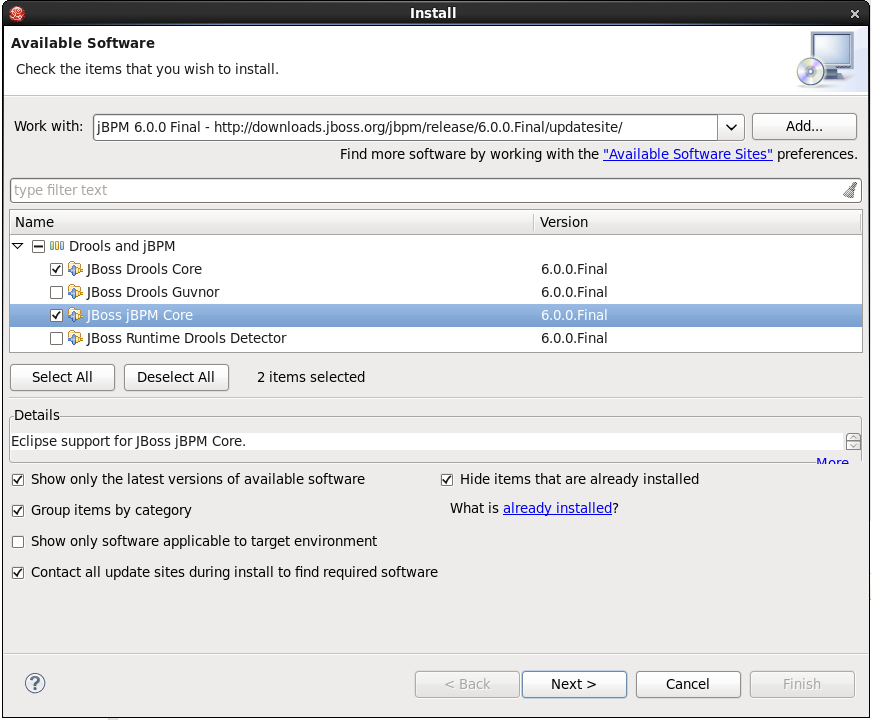
Select the JBoss jBPM Core and JBoss Drools Core plugins and click "Next >". Click "Next >" again after reviewing your selecting, accept the terms of the license agreement and click "Finish" to download and install the plugins. If you get a warning about installing software that contains unsigned content, click OK. After successful installation, Eclipse should ask you to restart, click Yes.
-
The plugin should now be installed. To check, check if you can for example see the new jBPM Project wizard: under the "File" menu, select "New Project …" and there you should be able to see "New jBPM Project" under the jBPM category.
-
Register a jBPM runtime to get started, see the section on jBPM runtimes in this chapter for more information.
Note that, when doing a manual install, you still need to manually install the Eclipse BPMN 2.0 Modeler plugin as well. Check out the chapter on the Eclipse BPMN 2.0 Modeler on how to do that.
24.1.2. jBPM Project Wizard
The aim of the new project wizard is to set up an executable sample project to start using processes immediately. This will set up a basic structure, the classpath, sample process and a test case to get you started. To create a new jBPM project, in the "File" menu select "New" and then "Project …" and under the jBPM category, select "jBPM Project". A dialog as shown below should pop up.
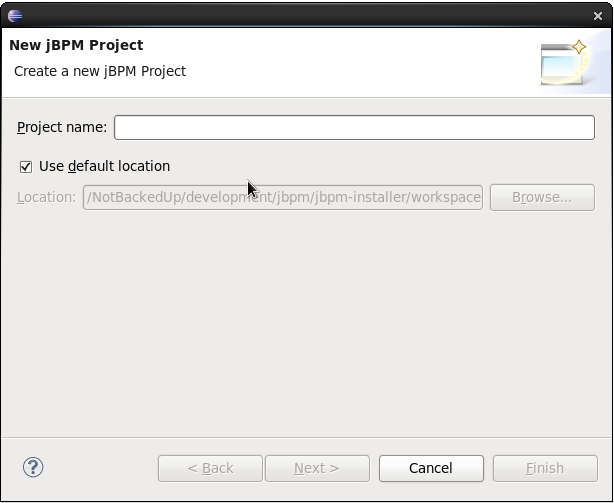
Fill in a name for your project and if necessary change the location where this project should be located (by default Eclipse will generate it inside your Eclipse workspace folder) and click "Next >".
Now you can optionally include a sample process in your project to get started. You can select to either use a simple "Hello World" process, a slightly more advanced process including human tasks and persistence or simply an empty project. You can also select to include a JUnit test class that you can use to test your process. These can serve as a starting point, and will give you something executable almost immediately, which you can then modify to your needs.
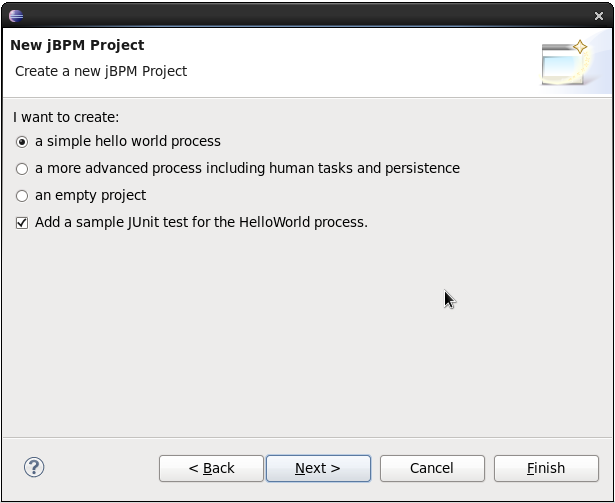
Finally, the last page in the wizard allows you select a jBPM runtime, as shown below. You can either use the default runtime (as configured for you workspace, in your workspace preferences), or you can select a specific runtime for this project. For more information about runtimes and how to create them, see the section on jBPM runtimes in this chapter.
You can also select which version of jBPM you want to generate sample code for. By default it will generate an example using the latest jBPM 6.x API, but you could also generate examples using the old jBPM 5.x API. Note that you yourself are responsible for making sure that the code you generate can be understood by the runtime (for example, if you create an example using jBPM6 API but select a jBPM5 runtime, your sample will not compile). Also note that, if you want to execute a jBPM5 example on jBPM6, you will need to have the knowledge-api JAR inside your jBPM6 runtime, as this is responsible for the backwards compatibility of the jBPM5 API in jBPM6.
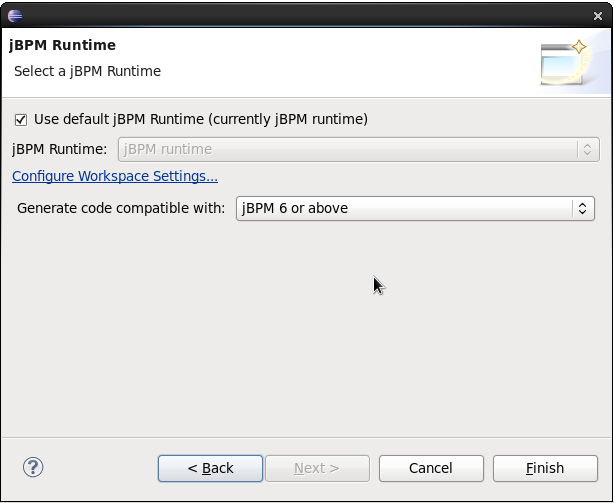
When you selected the simple 'hello world' example, the result is shown below. Feel free to experiment with the plug-in at this point.
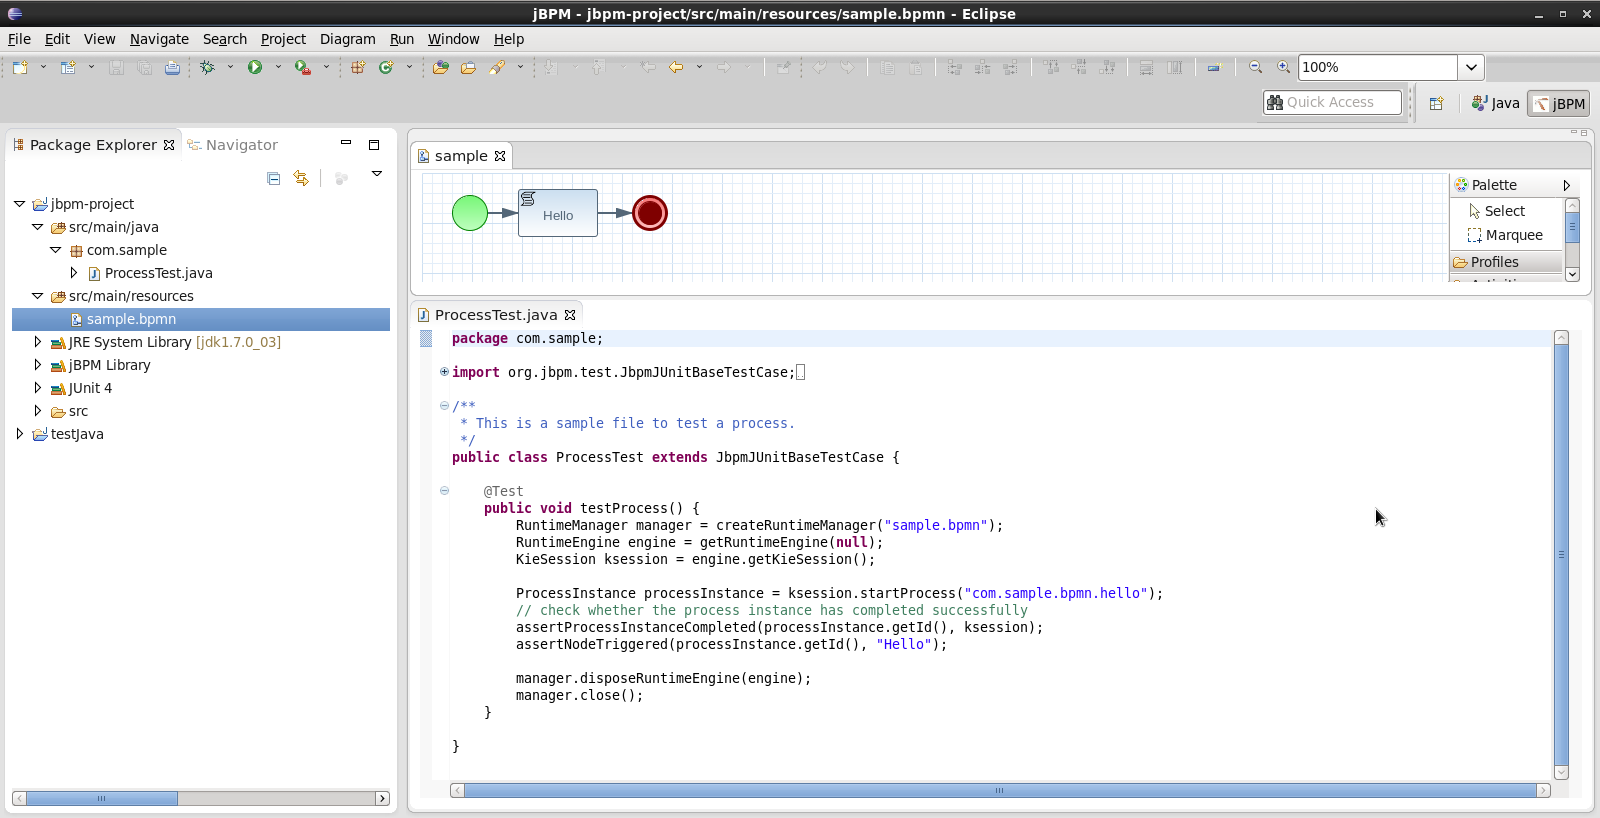
The newly created project contains an example process file (sample.bpmn) in the src/main/resources directory and an example Java file (ProcessTest.java) that can be used to test the process in the jBPM engine. You’ll find this in the folder src/main/java, in the com.sample package. All the other JARs that are necessary during execution are also added to the classpath in a custom classpath container called jBPM Library.
You can also convert an existing Java project to a jBPM project by selecting the "Convert to jBPM Project" action. Right-click the project you want to convert and under the "Configure" category (at the bottom) select "Convert to jBPM Project". This will add the jBPM Library to your project’s classpath.
24.1.3. New BPMN2 Process Wizard
You can create a new process simply as an empty text file with extension ".bpmn", or use the "New BPMN2 Process" wizard to do so. To create a new process, in the "File" menu select "New" and then "Other …" and under the jBPM category, select "BPMN2 Process" and click "Next >". In the next dialog, you should select the folder where the process should be created (for example the src/main/resources folder of your project) and a name for the process. Clicking "Finish" should create your new process (by default it should only contain one start node) and open it so you can start editing it.
24.1.4. jBPM Runtime
A jBPM runtime is a collection of JAR files that represent one specific release of the jBPM project JARs. To create a runtime, download the binary distribution of the version of jBPM you want to use and unzip on your local file system. You must then point the IDE to the release of your choice by selecting the folder where these JARs are located. If you want to create a new runtime based on the latest jBPM project JARs included in the plugin itself, you can also easily do that. You are required to specify a default jBPM runtime for your Eclipse workspace, but each individual project can override the default and select the appropriate runtime for that project specifically.
24.1.4.1. Defining a jBPM Runtime
To define one or more jBPM runtimes using the Eclipse preferences view you open up your Preferences, by selecting the "Preferences" menu item in the menu "Window". A "Preferences" dialog should show all your settings. On the left side of this dialog, under the jBPM category, select "Installed jBPM runtimes". The panel on the right should then show the currently defined jBPM runtimes. For example, if you used the jBPM Installer, it should look like the figure below.
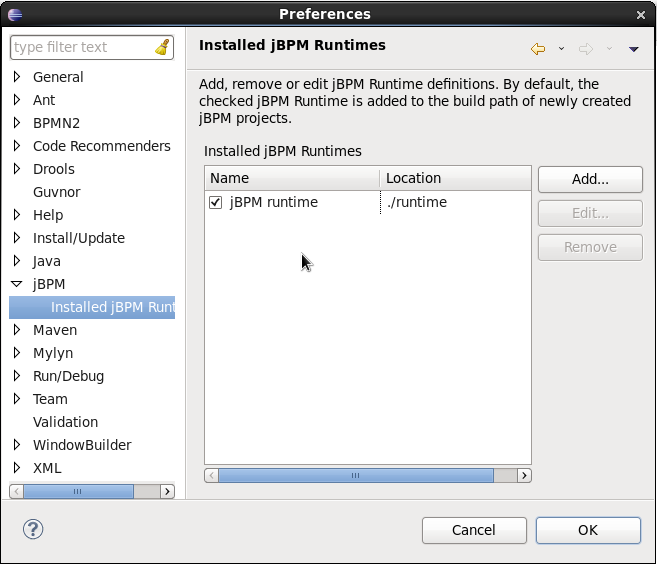
To define a new jBPM runtime, click the "Add" button. A dialog such as the one shown below should pop up, asking for the name of your runtime and the location on your file system where it can be found.
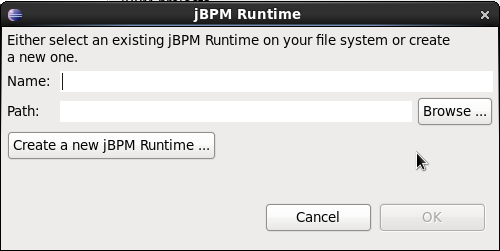
In general, you have two options:
-
If you simply want to use the default JAR files as included in the jBPM Eclipse plugin, you can create a new jBPM runtime automatically by clicking the "Create a new jBPM Runtime …" button. A file browser will show up, asking you to select the folder on your file system where you want this runtime to be created. The plugin will then automatically copy all required dependencies to the specified folder. Make sure to select a unique name for the newly created runtime and click "OK" to register this runtime.
Note that creating a jBPM runtime from the default JAR files as included in the jBPM Eclipse plugin is only recommended to get you started the first time and for very simple use cases. The runtime that is created this way only contains the minimal set of JARs, and therefore doesn’t support a significant set of features, including for example persistence. Make sure to create a full runtime (using the second approach) for real development.
-
If you want to use one specific release of the jBPM project, you should create a folder on your file system that contains all the necessary jBPM libraries and dependencies (for example by downloading the binary distribution and unzipping it on your local file system). Instead of creating a new jBPM runtime as explained above, give your runtime a unique name and click the "Browse …" button to select the location of this folder containing all the required JARs. Click "OK" to register this runtime.
After clicking the OK button, the runtime should show up in your table of installed jBPM runtimes, as shown below. Click the checkbox in front of one of the installed runtimes to make it the default jBPM runtime. The default jBPM runtime will be used as the runtime of all your new jBPM projects (in case you didn’t select a project-specific runtime).
You can add as many jBPM runtimes as you need. Note that you will need to restart Eclipse if you changed the default runtime and you want to make sure that all the projects that are using the default runtime update their classpath accordingly.
24.1.4.2. Selecting a runtime for your jBPM project
Whenever you create a jBPM project (using the New jBPM Project wizard or by converting an existing Java project to a jBPM project), the plugin will automatically add all the required JARs to the classpath of your project.
When creating a new jBPM project, the plugin will automatically use the default Drools runtime for that project, unless you specify a project-specific one. You can do this in the final step of the New jBPM Project wizard, as shown below, by deselecting the "Use default Drools runtime" checkbox and selecting the appropriate runtime in the drop-down box. If you click the "Configure workspace settings …" link, the workspace preferences showing the currently installed jBPM runtimes will be opened, so you can add new runtimes there.
You can change the runtime of a jBPM project at any time by opening the project properties and selecting the jBPM category, as shown below. Mark the "Enable project specific settings" checkbox and select the appropriate runtime from the drop-down box. If you click the "Configure workspace settings …" link, the workspace preferences showing the currently installed jBPM runtimes will be opened, so you can add new runtimes there. If you deselect the "Enable project specific settings" checkbox, it will use the default runtime as defined in your global workspace preferences.
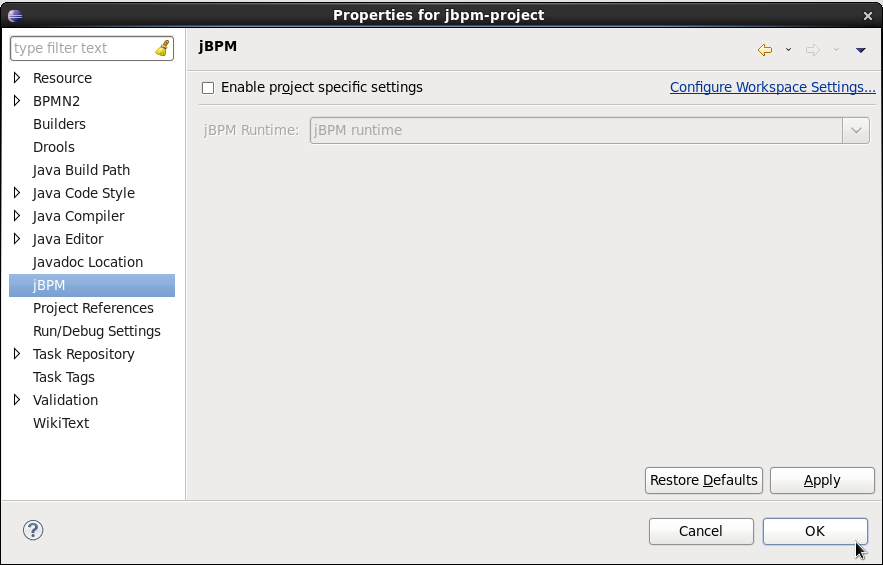
24.1.5. jBPM Maven Project Wizard
The aim of the new Maven project wizard is to set up an executable sample project to start using processes immediately (but not as normal Java project with all jBPM dependencies added using a jBPM library but by using Maven (and thus a pom.xml) to define your project’s properties and dependencies. This wizard will set up a Maven project using a pom.xml, and include a sample process and Java class to execute it. To create a new jBPM Maven project, in the "File" menu select "New" and then "Project …" and under the jBPM category, select "jBPM Project (Maven)". Give your project a name and click finish. The result should be as shown below.
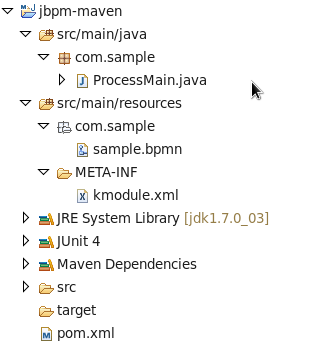
The pom.xml that is generated for your project contains the following:
<?xml version="1.0" encoding="UTF-8"?>
<project xmlns="http://maven.apache.org/POM/4.0.0"
xmlns:xsi="http://www.w3.org/2001/XMLSchema-instance"
xsi:schemaLocation="http://maven.apache.org/POM/4.0.0 http://maven.apache.org/xsd/maven-4.0.0.xsd">
<modelVersion>4.0.0</modelVersion>
<groupId>com.sample</groupId>
<artifactId>jbpm-example</artifactId>
<version>1.0.0-SNAPSHOT</version>
<name>jBPM :: Sample Maven Project</name>
<description>A sample jBPM Maven project</description>
<properties>
<version.org.jbpm>6.0.0.Final</version.org.jbpm>
</properties>
<repositories>
<repository>
<id>jboss-public-repository-group</id>
<name>JBoss Public Repository Group</name>
<url>http://repository.jboss.org/nexus/content/groups/public/</url>
<releases>
<enabled>true</enabled>
<updatePolicy>never</updatePolicy>
</releases>
<snapshots>
<enabled>true</enabled>
<updatePolicy>daily</updatePolicy>
</snapshots>
</repository>
</repositories>
<dependencies>
<dependency>
<groupId>org.jbpm</groupId>
<artifactId>jbpm-test</artifactId>
<version>${version.org.jbpm}</version>
</dependency>
</dependencies>
</project>In the properties section, you can specify which version of jBPM you would like to use (by default it uses 6.0.0.Final). It adds the JBoss Nexus Maven repository (where all the jBPM JARs and their dependencies are located) to your project and configures the dependencies.
|
By default, only the jbpm-test JAR is specified as a dependency, as this has transitive dependencies to almost all of the core dependencies you will need. You are free to update the dependencies section however to include only the dependencies you need. |
The project also contains a sample process, under src/main/resources, in the com.sample package, and a kmodule.xml configuration file under the META-INF folder. The kmodule.xml defines which resources (processes, rules, etc.) are to be loaded as part of your project. In this case, it is defining a kbase called "kbase" that will load all the resources in the com.sample folder:
<kmodule xmlns="http://www.drools.org/xsd/kmodule">
<kbase name="kbase" packages="com.sample"/>
</kmodule>Finally, it also contains a Java class that can be used to execute the sample process.
It will first create a kbase called "kbase" (by inspecting the kmodule.xml file and thus loading the sample.bpmn process) and then use a RuntimeManager to get access to a KieSession and TaskService.
In this case, it is used to start a process and then complete the tasks created by this process one by one.
24.1.6. Drools Eclipse plugin
The Drools Eclipse Plugin, which is bundled as part of the same Eclipse Update Site as the jBPM Eclipse Plugin, provides similar features for creating and editing business rules, and execute them using the Drools engine. This for example allows you to create and edit .drl files containing business rules. You can combine your processes and rules inside one project and execute them together on the same KieSession.
24.2. Debugging
This section describes how to debug processes using the jBPM Eclipse plugin. This means that the current state of your running processes can be inspected and visualized during the execution. Note that we currently don’t allow you to put breakpoints on the nodes within a process directly. You can however put breakpoints inside any Java code you might have (i.e. your application code that is invoking the jBPM engine or invoked by the jBPM engine, listeners, etc.) or inside rules (that could be evaluated in the context of a process). At these breakpoints, you can then inspect the internal state of all your process instances.
When debugging the application, you can use the following debug views to track the execution of the process:
-
The process instances view, showing all running process instances (and their state). When double-clicking a process instance, the process instance view visually shows the current state of that process instance at that point in time.
-
The audit view, showing the audit log (note that you should probably use a threaded file logger if you want to session to save the audit event to the file system on regular intervals, so the audit view can be updated to show the latest state).
-
The global data view, showing the globals.
-
Other views related to rule execution like the working memory view (showing the contents (data) in the working memory related to rule execution), the agenda view (showing all activated rules), etc.
24.2.1. The Process Instances View
The process instances view shows the process instances currently running in the selected ksession. To be able to use the process instances view, first open the Process Instances view (Window - Show View - Other … and under the Drools category select Process Instances and Process Instance). Tip: it might be useful to drag the Process Instance view to the Outline View and slightly enlarge it, as shown in the screenshot below, so you can see both the Process Instances and Process Instance views at the same time.
Next, use a (regular) Java breakpoint to stop your application at a specific point (for example right after starting a new process instance). In the Debug perspective, select the ksession you would like to inspect, and the Process Instances view should show the process instances that are currently active inside that ksession. For example, the screenshot below shows one running process instance (with id "1"). When double-clicking a process instance, the process instance viewer will graphically show the progress of that process instance. An example where the process instance is waiting for a human actor to perform "Task 1" is shown below.
|
The process instances view shows the process instances currently active inside the selected ksession. Note that, when using persistence, process instances are not kept in memory inside the ksession, as they are stored in the database as soon as the command completes. Therefore, you will not be able to use the Process Instances view when using persistence. For example, when executing a JUnit test using the JbpmJUnitBaseTestCase, make sure to call "super(true, false);" in the constructor to create a runtime manager that is not using persistence. |
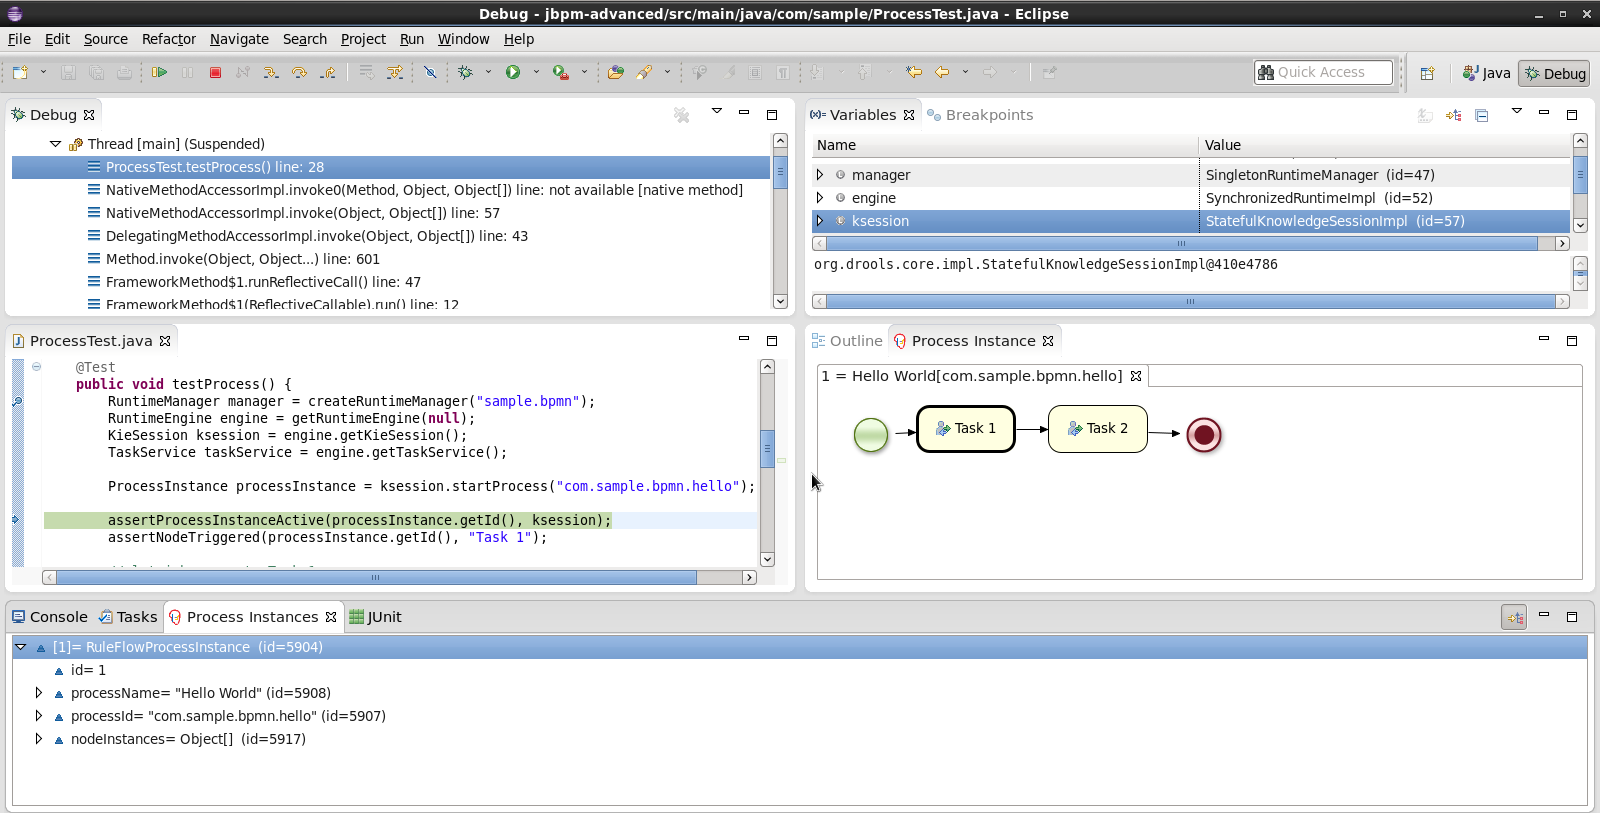
|
When you double-click a process instance in the process instances view and the process instance view complains that it cannot find the process, this means that the plugin wasn’t able to find the process definition of the selected process instance in the cache of parsed process definitions. To solve this, simply change the process definition in question and save again (so it will be parsed) or rebuild the project that contains the process definition in question. |
24.2.2. The Audit View
The audit view can be used to show the all the events inside an audit log in a tree-based manner. An audit log is an XML-based log file which contains a log of all the events that occurred while executing a specific ksession. To create a logger, use KieServices to create a new logger and attach it to a ksession. Be sure to close the logger after usage.
KieRuntimeLogger logger = KieServices.Factory.get().getLoggers()
.newThreadedFileLogger(ksession, "mylogfile", 1000);
// do something with the ksession here
logger.close();To be able to use the Audit View, first open it (Window - Show View - Other … and under the Drools category select Audit). To open up a log file in the audit view, open the selected log file in the audit view (using the "Open Log" action in the top right corner), or simply drag and drop the log file from the Package Explorer or Navigator into the audit view. A tree-based view is generated based on the data inside the audit log. An event is shown as a subnode of another event if the child event is caused by (a direct consequence of) the parent event. An example is shown below.
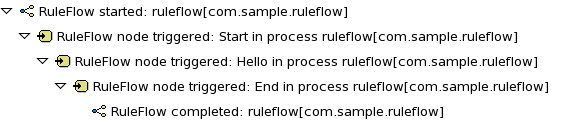
|
Note that the file-based logger will only save the events on close (or when a certain threshold is reached). If you want to make sure the events are saved on a regular interval (for example during debugging), make sure to use a threaded file logger, so the audit view can be updated to show the latest state. When creating a threaded file logger, you can specify the interval after which events should be saved to the file (in milliseconds). |
24.3. Synchronizing with Business Central Repositories
From Eclipse, you can synchronize your local workspace with one or more repositories that are managed inside the Business Central application. This enables collaboration between developers using Eclipse and users of the web-based Business Central (business analysts or end users for example). Synchronization between the Business Central repositories and your local version of these projects is done using Git (a popular distributed source code version control system).
When creating and executing processes inside Eclipse, you are creating them on your local file system. You can however also import an existing repository from Business Central, apply changes and push these changes back into Business Central repositories. We are using existing Git tools for this. Note that this section will describe how to do this using the EGit tooling (Eclipse Tooling for Git which comes by default with most versions of Eclipse), but feel free to use your preferred Git tool instead.
|
This section is not intended to explain what Git is, or how to use EGit, in detail. If you don’t have any experience with Git and/or EGit, it might be recommended to read up on them first if necessary. |
24.3.1. Importing a Business Central repository
To import an existing repository from Business Central, you can use the EGit import wizard. In the File menu, select "Import …" and in the Git category, select "Projects from Git" and click "Next >". This should open a new dialog where you should select the location of the repository you would like to import. Since we are connecting to a repository that is managed by the Business Central application, select "URI" and click "Next >" once more.
Use the following URI to connect to your Business Central repositories:
ssh://<hostname>:8001/<repository_name>For example, if you are running the Business Central application on your local host (for example by using the jbpm-installer), and you want to import the jbpm-playground repo, use the following URI:
ssh://localhost:8001/jbpm-playgroundNote that you can change the port that is used by the server to provide ssh access to the git repository if necessary, using the system property org.uberfire.nio.git.ssh.port
Fill in the URI of the repository you would like to import, as for example shown below, and click "Next >".
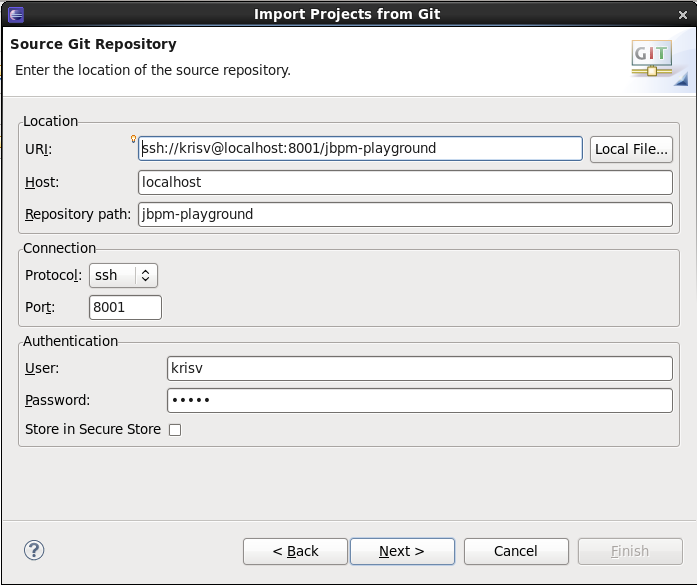
You will be asked to select which branch you would like to import. Select the master branch and click "Next >" again.
Finally, you need to specify where on your local file system you would like this repository to be created. Fill in the directory (you can use the Browse button to select the folder in question, and if necessary you can create a new folder there as well) and click "Next >". This will now download the repository to the folder you just selected.
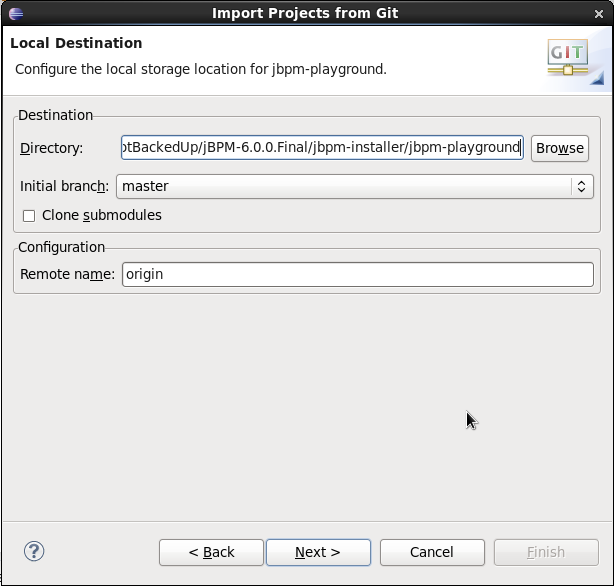
You still need to import the repository you just downloaded as a project in your Eclipse workspace. Select "Import as general project" and after clicking "Next >", give it a name and click "Finish". After doing so, your workspace should now contain your repository, and you should be able to browse, open and edit the various assets inside.
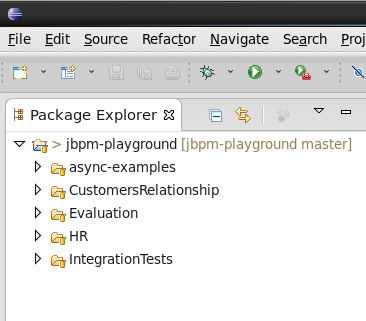
24.3.2. Committing changes to Business Central
You can commit and push changes (you do locally) back to the Business Central repositories. To commit changes, right-click your repository project and select "Team → Commit …". A new dialog pops up, showing all the changes you have on your local file system. Select the files you want to commit (if you double-click them, you can get an overview of the changes you did for that file), provide an appropriate commit message and click "Commit".
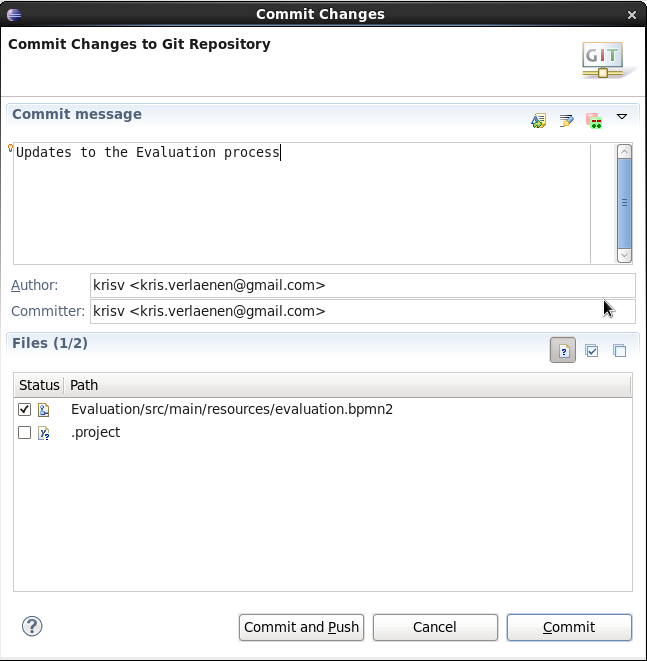
Once you’ve committed your change to your local git, you still need to push it to the Business Central repository. Right-click your project again, and select "Team → Push to Upstream".
|
You are only allowed to push changes upstream if your local version includes all recent changes (otherwise you might be overriding someone else’s changes). You might be forced to update (and if necessary resolve conflicts) before you are allowed to commit any changes. |
24.3.3. Updating from Business Central
To retrieve the latest changes from the Business Central repository, right-click your repository project and select "Team → Fetch from Upstream". This will fetch all changes from the Business Central repository, but not yet apply them to your local version. Now right-click your project again and select "Team → Merge …". In the dialog that pops up next, you need to select "origin/master" branch (under Remote Tracking) to indicate that you want to merge in all changes from the original repository in Business Central, and click "Merge".
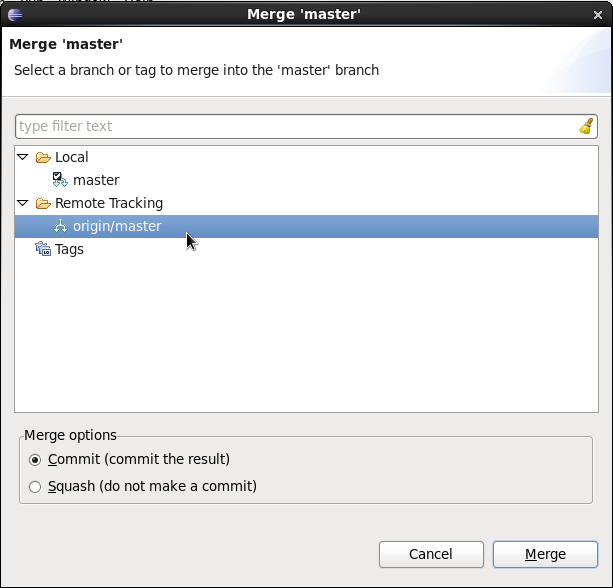
|
It is possible that you have committed and/or conflicting changes in your local version, you might have to resolve these conflicts and commit the merge results before you will be able to complete the merge successfully. It is recommended to update regularly, before you start updating a file locally, to avoid merge conflicts being detected when trying to commit changes. |
24.3.4. Working on individual projects
When you import a repository, it will download all the projects that are inside that repository. It is however useful to mount one specific project as a separate Java project in Eclipse. When you do this, Eclipse will be able to interpret the information in the project pom.xml file (that you created in Business Central), download and include any dependencies you specified, compile any Java classes you have in your project (that you for example created with the data modeler), etc.
To do so, right-click one of the projects in your repository project and select "Import …" and under the Maven category, select "Existing Maven Projects" (as shown below) and click Next.
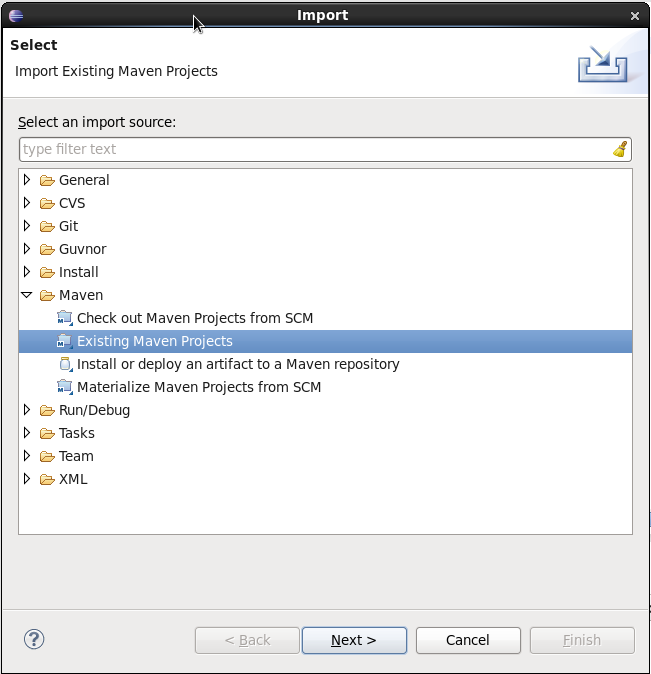
In the next page, you should see the pom.xml of the project you selected. Click Finish.
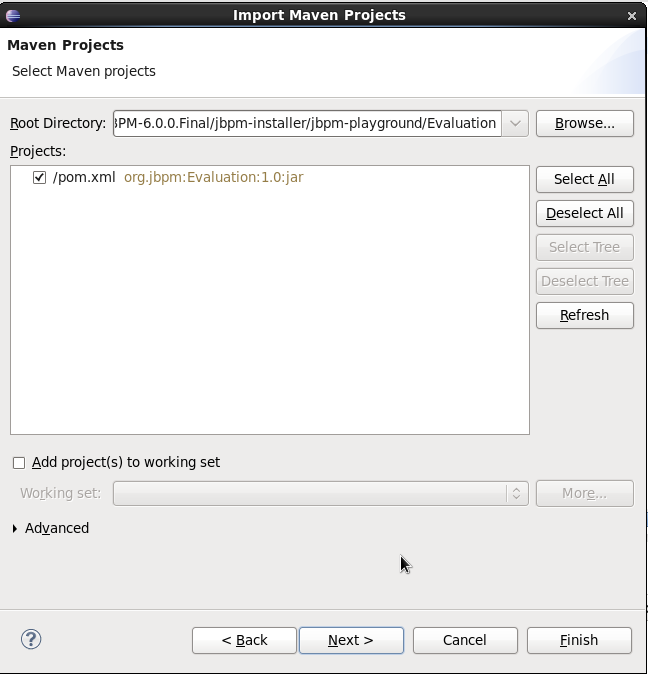
If your project requires some of the jBPM libraries to correctly compile and/or execute any Java classes in your project (for example if you have test classes in your project that start up a jBPM engine and execute some tests for your project, or if you are using the data modeler, which will add some annotations to the generated Java classes), you still need to add the jBPM libraries to the classpath of your project. To do so, simply convert your project into a jBPM project, which will add the jBPM library to your project’s classpath. Right-click your project and select "Configure → Convert to jBPM Project". Your project should now have a jBPM Library added to its classpath (it might be necessary to clean your project to pick up this change and recompile all Java classes).
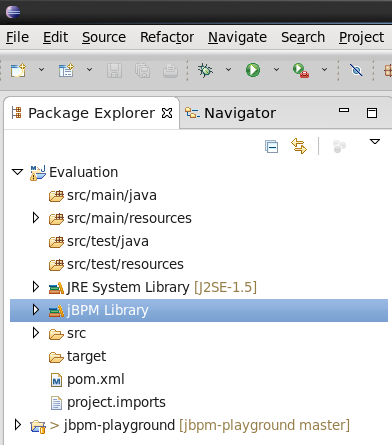
25. Eclipse BPMN 2.0 Modeler
25.1. Overview
The Eclipse BPMN 2.0 Modeler allows you to specify business processes, choreographies, etc. using the BPMN 2.0 XML syntax (including BPMNDI for the graphical information). The editor itself is based on the Eclipse Graphiti framework and the Eclipse BPMN 2.0 EMF meta-model.
Features:
-
It supports almost all BPMN 2.0 process constructs and attributes (including lanes and pools, annotations and all the BPMN2 node types).
-
Added additional support for the few custom attributes that jBPM introduces using a special jBPM Target Runtime.
-
Allows you to configure which elements and attributes you want use when modeling processes (so we can limit the constructs for example to the subset currently supported by jBPM, which is a profile supported by default, or even more if you like).
The BPMN2 Modeler project is being developed at eclipse.org, sponsored by Red Hat/JBoss. Red Hat understands the benefits of developing software in the community, and therefore, the Eclipse BPMN 2.0 Modeler was developed not just for the jBPM project only, but it can be used in a much broader context and is fully spec compliant. jBPM-specific features are developed as part of a separate jBPM Target Runtime. We welcome other organizations in contributing to this modeler as well and (re)using the generic functionality and/or defining their own target runtime if necessary. Not only is this a good thing for the community, but it also leaves the path open for the jBPM suite to evolve as new features are requested by customers.
Many thanks go out to the people at Codehoop that did a great job in creating a first version of this editor.
25.2. Installation
The jBPM installer is capable of downloading and installing an Eclipse installation, including the Eclipse BPMN2 Modeler and the Drools and jBPM Eclipse plugin (with a full jBPM runtime preconfigured).
|
Using the jBPM installer is definitely the recommended starting point for most users. |
You can however also download and install the jBPM Eclipse Plugin manually. To do so, you need Eclipse 3.6.2 (Helios) or newer. To install, startup Eclipse and install the Eclipse BPMN 2.0 Modeler from the following update site (from menu Help → Install new software and then add the update site in question by clicking the Add button, filling in a name and the correct URL as shown below). It will automatically download all other dependencies as well (e.g. Graphiti etc.)
Eclipse 3.6 (Helios): http://download.eclipse.org/bpmn2-modeler/updates/helios
Eclipse 3.7 - 4.2.1 (Indigo - Juno): http://download.eclipse.org/bpmn2-modeler/updates/juno
Eclipse 4.3 (Kepler): http://download.eclipse.org/bpmn2-modeler/updates/kepler
The project is hosted at eclipse.org and open for anyone to contribute. The project home page can he found here:
Sources are available here (using Eclipse Public License v1.0):
A community forum for posting questions and exchanging ideas is also available here:
A Bugzilla bug tracking system is available for reporting new bugs, or checking the status of existing bugs, here:
25.3. Documentation
The Eclipse BPMN 2.0 Modeler documentation is available at:
It contains various screencasts but also a full user guide, describing all its features in detail:
Here are some screenshots of the editor in action.

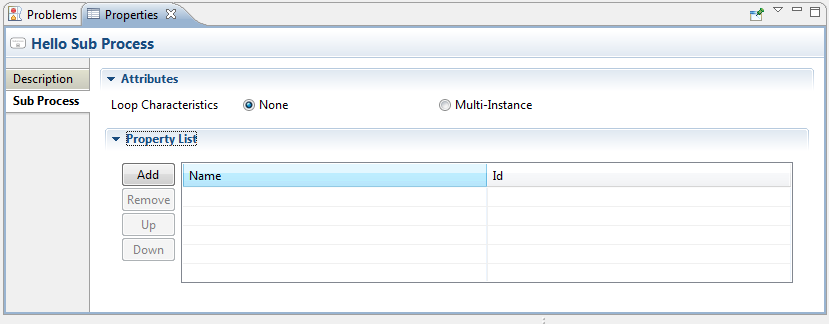
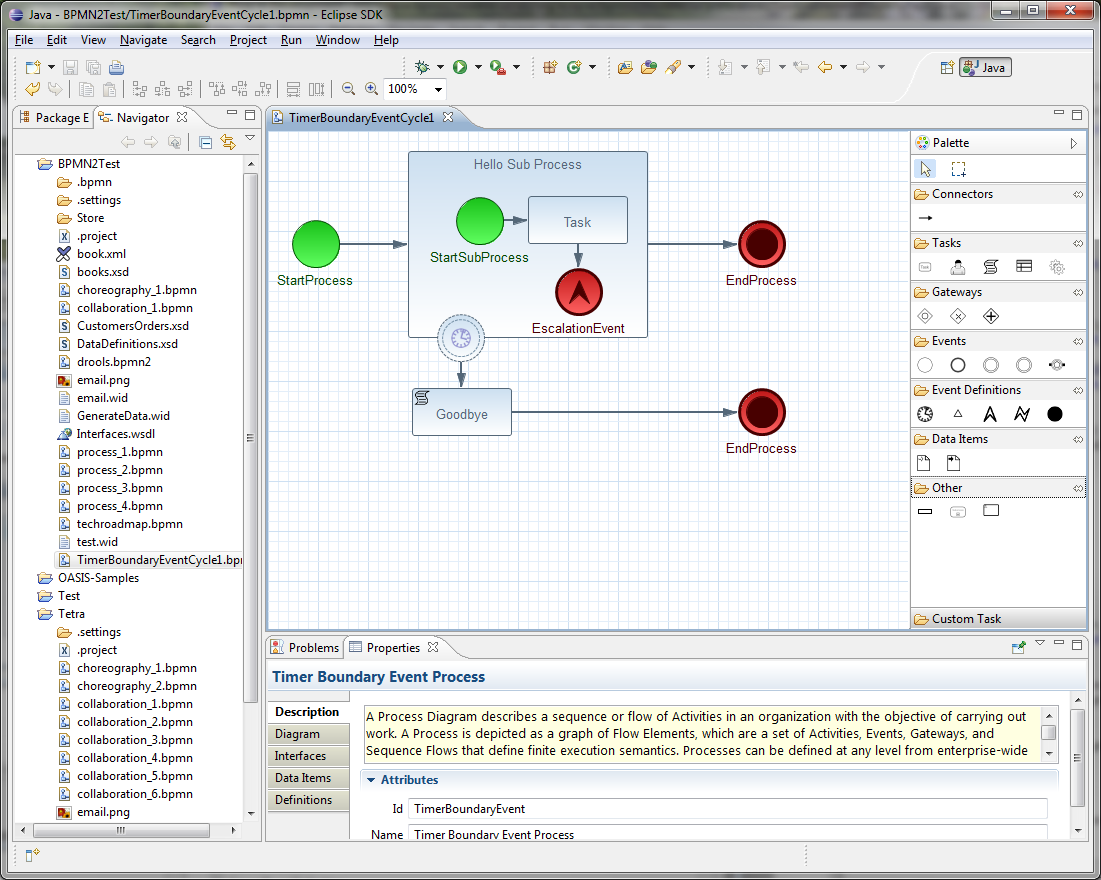
Integration
Integrating jBPM with other technologies, frameworks, etc.
26. Integration
You can integrate jBPM with several industry-standard Java frameworks.
26.1. Integration with Apache Maven
jBPM uses Maven for two main purposes:
-
To create KJAR artifacts, which are deployment units that the jBPM engine can install into a runtime environment for execution
-
To manage dependencies for building applications that embed the jBPM engine
26.1.1. Maven artifacts as deployment units
Since version 6, jBPM provides a mechanism to deploy processes from Apache Maven artifacts. These artifacts are in the JAR file format and are known as KJAR files, or informally KJARs. A KJAR file includes a descriptor that defines a KIE base and KIE session. It also contains the business assets, including process definitions, that the jBPM engine can load into the KIE base.
The descriptor of a KJAR file is represented by an XML file named kie-deployment-descriptor.xml. The descriptor can be empty, in which case the default configuration applies. It can also provide custom configuration for the KIE base and KIE session.
kie-deployment-descriptor.xml descriptor<?xml version="1.0" encoding="UTF-8" standalone="yes"?>
<deployment-descriptor xsi:schemaLocation="http://www.jboss.org/jbpm deployment-descriptor.xsd" xmlns:xsi="http://www.w3.org/2001/XMLSchema-instance">
<persistence-unit>org.jbpm.domain</persistence-unit>
<audit-persistence-unit>org.jbpm.domain</audit-persistence-unit>
<audit-mode>JPA</audit-mode>
<persistence-mode>JPA</persistence-mode>
<runtime-strategy>SINGLETON</runtime-strategy>
<marshalling-strategies/>
<event-listeners/>
<task-event-listeners/>
<globals/>
<work-item-handlers />
<environment-entries/>
<configurations/>
<required-roles/>
<remoteable-classes/>
</deployment-descriptor>With an empty kie-deployment-descriptor.xml descriptor, the following default configuration applies:
-
A single default KIE base is created with the following characteristics:
-
It contains all assets from all packages in the KJAR file
-
Its event processing mode is set to
cloud -
Its equality behaviour is set to
identity -
Its declarative agenda is disabled
-
For CDI applications, its scope is set to
ApplicationScope
-
-
A single default stateless KIE session is created with the following characteristics:
-
It is bound to the single KIE base
-
Its clock type is set to
real time -
For CDI applications, its scope is set to
ApplicationScope
-
-
A single default stateful KIE session is created with the following characteristics:
-
It is bound to the single KIE base
-
Its clock type is set to
real time -
For CDI applications, its scope is set to
ApplicationScope
-
If you do not want to use the defaults, you can change all configuration settings using the kie-deployment-descriptor.xml file. You can find the complete specification of all elements for this file in the XSD schema.
The following sample shows a custom kie-deployment-descriptor.xml file that configures the runtime engine. This example configures the most common options and includes a single work item handler. You can also use the kie-deployment-descriptor.xml file to configure other options.
kie-deployment-descriptor.xml file<?xml version="1.0" encoding="UTF-8" standalone="yes"?>
<deployment-descriptor xsi:schemaLocation="http://www.jboss.org/jbpm deployment-descriptor.xsd" xmlns:xsi="http://www.w3.org/2001/XMLSchema-instance">
<persistence-unit>org.jbpm.domain</persistence-unit>
<audit-persistence-unit>org.jbpm.domain</audit-persistence-unit>
<audit-mode>JPA</audit-mode>
<persistence-mode>JPA</persistence-mode>
<runtime-strategy>SINGLETON</runtime-strategy>
<marshalling-strategies/>
<event-listeners/>
<task-event-listeners/>
<globals/>
<work-item-handlers>
<work-item-handler>
<resolver>mvel</resolver>
<identifier>new org.jbpm.process.workitem.bpmn2.ServiceTaskHandler(ksession, classLoader)</identifier>
<parameters/>
<name>Service Task</name>
</work-item-handler>
</work-item-handlers>
<environment-entries/>
<configurations/>
<required-roles/>
<remoteable-classes/>
</deployment-descriptor>|
If you use the |
You can reference KJAR artifacts, like any other Maven artifacts, using the GAV (group, artifact, version) value. When deploying units from KJAR files, the jBPM engine uses the GAV value as the release ID in the KIE API. You can use the GAV value to deploy KJAR artifacts into a runtime environment, for example, a KIE Server.
26.1.2. Dependency management with Maven
When you build projects that embed the jBPM engine, use Apache Maven to configure all dependencies required by the jBPM engine.
The jBPM engine provides a set of BOMs (Bills of Material) to simplify declaring artifact dependencies.
Use the top-level pom.xml file of your project to define dependency management for embedding the jBPM engine, as shown in the following example. The example includes the main runtime dependencies, which are applicable whether the application is deployed on an application server, in a servlet container, or as a standalone application.
This example also includes version properties for components that applications using the jBPM engine commonly need. Adjust the list of components and versions as necessary. You can view the third-party dependency versions that the product team tests in the parent pom.xml file in the Github repository.
<properties>
<project.build.sourceEncoding>UTF-8</project.build.sourceEncoding>
<version.org.drools>7.52.0.Final</version.org.drools>
<version.org.jbpm>7.52.0.Final</version.org.jbpm>
<hibernate.version>5.3.17.Final</hibernate.version>
<hibernate.core.version>5.3.17.Final</hibernate.core.version>
<slf4j.version>1.7.26</slf4j.version>
<jboss.javaee.version>1.0.0.Final</jboss.javaee.version>
<logback.version>1.2.9</logback.version>
<h2.version>1.3.173</h2.version>
<narayana.version>5.9.0.Final</narayana.version>
<jta.version>1.0.1.Final</jta.version>
<junit.version>4.13.1</junit.version>
</properties>
<dependencyManagement>
<dependencies>
<!-- define Drools BOM -->
<dependency>
<groupId>org.drools</groupId>
<artifactId>drools-bom</artifactId>
<type>pom</type>
<version>${version.org.drools}</version>
<scope>import</scope>
</dependency>
<!-- define jBPM BOM -->
<dependency>
<groupId>org.jbpm</groupId>
<artifactId>jbpm-bom</artifactId>
<type>pom</type>
<version>${version.org.jbpm}</version>
<scope>import</scope>
</dependency>
</dependencies>
</dependencyManagement>In modules that use the jBPM engine Java API (KIE API), declare the necessary jBPM engine dependencies and other components that the modules require, as in the following example:
<dependency>
<groupId>org.jbpm</groupId>
<artifactId>jbpm-flow</artifactId>
</dependency>
<dependency>
<groupId>org.jbpm</groupId>
<artifactId>jbpm-flow-builder</artifactId>
</dependency>
<dependency>
<groupId>org.jbpm</groupId>
<artifactId>jbpm-bpmn2</artifactId>
</dependency>
<dependency>
<groupId>org.jbpm</groupId>
<artifactId>jbpm-persistence-jpa</artifactId>
</dependency>
<dependency>
<groupId>org.jbpm</groupId>
<artifactId>jbpm-human-task-core</artifactId>
</dependency>
<dependency>
<groupId>org.jbpm</groupId>
<artifactId>jbpm-runtime-manager</artifactId>
</dependency>
<dependency>
<groupId>org.slf4j</groupId>
<artifactId>slf4j-api</artifactId>
<version>${slf4j.version}</version>
</dependency>If your application uses persistence and transactions, you must add artifacts that implement the JTA and JPA frameworks. Additional dependencies are required for testing the workflow components before actual deployment.
The following example defines the dependencies that include Hibernate for JPA, the H2 database for persistence, Narayana for JTA, and the components needed for testing. This example uses the test scope. Adjust this example as necessary for your application. For production use, remove the test scope.
<!-- test dependencies -->
<dependency>
<groupId>org.jbpm</groupId>
<artifactId>jbpm-shared-services</artifactId>
<scope>test</scope>
</dependency>
<dependency>
<groupId>ch.qos.logback</groupId>
<artifactId>logback-classic</artifactId>
<version>${logback.version}</version>
<scope>test</scope>
</dependency>
<dependency>
<groupId>junit</groupId>
<artifactId>junit</artifactId>
<version>${junit.version}</version>
<scope>test</scope>
</dependency>
<dependency>
<groupId>org.hibernate</groupId>
<artifactId>hibernate-entitymanager</artifactId>
<version>${hibernate.version}</version>
<scope>test</scope>
</dependency>
<dependency>
<groupId>org.hibernate</groupId>
<artifactId>hibernate-core</artifactId>
<version>${hibernate.core.version}</version>
<scope>test</scope>
</dependency>
<dependency>
<groupId>com.h2database</groupId>
<artifactId>h2</artifactId>
<version>${h2.version}</version>
<scope>test</scope>
</dependency>
<dependency>
<groupId>jboss-transaction-api_1.2_spec</groupId>
<artifactId>org.jboss.spec.javax.transaction</artifactId>
<version>${jta.version}</version>
<scope>test</scope>
</dependency>
<dependency>
<groupId>org.jboss.narayana.jta</groupId>
<artifactId>narayana-jta</artifactId>
<version>${narayana.version}</version>
<scope>test</scope>
</dependency>With this configuration you can embed the jBPM engine in your application and use the KIE API to interact with processes, rules, and events.
Maven repositories
The release versions of jBPM engine Maven dependencies are available in the public Maven Central repository.
If you want to use SNAPSHOT versions, configure the JBoss Maven repository in the top-level pom.xml file:
<repositories>
<repository>
<id>jboss-public-repository-group</id>
<name>JBoss Public Repository Group</name>
<url>http://repository.jboss.org/nexus/content/groups/public/</url>
<releases>
<updatePolicy>never</updatePolicy>
</releases>
<snapshots>
<updatePolicy>daily</updatePolicy>
</snapshots>
</repository>
</repositories>26.2. Integration with CDI
The jBPM engine supports integration with CDI automatically. You can use most of its API in the CDI framework without any modification.
The jBPM engine also provides some dedicated modules that are designed specifically for CDI containers. The most important module is jbpm-services-cdi, which provides CDI wrappers for jBPM engine services. You can use these wrappers to integrate the jBPM engine in CDI applications. The module provides the following set of services:
-
DeploymentService -
ProcessService -
UserTaskService -
RuntimeDataService -
DefinitionService
These services are available for injection in any other CDI bean.
26.2.1. Deployment service for CDI
The DeploymentService service deploys and undeploys deployment units in the runtime environment. When you deploy a unit using this service, the deployment unit becomes ready for execution and a RuntimeManager instance is created for it. You can also use the DeploymentService to retrieve the following objects:
-
The
RuntimeManagerinstance for a given deployment ID -
The
DeployedUnitinstance that represents the complete deployment unit for the given deployment ID -
The list of all deployed units known to the deployment service
By default, the deployment service does not save information about deployed units to any persistent storage. In the CDI framework, the component that uses the service can save and restore deployment unit information, for example, using a database, file, system, or repository.
The deployment service fires CDI events on deployment and undeployment. The component that uses the service can process these events to store deployments and remove them from the store when they are undeployed.
-
A
DeploymentEventwith the@Deployqualifier is fired on deployment of a unit -
A
DeploymentEventwith the@Undeployqualifier is fired on undeployment of a unit
You can use the CDI observer mechanism to get notification on these events.
The following example receives notification on deployment of a unit and can save the deployment:
public void saveDeployment(@Observes @Deploy DeploymentEvent event) {
// Store deployed unit information
DeployedUnit deployedUnit = event.getDeployedUnit();
}The following example receives notification on deployment of a unit and can remove the deployment from storage:
public void removeDeployment(@Observes @Undeploy DeploymentEvent event) {
// Remove deployment with the ID event.getDeploymentId()
}Several implementations of the DeploymentService service are possible, so you must use qualifiers to instruct the CDI container to inject a particular implementation. A matching implementation of DeploymentUnit must exist for every implementation of DeploymentService.
The jBPM engine provides the the KmoduleDeploymentService implementation. This implementation is designed to work with KmoduleDeploymentUnits, which are small descriptors that are included in a KJAR file. This implementation is the typical solution for most use cases. The qualifier for this implementation is @Kjar.
26.2.2. Form provider service for CDI
The FormProviderService service provides access to form representations, which are usually displayed on the user interface for both process forms and user task forms.
The service relies on the concept of isolated form providers that can provide different capabilities and be backed by different technologies. The FormProvider interface describes the contract for implementations of form providers.
FormProvider interfacepublic interface FormProvider {
int getPriority();
String render(String name, ProcessDesc process, Map<String, Object> renderContext);
String render(String name, Task task, ProcessDesc process, Map<String, Object> renderContext);
}Implementations of the FormProvider interface must define a priority value. When the FormProviderService service needs to render a form, it calls the available providers in their priority order.
The lower the priority value, the higher priority the provider gets. For example, a provider with a priority of 5 is evaluated before a provider with a priority of 10. For each required form, the service iterates over the available providers in the order of their priority, until one of them delivers the content. In the worst-case scenario, a simple text-based form is returned.
The jBPM engine provides the following implementations of FormProvider:
-
A provider that delivers forms created in the Form Modeller tool, with a priority of 2
-
A FreeMarker-based implementation that supports process and task forms, with a priority of 3
-
The default forms provider, returning a simple text-based form, used as a last resort if no other provider delivers any content, with a priority of 1000
26.2.3. Runtime data service for CDI
The RuntimeDataService service provides access to data that is available at runtime, including the following data:
-
The available processes to be executed, with various filters
-
The active process instances, with various filters
-
The process instance history
-
The process instance variables
-
The active and completed nodes of process instance
The default implementation of RuntimeDataService observes deployment events and indexes all deployed processes to expose them to the calling components.
26.2.4. Definition service for CDI
The DefinitionService service provides access to process details that are stored as part of BPMN2 XML definitions.
|
Before using any method that provides information, invoke the |
The BPMN2DataService implementation provides access to the following data:
-
The overall description of the process for the given process definition
-
The collection of all user tasks found in the process definition
-
The information about the defined inputs for a user task node
-
The information about defined outputs for a user task node
-
The IDs of reusable processes (call activity) that are defined within a given process definition
-
The information about process variables that are defined within a given process definition
-
The information about all organizational entities (users and groups) that are included in the process definition. Depending on the particular process definition, the returned values for users and groups can contain the following information:
-
The actual user or group name
-
The process variable that is used to get the actual user or group name on runtime, for example,
#{manager}
-
26.2.5. CDI integration configuration
To use the jbpm-services-cdi module in your CDI framework, you must provide some beans to satisfy the dependencies of the included service implementations.
Several beans can be required, depending on the usage scenario:
-
The entity manager and entity manager factory
-
The user group callback for human tasks
-
The identity provider to pass authenticated user information to the services
When running in a JEE environment, such as Wildfly, the following producer bean satisfies all requirements of the jbpm-services-cdi module.
jbpm-services-cdi module in a JEE environmentpublic class EnvironmentProducer {
@PersistenceUnit(unitName = "org.jbpm.domain")
private EntityManagerFactory emf;
@Inject
@Selectable
private UserGroupInfoProducer userGroupInfoProducer;
@Inject
@Kjar
private DeploymentService deploymentService;
@Produces
public EntityManagerFactory getEntityManagerFactory() {
return this.emf;
}
@Produces
public org.kie.api.task.UserGroupCallback produceSelectedUserGroupCalback() {
return userGroupInfoProducer.produceCallback();
}
@Produces
public UserInfo produceUserInfo() {
return userGroupInfoProducer.produceUserInfo();
}
@Produces
@Named("Logs")
public TaskLifeCycleEventListener produceTaskAuditListener() {
return new JPATaskLifeCycleEventListener(true);
}
@Produces
public DeploymentService getDeploymentService() {
return this.deploymentService;
}
@Produces
public IdentityProvider produceIdentityProvider {
return new IdentityProvider() {
// implement IdentityProvider
};
}
}The beans.xml file for the application must enable a proper alternative for user group info callback. This alternative is taken based on the @Selectable qualifier.
beans.xml file`<beans xmlns="http://java.sun.com/xml/ns/javaee" xmlns:xsi="http://www.w3.org/2001/XMLSchema-instance"
xsi:schemaLocation="http://java.sun.com/xml/ns/javaee https://docs.jboss.org/cdi/beans_1_0.xsd">
<alternatives>
<class>org.jbpm.kie.services.cdi.producer.JAASUserGroupInfoProducer</class>
</alternatives>
</beans>|
|
Optionally, you can provide several other producers to deliver WorkItemHandlers and Process, Agenda, WorkingMemory event listeners. You can provide these components by implementing the following interfaces:
/**
* Enables providing custom implementations to deliver WorkItem name and WorkItemHandler instance pairs
* for the runtime.
* <br/>
* This interface is invoked by the RegisterableItemsFactory implementation (in particular InjectableRegisterableItemsFactory
* in the CDI framework) for every KieSession. Always return new instances of objects to avoid unexpected
* results.
*
*/
public interface WorkItemHandlerProducer {
/**
* Returns map of work items(key = work item name, value = work item handler instance)
* to be registered on KieSession
* <br/>
* The following parameters might be given:
* <ul>
* <li>ksession</li>
* <li>taskService</li>
* <li>runtimeManager</li>
* </ul>
*
* @param identifier - identifier of the owner - usually the RuntimeManager. This parameter allows the producer to filter out
* and provide valid instances for a given owner
* @param params - the owner might provide some parameters, usually KieSession, TaskService, RuntimeManager instances
* @return map of work item handler instances (always return new instances when this method is invoked)
*/
Map<String, WorkItemHandler> getWorkItemHandlers(String identifier, Map<String, Object> params);
}/**
* Enables defining custom producers for known EventListeners. There might be several
* implementations that might provide a different listener instance based on the context in which they are executed.
* <br/>
* This interface is invoked by the RegisterableItemsFactory implementation (in particular, InjectableRegisterableItemsFactory
* in the CDI framework) for every KieSession. Always return new instances of objects to avoid unexpected results.
*
* @param <T> type of the event listener - ProcessEventListener, AgendaEventListener, WorkingMemoryEventListener
*/
public interface EventListenerProducer<T> {
/**
* Returns list of instances for given (T) type of listeners
* <br/>
* Parameters that might be given are:
* <ul>
* <li>ksession</li>
* <li>taskService</li>
* <li>runtimeManager</li>
* </ul>
* @param identifier - identifier of the owner - usually RuntimeManager. This parameter allows the producer to filter out
* and provide valid instances for given owner
* @param params - the owner might provide some parameters, usually KieSession, TaskService, RuntimeManager instances
* @return list of listener instances (always return new instances when this method is invoked)
*/
List<T> getEventListeners(String identifier, Map<String, Object> params);
}The beans implementing these two interfaces are collected at runtime and invoked when the RuntimeManager class builds a KieSession instance.
A complete runnable example of an application built with CDI can be found here.
26.2.5.1. Runtime manager as a CDI bean
You can inject the RuntimeManager class as a CDI bean into any other CDI bean within your application. The RuntimeEnvironment class must be properly produced to enable correct initialization of the RuntimeManager instance.
The following CDI qualifiers reference the existing runtime manager strategies:
-
@Singleton -
@PerRequest -
@PerProcessInstance
For more information about the runtime manager, see [runtime-manager-con_kie-apis].
|
Though you can inject the |
To use the runtime manager, you must add the RuntimeEnvironment class to the producer that is defined in the CDI integration configuration section.
RuntimeEnvironment classpublic class EnvironmentProducer {
//Add the same producers as for services
@Produces
@Singleton
@PerRequest
@PerProcessInstance
public RuntimeEnvironment produceEnvironment(EntityManagerFactory emf) {
RuntimeEnvironment environment = RuntimeEnvironmentBuilder.Factory.get()
.newDefaultBuilder()
.entityManagerFactory(emf)
.userGroupCallback(getUserGroupCallback())
.registerableItemsFactory(InjectableRegisterableItemsFactory.getFactory(beanManager, null))
.addAsset(ResourceFactory.newClassPathResource("BPMN2-ScriptTask.bpmn2"), ResourceType.BPMN2)
.addAsset(ResourceFactory.newClassPathResource("BPMN2-UserTask.bpmn2"), ResourceType.BPMN2)
.get();
return environment;
}
}In this example, a single producer method is capable of providing the RuntimeEnvironment class for all runtime manager strategies by specifying all qualifiers on the method level.
When the complete producer is available, the RuntimeManager class can be injected into a CDI bean in the application:
RuntimeManager classpublic class ProcessEngine {
@Inject
@Singleton
private RuntimeManager singletonManager;
public void startProcess() {
RuntimeEngine runtime = singletonManager.getRuntimeEngine(EmptyContext.get());
KieSession ksession = runtime.getKieSession();
ProcessInstance processInstance = ksession.startProcess("UserTask");
singletonManager.disposeRuntimeEngine(runtime);
}
}If you inject the RuntimeManager class, only one instance of RuntimeManager might exist in the application. In typical cases, use the DeploymentService service, which creates RuntimeManager instances as necessary.
As an alternative to DeploymentService, you can inject the RuntimeManagerFactory class and then the application can use it to create RuntimeManager instances. In this case, the EnvironmentProducer definition is still required. The following example shows a simple ProcessEngine bean.
public class ProcessEngine {
@Inject
private RuntimeManagerFactory managerFactory;
@Inject
private EntityManagerFactory emf;
@Inject
private BeanManager beanManager;
public void startProcess() {
RuntimeEnvironment environment = RuntimeEnvironmentBuilder.Factory.get()
.newDefaultBuilder()
.entityManagerFactory(emf)
.addAsset(ResourceFactory.newClassPathResource("BPMN2-ScriptTask.bpmn2"), ResourceType.BPMN2)
.addAsset(ResourceFactory.newClassPathResource("BPMN2-UserTask.bpmn2"), ResourceType.BPMN2)
.registerableItemsFactory(InjectableRegisterableItemsFactory.getFactory(beanManager, null))
.get();
RuntimeManager manager = managerFactory.newSingletonRuntimeManager(environment);
RuntimeEngine runtime = manager.getRuntimeEngine(EmptyContext.get());
KieSession ksession = runtime.getKieSession();
ProcessInstance processInstance = ksession.startProcess("UserTask");
manager.disposeRuntimeEngine(runtime);
manager.close();
}
}26.3. Integration with Spring
While there are several ways to use the jBPM engine with the Spring framework, two approaches are most frequently used
-
Direct use of the Runtime Manager API
-
Use of jBPM engine services
Both approaches are tested and valid.
If your application needs to use only one runtime manager, use the direct Runtime Manager API, because it is the simplest way to use the jBPM engine within a Spring application.
If your application needs to use multiple instances of the runtime manager, use jBPM engine services, which encapsulate best practices by providing a dynamic runtime environment.
26.3.1. Direct use of the runtime manager API in Spring
The runtime manager manages the jBPM engine and task service in sychronization. For more information about the runtime manager, see [runtime-manager-con_kie-apis].
To set up the runtime manager in the Spring framework, use the following factory beans:
-
org.kie.spring.factorybeans.RuntimeEnvironmentFactoryBean -
org.kie.spring.factorybeans.RuntimeManagerFactoryBean -
org.kie.spring.factorybeans.TaskServiceFactoryBean
These factory beans provide a standard way to configure the spring.xml file for your Spring application.
26.3.1.1. RuntimeEnvironmentFactoryBean bean
The RuntimeEnvironmentFactoryBean factory bean produces instances of RuntimeEnvironment. These instances are required for creating RuntimeManager instances.
The bean supports creating the following types of RuntimeEnvironment instances with different default configurations:
-
DEFAULT: The default, or most common, configuration for the runtime manager -
EMPTY: A completely empty environment that you can configure manually -
DEFAULT_IN_MEMORY: The same configuration as DEFAULT, but without persistence of the runtime engine -
DEFAULT_KJAR: The same configuration as DEFAULT, but assets are loaded from KJAR artifacts, which are identified by the release ID or the GAV value -
DEFAULT_KJAR_CL: The configuration is built from thekmodule.xmldescriptor in a KJAR artifact
Mandatory properties depends on the selected type, however, knowledge information must be present for all types. This requirement means that one of the following kinds of information must be provided:
-
knowledgeBase -
assets -
releaseId -
groupId, artifactId, version
For the DEFAULT, DEFAULT_KJAR, and DEFAULT_KJAR_CL types, you must also configure persistence by providing the following parameters:
-
Entity manager factory
-
Transaction manager
The transaction manager must be the Spring transaction manager, because persistence and transaction support is configured based on this transaction manager.
Optionally, you can provide an EntityManager instance instead of creating a new instance from EntityManagerFactory, for example, you might use a shared entity manager from Spring.
All other properties are optional. They can override defaults that are determined by the selected type of the runtime environment.
26.3.1.2. RuntimeManagerFactoryBean bean
The RuntimeManagerFactoryBean factory bean produces RuntimeManager instances of a given type, based on the provided RuntimeEnvironment instance.
The supported types correspond to runtime manager stategies:
-
SINGLETON -
PER_REQUEST -
PER_PROCESS_INSTANCE
The default type, when no type is specified, is SINGLETON.
The identifier is a mandatory property, because every runtime manager must be uniquely identified. All instances created by this factory are cached, so they can be properly disposed using the destroy method (close()).
26.3.1.3. TaskServiceFactoryBean bean
The TaskServiceFactoryBean factory bean produces an instance of TaskService based on given properties. You must provide the following mandatory properties:
-
Entity manager factory
-
Transaction manager
The transaction manager must be the Spring transaction manager, because persistence and transaction support is configured based on this transaction manager.
Optionally, you can provide an EntityManager instance instead of creating a new instance from EntityManagerFactory, for example, you might use a shared entity manager from Spring.
You can also set additional optional properties for the task service instance:
-
userGroupCallback: The implementation ofUserGroupCallbackthat the task service must use, the default value isMVELUserGroupCallbackImpl -
userInfo: The implementation ofUserInfothat the task service must use, the default value isDefaultUserInfo -
listener: A list ofTaskLifeCycleEventListenerlisteners which must be notified upon various operations on tasks
This factory bean creates a single instance of the task service. By design, this instance must be shared across all beans in the Spring environment.
26.3.1.4. Configuring a sample runtime manager with a Spring application
The following procedure is an example of complete configuration for a single runtime manager within a Spring application.
-
Configure the entity manager factory and the transaction manager:
Configuring the entity manager factory and the transaction manager in thespring.xmlfile<bean id="jbpmEMF" class="org.springframework.orm.jpa.LocalContainerEntityManagerFactoryBean"> <property name="persistenceUnitName" value="org.jbpm.persistence.spring.jta"/> </bean> <bean id="jbpmEM" class="org.springframework.orm.jpa.support.SharedEntityManagerBean"> <property name="entityManagerFactory" ref="jbpmEMF"/> </bean> <bean id="narayanaUserTransaction" factory-method="userTransaction" class="com.arjuna.ats.jta.UserTransaction" /> <bean id="narayanaTransactionManager" factory-method="transactionManager" class="com.arjuna.ats.jta.TransactionManager" /> <bean id="jbpmTxManager" class="org.springframework.transaction.jta.JtaTransactionManager"> <property name="transactionManager" ref="narayanaTransactionManager" /> <property name="userTransaction" ref="narayanaUserTransaction" /> </bean>These settings define the following persistence configuration:
-
JTA transaction manager (backed by Narayana JTA - for unit tests or servlet containers)
-
Entity manager factory for the
org.jbpm.persistence.spring.jtapersistence unit
-
-
Configure the business process resource:
Configuring the business process resource in thespring.xmlfile<bean id="process" factory-method="newClassPathResource" class="org.kie.internal.io.ResourceFactory"> <constructor-arg> <value>jbpm/processes/sample.bpmn</value> </constructor-arg> </bean>These settings define a single process that is to be available for execution. The name of the resource is
sample.bpmnand it must be available on the class path. You can use the class path as a simple way to include resources for trying out the jBPM engine. -
Configure the
RuntimeEnvironmentinstance with the entity manager, transaction manager, and resources:Configuring theRuntimeEnvironmentinstance in thespring.xmlfile<bean id="runtimeEnvironment" class="org.kie.spring.factorybeans.RuntimeEnvironmentFactoryBean"> <property name="type" value="DEFAULT"/> <property name="entityManagerFactory" ref="jbpmEMF"/> <property name="transactionManager" ref="jbpmTxManager"/> <property name="assets"> <map> <entry key-ref="process"><util:constant static-field="org.kie.api.io.ResourceType.BPMN2"/></entry> </map> </property> </bean>These settings define a default runtime environment for the runtime manager.
-
Create a
RuntimeManagerinstance based on the environment:<bean id="runtimeManager" class="org.kie.spring.factorybeans.RuntimeManagerFactoryBean" destroy-method="close"> <property name="identifier" value="spring-rm"/> <property name="runtimeEnvironment" ref="runtimeEnvironment"/> </bean>
After these steps you can use the runtime manager to execute processes in the Spring environment, using the EntityManagerFactory class and the JTA transaction manager.
You can find complete Spring configuration files for different strategies in the repository.
26.3.1.5. Additional configuration options for the runtime manager in the Spring framework
In addition to the configuration with the EntityManagerFactory class and the JTA transaction manager, as described in Configuring a sample runtime manager with a Spring application, you can use other configuration options for the runtime manager in the Spring framework:
-
JTA and the
SharedEntityManagerclass -
Local Persistence Unit and the
EntityManagerFactoryclass -
Local Persistence Unit and
SharedEntityManagerclass
If your application is configured with a Local Persistence Unit and uses the AuditService service to query jBPM engine history data, you must add the org.kie.api.runtime.EnvironmentName.USE_LOCAL_TRANSACTIONS environment entry to the RuntimeEnvironment instance configuration:
RuntimeEnvironment instance configuration for a Local Persistence Unit in the spring.xml file<bean id="runtimeEnvironment" class="org.kie.spring.factorybeans.RuntimeEnvironmentFactoryBean">
...
<property name="environmentEntries" ref="env" />
</bean>
...
<util:map id="env" key-type="java.lang.String" value-type="java.lang.Object">
<entry>
<key>
<util:constant
static-field="org.kie.api.runtime.EnvironmentName.USE_LOCAL_TRANSACTIONS" />
</key>
<value>true</value>
</entry>
</util:map>You can find more examples of configuration options in the repository: configuration files and test cases.
26.3.2. jBPM engine services with Spring
You might want to create a dynamic Spring application, where you can add and remove business assets such as process definitions, data model, rules, and forms without restarting the application.
In this case, use jBPM engine services. jBPM engine services are designed as framework-agnostic, and separate modules bring in the required framework-specific addons.
The jbpm-kie-services module contains the code logic of the services. A Spring application can consume these pure Java services.
The only code you must add to your Spring application to configure jBPM engine services is the implementation of the IdentityProvider interface. This implementation depends on your security configuration. The following example implementation uses Spring Security, though it might not cover all available security features for a Spring application.
IdentityProvider interface using Spring Securityimport java.util.ArrayList;
import java.util.Collections;
import java.util.List;
import org.kie.internal.identity.IdentityProvider;
import org.springframework.security.core.Authentication;
import org.springframework.security.core.GrantedAuthority;
import org.springframework.security.core.context.SecurityContextHolder;
public class SpringSecurityIdentityProvider implements IdentityProvider {
public String getName() {
Authentication auth = SecurityContextHolder.getContext().getAuthentication();
if (auth != null && auth.isAuthenticated()) {
return auth.getName();
}
return "system";
}
public List<String> getRoles() {
Authentication auth = SecurityContextHolder.getContext().getAuthentication();
if (auth != null && auth.isAuthenticated()) {
List<String> roles = new ArrayList<String>();
for (GrantedAuthority ga : auth.getAuthorities()) {
roles.add(ga.getAuthority());
}
return roles;
}
return Collections.emptyList();
}
public boolean hasRole(String role) {
return false;
}
}26.3.2.1. Configuring jBPM engine services with a Spring application
The following procedure is an example of complete configuration for jBPM engine services within a Spring application.
-
Configure transactons:
Configuring transactions in thespring.xmlfile<context:annotation-config /> <tx:annotation-driven /> <tx:jta-transaction-manager /> <bean id="transactionManager" class="org.springframework.transaction.jta.JtaTransactionManager" /> -
Configure JPA and persistence:
Configuring JPA and persistence in thespring.xmlfile<bean id="entityManagerFactory" class="org.springframework.orm.jpa.LocalContainerEntityManagerFactoryBean" depends-on="transactionManager"> <property name="persistenceXmlLocation" value="classpath:/META-INF/jbpm-persistence.xml" /> </bean> -
Configure security and user and group information providers:
Configuring security and user and group information providers in thespring.xmlfile<util:properties id="roleProperties" location="classpath:/roles.properties" /> <bean id="userGroupCallback" class="org.jbpm.services.task.identity.JBossUserGroupCallbackImpl"> <constructor-arg name="userGroups" ref="roleProperties"></constructor-arg> </bean> <bean id="identityProvider" class="org.jbpm.spring.SpringSecurityIdentityProvider"/> -
Configure the runtime manager factory. This factory is Spring context aware, so it can interact with the Spring container in correct way and support the necessary services, including the transactional command service and the task service:
Configuring the runtime manager factory in thespring.xmlfile<bean id="runtimeManagerFactory" class="org.kie.spring.manager.SpringRuntimeManagerFactoryImpl"> <property name="transactionManager" ref="transactionManager"/> <property name="userGroupCallback" ref="userGroupCallback"/> </bean> <bean id="transactionCmdService" class="org.jbpm.shared.services.impl.TransactionalCommandService"> <constructor-arg name="emf" ref="entityManagerFactory"></constructor-arg> </bean> <bean id="taskService" class="org.kie.spring.factorybeans.TaskServiceFactoryBean" destroy-method="close"> <property name="entityManagerFactory" ref="entityManagerFactory"/> <property name="transactionManager" ref="transactionManager"/> <property name="userGroupCallback" ref="userGroupCallback"/> <property name="listeners"> <list> <bean class="org.jbpm.services.task.audit.JPATaskLifeCycleEventListener"> <constructor-arg value="true"/> </bean> </list> </property> </bean> -
Configure jBPM engine services as Spring beans:
Configuring jBPM engine services as Spring beans in thespring.xmlfile<!-- Definition service --> <bean id="definitionService" class="org.jbpm.kie.services.impl.bpmn2.BPMN2DataServiceImpl"/> <!-- Runtime data service --> <bean id="runtimeDataService" class="org.jbpm.kie.services.impl.RuntimeDataServiceImpl"> <property name="commandService" ref="transactionCmdService"/> <property name="identityProvider" ref="identityProvider"/> <property name="taskService" ref="taskService"/> </bean> <!-- Deployment service --> <bean id="deploymentService" class="org.jbpm.kie.services.impl.KModuleDeploymentService" depends-on="entityManagerFactory" init-method="onInit"> <property name="bpmn2Service" ref="definitionService"/> <property name="emf" ref="entityManagerFactory"/> <property name="managerFactory" ref="runtimeManagerFactory"/> <property name="identityProvider" ref="identityProvider"/> <property name="runtimeDataService" ref="runtimeDataService"/> </bean> <!-- Process service --> <bean id="processService" class="org.jbpm.kie.services.impl.ProcessServiceImpl" depends-on="deploymentService"> <property name="dataService" ref="runtimeDataService"/> <property name="deploymentService" ref="deploymentService"/> </bean> <!-- User task service --> <bean id="userTaskService" class="org.jbpm.kie.services.impl.UserTaskServiceImpl" depends-on="deploymentService"> <property name="dataService" ref="runtimeDataService"/> <property name="deploymentService" ref="deploymentService"/> </bean> <!-- Register the runtime data service as a listener on the deployment service so it can receive notification about deployed and undeployed units --> <bean id="data" class="org.springframework.beans.factory.config.MethodInvokingFactoryBean" depends-on="deploymentService"> <property name="targetObject" ref="deploymentService"></property> <property name="targetMethod"><value>addListener</value></property> <property name="arguments"> <list> <ref bean="runtimeDataService"/> </list> </property> </bean>
Your Spring application can use jBPM engine services.
You can find a complete Spring web application with this configuration here.
26.4. Integration with EJB
provides a complete integration layer for Enterprise Java Beans (EJB). This layer supports both local and remote EJB interaction.
The following modules provide EJB services:
-
jbpm-services-ejb-api: The API module that extends thejbpm-services-apimodule with EJB-specific interfaces and objects -
jbpm-services-ejb-impl: An EJB extension for core services -
jbpm-services-ejb-timer: A jBPM engine Scheduler Service implementation based on the EJB Timer Service -
jbpm-services-ejb-client: An EJB remote client implementation for remote interaction, which supports Wildfly by default
The EJB layer is based on jBPM engine services. It provides almost the same capabilities as the core module, though some limitations exist if you use the remote interface.
The main limitation affects the deployment service, which, if it is used as a remote EJB service, supports only the following methods:
-
deploy() -
undeploy() -
activate() -
deactivate() -
isDeployed()
Other methods are excluded because they return instances of runtime objects, such as RuntimeManager, which can not be used over the remote interface.
All other services provide the same functionality over EJB as the versions included in the core module.
26.4.1. Implementations for EJB services
As an extension of jBPM engine core services, EJB services provide EJB-based execution semantic and are based on various EJB-specific features.
-
DeploymentServiceEJBImplis implemented as an EJB singleton with container-managed concurrency. Its lock type is set towrite. -
DefinitionServiceEJBImplis implemented as an EJB singleton with container-managed concurrency. Its overall lock type is set toreadand for thebuildProcessDefinition()method the lock type is set towrite. -
ProcessServiceEJBImplis implemented as a stateless session bean. -
RuntimeDataServiceEJBImplis implemented as an EJB singleton. For the majority of methods the lock type is set toread. For the following methods the lock type is set towrite:-
onDeploy() -
onUnDeploy() -
onActivate() -
onDeactivate()
-
-
UserTaskServiceEJBImplis implemented as a stateless session bean.
Transactions
The EJB container manages transactions in EJB services. For this reason, you do not need to set up any transaction manager or user transaction within your application code.
Identity provider
The default identity provider is based on the EJBContext interface and relies on caller principal information for both name and roles. The IdentityProvider interface provides two methods related to roles:
-
getRoles()returns an empty list, because theEJBContextinterface does not provide an option to fetch all roles for a particular user -
hasRole()delegates to theisCallerInRole()method of the context
To ensure that valid information is available to the EJB environment, you must follow standard JEE security practices to authenticate and authorize users. If no authentication or authorization is configured for EJB services, an anonymous user is always assumed.
If you use a different security model, you can use CDI-style injection for the IdentityProvider object for EJB services. In this case, create a valid CDI bean that implements the org.kie.internal.identity.IdentityProvider interface and make this bean available for injection with your application. This implementation will take precedence over the EJBContext-based identity provider.
Deployment synchronization
Deployment synchronization is enabled by default and attempts to synchronize any deployments every 3 seconds. It is implemented as an EJB singleton with container-managed concurrency. Its lock type is set to write. It uses the EJB timer service to schedule synchronization jobs.
EJB scheduler service
The jBPM engine uses the scheduler service to handle time-based activities such as timer events and deadlines. When running in an EJB environment, the jBPM engine uses a scheduler based on the EJB timer service. It registers this scheduler for all RuntimeManager instances.
You might need to use configuration specific to an application server to support cluster operation.
UserGroupCallback and UserInfo implementation selection
The required implementation of UserGroupCallback and UserInfo interfaces might differ for various applications. These interfaces can not be injected with EJB directly. You can use the following system properties to select existing implementations or use custom implementations of these interfaces for the jBPM engine:
-
org.jbpm.ht.callback: This property selects the implementation for theUserGroupCallbackinterface:-
mvel: The default implementation, typically used for testing. -
ldap: The LDAP-based implementation. This implementation requires additional configuration in thejbpm.usergroup.callback.propertiesfile. -
db: The database-based implementation. This implementation requires additional configuration in thejbpm.usergroup.callback.propertiesfile. -
jaas: An implementation that requests user information from the container. -
props: A simple property-based callback. This implementation requires an additional properties file that contains all users and groups. -
custom: A custom implementation. You must provide the fully-qualified class name of the implementation in theorg.jbpm.ht.custom.callbacksystem property.
-
-
org.jbpm.ht.userinfo: This property selects the implementation for theUserInfointerface:-
ldap: The LDAP-based implementation. This implementation requires additional configuration in thejbpm-user.info.propertiesfile. -
db: The database-based implementation. This implementation requires additional configuration in thejbpm-user.info.propertiesfile. -
props: A simple property-based implementation. This implementation requires an additional properties file that contains all user information. -
custom: A custom implementation. You must provide the fully-qualified class name of the implementation in theorg.jbpm.ht.custom.userinfosystem property.
-
Typically, set the system properties in the startup configuration of the application server or JVM. You can also set the properties in the code before using the services. For example, you can provide a custom @Startup bean that configures these system properties.
You can find an example application that utilizes EJB services here.
26.4.2. Local EJB interfaces
The following local EJB service interfaces extend core services:
-
org.jbpm.services.ejb.api.DefinitionServiceEJBLocal -
org.jbpm.services.ejb.api.DeploymentServiceEJBLocal -
org.jbpm.services.ejb.api.ProcessServiceEJBLocal -
org.jbpm.services.ejb.api.RuntimeDataServiceEJBLocal -
org.jbpm.services.ejb.api.UserTaskServiceEJBLocal
You must use these interfaces as injection points and annotate them with @EJB:
@EJB
private DefinitionServiceEJBLocal bpmn2Service;
@EJB
private DeploymentServiceEJBLocal deploymentService;
@EJB
private ProcessServiceEJBLocal processService;
@EJB
private RuntimeDataServiceEJBLocal runtimeDataService;After injecting these interfaces, invoke operations on them in the same way as on core modules. No restrictions exist for using local interfaces.
26.4.3. Remote EJB interfaces
The following dedicated remote EJB interfaces extend core services:
-
org.jbpm.services.ejb.api.DefinitionServiceEJBRemote -
org.jbpm.services.ejb.api.DeploymentServiceEJBRemote -
org.jbpm.services.ejb.api.ProcessServiceEJBRemote -
org.jbpm.services.ejb.api.RuntimeDataServiceEJBRemote -
org.jbpm.services.ejb.api.UserTaskServiceEJBRemote
You can use these interfaces in the same way as local interfaces, with the exception of handling custom types.
You can define custom types in two ways. Globally defined types are available on application classpath and included in the enterprise application. If you define a type locally to the deployment unit, the type is declared in a project dependency (for example, in a KJAR file) and is resolved at deployment time.
Globally-available types do not require any special handling. The EJB container automatically marshalls the data when handling remote requests. However, local custom types are not visible to the EJB container by default.
The jBPM engine EJB services provide a mechanism to work with custom types. They provide the following two additional types:
-
org.jbpm.services.ejb.remote.api.RemoteObject: A serializable wrapper class for single-value parameters -
org.jbpm.services.ejb.remote.api.RemoteMap: A dedicatedjava.util.Mapimplementation to simplify remote invocation of service methods that accept custom object input. The internal implementation of the map holds content that is already serialized, in order to avoid additional serialization at sending time.This implementation does not include some of the methods of
java.util.Mapthat are usually not used when sending data.
These special objects perform eager serialization to bytes using an ObjectInputStream object. They remove the need for serialization of data in the EJB client/container. Because no serialization is needed, it is not necessary to share the custom data model with the EJB container.
The following example code works with local types and remote EJB services:
// Start a process with custom types via remote EJB
Map<String, Object> parameters = new RemoteMap();
Person person = new org.jbpm.test.Person("john", 25, true);
parameters.put("person", person);
Long processInstanceId = processService.startProcess(deploymentUnit.getIdentifier(), "custom-data-project.work-on-custom-data", parameters);
// Fetch task data and complete a task with custom types via remote EJB
Map<String, Object> data = userTaskService.getTaskInputContentByTaskId(taskId);
Person fromTaskPerson = data.get("_person");
fromTaskPerson.setName("John Doe");
RemoteMap outcome = new RemoteMap();
outcome.put("person_", fromTaskPerson);
userTaskService.complete(taskId, "john", outcome);In a similar way, you can use the RemoteObject class to send an event to a process instance:
// Send an event with a custom type via remote EJB
Person person = new org.jbpm.test.Person("john", 25, true);
RemoteObject myObject = new RemoteObject(person);
processService.signalProcessInstance(processInstanceId, "MySignal", myObject);26.4.4. Remote EJB client
Remote client support is provided by implementation of the ClientServiceFactory interface that is a facade for application server specific code:
ClientServiceFactory interface/**
* Generic service factory used for remote lookups that are usually container specific.
*
*/
public interface ClientServiceFactory {
/**
* Returns unique name of given factory implementation
* @return
*/
String getName();
/**
* Returns remote view of given service interface from selected application
* @param application application identifier on the container
* @param serviceInterface remote service interface to be found
* @return
* @throws NamingException
*/
<T> T getService(String application, Class<T> serviceInterface) throws NamingException;
}You can dynamically register implementations using the ServiceLoader mechanism. By default, only one implementation is available in Wildfly.
Each ClientServiceFactory implementation must provide a name. This name is used to register it within the client registry. You can look up implementations by name.
The following code gets the default Wildfly remote client:
// Retrieve a valid client service factory
ClientServiceFactory factory = ServiceFactoryProvider.getProvider("JBoss");
// Set the application variable to the module name
String application = "sample-war-ejb-app";
// Retrieve the required service from the factory
DeploymentServiceEJBRemote deploymentService = factory.getService(application, DeploymentServiceEJBRemote.class);After retrieving a service you can use its methods.
When working with Wildfly and the remote client you can add the following Maven dependency to bring in all EJB client libraries:
<dependency>
<groupId>org.jboss.as</groupId>
<artifactId>jboss-as-ejb-client-bom</artifactId>
<version>7.3.0.Final</version> <!-- use the valid version for the server you run on -->
<optional>true</optional>
<type>pom</type>
</dependency>26.5. Integration with OSGi
All core jBPM engine JAR files and core dependencies are OSGi-enabled. The following additional jBPM engine JAR files are also OSGI-enabled:
-
jbpm-flow
-
jbpm-flow-builder
-
jbpm-bpmn2
OSGi-enabled JAR files contain MANIFEST.MF files in the META-INF directory. These files contain data such as the required dependencies. You can add such JAR files to an OSGi environment.
For additional information about the OSGi infrastructure, see the OSGi documentation.
|
Support for integration with the OSGi framework is deprecated. It does not receive any new enhancements or features and will be removed in a future release. |
27. Integration with Apache Kafka
27.1. Kafka messages in a business process
Apache Kafka is a streaming platform. It acts as a message broker, passing messages, which are sorted into topics, between applications in a software environment.
Using jBPM, you can create business processes that send and receive Kafka messages in the following ways:
-
Create a start event, intermediate catch event, or boundary event (attached to a human task) of the type
message. The KIE Server automatically subscribes to the Kafka topic that is defined in the message. A message triggers the event. The event node acts as the consumer of the message and can pass the content of the message to the subsequent node in the process. -
Create an end event or intermediate throw event of the type
message. When the process triggers the event, the KIE Server sends a Kafka message in the topic that is defined in the message. The message contains the data that is configured in the event. The event node acts as the producer of the message. -
Add the
KafkaPublishMessagescustom task to the process. This task does not require the KIE Server Kafka capability but can be more complicated to configure than message events. -
Configure your service and the KIE Server to emit Kafka messages about every completed process, case, and task when transactions are committed.
27.2. Creating an event that receives Kafka messages
When designing your business process in Business Central, you can create an event that receives Kafka messages.
This event is triggered each time a message arrives in the configured topic. The message is expected to contain data that matches a predefined data object. The jBPM engine parses the message and provides it as an output of the event.
-
Open the project that contains your business process in Business Central.
-
Create a data object defining the data that the message will contain. For instructions about creating data objects, see Processes.
-
Select the business process and open the business process designer.
-
Add a start event, an intermediate catch event, or a boundary event (attached to a human task) of the type
message. -
Open the properties of the event.
-
In the Message field, select New and then enter the name of the message. This name must be the same as the name of the topic from which the event is to receive Kafka messages, or else must be defined in an
org.kie.server.jbpm-kafka.ext.topics.broker-topic-namesystem property of the KIE Server.For instructions about using
org.kie.server.jbpm-kafka.ext.topics.*system properties to define topic names, see Configuring a KIE Server to send and receive Kafka messages from the process. -
Add an output data item. Select the data object that you created as its type.
-
Save the business process.
To enable Apache Kafka integration when running the process, you must configure the KIE Server according to instructions in Configuring a KIE Server to send and receive Kafka messages from the process.
27.3. Creating an event that sends Kafka messages
When designing your business process in Business Central, you can create an event that sends Kafka messages.
The event can have a data object as an input data item. The jBPM engine sends the content of a data object as a message in the configured topic.
-
Open the project that contains your business process in Business Central.
-
Add the work item handler that is required for message-sending events:
-
Select the Settings → Deployments → Work Item Handlers tab.
-
Click Add Work Item Handler.
-
Enter the following values in the new empty line:
-
Name:
Send Task -
Value :
new org.jbpm.bpmn2.handler.SendTaskHandler() -
Resolver type:
MVEL
-
-
-
Create a data object defining the data that the message must contain. For instructions about creating data objects, see Processes.
-
Select the business process and open the business process designer.
-
Add an intermediate throw event or an end event of the type
message. -
Open the properties of the event.
-
In the Message field, select New and then enter the name of the message. This name must be the same as the name of the topic to which the event is to send Kafka messages, or else must be defined in an
org.kie.server.jbpm-kafka.ext.topics.broker-topic-namesystem property of the KIE Server.For instructions about using
org.kie.server.jbpm-kafka.ext.topics.*system properties to define topic names, see Configuring a KIE Server to send and receive Kafka messages from the process. -
Add an input data item. Select the data object that you created as its type.
-
Save the business process.
To enable Apache Kafka integration when running the process, you must configure the KIE Server according to instructions in Configuring a KIE Server to send and receive Kafka messages from the process.
27.4. Adding a custom task that sends Kafka messages
You can add a KafkaPublishMessages custom task to your process. This task sends Kafka messages. It does not use the KIE Server Kafka capability, so you can use this task in processes that do not run on a KIE Server. However, this task can be more complicated to configure than other Apache Kafka integration options.
-
In the Business Central administrative settings menu, as the administrative user, select Custom Tasks Administration.
-
Ensure that KafkaPublishMessages is set to On.
-
In Business Central, select Menu → Design → Projects and then click the space name and the project name.
-
Select the Settings → Custom Tasks tab.
-
In the KafkaPublishMessages line, click Install.
-
Optional: Enter the following information. If you leave any of the fields empty, the jBPM engine uses the default values for these fields.
-
Bootstrap Servers: The host and port of the Kafka broker. You can use a comma-separated list of multiple host:port pairs. The default value is
localhost:9092. -
Client ID: An identifier string to pass to the broker when making requests. Apache Kafka uses this string for logging. The default value is
-
Key Serializer class: The class that provides the key serializer. The default value is
org.apache.kafka.common.serialization.StringSerializer. You can enter a different value if you want to use your own custom serializer class. -
Value Serializer class: The class that provides the value serializer. The default value is
org.apache.kafka.common.serialization.StringSerializer. You can enter a different value if you want to use your own custom serializer class.In any of these fields, you can enter an
env[property]value. In this case, the jBPM engine reads the setting from a system property at runtime. For example, you can set Client ID toenv[application.client.id]and then, before running the process service, set the client ID value in theapplication.client.idsystem property.
-
-
If you entered the name of a custom serializer class, complete the following additional configuration:
-
Select the Settings → Deployments → Work Item Handlers tab.
-
In the
KafkaPublishMessagesline, modify theValuefield to add theclassLoaderparameter. For example, the initial value of this field can be the following string:new org.jbpm.process.workitem.kafka.KafkaWorkItemHandler("127.0.0.1:9092", "jbpm", "com.myspace.test.MyCustomSerializer", "com.myspace.test.MyCustomSerializer")In this example, change the value to the following string:
new org.jbpm.process.workitem.kafka.KafkaWorkItemHandler("127.0.0.1:9092", "jbpm", "com.myspace.test.MyCustomSerializer", "com.myspace.test.MyCustomSerializer", classLoader)
-
-
Select the Assets tab.
-
Select the business process and open the business process designer.
-
Add the
KafkaPublishMessagescustom task, available under Custom Tasks in the BPMN modeler palette. -
In the properties of the custom task, open the data assignments.
-
Assign the Key, Topic, and Value inputs to define the message.
If you entered a custom serializer class, you must provide this class to your business application. For instructions about providing custom classes to your business application, see Providing a custom class to your business application in Business Central.
27.5. Configuring a KIE Server to send and receive Kafka messages from the process
To run a process that sends or receives Kafka messages (except when using the custom task), you must use a KIE Server. You must configure this KIE Server to integrate with Apache Kafka.
-
To enable integration with Apache Kafka, set the following system properties according to your environment:
-
If you are using the KIE Server on Wildfly, set the
org.kie.kafka.server.ext.disabledsystem property of the KIE Server tofalse. -
If you are using Spring Boot, set the
kieserver.kafka.enabledsystem property totrue.
-
-
To configure the connection to the Kafka broker, set the
org.kie.server.jbpm-kafka.ext.bootstrap.serverssystem property to the host and port of the broker. The default value islocalhost:9092. You can use a comma-separated list of multiple host:port pairs. -
Optional: Set any of the following system properties to configure sending and receiving Kafka messages:
-
org.kie.server.jbpm-kafka.ext.client.id: An identifier string to pass to the broker when making requests. Apache Kafka uses this string for logging. -
org.kie.server.jbpm-kafka.ext.topics.*: Mapping of message names to topic names. For example, if you want to send or receive a message in theExampleTopictopic whenExampleNameis the name of the message, set theorg.kie.server.jbpm-kafka.ext.topics.ExampleNamesystem property toExampleTopic. You can set any number of such system properties. If a message name is not mapped using a system property, the jBPM engine uses this name as the topic name.
-
-
Optional: Set any of the following system properties to configure receiving Kafka messages:
-
org.kie.server.jbpm-kafka.ext.allow.auto.create.topics: Allow automatic topic creation. Enabled by default. -
org.kie.server.jbpm-kafka.ext.group.id: A unique string that identifies the group to which this Kafka message consumer belongs. The default value isjbpm-consumer.
-
-
Optional: Set any of the following system properties to configure sending Kafka messages:
-
org.kie.server.jbpm-kafka.ext.acks: The number of acknowledgements that the Kafka leader must receive before marking the request as complete. The default value is1, which means the leader writes the record to its local log and then responds to the jBPM engine, without waiting for full acknowledgement from all followers. -
org.kie.server.jbpm-kafka.ext.max.block.ms: The number of milliseconds for which the publish method blocks. After this time, the jBPM engine can resume execution of the business process. The default value is2000(2 seconds).
-
27.5.1. Configuring the use a custom message format
By default, when using message events, the jBPM engine sends and receives messages in a format compliant with the CloudEvents specification version 1.0.
Optionally, you can configure the use of a raw JSON data format or a custom format for the messages. If you want to use a custom format, you need to implement and provide classes.
-
Your project uses message events to send or receive messages.
-
If you want to use a custom format for sending or receiving messages, implement and provide custom classes:
-
Develop the source code for the classes:
-
To send messages, develop a class that implements the
KafkaEventWriterinterface -
To receive messages, develop a class that implements the
KafkaEventReaderinterfaceYou can download the interface definitons from the https://github.com/kiegroup/droolsjbpm-integration/tree/7.52.0.Final/kie-server-parent/kie-server-services/kie-server-services-kafka/src/main/java/org/kie/server/services/jbpm/kafka
-
-
Provide the classes to your business application. For instructions, see Providing a custom class to your business application in Business Central.
-
-
Set the following KIE Server system properties to set the custom writer or reader:
-
org.kie.server.jbpm-kafka.ext.eventWriterClass: the custom event writer class. Set this property to use a different format to send messages. If you want to use a custom format, set the property to the fully qualified name of your custom event writer class. If you want to use a raw JSON data format, set the property toorg.kie.server.services.jbpm.kafka.RawJsonEventWriter. -
org.kie.server.jbpm-kafka.ext.eventReaderClass: the custom event reader class. Set this property to use a different format to receive messages. If you want to use a custom format, set the property to the fully qualified name of your custom event reader class. If you want to use a raw JSON data format, set the property toorg.kie.server.services.jbpm.kafka.RawJsonEventReader.
-
27.6. Configuring a service and the KIE Server to emit Kafka messages when a transaction is committed
You can configure the KIE Server to emit Kafka messages about every event when a process, case, or task is completed. The KIE Server sends the messages when it commits transactions.
You can use this functionality with any business process or case. You do not need to change anything in the process design.
This configuration is also available if you run your process service using SpringBoot.
By default, the KIE Server publishes the messages in the following topics:
-
jbpm-processes-eventsfor messages about completed processes -
jbpm-tasks-eventsfor messages about completed tasks -
jbpm-cases-eventsfor messages about completed cases
You can configure the topic names.
The published messages comply with the CloudEvents specification version 1.0. Each message contains the following fields:
-
id: The unique identifier of the event -
type: The type of the event (process, task, or case) -
source: The event source as a URI -
time: The timestamp of the event, by default in the RFC3339 format -
data: Information about the process, case, or task, presented in a JSON format
-
To enable emitting Kafka messages, complete one of the following steps:
-
If you deployed the KIE Server on Wildfly or another application server:
-
Retrieve the
org.jbpm.jbpm-event-emitters-kafkaJAR file version7.52.0.Finalfrom the public Maven repository. -
Copy the file into the
deployments/kie-server.war/WEB-INF/libsubdirectory of the application server.
-
-
If you deployed the application using SpringBoot, add the following lines to the
<dependencies>list in thepom.xmlfile of your service:<dependency> <groupId>org.jbpm</groupId> <artifactId>jbpm-event-emitters-kafka</artifactId> <version>${version.org.kie}</version> </dependency>
-
-
Configure any of the following system properties for the KIE Server as necessary:
-
org.kie.jbpm.event.emitters.kafka.bootstrap.servers: The host and port of the Kafka broker. The default value islocalhost:9092. You can use a comma-separated list of multiple host:port pairs. -
org.kie.jbpm.event.emitters.kafka.date_format: The timestamp format for thetimefield of the messages. The default value isyyyy-MM-dd’T’HH:mm:ss.SSSZ. -
org.kie.jbpm.event.emitters.kafka.topic.processes: The topic name for process event messages. The default value isjbpm-processes-events. -
org.kie.jbpm.event.emitters.kafka.topic.cases: The topic name for process event messages. The default value isjbpm-cases-events. -
org.kie.jbpm.event.emitters.kafka.topic.tasks: The topic name for process event messages. The default value isjbpm-processes-tasks. -
org.kie.jbpm.event.emitters.kafka.client.id: An identifier string to pass to the server when making requests. The server uses this string for logging.
-
27.7. Providing a custom class to your business application in Business Central
To interact with Apache Kafka, your business application requires a custom class in the following cases:
-
You want to use a custom message format for sending or receiving messages using message events.
-
You want to use a custom serializer class for the
KafkaPublishMessagescustom task.
To use a custom class in your business application, use Business Central to upload the source code and configure the class.
Alternatively, if you deploy your application on SpringBoot, you can compile the classes separately and include them in the class path. In this case, do not complete this procedure.
-
Prepare Java source files with the required custom classes, for example,
MyCustomSerializer. Use the package name for your space and project, for example,com.myspace.test. -
In Business Central, enter your project and select the Settings → Dependencies tab.
-
Add any dependencies that your custom classes require, for example,
org.apache.kafka.kafka-clients. -
Select the Assets tab.
-
For each of the class source files, complete the following steps:
-
Click Import Asset.
-
In the Please select a file to upload field, select the location of the Java source file for the custom serializer class.
-
Click Ok to upload the file.
-
28. Integration with ElasticSearch using the KIE Server
28.1. Configuring the KIE Server to send information to ElasticSearch when a transaction is committed
You can configure the KIE Server to send information to ElasticSearch about every event when a process, case, or task is modified. The KIE Server sends the information when it commits transactions.
You can use this functionality with any business process or case. You do not need to change anything in the process design.
This configuration is also available if you run your process service using Spring Boot.
The KIE Server serializes the process, case, and task information as JSON documents.
-
You created a business process or a case.
-
To enable sending information to ElasticSearch, complete one of the following steps:
-
If you deployed the KIE Server on Wildfly or another application server:
-
Retrieve the
org.jbpm.jbpm-event-emitters-elasticsearchJAR file version7.52.0.Finalfrom the public Maven repository. -
Copy the file into the
deployments/kie-server.war/WEB-INF/libsubdirectory of the application server.
-
-
If you deployed the application using Spring Boot, add the following lines to the
<dependencies>list in thepom.xmlfile of your service:<dependency> <groupId>org.jbpm</groupId> <artifactId>jbpm-event-emitters-elasticsearch</artifactId> <version>${version.org.kie}</version> </dependency>
-
-
Configure any of the following system properties for the KIE Server as necessary:
-
org.jbpm.event.emitters.elasticsearch.url: The URL of the ElasticSearch server. The default value ishttp://localhost:9200. -
org.jbpm.event.emitters.elasticsearch.index: The ElasticSearch index to use for the information. -
org.jbpm.event.emitters.elasticsearch.date_format: The timestamp format for the information. The default value isyyyy-MM-dd’T’HH:mm:ss.SSSZ. -
org.jbpm.event.emitters.elasticsearch.user: The user name for authenticating to the ElasticSearch server. -
org.jbpm.event.emitters.elasticsearch.password: The password for authenticating the user to the ElasticSearch server.
-
Advanced Topics
Some more advanced topics
29. Domain Specific Processes
29.1. Introduction
jBPM provides the ability to create and use domain-specific task nodes in your business processes. This simplifies development when you’re creating business processes that contain tasks dealing with other technical systems.
When using jBPM, we call these domain-specific task nodes "custom work items" or (custom) "service nodes". There are two separate aspects to creating and using custom work items:
-
Adding a node with a custom work item to a process definition using the Eclipse editor or jBPM designer.
-
Creating a custom work item handler that the jBPM engine will use when executing the custom work item in a running process.
With regards to a BPMN2 process, custom work items are certain types of <task> nodes.
In most cases, custom work items are <task> nodes in a BPMN2 process definition, although they can also be used with certain other task type nodes such as, among others, <serviceTask> or <sendTask> nodes.
|
When creating custom work items, it’s important to separate the data associated with the work item, from how the work item should be handled. In other words, separate the what from the how. That means that custom work items should be:
On the other hand, custom work item handlers, which are Java classes, should be:
Work item handlers should almost never contain any data. |
Users can thus easily define their own set of domain-specific service nodes and integrate them with the process language. For example, the next figure shows an example of a healthcare-related BPMN2 process. The process includes domain-specific service nodes for measuring blood pressure, prescribing medication, notifying care providers and following-up on the patient.
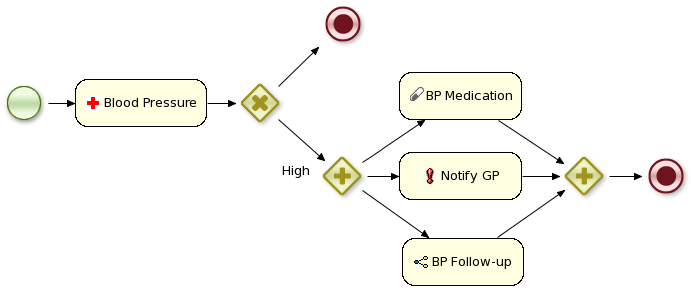
29.2. Overview
Before moving on to an example, this section explains what custom work items and custom work item handlers are.
29.2.1. Work Item Definitions
In short, we use the term custom work item when we’re describing a node in your process that represents a domain-specific task and as such, contains extra properties and is handled by a WorkItemHandler implementation.
Because it’s a domain-specific task, that means that a custom
work item is equivalent to a <task> or <task>-type node in BPMN2.
However, a WorkItem is also Java class instance that’s used when a WorkItemHandler instance is called to complete the task or work item.
Depending on the BPMN2 editor you’re using, you can create a custom work item definition in one of two ways:
-
If you’re using Designer, then this means creating a MVEL based definition and adding the definition in Designer itself. Once this is done, a new service node will appear on the BPMN 2.0 palette. For more information, see Designer.
-
If you’re using the Eclipse BPMN 2.0 modeler plugin (which can be found here), then you’ll can modify the BPMN2
<task>or<task>-type element to work withWorkItemHandlerimplementations. For more information, see the Eclipse BPMN 2.0 Modeler chapter.
29.2.2. Work Item Handlers
A work item handler is a Java class used to execute (or abort) work items.
That also means that the class implements the org.kie.runtime.instance.WorkItemHandler interface.
While jBPM provides some custom WorkItemHandler instances (listed below), a Java developer with a minimal knowledge of jBPM can easily create a new work item handler class with its own custom business logic.
Among others, jBPM offers the following WorkItemHandler implementations:
-
In the jbpm-bpmn2 module,
org.jbpm.bpmn2.handlerpackage:-
ReceiveTaskHandler (for use with BPMN element
<receiveTask>) -
SendTaskHandler (for use with BPMN element
<sendTask>) -
ServiceTaskHandler (for use with BPMN element
<serviceTask>)
-
-
In the jbpm-workitems module, in various packages under the
org.jbpm.process.workitempackage:-
ArchiveWorkItemHandler There are many more
WorkItemHandlerimplementations present in the jbpm-workitems module. If you’re looking for specific integration logic with Twitter, for example, we recommend you take a look at the classes made available there.
-
In general, a WorkItemHandler's .executeWorkItem(…) and .abortWorkItem(…) methods will do the following:
-
Extract information about the task being executed (or aborted) from the
WorkIteminstance -
Execute the necessary business logic. This might be mean interacting with a web service, database, or other technical component.
-
Inform the jBPM engine that the work item has been completed (or aborted) by calling one of the following two methods on the
WorkItemManagerinstance passed to the method:
WorkItemManager.completeWorkItem(long workItemId, Map<String, Object> results)
WorkItemManager.abortWorkItem(long workItemId)In order to make sure that your custom work item handler is used for a particular process instance, it’s necessary to register the work item handler before starting the process.
This makes the jBPM engine aware of your WorkItemHandler so that the jBPM engine can use it for the proper node.
For example:
ksession.getWorkItemManager().registerWorkItemHandler("Notification",
new NotificationWorkItemHandler());The ksession variable above is a StatefulKnowledgeSession (and also a KieSession) instance.
The example code above comes from the example that we will go through in the next session.
Work item handler life cycle management
Work item handler is registered on kie session and then can be used whenever jBPM engine encounters a node that should be handled by that handler. Depending on the implementation of the handler (e.g. some handler might keep state or depend on some resources such as database connection) there might be a need to maintain life cycle of the handler. To ease the way of doing that jBPM comes with two additional interfaces that handler might implement:
-
org.kie.internal.runtime.Closeable - allows auto close of the handler whenever owner (work item handler manager) of it is closed or disposed. This is useful in case a handler can be quickly and frequently recreated so the jBPM engine will have it for the execution and when disposed it will dispose as well all handlers of Closeable type.
-
org.kie.internal.runtime.Cacheable - allows handlers to be cached and reused to avoid recreation of the objects. There might be several reasons of doing so - expensive bootstrap of the handler, dependency on external resources - socket connections, db connections, web service client. While this brings powerful feature to the work item handler management it does put additional requirement on the implementation - needs to deal with exceptions internally and recover from any failures. In case recovery cannot be performed it needs to remove itself from the cache.
Closeable interface is handled for all use cases, while Cacheable is available only when RuntimeManager is used. RuntimeManager provides caching capabilities via its CacheManager (available via InternalRuntimeManager in case self removal is required).
|
You can use different work item handlers for the same process depending on the system on which it runs: by registering different work item handlers on different systems, you can customize how a custom work item is processed on a particular system.
You can also substitute mock |
29.3. Example: Notifications
Let us start by showing you how to include a simple work item for sending notifications. A work item is defined by a unique name and includes additional parameters that describe the work in more detail. Work items can also return information after they have been executed, specified as results.
Our notification work item could be defined using a work definition with four parameters and no results. For example:
-
Name: "Notification"
-
Parameters:
-
From [String type]
-
To [String type]
-
Message [String type]
-
Priority [String type]
-
29.3.1. The Notification Work Item Definition
29.3.1.1. Creating the work item definition
In this example, let us create an MVEL work item definition that defines a "Notification" work item. Using MVEL is the default way to configure work items. This file is placed in the project classpath in a directory called META-INF. Note that, imports to the default jBPM data types (in the org.jbpm.process.core.datatype.impl.type package) are added by default and do not need to be explicitly defined. If you are using any custom defined data type, an import statement for it (using the java standard) is necessary to be added before any work item definitions begin.
The work item configuration file for this example, MyWorkDefinitions.wid, will look like this:
[
// the Notification work item
[
"name" : "Notification",
"parameters" : [
"Message" : new StringDataType(),
"From" : new StringDataType(),
"To" : new StringDataType(),
"Priority" : new StringDataType(),
],
"displayName" : "Notification",
"icon" : "icons/notification.gif"
]
]The project directory structure could then look something like this:
project/src/main/resources/META-INF/MyWorkDefinitions.widWe also want to add a specific icon to be used in the process editor with the work item. To add this, you will need .gif or .png images with a pixel size of 16x16. We put them in a directory outside of the META-INF directory, for example, here:
project/src/main/resources/icons/notification.gif29.3.1.2. Registering the work definition
The jBPM Eclipse editor uses the configuration mechanisms supplied by Drools to register work item definition files.
That means adding a drools.workDefinitions property to the drools.rulebase.conf file in the META-INF.
The drools.workDefinitions property represents a list of files containing work item definitions, separated using spaces.
If you want to exclude all other work item definitions and only use your definition, you could use the following:
drools.workDefinitions = MyWorkDefinitions.widHowever, if you only want to add the newly created node definition to the existing palette nodes, you can define the drools.workDefinitions property as follows:
drools.workDefinitions = MyWorkDefinitions.wid WorkDefinitions.confWe recommended that you use the extension +.+wid for your own definitions of domain specific nodes.
The +.+conf extension used with the default definition file, WorkDefinitions.conf, for backward compatibility reasons.
29.3.1.3. Using your new work item in your processes
We’ve created our work item definition and configured it, so now we can start using it in our processes. The process editor contains a separate section in the palette where the different service nodes that have been defined for the project appear.
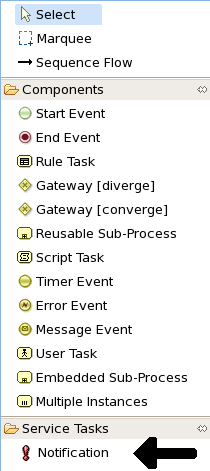
Using drag and drop, a notification node can be created inside your process. The properties can be filled in using the properties view.
Besides any custom properties, the following three properties are available for all work items:
-
Parameter Mapping: Allows you to map the value of a variable in the process to a parameter of the work item. This allows you to customize the work item based on the current state of the actual process instance (for example, the priority of the notification could be dependent on some process-specific information). -
Result Mapping: Allows you to map a result (returned once a work item has been executed) to a variable of the process. This allows you to use results in the remainder of the process. -
Wait for completion: By default, the process waits until the requested work item has been completed before continuing with the process. It is also possible to continue immediately after the work item has been requested (and not waiting for the results) by settingwait for completionto false. h
Here is an example that creates a domain specific node to execute Java, asking for the class and method parameters. It includes a custom java.gif icon and consists of the following files and resulting screenshot:
[
// the Java Node work item located in:
// project/src/main/resources/META-INF/JavaNodeDefinition.wid
[
"name" : "JavaNode",
"parameters" : [
"class" : new StringDataType(),
"method" : new StringDataType(),
],
"displayName" : "Java Node",
"icon" : "icons/java.gif"
]
]// located in: project/src/main/resources/META-INF/drools.rulebase.conf
drools.workDefinitions = JavaNodeDefinition.wid WorkDefinitions.conf
// icon for java.gif located in:
// project/src/main/resources/icons/java.gif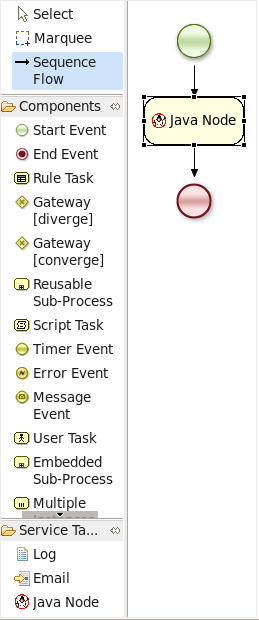
29.3.2. The NotificationWorkItemHandler
29.3.2.1. Creating a new work item handler
Once we’ve created our Notification work item definition (see the sections above), we can then create a custom implementation of a work item handler that will contain the logic to send the notification.
In order to execute our Notification work items, we first create a NotificationWorkItemHandler that implements the WorkItemHandler interface:
package com.sample;
import org.kie.api.runtime.process.WorkItem;
import org.kie.api.runtime.process.WorkItemHandler;
import org.kie.api.runtime.process.WorkItemManager;
public class NotificationWorkItemHandler implements WorkItemHandler {
public void executeWorkItem(WorkItem workItem, WorkItemManager manager) {
// extract parameters
String from = (String) workItem.getParameter("From");
String to = (String) workItem.getParameter("To");
String message = (String) workItem.getParameter("Message");
String priority = (String) workItem.getParameter("Priority");
// send email (1)
EmailService service = ServiceRegistry.getInstance().getEmailService();
service.sendEmail(from, to, "Notification", message);
// notify manager that work item has been completed
manager.completeWorkItem(workItem.getId(), null); (2)
}
public void abortWorkItem(WorkItem workItem, WorkItemManager manager) {
// Do nothing, notifications cannot be aborted
}
}| 1 | The ServiceRegistry class is simply a made-up class that we’re using for this example. In your own WorkItemHandler implementations, the code containing your domain-specific logic would go here. |
| 2 | Notifying the WorkItemManager instance when your work item has been completed is crucial. For many synchronous actions, like sending an email in this case, the WorkItemHandler implementation will notify the WorkItemManager in the executeWorkItem(…) method. |
This WorkItemHandler sends a notification as an email and then notifies the WorkItemManager that the work item has been completed.
Note that not all work items can be completed directly. In cases where executing a work item takes some time, execution can continue asynchronously and the work item manager can be notified later.
In these situations, it might also be possible that a work item is _aborted_before it has been completed.
The WorkItemHandler.abortWorkItem(…) method can be used to specify how to abort such work items.
|
Remember, if the |
29.3.2.2. Registering the work item handler
WorkItemHandler instances need to be registered with the WorkItemManager in order to be used.
In this case, we need to register an instance of our NotificationWorkItemHandler in order to use it with our process containing a Notification work item.
We can do that like this:
StatefulKnowledgeSession ksession = kbase.newStatefulKnowledgeSession();
ksession.getWorkItemManager().registerWorkItemHandler(
"Notification", (1)
new NotificationWorkItemHandler() (2)
);| 1 | This is the drools name of the <task> (or other task type) node. See below for an example. |
| 2 | This is the instance of our custom work item handler instance! |
If we were to look at the BPMN2 syntax for our process with the Notification process, we would see something like the following example.
Note the use of the tns:taskName attribute in the <task> node.
This is necessary for the WorkItemManager to be able to see which WorkItemHandler instance should be used with which task or work item.
<?xml version="1.0" encoding="UTF-8"?>
<definitions id="Definition"
xmlns="http://www.omg.org/spec/BPMN/20100524/MODEL"
xs:schemaLocation="http://www.omg.org/spec/BPMN/20100524/MODEL BPMN20.xsd"
...
xmlns:tns="http://www.jboss.org/drools">
...
<process isExecutable="true" id="myCustomProcess" name="Domain-Specific Process" >
...
<task id="_5" name="Notification Task" tns:taskName="Notification" >
...|
Different work item handlers could be used depending on the context. For example, during testing or simulation, it might not be necessary to actually execute the work items. In this case specialized dummy work item handlers could be used during testing. |
29.4. Service Repository
A service repository allows easy discovery and use of existing services, as well as contributing new services to the jBPM community. It should allow public access via URL as well as allow users to locally build and update it as they see fit. The content of the service repository are domain-specific services that provide integration of your processes with different types of systems. Their implementation should work out-of-the-box or with minimal configuration to the users. Users can benefit from the service repository by having pre-tested and ready to use integration points which they do not have to implement themselves.
29.4.1. Public jBPM service repository
jBPM provides a public service repository which contains contributed reusable services:
This repository is dynamically generated from the jBPM Workitems GitHub module. It includes a user-friendly "Home Page" where you can view details about all services provided as well as download links to specific service definitions and implementation (jar). jBPM tooling as for example the jBPM Designer can be used to discover this service repository and easily install these services into Business Central for you to start using them inside business processes.


To start implementing and contributing your own service integration points please take a look at jBPM Workitems Archetype module which can get you up and running with a Maven project quickly. Otherwise feel free to contact someone from the dev team and we will be happy to help you get started.
29.4.2. Building and extending the jBPM Service Repository
You can build and extend the jBPM service repository locally. For this simply build the jBPM work items module in GitHub. The look/feel of the repository can be changed by updating the repository index file. jBPM tooling can discover your repository even if it’s not available on a public URL.
29.4.3. Using repository workitems in your processes
Within Business Central you can use jBPM Designer editor to easily start importing your services into existing processes. Inside Designer open up the workitem repository editor and type in the repository URL to connect to, for example
or if you build your repository locally it could look something like
The repository import feature then will scan the workitem repository and list its content for you to start importing:
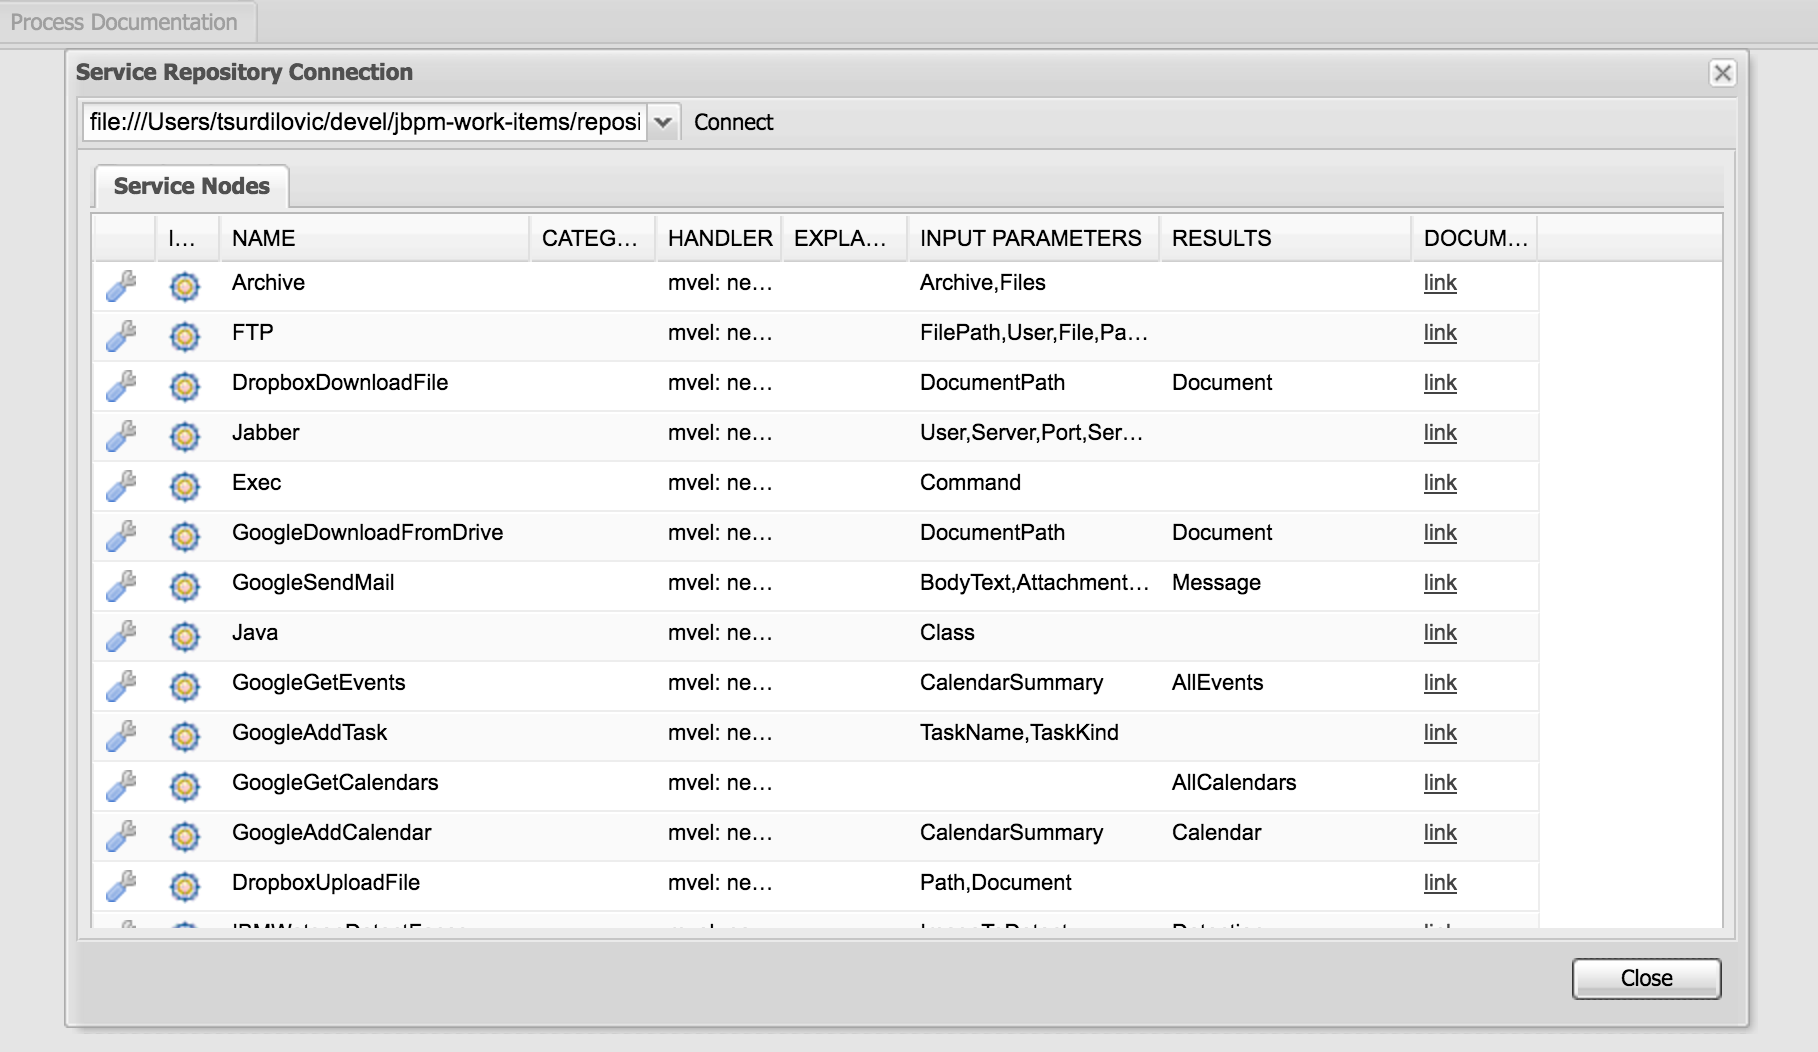
Once imported, workitems are going to be included in the Designer shapes section when new processes are created or existing are re-opened.
Another option is to tell your app server that is running Business Central to automatically install specific workitems from your repository on Business Central startup. This is a very nice option which saves time of having to manually import individual workitems via the repository importer. It automatically registers your workitem handler and its maven dependencies to Business Central which is very handy (same is done via the manual install using Designer).
For example let’s say you have a service repository available at http://mysite.com/myservicerepo and there you have two services, namely BuyStock and SellStock. To have these services automatically installed in Business Central, you can add the following startup parameters:
AS/bin/standalone.sh -Dorg.jbpm.service.repository=http://mysite.com/myservicerepo -Dorg.jbpm.service.servicetasknames=BuyStock,SellStockOr if you wanted just the SellStock service installed:
AS/bin/standalone.sh -Dorg.jbpm.service.repository=http://mysite.com/myservicerepo -Dorg.jbpm.service.servicetasknames=SellStockCurrently there is no install-all option available so service names must be individually specified. When creating a new or opening an existing business process then Business Central will attempt to install the specified services from the provided repository URL. This will install the service wid configuration, the specified icon (if there is one or if not Business Central will provide a default one for it), the default handler will be added to the deployment descriptor of your Business Central project as well as the specified maven dependencies in the service configuration will be added to the Business Central project pom.xml file. Please note that currently there is no option to specify maven repositories via the service task configuration so they must be added via Business Central in its POM Editor by the users.
29.4.4. Setting up your own service repository
With previous versions of the jBPM Service repository users had to manually set up their workitem configuration (.wid) files as well as provide jars and the maintain a repo configuration file (index.conf). With the new version this is no longer the case and if you use Maven most if not all of the repository artifacts can be generated for you.
If you do have an existing custom repository already set up be rest assured that it will still work as the overall structure has not changed. In this case there are two things you will notice. One that there is no longer the need for you to maintain the index.conf file which lists all your repository workitems, and two that you now can add maven dependencies into your workitem configurations to define depends which can be pulled in at compile or runtime rather than dependencies which you had to previously provide manually.
Ok, so let’s see what are some easy ways to set up your own repository:
29.4.4.1. Create own workitem inside jBPM WorkItems module
Here you would clone the jBPM WorkItems module from GitHub and create your own modules for your services. You can follow one of the existing modules to set up your own workitem implementation. Once you have added your module to the list of modules in the main pom, then also add it to the repository Home Page setup and you are good to go. Once you build the main module all the artifacts and the repository itself will be generated for you under $moduleHome$/repository/target/repository-$version$.
This is a also a nice way to contribute your workitem impl to the community as it will be already set-up and ready to do a pull request if you so choose so.
29.4.4.2. Create own workitem with the workitem Maven Archetype
We mentioned before the jBPM Workitem Archetype module. Creating a workitem project with this archetype will provide you with full generation of all elements needed for the repository.
To get started run the following maven command (update the archetypeVersion as needed):
mvn archetype:generate -DarchetypeGroupId=org.jbpm -DarchetypeArtifactId=jbpm-workitems-archetype -DarchetypeVersion=7.5.0-SNAPSHOT -DgroupId=org.jbpm.demo.workitems -DartifactId=myworkitem -DclassPrefix=MyWorkItem -DarchetypeCatalog=local -Dversion=1.0This will create a base workitem project for you called myworkitem. If you within that workitem run
mvn clean installyou will find that the Maven build process will generate the workitem configuration, the implementation jar as well as html that contains your workitem information in the myworkitem/jbpm-workitems-myworkitem/target/jbpm-workitems-myworkitem-1.0.zip file. You can then simply extract the contents of this zip into your existing custom repository or anywhere on the file system. The zip will have the following structure (for the base project):
index.conf
MyWorkItem/
- MyWorkItem.json
- MyWorkItem.wid
- MyWorkItem.png
- index.html
- jbpm-workitems-myworkitem-1.0.jar29.4.5. Workitem Configuration (wid) from Handler Annotations
Generating the workitem configuration used to be a manual process which involved creating a workitem .wid file and having to know mvel to define your workitem input/output parameters, handler, dependencies etc. You can still manually do that but we have added a way to define your workitem configuration information in your workitem Java implementation using annotations. Here is an example of this approach
@Wid(widfile = "DropboxDownloadFileDefinitions.wid", name = "DropboxDownloadFile",
displayName = "DropboxDownloadFile",
defaultHandler = "mvel: new org.jbpm.process.workitem.dropbox.DownloadFileWorkitemHandler()",
parameters = {
@WidParameter(name = "DocumentPath")
},
results = {
@WidResult(name = "Document")
},
mavenDepends = {
@WidMavenDepends(group = "com.dropbox.core", artifact = "dropbox-core-sdk", version = "3.0.5")
})
public class DownloadFileWorkitemHandler extends AbstractLogOrThrowWorkItemHandler {
...
}Annotating your workitem handler implementation tells the jBPM Workitem Processor to use the defined information by this annotation to generate the workitem configuration from. It has a number of different properties you can use:
-
widFile: defines the name of the generated config file -
name: - unique name for your service -
displayName: - display name to be used within editors such as jBPM Designer -
parameters: - define the service data inputs given their name and type -
results: - define the service data outputs -
mavenDepends: - define a list of maven dependencies needed for your workitem to be executable at runtime. -
icon: - should refer to a file with the given file name in the same folder as the extended configuration file (so it can be downloaded by the import wizard and used in the process diagrams). Icons should be 16x16 GIF files. -
category: - defines the category this service should be placed under when browsing the repository. -
defaultHandler: - defines the default handler implementation (i.e. the Java class that implements theWorkItemHandlerinterface and can be used to execute the service). This can automatically be registered as the handler for that service when importing the service from the repository. You can also use mvel to resolve the default handler expression which has the additional benefit of being able to resolve the handlers parameters, for example:
"defaultHandler" : "mvel: new org.jbpm.process.workitem.twitter.TwitterHandler(ksession)",Some of the available named parameters you can use are:
ksession
taskService
runtimeManager
classLoader
entityManagerFactory-
documentation: - defines a documentation file that describes what the service does and how it works. This property should refer to an HTML file with the given name in the same folder as the extended configuration file (so it can be shown by the import wizard when browsing the repository). -
version: - the version (String) of the workitem implementation
Only setup needed for the @Wid annotation is to use an already provided annotation processor, namely
org.jbpm.process.workitem.core.util.WidProcessorTo add this in your projects pom.xml, you can define in the poms <plugins> section:
<plugin>
<groupId>org.apache.maven.plugins</groupId>
<artifactId>maven-compiler-plugin</artifactId>
<configuration>
<annotationProcessors>
<annotationProcessor>org.jbpm.process.workitem.core.util.WidProcessor</annotationProcessor>
</annotationProcessors>
<compilerArgs>
<arg>-AwidName=${project.artifactId}</arg>
</compilerArgs>
</configuration>
</plugin>29.4.6. Programmatically interacting with the service repository
jBPM provides classes in the org.jbpm.process.workitem package which allows you to connect and retrieve your service information. For example:
Map<String, WorkDefinitionImpl> workitemsFromRepo =
WorkItemRepository.getWorkDefinitions("https://docs.jboss.org/jbpm/service-repository/7.5.0.Final");This will provide you with all services defined in the repository. You can then get more detailed information about each of services in the repository using their name as declared in the service wid file, for example we could do (for an example Workitem called "MyWorkitem"):
workitemsFromRepo.get( "MyWorkitem" ).getName();
workitemsFromRepo.get( "MyWorkitem" ).getDescription();
workitemsFromRepo.get( "MyWorkitem" ).getDefaultHandler();
workitemsFromRepo.get( "MyWorkitem" ).getMavenDependencies();
...or you could for example check if the correct version of the service you need is contained in the repository:
if( workitemsFromRepo.containsKey( "MyWorkitem" ) && workitemsFromRepo.get( "MyWorkitem" ).getVersion().equals( "1.0" )) {
// do something
}Currently all operations are read-only. There isn’t a way to update the service repository automatically.
29.4.7. Defining extended service configuration with JSON
The previous extended configuration example for the Twitter service was defined with the default mvel configuration. It is also possible to do this with JSON and the Twitter example would look like this:
[
[
"java.util.HashMap",
{
"name":"TestServiceFour",
"displayName":"Twitter",
"description":"Send a Twitter message",
"parameters":[
"java.util.HashMap",
{
"Message":["org.jbpm.process.core.datatype.impl.type.StringDataType", {}]
}
],
"eclipse:customEditor":"org.drools.eclipse.flow.common.editor.editpart.work.SampleCustomEditor",
"defaultHandler" : "org.jbpm.process.workitem.twitter.TwitterHandler",
"documentation" : "index.html",
"dependencies":[
"java.util.ArrayList", ["file:./lib/jbpm-twitter.jar", "file:./lib/twitter4j-core-2.2.2.jar"]
]
}
]
]In your service repository you can define the extended configuration of your services with mvel or JSON (or have some defined in one way and some in the other as well). Defining the extended configuration with JSON might have some benefits if being read by custom web-based clients for example but the mvel configuration option is default and currently still prefered.
30. Exception Management
30.1. Overview
This chapter will describe how to deal with unexpected behavior in your business processes using both BPMN2 and technical mechanisms.
The first section will explain Technical Exceptions: we’ll go through an example that uses both BPMN2 and WorkItemHandler implementations in order to isolate and handle exceptions caused by a technical component.
We will also explain how to modify the example to suit other use cases.
The second section will define and explain the types of (BPMN2) exceptions that can happen or be used in a business process.
30.2. Introduction
What happens to a business process when something unexpected happens during the process? Most of the time, when creating and designing a new process definition, the first step is to describe the normative or desirable behaviour. However, a process definition that only describes all of the normal tasks and their execution order is incomplete.
The next step is to think about what might go wrong when the business process is run. What would happen if any of the human or technical actors in the process do not respond in unexpected ways? Will any of the technical systems that the process interacts with return unexpected results — or not return any results at all?
Deviations from the normative or "happy" flow of a business process are called exceptions. In some cases, exceptions might not be that unusual, such as trying to debit an empty bank account. However, some processes might contain many complex situations involving exceptions, all of which must be handled correctly.
|
The rest of chapter assumes that you know how to create custom |
30.3. Technical Exceptions
30.3.1. Introduction
Technical exceptions happen when a technical component of a business process acts in an unexpected way. When using Java based systems, this often results in a literal Java Exception being thrown by the system.
Technical components used in a process can fail in a way that can not be described using BPMN2. In this case, it’s important to handle these exceptions in expected ways.
The following types of code might throw exceptions:
-
Any code that is present in the process definition itself
-
Any code that is executed during a process and is not part of jBPM
-
Any code that interacts with a technical component outside of the jBPM engine
However, those are somewhat abstract definitions. We can narrow down the places at which an exception might be thrown. Technical exceptions can occur at the following points:
-
Code present in
<scriptTask>nodes or in the jbpm-specific<onEntry>and<onExit>elements -
Code executed in
WorkItemHandlersassociated with<task>and task-type nodes
It is much easier to ensure correct exception handling for <task> and other task-type nodes that use WorkItemHandler implementations, than for code executed directly in a <scriptTask>.
Exceptions thrown by <scriptTask> can cause the process to fail in an unrecoverable fashion.
While there are certain things that you can do to contain the damage, a process that has failed in this way can not be restarted or otherwise recovered.
This also applies to other nodes in a process definition that contain script code in the node definition, such as the <onEntry> and <onExit> elements.
When jBPM engine does throw an exception generated by the code in a <scriptTask> the exception thrown is a special Java exception called the WorkflowRuntimeException that contains information about the process.
|
Again, exceptions generated by a For this reason, it’s important to limit the scope of the code in these nodes to operations dealing with process variables.
Using a
|
30.3.2. Handling exceptions in WorkItemHandler instances
` WorkItemHandler` classes are used when your process interacts with other technical systems. For an introduction to them and how to use them in processes, please see the Domain-Specific Processes chapter.
While you can build exception handling into your own WorkItemhandler implementations, there are also two “handler decorator”
classes that you can use to wrap a WorkItemhandler implementation.
These two wrapper classes include logic that is executed when an exception is thrown during the execution (or abortion) of a work item.
| Decorator classes in the org.jbpm.bpmn2.handler package | Description |
|---|---|
|
This class wraps an existing |
|
This class reacts to all exceptions thrown by the |
While the two classes described above should cover most cases involving exception handling, a Java developer with some experience with jBPM should be able to create a WorkItemHandler that executes custom code upon an exception.
If you do decide to write a custom WorkItemHandler that includes exception handling logic, keep the following checklist in mind:
-
Are you catching all possible exceptions that you want to (and no more, or less)?
-
Are you making sure to either complete or abort the work item after an exception has been caught? If not, are there mechanisms to retry the process later? Or are incomplete process instances acceptable?
-
What other actions should be taken when an exception is caught? Do you want to simply log the exception, or is it also important to interact with other technical systems? Do you want to trigger a (BPMN2) sub-process that will handle the exception?
|
When you use the |
In the next section, we’ll describe an example that uses the SignallingTaskHandlerDecorator to signal an event subprocess when a work item handler throws an exception.
30.3.3. Examples
30.3.3.1. Example: service task handlers
We’ll go through one example in this section, and then look quickly at how you can change it to get the behavior you want.
The example involves an <error> event that’s caught by an (Error) Event SubProcess.
When an Error Event is thrown, the containing process will be interrupted. This means that after the process flow attached to the error event has executed, the following will happen:
-
process execution will stop, and no other parts of the process will execute
-
the process instance will end up in an aborted state (instead of completed)
The example we’ll go through contains an <error>, but at the end of the section, we’ll show how you can change the process to use a <signal> instead.
|
The code and BPMN2 process definition shown in the next section are available in the jbpm-examples
module.
See the |
BPMN2 configuration
Let’s look at the BPMN2 process definition first. Besides the definition of the process, the BPMN2 elements defined before the actual process definition are also important. Here’s an image of the BPMN2 process that we’ll be using in the example:
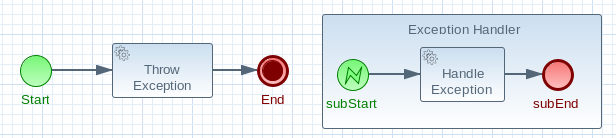
The BPMN2 process fragment below is part of the process shown above, and contains some notes on the different BPMN2 elements.
|
If you’re viewing this on a web browser, you may need to widen or narrow your browser window in order to see the "callout" or note numbers on the right hand side of the code. |
<itemDefinition id="_stringItem" structureRef="java.lang.String" /> (1)
<message id="_message" itemRef="_stringItem"/> (2)
<interface id="_serviceInterface" name="org.jbpm.examples.exceptions.service.ExceptionService">
<operation id="_serviceOperation" name="throwException">
<inMessageRef>_message</inMessageRef> (2)
</operation>
</interface>
<error id="_exception" errorCode="code" structureRef="_exceptionItem"/> (3)
<itemDefinition id="_exceptionItem" structureRef="org.kie.api.runtime.process.WorkItem"/> (4)
<message id="_exceptionMessage" itemRef="_exceptionItem"/> (4)
<interface id="_handlingServiceInterface" name="org.jbpm.examples.exceptions.service.ExceptionService">
<operation id="_handlingServiceOperation" name="handleException">
<inMessageRef>_exceptionMessage</inMessageRef> (4)
</operation>
</interface>
<process id="ProcessWithExceptionHandlingError" name="Service Process" isExecutable="true" processType="Private">
<!-- properties -->
<property id="serviceInputItem" itemSubjectRef="_stringItem"/> (1)
<property id="exceptionInputItem" itemSubjectRef="_exceptionItem"/> (4)
<!-- main process -->
<startEvent id="_1" name="Start" />
<serviceTask id="_2" name="Throw Exception" implementation="Other" operationRef="_serviceOperation">
<!-- rest of the serviceTask element and process definition... -->
<subprocess id="_X" name="Exception Handler" triggeredByEvent="true" >
<startEvent id="_X-1" name="subStart">
<dataOutput id="_X-1_Output" name="event"/>
<dataOutputAssociation>
<sourceRef>_X-1_Output</sourceRef>
<targetRef>exceptionInputItem</targetRef> (4)
</dataOutputAssociation>
<errorEventDefinition id="_X-1_ED_1" errorRef="_exception" /> (3)
</startEvent>
<!-- rest of the subprocess definition... -->
</subprocess>
</process>| 1 | This <itemDefinition> element defines a data structure that we then use in the serviceInputItem property in the process. |
| 2 | This <message> element (1rst reference) defines a message that has a String as its content (as defined by the <itemDefinition> element on line above). The <interface> element below it refers to it (2nd reference) in order to define what type of content the service (defined by the <interface>) expects. |
| 3 | This <error> element (1rst reference) defines an error for use later in the process: an Event sub-process is defined that is triggered by this error (2nd reference). The content of the error is defined by the <itemDefinition> element defined below the <error> element. |
| 4 | This <itemDefinition> element (1rst reference) defines an item that contains a WorkItem instance. The <message> element (2nd reference) then defines a message that uses this item definition to define its content. The <interface> element below that refers to the <message> definition (3rd reference) in order to define the type of content that the service expects.
In the process itself, a |
|
When you’re using a |
SignallingTaskHandlerDecorator and WorkItemHandler configuration
Now that BPMN2 process definition is (hopefully) a little clearer, we can look at how to set up jBPM to take advantage of the above BPMN2.
In the (BPMN2) process definition above, we define two different <serviceTask> activities.
The org.jbpm.bpmn2.handler.ServiceTaskHandler class is the default task handler class used for <serviceTask> tasks.
If you don’t specify a WorkItemHandler implementation for a <serviceTask>, the ServiceTaskHandler class will be used.
In the code below, you’ll see that we actually wrap or decorate the ServiceTaskHandler class with a SignallingTaskHandlerDecorator instance.
We do this in order to define what happens when the ServiceTaskHandler throws an exception.
In this case, the ServiceTaskHandler will throw an exception because it’s configured to call the ExceptionService.throwException method, which throws an exception.
(See the _handlingServiceInterface <interface> element in the BPMN2.)
In the code below, we also configure which (error) event is sent to the process instance by the SignallingTaskHandlerDecorator instance.
The SignallingTaskHandlerDecorator does this when an exception is thrown in a task.
In this case, since we’ve defined an <error> with the error code “code” in the BPMN2, we set the signal to Error-code.
|
When signalling the jBPM engine with an event of some sort, you should keep in mind the rules for signalling process events.
|
import java.util.HashMap;
import java.util.Map;
import org.jbpm.bpmn2.handler.ServiceTaskHandler;
import org.jbpm.bpmn2.handler.SignallingTaskHandlerDecorator;
import org.jbpm.examples.exceptions.service.ExceptionService;
import org.kie.api.KieBase;
import org.kie.api.io.ResourceType;
import org.kie.api.runtime.KieSession;
import org.kie.api.runtime.process.ProcessInstance;
import org.kie.internal.builder.KnowledgeBuilder;
import org.kie.internal.builder.KnowledgeBuilderFactory;
import org.kie.internal.io.ResourceFactory;
public class ExceptionHandlingErrorExample {
public static final void main(String[] args) {
runExample();
}
public static ProcessInstance runExample() {
KieSession ksession = createKieSession();
String eventType = "Error-code"; (1)
SignallingTaskHandlerDecorator signallingTaskWrapper (2)
= new SignallingTaskHandlerDecorator(ServiceTaskHandler.class, eventType);
signallingTaskWrapper.setWorkItemExceptionParameterName(ExceptionService.exceptionParameterName); (3)
ksession.getWorkItemManager().registerWorkItemHandler("Service Task", signallingTaskWrapper);
Map<String, Object> params = new HashMap<String, Object>();
params.put("serviceInputItem", "Input to Original Service");
ProcessInstance processInstance = ksession.startProcess("ProcessWithExceptionHandlingError", params);
return processInstance;
}
private static KieSession createKieSession() {
KnowledgeBuilder kbuilder = KnowledgeBuilderFactory.newKnowledgeBuilder();
kbuilder.add(ResourceFactory.newClassPathResource("exceptions/ExceptionHandlingWithError.bpmn2"), ResourceType.BPMN2);
KieBase kbase = kbuilder.newKnowledgeBase();
return kbase.newKieSession();
}| 1 | Here we define the name of the event that will be sent to the process instance if the wrapped WorkItemHandler implementation throws an exception. The eventType string is used when instantiating the SignallingTaskHandlerDecorator class. |
| 2 | Then we construct an instance of the SignallingTaskHandlerDecorator class. In this case, we simply give it the class name of the WorkItemHandler implementation class to instantiate, but another constructor is available that we can pass an instance of a WorkItemHandler implementation to (necessary if the WorkItemHandler implementation does not have a no-argument constructor). |
| 3 | When an exception is thrown by the wrapped WorkItemHandler, the SignallingTaskHandlerDecorator saves it as a parameter in the WorkItem instance with a parameter name that we configure the SignallingTaskHandlerDecorator to give it (see the code below for the ExceptionService). |
ExceptionService setup and configuration
In the BPMN2 process definition above, a service interface is defined that references the ExceptionService class:
<interface id="_handlingServiceInterface" name="org.jbpm.examples.exceptions.service.ExceptionService">
<operation id="_handlingServiceOperation" name="handleException">In order to fill in the blanks a little bit, the code for the ExceptionService class has been included below.
In general, you can specify any Java class with the default or an other no-argument constructor and have it executed during a <serviceTask>
public class ExceptionService {
public static String exceptionParameterName = "my.exception.parameter.name";
public void handleException(WorkItem workItem) {
System.out.println( "Handling exception caused by work item '" + workItem.getName() + "' (id: " + workItem.getId() + ")");
Map<String, Object> params = workItem.getParameters();
Throwable throwable = (Throwable) params.get(exceptionParameterName);
throwable.printStackTrace();
}
public String throwException(String message) {
throw new RuntimeException("Service failed with input: " + message );
}
public static void setExceptionParameterName(String exceptionParam) {
exceptionParameterName = exceptionParam;
}
}Changing the example to use a <signal>
In the example above, the thrown Error Event interrupts the process: no other flows or activities are executed once the Error Event has been thrown.
However, when a Signal Event is processed, the process will continue after the Signal Event SubProcess (or whatever other activities that the Signal Event triggers) has been executed. Furthermore, this implies that the process will not end up in an aborted state, unlike a process that throws an Error Event.
In the process above, we use the <error> element in order to be able to use an Error Event:
<error id="_exception" errorCode="code" structureRef="_exceptionItem"/>When we want to use a Signal Event instead, we remove that line and use a <signal> element:
<signal id="exception-signal" structureRef="_exceptionItem"/>However, we must also change all references to the _exception <error> so that they now refer to the exception-signal <signal>.
That means that the <errorEventDefinition> element in the <startEvent>,
<errorEventDefinition id="_X-1_ED_1" errorRef="_exception" />must be changed to a <signalEventDefinition> which would like like this:
<signalEventDefinition id="_X-1_ED_1" signalRef="exception-signal"/>In short, we have to make the following changes to the <startEvent> in the Event sub-process:
-
It will now contain a
<signalEventDefinition>instead of a<errorEventDefinition> -
The
errorRefattribute in the<errorEventDefinition>is now asignalRefattribute in the<signalEventDefinition>. -
The
idattribute in thesignalRefis of course now the id of the<signal>element. Before it was id of<error>element. -
Lastly, when we signal the process in the Java code, we do not signal “`Error-code`” but simply “`exception-signal`”, the
idof the<signal>element.
30.3.3.2. Example: logging exceptions thrown by bad <scriptTask> nodes
In this section, we’ll briefly describe what’s possible when dealing with <scriptTask> nodes that throw exceptions, and then quickly go through an example (also available in the jbpm-examples
module) that illustrates this.
Introduction
If you’re reading this, then you probably already have a problem: you’re either expecting to run into this problem because there are scripts in your process definition that might throw an exception, or you’re already running a process instance with scripts that are causing a problem.
Unfortunately, if you’re running into this problem, then there is not much you can do.
The only thing that you can do is retrieve more information about exactly what’s causing the problem.
Luckily, when a <scriptTask> node causes an exception, the exception is then wrapped in a WorkflowRuntimeException.
What type of information is available? The WorkflowRuntimeException instance will contain the information outlined in the following table.
All of the fields listed are available via the normal get* methods.
| Field name | Type | Description |
|---|---|---|
|
|
The id of the |
|
|
The id of the process definition that was used to start the process (i.e.
“`ExceptionScriptTask`” in |
|
|
The value of the (BPMN2) id attribute of the node that threw the exception. |
|
|
The value of the (BPMN2) name attribute of the node that threw the exception. |
|
|
The map containing the variables in the process instance (experimental). |
|
|
The short message indicating what went wrong. |
|
|
The original exception that was thrown. |
Example: Exceptions thrown by a <scriptTask>.
The following code illustrates how to extract extra information from a process instance that throws a WorkflowRuntimeException exception instance.
import org.jbpm.workflow.instance.WorkflowRuntimeException;
import org.kie.api.KieBase;
import org.kie.api.io.ResourceType;
import org.kie.api.runtime.KieSession;
import org.kie.api.runtime.process.ProcessInstance;
import org.kie.internal.builder.KnowledgeBuilder;
import org.kie.internal.builder.KnowledgeBuilderFactory;
import org.kie.internal.io.ResourceFactory;
public class ScriptTaskExceptionExample {
public static final void main(String[] args) {
runExample();
}
public static void runExample() {
KieSession ksession = createKieSession();
Map<String, Object> params = new HashMap<String, Object>();
String varName = "var1";
params.put( varName , "valueOne" );
try {
ProcessInstance processInstance = ksession.startProcess("ExceptionScriptTask", params);
} catch( WorkflowRuntimeException wfre ) {
String msg = "An exception happened in "
+ "process instance [" + wfre.getProcessInstanceId()
+ "] of process [" + wfre.getProcessId()
+ "] in node [id: " + wfre.getNodeId()
+ ", name: " + wfre.getNodeName()
+ "] and variable " + varName + " had the value [" + wfre.getVariables().get(varName)
+ "]";
System.out.println(msg);
}
}
private static KieSession createKieSession() {
KnowledgeBuilder kbuilder = KnowledgeBuilderFactory.newKnowledgeBuilder();
kbuilder.add(ResourceFactory.newClassPathResource("exceptions/ScriptTaskException.bpmn2"), ResourceType.BPMN2);
KieBase kbase = kbuilder.newKnowledgeBase();
return kbase.newKieSession();
}
}30.4. Business Exceptions
Business Exceptions are exceptions that are designed and managed in the BPMN2 specification of a business process. In other words, Business Exceptions are exceptions which happen at the process or workflow level, and are not related to the technical components.
Many of the elements in BPMN2 related to Business Exceptions are related to Compensation and Business Transactions. Compensation, in particular, is complexer than many other parts of the BPMN2 specification.
Full support for compensation and business transactions is expected with the release of jBPM 6.1 or 6.2. Once that has been implemented, this section will contain more information about using those BPMN2 features with jBPM.
30.4.1. Business Exceptions elements in BPMN2
The following attempts to briefly describe Compensation and Business Transaction related elements in BPMN2. For more complete information about these elements and their uses, see the BPMN2 specification, Bruce Silver’s book BPMN Method and Style or any of the other available books about the use of BPMN2.
| BPMN2 Element types | Description |
|---|---|
Errors |
Error Events can be used to signal when a process has encountered an unexpected situation: signalling an error is often called throwing an error. Boundary Error Events in a different part of the process can then be used to catch the error and initiate a sequence of activities to handle the exception. Errors themselves can be extended with extra information that is passed from the throwing to catching event. This is done with the use of an Item Definition. |
Compensation |
Exception handling activities associated with the normal activities in a Business Transaction are triggered by Compensation Events. There are 3 types of compensation events: Intermediate (a.k.a. Boundary) (catch) events, Start (catch) events, and Intermediate or End (throw) events. Compensation Boundary (catch) events may only be attached to activities (e.g. tasks) that could cause an exception. These Boundary events are then associated (not linked!) with a Task that will be executed if the Boundary event catches a (thrown) Compensation signal. Start (catch) events are used when defining a Compensation Event SubProcess, which requires them in order to be able to catch a (thrown) Compensation signal. Compensation Intermediate and End events are used in order to throw Compensation Events. These events often follow decision nodes that determine whether the workflow executed up to that point has succeeded. If not, the path including the Intermediate or End Event is chosen in order to trigger Compensation for the activities that did not succeed. |
BPMN2 contains a number of constructs to model exceptions in business processes. There are several advantages to doing exception handling at the business process level (as opposed to handling it with code):
-
Transparency
-
Being able to quickly see what happens in exceptional situations means that the results and performance of a process is more easily monitored and measured.
-
It also increases how easily a process can be implemented as well as how maintainable a process definition is.
-
-
Business Logic Isolation
-
Again, the idea behind using a business process is to isolate the business logic from the technical code. This simplifies the complexity of the system and increases how quickly you can create new business processes and change existing ones.
-
Implementing exception handling at a technical level often takes more time because it’s often complexer and specific to a system.
-
30.4.2. Designing a workflow with Business Exceptions
Where are business exceptions likely to occur? There is academic research on this, but some possible examples are:
-
When an interaction with an external party or 3rd party system does not go as planned
-
When you can not fully check the input data in your process (like a client’s address information, for example)
-
In general, if there are parts of your process that are particularly dependent on one of the following, a business exception will be a good idea:
-
Company policy or policy governing certain (in-house) procedures
-
Laws governing the business process (such as age requirements, for example)
-
31. Flexible Processes
Case management and its relation to BPM is a hot topic nowadays. There definitely seems to be a growing need amongst end users for more flexible and adaptive business processes, without ending up with overly complex solutions. Everyone seems to agree that using a process-centric approach only in many cases leads to complex solutions that are hard to maintain. The "knowledge workers" no longer want to be locked into rigid processes but wants to have the power and flexibility to regain more control over the process themselves.
The term case management is often used in that context. Without trying to give a precise definition of what it might or might not mean, as this has been a hot topic for discussion, it refers to the basic idea that many applications in the real world cannot really be described completely from start to finish (including all possible paths, deviations, exceptions, etc.). Case management takes a different approach: instead of trying to model what should happen from start to finish, let’s give the end user the flexibility to decide what should happen at runtime. In its most extreme form for example, case management doesn’t even require any process definition at all. Whenever a new case comes in, the end user can decide what to do next based on all the case data.
A typical example can be found in healthcare (clinical decision support to be more precise), where care plans can be used to describe how patients should be treated in specific circumstances, but people like general practitioners still need to have the flexibility to add additional steps and deviate from the proposed plan, as each case is unique. And there are similar examples in claim management, help desk support, etc.
So, should we just throw away our BPM system then? No! Even at its most extreme form (where we don’t model any process up front), you still need a lot of the other features a BPM system (usually) provides: there still is a clear need for audit logs, monitoring, coordinating various services, human interaction (e.g. using task forms), analysis, etc. And, more importantly, many cases are somewhere in between, or might even evolve from case management to more structured business process over time (when we for example try to extract common approaches from many cases). If we can offer flexibility as part of our processes, can’t we let the users decide how and where they would like to apply it?
Let me give you two examples that show how you can add more and more flexibility to your processes. The first example shows a care plan that shows the tasks that should be performed when a patient has high blood pressure. While a large part of the process is still well-structured, the general practitioner can decide himself which tasks should be performed as part of the sub-process. And he also has the ability to add new tasks during that period, tasks that were not defined as part of the process, or repeat tasks multiple times, etc. The process uses an ad-hoc sub-process to model this kind of flexibility, possibly augmented with rules or event processing to help in deciding which fragments to execute.
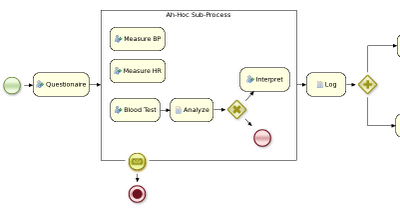
The second example actually goes a lot further than that. In this example, an internet provider could define how cases about internet connectivity problems will be handled by the internet provider. There are a number of actions the case worker can select from, but those are simply small process fragments. The case worker is responsible for selecting what to do next and can even add new tasks dynamically. As you can see, there is not process from start to finish anymore, but the user is responsible for selecting which process fragments to execute.
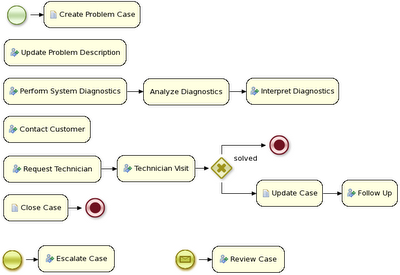
And in its most extreme form, we even allow you to create case instances without a process definition, where what needs to be performed is selected purely at runtime. This however doesn’t mean you can’t figure out anymore what 's actually happening. For example, meetings can be very ad hoc and dynamic, but we usually want a log of what was actually discussed. The following screenshot shows how our regular audit view can still be used in this case, and the end user could then for example get a lot more info about what actually happened by looking at the data associated with each of those steps. And maybe, over time, we can even automate part of that by using a semi-structured process.
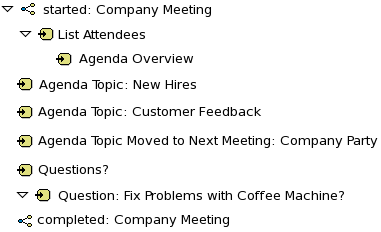
32. Concurrency and asynchronous execution
32.1. Concurrency
In the following text, we will refer to two types of "multi-threading": logical and technical. Technical multi-threading is what happens when multiple threads or processes are started on a computer, for example by a Java or C program. Logical multi-threading is what we see in a BPM process after the process reaches a parallel gateway, for example. From a functional standpoint, the original process will then split into two processes that are executed in a parallel fashion.
Of course, the jBPM engine supports logical multi-threading: for example, processes that include a parallel gateway. We’ve chosen to implement logical multi-threading using one thread: a jBPM process that includes logical multi-threading will only be executed in one technical thread. The main reason for doing this is that multiple (technical) threads need to be able to communicate state information with each other if they are working on the same process. This requirement brings with it a number of complications. While it might seem that multi-threading would bring performance benefits with it, the extra logic needed to make sure the different threads work together well means that this is not guaranteed. There is also the extra overhead incurred because we need to avoid race conditions and deadlocks.
32.1.1. Engine execution
In general, the jBPM engine executes actions in serial. For example, when the jBPM engine encounters a script task in a process, it will synchronously execute that script and wait for it to complete before continuing execution. Similarly, if a process encounters a parallel gateway, it will sequentially trigger each of the outgoing branches, one after the other. This is possible since execution is almost always instantaneous, meaning that it is extremely fast and produces almost no overhead. As a result, the user will usually not even notice this. Similarly, action scripts in a process are also synchronously executed, and the jBPM engine will wait for them to finish before continuing the process. For example, doing a Thread.sleep(…) as part of a script will not make the jBPM engine continue execution elsewhere but will block the jBPM engine thread during that period.
The same principle applies to service tasks. When a service task is reached in a process, the jBPM engine will also invoke the handler of this service synchronously. The jBPM engine will wait for the completeWorkItem(…) method to return before continuing execution. It is important that your service handler executes your service asynchronously if its execution is not instantaneous.
An example of this would be a service task that invokes an external service. Since the delay in invoking this service remotely and waiting for the results might be too long, it might be a good idea to invoke this service asynchronously. This means that the handler will only invoke the service and will notify the jBPM engine later when the results are available. In the meantime, the jBPM engine then continues execution of the process.
Human tasks are a typical example of a service that needs to be invoked asynchronously, as we don’t want the jBPM engine to wait until a human actor has responded to the request. The human task handler will only create a new task (on the task list of the assigned actor) when the human task node is triggered. The jBPM engine will then be able to continue execution on the rest of the process (if necessary) and the handler will notify the jBPM engine asynchronously when the user has completed the task.
32.1.2. Multiple KIE sessions and persistence
The simplest way to run multiple processes is to run them all using one KIE session. However, there are cases in which it’s necessary to run multiple processes in different KIE sessions, even in different (technical) threads. Both are supported by jBPM.
When we add persistence (using a database, for example) to a situation in which we have multiple KIE sessions (and processes), there is a guideline that users should be aware of. The following paragraphs explain why this guideline is important to follow.
|
Please make sure to use a database that allows row-level locks as well as table-level locks. |
For example, a user could have a situation in which there are 2 (or more) threads running, each with its own KIE session instance. On each thread, jBPM processes are being started using the local KIE session instance.
In this use case, a race condition exists in which both thread A and thread B will have coincidentally simultaneously finished a process. At this point, because persistence is being used, both thread A and B will be committing changes to the database. If row-level locks are not possible, then the following situation can occur:
-
Thread A has a lock on the ProcessInstanceInfo table, having just committed a change to that table.
-
Thread A wants a lock on the SessionInfo table in order to commit a change there.
-
Thread B has the opposite situation: it has a lock on the SessionInfo table, having just committed a change there.
-
Thread B wants a lock on the ProcessInstanceInfo table, even though Thread A already has a lock on it.
This is a deadlock situation which the database and application will not be able to solve. However, if row-level locks are possible (and enabled!!) in the database (and tables used), then this situation will not occur.
32.2. Asynchronous execution
32.2.1. Asynchronous handlers
How can we implement an asynchronous service handler? To start with, this depends on the technology you’re using. If you’re only using Java, you could execute the actual service in a new thread:
public class MyServiceTaskHandler implements WorkItemHandler {
public void executeWorkItem(WorkItem workItem, WorkItemManager manager) {
new Thread(new Runnable() {
public void run() {
// Do the heavy lifting here ...
}
}).start();
}
public void abortWorkItem(WorkItem workItem, WorkItemManager manager) {
}
}It’s advisable to have your handler contact a service that executes the business operation, instead of having it perform the actual work. If anything goes wrong with a business operation, it doesn’t affect your process. The loose coupling that this provides also gives you greater flexibility in reusing services and developing them.
For example, you can have your human task handler simply invoke the human task service to add a task there. To implement an asynchronous handler, you usually have to simply do an asynchronous invocation of this service. This usually depends on the technology you use to do the communication, but this might be as simple as asynchronously invoking a web service, or sending a JMS message to the external service.
32.2.2. jbpm executor
In version 6, jBPM introduces new component called jbpm executor which provides quite advanced features for asynchronous execution. It delivers generic environment for background execution of commands. Commands are nothing more than business logic encapsulated within simple interface. It does not have any process runtime related information, that means no need to complete work items, or anything of that sort. It purely focuses on the business logic to be executed. It receives data via CommandContext and returns results of the execution with ExecutionResults.
Before looking into details on jBPM support for asynchronous execution let’s look at what are the common requirements for such execution:
-
allows asynchronous execution of given piece of business logic
-
allows to retry in case of resources are temporarily unavailable e.g. external system interaction
-
allows to handle errors in case all retries have been attempted
-
provides cancellation option
-
provides history log of execution
When confronting these requirements with the "simple async handler" (executed as separate thread) you can directly notice that all of these would need to be implemented all over again by different systems. Due to that a common, generic component has been provided out of the box to simplify and empower usage.
jBPM executor operates on commands, which are essential piece of code that is going to be executed as background job.
/**
* Executor's Command are dedicated to contain purely business logic that should be executed.
* It should not have any reference to the underlying jBPM engine and should not be concerned
* with any process runtime related logic such as completing work item, sending signals, etc.
* <br/>
* Information that are taken from process will be delivered as part of data instance of
* <code>CommandContext</code>. Depending on the execution context that data can vary but
* in most of the cases following will be given:
* <ul>
* <li></li>
* <li>businessKey - usually unique identifier of the caller</li>
* <li>callbacks - FQCN of the <code>CommandCallback</code> that shall be used on command completion</li>
* </ul>
* When executed as part of the process (work item handler) additional data can be expected:
* <ul>
* <li>workItem - the actual work item that is being executed with all its parameters</li>
* <li>processInstanceId - id of the process instance that triggered this work</li>
* <li>deploymentId - if given process instance is part of an active deployment</li>
* </ul>
* Important note about implementations is that it shall always be possible to be initialized with default constructor
* as executor service is an async component so it will initialize the command on demand using reflection.
* In case there is a heavy logic on initialization it should be placed in another service implementation that
* can be looked up from within command.
*/
public interface Command {
/**
* Executed this command's logic.
* @param ctx - contextual data given by the executor service
* @return returns any results in case of successful execution
* @throws Exception in case execution failed and shall be retried if possible
*/
public ExecutionResults execute(CommandContext ctx) throws Exception;
}Looking at the interface above, there is no specific integration with the jBPM engine, it’s decoupled from it to put main focus on the actual logic that shall be executed as part of that command rather to worry about integration with the jBPM engine. This design promotes reuse of already existing logic by simply wrapping it with Command implementation.
Input data is transferred from the jBPM engine to command via CommandContext. It acts purely as data transfer object and puts single requirement on the data it holds - all objects must be serializable.
/**
* Data holder for any contextual data that shall be given to the command upon execution.
* Important note that every object that is added to the data container must be serializable
* meaning it must implement <code>java.io.Serializable</code>
*
*/
public class CommandContext implements Serializable {
private static final long serialVersionUID = -1440017934399413860L;
private Map<String, Object> data;
public CommandContext() {
data = new HashMap<String, Object>();
}
public CommandContext(Map<String, Object> data) {
this.data = data;
}
public void setData(Map<String, Object> data) {
this.data = data;
}
public Map<String, Object> getData() {
return data;
}
public Object getData(String key) {
return data.get(key);
}
public void setData(String key, Object value) {
data.put(key, value);
}
public Set<String> keySet() {
return data.keySet();
}
@Override
public String toString() {
return "CommandContext{" + "data=" + data + '}';
}
}Next outcome is provided to the jBPM engine via ExecutionResults, which is very similar in nature to the CommandContext and acts as data transfer object.
/**
* Data holder for command's result data. Whatever command produces should be placed in
* this results so they can be later on referenced by name by the requester - e.g. process instance.
*
*/
public class ExecutionResults implements Serializable {
private static final long serialVersionUID = -1738336024526084091L;
private Map<String, Object> data = new HashMap<String, Object>();
public ExecutionResults() {
}
public void setData(Map<String, Object> data) {
this.data = data;
}
public Map<String, Object> getData() {
return data;
}
public Object getData(String key) {
return data.get(key);
}
public void setData(String key, Object value) {
data.put(key, value);
}
public Set<String> keySet() {
return data.keySet();
}
@Override
public String toString() {
return "ExecutionResults{" + "data=" + data + '}';
}
}Executor covers all requirements listed above and provides user interface as part of Business Central applications.
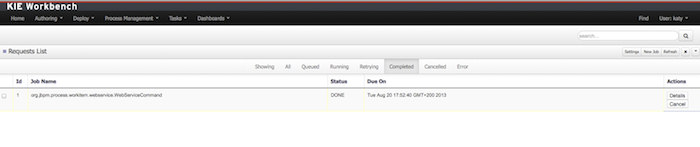
Above screenshot illustrates history view of executor’s job queue. As can be seen on it there are several options available:
-
view details of the job
-
cancel given job
-
create new job
32.2.2.1. WorkItemHandler backed with jbpm executor
jBPM (again in version 6) provides an out of the box async work item handler that is backed by the jbpm executor. So by default all features that the executor delivers will be available for background execution within a process instance. AsyncWorkItemHandler can be configured in two ways:
-
as generic handler that expects to get the command name as part of work item parameters
-
as specific handler for given type of work item - for example web service
Option 1 is by default configured for Business Central web applications and is registered under async name in every ksession that is bootstrapped within the applications. So whenever there is a need to execute some logic asynchronously following needs to be done at modeling time (using jbpm web designer):
-
specify async as TaskName property
-
create data input called CommandClass
-
assign fully qualified class name for the CommandClass data input
Next follow regular way to complete process modeling. Note that all data inputs will be transferred to the executor so they must be serializable.
Second option allows to register different instances of AsyncWorkItemHandler for different work items. Since it’s registered for dedicated work item most likely the command will be dedicated to that work item as well. If so CommandClass can be specified on registration time instead of requiring it to be set as work item parameters. To register such handlers for Business Central additional class is required to inform what shall be registered. A CDI bean that implements WorkItemHandlerProducer interface needs to be provided and placed on the application classpath so CDI container will be able to find it. Then at modeling time TaskName property needs to be aligned with those used at registration time.
32.2.2.2. Configuration
jbpm executor is configurable to allow fine tuning of its environment. In general jbpm executor runs as a thread pool executor that schedules or directly executes jobs when needed. This is based on specialised executor to take into consideration job priority (important when there are many jobs to be fired at exact same time). Thread pool is backed by database to make sure jobs will survive server restarts. When executor is initialised it will load all jobs that are awaiting execution into the thread pool executor.
Configuration of jbpm executor is done via system properties:
-
org.kie.executor.disabled = true|false - allows to completely disable executor component
-
org.kie.executor.pool.size = Integer - allows to specify thread pool size where default is 1
-
org.kie.executor.retry.count = Integer - allows to specify number of retries in case of errors while running a job
-
org.kie.executor.interval = Integer - allows to specify interval (by default in seconds) that executor will use to synchronize with database - default is 0 seconds which means it is disabled
-
org.kie.executor.timeunit = String - allows to specify timer unit used for calculating interval, value must be a valid constant of java.util.concurrent.TimeUnit, by default it’s SECONDS.
32.2.2.3. Clustering and failover
jBPM executor will run jobs on the same server instance (jvm) that they were scheduled on. Unless that server crashes or is shutdown. In single server setup this will mean that until that server is brought up again, jobs are not going to be executed. In case of cluster, job might be executed by any cluster member if synchronisation with database was enabled or on the same server when it was not enabled.
Whenever jBPM executor needs to run in cluster (meaning more than one instance using same database) it’s recommended to enable synchronisation with underlying database. That will ensure jobs from instances that failed will be processed by another cluster member.
To enable it, set org.kie.executor.interval system property to a valid interval. It’s recommended to take into account the demands of your
system, such as maximum acceptable delay for jobs to avoid too frequent synchronisations.
32.2.2.4. Reoccurring jobs
jbpm executor introduced (in version 6.2) extension to jobs (aka commands) that allow single job to be executed multiple times. That feature is brought to the executor via additional interface that command should implement.
/**
* Marks given executor command it is reoccurring and shall be rescheduled after completion of single instance.
*
*/
public interface Reoccurring {
/**
* Returns next time to be scheduled. Date must be in future as jobs cannot be scheduled in past.
* Returns null in case it should not be scheduled any more.
* @return
*/
Date getScheduleTime();
}Reoccurring interface is very simple and enforces implementation to provide the next schedule time that the command should be executed at. It must already be valid date that is not in the past. In case no more invocation of given command should happen return value of this method should be null.
An excellent example of such command is org.jbpm.executor.commands.LogCleanupCommand that provides an easy and convenient way to schedule periodic clean up of jBPM log tables on defined time intervals. See this article to see it in action and how to configure and run it.
32.2.2.5. Run jobs on same server node on which it was scheduled
By default jbpm executor is cluster ready and by that might distribute jobs across all cluster members. That might result in execution of given job on different cluster member than it was scheduled which is not always desired. To override this mechanism job can set 'Owner' as part of their data when being registered where owner is the executor instance that is scheduling the job.
CommandContext ctx = new CommandContext();
ctx.setData("some data", "data...");
ctx.setData("retries", 0);
ctx.setData("owner", ExecutorService.EXECUTOR_ID);That will ensure that only the instance that scheduled the job will be the one which will execute it. Note that it might impact the time when the job is executed especially in cases where given cluster member will be unavailable.
32.2.2.6. Assign priority to jobs
Asynchronous jobs are by default executed based on their scheduled time thus in case several jobs are scheduled to be executed at the same time there might be an issue with which one will be executed first. To override default behavior priorities can be assigned to individual jobs. Priority is given as an integer from 0-9 range where 0 is the lowest priority and 9 is the highest. This can be done:
-
directly via CommandContext using priority context data object where value is a valid integer from 0-9 range
-
via data inputs of Async task where data input property name is Priority and value is a valid integer from 0-9 range
With assigned priority jBPM executor will pick the jobs based on the scheduled time and their priority. In case there is no priority assigned jBPM executor will set it to 5 as default.
jBPM executor can utilize JMS broker for notifying about job to be executed (only jobs to be executed immediately) and the priority then is also set on JMS message so the JMS broker will take this into account on delivery.
33. Release Notes
33.1. jBPM 7.52
33.1.1. New and Noteworthy in jBPM 7.52.0
The following features were added to jBPM 7.52.0
- Unresolved directive in ReleaseNotes/Release.7.52.0.Final/Release.7.52.0.Final-section.adoc - include
-
smart-router-tls.adoc[leveloffset=+1]
33.2. jBPM 7.51
33.2.1. New and Noteworthy in jBPM 7.51.0
The following features were added to jBPM 7.51.0
33.2.1.1. Variable data types
Variables specified from Business Central are now converted to the data type declared in the process definition (if not operating in strict mode, system property org.jbpm.variable.strict). For backward compatibility, if the conversion fails, the string type is used, as it was done before.
Also when using jaxb marshalling for a REST invocation, passing a non int value for a int declared variable now throws an exception (it was returning 0 before)
33.3. jBPM 7.50
33.3.1. New and Noteworthy in jBPM 7.50.0
The following features were added to jBPM 7.50.0
33.3.1.1. Pagination parameter for LogCleanupcommand
The new RecordsPerTransaction parameter was added to the LogCleanupCommand KIE API command. The parameter specifies the number of records to be deleted by one transaction. 0 (default) means all records are deleted on the same transaction.
33.4. jBPM 7.49
33.4.1. New and Noteworthy in jBPM 7.49.0
The following features were added to jBPM 7.49.0
33.4.1.1. Kafka extension support custom format
Before the addition of this functionality, only the CloudEvent format was supported by the KIE server Kafka extension. Now users can specify other formats by providing their own implementations of the following interfaces: KafkaEventWriter (org.kie.server.jbpm-kafka.ext.eventWriterClass system property) and KafkaEventReader (org.kie.server.jbpm-kafka.ext.eventReaderClass system property)
33.5. jBPM 7.48
33.5.1. New and Noteworthy in jBPM 7.48.0
The following features were added to jBPM 7.48.0
33.5.1.1. Send signals using container alias
Signals can now be sent to all process instance of a given type by using container alias (before this change it was required to specify proper container id).
REST API is http://${HOST}:${PORT}/kie-server/services/rest/server/containers/${CONTAINER_ALIAS}/processes/instances/signal/${SIGNAL_NAME}
33.5.1.2. Ability to access activity details in boundary events
In the BPMN modeler, you can now set a data output in the Data Output and Assignments field for a boundary event. For example, you can set nodeInstance as a data output variable for a boundary event, which carries the node instance details to use in a further process when the boundary event is triggered.
33.5.1.3. Heatmaps Components
Heatmap is a new Business Central component that can be added to pages and be exported to dashbuilder runtime. Similar to a bar chart, line chart, you can drag these heatmap components to a page and later you can export it to dashbuilder runtime. Heatmaps components are used to display heat information over a process diagram. You can retrieve the heat information from a KIE Server datasets. You can create, edit and, build a dashboard using heatmap component. For more information, see Business Dashboards section for more information.
33.6. jBPM 7.47
33.6.1. New and Noteworthy in jBPM 7.47.0
The following features were added to jBPM 7.47.0
33.6.1.1. Kie Kafka server extension
New Kafka server extension has been added. When enabled (-Dorg.kie.kafka.server.ext.disabled=false for EAP, kieserver.kafka.enabled=true in application.properties for SpringBoot), any catch or start event node with a message will be subscribed to a Kafka topic and any throw or end event node with a message that is triggered will be published to a Kafka topic. Message name is used as topic selector using system properties of the form org.kie.server.jbpm-kafka.ext.topics.<messageName>=<topicName>. If not property is set, the name itself is used as topic. Currently the only Kafka Record value format supported by the extension is a JSON object following CloudEvent specification. For more details, please check https://blog.kie.org/2020/12/jbpm-messages-and-kafka.html
33.6.1.2. MVEL expressions in assignments
MVEL expressions are now supported in assignments, in addition to already supported Xpath expressions.
For example, assuming that instanceMedata is a custom object property containing an Address object, this xml snippet will assign the city of that address to a variable named output
<dataInputAssociation>
<targetRef>output</targetRef>
<assignment>
<from xsi:type="tFormalExpression" language="http://www.mvel.org/2.0">instanceMetadata.address.city</from>
<to>this</to>
</assignment>
</dataInputAssociation>
Please note the usage of this keyword inside to expression as an alias for targetRef. Note also that, if language is specified, you do not need to embed the expression between #{}
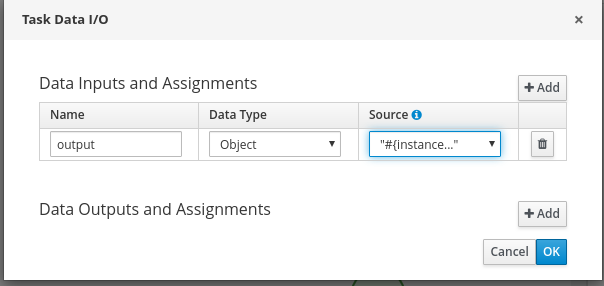
33.6.1.3. Additions on Event Listener
-
onSignalandonMessagemethods has been added to ProcessEventListener. They will allow interested parties to easily react to the firing of a message or signal by a process. -
getNodeTypemethods has been added toNodeinterface. Since this interface is included is most events, this will allow interested parties to find out which type of node the event is related to.
33.7. jBPM 7.46
33.7.1. New and Noteworthy in jBPM 7.46.0
The following features were added to jBPM 7.46.0
33.7.1.1. New API to signal process instance with correlation key
A signal can now be sent to a particular process instance id by using correlation key (before this change you have to use the process instance id), by invoking added signalProcessInstanceByCorrelationKey methods on ProcessService interface or using REST API: http://${HOST}:${PORT}/kie-server/services/rest/server/containers/${CONTAINER}/processes/instances/correlation/${CORRELATION_KEY}/signal/${SIGNAL_NAME}
33.7.1.2. Add named beans for marshalling strategy resolution
At object marshalling strategy resolution you can now refer to spring named beans.
Given a spring bean:
@Bean(name = "auditEntityManager")
public LocalContainerEntityManagerFactoryBean entityManagerFactory(@Qualifier("jpaAuditDataSource") DataSource dataSource,
JpaProperties jpaProperties) {
return EntityManagerFactoryHelper.create(applicationContext,
dataSource,
jpaProperties,
AUDIT_PERSISTENCE_UNIT_NAME,
PERSISTENCE_XML_LOCATION);
}
you can use it as entity manager factory for object marshalling
<marshalling-strategy> <resolver>mvel</resolver> <identifier>new org.drools.persistence.jpa.marshaller.JPAPlaceholderResolverStrategy(auditEntityManager)</identifier> <parameters/> </marshalling-strategy>
33.8. jBPM 7.45
33.8.1. New and Noteworthy in jBPM 7.45.0
The following features were added to jBPM 7.45.0
33.8.1.1. Kafka Event emitter
A new EventEmitter implementation that publish event to several topics (KafkaEventEmitter) has been defined
As in any other emitter, there are three type of events, those related with process, tasks and cases. Each different event type will be published in a different topic once a KIE server transaction that modify any of these entities is commited.
Default topic names are jbpm-processes-events, jbpm-tasks-events and jbpm-cases-events. They can be changed by setting a value to these system properties: org.kie.jbpm.event.emitters.kafka.topic.processes, org.kie.jbpm.event.emitters.kafka.topic.cases and org.kie.jbpm.event.emitters.kafka.topic.cases
The events being published follows the cloud event 1.0 specification.They will contain information stored in the InstanceView implementation for each different type of event: ProcessInstanceView, TaskInstanceView and CaseInstanceView
33.9. jBPM 7.44
33.9.1. New and Noteworthy in jBPM 7.44.0
The following features were added to jBPM 7.44.0
33.9.1.1. Script syntax highlight in process designer
The process designer now provides syntax highlighting and error checking capabilities when working with scripts, for example in case of a Script Task.
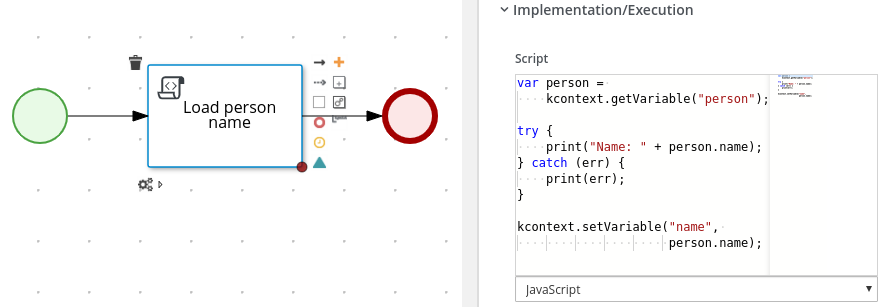
33.9.1.2. Inline Text Editing in process and DMN designer
You can double-click any node to edit its name directly without using floating boxes or confirmation buttons. After editing the node name in the inline text editor, press Enter or click outside of the node to save the name. To cancel, press Esc while editing.
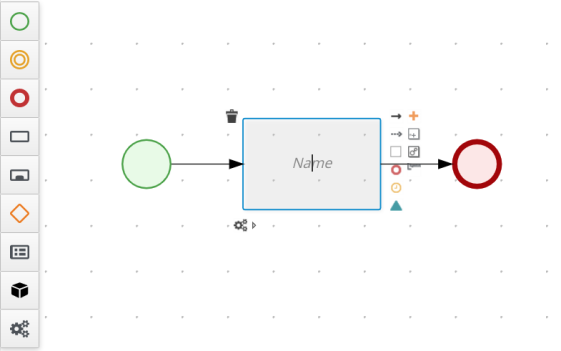
33.9.1.3. Support for default home pages in Dashbuilder Runtime
Dashboards imported in dashbuilder runtime can have a default page. The following list provides a summary of dashbuilder runtime default page updates:
-
When an imported dashboard has only one page, then it is used as the default page;
-
If a page is named as
indexthen it will be used as the default page; -
In other cases the generic Dashbuilder Runtime home page is used.
33.10. jBPM 7.43
33.10.1. New and Noteworthy in jBPM 7.43.0
The following features were added to jBPM 7.43.0
33.10.1.1. Process Fluent API
The process fluent API has been revamped a bit. This is a Java API that allows you to create business processes through a fluent API (so in code, rather than graphically using BPMN 2.0 XML standard). The API has been moved to the public kie-api. A quick example of how it can be used to create a process:
ProcessBuilderFactory factory = ProcessBuilderFactories.get();
Process process = factory
// start process definition
.processBuilder(processId)
// package and name
.packageName(packageName)
.name(processName)
.setMetadata("pepe", true)
// start node
.startNode(1).name("Start").done()
// script node in Java language that prints "action"
.actionNode(2).name("Action")
.action(Dialect.JAVA,
"System.out.println(\"Action\");").done()
// end node
.endNode(3).name("End").done()
// connections
.connection(1, 2)
.connection(2, 3)
.build();33.10.1.2. Dashbuilder Runtime
Dashbuilder Runtime can run dashboards authored in Business Central. It can also connect to Kie Server and run multiple dashboards. Please refer to Dashbuilder Runtime Documentation for more information.
33.10.1.3. Custom Components
It is now possible to extend Business Central reports capabilities by creating custom components that can be part of a dashboard page. Please refer to the Custom Components section for more information.
33.10.1.4. Immutable SpringBoot Deployments
When building a SpringBoot application that embeds the jBPM process engine, the necessary processes (rules, forms, and so in), bundled in a kjar, can be either embedded as part of the application or loaded on the fly. In cloud environments, immutable applications are often wanted, and we have therefore improved our kie-maven-plugin that includes all necessary kjars (and dependencies) as part of the application so it is self-contained, by adding a new package-dependencies-kjar goal.
33.10.1.5. Task Notification using Emails
Earlier it was possible to send task notification emails to specific users (by looking up the email associated with the provided user id), now you can also add additional email addresses directly.
33.10.1.6. JMS Audit Data Replication in Springboot
A new module is added that allows you to automatically configure how JMS audit events are managed.
33.11. jBPM 7.42
33.11.1. New and Noteworthy in jBPM 7.42.0
The following features were added to jBPM 7.42.0
33.11.1.1. Link Events support in Process Designer
Link Events can now be used in the Process Designer. They were supported in the core engine for quite a while, but you can now also use them in the new Process Designer to easily link different parts of your process without drawing long sequence flows. This includes both an intermediate throwing link event and intermediate catching link event, which are matched by the engine at runtime based on matching node names.
33.12. jBPM 7.41
33.12.1. New and Noteworthy in jBPM 7.41.0
The following features were added to jBPM 7.41.0
33.12.1.1. Core process engine
-
When retrieving information about user tasks, the correlation Id of the associated process and the type of process (for example, process or case instance) is now also returned.
-
Additional operations where added to retrieve information about case instances where information about the case file data is included in the results.
33.12.1.2. Data Object support in Process Designer
Data Objects can now be used in the Process Designer. They are similar to process variables, but also have a visual representation on the process diagram itself.
33.13. jBPM 7.40
33.13.1. New and Noteworthy in jBPM 7.40.0
jBPM 7.40.0 contains bug fixes and enhancements.
33.14. jBPM 7.39
33.14.1. New and Noteworthy in jBPM 7.39.0
The following features were added to jBPM 7.39.0
33.14.1.1. Core process engine
-
You can now start a process instance from a given set of node IDs instead of starting a process instance from the start node.
-
The REST service task (REST work item handler implementation) now supports configuring an HTTP proxy.
Wildfly is upgraded to Wildlfy 19.1.0 and EAP is upgraded to EAP 7.3.0 Many of the dependencies are also updated to align.
33.14.2. New and Noteworthy in KIE Server 7.39.0
33.14.2.1. KIE Server Task Assigning
KIE Server optimization and business process management capabilities are integrated to provide the ability to assign the processes human tasks to users as part of an optimized plan see Kie Server Task Assigning.
33.15. jBPM 7.38
33.15.1. New and Noteworthy in jBPM 7.38.0
The following features were added to jBPM 7.38.0
Wildfly is upgraded to Wildfly 18.0.0. SpringBoot is upgraded to 2.2.6.
33.16. jBPM 7.37
33.16.1. New and Noteworthy in jBPM 7.37.0
The following features were added to jBPM 7.37.0
33.16.1.1. Search for Process Instances, Cases and Tasks
The KIE Server has been extended with more out-of-the-box operations to search for specific process instances, cases, or tasks based on multiple constraints. This introduces more flexible search criteria, where you can combine any number of these constraints, including for example process variables or task inputs and outputs. You can also combine constraints from different elements, for example, search for tasks where the associated process instances have specific variable values. The implementation generates a SQL query on the fly based on the provided constraints and executes on the underlying database. The following operations are added to the KIE Server APIs including: queryProcessesByVariables, queryCasesByVariables, and queryUserTaskByVariables.
33.16.1.2. Case identifier customization
The case id typically consists of a prefix and a generated number (for example, CASE-000000001). This can now be further customized, using a 'CaseIdPrefix' process metadata property. The custom case id can use a combination of CASE_PREFIX_ID, DEPLOYMENT_ID, CASE_DEFINITION_ID, and any of the case variables (passed in when starting the case). This allows you to provide a completely custom case identifier (provided as case variable) or to generate a case id based on a combination of the provided information.
33.16.2. New and Noteworthy in Business Central 7.37.0
33.16.2.1. Enhanced DMN KIE Server endpoint
Previously, a Drools project containing DMN assets and explicitly defining a default session, required to specify the default KieSession as a stateful session.
Also, other non-DMN assets required to modify all other requests explicitly to use a stateless KieSession.
In this release, the limitation is resolved, and all DMN models and runtimes execute with default KieBase, including the instance when KieBase is manually specified by default (ref: DROOLS-4431).
33.17. jBPM 7.36
33.17.1. New and Noteworthy in jBPM 7.36.0
The following features were added to jBPM 7.36.0
33.17.1.1. Management console: Navigate to child sub-process
In the management console, when showing the details of a process instance, you can now navigate to any linked sub-process instances directly, either by clicking on the diagram itself or by using the process instance details panel (required in case there are more than one sub-process instance active).
33.17.1.2. Process Metadata support in Process Designer
A new section in the process properties allows you to define additional metadata related to the process. Metadata is just a set of simple key-value pairs and is stored as part of the process definition. This metadata can be accessed, either from within the process or by various features, or listeners at runtime, that take that information into account. For example, this feature can provide more customized case identifiers in the next release.
33.17.1.3. Tagging process variables
You can now tag the process or case variables in the process designer with additional metadata. There are three predefined tags and custom tags that you can add too.
-
required: it is mandatory to assign a value to the variable to start a process or case instance
-
readonly: variable modification is not possible
-
restricted: variable modification is only allowed based on implemented restriction policy (required role and identity provider)
33.18. jBPM 7.33
33.18.1. New and Noteworthy in jBPM 7.33.0
The following features were added to jBPM 7.33.0:
33.18.1.1. New navigation between the child Process Instance Details page and the parent Process Instance Details page in Business Central
In the Process Instance Details page in Business Central, you can now click the Parent Process Instance ID field to navigate to the parent Process Instance Details page.
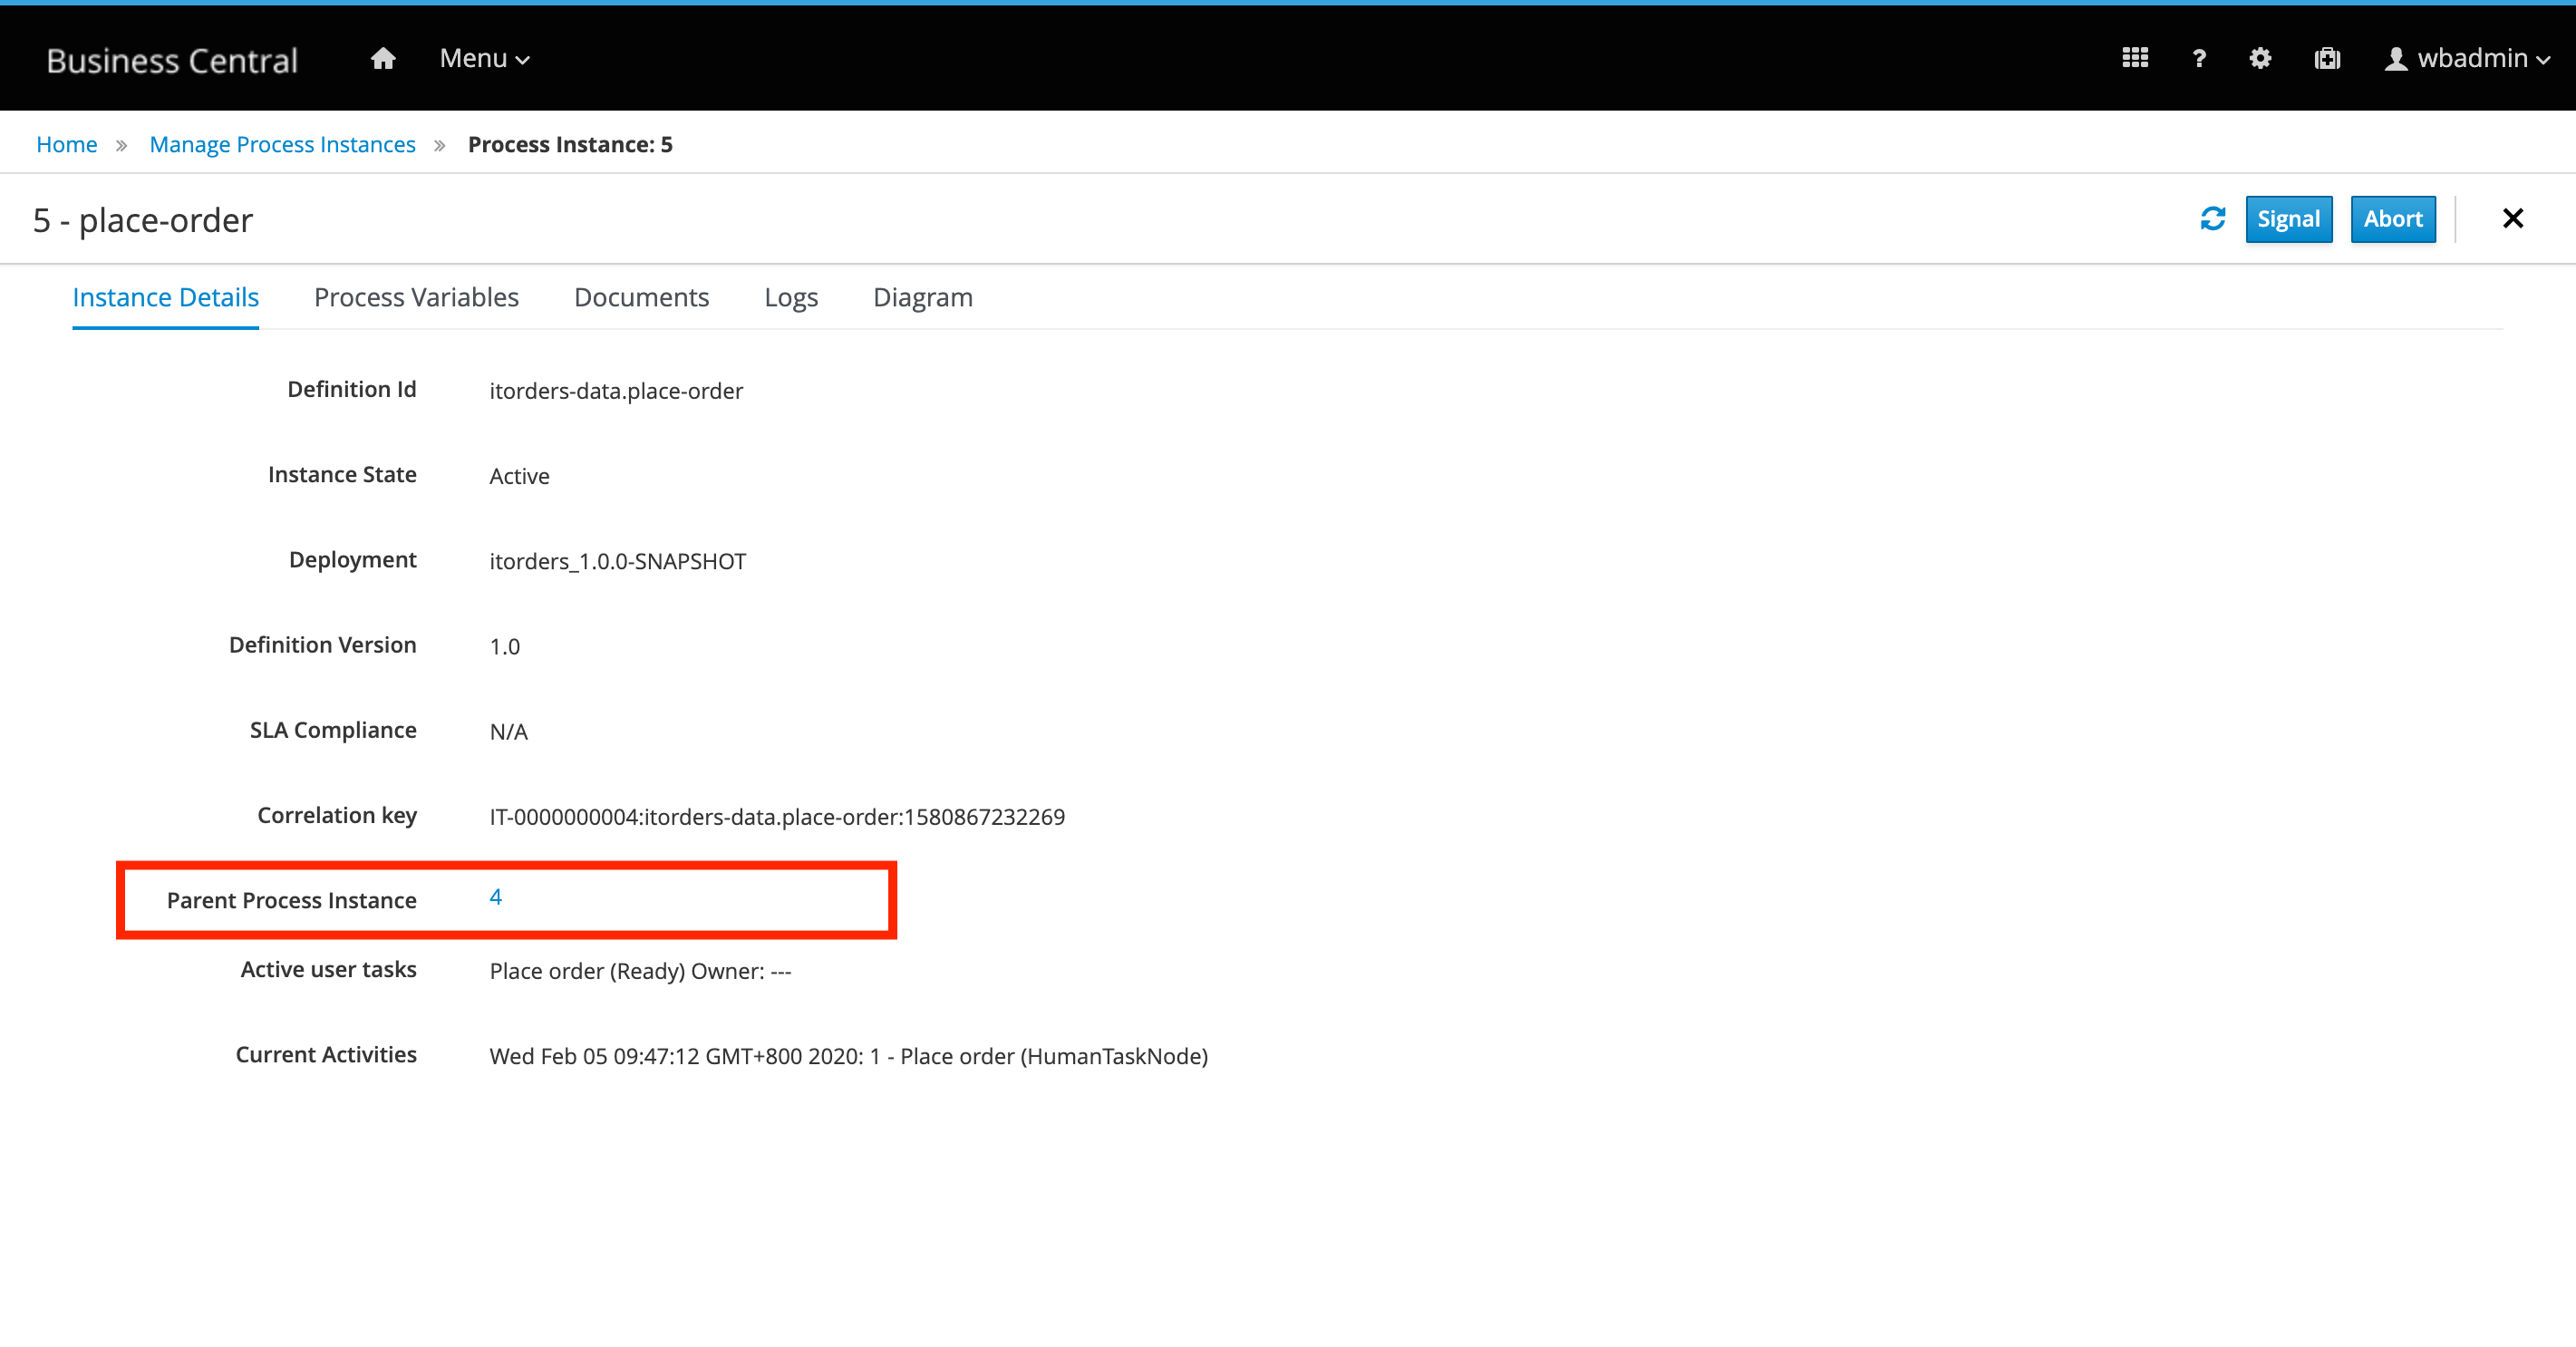
33.18.1.2. New navigation between the child Process Instance Diagram page and parent Process Instance Diagram page in Business Central
In the Process Instance Diagram page in Business Central, you can now use the parent Process Instance ID or Sub Process Instance ID field to navigate between the parent and the sub process Process Instance Diagram page.
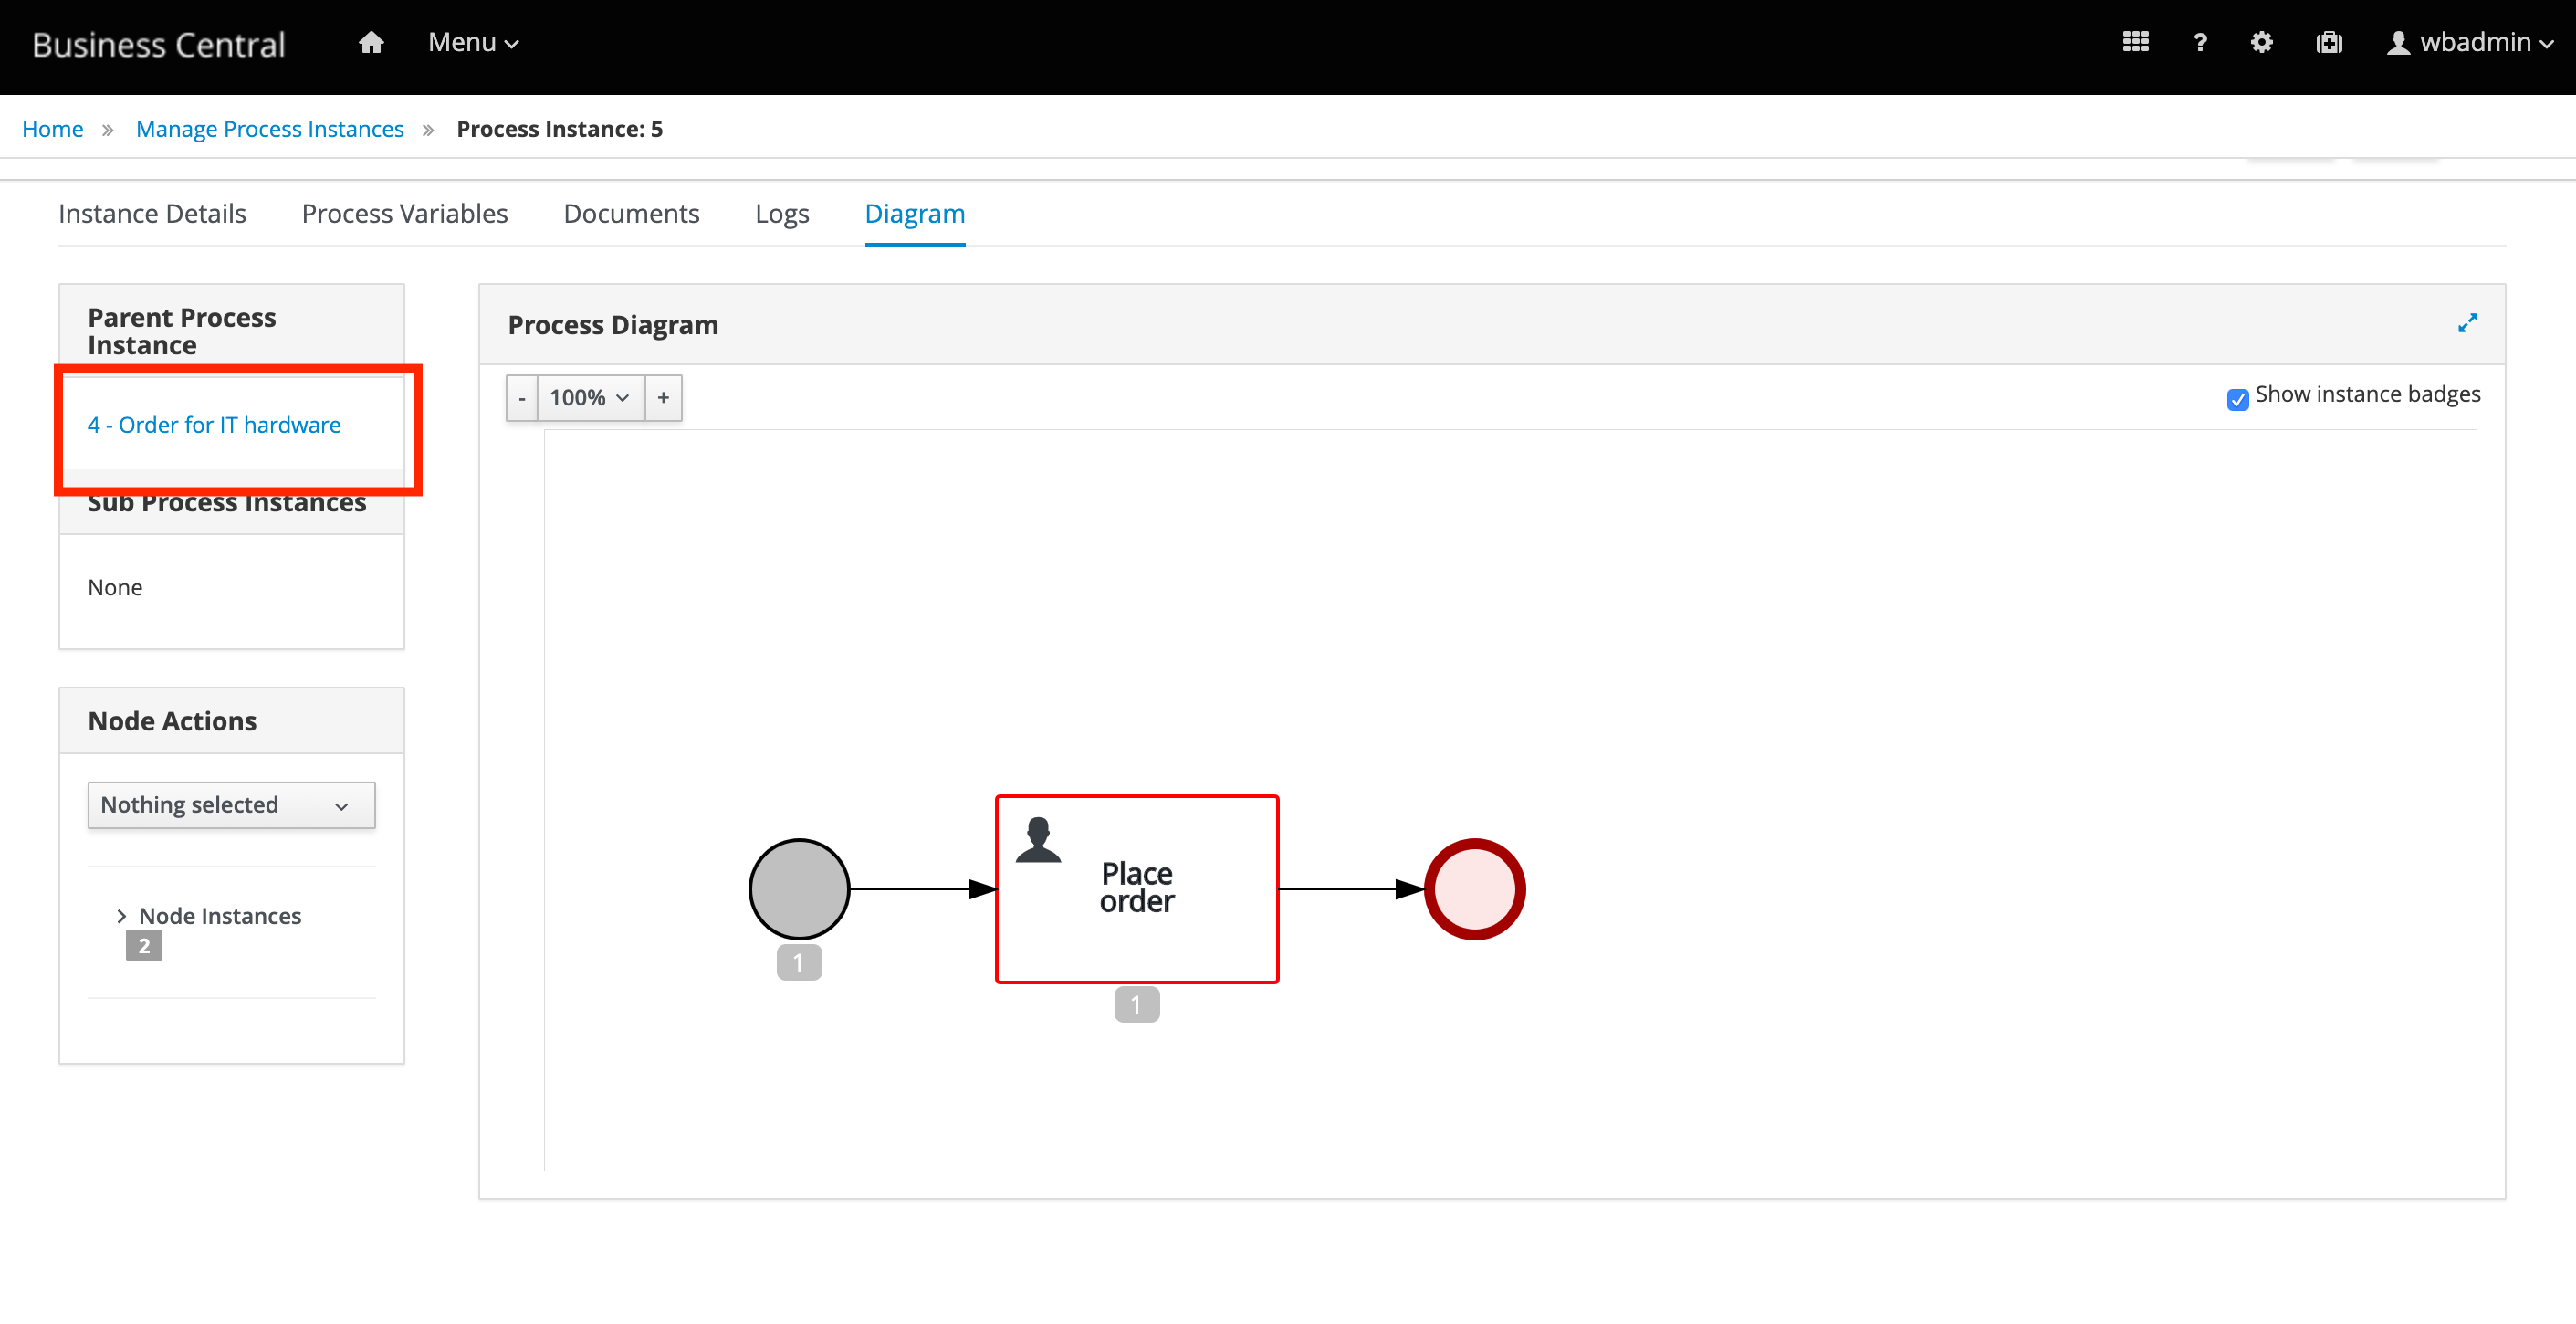
33.19. jBPM 7.30
33.19.1. New and Noteworthy in jBPM 7.30.0
The following features were added to jBPM 7.30.0
33.19.1.1. New quick search filter and parent instance ID column in process instance list in Business Central
In the Process Instances page in Business Central, you can now use the Parent Process Instance ID column to filter process instances based on their parent process instance ID.
33.20. jBPM 7.27
33.20.1. New and Noteworthy in jBPM 7.27.0
The following features were added to jBPM 7.27.0
33.20.1.1. Support for quick search in process definitions list in Business Central
In the Process Definitions page in Business Central, you can now filter the process definitions based on their names using the built-in filter feature.
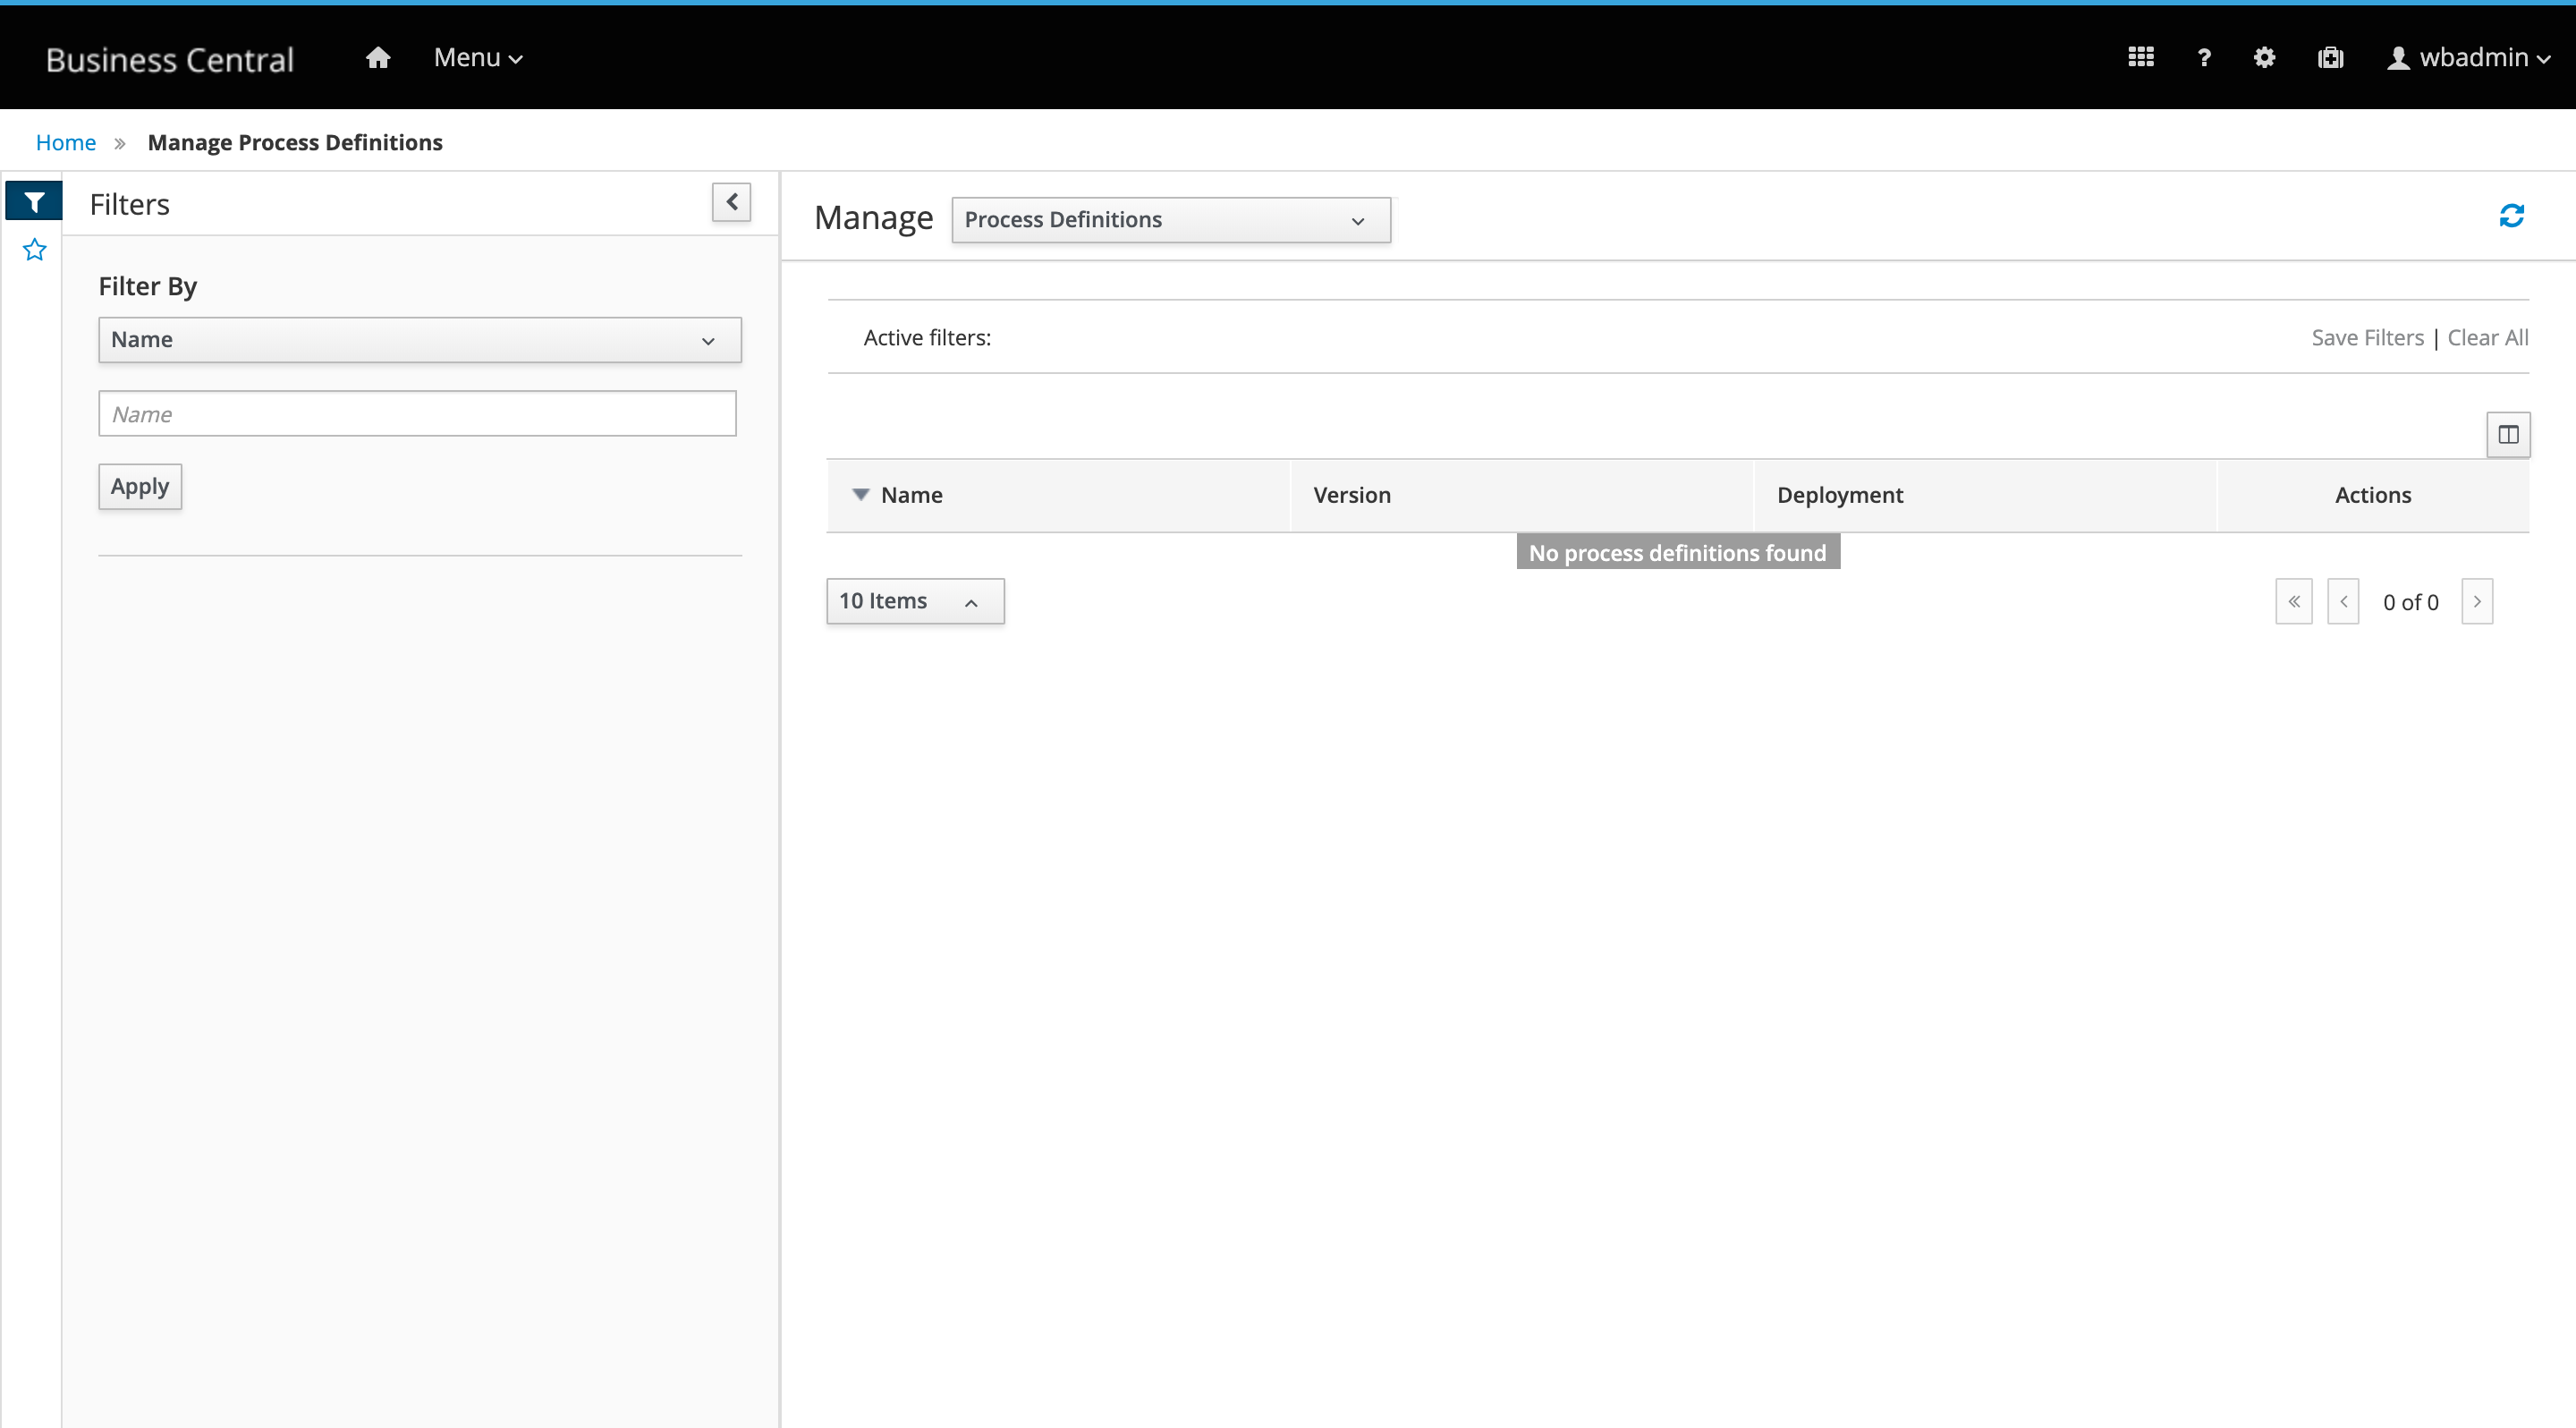
33.21. jBPM 7.25
33.21.1. New and Noteworthy in jBPM 7.25.0
The following features were added to jBPM 7.25.0
33.21.1.1. Bulk reassignment supported for tasks in Business Central
In the Task Inbox and Tasks pages in Business Central, you can now perform bulk reassignment over multiple tasks in a single operation. To reassign tasks in bulk, select two or more tasks, click the Bulk Actions drop-down menu in the upper-right corner of the window, and select Bulk Reassign.
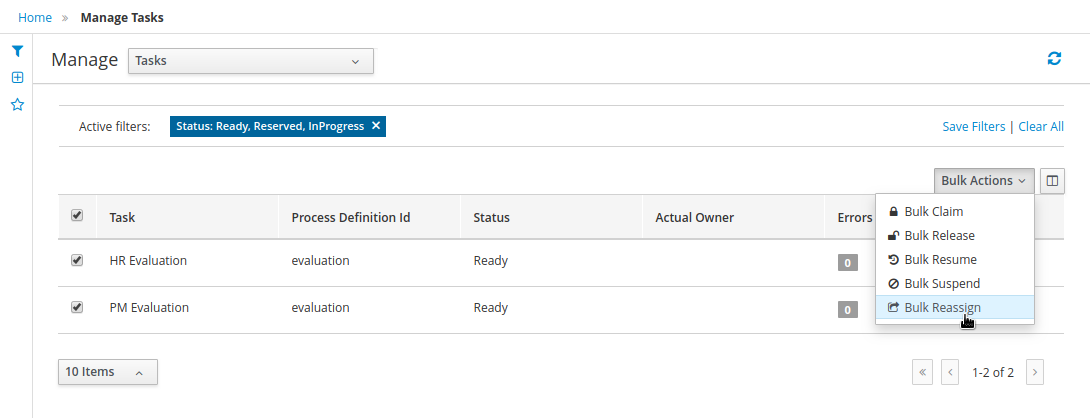
In the pop-up, enter the user identifier of the user to reassign the tasks, and click Delegate. For each task selected, a notification is displayed showing the reassignment result.
33.21.1.2. Import and export Dashbuilder data in Business Central
You can now import and export Dashbuilder data as ZIP files in Business Central. To export or import Dashbuilder data, select the Admin icon in the upper-right corner of the screen and select Dashbuilder Data Transfer.

33.22. jBPM 7.24
33.22.1. New and Noteworthy in jBPM 7.24.0
The following features were added to jBPM 7.24.0
33.22.1.1. User role requirement for WebSocket clients to access the built-in jBPM controller in Business Central
Starting this release, if you use WebSocket protocol in your Java client to connect to the built-in jBPM controller in Business Central,
you must configure the client with the rest-all user role in order to access the jBPM controller REST API.
This enhancement ensures that WebSocket clients have proper access and security when interacting with the jBPM controller in Business Central.
33.22.1.2. Bulk actions supported for tasks in Business Central
In the Task Inbox and Tasks pages in Business Central, you can now perform bulk actions over multiple tasks in a single operation. To update tasks in bulk, select two or more tasks, click the Bulk Actions drop-down menu in the upper-right corner of the window, and select one of the following bulk actions:
-
Bulk Claim
-
Bulk Release
-
Bulk Resume
-
Bulk Suspend
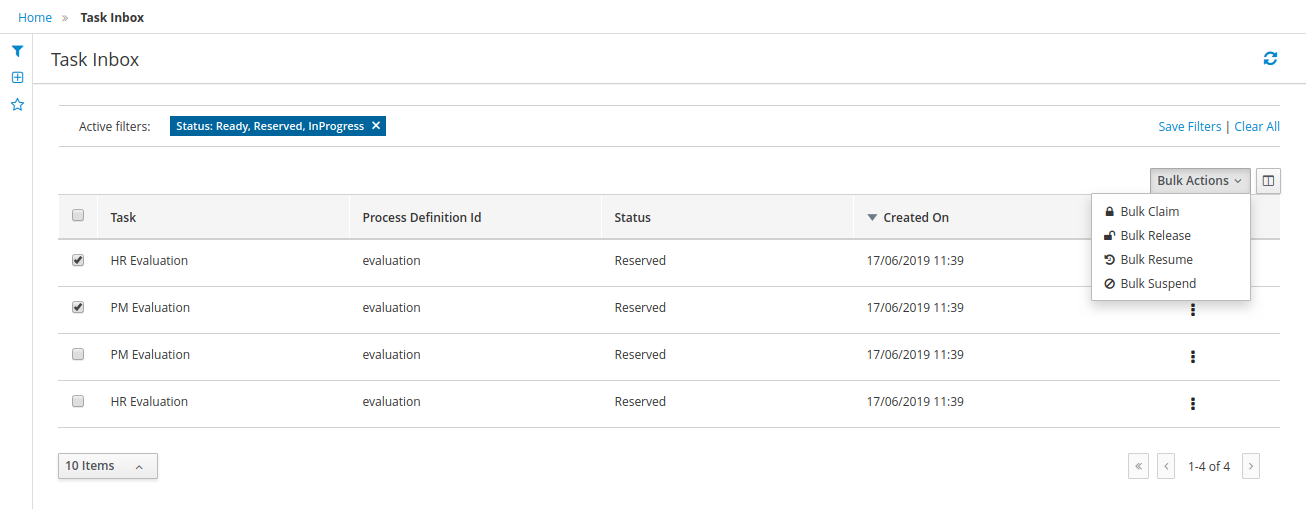
If a specified bulk action is not permitted, based on the task status, a notification is displayed and the operation is not executed on that task.
33.23. jBPM 7.23
33.23.1. New and Noteworthy in Business Central 7.23.0
33.23.1.1. Enhanced BC collaboration features
The following enhancements were added to Business Central to provide additional options for managing access to spaces and projects.
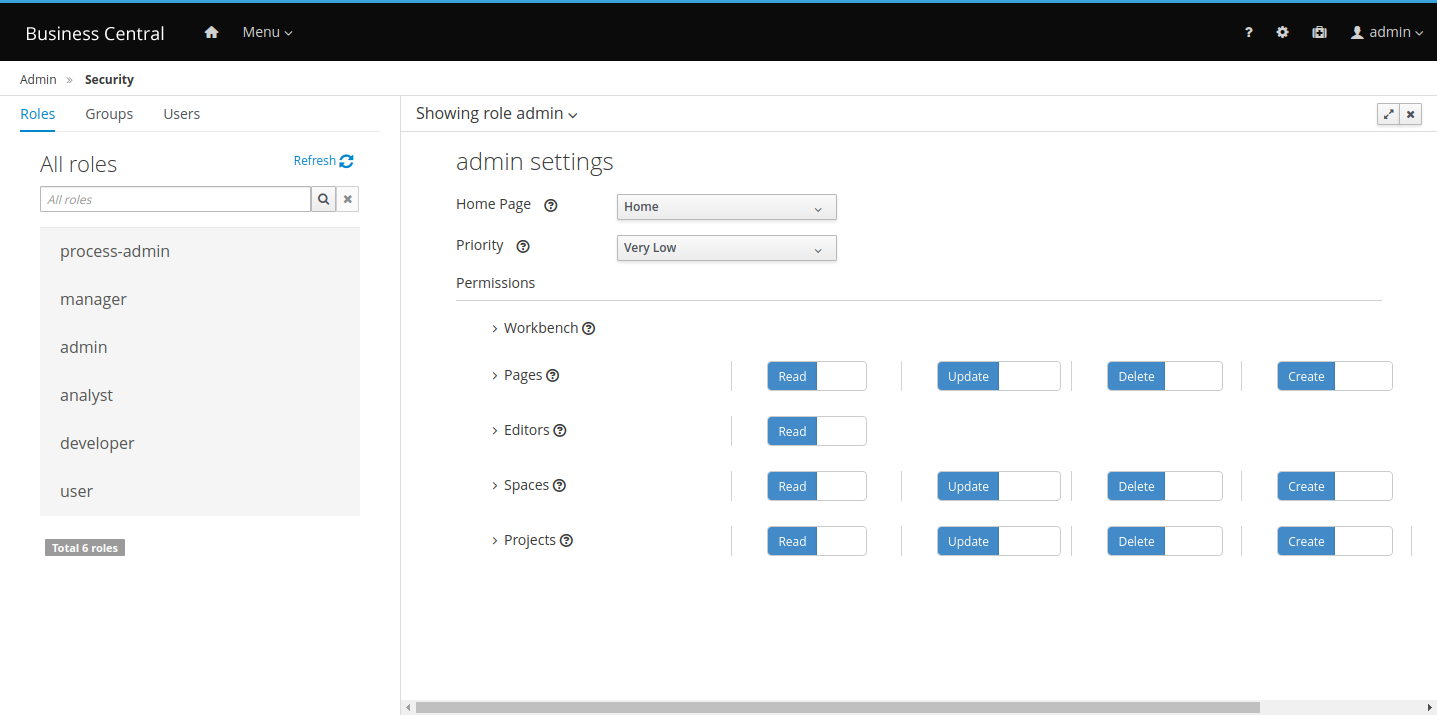
With the introduction of this new feature, it is now possible to manage spaces and projects permissions directly in their respective screens, using the Contributors tab. When contributors are added to a space, they are able to open it and see its projects and other information available. Based on their contributor role, they also have the following permissions granted:
-
Owner: Update contributors, delete spaces, create and delete projects
-
Admin: Update contributors (except owners) and create projects
-
Contributor: Create projects
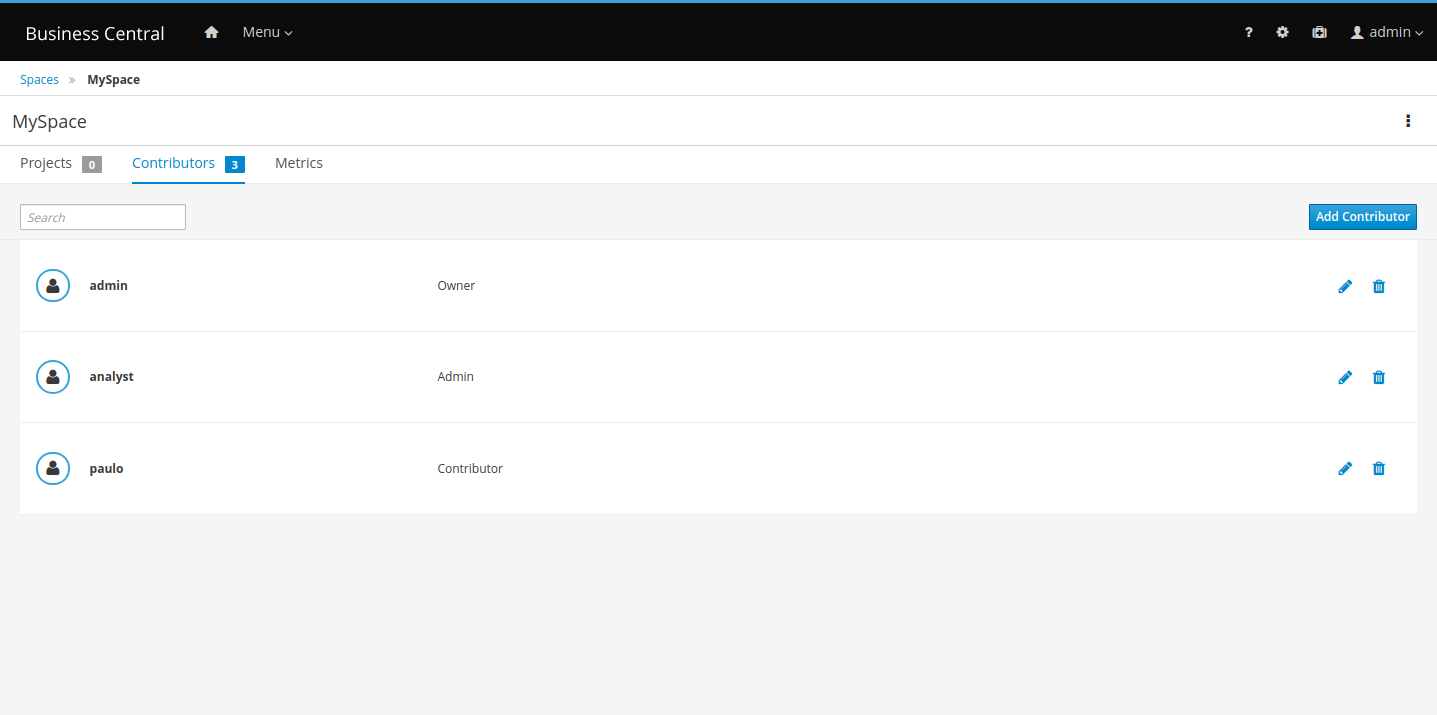
When a project is created inside a space, its contributors are copied from the space and the project creator becomes the owner of the new project. It is also possible to add new contributors to the project if they are also contributors to the project’s space. Contributors can view the project, and depending on their role, they may also have the following permissions:
-
Owner: View, update, build, deploy, and delete projects
-
Admin: View, update, build and deploy projects
-
Contributor: View, update and build projects

The security check uses both the Security Management user interface and Contributors tab to assign permissions to spaces and projects. For example, users can delete a space if they are assigned to a role with the required permissions or is an owner of that space.
33.23.1.2. Role based access control for branches
In addition to the new collaboration features, you can customize contributor role permissions for each branch of a project.
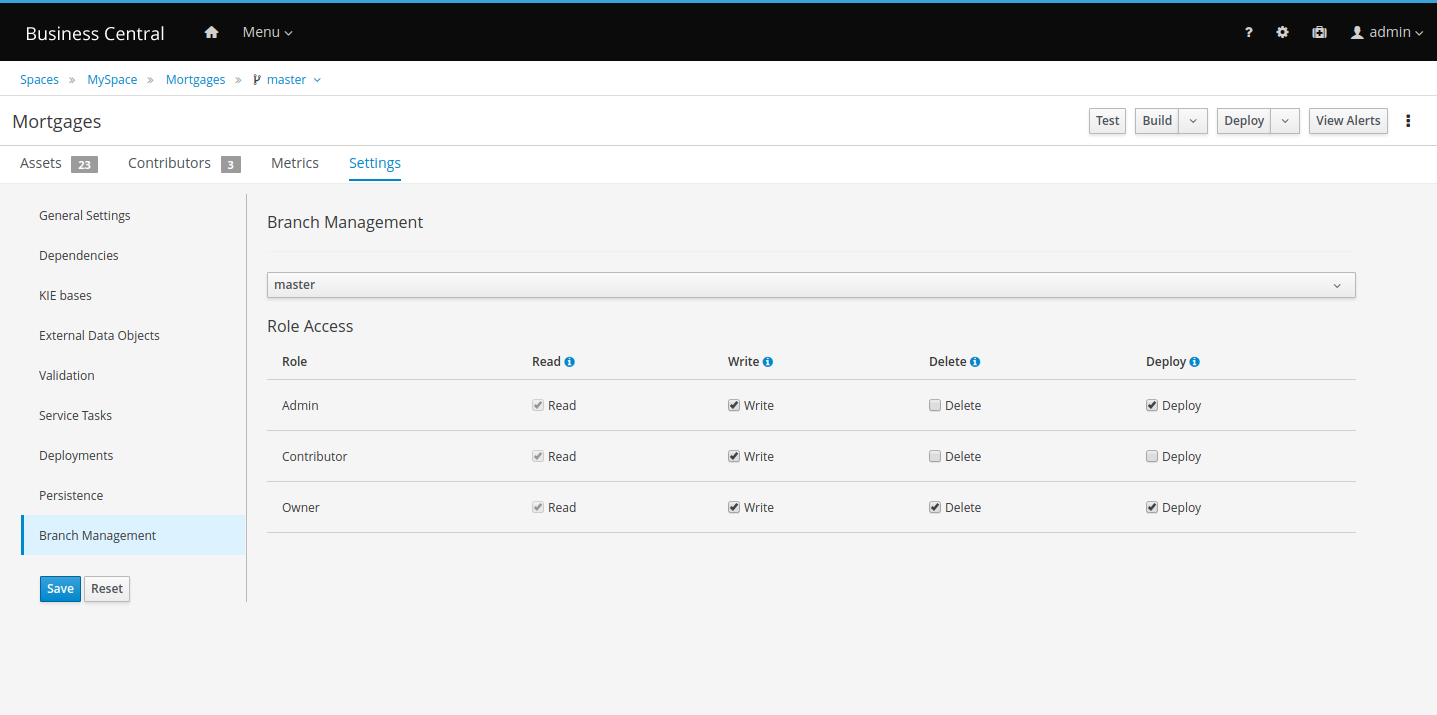
Select which permissions each contributor role has for the selected branch.
33.23.1.3. Importing a subset of branches
When importing projects from a repository, you can select only the branches that you want to persist in Business Central.
-
In Business Central, click Menu → Design → Projects.
-
Select or create the space into which you want to import the project. The default space is MySpace.
-
Click the three dots on the right side of the screen and select Import Project.
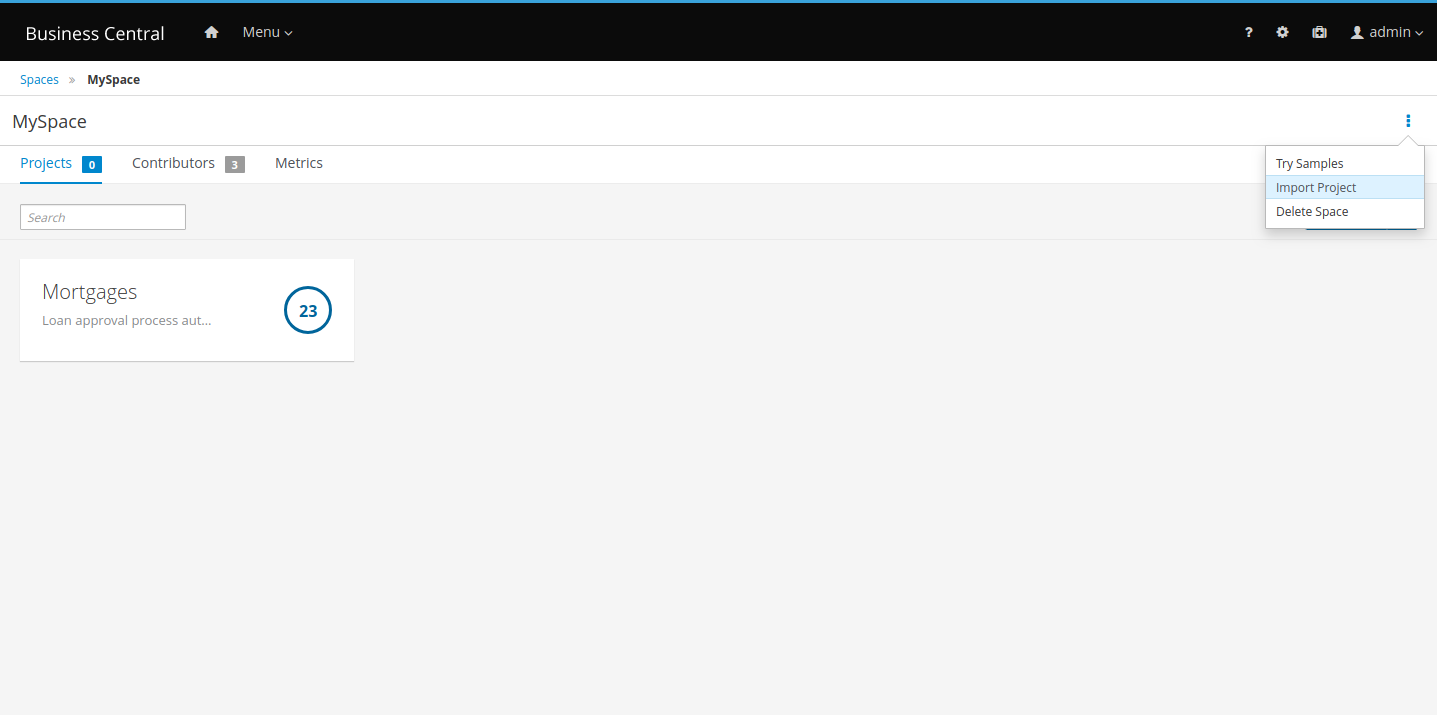
In the Import Project window, enter the URL and credentials for the Git repository that contains the project that you want to import and click Import.
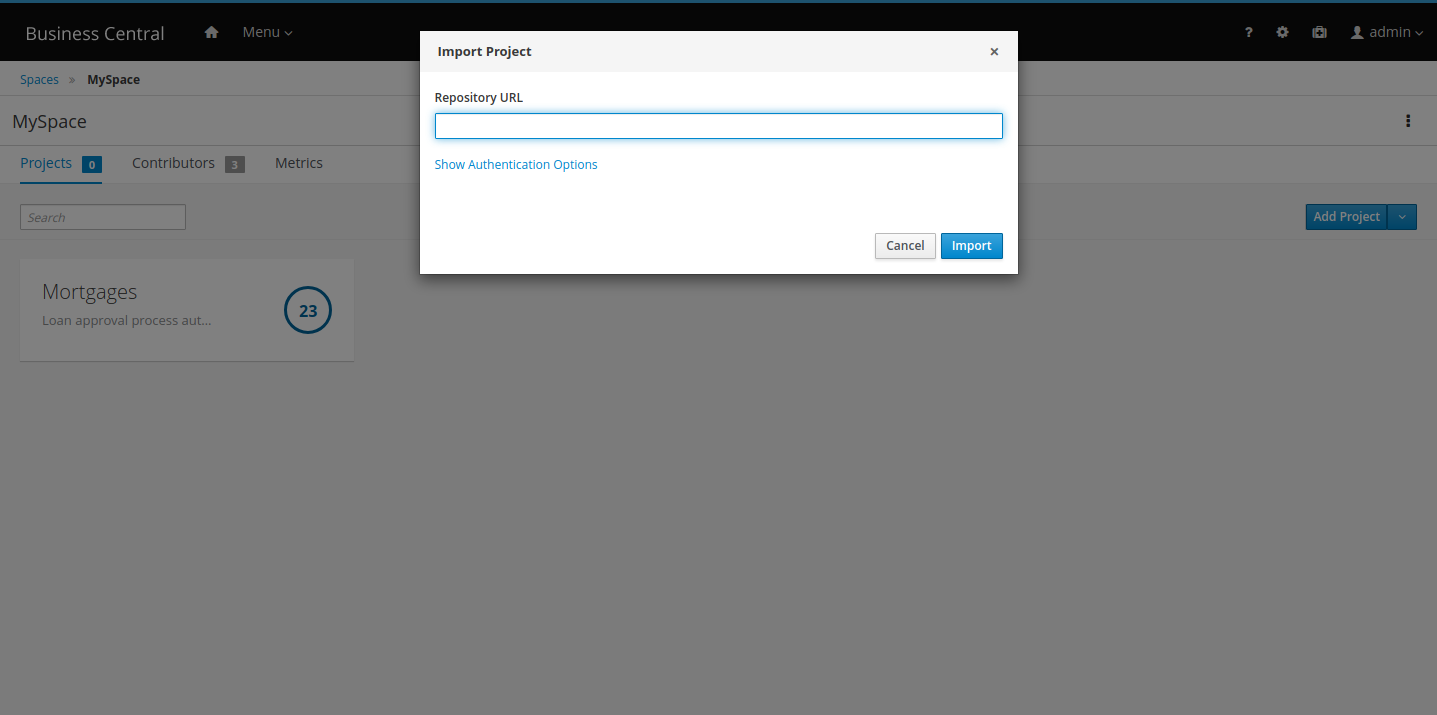
After clicking on Import, all projects found in that repository will be listed:
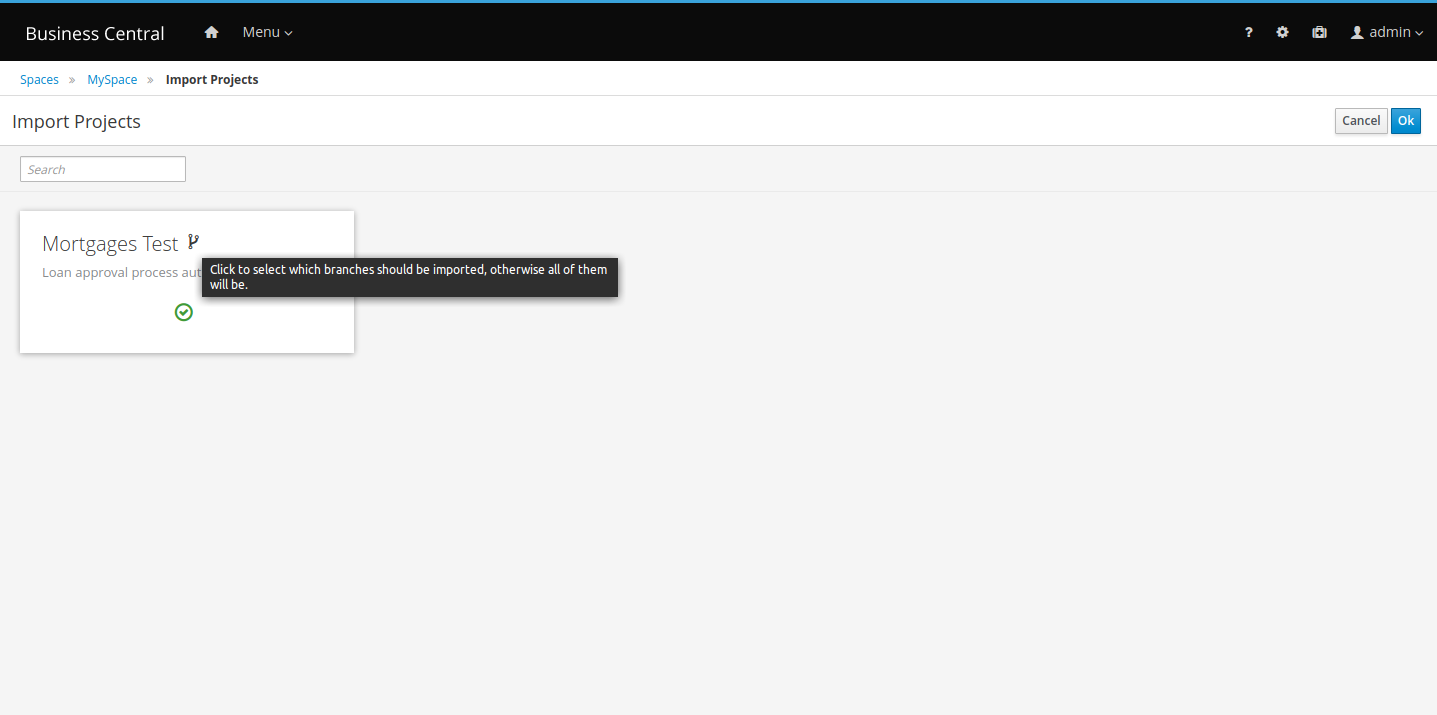
On the right side of each project name, click the branch icon. Select the branches that you want to import.
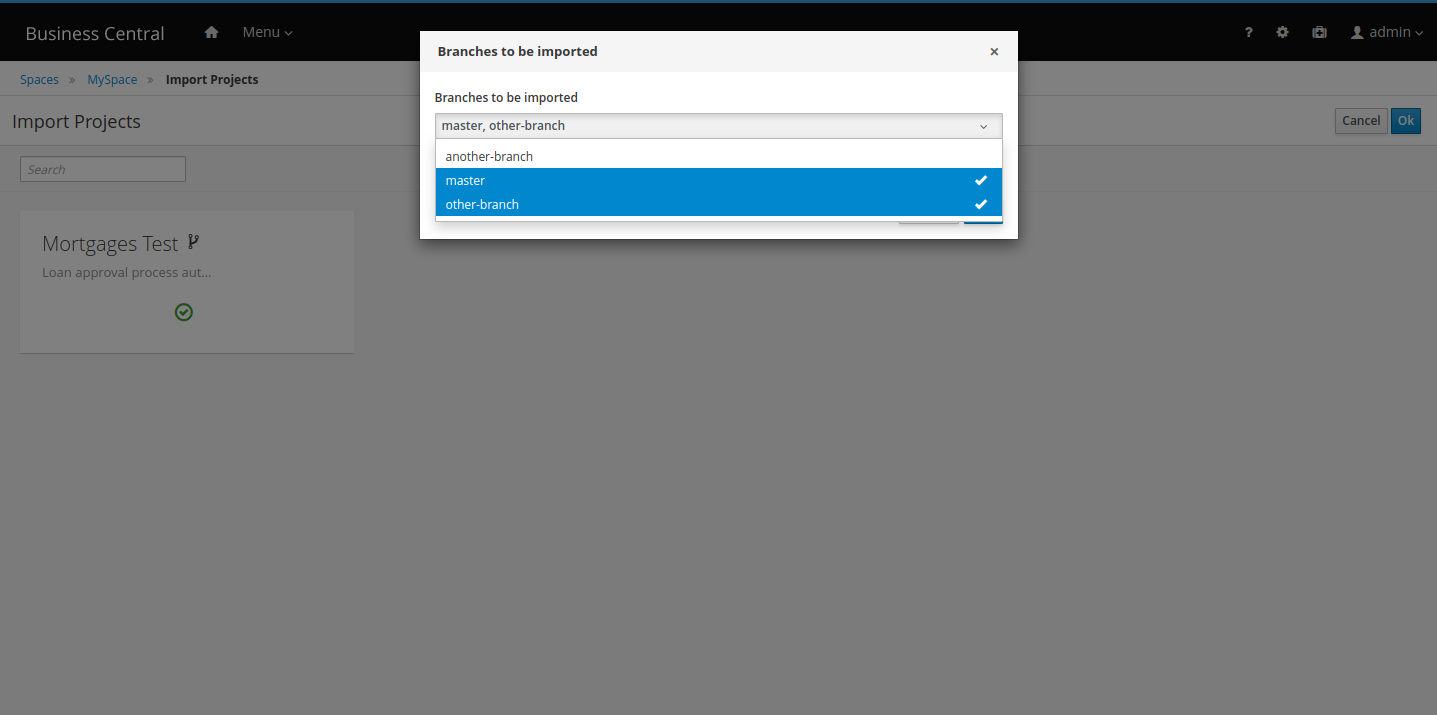
Only the selected branches are persisted:
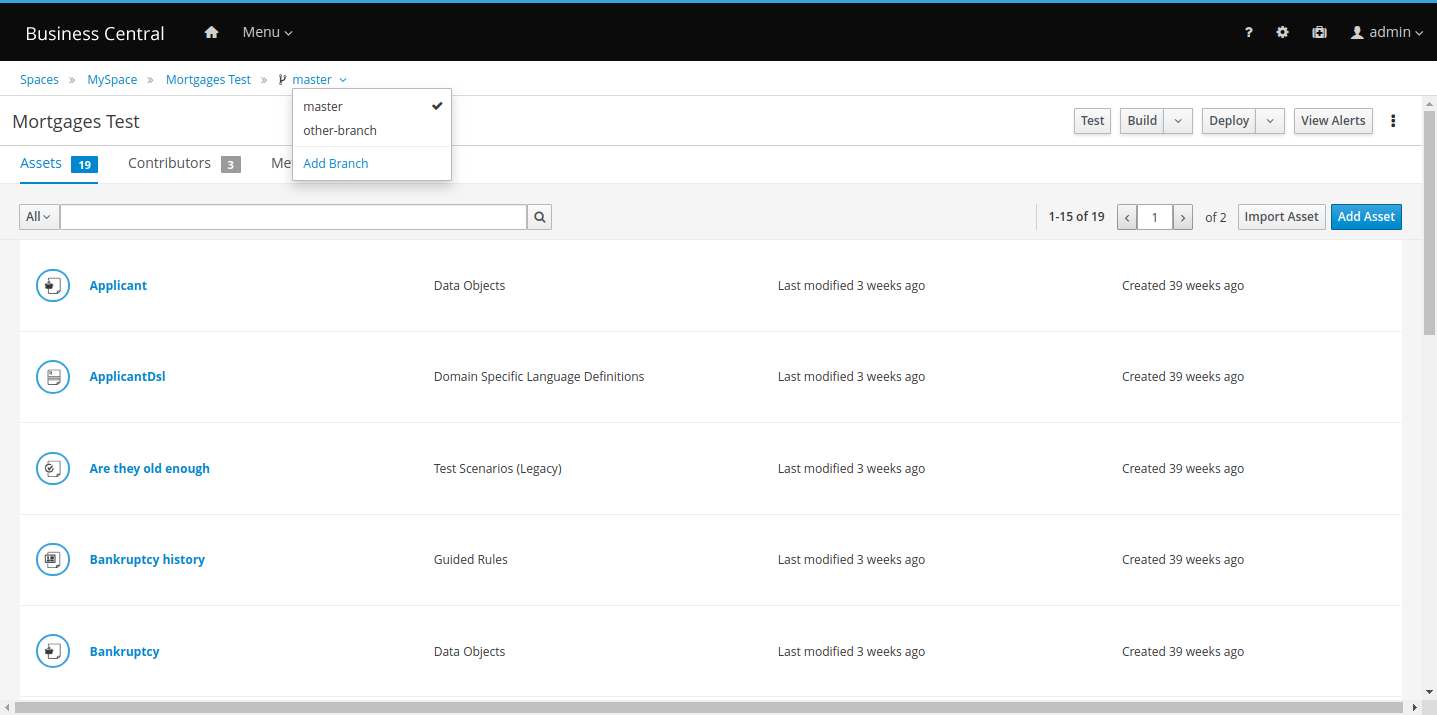
33.23.1.4. DMN included models
The DMN designer contains a new Included Models tab that you can use to include externally defined DMN models in the specified DMN file. When you add an included model in a DMN file, you can reuse components of the included model in that DMN file. This enhancement helps you more efficiently integrate DMN logic between different DMN models in your project.
33.24. jBPM 7.22
33.24.1. New and Noteworthy in jBPM 7.22.0
The following features were added to jBPM 7.22
View task comments in Work tab
You can now add and view task-related comments in the Work tab of tasks in Business Central. This enhancement creates more streamlined workflow and collaboration around tasks.
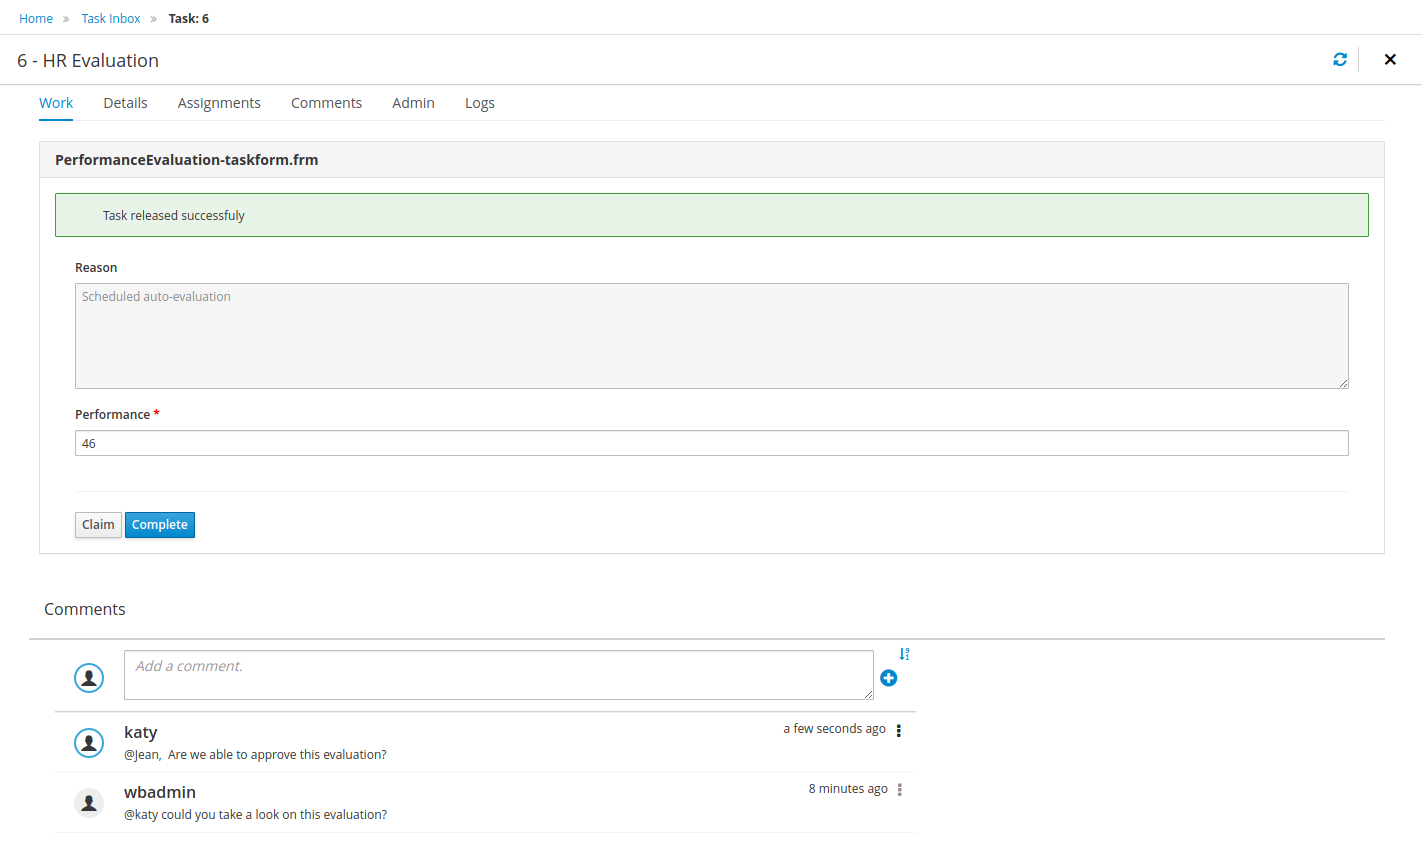
To enable or disable this feature, you can select or clear the Show task comments at work tab parameter in the process administration settings in Business Central.
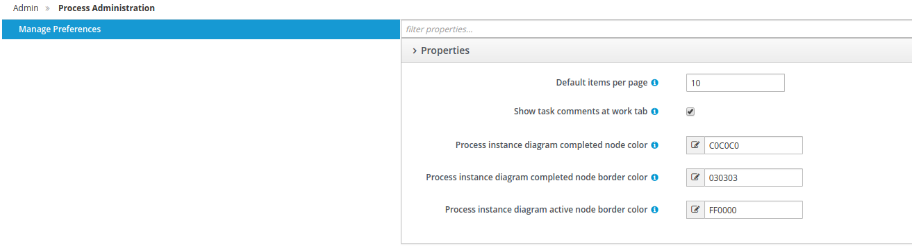
You cannot add comments to tasks in a Completed state and you cannot delete comments added by other users.
New chart API for Business Central
Business Central uses a new API for chart rendering based on C3 and D3. The C3 Renderer API is used by default and implements all of the features from the previous chart library, Google Charts. The Google Charts library is now deprecated and removed from Business Central. To revert to Google Charts, build it from sources and add it to Business Central (see the README.md file in dashbuilder-renderer-google), and then set the renderer system property to org.dashbuilder.renderer.default=gwtcharts.
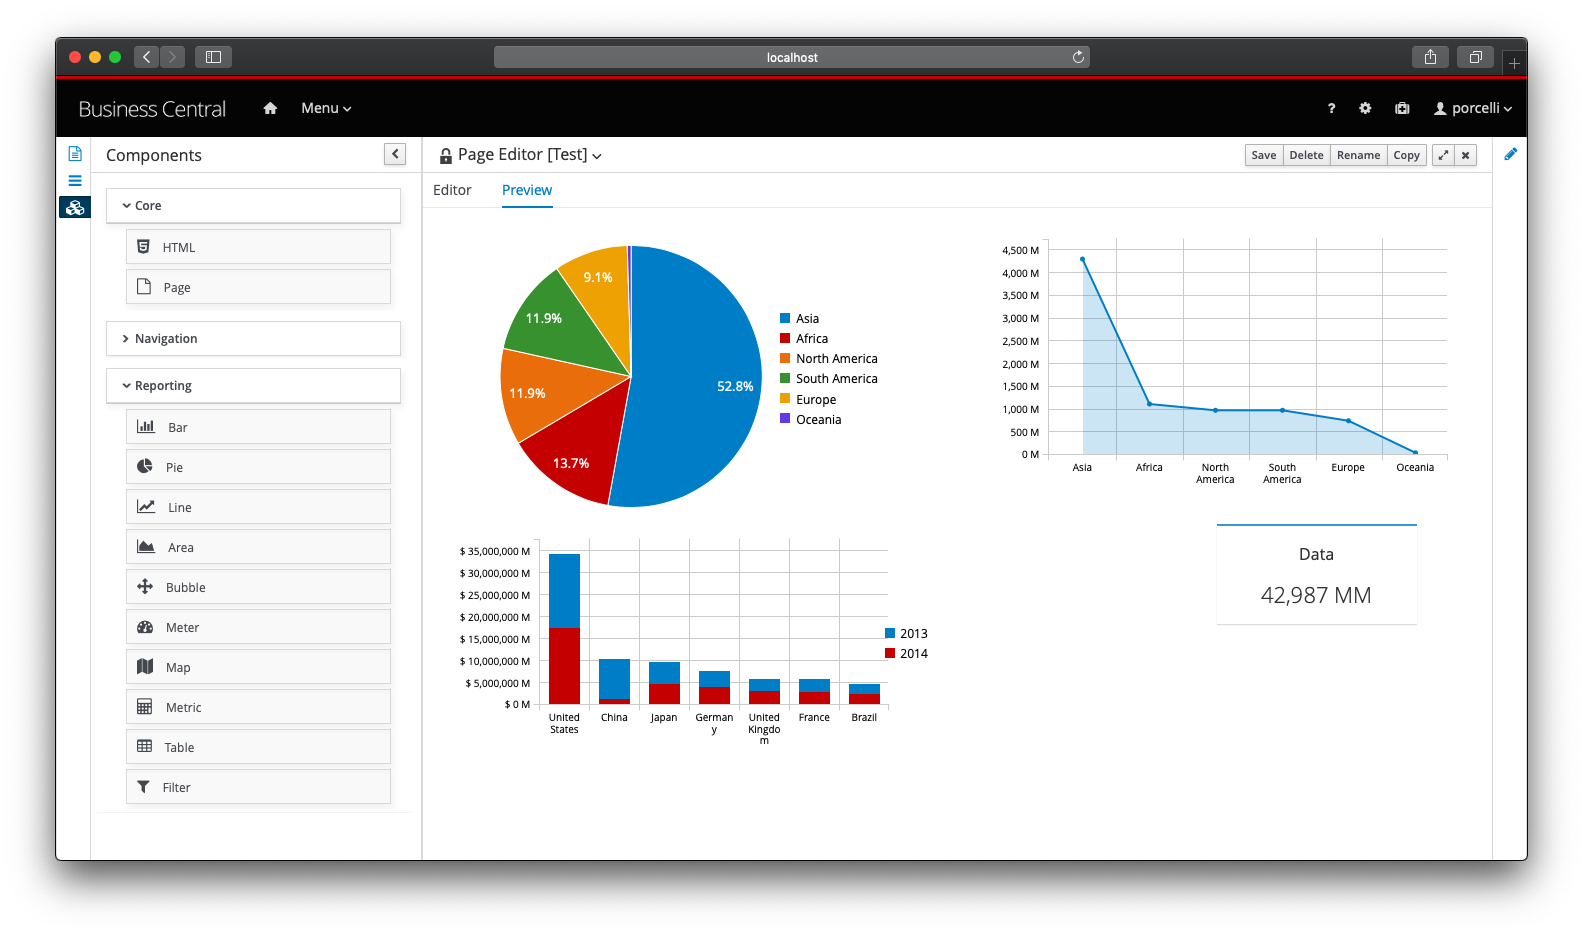
33.25. jBPM 7.21
33.25.1. New and Noteworthy in jBPM 7.21.0
The following features were added to jBPM 7.21
33.25.1.1. Added access to Service Level Agreement (SLA) tracking of tasks
Task-related SLA information is now visible in the Tasks and Task Inbox pages in Business Central. The SLA Compliance status is shown in the task details and two new selectable columns have been added to the task lists: SLA compliance and SLA due date. The filters now have a new SLA Compliance selector that enables you to filter the tasks by their SLA Compliance status.
33.25.1.2. KIE Server and Business Application monitoring using Prometheus
In this release, the KIE Server has been extended for collecting jBPM related metrics using Prometheus. A new server extension has been included, responsible for collecting and exposing this information in the format required by Prometheus.
To enable this new extension, set the Prometheus system property to org.kie.prometheus.server.ext.disabled=false.
When you enable this extension, a series of metrics will be collected, including information about KIE Server deployments,
start time, data sets, execution errors, jobs, tasks, processes, cases, and more. For the complete list of metrics, see the
Prometheus services repository in GitHub.
After the extension is started, you can access the available metrics at $kie-apis/services/rest/metrics. For example:
curl -u wbadmin:wbadmin http://localhost:8080/kie-server/services/rest/metricsAdditionally, this extension is also available for your Business Application. To enable it, update your application.properties
file to include the setting kieserver.prometheus.enabled=true. After your application is running, all
metrics will be available under /rest/metrics.
33.25.1.3. Default filter selection
You can set a saved filter as the default filter that is displayed when other users navigate to the relevant page. The following pages in Business Central support default filters:
-
Process Instances
-
Execution Errors
-
Jobs
-
Tasks
-
Task Inbox
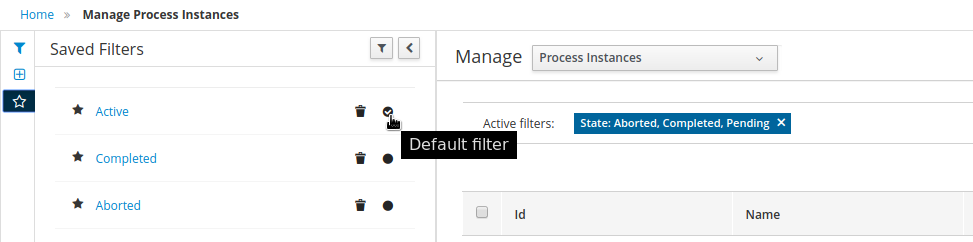
Users can also click Restore default filters to remove any custom filters and restore the default filters that an administrative user has configured.
33.26. jBPM 7.20
33.26.1. New and Noteworthy in jBPM 7.20.0
The following features were added to jBPM 7.20
33.26.1.1. Ability to invoke a DMN decision service from jBPM business rule tasks
Business rule tasks have been improved to enable you to invoke a DMN decision service.
33.26.1.2. KIE container ID filters for process and task instances
You can now filter process and task instances by KIE container ID (deployment unit ID).
33.26.1.3. Form generation for classes from external dependencies
The forms designer supports form generation from classes that are not part of the project but that are added as dependencies of the project.
33.26.1.4. Added support to document lists on forms
A new Document Collection widget is available in the forms designer that enables you to upload multiple documents to a process or task form.
You can use the Document Collection widget for process or task forms that have a variable with the type org.jbpm.document.DocumentCollection.
Additionally it also supports the legacy type org.jbpm.document.Documents.
33.26.1.5. Significant improvement of JMS client for KIE Server
The JMS client for KIE Server has been enhanced to enable you to reuse JAXB context that significantly improves overall performance of KIE Server client operations with JMS.
33.27. jBPM 7.19
33.27.1. New and Noteworthy in jBPM 7.19.0
The following features were added to jBPM 7.19
33.27.1.1. Simplified access to Task and Process variables in Manage and Task Inbox sections
In this release, the Manage Process Instance, Manage Tasks and Task Inbox, have been enhanced to facilitate access to custom variables. Previously, the only way to access these custom variables was to create an Advanced Filter using either the Task Name or the Process Id. Now users can use the newly added pre-defined filters (based on Task Name and Process Id) to filter a specific instance or task and also make use of the extra variables as columns in the resulting table.
33.27.1.2. New predefined filters for process instances and tasks
In this release, a new set of quick-search filters has been created to allow you to easily filter relevant data of process instances and tasks. These new filters include SLA Compliance and Deployment Id.
33.27.1.3. jBPM XES Export
This release includes a new tool that aims to facilitate exporting XES based logs from the jBPM runtime. These logs can then be consumed by different process mining tools to analyse different aspects from the process runtime execution such as conformance, performance, deviations, process discovery and more. eXtensible Event Stream (XES) is an xml based standard that unifies the interchange event data information between information systems on one side and analysis tools on the other side. For more information regarding the XES standard, please visit: http://www.xes-standard.org/. To get started using the export tool, please check instructions in: https://github.com/kiegroup/jbpm/tree/master/jbpm-xes.
33.27.1.4. Added color configurations for process instance diagrams
The following new properties were added in Settings → Process Administration in Business Central to enable you to change the node colors used in process instance diagrams:
-
Completed node color
-
Completed node border color
-
Active node border color
When you modify these configurations, the change is applied to all process instance diagrams in Business Central.
33.28. jBPM 7.18
33.28.1. New and Noteworthy in jBPM 7.18.0
The following features were added to jBPM 7.18
33.28.1.1. Enhanced process instance diagram view
In this release, the process diagram view has been enhanced to show extra information regarding the number of node instances (either completed or in progress) for a specific node in the process. This new feature is displayed in form of counter badges below each node in the process diagram view. It is also possible to toggle the badges visibility to show or hide it.

33.28.1.2. Upgrade of SpringBoot to 2.1.1
jBPM 7.18 comes with long awaited SpringBoot upgrade. Business applications are now based on 2.1.1.RELEASE of SpringBoot. All components shipped with jBPM have been tested and confirmed to work without issues after upgrade.
| When upgrading your business application to 7.18, make sure to increase the version of spring boot as well. |
<parent>
<groupId>org.springframework.boot</groupId>
<artifactId>spring-boot-starter-parent</artifactId>
<version>2.1.1.RELEASE</version>
</parent>33.28.1.3. Upgrade of Hibernate to 5.3.6
Following up on the recent upgrade of the run time (Wildfly 14), with jBPM 7.18, Hibernate has been upgraded to match
this run time. Since Hibernate 5.3.x is already on JPA 2.2, it resulted in a split in the KIE Server WAR file:
-
ee8 - Comes with upgraded Hibernate and targets WildFly 14+ and EAP 7.2
-
ee7 - Comes with Hibernate version as in 7.17 (5.1.x) and targets environments like WAS and WLS
-
webc - Comes with Hibernate 5.3.6 and targets Tomcat
Please ensure you run the right version of the WAR file for your run time.
33.28.1.4. New development mode for KIE Server
Added ability to KIE Server to start in development mode to provide a more fluent experience during the development and testing phases of projects. Development mode provides a more flexible deployment policy that enables you to update existing containers while keeping the active process instances for small changes, or to reset the container state before updating active process instances for bigger changes.
KIE Server also provides a production mode that you can use for production environments. This mode was the default mode in previous releases.
You can select the KIE Server mode by setting the system property org.kie.server.mode to production or development.
If no other configuration is provided, KIE Server starts in development mode by default.
33.28.2. New and Noteworthy in Business Central 7.18.0
33.28.2.1. Guided rules designer filtering
The guided rules designer now supports filtering of DSL (domain specific language) files and Fact Types when you add new Condition or Action elements.
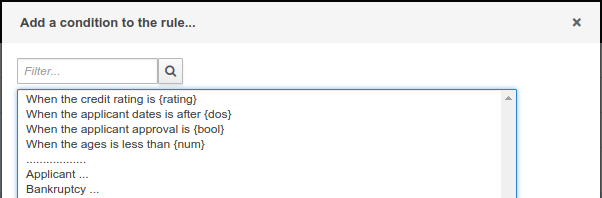
33.28.2.2. Test Scenario (Preview) renamed to Test Scenario and List/Map support
Old Test Scenario has been renamed as Test Scenario (Legacy) and Test Scenario (Preview) now is Test Scenario. The editor now supports also List and Map as supported data types for testing.
33.28.2.3. Development streamline lifecycle
Along with the new development mode on KIE Server, Business Central also adds a simplified deployment mechanism for SNAPSHOT modules to improve the user experience during the development and testing phases of a module. Some of the changes introduced:
-
More flexible deployment policy, allowing you to run module updates with no need of undeploying previous deployments.
-
Once a SNAPSHOT module is deployed, Business Central will store the user deployment preferences making subsequent deployments update the previously deployed container. This mechanism also keeps the active process instances.
-
Added ability to redeploy a module, updating the container with latest changes but aborting the active process instances.
Other changes introduced:
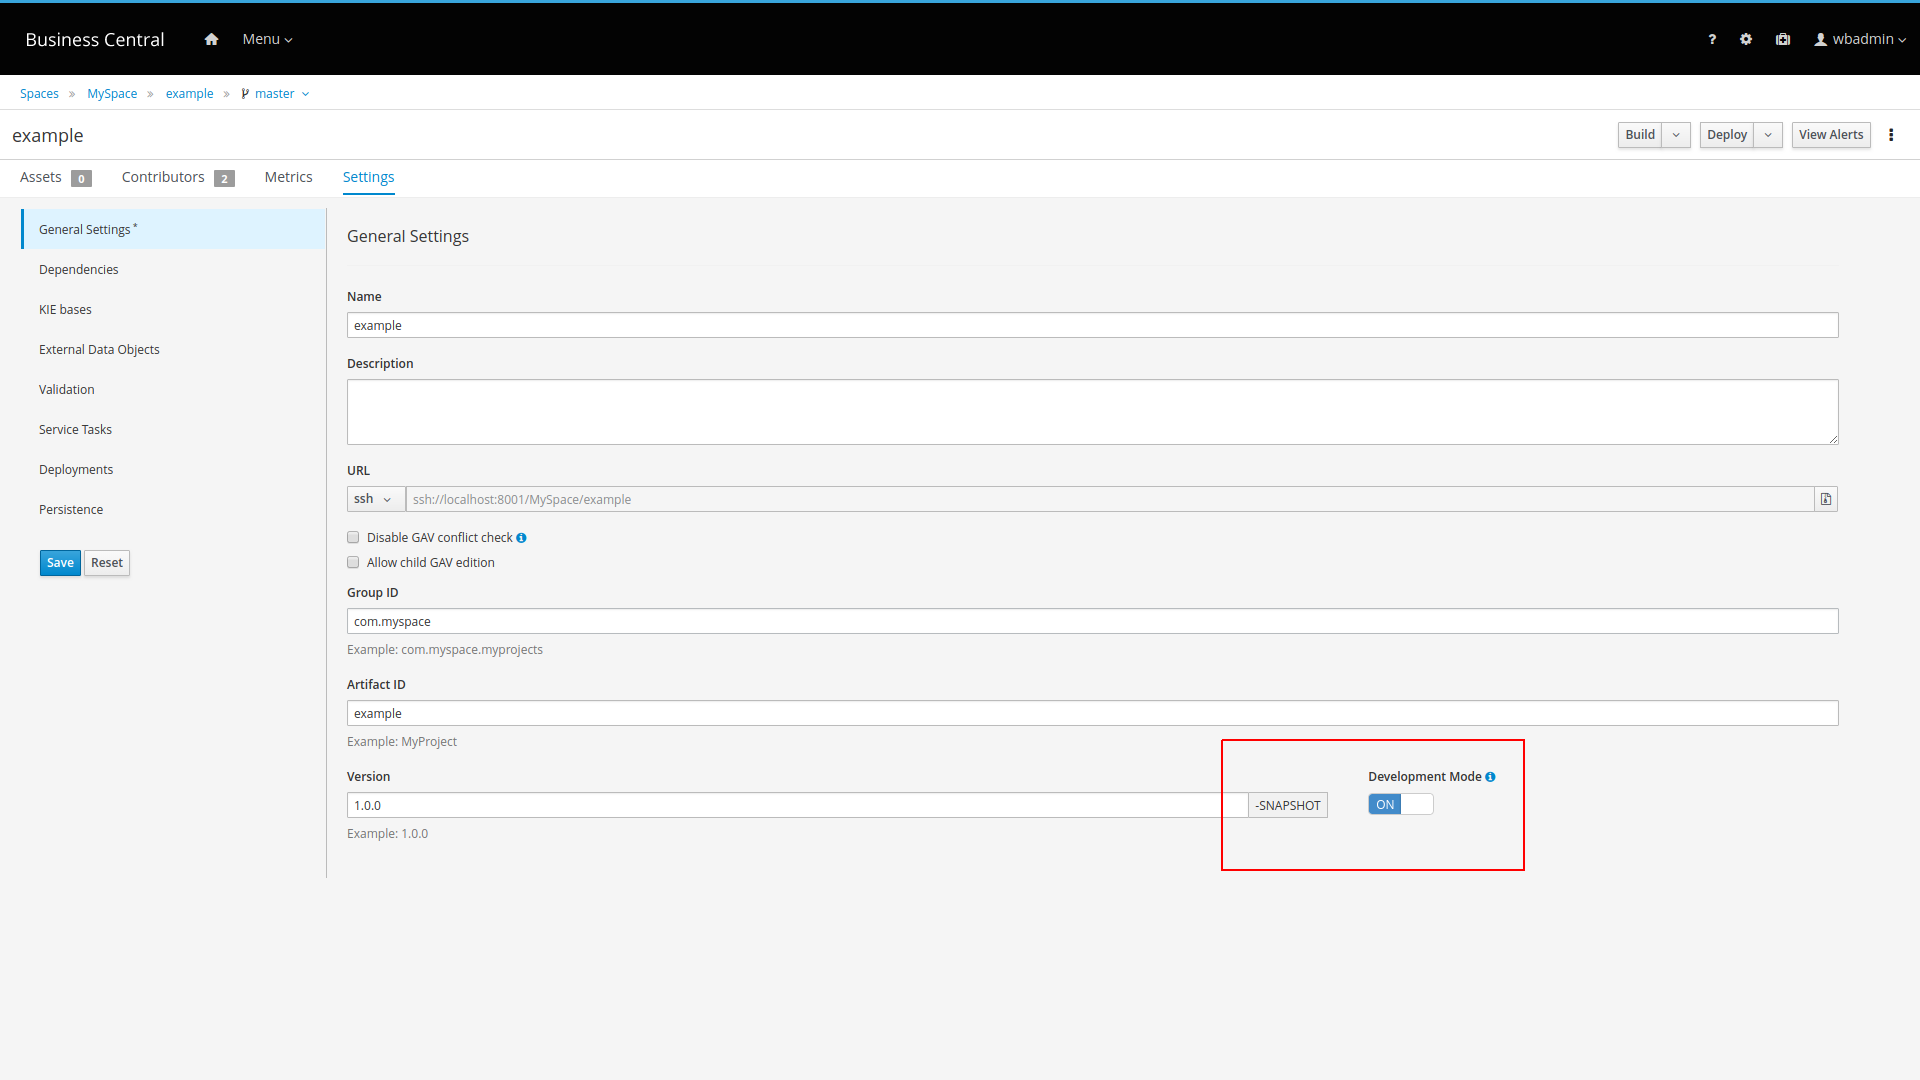
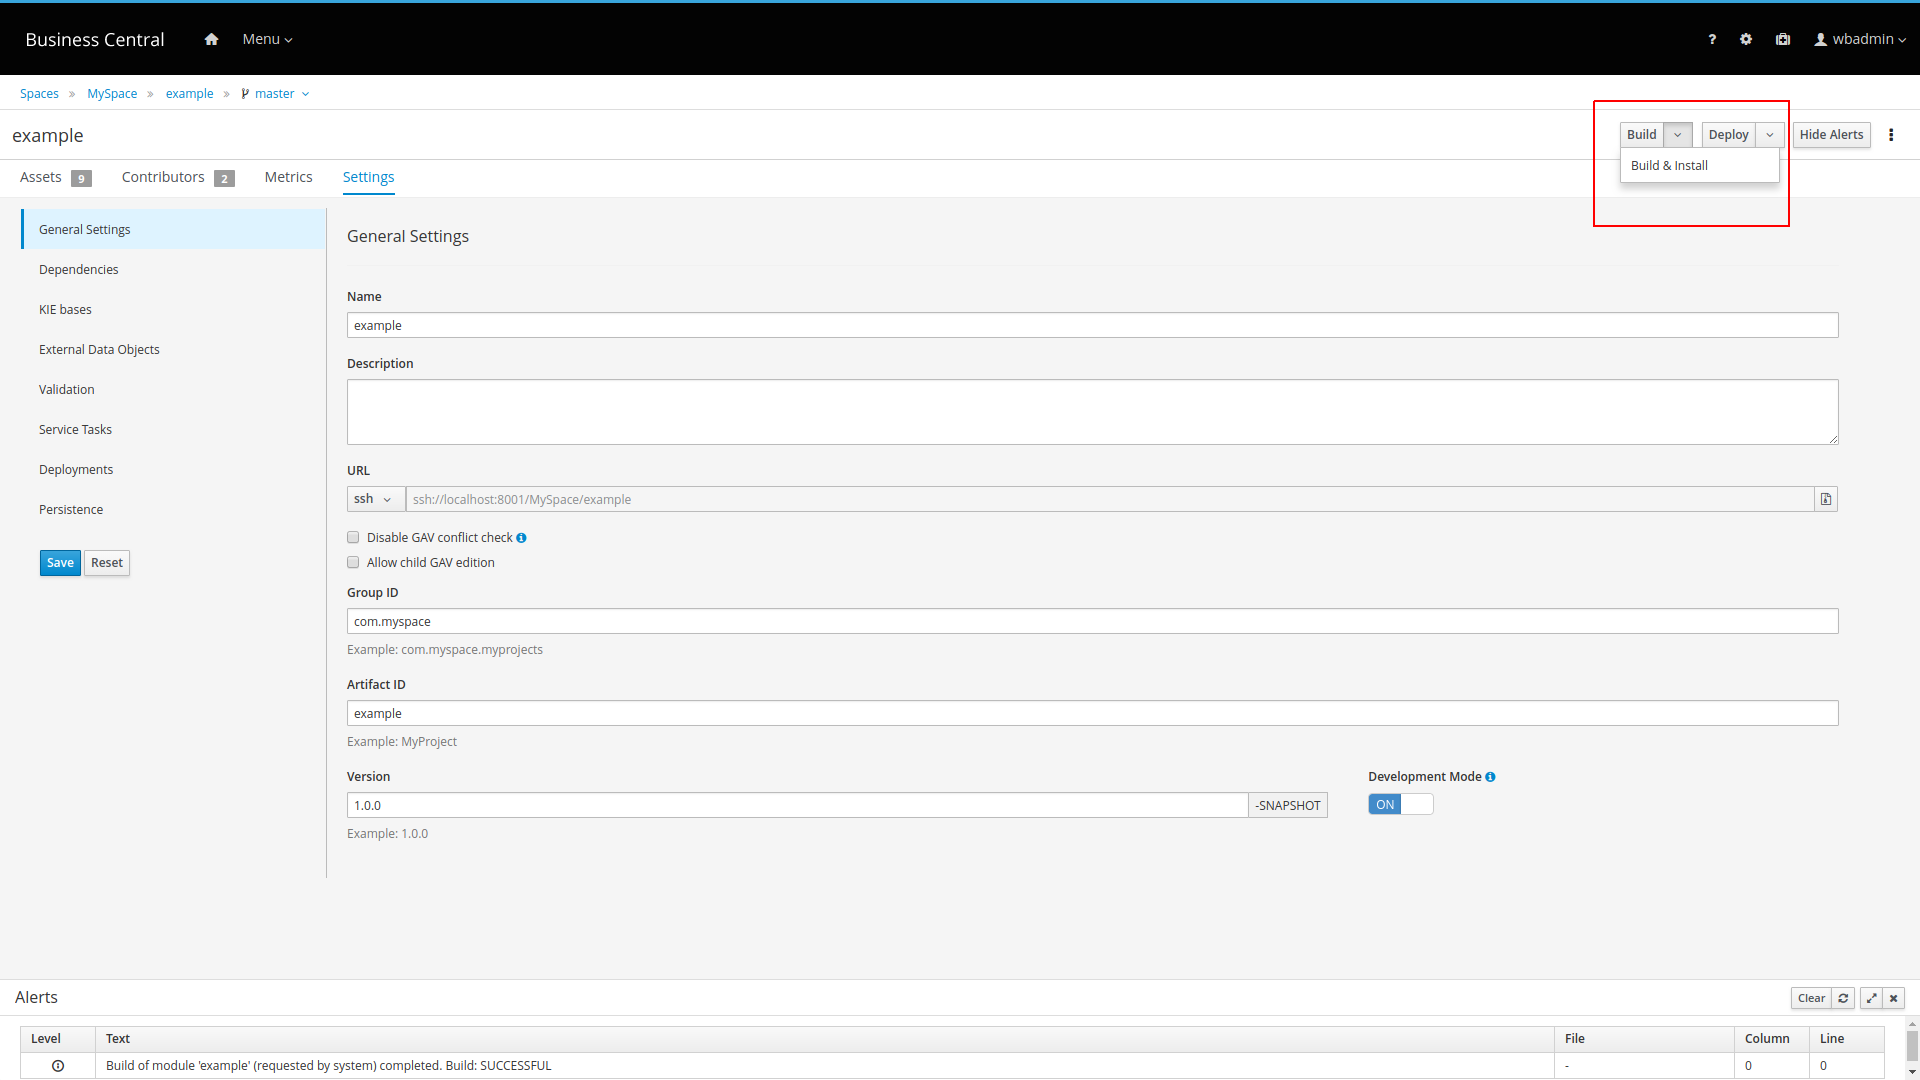
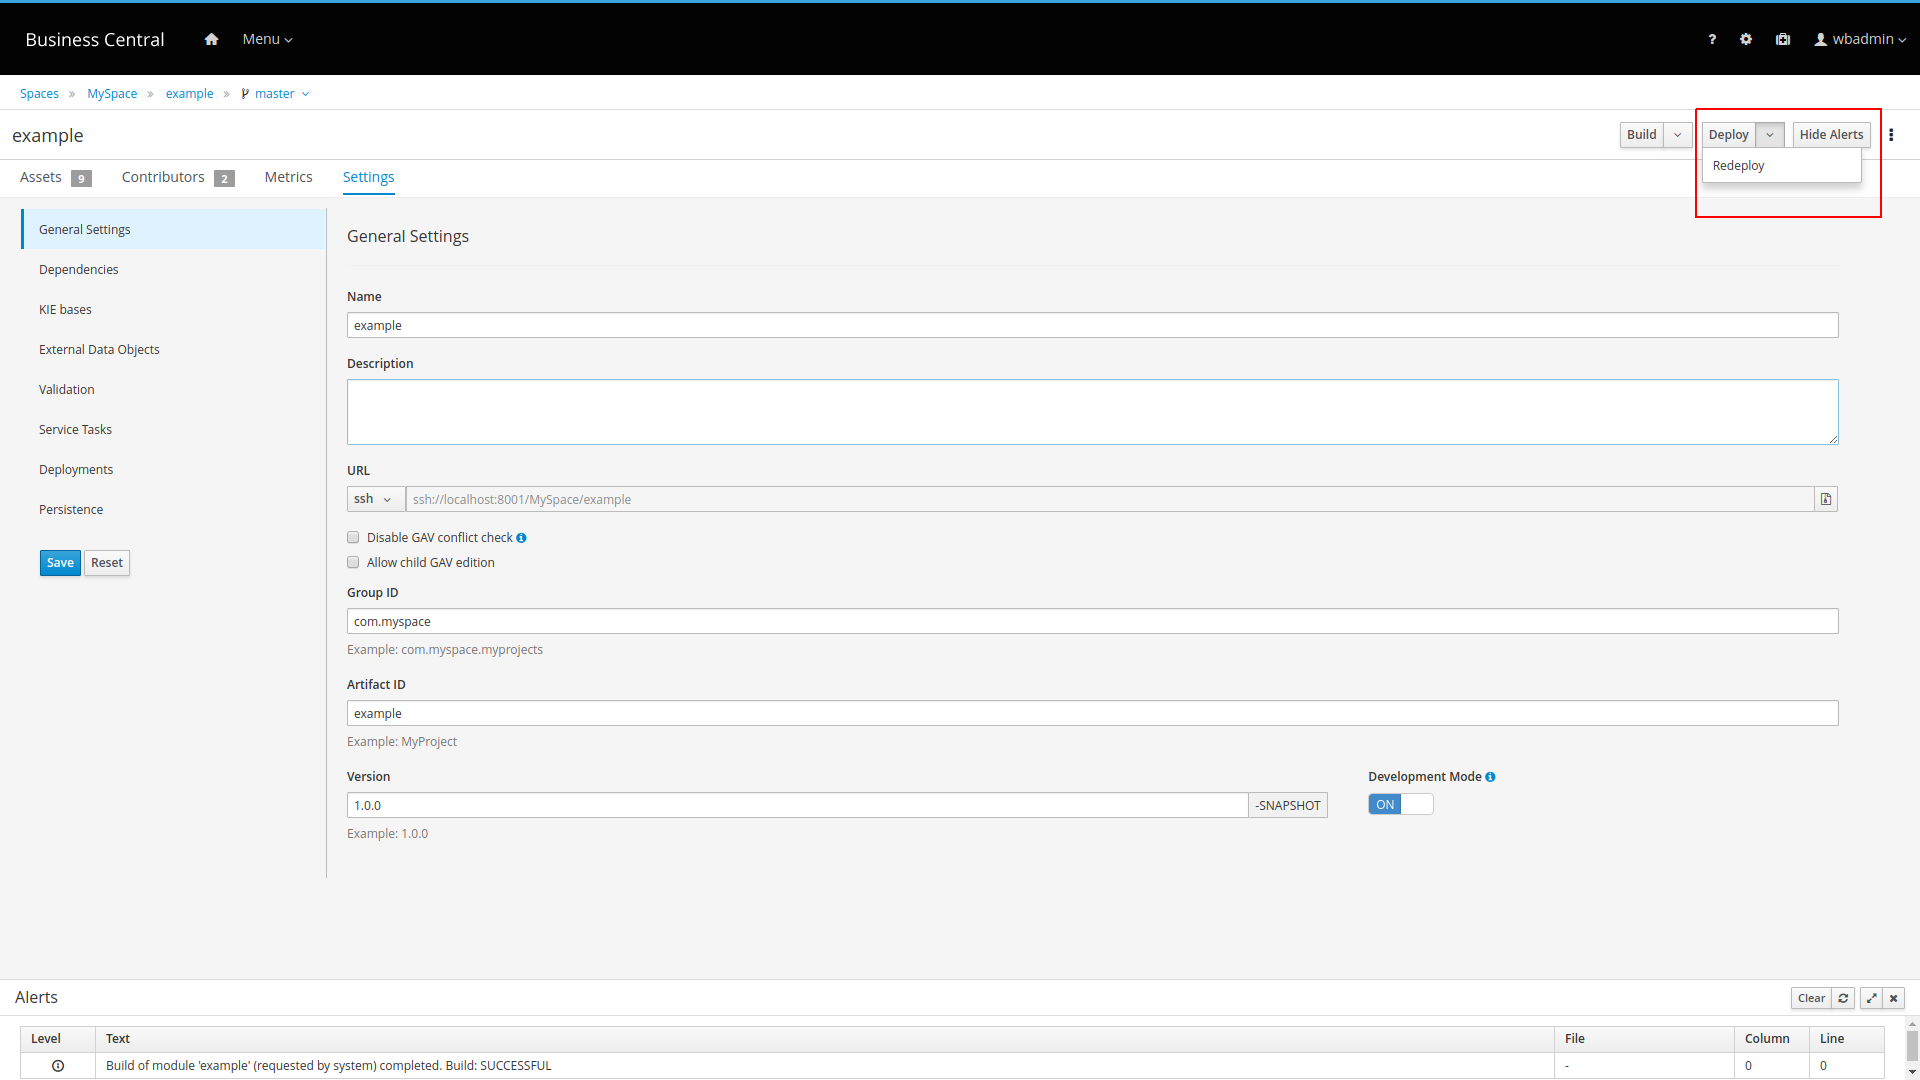
33.29. jBPM 7.17
33.29.1. New and Noteworthy in jBPM 7.17.0
The following features were added to jBPM 7.17
33.29.1.1. Enhanced capabilities for managing node and timer instances using the process instance diagram view
In this release, the process diagram view has been enhanced to offer new capabilities for visualizing and managing node and timer information. By default, information about all node and timer instances are displayed in the new side panel. By expanding each instance, users can access extra details like id, start and updated time, and SLA status. For active timer instance, users can also view specific details such as the last and next activation time, as well as the delay and activation time. Apart from displaying information, users are now also able to execute certain operations on each of the nodes and timers, which includes:
-
Trigger a specific node.
-
Cancel a node instance.
-
Retrigger a node instance.
-
Reschedule a timer instance.
A context menu is available for nodes and timers that allow operations to be executed.
The process diagram viewer has also been enhanced allowing users to easily control the zoom level on the process image. Furthermore, it is also possible for users to interactively select nodes in the diagram image to filter down the nodes panel on the left for a more specific visualization of the node data.

33.29.1.2. Service task repository integrated with Business Central
Service task repository (aka work item repository) has been integrated into Business Central. It provides two areas to manage service tasks
-
Global administration - accessible via settings page with dedicated
Service Task Administrationtile -
Project level management - accessible via project settings
Global administration allows process administrators to define what service tasks can be used within projects by either enabling or disabling them. Most of service tasks available in repository are disabled by default except those that come with jBPM out of the box e.g. REST, Email, Decision, Business rule.
Administrators can also upload custom service tasks to make them available for projects.
Project level management allows to install given service task into the project. Installation consists of
-
updating project dependencies (modifies pom.xml of the project)
-
updating deployment descriptor - registers work item handler for the service task
-
installs icon and work definition file into project resources (global area)
To learn more read this article
33.29.1.3. Docker service task
jbpm work items have been equipped to provide several service tasks to interact with docker
-
Create container
-
Inspect container
-
Kill container
-
List containers
-
Start container
-
Stop container
-
List images
These can be used directly by taking advantage of service task repository integrated into Business Central.
33.29.1.4. VS Code Extension for jBPM Business Applications
If you are developing your apps using Visual Studio Code you can now install a new jBPM Business Application extension. With this extension and the great tooling support of VSC you can now generate, develop, and launch your jBPM business apps without ever leaving your development environment.
Have a look at this video to see it in action.
33.29.2. New and Noteworthy in Business Central 7.17.0
33.29.2.1. Test Scenario (Preview) enabled by default
Test Scenario (Preview) is now enabled by default so there is no additional configuration needed.
33.29.2.2. Test Scenario DMN support
Test Scenario (Preview) now support DMN model testing
33.29.2.3. DMN Decision Service support
A DMN decision service node is now available in the DMN designer palette in Business Central.
33.30. jBPM 7.16
33.30.1. New and Noteworthy in jBPM 7.16.0
The following features were added to jBPM 7.16
33.30.1.1. jBPM Server Distribution context update
Following up on the recent development to rename jBPM Console to Business Central, the single server zip distribution has been updated to reflect the new naming convention. Business Central will now be available on http://localhost:8080/business-central.
33.30.1.2. Enhanced Kie Controller Swagger documentation
In this release, the Swagger documentation for the Controller REST API endpoints has been enhanced to include more details such as examples for body payloads and urls.
33.30.1.3. New Okta work item handler
This release includes a new work item handler to easily integrate your business application with Okta identity management service. See git repository for more details.
33.30.1.4. Kie Server rendered forms in Business Central
Following up on the recent enhancements to render forms directly in the Kie Server, two new system properties:
org.jbpm.wb.forms.renderer.ext and org.jbpm.wb.forms.renderer.name now allow you to switch between Business Central
and Kie Server rendered forms. By default, forms are still rendered by Business Central but you can easily switch to either
one of the standard renderers from Kie Server ('bootstrap' or 'patternfly') or your custom render implementation.
NOTE: When using Business Central rendered forms, only the 'workbench' render fully integrates with all the needed
requirements. Users can, in this case, extend this render for further customization.
33.30.1.5. Enhanced data source configuration for SpringBoot
In this release, the jBPM data source configuration has been refactored to allow easier migration to latest SpringBoot. Data source configuration are now externalised to allow switch of different versions of data sources setup and allow both easier upgrade to spring boot 2.x and to use the latest versions of jBPM to run with both spring boot 2.x and 1.5.x.
33.30.2. New and Noteworthy in Business Central 7.16.0
33.30.2.1. DMN and Test Scenario keyboard control
For both DMN and Test Scenario tables, the following keyboard control support was added:
-
Table navigation: After you select a cell in a DMN or Test Scenario table, you can use the arrow keys to navigate between other cells. The way you select the first cell differs in DMN and Test Scenario tables:
-
In a DMN table, the top-left cell is selected by default. Next to standard navigation, press Enter to select a nested expression and Esc to return to the parent expression.
-
In a Test Scenario table, no cell is selected by default. Press Shift+Home to select the first available cell.
-
-
Table editing: After you select a cell in a DMN or Test Scenario table, you can input a new value into the cell or change the already added value. To edit a cell, press Enter. To stop the editing, press Shift+Tab.
33.31. jBPM 7.15
33.31.1. New and Noteworthy in jBPM 7.15.0
The following features were added to jBPM 7.15
33.31.1.1. Manage section error messages handling
This release includes improvements to error scenarios when using any of the manage section operations, providing more detailed
information about exceptions when communicating with a remote server.
A more specific alert panel for when no Kie Server instance is connected or is missing the required Process
capability is also included to better inform users.

33.31.1.2. New timeline view for Task Logs
In this release, Task Logs view was redesigned, allowing users to easily visualize the events related to a specific task based on a timeline of events. Events are highlighted in blue to indicate a transition in the Task lifecycle for events like 'Claim' and 'Start' and have a grey out highlight to indicate the completion of the task or a user releasing it.
By default, the latest 10 events are presented in the timeline but users can load more data all the way back to the the task creation.

33.31.1.3. KIE Server forms HTML elements support for variables
Recently added KIE Server Form Rendering has been enhanced to extract variables in HTML elements of the form. When designing forms and using HTML elements users can refer to process/task variables to be extracted on rendering time.
<h3>Hello ${user.name}!</h3>Above expression (${user.name}) will be extracted at rendering time assuming there is user (task or process) variable available.
33.31.1.4. Camel component for jBPM has been significantly improved.
Apache Camel comes with huge set of components to integrate with various systems. There has been
camel-jbpm for quite some time (since 2.6 version of Camel) but it was based on v6 kie-remote-client
and supported only producer.
With Camel version 2.23.0 camel-jbpm component has been significantly improved and upgraded. It now supports the latest
version of jBPM and for producer it relies on kie-server-client instead kie-remote-client.
In addition to that consumer support has been added which allows to use camel routes that will be initiated by:
-
process event listeners
-
task life cycle event listeners
-
case event listeners
On top of that there is also camel based event emitter that allows to send events through event emitter infrastructure using camel routes.
See the article for more details and a sample project.
33.31.1.5. Audit log mode applies to task and case audit logs
Well known audit mode setting from deployment descriptor now supports all three types of audit logs
-
process (has been supported from the beginning)
-
task
-
case
Audit modes that are supported are:
-
JPA (default)
-
JMS
-
None
| None does not apply to case audit data as these are mandatory to be stored (either directly or via JMS). |
33.31.1.6. Variable indexer supported for case file data
Process and task variables allow to use custom VariableIndexer to store the information in log tables. 7.15 comes with support for using VariableIndexer for case file data. An example of case variable indexer can be found below
public class PatientCaseVariableIndexer implements CaseVariableIndexer {
@Override
public boolean accept(Object variable) {
return Patient.class.isAssignableFrom(variable.getClass());
}
@Override
public List<CaseFileData> index(String name, Object variable) {
List<CaseFileData> indexed = new ArrayList<CaseFileData>();
CaseFileDataLog caseVariable = new CaseFileDataLog();
caseVariable.setItemName(name);
caseVariable.setItemValue(variable == null ? "" : variable.toString());
caseVariable.setItemType(variable.getClass().getName());
indexed.add(caseVariable);
// add mapped information as another entry
CaseFileDataLog caseVariableMapped = new CaseFileDataLog();
caseVariableMapped.setItemName(name + "_name");
caseVariableMapped.setItemValue(((Patient) variable).getName());
caseVariableMapped.setItemType(String.class.getName());
indexed.add(caseVariableMapped);
return indexed;
}
}In the above mentioned example single Patient case variable will be stored in data log table as two entries (rows) to allow more fine grained searching capabilities.
33.31.2. New and Noteworthy in KIE Workbench 7.15.0
33.31.2.1. Git hooks notifications
Improved git hooks integration to provide feedback notifications to the user with customized messages.
33.31.2.2. KIE Workbench Consolidation
KIE Workbench is now called Business Central and it is available on business-central web context.
Profiles provide a set of Business Central features and you can choose a profile based on your requirements.
The FULL profile is a default profile that includes all features. The PLANNER_AND_RULES profile includes only drools-kie-wb features. You can select a profile either by using the org.kie.workbench.profile system property (possible values are FULL or PLANNER_AND_RULES) or from the Profile option in the Administration screen.
33.32. jBPM 7.14
33.32.1. New and Noteworthy in jBPM 7.14.0
The following features were added to jBPM 7.14
33.32.1.1. Support for WildFly 14
jBPM 7.14 comes with support (and used by default) latest and greatest version of WildFly application server. This long awaited support provides a number of upgrades to the libraries which allows the server to execute smoothly.
Installation component (single zip distribution) has been also updated so it’s enough to download single zip jBPM distribution to directly take advantage of this feature.
33.32.1.2. Query performance enhancements for displaying Process and Task variables in Manage section
In this release, changes have been made to enhance the performance of the underlying Kie Server queries responsible for retrieving data about Process and Task variables. If you’re upgrading jBPM from a previous version, we encourage you to review the new table indexes that were introduced in this release. You can review it in more detail here.
For more details on how to use these filters please refer to the following documentation:
33.32.1.3. Swagger documentation for jBPM controller REST API
This release includes enhanced documentation about the jBPM controller REST API.
You can access this documentation by running the headless jBPM controller .war application or Business Central (which contains a built-in jBPM controller).
Both applications will allow you to explore the available endpoints by accessing the /docs context.
Example: http://localhost:8080/controller/docs or http://localhost:8080/business-central/docs.
A static version of the API is also available at jbpm.org.

33.32.1.4. Multi sub forms rendering in KIE Server
Kie Server form rendering was enhanced to add forms that include lists of items (called multi sub forms in the workbench). For more info you can watch this short screencast showing the multi sub forms support in action.
33.32.1.5. Enhanced KIE Server documentation with payload information
In addition to the above mentioned enhanced Swagger docs about the jBPM controller REST API, in this release we also improvements to Swagger docs to include payload information (examples). These are presented in the Swagger UI and the generated documentation.
Here is an example of the improved Swagger UI with examples:

And here is an example of generated asciidoc from Swagger docs:

33.32.1.6. ElasticSearch event emitter for runtime events
Added out of the box support for a new event emitter that pushes data out to ElasticSearch. This enables process data to be pushed and stored in ElasticSearch.
33.32.1.7. Filtering capabilities for Process Instance Logs
In this release, we have enhanced the Process Instance Logs view by introducing filtering capabilities that allow users to narrow down the timeline results according to their needs. There are now two new filter categories that allows a user to filter process instances based on event types such as either Node Entered or Node Completed or process nodes, such as Human Task, Start and End nodes, and so on.
Apart from the filtering enhancements, users can now also view extra details about Human Task nodes, such as State, Owner, Description, and so on.

33.32.2. New and Noteworthy in KIE Workbench 7.14.0
33.32.2.1. SSH and Git Daemon Port Assignment Changes
If the SSH or Git daemon default or assigned ports are already in use, a new port is automatically selected. Ensure that the ports are available and check the log for more information.
Before this change, the application used to fail to start.
33.33. jBPM 7.13
33.33.1. New and Noteworthy in jBPM 7.13.0
The following features were added to jBPM 7.13
33.33.1.1. Default pagination system preference for Manage result lists in jBPM Console
Starting from this version, users with the Edit Global Preferences permission will be able to define the default pagination option to be used for all users under the Manage items ( Process Definition, Process Instances, Tasks, Jobs and Execution Errors ) and Task Inbox. The new preference ( Process Administration ) is available in the global settings page and once a new default is applied it will be effective for all users which still don’t have a custom preference saved for these items.
33.33.1.2. Managing work item handler exception
Work items are very powerful concept in jBPM, they are responsible for heavy lifting in your business
processes. In many cases there is a need to handle exception situations in their execution.
jBPM 7.13 comes with additional handling support based on special type of exception
ProcessWorkItemHandlerException. As implementor of the work item handler you can throw
such exception that allows to specify
-
process id
-
handling strategy
which in turn will be automatically used to start sub process instance to deal with that exception. To read more take a look at this article
33.33.1.3. Form renderer in KIE Server
This has been on the todo list for quite a bit and finally it goes out!
KIE Server can now deliver fully functional form (HTML) that allows to
-
start process instance
-
start case instance
-
work on user task
KIE Server can easily render forms designed in workbench’s form modeller. The same forms can then be used in workbench or directly through KIE Server REST api.
To learn more about this feature have a look at this article
Currently there are few limitations that will be tackled in the coming releases
-
multi sub forms are not supported yet
-
date picker relies on HTML5 input type date - thus is browser dependant
-
multi select dropdowns are not supported yet
33.33.1.4. HTTPS support for smart router
Smart Router (aka Kie Server Router) has been enhanced to allow to enable HTTPS traffic on it. See here to learn on how to enable it.
33.33.1.5. Deactivation of kie containers on KIE Server
KIE Server got two additional features on KIE Container level that allows to deactivate given container. This is mainly for jBPM extension of KIE Server and allows to pause creation of new process instances from given container but at the same time allow to work on already existing process instances and tasks.
In case the deactivation should only be temporary, given container can be activated again. All these operations do not require server restarts.
33.33.1.6. Resolution of data source in advanced queries
Data source in advanced queries can be given as expression that points to a system variable. That allows to create query definition and deployed to multiple runtime environments. With 7.13 the resolution mechanism has been improved to resolve it on actual registration in runtime environment instead of at creation time. This in turn makes it possible to change data source between server restarts without errors in already defined queries.
33.33.1.7. Process instance migration support for async jobs
Process instance migration has been improved to deal with asynchronous jobs that are started as part of process instance. The mechanism mainly guards the migration to not be allowed when
-
there are queued jobs
-
there are running jobs
-
there are retrying jobs
Migration is only allowed when async job is in error state so it can be requeued after process instance migration.
33.33.1.8. New timeline view for Process Instance Logs
In this release, the Process Instance Logs view was redesigned, allowing users to easily visualize the events related to a specific process instance based on a timeline of events. Node entered events are highlighted in blue whereas completed ones have a grey out indication. By default, the latest 10 events are presented in the timeline but users can load more data all the way back to the starting point of the process instance. In future releases, we will introduce extra details about relevant node types as well as filtering capabilities to limit the items in the timeline view.

33.33.2. New and Noteworthy in KIE Workbench 7.13.0
33.33.2.1. Test Scenarios (Preview) editor
This version contains a preview of the new Test Scenarios editor that tests a rule with a completely new user experience.
See section [test-scenarios-intro-con_kie-apis] for details on enabling and using the editor.
33.33.2.2. Experimental Features support
New Experimental Features Framework added to the Workbench. It provides an easy mechanism for users to preview features which are not part of the product but might be interesting for them (for example, ongoing developments, tech previews, POCs…).
See section Experimental Features Framework for more details.
33.33.2.3. SSH keystore
In order to provide the Workbench VFS with proper SSH authentication, a new keystore must added. This keystore enables users to register their SSH public keys.
You can access it from the Admin page using the new SSH Keys menu option.
See the SSH keystore section for details.
33.34. jBPM 7.12
33.34.1. New and Noteworthy in jBPM 7.12.0
The following features were added to jBPM 7.12
33.34.1.1. Business application - first rollout
jBPM with 7.12 introduces concept of Business Applications to enable developers to take advantage of latest technology and combine it with battle tested business automation. This brings in brand new approach on how jBPM can be used in enterprise application and deployed to any environment (primary to cloud) with ease.
This is the first release and is considered beta release so expect some issues but we are heavily working on them to make it as smooth as possible. Your feedback and any contribution is welcome (in fact wanted).
Read more about Business Applications and how to get started in following sections of the documentation
33.34.1.2. Test helper classes for jBPM Services and Case management
jBPM services are the primary API that developers should use when embedding jBPM. 7.12 provides standalone test helper classes to simplify test cases for jBPM services and case management services. The aim is to allow developers to quickly test the APIs with or without additional services.
-
org.jbpm.test.services.AbstractCaseServicesTest -
org.jbpm.test.services.AbstractServicesTest
There are two methods that need to be overridden so the proper business assets are added to the kjar and maven coordinates for the kjar itself. Everything else will be automatically configured. All jBPM Services / Case management services will be available for tests.
An example of what it takes to create a test case for jBPM Services
public class ProcessServiceImplPerProcessInstanceTest extends AbstractKieServicesTest {
@Override
protected DeploymentUnit createDeploymentUnit(String groupId, String artifactid, String version) throws Exception {
// optionally override createDeploymentUnit method in case runtime strategy should be changed
DeploymentUnit unit = super.createDeploymentUnit(groupId, artifactid, version);
((KModuleDeploymentUnit) unit).setStrategy(RuntimeStrategy.PER_PROCESS_INSTANCE);
return unit;
}
@Override
protected List<String> getProcessDefinitionFiles() {
List<String> processes = new ArrayList<String>();
// add here your process, rules and other business assets that should be added to kjar
processes.add("repo/processes/general/signal.bpmn");
return processes;
}
@Override
public DeploymentUnit prepareDeploymentUnit() throws Exception {
// specify GROUP_ID, ARTIFACT_ID, VERSION of your kjar
return createAndDeployUnit(GROUP_ID, ARTIFACT_ID, VERSION);
}
}An example of what it takes to create a test case for Case Management Services
public class CaseServiceImplTest extends AbstractCaseServicesTest {
@Override
protected List<String> getProcessDefinitionFiles() {
List<String> processes = new ArrayList<String>();
// add here your process, case, rules and other business assets that should be added to kjar
processes.add("cases/EmptyCase.bpmn2");
return processes;
}
@Override
protected DeploymentUnit prepareDeploymentUnit() throws Exception {
// specify GROUP_ID, ARTIFACT_ID, VERSION of your kjar
return createAndDeployUnit(GROUP_ID, ARTIFACT_ID, VERSION);
}
@Test
public void testStartEmptyCase() {
String caseId = caseService.startCase(deploymentUnit.getIdentifier(), EMPTY_CASE_P_ID);
assertNotNull(caseId);
assertEquals(FIRST_CASE_ID, caseId);
try {
CaseInstance cInstance = caseService.getCaseInstance(caseId);
assertNotNull(cInstance);
assertEquals(deploymentUnit.getIdentifier(), cInstance.getDeploymentId());
caseService.cancelCase(caseId);
CaseInstance instance = caseService.getCaseInstance(caseId);
Assertions.assertThat(instance.getStatus()).isEqualTo(CaseStatus.CANCELLED.getId());
caseId = null;
} catch (Exception e) {
logger.error("Unexpected error {}", e.getMessage(), e);
fail("Unexpected exception " + e.getMessage());
} finally {
if (caseId != null) {
caseService.cancelCase(caseId);
}
}
}33.34.1.3. jBPM Executor Service available in ServiceRegistry
Couple releases back, jBPM introduced ServiceRegistry so developers could easily look up jBPM services such as ProcessService or UserTaskService. ExecutorService was unfortunately left out of this registry and thus did not allow to be used easily in custom code.
with 7.12 this has been fixed and developers can get hold of fully configured instance of jBPM ExecutorService through the registry. It will only be there if it was enabled.
ExecutorService executorService = (ExecutorService) ServiceRegistry.get().service(ServiceRegistry.EXECUTOR_SERVICE);33.35. jBPM 7.11
33.35.1. New and Noteworthy in jBPM 7.11.0
The following features were added to jBPM 7.11
33.35.1.1. CMMN support in the jBPM Console
In addition to the recent support for executing CMMN 1.1 models, the jBPM Console now allows you to import, view and modify the content of .cmmn files.
When authoring a project, you will be able to import your Case Management Model and select it from the asset list for viewing or modifying using the standard XML editor.
33.35.1.2. jBPM Console Task Comments enhancements
In this release, the Task Management, Task Inbox and Task Report sections have been enhanced to display comments from completed tasks. This allows users to review any relevant mention that was added to accomplish certain task.
Task comments deletion is now restricted to the comment owner and task administrator users only.
-
Note: Task comments are available only if the deployment unit where the process lived still active and the task data still persisted. By default, the Kie Server runs a clean up job that removes any task related data from completed processes. If you wish to access the task comments once the process is completed, make sure you set the system property:
org.jbpm.task.cleanup.enabledtofalseonce starting the Kie Server instance.
33.35.1.3. Spring Boot support for KIE projects enhancements
We have further enhanced the Spring Boot support for KIE projects. Now you have the ability to use regular Spring beans for:
-
Process Event Listeners
-
Task Event Listeners
-
Case Event Listeners
-
KIE Server Event Listeners
-
Custom Workitem Handlers
In addition the following features were added:
-
Updated to the latest Narayana Spring Boot transaction manager
-
Added ability to register custom REST endpoints in KIE Server Spring Boot applications
-
Support for adding aliases when interacting with jBPM services from Spring Boot based applications
-
Support for Swagger documentation of REST api for custom Spring Boot applications
-
Replaced Jersey with the Spring Boot CXF JAX-WS Starter for serving REST endpoints. This enhancement will require a small change in your existing application.properties, namely remove existing
kieserver.restContextPath=/restand replace with
cxf.path=/rest33.35.1.4. SLA support enhancements
SLA support has been enhanced, it is now possible to define SLA (due date) on intermediate catch event nodes to track SLA on them.
33.35.1.5. Business model validation enhancement
Enhanced validation on business models for checks on empty sub-process nodes.
33.35.1.6. Runtime engine enhancement
Updated support for broadcasting signals with expressions (e.g myevent-#{variable}). Event sub-processes receive those correctly now.
33.35.1.7. Designer marshalling backend
This version officially switches to a rewritten marshalling backend. If you find any issues, you can temporarily revert to the legacy marshalling backend by setting the system property bpmn.marshaller.legacy=true.
33.35.2. New and Noteworthy in KIE Workbench 7.11.0
33.35.2.1. Multiple Git branches support
You can now work on multiple Git source branches interchangeably in Business Central to improve the Git workflow of your projects.
After you have created and opened a project, you can see all the assets of your project:

In the breadcrumbs navigation, you can now see a drop-down menu that, when clicked, displays all the Git branches available:

You can click Add Branch to add more branches to your project:
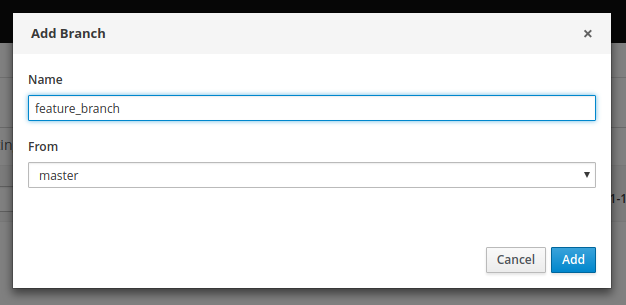
After adding the new branch, you are redirected to the new branch with all the assets that you had in the base branch:
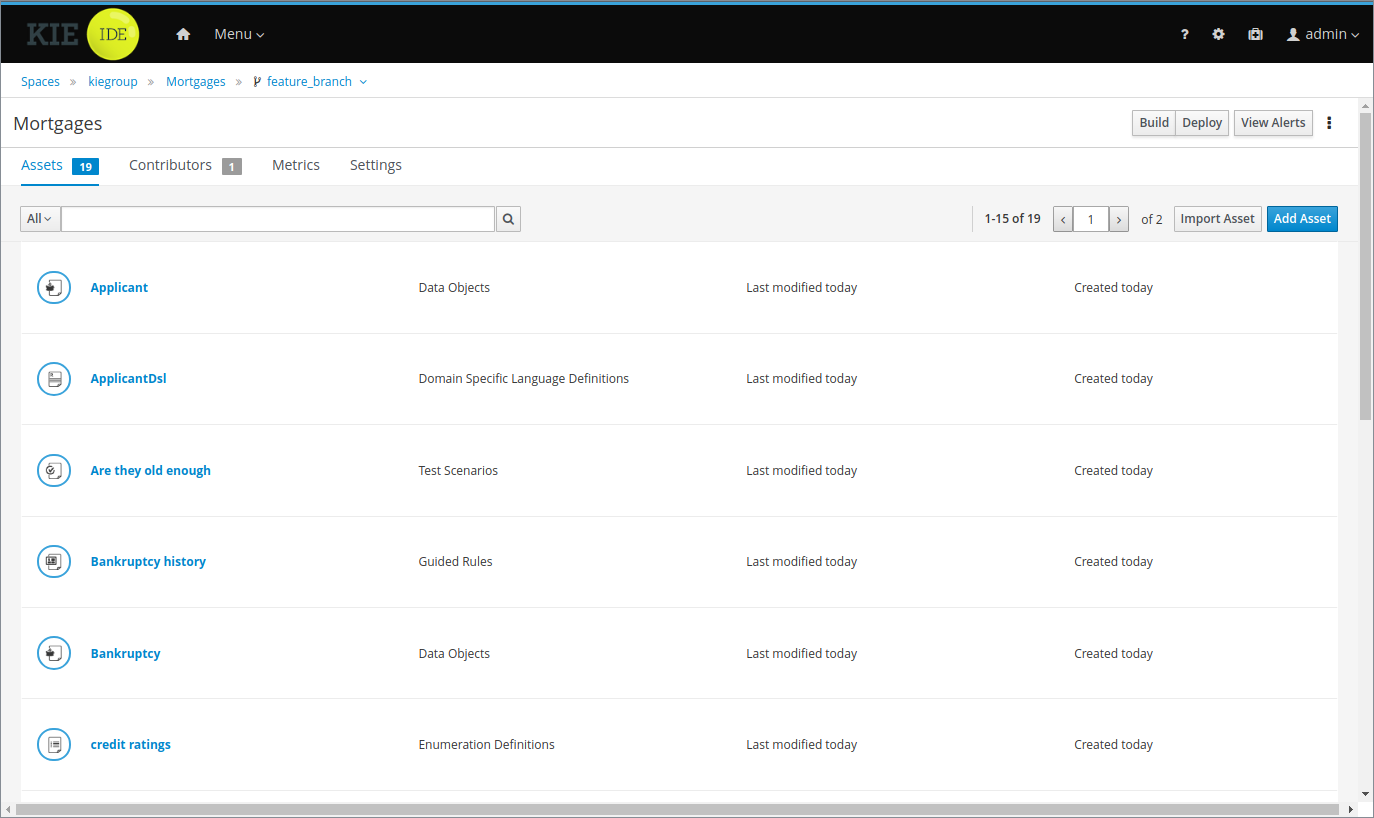

You can also click Delete Branch in the top-right corner of the screen to delete any branch except for the primary branch:
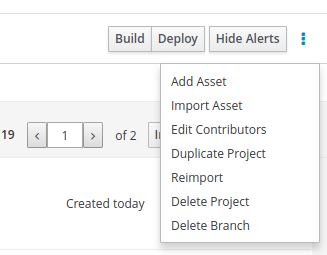
33.36. jBPM 7.10
33.36.1. New and Noteworthy in jBPM 7.10.0
The following features were added to jBPM 7.10
33.36.1.1. jBPM Server Full Distribution Docker image
Version 7.10 introduces another way for people to get started very quickly. As an addition to the single zip distribution that we recently added on version 7.8.0.Final, you can now also use the jbpm-server-full Docker image to have a fully configured and running environment.
If you already have Docker installed on your local machine, all you need to do is run the following command:
docker run -p 8080:8080 -p 8001:8001 -d --name jbpm-server-full jboss/jbpm-server-full:latestOnce container and web applications started, you can navigate to it and login using the user name wbadmin and password wbadmin
or any of the users available in the getting started document.
http://localhost:8080/business-central
that’s all that is needed to get fully configured and running jBPM distribution that includes:
-
WildFly server
-
jBPM Console (aka workbench)
-
KIE Server
-
jBPM Case Management showcase
-
jBPM Service repository
Everything configured to work together smoothly and you can access them at the following locations:
-
jBPM console - http://localhost:8080/business-central
-
KIE Server - http://localhost:8080/kie-server/services/rest/server
-
KIE Server Swagger docs - http://localhost:8080/kie-server/docs
-
jBPM case management - http://localhost:8080/jbpm-casemgmt
-
jBPM Service repository - http://localhost:8080/repository
For mode details please read our updated Getting Started page, where you can find advanced information about using this new Docker image.
33.36.1.2. Jobs Management: Added bulk actions
The jobs list provides now a way to perform actions over multiple jobs, in a single operation. After one or more jobs are selected from the list, the bulk actions menu becomes available, with all supported actions. The available operations in this screen are 'Cancel' and 'Requeue'. If that operation is not allowed, regarding the job status, over any of the selected item, a notification is displayed and the operation is not executed on that item.
33.36.1.3. Process Instances Management: Further flexibility to access process instance related data
When retrieving process instance data, from one or more Kie Server instances, we used to enforce the rule that only data from active deployment units would be available. That is not a requirement any longer, as long as the data is persisted in the database, it is now possible to list and display most of the information for any process instance. There is no need for the container to be running in order to list process instances in the Manage Process Instances area. Please note that the following data is not available when the deployment unit is not available:
-
Process instance diagram: As the actual image is hosted as part of the container resources, it is not possible to display the diagram.
-
Process instance variables: Only variables that changed its value during the process execution are listed.
33.36.1.4. CaseData type information is auto-imported into the process context
Prior to version 7.10 whenever referring to CaseData type a fully qualified class name has to be given. This applies to:
-
Milestone conditions
-
Stage (activation and completion) conditions
This has now been improved to allow short and direct reference to CaseData instead of org.kie.api.runtime.process.CaseData and CaseAssignment instead
of org.kie.api.runtime.process.CaseAssignment.
33.36.1.5. Stage name to trigger adhoc fragments
Initially to trigger adhoc fragments within given stage that required to use the identifier of the stage, 7.10 brings in additional option to refer to stage by name. This simplifies usability of the trigger operations and allow more human friendly approach.
33.36.1.6. Parameterized stage names
In addition to referring to stages by names, stages can now have parameterized names which will allow to distinguish them between each other in situations
when there are multiple stage instances of the same stage (definition). This makes it possible to trigger ad hoc fragments in particular stage instance when
referring to it my name and the name is unique due to use of parameters in the stage definition - Stage #{variable}
33.36.1.7. Archetypes
jBPM 7.10 introduces new maven archetypes to easily generate:
-
KJAR projects outside of workbench - allows to generate regular project and case project
-
service project - a fully featured service based on SpringBoot and equipped with business automation capabilities (kie server apis)
| Work in progress - This is an initial delivery which will be significantly improved over the coming weeks to provide comprehensive solution to build business applications with jBPM as one of the capabilities. |
Take a look at the following documentation to learn more about these archetypes - kjar archetype and service archetype.
33.36.1.8. Process instance migration with timers
This is a worth noting bug fix that affects process instances with timers within sub-processes. Prior to this version such timers were simply canceled and not rescheduled after migrating process instances. This has been fixed and thus it is strongly recommended to upgrade to version 7.10 as soon as possible if you plan to migrate active process instances and there are timers within sub-processes.
33.36.1.9. JPA entities can be used as case file variables
Case file follows same approach for externalizing data storage, meaning different type of data can be stored in different systems. With 7.10 it is now possible to use JPA entities as case file variables that will be stored in separate database columns.
The only requirement is to configure the marshaller in deployment descriptor
.withJpa("org.jbpm.persistence.patient.example")and the complete registration of the marshaller is:
org.jbpm.casemgmt.impl.marshalling.CaseMarshallerFactory.builder().withDoc().withJpa("org.jbpm.persistence.patient.example").get()33.37. jBPM 7.9
33.37.1. New and Noteworthy in jBPM 7.9.0
The following features were added to jBPM 7.9
33.37.1.1. Installation of work items directly from service repository
Service repository that has been improved a lot over the last two releases received another feature - install work items into existing workbench. This then allows to have the project directly prepared for work items without a need to install it from within jBPM designer.
To read more have a look at this article.
33.37.1.2. Running the service repository on Heroku
Another feature added to the service repository was the ability to deploy the springboot repository war on Heroku.
For more information see this documentation
33.37.1.3. Service repository rest service
When using the service repository springboot or wildfly deployments in addition to the numerous workitems hosted users now have a rest api available to query information about these workitems.
The rest service include following end points:
/repository/rest/services
/repository/rest/services/{name}
/repository/rest/services/{name}/parameters
/repository/rest/services/{name}/results
/repository/rest/services/{name}/mavendepends
/rest/services/category/{category}
/rest/servicetriggers
/rest/servicetriggers/count
/rest/serviceactions
/rest/serviceactions/count33.37.1.4. SpringBoot jBPM auto configuration update
SpringBoot auto configuration for jBPM (and KIE Server that uses jBPM extension) has been improved to allow to use custom entities as part of the EntityManagerFactory used by the execution engine. That enables colocation of business logic and business assets.
It’s enough to provide a bean that will override entityManagerFactory bean that comes with jBPM auto configuration.
@Bean("entityManagerFactory")
public LocalContainerEntityManagerFactoryBean entityManagerFactory(JpaProperties jpaProperties, DataSource dataSource){
LocalContainerEntityManagerFactoryBean factoryBean = new LocalContainerEntityManagerFactoryBean();
factoryBean.setPersistenceUnitName(PERSISTENCE_UNIT_NAME);
factoryBean.setPersistenceXmlLocation(PERSISTENCE_XML_LOCATION);
factoryBean.setJtaDataSource(dataSource);
factoryBean.setJpaPropertyMap(jpaProperties.getProperties());
factoryBean.setPersistenceUnitPostProcessors(new PersistenceUnitPostProcessor() {
@Override
public void postProcessPersistenceUnitInfo(MutablePersistenceUnitInfo pui) {
pui.addManagedClassName("org.jbpm.springboot.samples.entities.Person");
}
});
return factoryBean;
}33.37.1.5. Performance baseline for jBPM 7
Wondering how good jBPM performs when it comes to execution? Here is a very interesting study describing base performance of jBPM execution through KIE Server.
33.37.1.6. Creation of indexes for all database tables
With the update to JPA 2.1 all jBPM entities received an update to declare index creation information. This results in a better query performance overall.
33.37.1.7. Process Designer
This release allows the user to enable/disable HiDPI via system preferences, that results on performance improvements for users with non HiDPI screens.
It also improves the performance and user experience by adding support for image strips, on both canvas and DOM side, making all icons appear instantaneously on all browsers and all components.
Also some other issues has been fixed. The most relevant ones are:
-
Fixed issues when changing between different element types, restricted the available morphing types for tasks, sub-processes and events
-
Fixed issues related to boundary events
-
Fixed issues when saving properties for the ad-hoc and multiple instance sub-process
33.38. jBPM 7.8
33.38.1. New and Noteworthy in jBPM 7.8.0
The following features were added to jBPM 7.8
33.38.1.1. CMMN 1.1 native execution
jBPM version 7.8 introduces native support for execution of CMMN 1.1 cases. It provides main constructs support and does not aim at full specification coverage. Constructs that are currently available are:
-
tasks (human task, process task, decision task, case task)
-
discretionary tasks (same as above)
-
stages
-
milestones
-
case file items
-
sentries (both entry and exit)
Not all attributes of tasks are supported - required, repeat and manual activation are currently not supported. Although most of the behaviour can still be achieved using different constructs. Sentries for individual tasks are limited to entry criteria while entry and exit are supported for stages and milestones.
Decision task by default maps to DMN decision although ruleflow group based is also possible with simplified syntax - decisionRef should be set to ruleflow-group attribute.
Event listeners are not supported as they do not bring much value for execution and instead CaseEventListener support in jBPM should be used as a substitute.
jBPM does not provide any modeling capabilities for CMMN and focuses purely on execution of the model.
Even with the support of CMMN jBPM still promotes BPMN2 and the most powerful way of designing your case definition where you can take advantage of both the specifications.
33.38.1.2. Single zip distribution of jBPM
Version 7.8 introduces simplified distribution to let people start very quickly. It is a single zip distribution that requires just three steps:
curl https://download.jboss.org/jbpm/release/7.8.0.Final/jbpm-server-7.8.0.Final-dist.zip --output jbpm-server-distribuion.zip (1)
unzip jbpm-server-distribuion.zip -d jbpm-server (2)
jbpm-server/bin/standalone.sh (3)| 1 | download |
| 2 | unzip |
| 3 | run |
that’s all that is needed to get fully configured and running jBPM distribution that includes:
-
WildFly server
-
Business Central
-
KIE Server
-
jBPM case management showcase
-
jBPM Service repository
Everything configured to work together smoothly and you can access them at the following locations:
-
Business Central - http://localhost:8080/business-central
-
KIE Server - http://localhost:8080/kie-server/services/rest/server
-
KIE Server Swagger docs - http://localhost:8080/kie-server/docs
-
jBPM case management - http://localhost:8080/jbpm-casemgmt
-
jBPM Service repository - http://localhost:8080/repository
In addition, this distribution simplifies switching to other databases - MySQL and PostgreSQL. As simple as just running a script from within jbpm-server/bin directory
./jboss-cli.sh --file=jbpm-mysql-config.cli (Unix / Linux)
jboss-cli.bat --file=jbpm-mysql-config.cli (Windows)To read more have a look at this article.
33.38.1.3. Pluggable Startup strategy in KIE Server
KIE server has been equipped with additional pluggable mechanism that allows to control the startup behaviour. Main use case is to allow finer control over what KIE containers are deployed and in what order. Primary usage pattern is to allow to use monitoring application (workbench) to manage processes and tasks on immutable KIE Servers. That means they are not under the control of the KIE Server jBPM controller but rather decide themselves what containers should be deployed.
There are two out of the box strategies provided:
-
ControllerBasedStartupStrategy - default startup strategy that will favour jBPM controller configuration whenever is given and thus override any local configuration. In case jBPM controller endpoint is not present it will fallback to what is known in the local server state file
-
LocalContainersStartupStrategy - strategy that will always deploy containers configured in the server state file regardless of the jBPM controller configuration although when jBPM controller endpoint is given it will connect to it.
Users can implement they own startup strategies by implementing org.kie.server.services.api.StartupStrategy interface and then packaging
it in ServiceLoader way - it needs to have services file that defines the implementation class which is then used upon startup of the
server via discovery mechanism.
To specify which startup strategy should be used a system property org.kie.server.startup.strategy should be set
to the name of the class (simple name) implementing given strategy.
Example: -Dorg.kie.server.startup.strategy=ControllerBasedStartupStrategy
33.38.1.4. Custom queries as data set editor in workbench
Custom queries are really powerful features and frequently used. jBPM 7.8 introduces a data set editor to allow use of it in workbench environment. This editor allows to build data sets that can later on be used to build pages and dashboards based on actual information retrieved from KIE servers on runtime.
These data sets are scoped to server configurations and by that will only target particular subset of KIE Servers. Moreover by using KIE Server as the source of data, it removes the need to directly access databases which (especially in cloud environments) might not be desired or even possible. Additionally, these queries are executed in user context (user performing the query is actually user who is logged into workbench) which makes the results tailored to given user - important from a security point of view - will only see data that is authorised to see.
To learn more, have a look at this article.
33.38.1.5. Support for FEEL language as expressions for sequence flows
Drools provides support for DMN and FEEL language from the early days of version 7. jBPM added support for decision evaluation some time ago too. Now it was time to add FEEL language support for sequence flows of the process definition. Users who work with DMN can unify the language used for expressing condition logic to just single one - FEEL.
33.38.1.6. Milestone condition support for multiple instances
Milestone used in specific situation where there are multiple instances of the same milestone node active at the same time requires additional check upon match. This is to allow extra filtering of matches to find the right instance to be completed.
This advanced use case manifests itself when users model logic for multi instance activation where just simple rule is not enough.
An example of it is to have a stage that includes milestone and each of the stage deals with other types of document to be processed.
Milestone in that stage tracks progress of the document, although it should track individual documents of each stage. So an extra validation
on the milestone is required.
And for that exact scenario a MatchVariable was introduced. This is an extra parameter on milestone itself (next to condition) that specifies
the name of the variable it should compare with matched items. So if the stage has a variable documentType and then the rule in milestone is as follows:
$caseData : CaseData()
$documentType : DocumentType(uploaded == true) from $caseData.getData(docName)user can set MatchVariable parameter to documentType to compare the activation item ($documentType) with documentType
variable taken from stage instance and only if this match that milestone instance will be completed.
33.38.1.7. Case instance migration
Similar as there is support for process instance migration, version 7.8 introduces case instance migration. This essentially allows to move given case instance from one definition to another - in other words migrate to another case project version. This instance migration ensures that all active process instances for given case instance are migrated at the same time, thus it’s required to provide mapping of case definition and process definitions at the time when doing migration.
Same as for process instance migration, there is an optional parameter for mapping nodes from old to new version of case or process definition.
33.38.1.8. Even more improvements around service repository and work items
jBPM 7.8 continues with improvements for service repository and work items to make them as simple as possible to be built and used. It’s a very powerful feature that is underused usually due to the difficult entry level… but that is now the past. The future looks much brighter than ever. Have a look at this article to see how easy it is to build your own service tasks and make use of them in your processes.
After that, read these tips and tricks on how to get even more from it.
33.38.1.9. Process Designer
One of the most important updates is that Stunner becomes the default process editor. As it’s still not fully feature complete, this new release also includes support for the jBPM process designer editor. This way there exists two editors for business processes, the Business Process, which relies on Stunner, and the Business Process (legacy) one, which relies on the legacy process editor.
It also includes new features, improvements and some bug fixings.
Features and improvements
-
Stunner becomes the default process editor (also for processes from the built-in examples)
-
Improved the overall performance, response and computation times spent by the editor’s engine
-
Fixed support for Internet Explorer 11
-
Platform integrations
-
Backend generation for the process' SVG image
-
Process SVG integration into the workbench (console)
-
Integration with the jBPM validation engine
-
Support for the Overview panel
-
Open an XML Editor in case it is not possible to open a process file in the graphical editor. This allows manual fixing of the issue in the process file.
-
Automatic deployment for service tasks (from both the default and from external repositories)
-
-
New preferences
-
Default canvas size
-
Palette close behavior
-
-
Properties panel
-
Automatic grouping for fields
-
Brand new actors field editor for User Task - it supports filtering and inline creation of new items
-
Bug fixings - most relevant
-
Fixed memory leaks after opening several processes
-
Fixed intermediate event connection cardinality rules
-
Fixed issues with control points inside containers
-
Fixed the inline editor for the element’s name
-
Make notifications more user friendly
-
Editor for tasks' data assignments is now filtering by the current project
-
Allow to see old process versions
-
Do not allow updates on view mode (old process versions)
-
Fixed issues about wrong shape locations after applying zoom
-
Fixed issues during process import that were making the editor show an error and so not be usable
-
Fixed issues when nesting containers
-
Fixed the limited command registry, that was causing the editor stop working after long time
-
Fixed issues about docking (boundary events)
33.38.2. New and Noteworthy in KIE Workbench 7.8.0
33.38.2.1. New System Property for setting the Default Maven Repository in Project pom.xml files
To make building Workbench projects outside of the Workbench easier, it is now possible to set the URL for the default Maven Repository that is added into each new Project pom.xml. It is recommended that you set this before starting you Workbench for the first time.
33.39. jBPM 7.7
33.39.1. New and Noteworthy in jBPM 7.7.0
The following features were added to jBPM 7.7
33.39.1.1. jBPM executor redesigned
up to version 7.7, jBPM executor used default mechanism based on polling. It periodically polls the database to check if there are any jobs to be executed. This does not scale too good and was the main motivation to approach redesign. With version 7.7, jBPM executor is enhanced to remove polling mechanism and instead relies on specialised ScheduledThreadPoolExecutor that respects job’s priority.
This allows to have really efficient processing with less load on the database (and less locks on database). New mechanism does cover all possible types of jobs including retries and requeues. With additional JMS trigger (that was already present since version 6.3) this provides complete and fast asynchronous job processing solution. To read up more on this see this article and async section in the docs.
33.39.1.2. UserInfo interface allows to get user id by email
Small addition to UserInfo interface (and its default implementations) was provided to allow to find user id by email address. This is the reverse operation that was already there - get email address by user id. With this, email integration (such as completing task by email) can be easily implemented.
33.39.1.3. Service Level Agreement (SLA) tracking for processes and cases
SLA tracking has been added to jBPM to allow to easily keep track of the execution of:
-
processes
-
cases
-
individual activities of the process/case
This allows administrators to be always up to date with what is happening with running processes and be notified when SLA are violated. More can be found in SLA overview article and SLA with cases article.
33.39.1.4. Case stages activation condition
Case stages (ad hoc sub-processes) are equipped (next to completion condition) with activation condition. This means that ad hoc stage can be automatically activated when defined condition is met. Conditions should be defined as rule expressions and usually refer to case file data, although are not limited to that.
33.39.1.5. NoSQL integration
Initial integration with NoSQL (and not only that) has been introduced. This is based on additional so-called Emitters that can be implemented to receive notifications when the jBPM engine executes processes. In general, this allows users to plugin their own emitters that will be responsible for sending data to external data stores. Note that this is integration and not replacement of persistence layer of jBPM. You can read up more about it in this article and if would like to see an implementation based on Elasticsearch, take a look at this article
33.39.1.6. Process Designer (Preview)
The new version of the jBPM Process Designer (Stunner) provides lots of new features, plus some other stability and usability improvements as well.

Here is a summary of some of the most relevant new features and improvements included in this release:
-
Palette visual and structural re-design

-
Visual enhancements for shape states


-
Shape resize constraints capabilities
-
Increased the available modelling area size
-
Improved docking related capabilities (boundary shapes)
-
Enhanced the usability by doing automatic adjustment (snap) to the docking magnets while dragging the boundary shapes
-
Ability to dock boundary shapes directly when dragging from the palette
-
-
UI Exporting capabilities improved
-
Export into BPMN2
-
Export into an SVG image
-
-
Added new drop-down selector field type with filtering capabilities
-
Support for connector’s bend-points (eg: move points, add/remove points)

-
Added new connector type that renders as a regular poly-line
-
Process import/export capabilities
-
Toolbar re-design

-
Automatic migration capabilities between both process designers
-
Keyboard mappings improved (eg: arrow key)
-
Form generation capabilities
-
BPMN2
-
Support for service tasks
-
Support for event sub-process
-
Support for ad-hoc sub-process
-
Support for multiple instance sub-process
-
Support for parallel gateway
-
Shapes re-design
-
Icons re-design
-
Support for interrupting events (start events)
-
Included brand new marshaller and unmarshaller implementations, which rely on the Eclipse BPMN2 domain model, and new complete suite of unitary tests (still experimental)
-
33.39.1.7. jBPM Manage section redesign
The entire admin console screens have been re-designed focusing on:
-
Create new layout and re-styling existent elements
-
Revise Manage Process Instances page
-
Review and improve quick filter creation
-
Review and improve saved filters
-
Rename top level menus
New layout
A new layout have been created as part of the admin console screens re-design. The new layout of jBPM Manage section contains the following new areas:
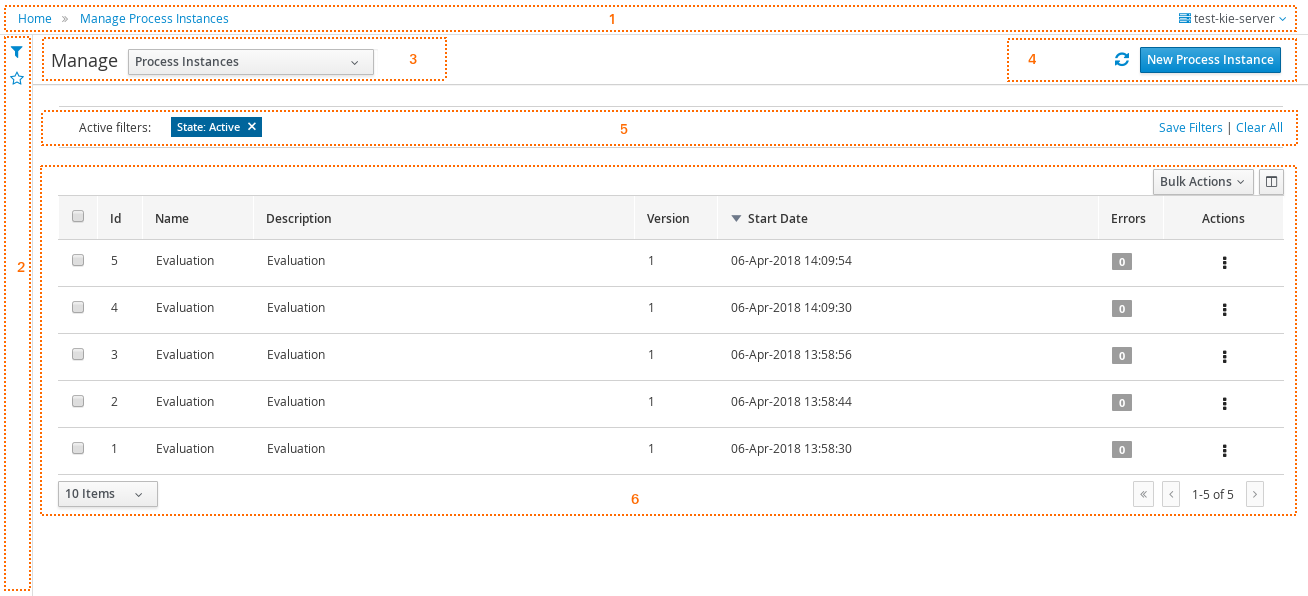
-
(1) Breadcrumb area: Contains breadcrumbs and the server configuration selector.
-
(2) Filters area: Contains the dock for filter creation and dock with saved filters
The new docks are placed in the expandable panel on the left side of the screen. The selections made inside any of the docks are immediately reflected in the table on the right.
That panels can be expanded or collapsed using the standard workbench docks controls.
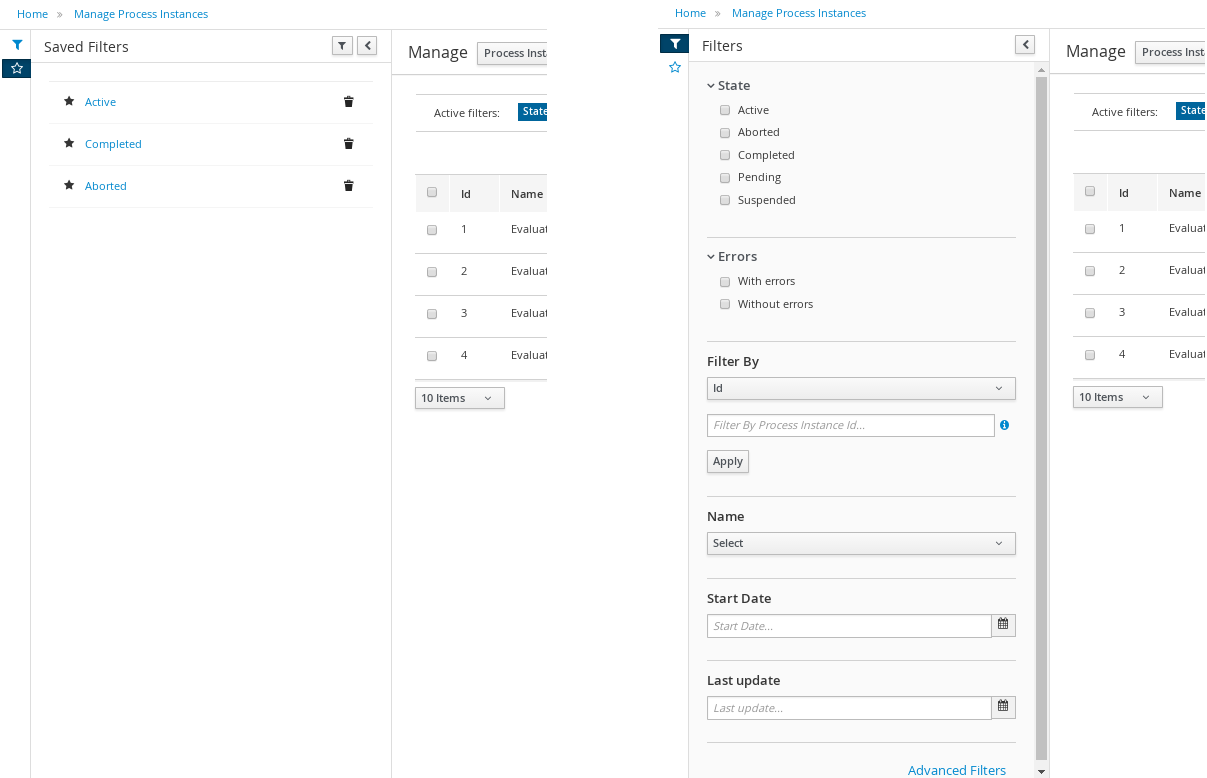
-
(3) Manage screen selector.
The new drop-down offers navigation to the all manage screens: Process Definitions, Process Instances, Tasks, Execution Errors and Jobs have been created. This selector allows the user to switch process admin screens quickly and easily.
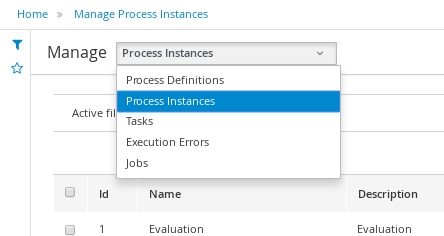
-
(4) Toolbar area.
This toolbar has been designed to contain each screen specific actions and provides different kinds of visualizations: icons for common actions like 'Refresh' that are self-explained, buttons for primary actions and it’s prepared for containing kebab with a list of actions.
-
(5) Filter status area.
As in previous version shows the currently applied filters and provides options to clear individual filters or to clear them all. The new feature introduced is the ability to save the currently applied filter as a new saved filter, which becomes available in Saved filters dock (see Filters area above)
-
(6) The list table area.
The previous table layout has been redesigned to list-like layout, matching with PatternFly guidelines. Some of the changes that have been added:
— New styles are applied to the different list elements.
— The page size selector and the pagination footer has been re-styled and placed closer to the list.
— PatternFly standards applied to list item’s actions. Perform actions on individual list items using the kebab button control. When there are more than one available actions the kebab groups the available actions. There are different areas at kebab: primary actions first and separately the navigation to other screens ones
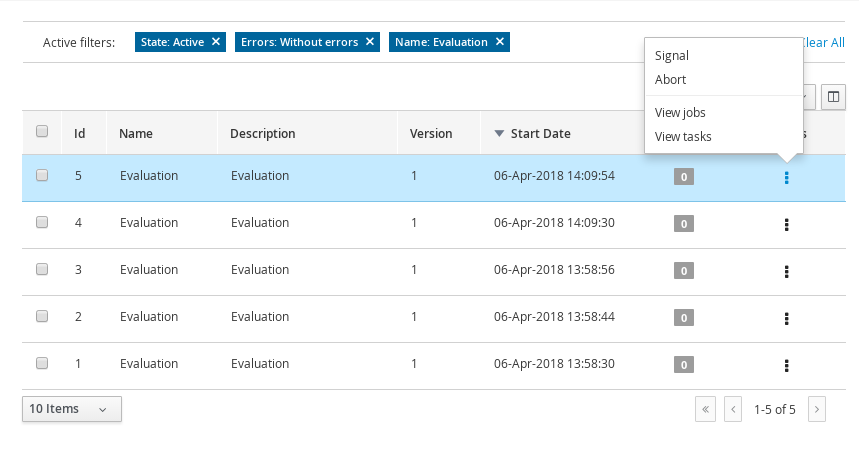
Revised Manage Process Instances page
The different management screens have been redesigned to change the way to open the item detail. When the user selects an item by clicking on the list row to drill into the details, the item details are shown in full screen and the primary list disappears, instead of being open in a right side panel as was in the previous versions
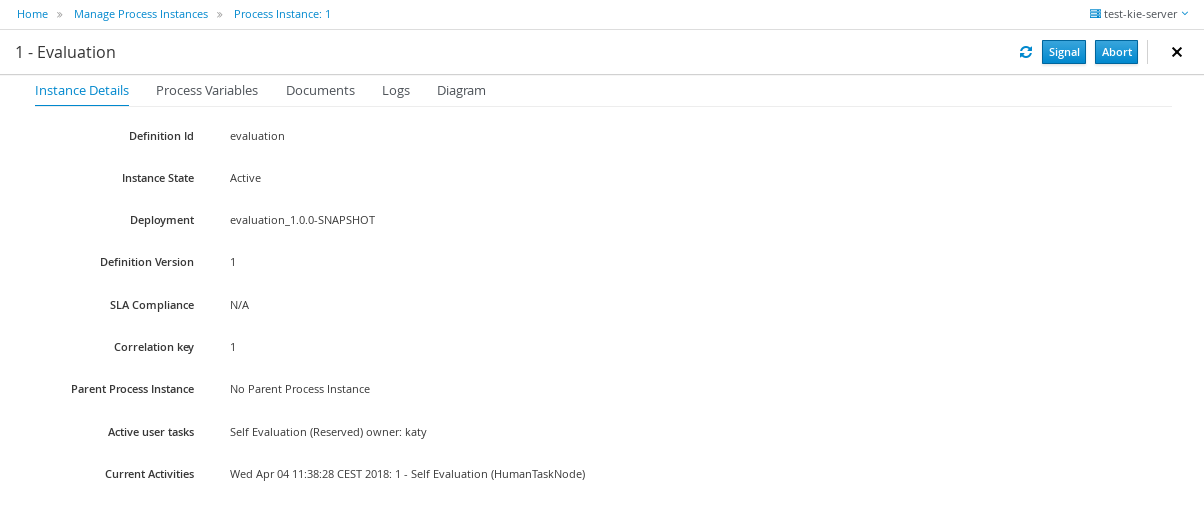
Some changes have been introduced for that purpose:
-
Migrated details views to full screen/adjust styling and breadcrumbs
-
Moved process model pop up in process definition and instance to tab in details ( process definitions and process instances)
-
Moved actions to the new layout toolbar.
-
Re-styling the tabs items details to be shown in full screen mode
-
Navigate back to list view using “X” close button or breadcrumbs
Reviewed and improved quick filter creation
The quick filter bar have been placed to the dock panel and reorganized in vertical disposition.
A new type of basic filters has been introduced to allow multiple value selection. It’s using checkboxes controls to set the different values. The resulting restriction of selecting different values is retrieve the items that match with one of selected values.

This new type of filter has been applied on the following fields:
-
Process instances: State (Active, Aborted,..) and Errors (With errors, Without errors)
-
Task: Status (Completed, Created, ..)
-
Execution Errors: Type (DB, Task, Process, Job)
-
Jobs: Status (Canceled, Completed,..)
Reviewed and improved saved filters
Different changes have been done in this area:
-
Migrated filter tabs to 'Saved filters' dock, in side panel that shows the list of stored filters.
-
Moved the 'Add advanced filter' that opens the previous creation filter popup, to 'Filters' dock.
-
The 'Saved filters' dock allows manage the stored filters:
-
Filters can be deleted
-
The default filters can always be restored as in the previous version with the 'Restore default filters' button.
-
Filters can be applied: When a user selects one filter, that is applied on the current list and the 'Active filters' displays the restrictions contained in that filter.
-
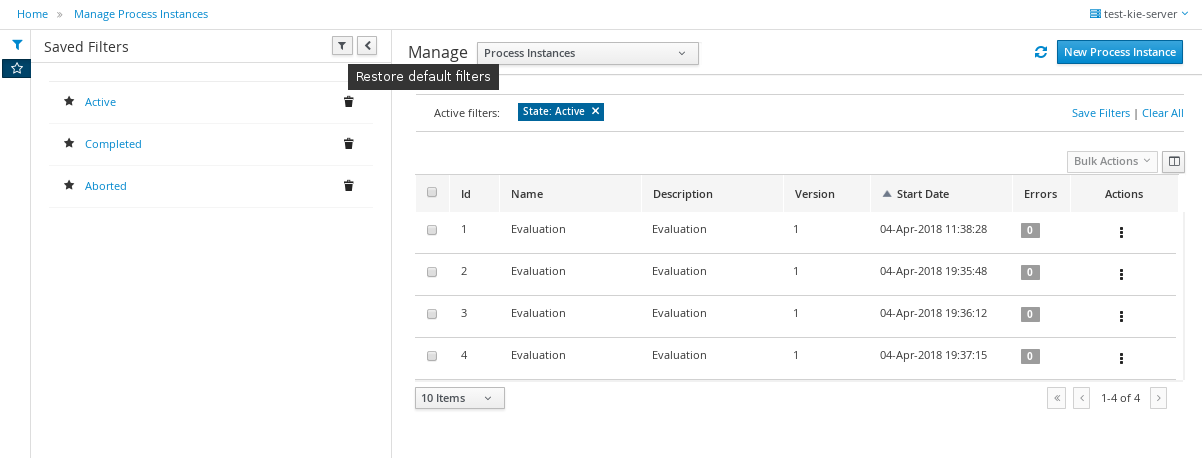
-
The user has now the ability to modify/complete filters and save it to be reused later. The new way to save filter is selecting 'Save filters' at 'Active filters' bar. A name for the new stored filter is requested and a new filter with the current restrictions is added to 'Saved filters' list.
It’s not allowed to have filters with the same name. When the user tries to save a filter with an existing name, currently an error is shown.
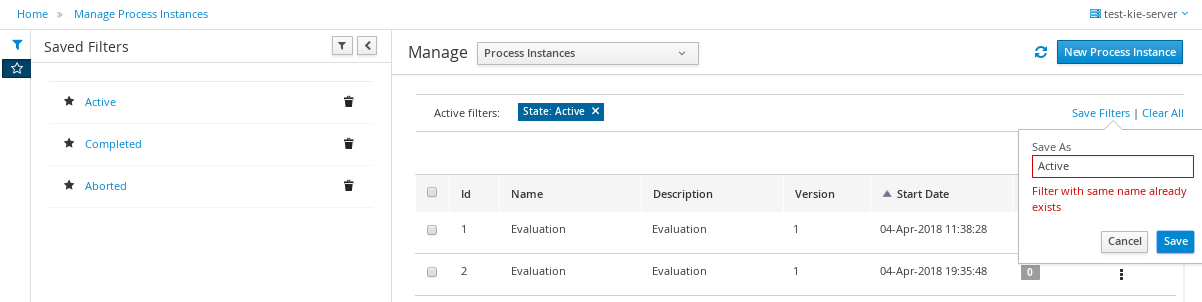
Reviewed Reports section design allowing to work with master / detail
The reports screen has been separated in two sections: Task reports and Process reports.
This new screens are using the new layout, The item details are opened in full screen mode too and the breadcrumb has been added to allow the navigation and keep consistency with the other console screens.
The new layout toolbar has been filled with the action to change between dashboard and table view.
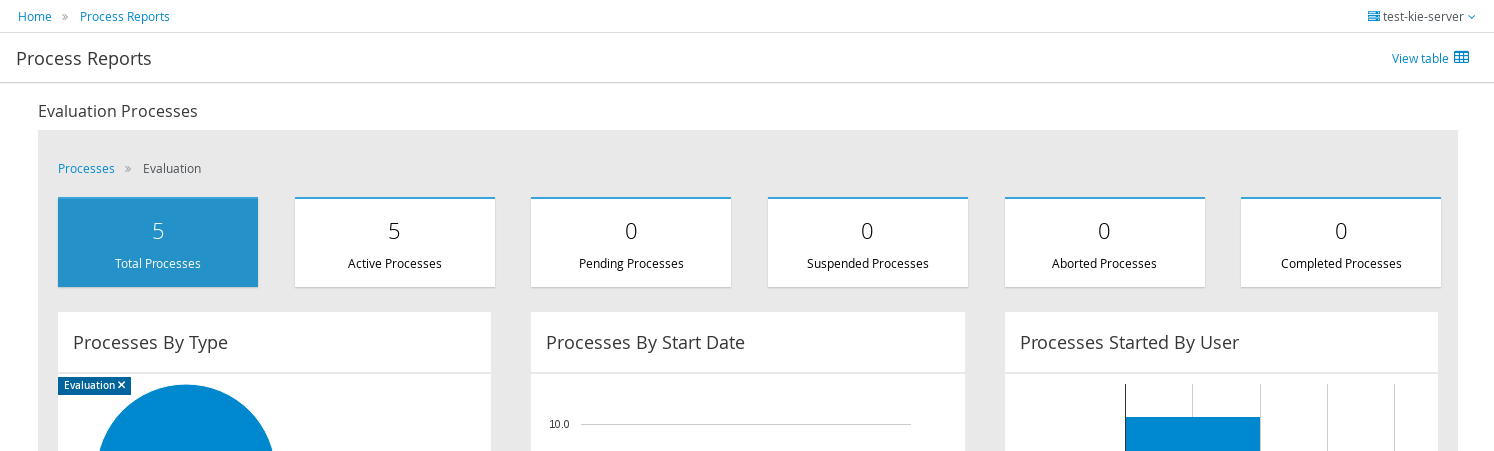

Renamed top level menus
Some naming adjustments have been done to the top level menu:
-
'Task Administration' → 'Tasks'
-
'Task List' → 'Task Inbox'
-
'Process & Task Reports' → two new options: 'Process Reports' and 'Task Reports'

33.39.1.8. Other specific changes on Admin console screens
Process Definitions
-
Navigation to process instances has been placed in process definitions list.
-
View 'Process model' has been placed as a new tab 'Diagram' on the process definition detail.
Process Instances
-
View 'Process model' has been placed as a new tab 'Diagram' on the process definition detail.
-
Signal and abort actions are exposed as a primary actions at new layout toolbar.
Task ( previously Tasks Administration)
-
In the previous version Tasks were only displayed when the current user was part of the following system properties in Kie Server: org.jbpm.ht.admin.user (default: Administrator) or org.jbpm.ht.admin.group (default: Administrators). With the current implementation when this criteria isn’t met, this screen retrieve the list of tasks where the logged user or any of its groups have 'Business Administrator' relationship with them.
-
An error count column added to task information. Same as the error column in process instance list. Also add navigation link (View Errors).
Task details
-
Removed 'Process Context' tab. Leaving the navigation to process instance screen at task list.
-
'Process Instance Id' and 'Process Definition Id' have been placed at 'Details' tab
-
Reviewed styles on primary actions buttons
33.39.2. New and Noteworthy in KIE Workbench 7.7.0
33.39.2.1. Project Oriented Workbench
Workbench becomes Project Oriented. Meaning each project is now in a dedicated repository. Previously each project was in a folder and one repository could hold several projects. These changes merge the concepts of Project and Repository.
One project one repository approach makes the UI simpler and improves releasing or freezing a single project. Previously if a project was frozen, branched or tagged the repository was still shared with other projects, making the release control harder and more complicated.
Projects from older Workbench versions need to be migrated to the new setup. For this we offer a command line migration tool.
Project Oriented does not, at the moment, offer support for multi-module setup. This feature is planned, but not in this release. The now deprecated Asset Management features depended on multi-module support and can not be migrated to this Workbench version.
33.39.2.2. Connecting to a headless jBPM controller
When running a Workbench instance, there is now greater flexibility to decide how Kie Server instances will be managed. Previously, whenever a Workbench is started, it would always start an embedded jBPM controller. This setup is still available but now there is also an option to not start this service and instead connect to a headless jBPM controller. This allows a more fine grained deployment model where it’s possible to decide the best approach for a specific scenario.
To switch between these modes, a key system property is used: org.kie.workbench.controller. By default, the Workbench will continue to start the embedded service if this system property is missing. Otherwise, it will try to connect to the remote service and also ensure that none of the embedded services are started.
It is important to note that only Web Socket connection protocol is available to use when connecting to headless jBPM controller.
For more details regarding all possible system configs regarding user name, password, token and secured password via key store, please refer to Workbench system properties.
33.39.2.3. Content management enhancements
Properties panel
It is possible to edit the properties of the different page elements including, the page itself or any of its rows and components. Once an element is selected, either by hovering on the element and clicking on the editor’s area or selecting the element in the Properties panel dropdown, its properties are displayed in the left docked panel. See screenshot:
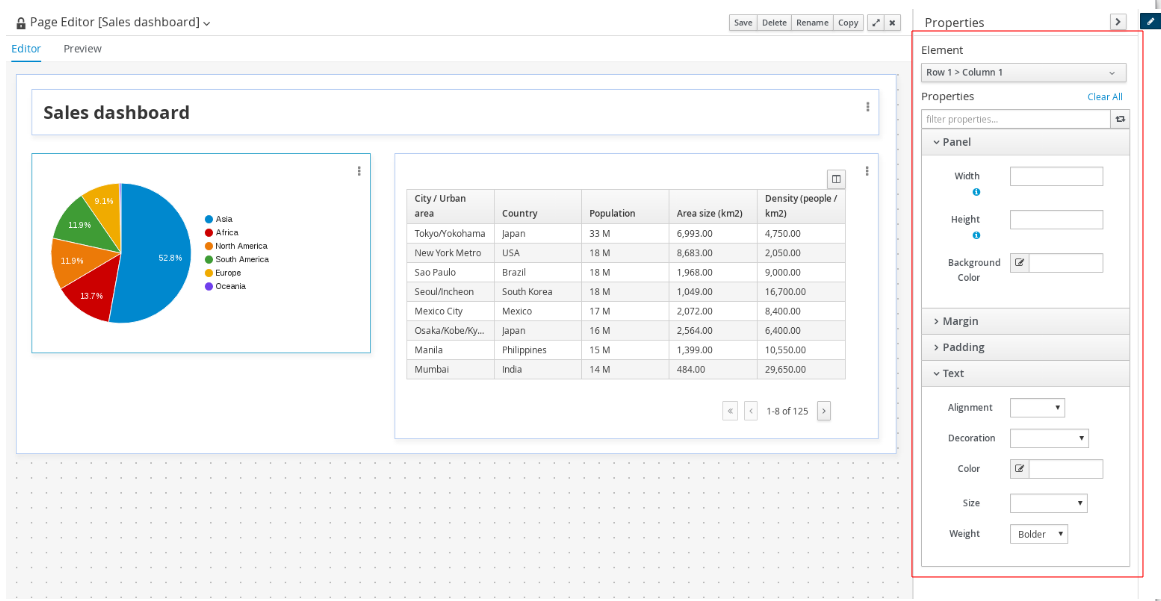
The properties available in this version are basically those related with the element style such as width, height or margins, amongst others. The properties available might differ for each type. Notice for example, the HTML component provides an extra set of properties all related with the text style.
Once a property is changed, its value is reflected in the editor’s area, both in design and preview modes.
Screen component removed
The Screen component, which was placed under the Core group in the right sidebar’s Components panel, has been removed. The reason is, this component was not suitable for production environments.
In future versions though, domain related components, such as a BPM’s task list, will be available for easy consumption by end users.
33.39.2.4. New Migration Tool
A new command line Migration tool with support for Linux and Windows has been provided to move different resources to it’s latest version. It makes possible to perform different migrations:
-
Project Migration: migrates KIE projects from the old project layout (7.4.x and previous) to the new project-oriented structure.
-
Forms Migration: migrates old jBPM Form Modeler forms into the new Forms format.

You can find more info here.
33.40. jBPM 7.6
33.40.1. New and Noteworthy in jBPM 7.6.0
The following features were added to jBPM 7.6
33.40.1.1. Process Designer (Preview)
The new version of the jBPM Process Designer (Stunner) provides stability enhancements again by introducing several bug fixings, tests and other improvements.
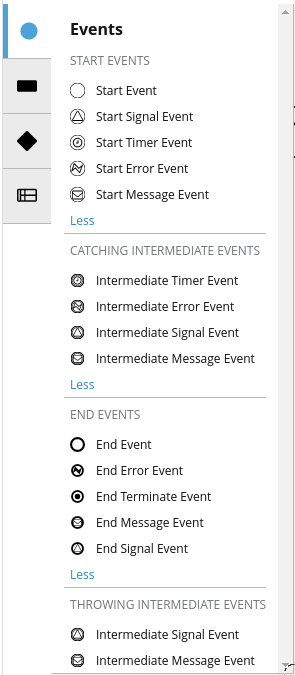
Most relevant features and improvements for this version are:
-
Support for multiple selection (operations with multiple elements)
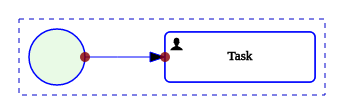
-
Added cut/copy/paste capabilities
-
Support for shape size constraints
-
Improved BPMN2 support:
-
Added Start Message Event
-
Added Start Error Event
-
Added End Message Event
-
Added End Error Event
-
Added Catching Intermediate Error Event
-
Added Catching Intermediate Message Event
-
Added Throwing Intermediate Message Event
-
Improved signal management for events
-
New widget which improves the declaration for the timer event related properties
-
Added some help messages
-
33.40.1.2. Form Modeler
Old jBPM Form Modeler has been deprecated and new Form Modeler has become the default Forms Engine (a migration tool will be provided to move old forms into the new forms format). This new version improves the Forms Engine stability and provides several fixes for different bugs.
Most important features:
-
Added form synchronization on editor startup to fix possible errors caused by model changes (properties removed, type changes…)
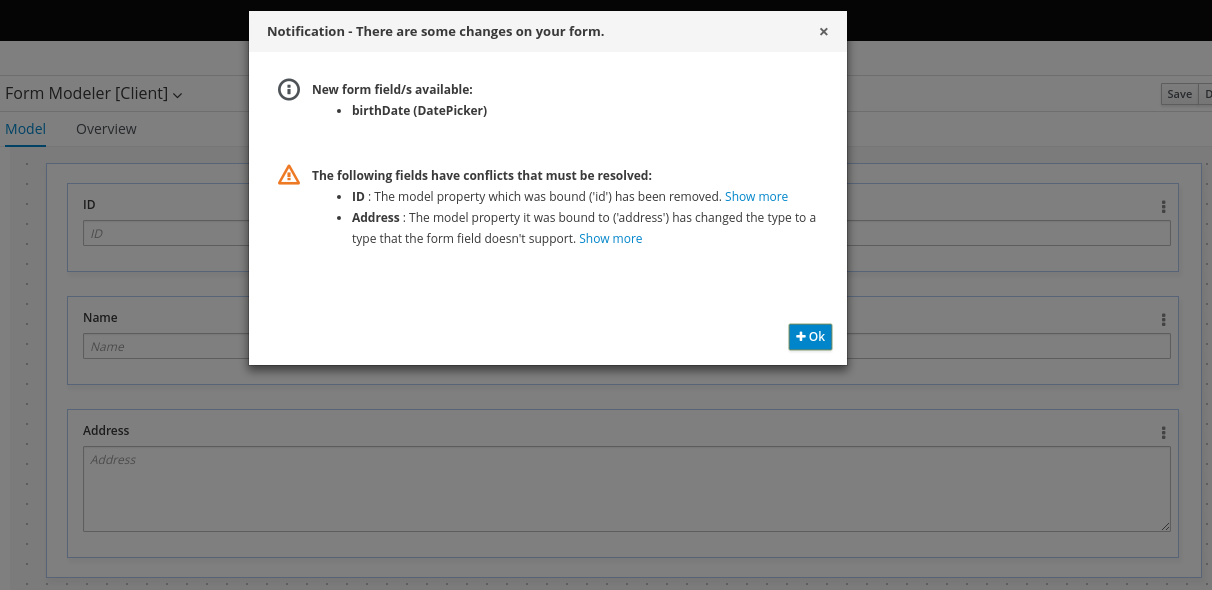
-
Added ability to show Help Messages on fields properties (supports plain text or HTML)
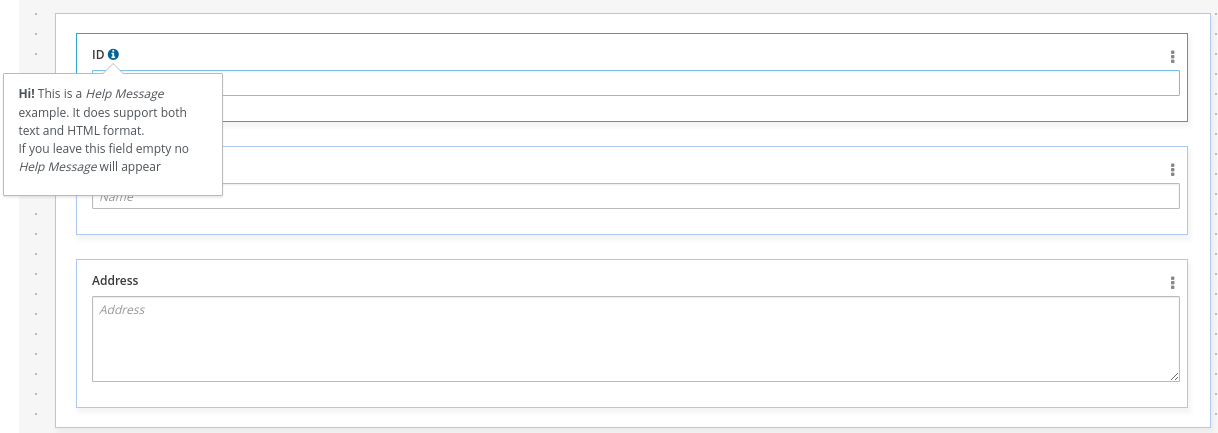
33.40.1.3. Quartz upgraded to 2.2.3
Scheduler Service based on Quartz has been upgraded to use the latest version of Quartz library 2.2.3. That means when updating to 7.6.0 of jBPM and existing installation uses Quartz as scheduler service that will require upgrade before moving further. jBPM comes with upgrade script that is delivered as part of jBPM installer and is specific to database being used by Quartz.
It is located in jBPM installer/db/upgrade-scripts/{database-name}/quartz-upgrade.sql
Procedure to be followed is:
-
stop jBPM (for example kie server)
-
upgrade Quartz database with suitable quartz-upgrade.sql script (according to database used)
-
upgrade jBPM (for example kie server binaries)
-
start jBPM
There are no changes in the quartz.properties file as it will work exactly the same.
33.40.1.4. Support for lazy loaded variables
Pluggable variable persistence strategy has been improved to support (optionally) lazy loaded variables. That is mainly to improve performance and reduce load on external systems that store these variables. Especially valid for documents that could be of significant size and could be stored in external document management systems. To read up more on this see this article
33.40.1.5. Expose readiness and liveness checks in KIE Server
KIE Server has been equipped by default with readiness and liveness checks (REST endpoints)
-
readiness will either respond with 200 (OK) when it’s actually ready or with 503 (Service Unavailable) when it’s still booting/deploying containers/waiting for jBPM controller.
-
liveness (aka health check) will perform following:
-
check readiness
-
check for failed kie containers
-
ask each active extension to health check itself response codes for health check are same as for readiness. Meaning that any error found will result in response 503, regardless if that is failed container, failed extension or not ready yet.
-
Health check can be invoked in two modes:
-
basic - that will return status only (200 or 503)
-
report - will respond with both status and report in response body that will provide info like below (body can be XML or JSON)
Examples:
-
Readiness check
http://localhost:8080/kie-server/services/rest/server/readycheck -
Liveness check
http://localhost:8080/kie-server/services/rest/server/healthcheck -
Liveness check with report
http://localhost:8080/kie-server/services/rest/server/healthcheck?report=true
33.40.1.6. Allow to disable management api of KIE Server
Administrators can decide to disable management api of KIE Server - that is to disallow modifying server configuration once the server was started. This is especially important when running in cloud-based environments where the image consists of kjars to be active and no other kjars should be deployed to it.
By setting system property org.kie.server.mgmt.api.disabled to value true KIE Server will disable management api (that changes the state of it)
and when attempted will always respond with code 400 (Bad Request). This applies both to REST api and JMS api.
33.40.1.7. Spring Boot support for KIE projects
KIE projects (jBPM, Drools and OptaPlanner) has been prepared for running in Spring Boot setup for a while now but with 7.6.0 release they are providing so-called starters that can be easily used to bootstrap your projects with Spring Boot.
Following is a list of Spring Boot starters:
-
jBPM business process management - embedded engine
-
groupId: org.kie
-
artifactId: jbpm-spring-boot-starter-basic
-
-
Fully featured KIE Server (Drools, jBPM, Optaplanner)
-
groupId: org.kie
-
artifactId: kie-server-spring-boot-starter
-
-
Rules and Decisions KIE Server (Drools, DMN)
-
groupId: org.kie
-
artifactId: kie-server-spring-boot-starter-drools
-
-
Rules and Decisions, Process and Cases KIE Server (Drools, DMN, jBPM, Case mgmt)
-
groupId: org.kie
-
artifactId: kie-server-spring-boot-starter-jbpm
-
-
Planning KIE Server (Optaplanner)
-
groupId: org.kie
-
artifactId: kie-server-spring-boot-starter-optaplanner
-
Starters can also be used directly from https://start.spring.io to generate the project.
33.40.1.8. Jobs creation (Admin Console): Allow Launching the job immediately or scheduling
The Job creation interface has been modified to allow start the job immediately or schedule it for being executed later.
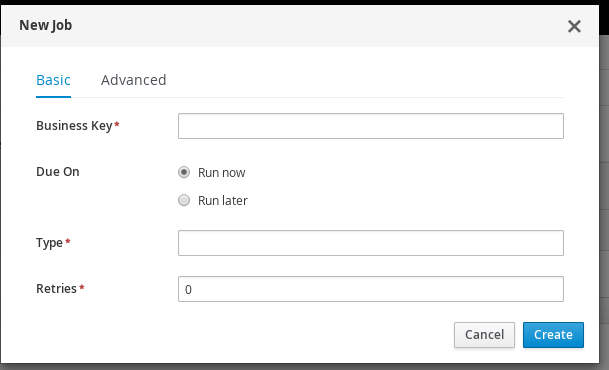
A new Date & time picker has been integrated to allow the user to select the exact moment when the job has to be executed. This option is only available when the 'Run Later' option is selected.
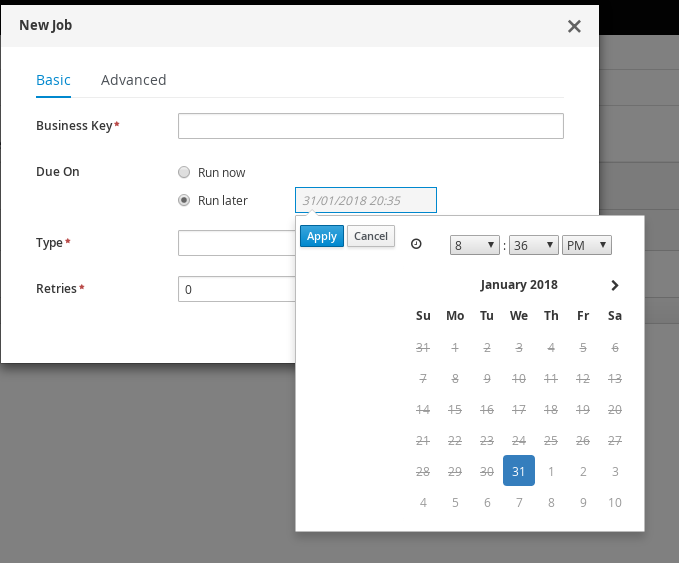
33.40.2. New and Noteworthy in KIE Workbench 7.6.0
33.40.2.1. Content management enhancements
A few extra changes have been introduced in the Content Management tooling (aka Page Authoring) in order to improve the user experience. The following screenshot reveals the changes introduced since the latest version.
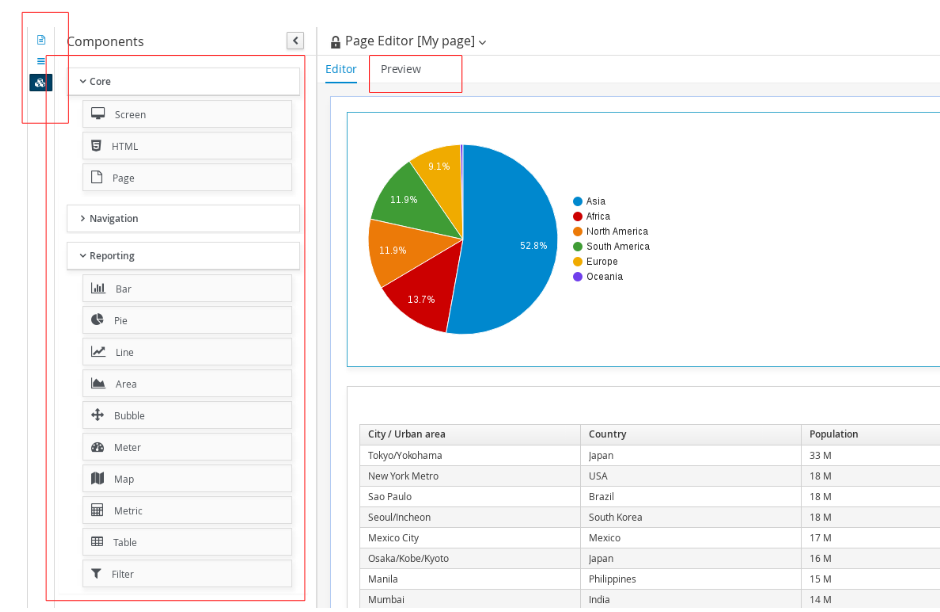
Fluid/Page editor mode selection
The new page pop up allows for the selection of two edition modes:
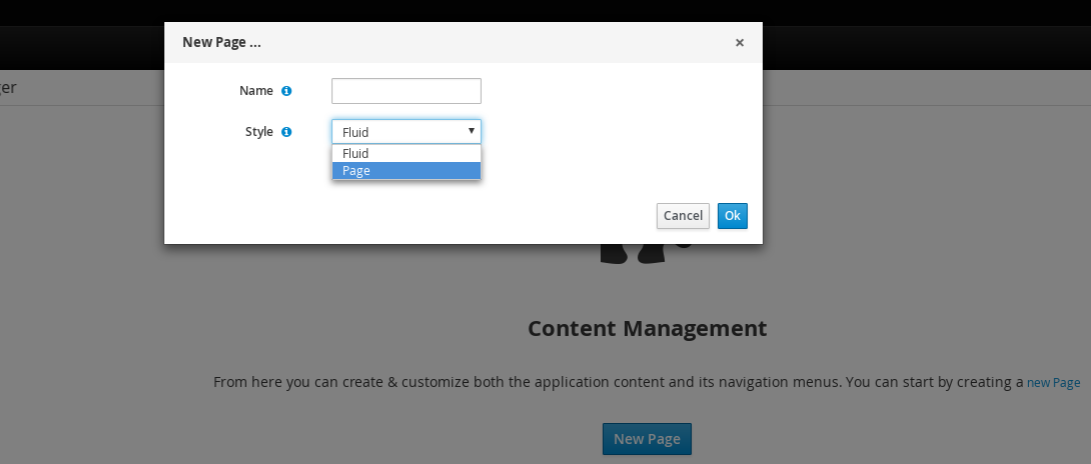
-
Fluid: it acts more as a classical web page, showing a vertical scrollbar when the page exceeds the available height.
-
Page: it was the default in previous versions. When selected, it forces the page to always fit the window’s 100% height.
Preview feature
Page authors can go back and forth from the Editor to the Preview mode as many times as needed. In the Preview mode all the editor’s controls are removed, allowing for the display of the page as it would be seen by end users once the page is published.
Use dock panels to increase the editor content area
In order to increase the available space in the editor’s central area, the page listing, the navigation configuration and the component palette panels have all been moved to the left sidebar as docked panels.
Component palette reorganization
In previous versions, there only existed one single category of components in the palette. As of version 7.6, the components are now grouped into three main categories:
-
Core: HTML and Page components
-
Navigation: Menu Bar, Tree, Tiles, Tab List, Carousel and Target Div
-
Reporting: Bar, Pie, Line, Area, Map, Bubble, Metric, Meter, Table and Filter
The goal of these changes is to make the palette more appealing as well as to ease the selection of the target component to drag.
33.41. jBPM 7.5
33.41.1. New and Noteworthy in jBPM 7.5.0
The following features were added to jBPM 7.5
33.41.1.1. Case management
jBPM 7.5 brings number of case management improvements.
Sub case support
Sub case support is provided as additional activity that can be easily drag and dropped into existing case definitions or even into regular processes to allow creating case instances from within business process.
It allows to provide all information as for regular start case plus enables users to decide what should happen after case is started. For more information take a look at this article
Case file and case comment authorization
Access to case file and case comments can be restricted to particular case roles. By default the access is open unless specified differently.
Access restrictions can be set for comment:
-
when adding a comment
-
when updating a comment
Access restrictions to case file can be set:
-
in case definition
-
when starting a case
-
when setting case file items
More detailed explanation of this feature can be found here
Case close with message
Support for close of case instance was added with optional message. That message will then show up in case instance as outcome message. It accompanies case abort and destroy operations to provide complete coverage of the possible end states of the case instance.
Case comments notifications
Case comments have been equipped with optional support for notifications, by default email notifications with template support. Whenever any of the case roles is mentioned in the comment (@onwer) email notification will be sent to user or group of users assigned to that role. See more details in this article
33.41.1.2. Document list marshalling strategy
A common requirement is to have a list of documents to be handled by business process, jBPM does provide support for physical
documents (e.g. pdf) since version 6 with custom marshalling strategy. Though it only allows to handle single document per process
variable. With version 7.5 there is a new marshalling strategy provided to allow handling list of
documents org.jbpm.document.marshalling.DocumentsMarshallingStrategy. It does rely on the DocumentMarshallingStrategy to process
individual documents so they are properly stored in document management system.
This marshalling strategy accepts only org.jbpm.document.Documents type that represents list of documents.
33.41.1.3. Update task metadata and variables in single operation
UserTaskService has been extended to provide operation to update metadata of a task and its input and output data at the same time. It allows to update following metadata of a task:
-
name
-
description
-
priority
-
expiration date
-
form name
Same feature is available via KIE Server REST and JMS api.
33.41.1.4. Quartz improvements - db job store aware of deployed kjars
Quartz scheduler service has been improved to allow to fetch jobs only for deployments (kie containers) that are currently available in the running system. This applies only to Quartz setup with database job store and requires additional changes in quartz configuration file:
org.quartz.jobStore.driverDelegateClass=org.jbpm.process.core.timer.impl.quartz.DeploymentsAwareStdJDBCDelegate
there is another PostgreSQL delegate class (due to handling of blob data)
org.quartz.jobStore.driverDelegateClass=org.jbpm.process.core.timer.impl.quartz.DeploymentsAwarePostgreSQLDelegate
they both do the same logic to find next trigger to fire - query for triggers based on trigger group id that now is set to deploymentId of the kjar.
33.41.1.5. Move of jBPM work items into dedicated repository
As part of preparation work for revamped Service Repository, some jBPM work items have been moved to dedicated GitHub repository. This is intended to allow easier contribution from community to build up a comprehensive list of work items that users can simply import from Service repository and use in their processes.
33.41.1.6. XStream security improvements
XStream is used as one of data formats (next to JSON and XML-JAXB) used by KIE Server when interacting with runtimes. It might be exposed to certain security issues that could allow to push malicious code over the wire and affect server upon serialization process. This has been addressed by hardening security policy on XStream instances used by KIE Server marshaller. By default it allows only few selected classes from KIE projects plus classes found in kjar.
Additional classes can be added to the policy globally by system property org.kie.server.xstream.enabled.packages that accepts wildcard expressions.
33.41.1.7. KIE Server < - > jBPM controller communication security
KIE server uses either REST or WebSocket to communicate with jBPM controller. Up till now, the only way to provide password was to use system properties which had certain drawbacks from security standpoint. Version 7.5 brings in support for keystore based password storage that KIE Server and jBPM controller can use on runtime to load password.
Take a look at section 'KIE Execution Server → Securing password using key store' for more details
33.41.1.8. Business rule task fire limit
Business rule task has been enhanced to limit the number of fired rules to avoid the situation where rules run into an infinite loop and make the server completely unresponsive. Fire limit is set by default to 10000 and can be configured:
-
globally (per JVM) via system property org.jbpm.rule.task.firelimit
-
per business rule task via data input named FireRuleLimit
in case fire rule limit is reached service will throw an exception to indicate possible dangerous situation.
33.41.1.9. Swagger based KIE Server documentation
KIE Server documentation, that is hosted on running KIE Server has been completely rewritten based on Swagger. It provides nice looking UI plus possibility to try different endpoints directly from within the documentation.
Moreover, it does filter endpoints based on active KIE Server extensions and shows endpoints that are actually available.
It is build as KIE Server extension itself and thus can be disabled if not needed, like production environments. More on this can be found here.
33.41.1.10. Email work item with template support
Email work item (jar that provides support for emails) has been enhanced with support for html templates based on freemarker template engine. It is automatically available as soon as the jbpm-work-item-email library is on class path. It supports three system properties that configure it:
-
org.jbpm.email.templates.dir - mandatory property that specifies absolute directory path where templates can be found
-
org.jbpm.email.templates.watcher.enabled - (default false) optional setting to enable watcher thread for added/changed/deleted template files so they can be seen without server restart
-
org.jbpm.email.templates.watcher.interval - (default 5) optional setting for watcher thread that specifies polling interval
Templates are loaded on startup and when discovered any changes to it (in case watcher thread is configured).
To use this feature from Email work item (service node) add extra data input called Template that will be the file name of the template (without extension .html).
33.41.1.11. Updated jBPM Service Repository
jBPM Service Repository has had a complete overhaul and is now generated from the list of contributed work items. It now contains a user-friendly "Home Page" that lists all available workitems, specific workitem information, as well direct download links the workitem resources. Community contributions to the workitem repository are welcome and contributors names are showcased on the repository home page.
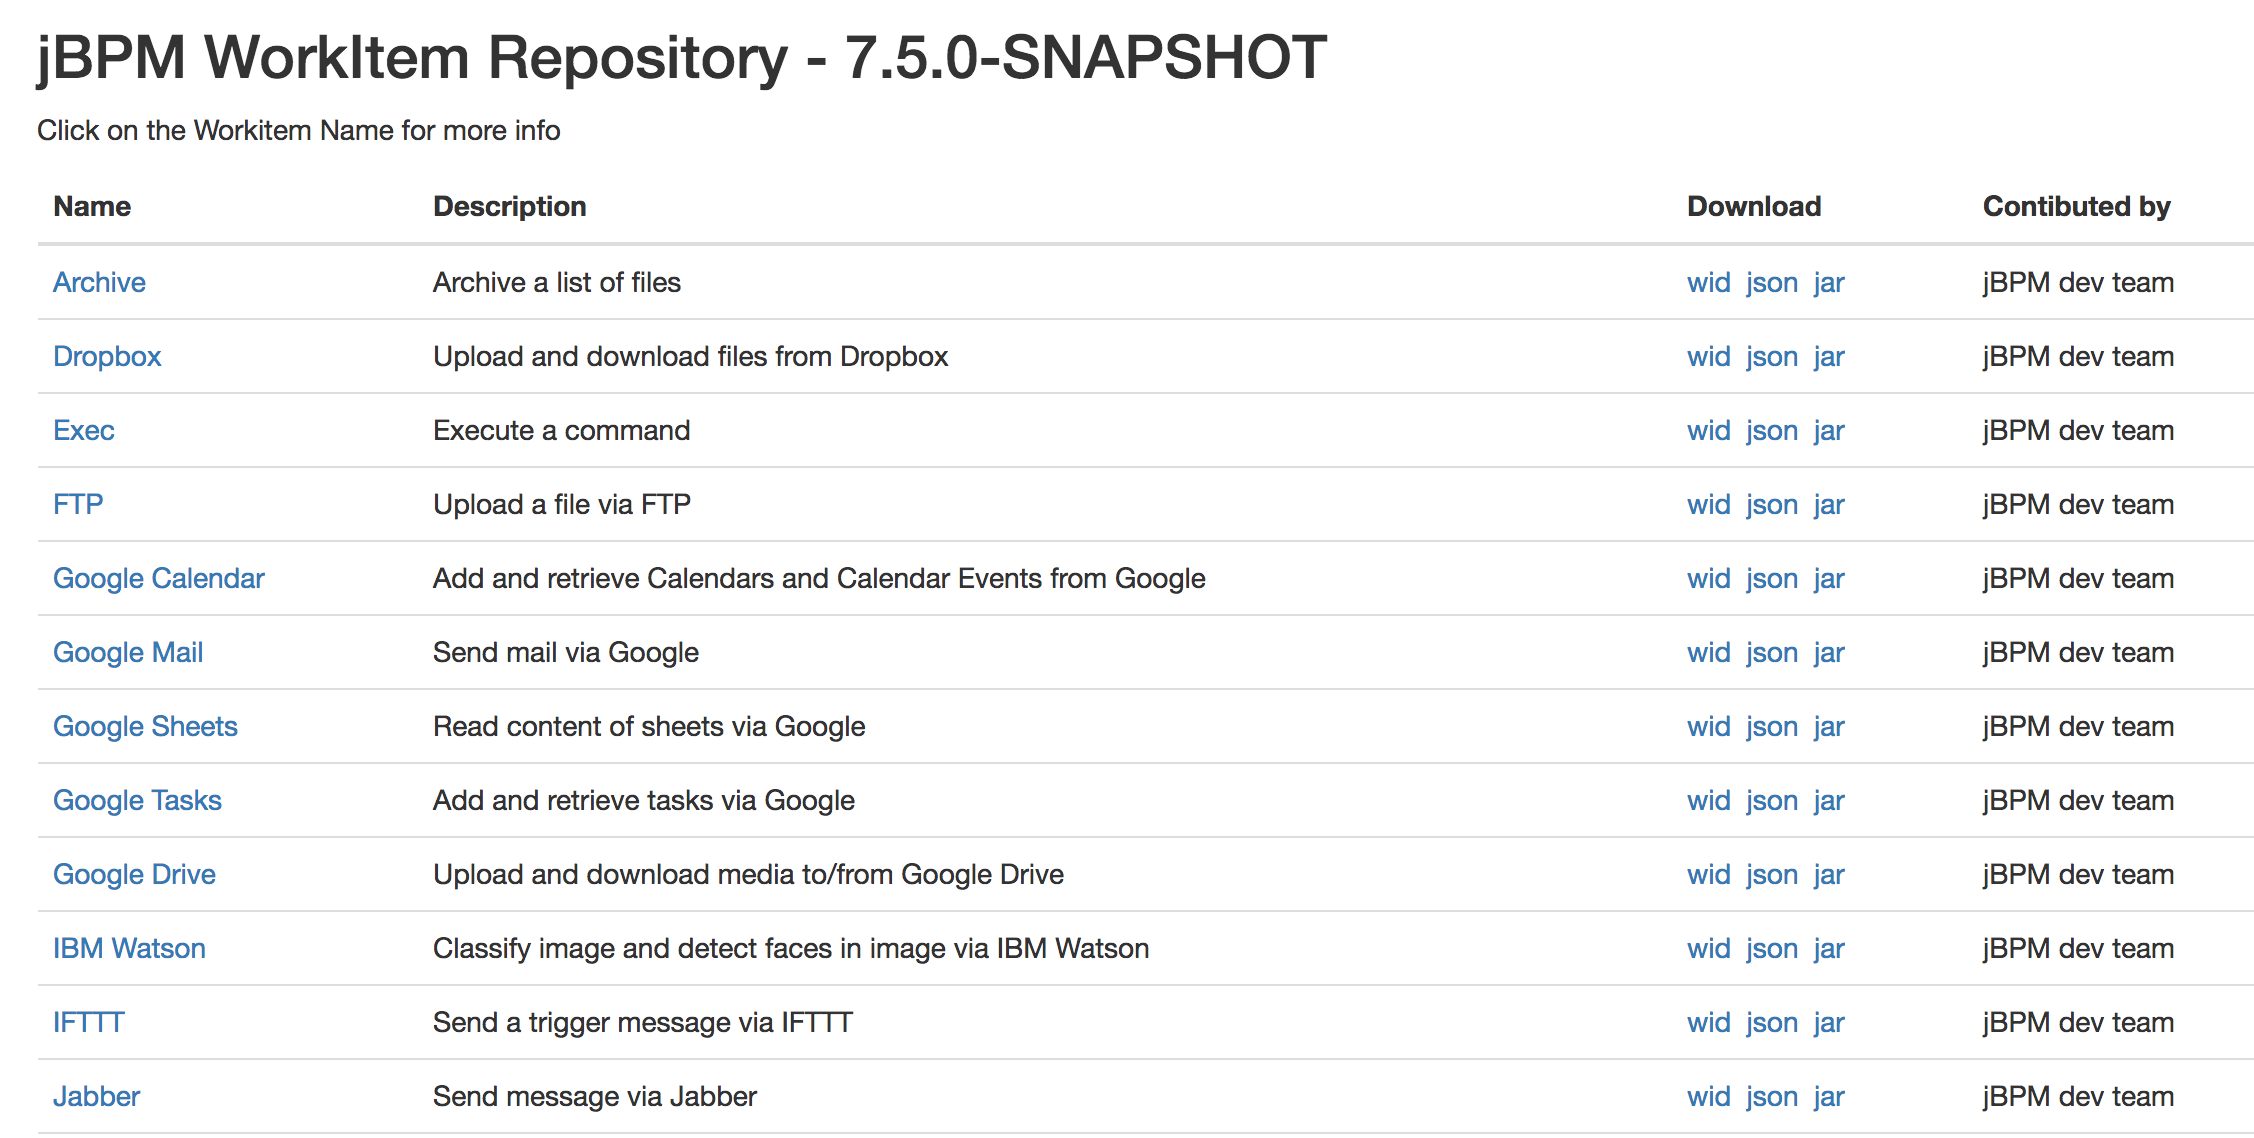
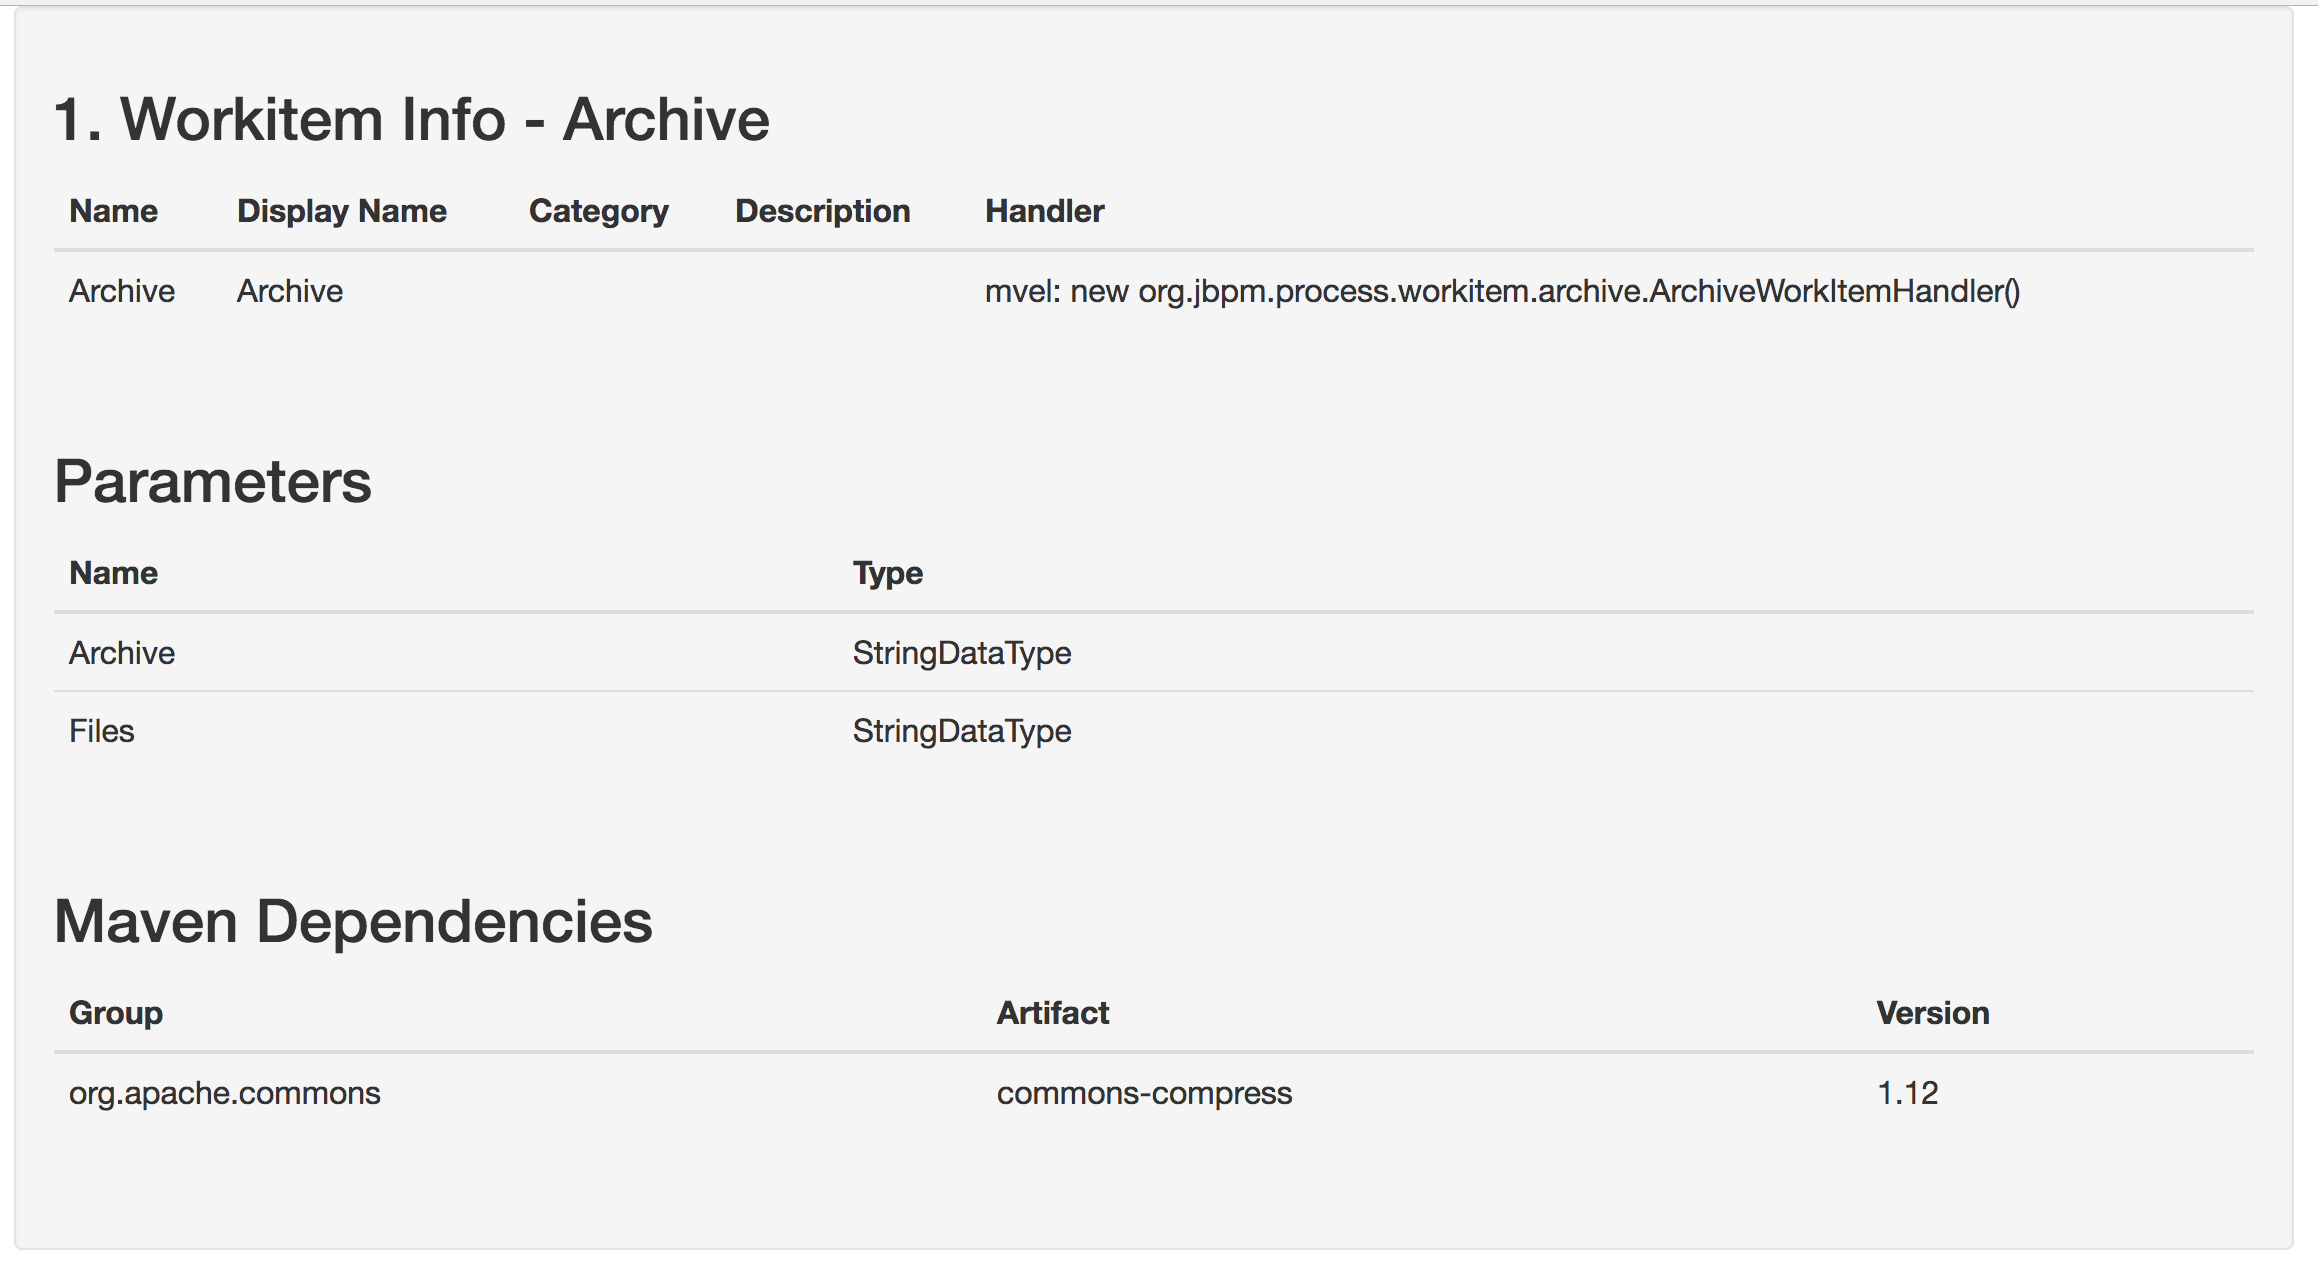
The service repository can also be generated locally by building the jBPM workitems module. The look/feel of the generated repository can be completely customized by updating the repository home page.
Need to have and maintain a repository-wide index.conf file has been removed. service repository importer available in jbpm-designer has also been updated to list all workitems available in the given repository regardless of the existence of this index.conf file.
33.41.1.12. Process Designer (Preview)
The new version of the jBPM Process Designer (Stunner) provides stability enhancements - it introduces several bug fixings, tests and usability improvements.
Most relevant added features and improvements:
-
Support for text auto-wrapping - text is being automatically wrapped to fit the shape size
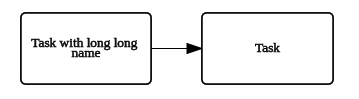
-
Improved usability on connectors by making easier to achieve straight lines
-
Improved BPMN2 support:
-
Events - more common attributes being supported
-
Added Start Signal Event
-
Added Start Timer Event
-
Added End Signal Event
-
Added End Timer Event
-
Added catching intermediate signal event
-
Added throwing intermediate signal event
-
-
Re-styling BPMN2 shapes (still in progress)
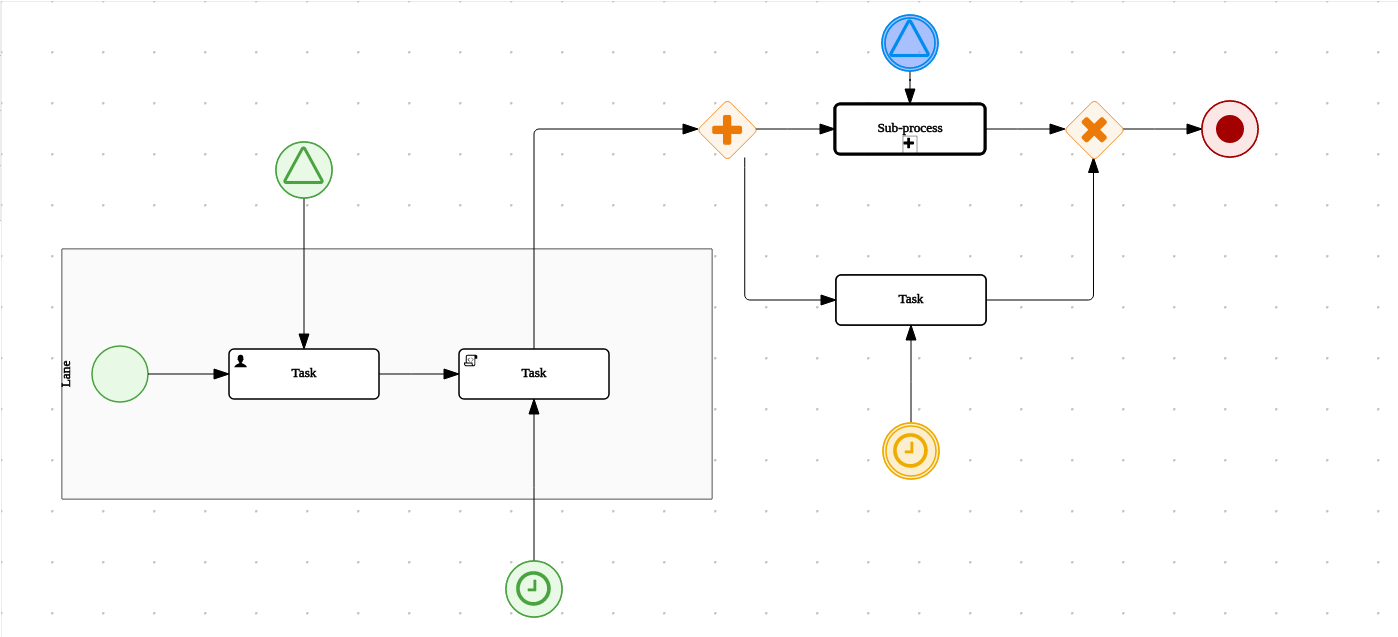
33.41.2. New and Noteworthy in KIE Workbench 7.5.0
33.41.2.1. Content management enhancements
Remarkable changes have been introduced in the Content Management (aka Dashboards) tooling in order to improve the user experience.
Perspective to page renaming
The "page" term is far more familiar to users. Notice that, "perspective" is a concept that was borrowed from the Eclipse development tool, thus it is a concept mostly used in developer circles. Page is more related to web content, easier to understand by regular people. For this reason, perspective has been renamed to page all over the tooling.
Left sidebar new look and feel
This is the most noticeable change introduced. The left sidebar has been completely rewritten in order to provide an enhanced look and feel.
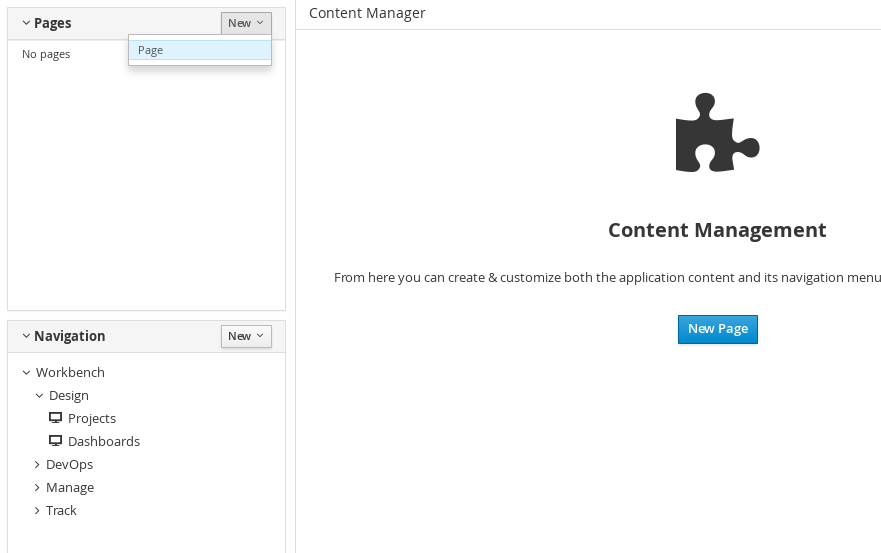
The two sections Pages and Navigation have been merged into a single view. From this view users can either create new pages or change the navigation configuration.
The Navigation section lists the navigation trees. Specifically, the tree named Workbench is available by default, it can not be deleted and it contains the entries displayed in the workbench’s top mega menu. Any change applied to it will cause the mega menu to modify its entries. This is actually the mechanism users must use to extend the workbench with new pages.
Tags button disabled
The tags feature or the ability to attach a set of labels to a page during edition time has been removed. This feature in combination with the former "Apps" perspective was used to allow users to publish their dynamic pages in a categorized way. This feature is no longer needed. During the edition of a page, the Tags button, that used to appear at the editor’s top right button bar, has been removed.
As a replacement, users can leverage the existing navigation features to create new pages and attach them to the workbench’s mega menu.
33.41.2.2. Extra navigation components
The existing navigation components available in the Content Management tooling have been extended with some extra types. To date there exist the following components:
-
Tile navigator
-
Tab list
-
Carousel
The following have recently been added to the release:
Menu bar
As its name states, this component displays the entries of a navigation tree in a menu bar shape. There is no limit to the number of levels supported. When a page item is clicked, the page content is displayed in the Target div (see details below) component specified in the menu bar’s configuration.

Tree navigator
Same as the Menu bar, but the entries are displayed as a vertical tree structure.
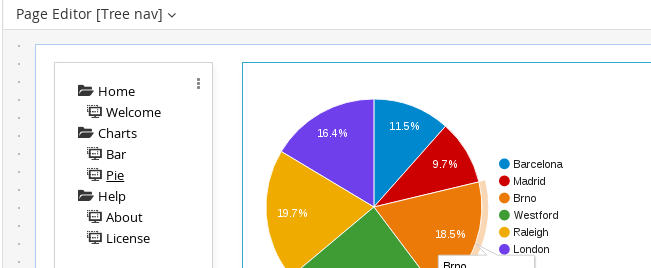
Target div
Both the Carousel and the Tile navigator components can handle by themselves the display of the items the user clicks on. Others like Tab list, Menu bar and Tree navigator require a Target div component as its display output since they have a clear separation between the display of its entries and the content of the last item clicked.
So, every time, a Target div based navigation component is dropped into a page, a Target div component must have been dropped as well, so that the first one can link to it. The following screen shows the configuration panel that is displayed every time a target div based component is dropped into a page.
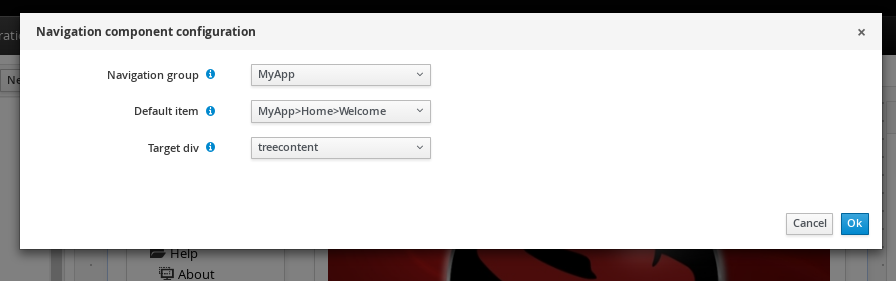
The navigation group is mandatory for all the navigation components as it indicates the navigation structure to display whereas the Target div setting is not available for non target div components like Carousel or Tile navigator.
33.41.3. New jBPM controller client API
In order to facilitate the management of jBPM controller related tasks such as creating server templates, starting and stopping containers, etc, we developed a new Java client API available under the kie-server-controller-client Maven module. With this API, you can connect to a jBPM controller using either REST or Web Socket protocols. For more details, see jBPM controller Client API chapter.
33.41.4. Breaking changes in Kie Server 7.5.1 from 7.0
33.41.4.1. jBPM controller API changes
Changes to SpecManagementService interface:
-
Included new method
getContainerInfothat allows to retrieve a singleContainerSpecdefined in aServerTemplate. -
Changed methods
listContainerSpec,listServerTemplateKeys, andlistServerTemplatesreturn types from generic collection to specific domain list types (ContainerSpecList,ServerTemplateKeyList, andServerTemplateList) in order to properly serialize and deserialize the returned values using JAXB and JSON.
Changes to RuleCapabilitiesService interface:
-
startScannermethod now uses ajava.lang.Longtime instead of a primitivelongfor theintervalparameter in order to avoid JSON and JAXB serialization issues.
Changes to RuntimeManagementService interface:
-
Changed methods
getContainersandgetServerInstancesreturn types from generic collection to specific domain list types (ContainerListandServerInstanceKeyList) in order to properly serialize and deserialize the returned values using JAXB and JSON.
For more details, see JBPM-6243.
33.41.4.2. Kie Server API changes
Changes to ServiceResponse wrapper:
-
Moved
ResponseTypeenum and common methods to a new interface calledKieServiceResponse, allowing it to be extended to multiple implementations.
33.42. jBPM 7.4
33.42.1. New and Noteworthy in jBPM 7.4.0
The following features were added to jBPM 7.4
33.42.1.1. KIE Server Router enhancements
KIE Server Router received number of enhancements where majority of them were around connectivity with KIE Servers and jBPM controller. Most of the work was to make it more reliable in case of failures of the other components
-
when jBPM controller is not available during router start a retry mechanism is in place to connect to it as soon as the jBPM controller becomes available
-
when jBPM controller is not available when there are updates to be sent to it a retry mechanism is in place
-
when KIE Server that request is sent to does not respond it is removed from the active servers and thus subsequent requests won’t target it any more, at the same time such server is put on a list to be verified if that server was only temporarily unavailable and if so will be put back on the active servers list
With these enhancements KIE Server Router is more resilient to failures and thus provides a much higher level of reliability, especially important in cloud-based environments.
33.42.1.2. User task update (properties and data)
Besides regular life cycle of user task, users could set task content while working on the task or change the task priority, name or description. This is all possible but requires users to do that individually. 7.4 comes with a feature that allows to update certain properties and data in one shot. Following is a list of user task properties that can be updated:
-
name
-
description
-
priority
-
expiration date
-
form name
Both user task inputs and outputs can be given to be updated. Data will be merged with existing values if any. That means if there are task inputs or outputs with same name already present on a task they will be replaced with given values.
33.42.1.3. Work Item archetype
To help users build custom service tasks (work items) jBPM 7.4 comes with Work Item Archetype that aims at generating majority of things required to build a custom service task. It does include:
-
WID file (work item definition)
-
Work Item Handler implementation class
-
WorkItem handler test class
-
maven assembly (zip) that will package everything on the build time so it can be consumed by Service Repository and thus used from within Web Designer
A detailed article can be found here
33.42.1.4. KIE Workbench enhancements
In this release, a series of bug fixes have been resolved. This list highlights some of the major fixes:
-
When selecting items in the different runtime views (Process List, Task List, Jobs, etc), selection will now be persistent across different pages. See JBPM-6374 for more details.
-
When searching for Jobs, it is now possible to filter by Due On dates in the future, see JBPM-6437 for more details.
-
Improved overall query performance for listing process instances. See JBPM-6292 for more details.
-
Consolidated process related columns name in the Task and Job search pages. See JBPM-5957 and JBPM-5955 for more details.
-
Forwarding a task via the task details page, now correctly moves the task into Ready state. See JBPM-6438 for more details.
33.42.2. New and Noteworthy in KIE Workbench 7.4.0
33.42.2.1. Guided Decision Table improvements
In addition to fixing numerous bugs the Wizard used to create and edit columns has been improved to show descriptions of the different steps required for the different column types.
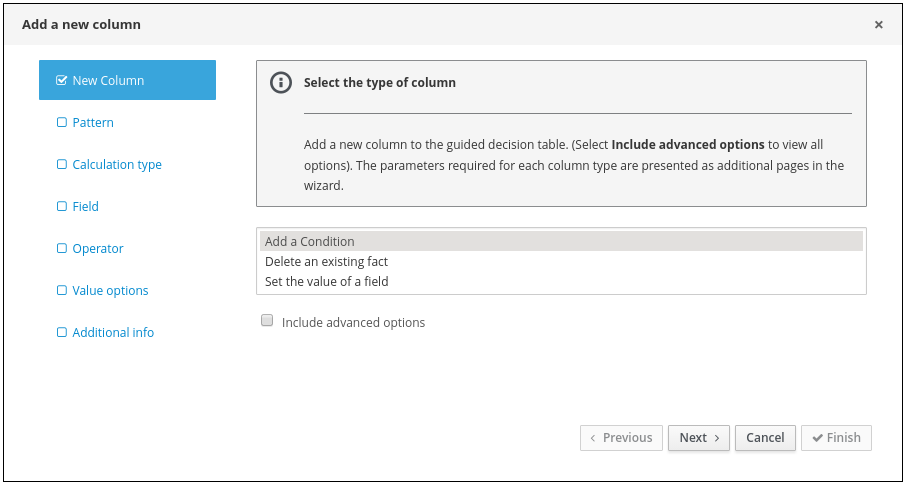
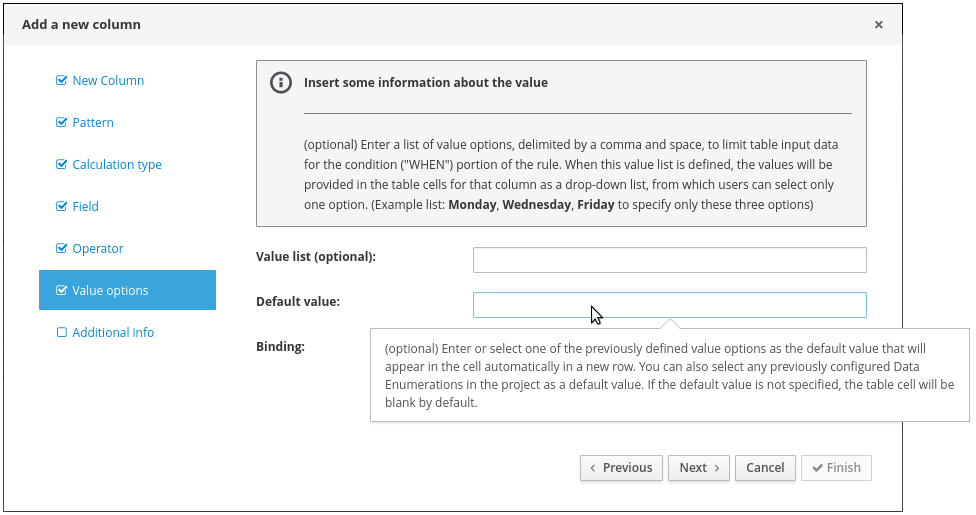
33.42.2.2. Disable experimental editors
The following features are considered experimental and can be disabled using the Security/User Management administration screen:-
-
Guided Decision Tree Editor
-
Guided Score Card Editor
-
XLS Score Card Editor
-
(New) BPMN2 Process Editor
-
Deployments/Server Provisioning Perspective
These features are enabled by default.
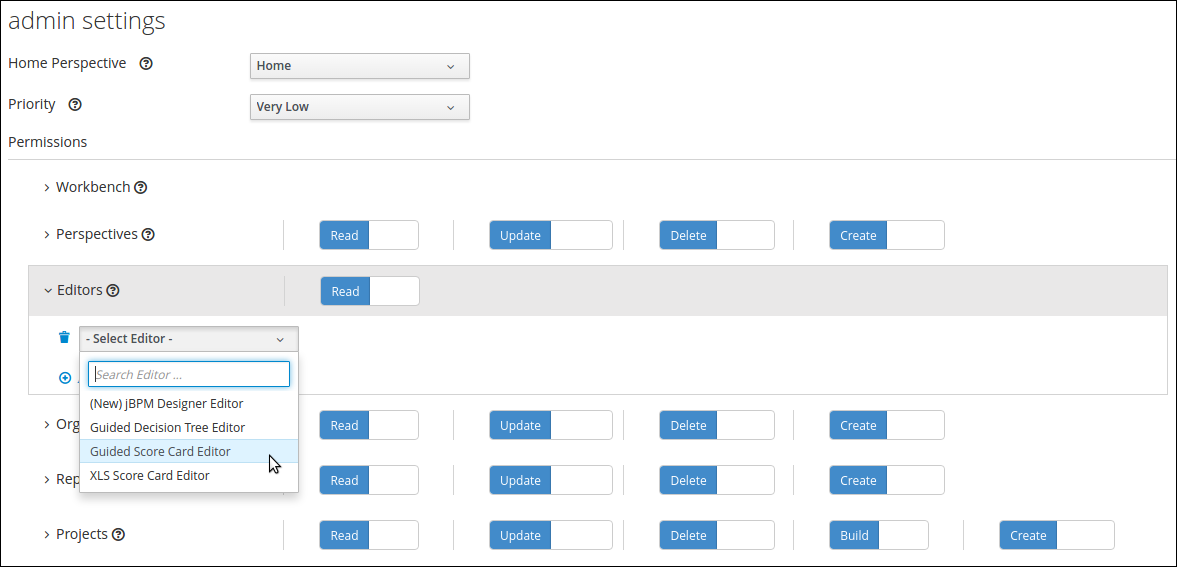
33.43. jBPM 7.3
33.43.1. New and Noteworthy in jBPM 7.3.0
The following features were added to jBPM 7.3
33.43.1.1. KIE Workbench Monitoring Web Application
A new distribution war has been added to the project in this release. The goal for the KIE Monitoring Web Application is to be used along with Kie Server instances, managing all runtime capabilities. This includes managing containers, process instances, tasks, dashboards and more. As opposed to the standard Kie Workbench distribution, no authoring capabilities are offered,
33.43.1.2. KIE Server Maven Plugins
With version 7.3 KIE Server has been empowered with additional Maven Plugins that allow to interact with KIE Server and jBPM controller REST api directly from within a build. This enables easier integration with CI/CD pipelines when building KJars so they can be directly deployed to execution environment (both managed and unmanaged KIE Servers).
KIE Server Deploy Maven Plugin - read more
-
deploy - deploy kjar to runtime environment
-
dispose - dispose running kjar (kie container) in runtime environment
-
update - update version of running kjar (kie container) in runtime environment
KIE Server Controller Deploy Maven Plugin - read more
-
get-template - retrieves existing server templates from jBPM controller
-
create-template - creates new server templates with set of containers
-
delete-template - removes server template
-
get-containers - retrieves containers in given server template
-
get-container - retrieves given container from server template
-
create-container - create new container in given server template
-
delete-container - delete container from given server template
-
start-container - starts container in given server template
-
stop-container - stops container in given server template
-
deploy-container - creates and starts container in given server template
-
dispose-container - stops and removes container from given server template
Process Designer (Preview)
The new jBPM Process Designer (Stunner) provides stability enhancements again by introducing several bug fixings, tests and reviews.
On the other hand this release includes some new cool core features:
-
Improving user experience & usability by introducing enhancements in the connections and magnets capabilities. At this point:
-
Connections can be attached to a concrete shape magnet. Irrespective of the location of shape, the connection will target the specified magnet
-
Connections can be attached to the shape’s center magnet. In this case the connector/connections point to the shape’s border, depending on its location
-
Connections can be attached to the shape area, instead of a concrete magnet. This produces the magnet to be automatically updated depending on the shape’s location
-
Notice this information is also being persisted and stored in the BPMN diagram files
-
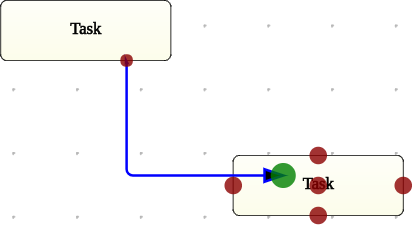
-
Integration for validation and error messages into the workbench’s IDE. This way users can keep track of the validations and errors produced during the modelling phase and link back to the canvas and the affected shapes in order to fixing the issues
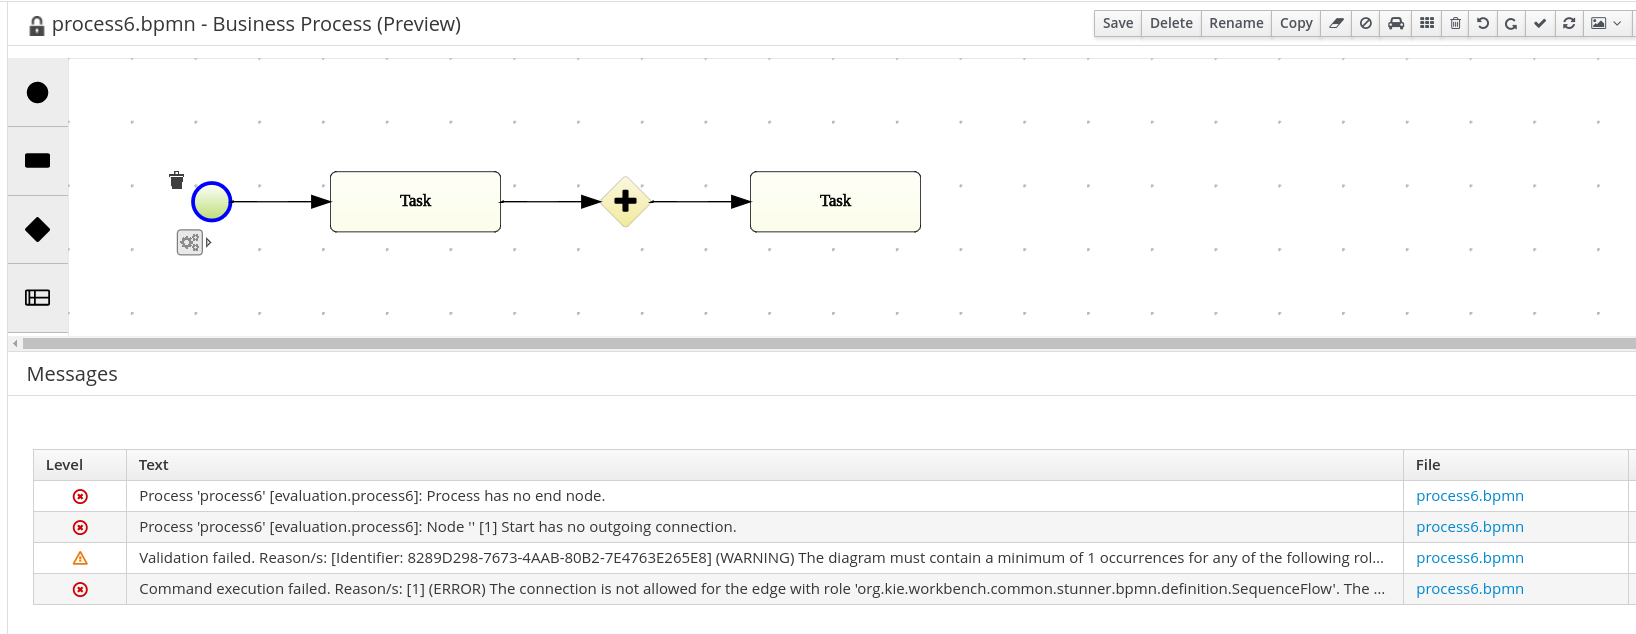
-
Toolbox re-design & usability enhancements. Many visual visual and usability improvements applied on the toolbox for this release. It now supports multiple grids, floating grids, automatic layouts and much more
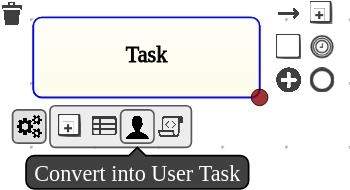
33.43.2. New and Noteworthy in KIE Workbench 7.3.0
33.43.2.1. New Home and Menu Bar
The Home page, Menu bar and About popup now have a new design. Menu items are split into groups representing major functional areas.
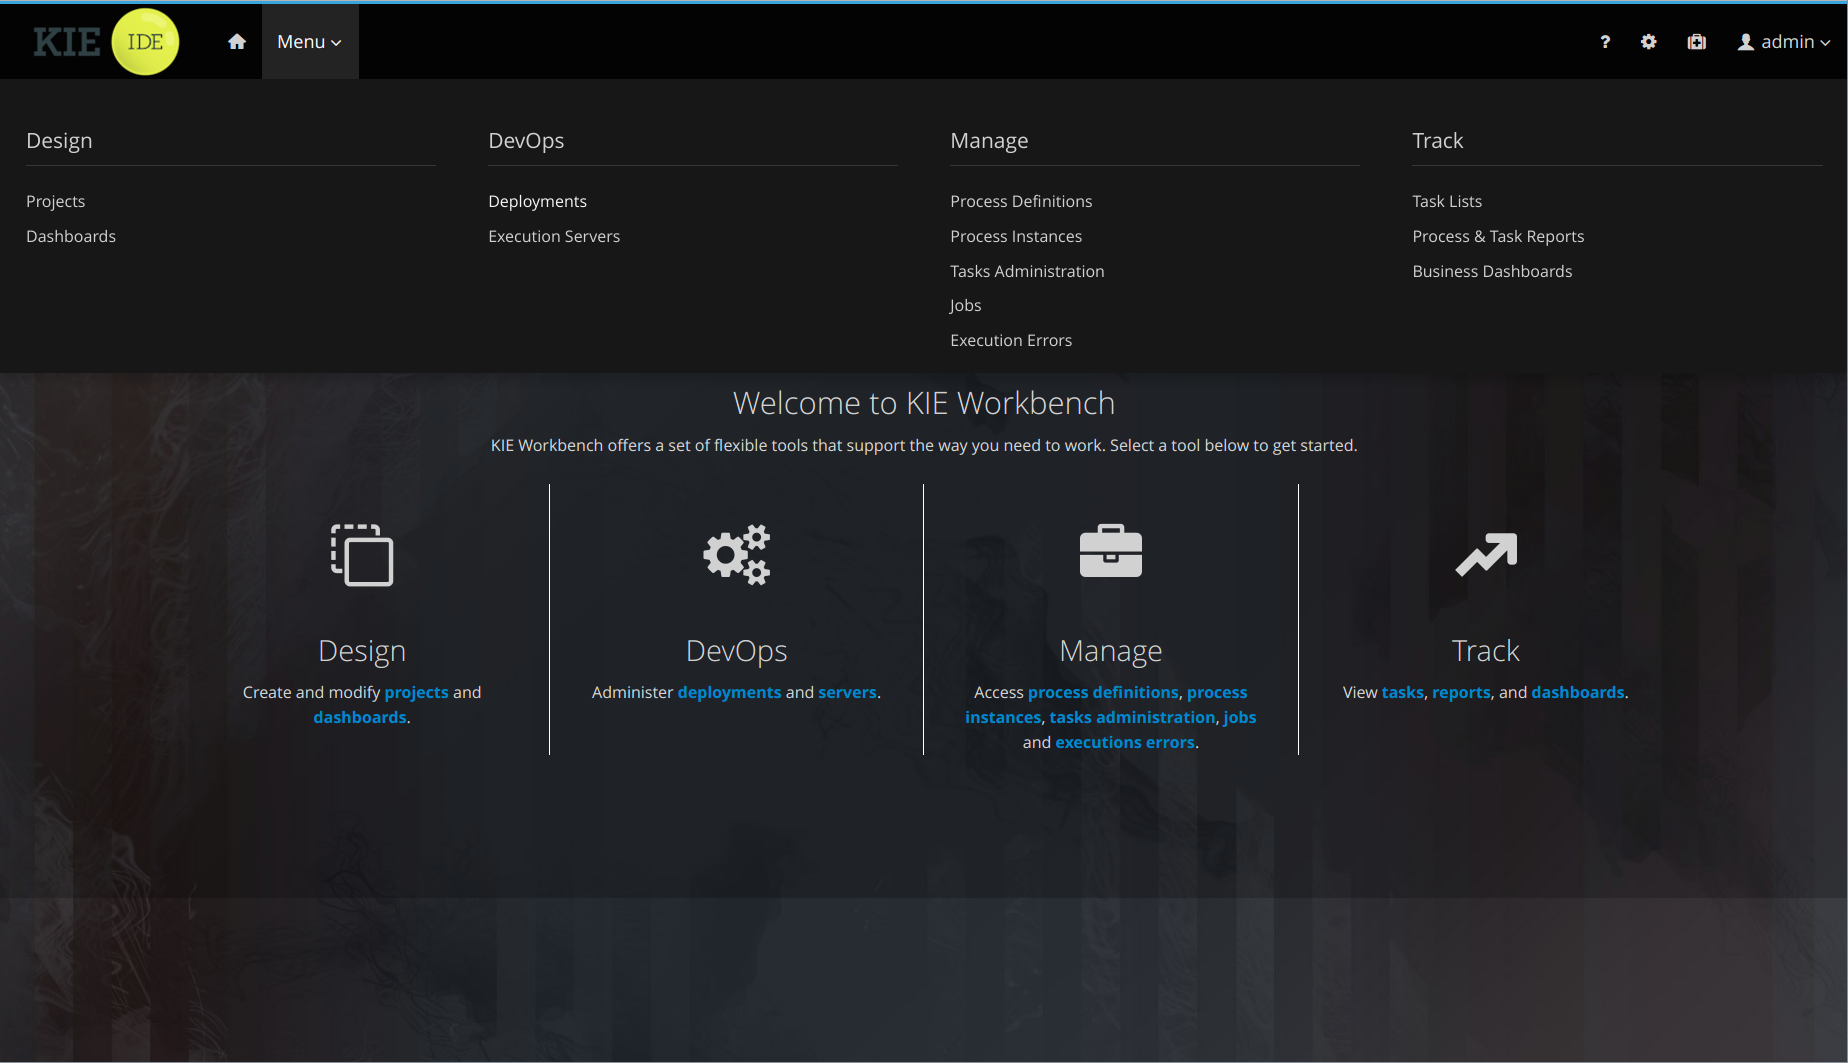
33.43.2.2. Admin page changes
The Admin page is now accessible with the cog icon on the Menu bar and has more items. Access to the perspective artifacts, Data Sets, Data Sources and Language options have been moved there.
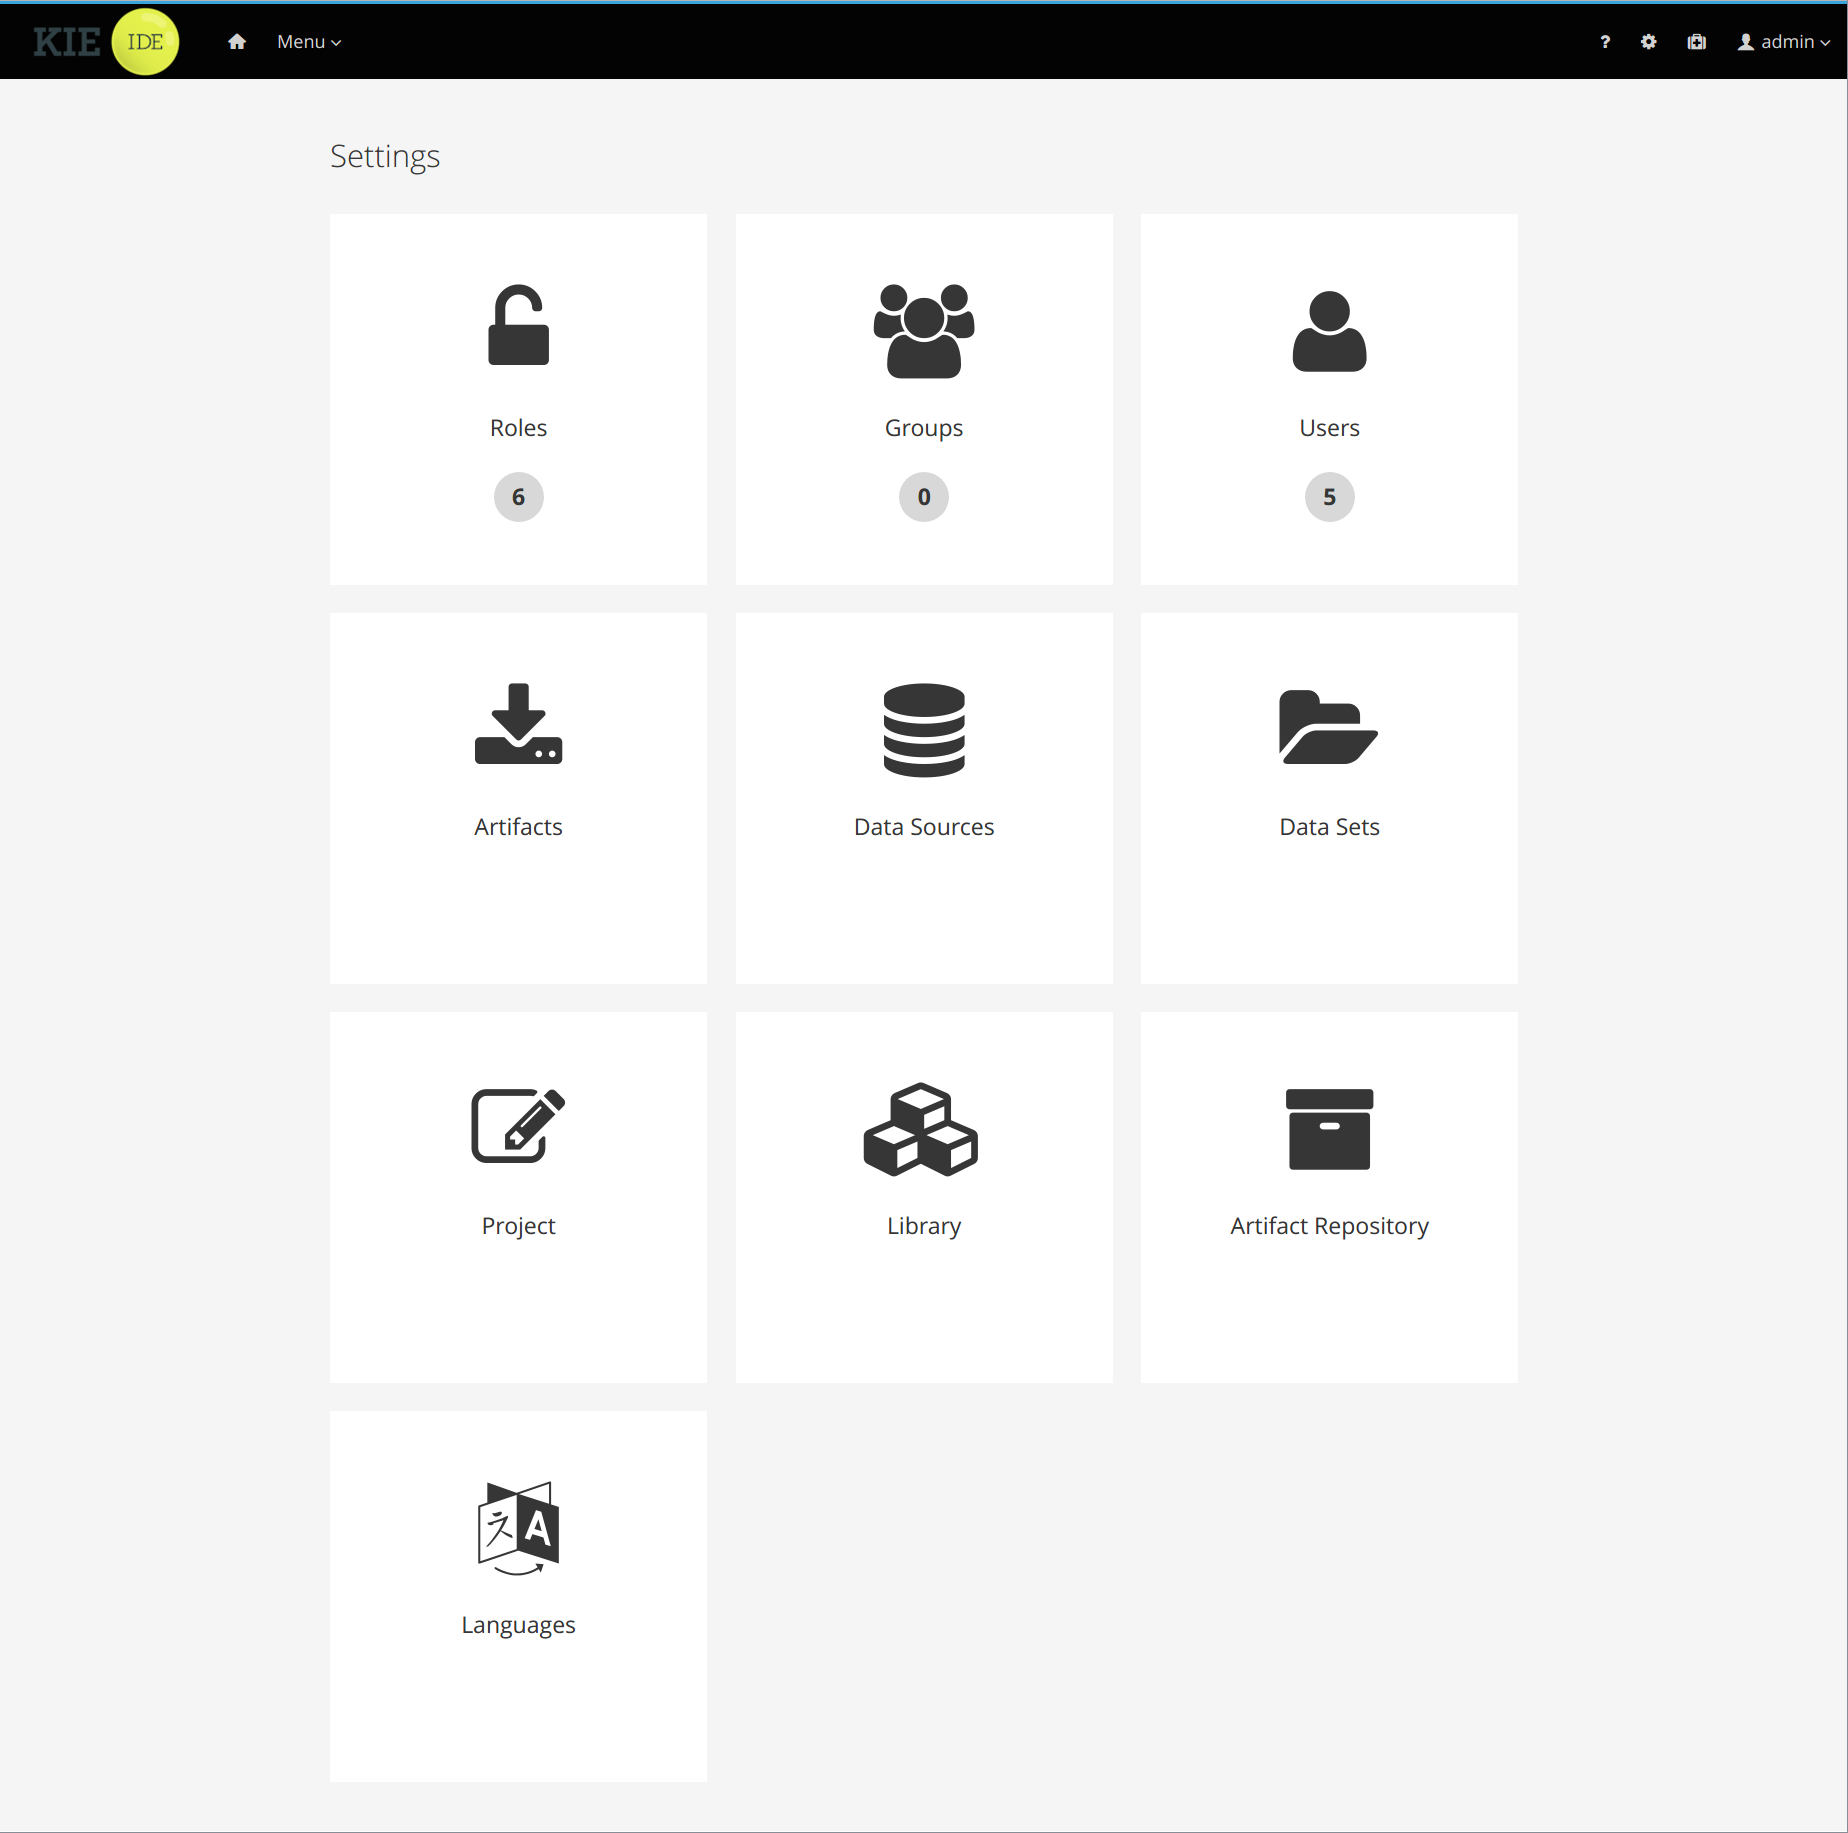
33.44. jBPM 7.2
33.44.1. New and Noteworthy in jBPM 7.2.0
The following features were added to jBPM 7.2
33.44.1.1. Improved validation in deployment descriptor editor
Deployment descriptor editor in workbench has been improved to validate content of entered data for
-
work item handlers
-
event listeners
-
marshalling strategies
-
globals
-
environment entries
-
configuration
Validation is performed automatically when build is invoked or manually when user clicks on Validate button
Validation mainly focuses on checking if data entered are valid based on selected types:
-
MVEL type resolver will perform compilation of the expression that was given as an identifier, it can produce warning messages as it might not have access to all classes that will be available on runtime, thus it’s only warning to not block the build.
-
Reflection type resolver will verify if the identifier has valid name according to Java standard (class name)
33.44.1.2. Websocket based KIE Server communication with jBPM controller
Default communication mechanism for KIE Server to connect to jBPM controller is HTTP/REST based. This fits well in non-restricted environments where both components can freely talk to each other. Though it requires both components to know how to access and authorize itself when sending requests. That does not play well in cloud-based environments or environments that utilize load balancer.
To overcome these issues, an alternative mechanism was introduced. It is based on Websocket where KIE Server is solely responsible for connection. Thus only KIE Server needs to be aware of jBPM controller and it’s authentication, while jBPM controller simply reuses already opened communication channel. More on this can be found in this article.
Process Designer (Preview)
This release includes several important bug fixes for the jBPM Process Designer (Stunner).
Here are some relevant ones:
-
Fixed conditional form fields and marshalling issues for the BPMN Script language property
-
Fixed some CSS issues of the palette
-
Use of the right title for BPMN diagrams. Add information about the file extensions and resource type description as well
-
Avoid shape interaction when right-clicking on the canvas
-
Included a few missing properties for the BPMN Embedded Subprocess
-
Removed toolbar’s refresh button. No longer need for it, it was causing confusion
-
Bug fixings for the Properties and Diagram Explorer panels, once moving between different diagrams
-
Do not show save confirm dialog only if no changes has been applied
33.45. jBPM 7.1
33.45.1. New and Noteworthy in jBPM 7.1.0
The following features were added to jBPM 7.1
33.45.1.1. Business Central
The following are the jBPM-specific enhancements made in the workbench.
Quick search filters for runtime data
To allow you to quickly find data related to Process Instances, Jobs, Tasks and Errors, a new set of pre-defined filters has been introduced into the related views. These filters are always available in the "Search" tab when you first access any of the pages related to the domain mentioned above. By default, you will notice that at least one filter is defined. That is done so that only the most relevant data is shown. You’re free to restrict the data even further by adding new filters. This can be done by either selecting values from the dropdown list or providing values to the different attributes in the input box. You will notice that the data is filtered as you add or remove any of the active filters.
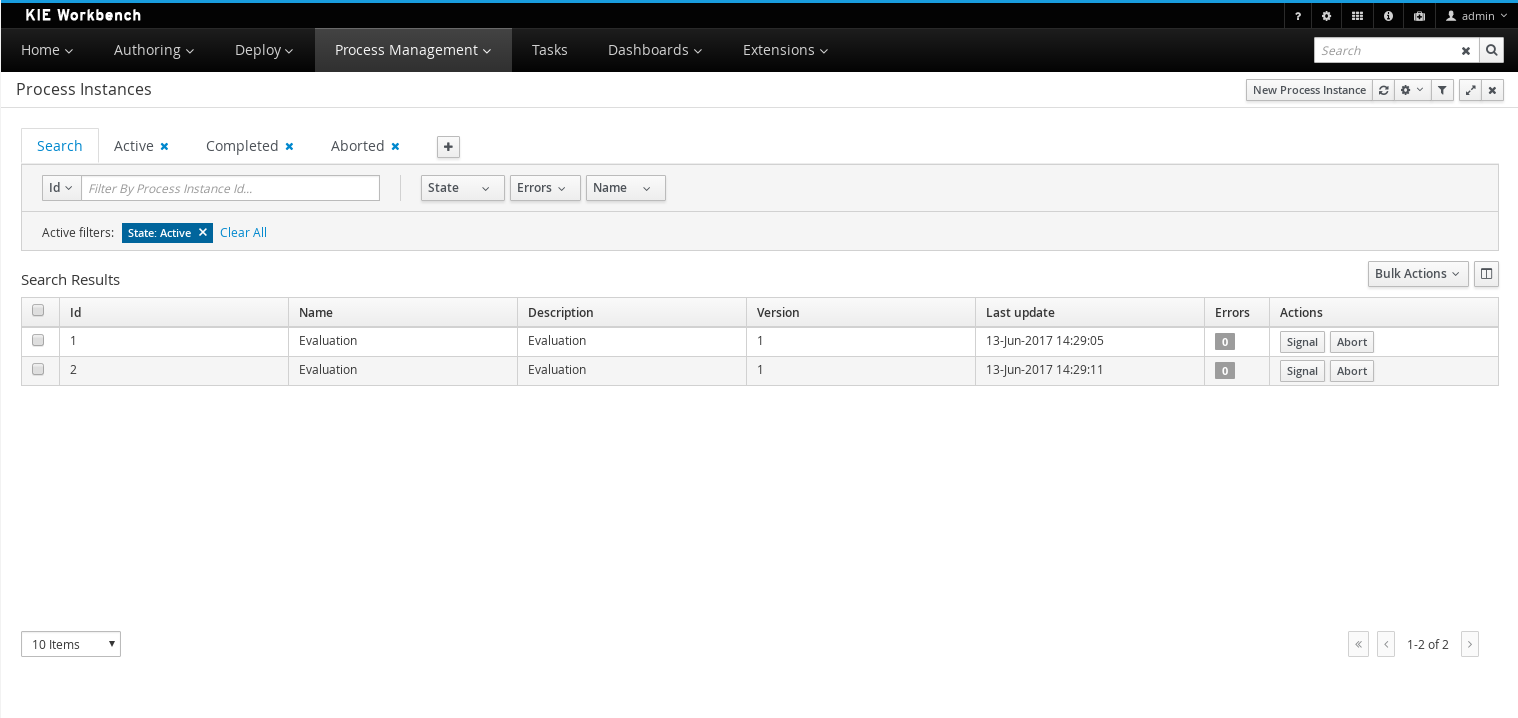
The complete list of views where quick search filters have been added include:
-
Process Instances
-
Tasks
-
Task Administration
-
Jobs
-
Execution Errors
New error handling
The system now detects and stores execution errors, such as exceptions while running a process instance or a job once the maximum retry number has been exceeded. The process instance list includes a new column that displays the number of errors per process instance which are not marked as acknowledged. When the column is clicked a popup is displayed, which will allow users to navigate to the new error perspective.
New Execution Errors View
A new view to explore and acknowledge the new generated execution error has been added.

The Execution Errors view shows a list of errors. It contains a 'Search' tab that provides quick search capabilities filtered by fields like Process Instance Id, Job Id, and Type.
This view also provides a set of predefined filters: All, New (pending of acknowledgement), and Acknowledged.
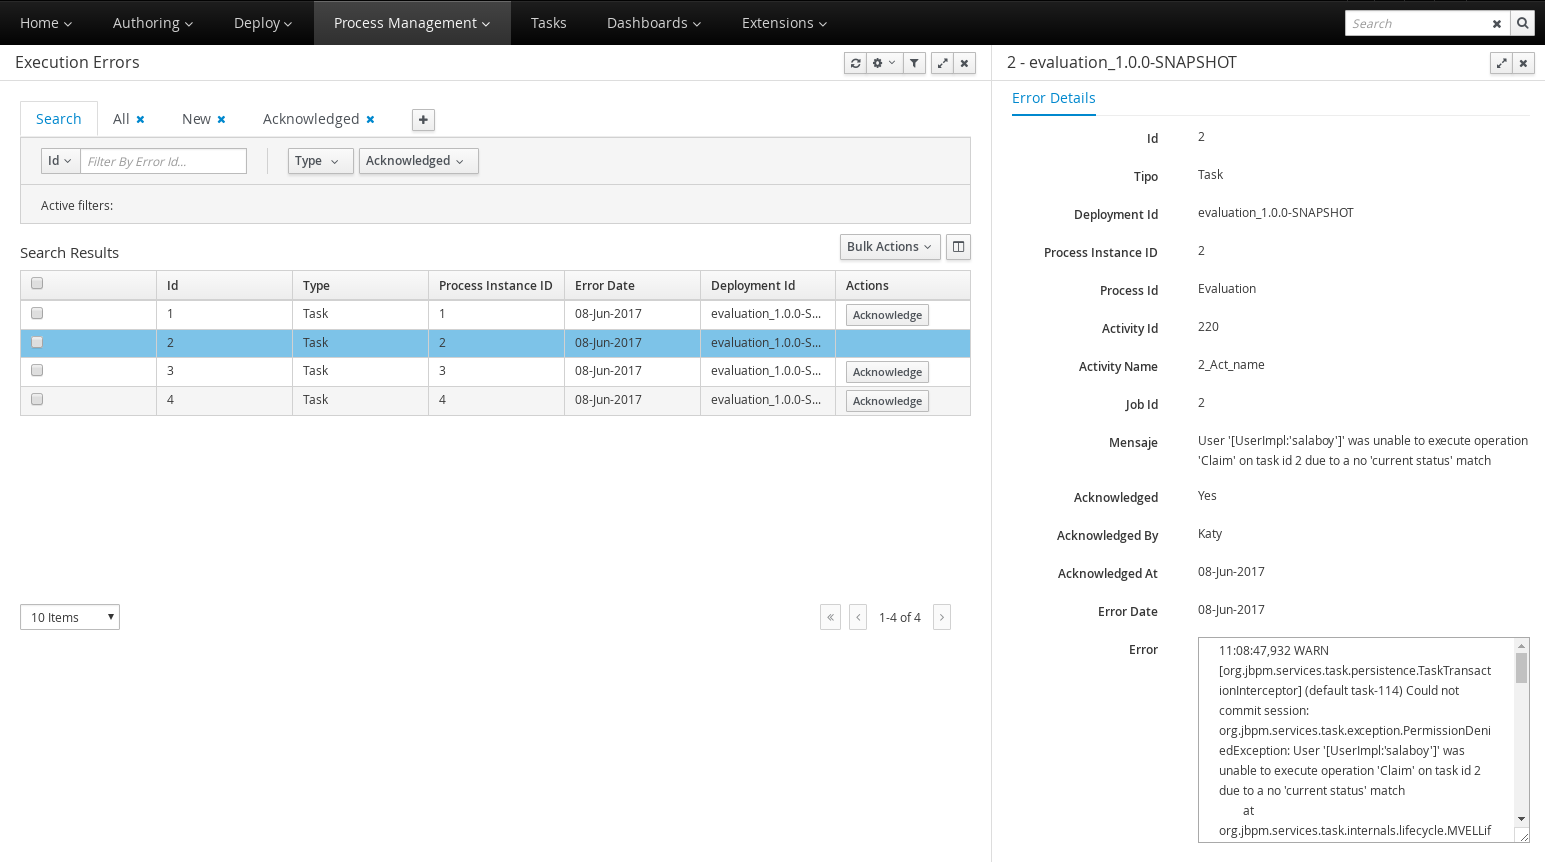
You can acknowledge the unacknowledged errors by selecting the related error action. This new view also allows acknowledgment of multiple errors. To acknowledge multiple errors at once, select all the errors you wish to acknowledge and use the 'Bulk Acknowledge' button.
Navigation between views
New actions that allow navigation between views, have been added. This actions link an origin list view that shows the action, and a destination list view prepared for filtering.
Basically this new navigation is composed by: a set of validations at the origin view to check if the action have to be displayed, a group of parameter that the action pass and a predefined filter at the destination view that uses that parameters.
The list of origin views and the new navigation allowed:
-
Process Instances: view jobs, tasks and errors
-
Tasks: view process instance
-
Task Administration: view process instance
-
Jobs : view process instance
-
Execution Errors: view job, process instance and task
Over all this new actions, there is a basic validation, checking if the user has granted privileges to access to the destination view.
New task admin perspective and actions
The former task list perspective has been divided into two:
-
Task list perspective: Aims to be used by task operators, in order to work with their assigned (or potentially assigned) tasks.
-
Task administration perspective: Designed to be used by administrators, which can manage tasks belonging to other users. This perspective is only available for users with roles
admin andprocess-admin. It is similar to the former "Admin" filter tab on the former task list perspective.
The tasks which are displayed on the task administration perspective are determined by the current user permissions. The list shows the tasks that have the current user or the current user’s group associated as business administrator. By default the system associates all tasks to the user Administrator (configured via the org.jbpm.ht.admin.user system property) and the group Administrators (configured via the org.jbpm.ht.admin.group system property), so in order to display all tasks, your admin or process-admin user needs to belong to the Administrators group.
| Notice that the mentioned roles and group configurations are related to the KIE server’s, not the Workbench’s (in case they have separate user configurations). |
In addition, the Suspend and Resume action buttons have been enabled on both perspectives. They are visible depending on the state of the associated task in regard to the current user.
Advanced Queries with ORDER BY clause
The QueryService used in executing advanced queries only supported sorting with ORDER BY clauses having the following pattern:
ORDER BY Column1, Column2, ... ASC|DESC;which limited the sorting to either ascending or descending for all columns.
The desired behavior, that of a full ORDER BY clause
ORDER BY Column1 ASC|DESC, Column2 ASC|DESC, ..., ColumnN ASC|DESC;allowing sort order per column, is now possible. Please see the documentation for examples of how to apply the new full ORDER BY clause when using the QueryService.
Process Designer (Preview)
The new jBPM Process Designer (Stunner) has enhanced stability. Several bugs and issues are identified and fixed in this release.
Following is a list of new features and relevant updates:
-
Re-design for some BPMN shapes and icons. The following picture shows an example BPMN process:

-
Palette re-design & usability enhancements
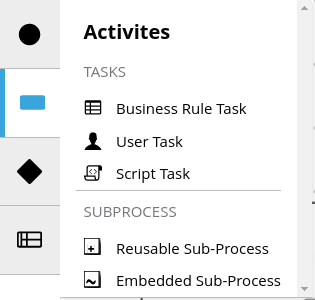
-
Improved stability, performance and design for the Diagram Explorer
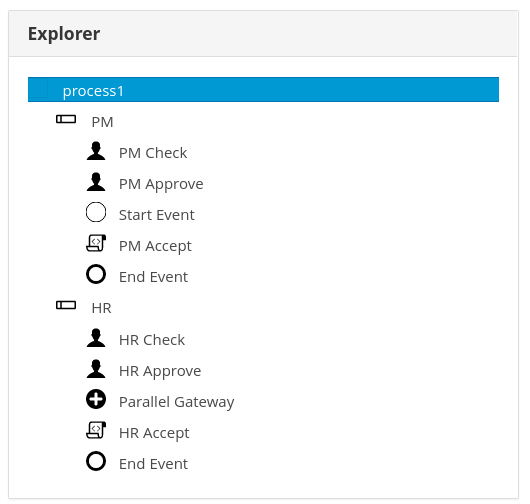
-
More BPMN specification support: Inclusion of the Embedded Subprocess, including its own validations and constraints given by the BPMN specification
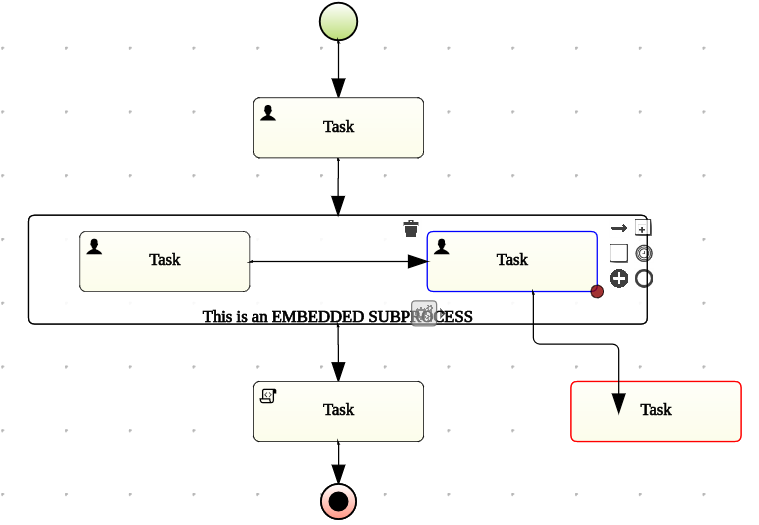
-
Improved some core features of the connector. Some examples:
-
Removing a node means removing its incoming connections as well
-
Once removing a node, if the node has single incoming and outgoing connections to other nodes, the connections are being shortcut into a single one
-
-
Improved target locations for elements created using the toolbox. The new elements are co-located with the previous ones
-
Export capabilities for the Diagram’s picture. Multiple image types (like jpg or png) and PDF formats are supported
-
Notifications and error messages displaying in much pretty and configurable workbench’s popups
33.45.2. New and Noteworthy in KIE Workbench 7.1.0
33.45.2.1. Project Metrics Dashboard
A brand new dashboard is now available for every project listed in the authoring library. After opening the project details page, a metrics card shows up on the right side of the screen.
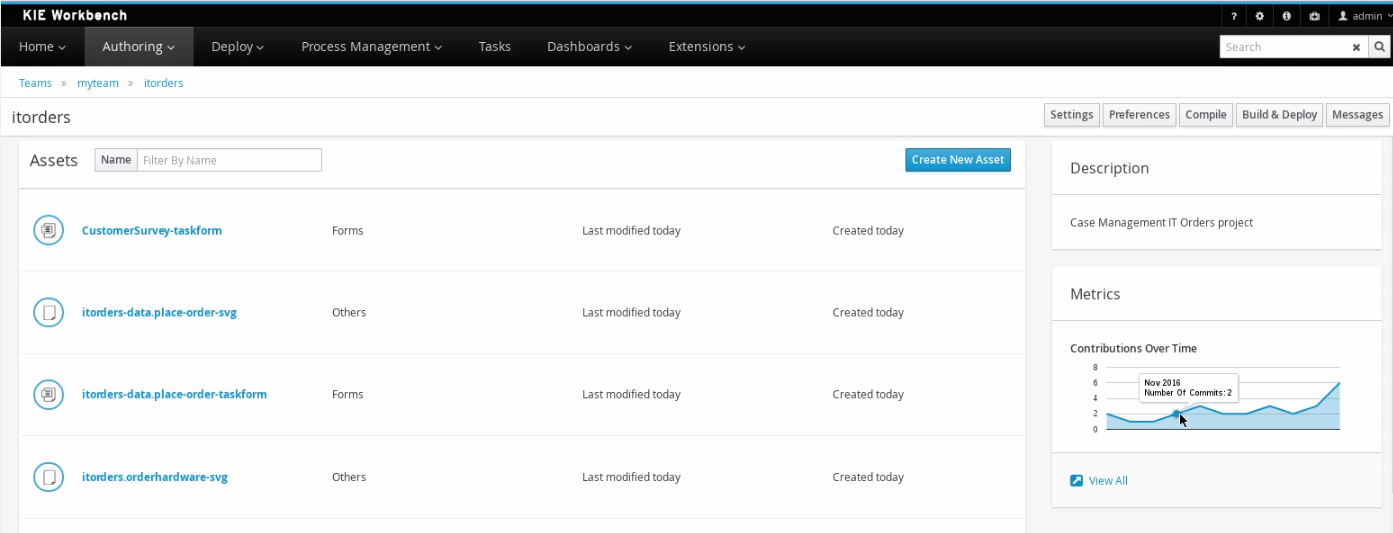
The card shows the history of contributions (commits) made to that specific project over time. Click the View All link to access the full dashboard that shows several metrics all about the project’s contributions.
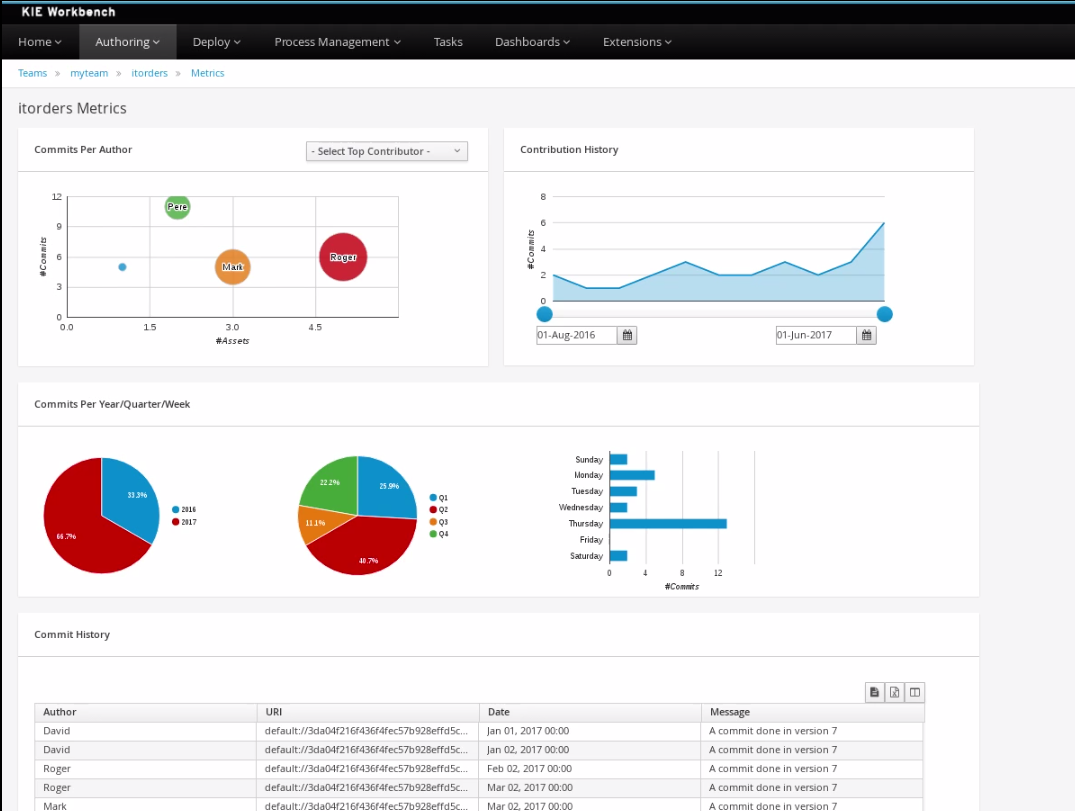
Notice that different filter controls are available for selecting the contributions made either by a concrete user or in a specific time frame.
33.45.2.2. Teams Metrics Dashboard
A brand new dashboard has also been added to the Teams page. A metrics card on the right side shows the history of all contributions (commits).
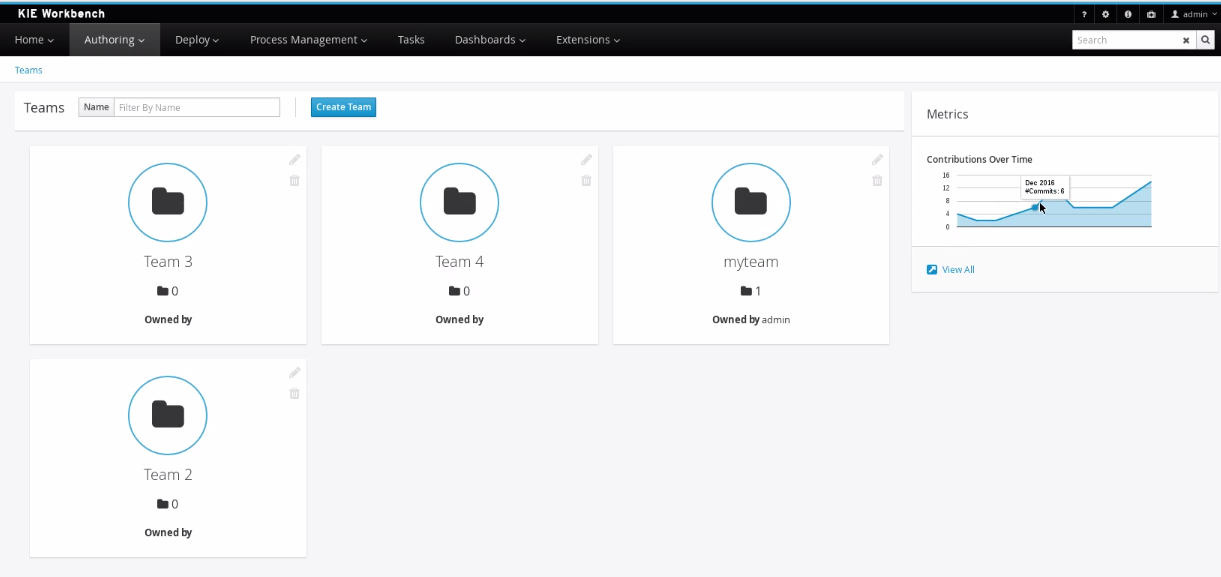
Click the View All link to access the full dashboard showing overall contributions metrics.
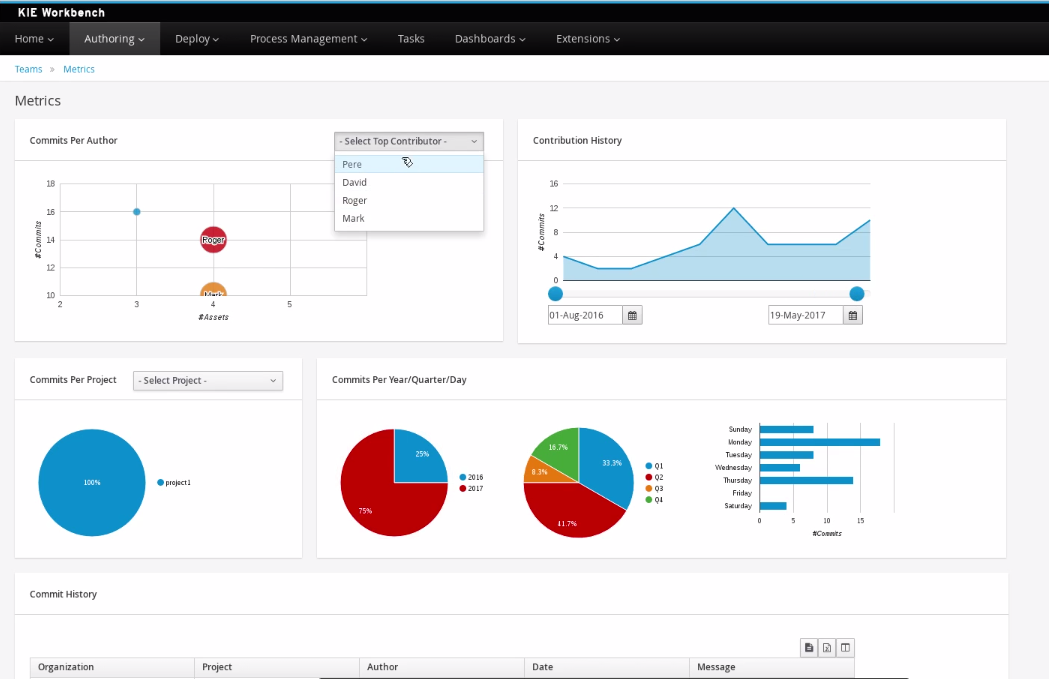
Note that different filter controls are available for selecting the contributions by different criteria:
-
by a concrete user,
-
within a specific time frame,
-
by team or,
-
by project.
This dashboard replaces the former Authoring>Contributors dashboard, which is no longer available at the top menu bar of the workbench.
33.46. jBPM 7.0
33.46.1. New and Noteworthy in jBPM 7.0.0
The following features were added to jBPM 7.0
33.46.1.1. jBPM engine
Case management
jBPM v7 comes with a lot of improvements to better support 'case management' use cases. These use cases are different from more traditional business processes since they (typically) require more flexibility and support more unstructured and unplanned work. Rather than following a nicely predefined plan from start to finish, actions are more ad-hoc decisions, what to do next is more based on the data associated with the case, the end user needs to be given the flexibility to decide what to do next (although recommendations are welcome), etc.
We have added a lot of features to the jBPM engine to be able to support these 'case management' use cases better. Note that we have added these as an extension of our existing jBPM engine (based on BPMN 2.0 specification) rather than as a separate effort, as we believe that case management is an extension of more traditional BPM, and that there is a spectrum of processes (from well-structured business processes to adaptive cases all the way to completely dynamic use cases) that we want to support with one unified solution.
As a result, the jBPM engine has been extended to support features like:
-
Cases have a unique case identifier (which can be customised per case) and a longer life cycle (close, reopen, etc.)
-
A Case File that is responsible for collecting all data (documents, structured data, etc.) related to a case
-
Ad hoc fragments allow you to model optional paths that might be recommended to end users or automatically triggered by rules
-
Dynamic tasks can be dynamically executed in the context of a specific case instance even though it was not defined upfront in the case definition
-
Milestones and Stages to better keep track of progress
-
Case comments to be able to have discussions related to a specific case instance
-
Session per case strategy to allow reuse of the same jBPM engine (ksession) per case
Process and task administration API
A Process and task admin API has been introduced to simplify some of the more complex administrator use cases.
The process admin API allows you to:
-
get all process definition nodes
-
cancel node instance
-
retrigger node instance
-
update timer (absolute or relative)
-
list timer instances
-
trigger node
The task admin API allows you to:
-
add/remove potential owners, excluded owners and business admins
-
add/remove task inputs and outputs
-
list/create/cancel escalations and notifications
Advanced task routing
When tasks are assigned to a group of users, pluggable task assignment strategies can be used to automatically assign tasks to a suitable individual immediately (when the task is being created or later released etc.). This allows more efficient task allocation, based on basically all properties associated with the task (for example potential owners and task priority but also task data that could include information like geography, required skills, etc.). Business rules can be used to define the assignment logic, making it easy to customize this to your needs.
Other
-
Java requirement was updated to JDK 1.8
-
Business rule task was enhanced to support execution of DMN rules and to externalize rule evaluation on a remote rule decision services
-
Defining which (asynchronous) jobs to execute next based on job priority
33.46.1.2. Process Execution Server
The process execution server (also known as kie-server) has been extended to support the jBPM engine features above (related to case management, admin APIs, etc.) and to offer a remote API for these operations. On top of that, two other important architectural changes were done.
Separate workbench from execution server
While in v6 the workbench came with an embedded execution server to execute all the process and task requests that users were performing in the web-based UI, in v7 this embedded execution server has been removed and the workbench delegates all its requests to the kie-server as well. The main advantage is that the workbench can now be used to monitor any (set of) kie-server(s). By linking the kie-server to the workbench, the process and task monitoring UIs in the workbench can now connect to this kie-server and show all relevant information. When multiple independent kie-servers are used, you can either connect to a specific one or use the smart router to aggregate information across multiple servers (see below). As a result, a few missing features that were not yet available in v6 on kie-server but only on the remote API of the workbench have also been migrated to the kie-server.
Smart router
When managing multiple independent process execution servers (for example each only having a few projects deployed, with persistence configured to a separate datasource), it might be difficult to keep track of where all these servers are and to collect information from all of these. The smart router (also known as kie-server-router) can be used as a proxy:
-
requests can be sent to the smart router, it will be able to figure out which of the known kie-server instances the request should be sent to
-
when trying to retrieve information, the smart router can collect information from different servers and aggregate that information for you
So if you have an architecture where you might end up with a lot of independent process execution servers (for example in a cloud environment), the smart router will try to hide some of this complexity for you again.
33.46.1.3. Case Management Showcase
A new (web-based) case management showcase application has been added that allows an easy and comprehensive look into the case management capabilities that were added to the jBPM engine. This application gives a quick view at available cases (both definitions and instances) and allows you to interact with them. To make it possible to deal with any kind of case, the application is generic (so not applied to a specific domain) and:
-
Brings visibility to the technical users on case definitions and instances
-
Provides insight in where the case instance is
-
Allows to perform certain operations on a case instance
End-user focused case management applications should be domain-specific: they should be using the terminology the user is familiar with and focus on the tasks the user wants to perform. As a result, this generic showcase application should more be considered a showcase application to demonstrate some of the capabilities. However, our generic showcase application is built as a combination of various UI building blocks that each focus on a specific feature.
In this version we can find the following building blocks:
-
Case List. Allows sort and filter the case list, perform general case operations and start new cases.
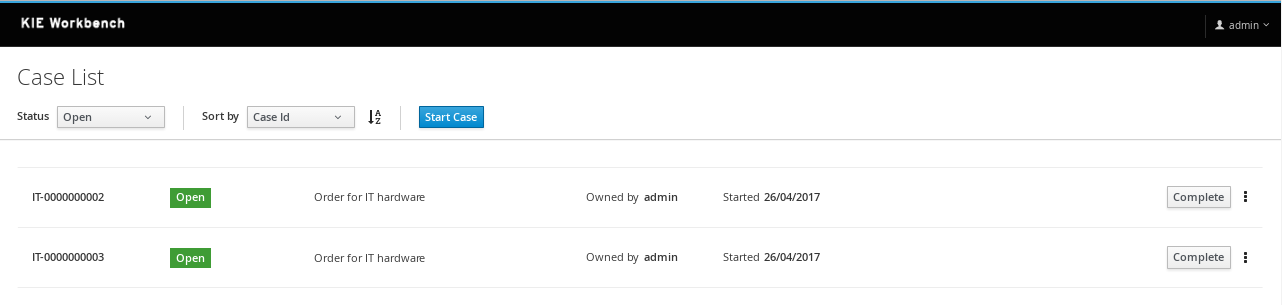
-
Case Details.
-
Case Stages.
-
Case Comments.
-
Case Roles.
-
Case Milestones.
-
Case Overview. This building block, provides a generic, building block composition and exposes the general case actions like 'Complete'.
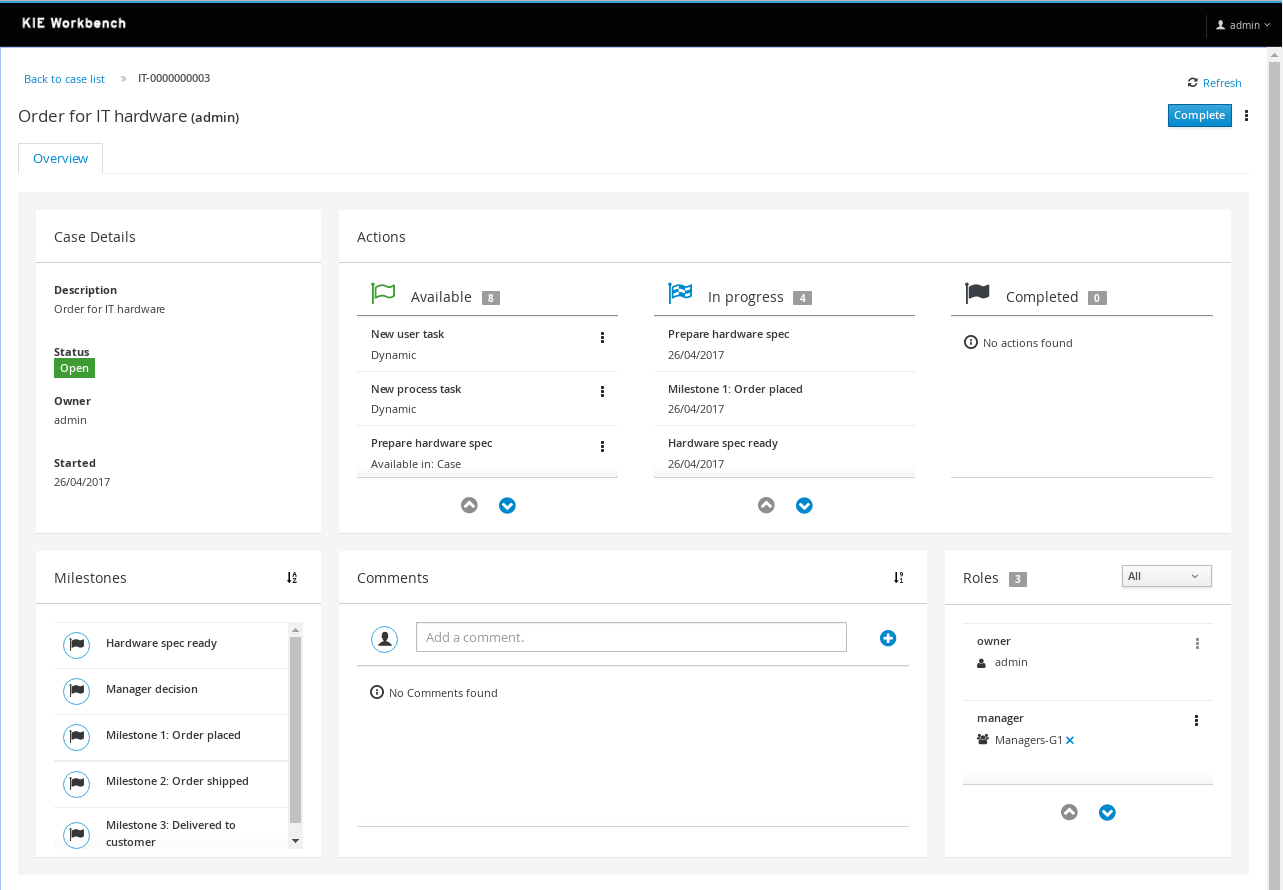
This application can be used standalone or can be automatically provisioned by workbench and accessible from within the workbench UI.
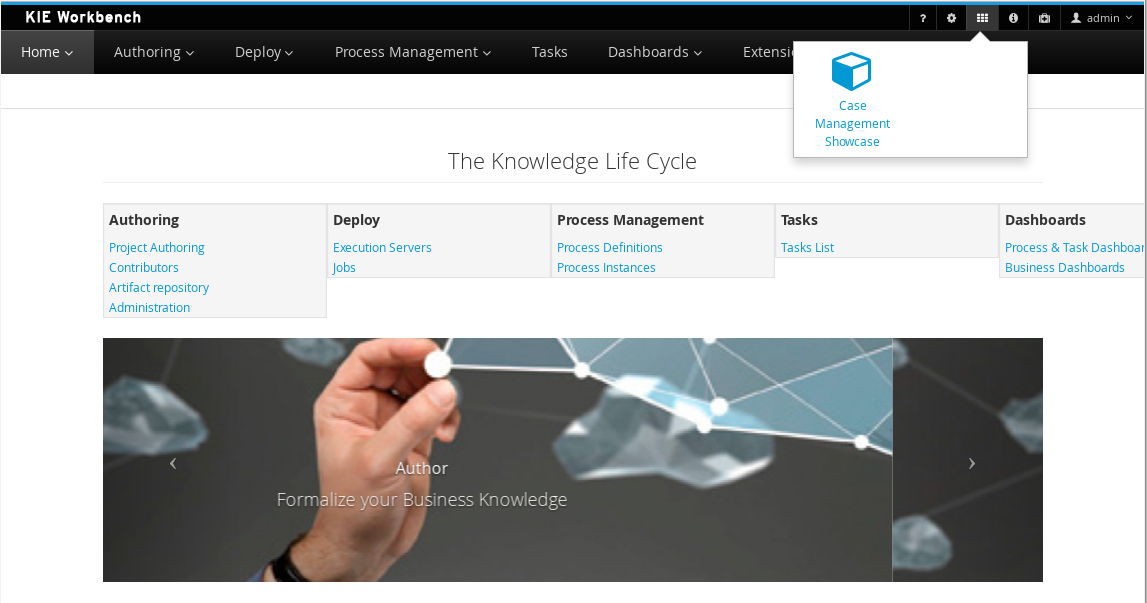
| The Case Management Showcase application launcher is only available from the workbench UI if the application has been automatically provisioned or a url has been provided via org.jbpm.casemgmt.showcase.url system property. |
33.46.1.4. Business Central
Apart from the generic improvements to the workbench (listed below in a separate section), there are also some jBPM-specific enhancements in the workbench.
Case management in the workbench
To better support case management, following enhancements were added:
-
When creating a new project, you can choose to create a case management project. This will auto-configure some additional services for you that are typically used in the context of case management.
-
Our web-based process designer has been extended with a few more properties and custom service tasks to support some of the new features related to case management.
Business Dashboards
The Business Dashboards section in the top menu bar opens up a new perspective which can be used to author brand new dashboards.
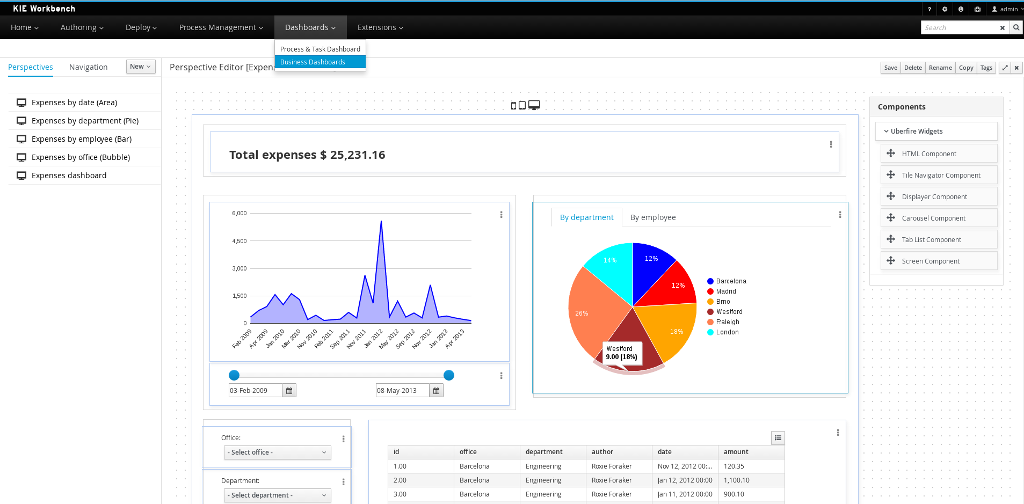
From this very new perspective, aside from creating new content, it is also possible to change the layout of the top menu bar by adding, removing or moving entries around. The menu entries are linked to existing perspectives and can be modified, thus making extremely easy to create and publish new perspectives in the top menu bar.
Altogether, it provides a rich environment which allows for both changes in the application content and its menus. A detailed introduction to the new solution can be found at the Business Dashboards section.
| Notice, the former dashboard tooling was a separated web application. The new solution has been completely rewritten from scratch and it is fully integrated into the workbench. |
New columns available on process instances, tasks and jobs
The following columns have been added to the corresponding perspectives:
-
Process instance list perspective: Last update and correlation key.
-
Task list: Last update, correlation key (of the associated process instance ID), process instance description (of the associated process instance).
-
Jobs perspective: Name of the associated process (if any), ID of the associated process instance (if any), Description of the associated process instance (if any).
These columns are sometimes optional so some of them aren’t displayed by default. In order to show them it’s necessary to select them in the column picker of the corresponding table.
Process Designer (Preview)
We are working on a completely new web-based process designer, and this release introduces an early preview (where we only support a small subset of the full feature set).
The new jBPM process designer, also known as Stunner, is an open-source software that brings to users exciting representation and authoring capabilities for business process diagrams. It is completely focused on, built and designed for end users, providing an easy yet powerful and rich modelling experience.
The following image shows an example of a BPMN2 diagram authoring screen:
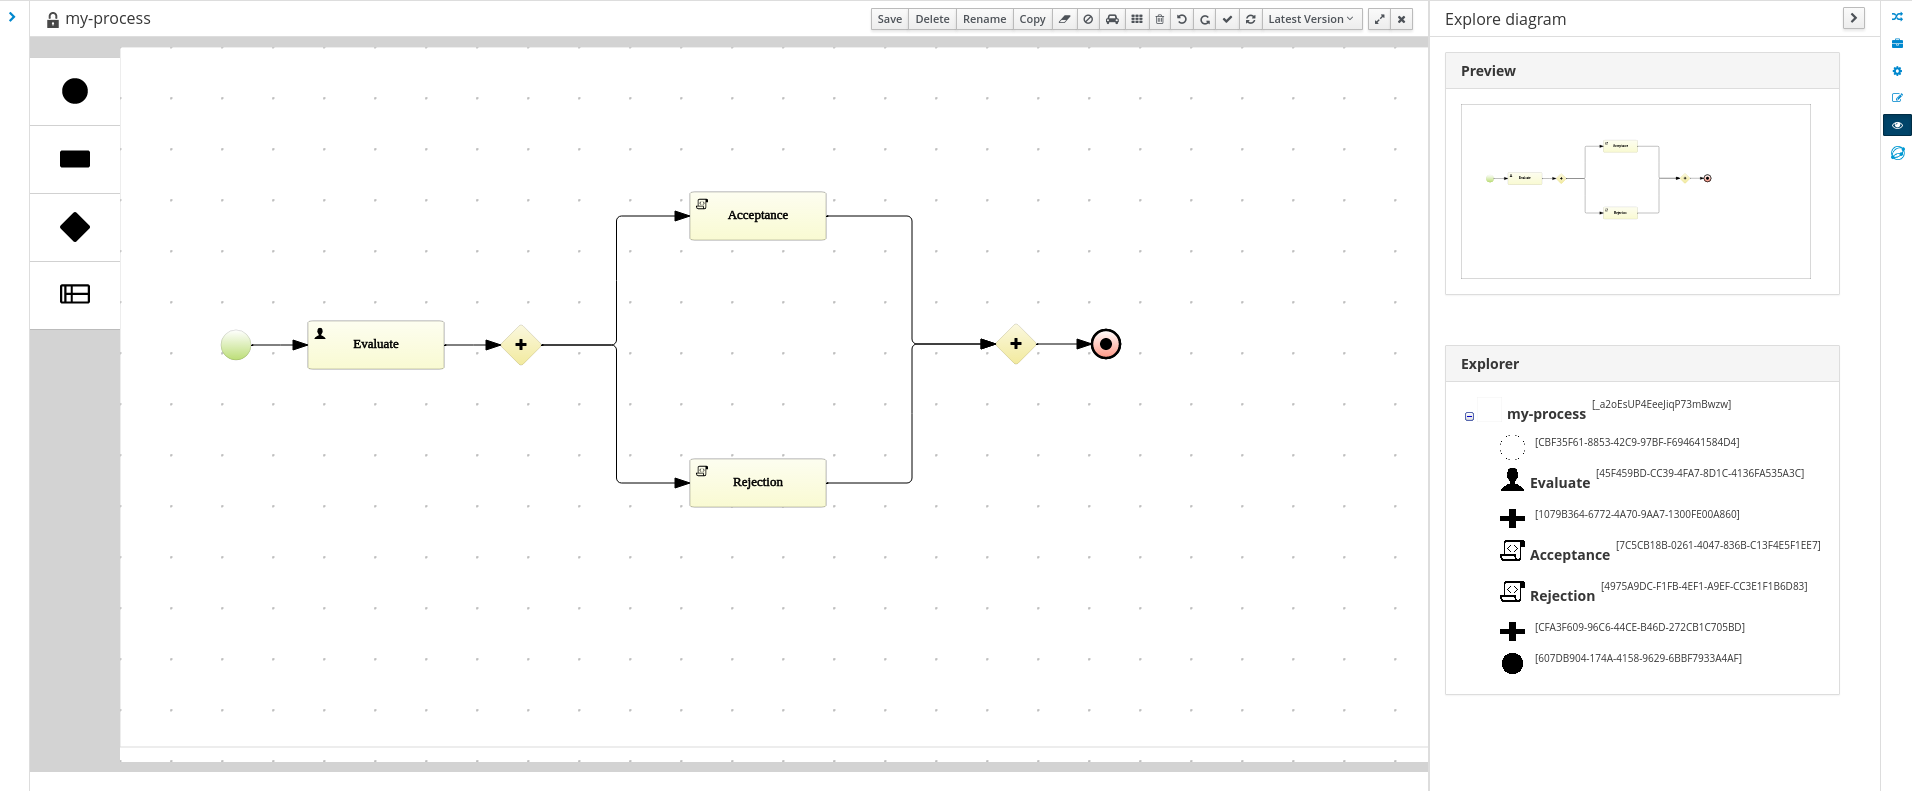
Our long-term experience along with the community and customers' feedback have allowed us to bring the most state-of-the-art modelling tool.
Built as an open-source library, it is intended for developers as well, providing useful customization and extensibility capabilities.
|
The following two process designers are included in the workbench: the already existing JBPM Designer and the Stunner, the new one. It is important to notice that the previously existing jBPM Designer is still being considered the full BPMN compliant process designer for production and regular use, meanwhile Stunner is available as a preview feature, supporting only a few BPMN elements. More amazing features are still in progress. |
|
|
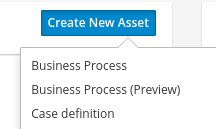
Some of the key features currently available are:
-
Visual authoring and representation capabilities for diagrams
-
Runtime server and client side processing, validation, and constraint features
-
Rich client multi-platform support
-
Rich set of client features - complex shapes, toolboxes, poly-line support, animations, layout alignment and distribution, keyboard integration and much more
-
Rich set of client components - viewer, editor and preview authoring modes, components palette, visual diagram structure , property editors, and toolbars
-
Properties rendering and authoring capabilities by extensible an form mechanism
-
Easy extensibility of data models, behaviors, validations, constraints, and shapes
-
Additional serialization formats
-
Native workbench integration
-
Built-in support for HTML5 & canvas
-
Built-in BPMN2 support
Form Modeler (Preview)
jBPM v7 includes a preview of the new Form Modeler. This new version comes with an improved Look and Feel and improvements to simplify the form creation and rendering.
Some of the new features are:
-
Form Layout based on Bootstrap Grid System
-
Drag & Drop Form Editor to simplify the form composition
-
New widget library including TextBoxes, TextAreas, DatePickers, ListBoxes, Radios, Nested Forms
-
Supports both simple Data Types (such as String, numbers, boolean) and Data Objects created using the Data Modeler
-
Ability to easily generate forms for Data Objects and Business Processes. Improved way to modify field bindings over the previous jBPM Form Modeler
-
Field validation based on Bean Validation
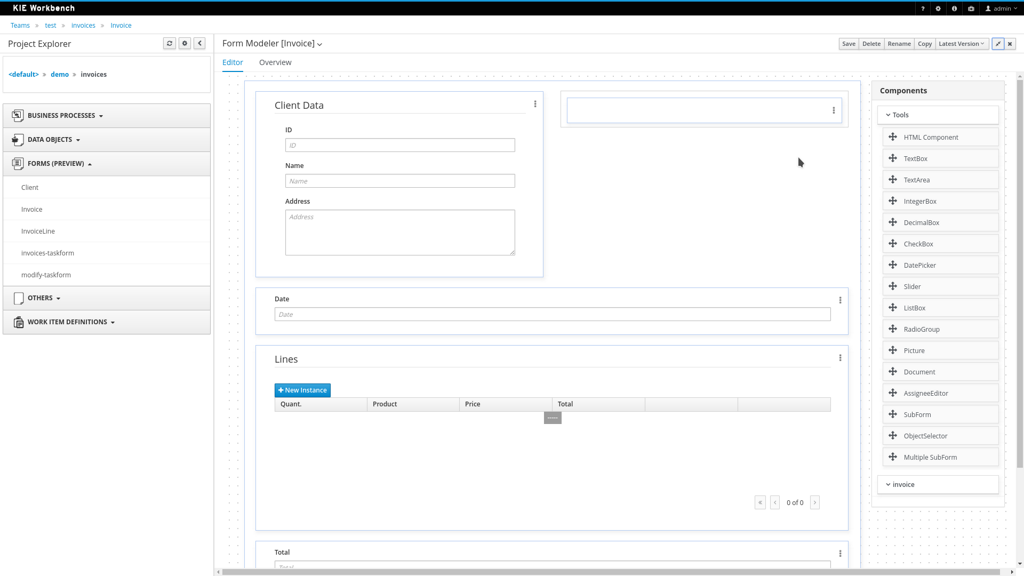
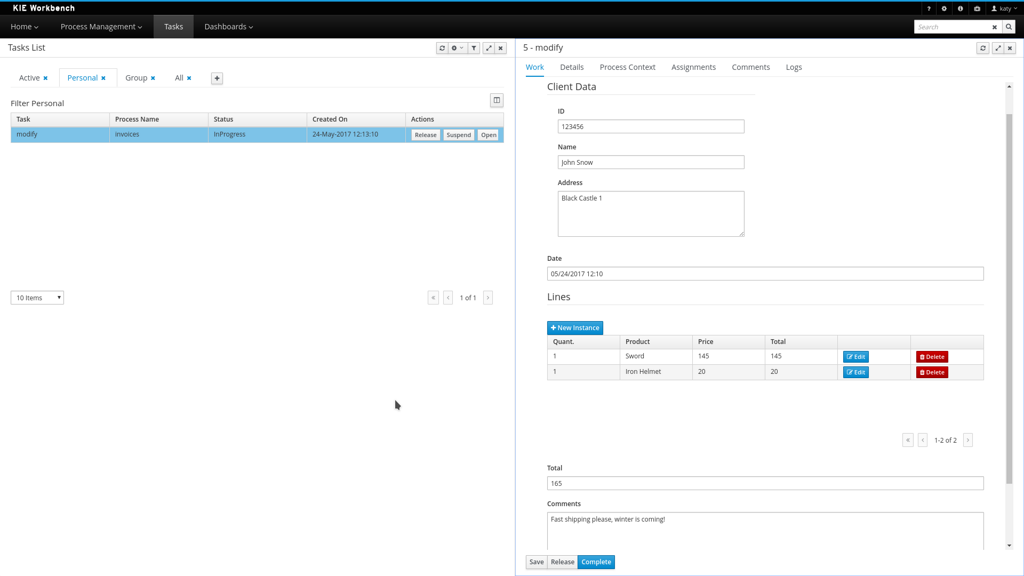
33.46.2. New and Noteworthy in KIE Workbench 7.0.0
The workbench has been updated to support Wildfly 10 and EAP7. Minimum Java requirement is JDK8.
33.46.2.1. New Authoring (Library)
Authoring now has a new design, with a better information organization. It’s now possible to manage (create, delete and edit) Teams (Organizational Units), list Projects in a Repository and the Assets in a Project. When an Asset is selected, you can see the Asset Editor and the Project Explorer.
|
The Library uses the indexing of the Workbench. It is, therefore, imperative that existing index information is deleted so that the Workbench can rebuild them with the necessary information. Index information is stored in the |
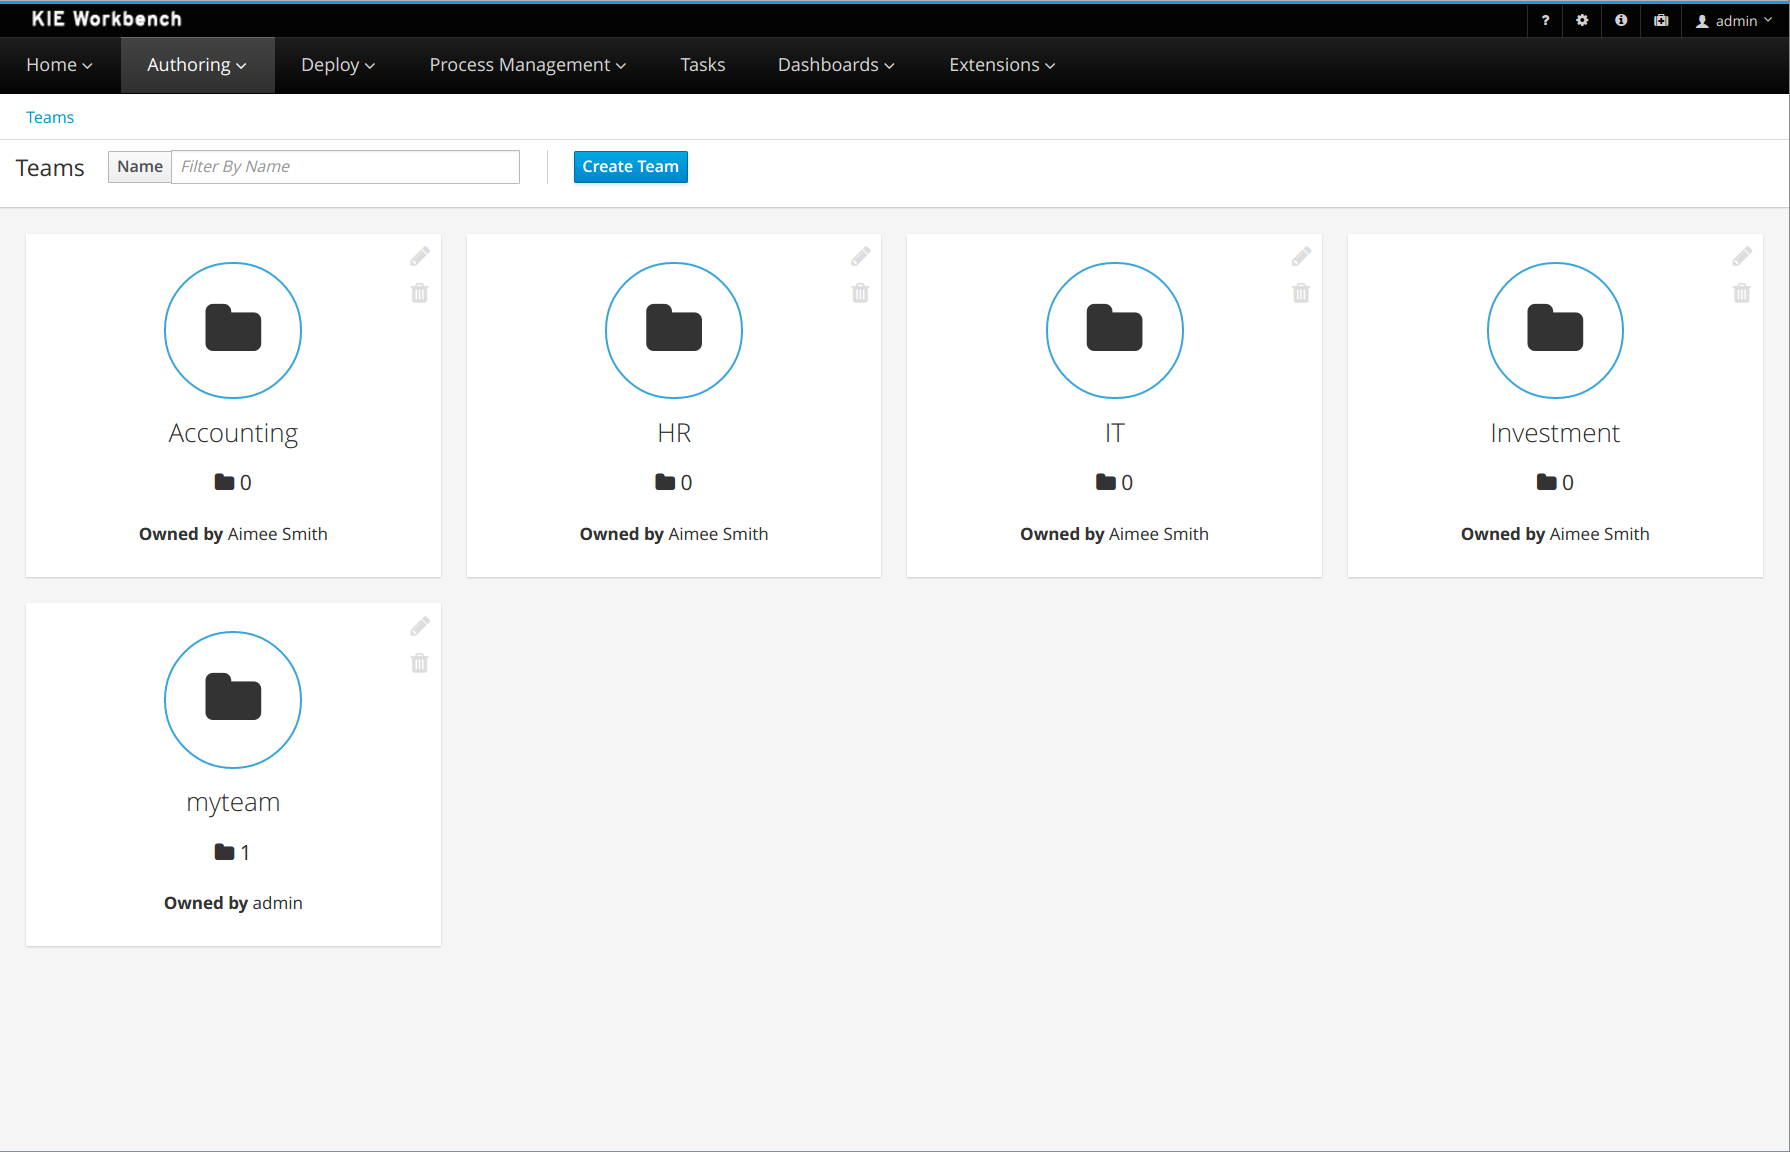
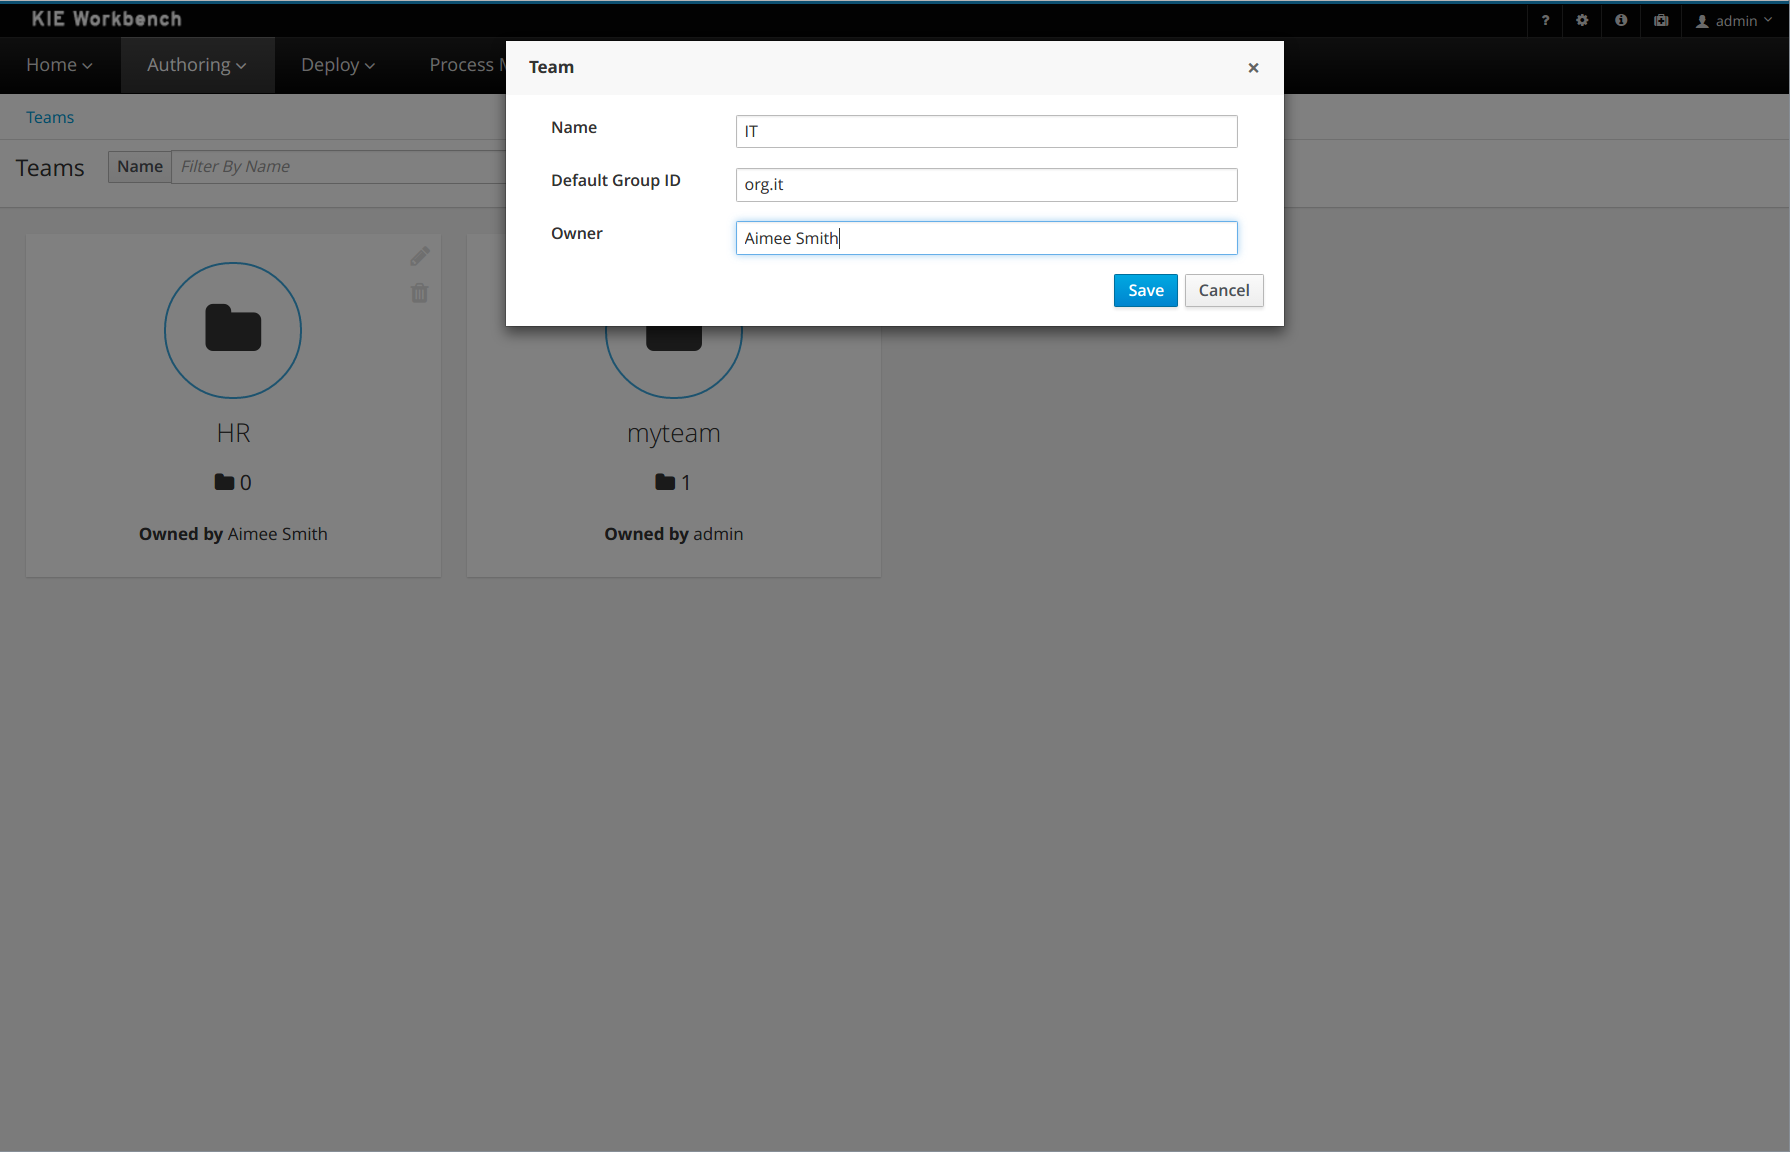
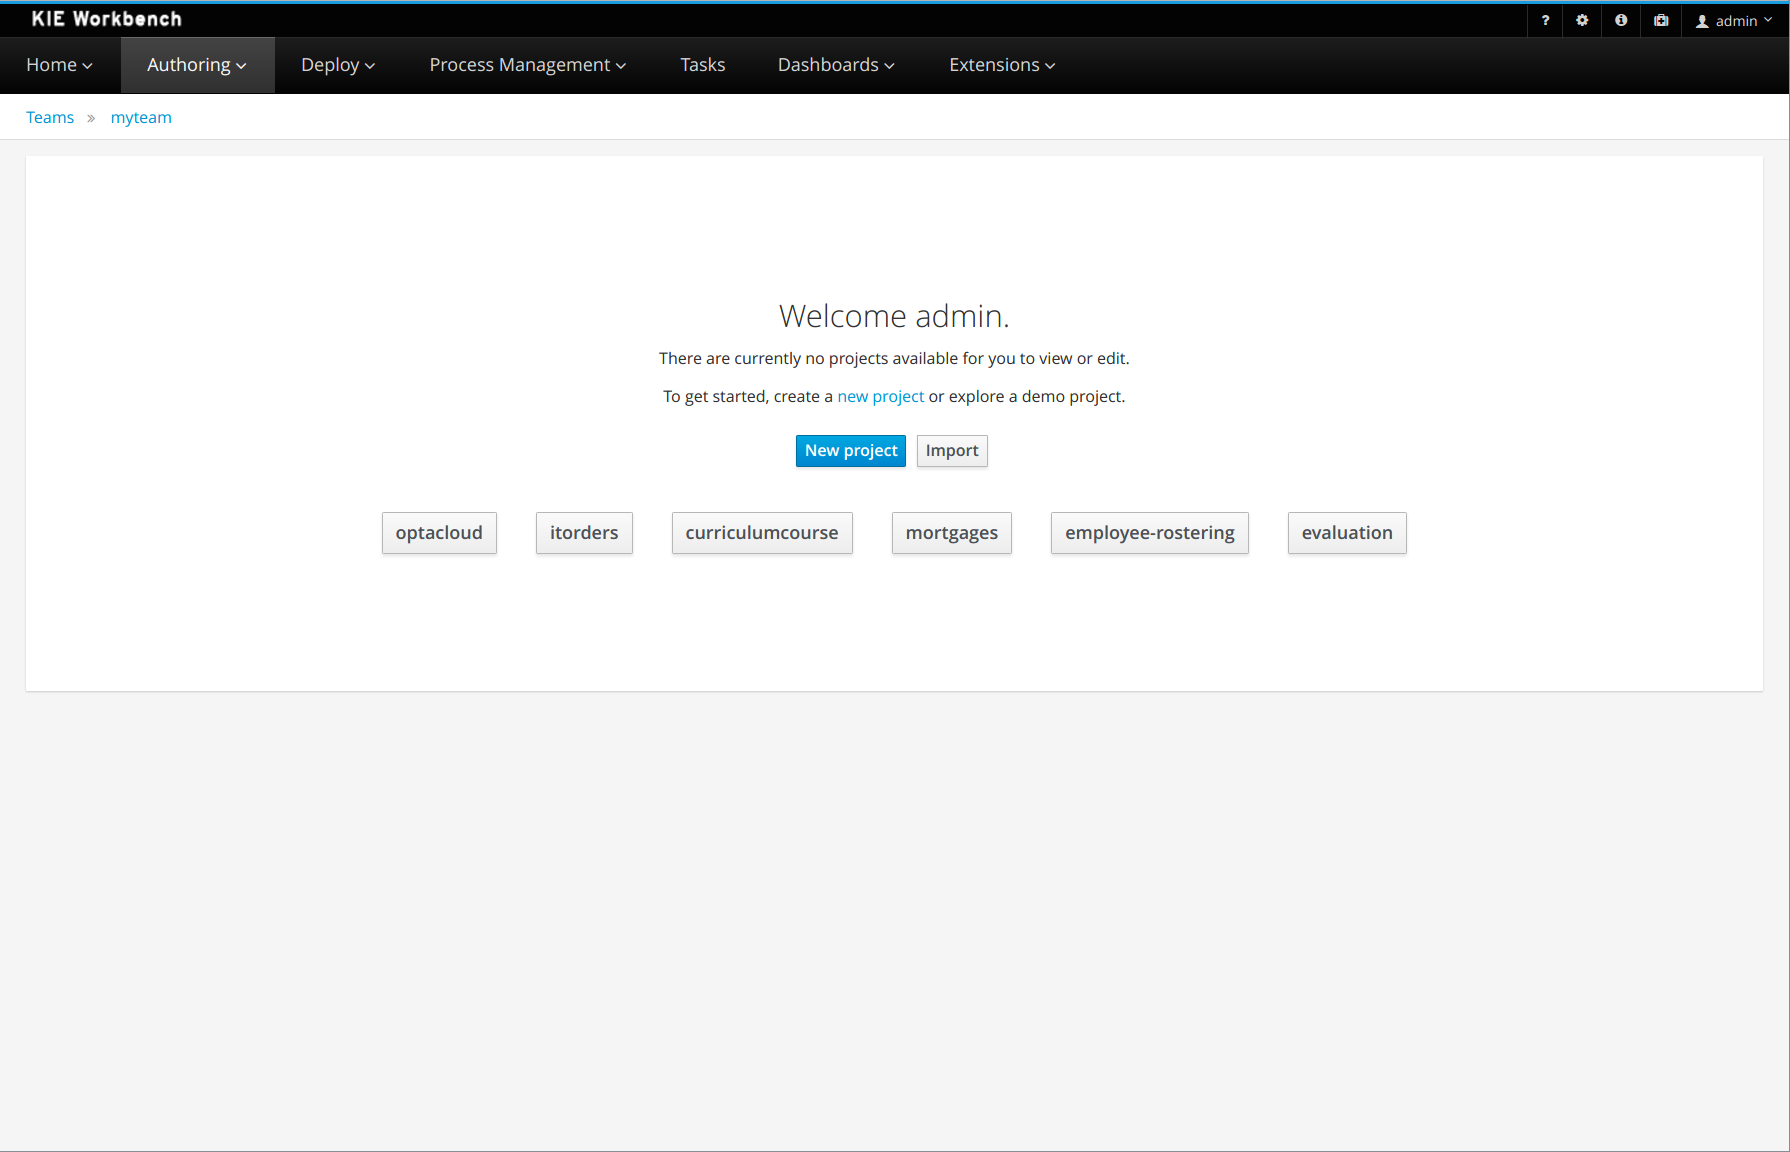
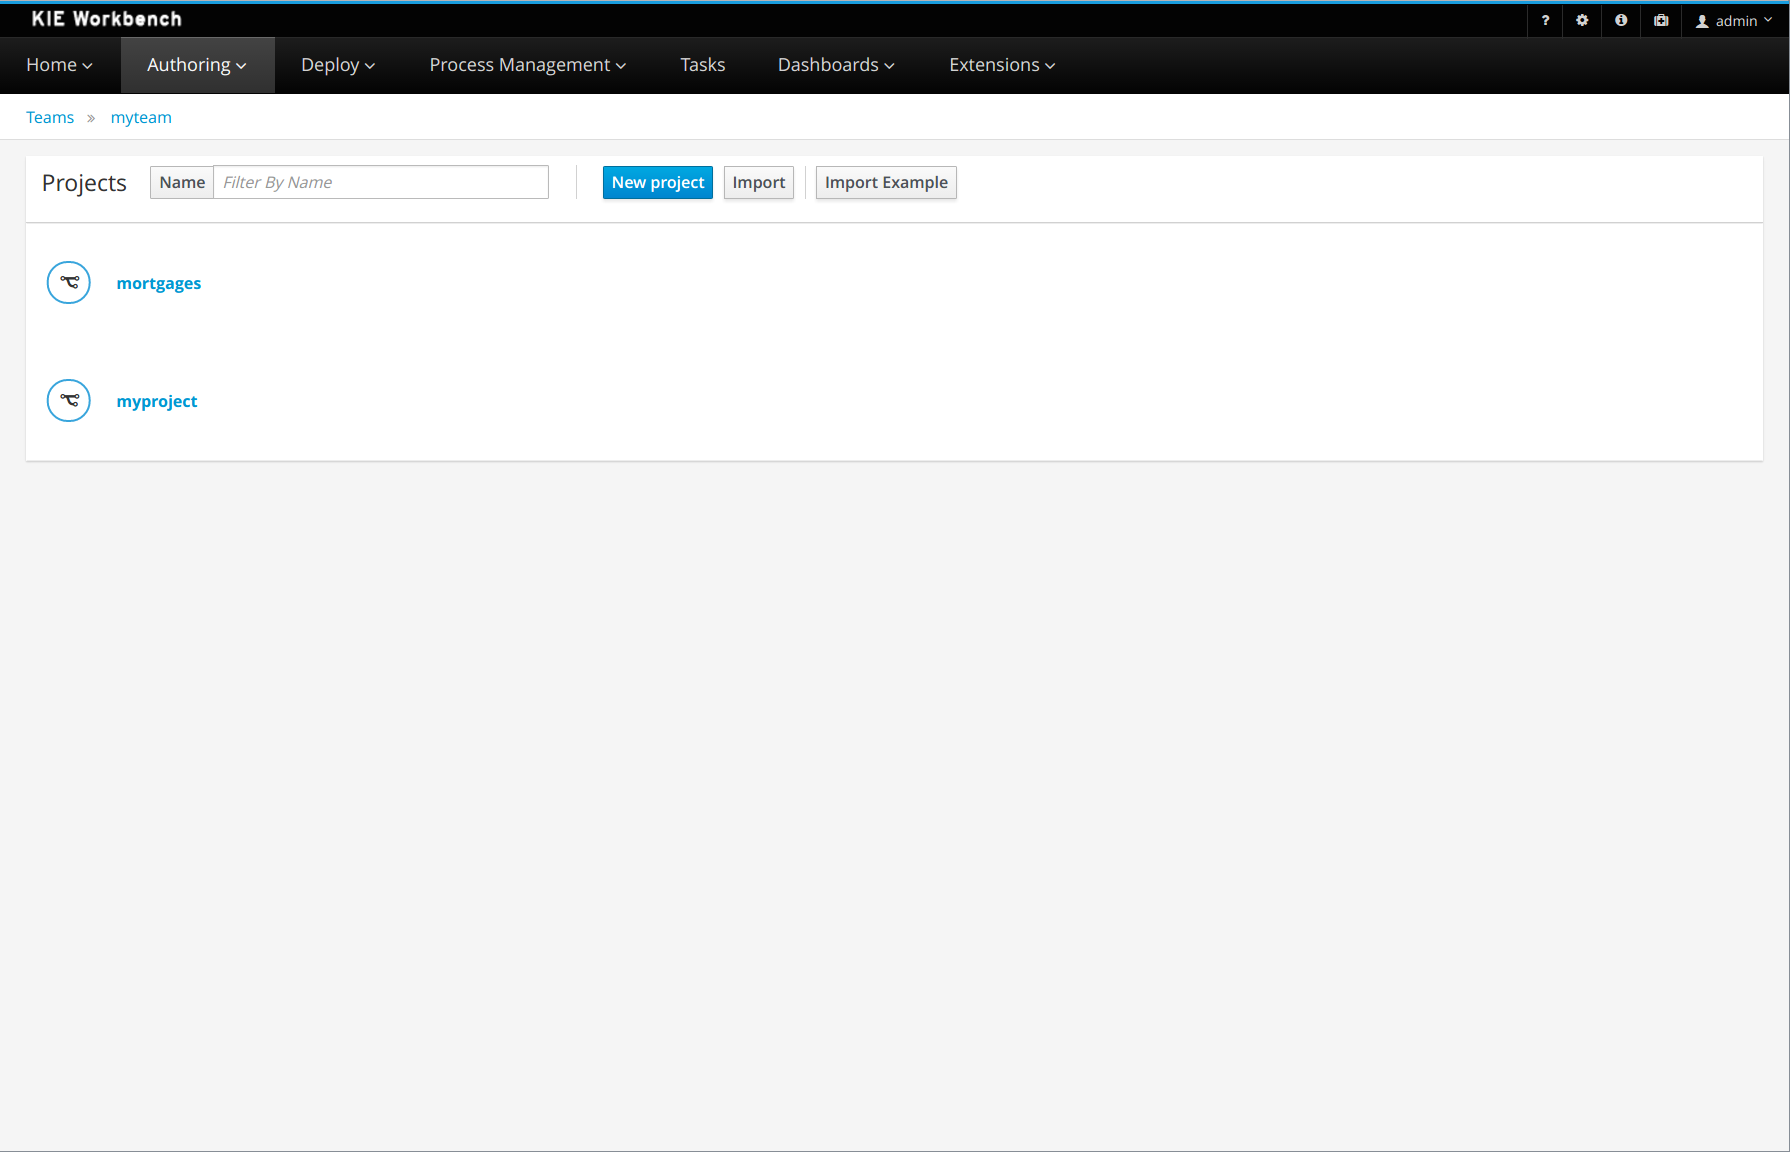
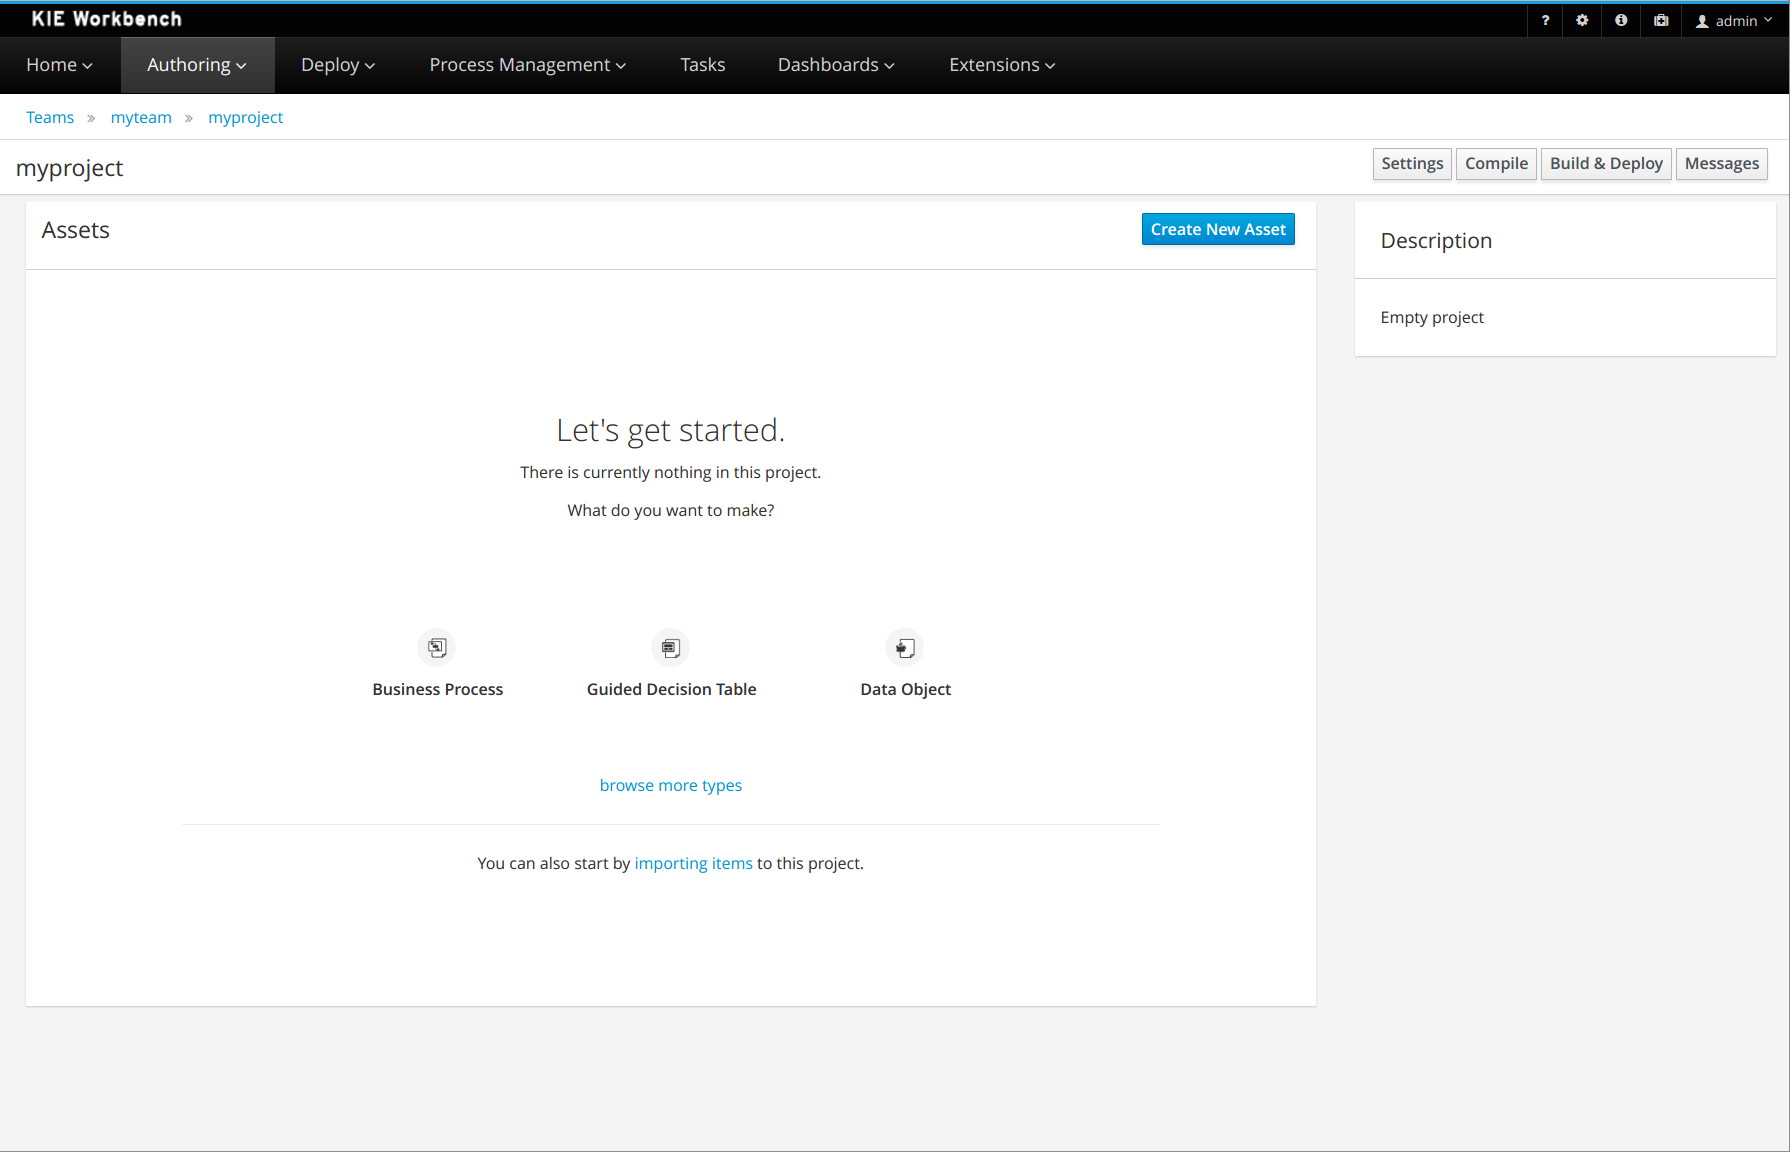
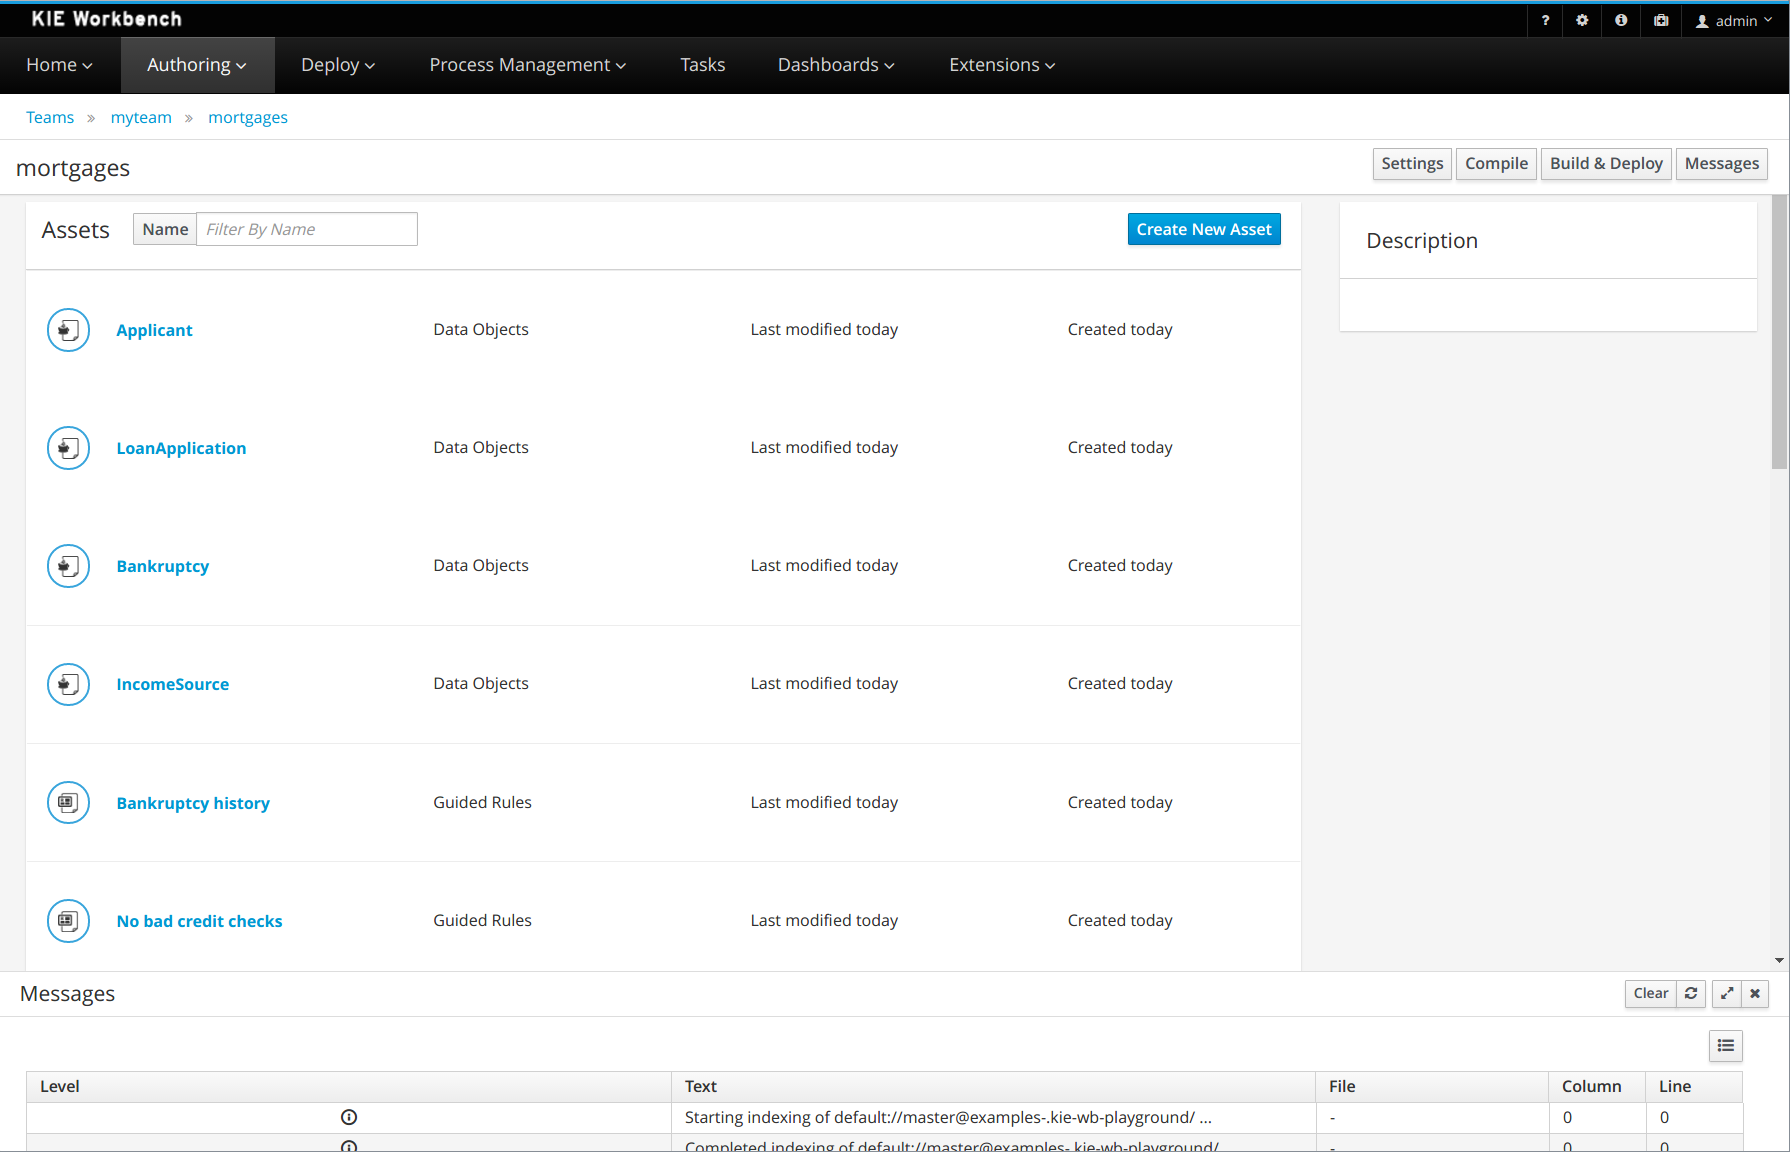
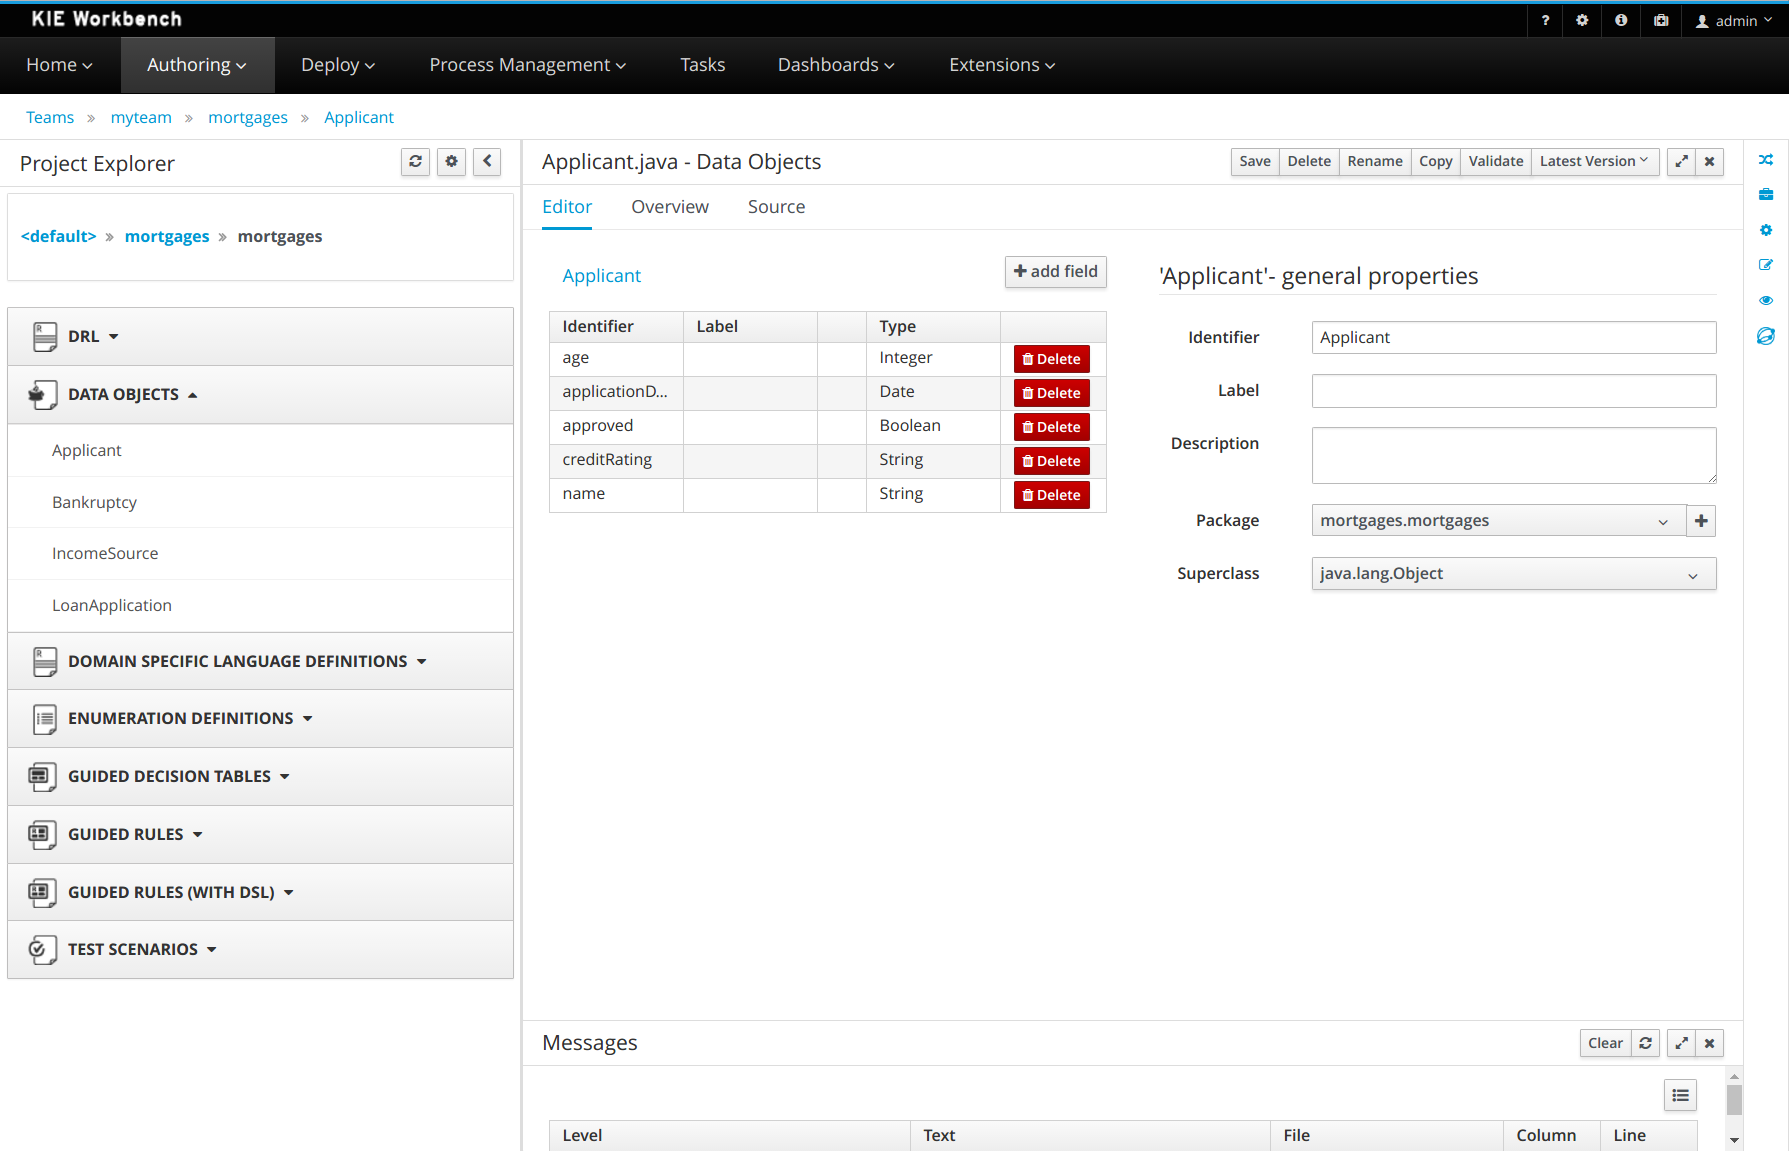
Also, you can set some preferences about your default workspace by accessing Home > Admin > Library.
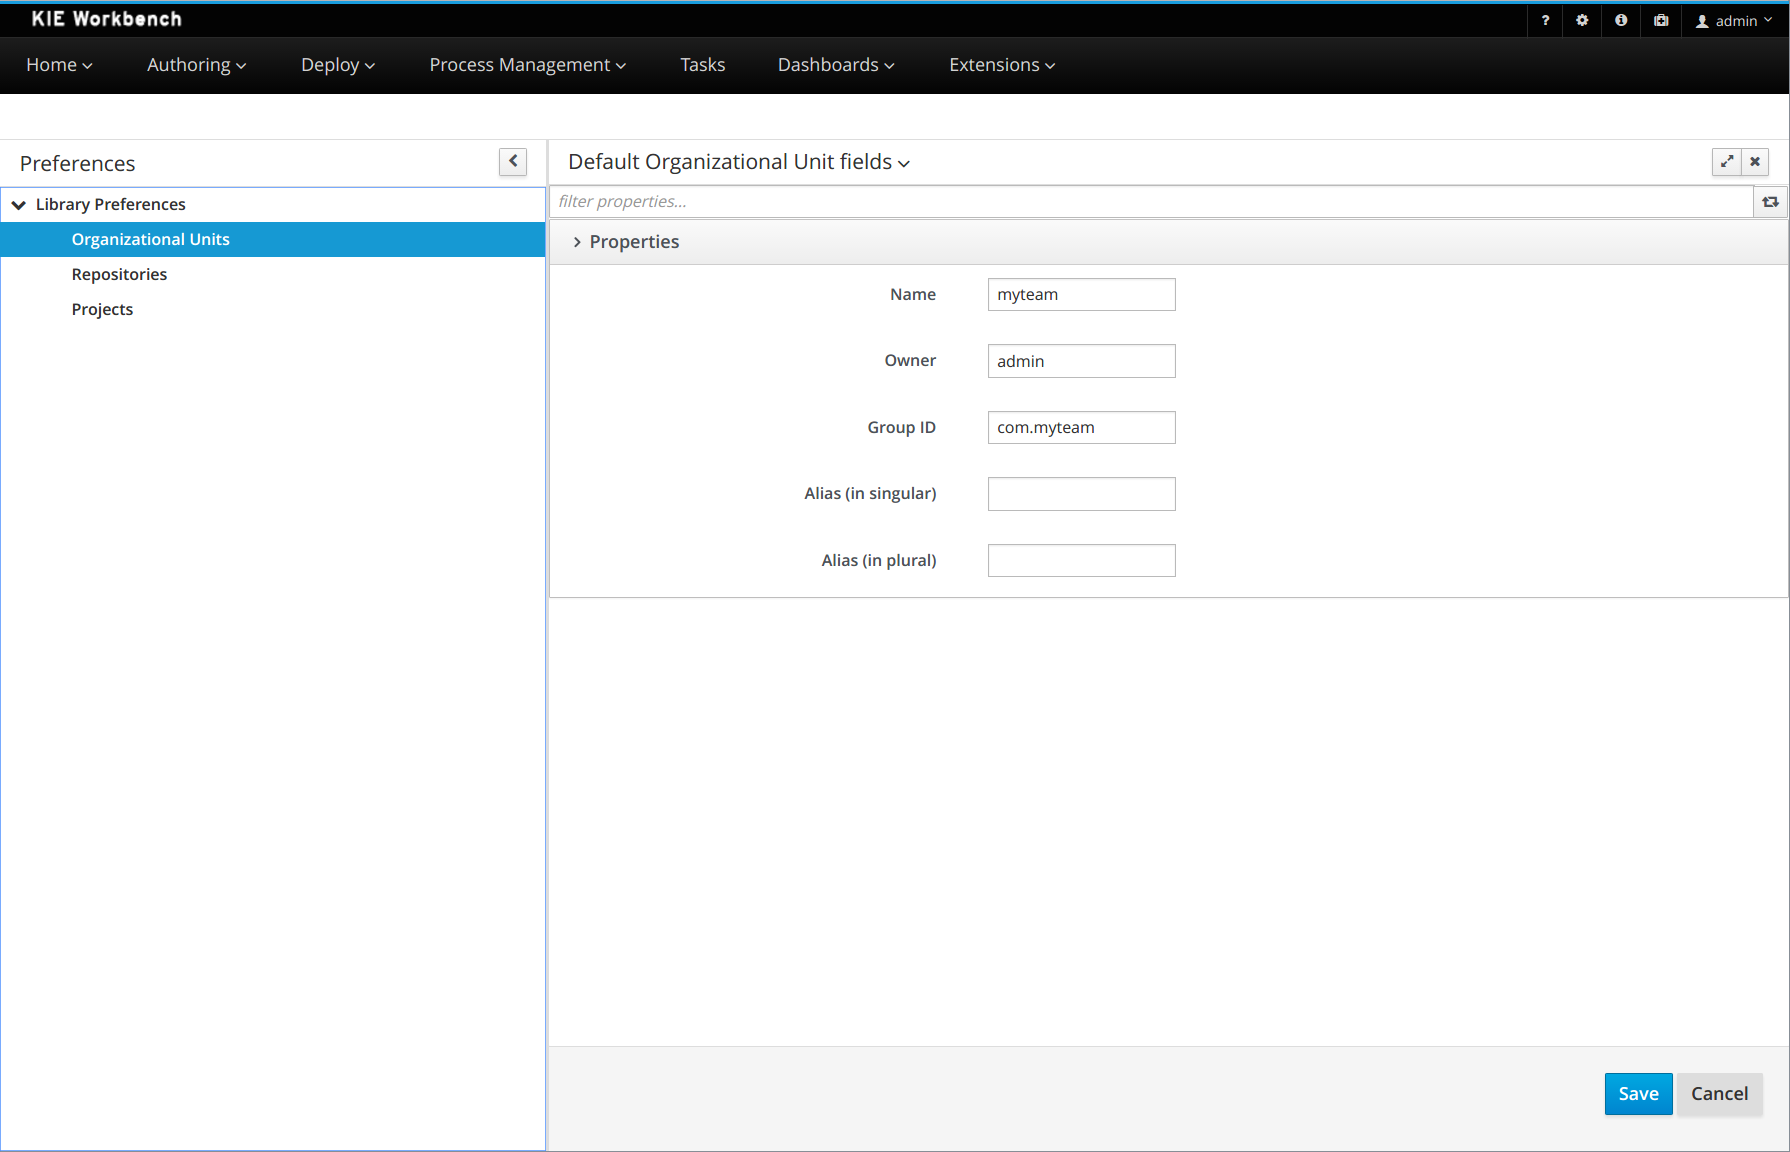
33.46.2.2. Authoring - Imports of Examples
Prior to 7.x the Workbench used to install pre-defined examples at startup.
Version 7.x brings the ability to import examples from git repositories. The Authoring Perspective contains a menu item for 'Examples' clicking this launches a Wizard to guide you through the import.
The Authoring Perspective contains a menu item for 'Examples'.
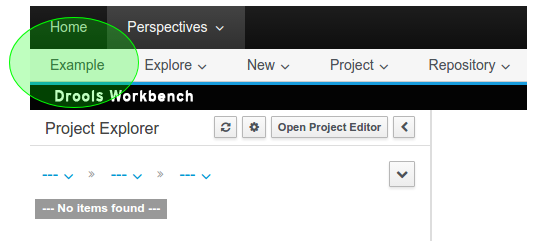
Page 1 of the Wizard allows the User to select a pre-defined examples repository, or enter their own URL.
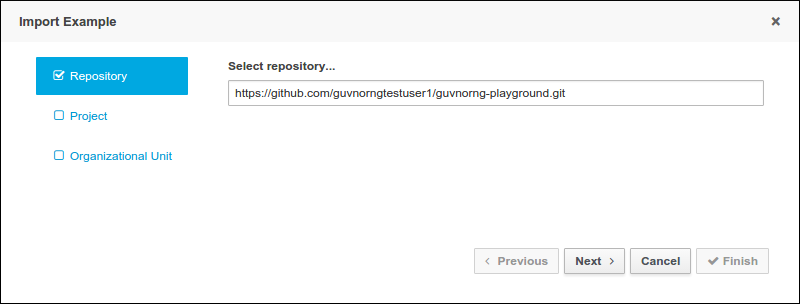
Page 2 of the Wizard lists Projects available in the source repository.
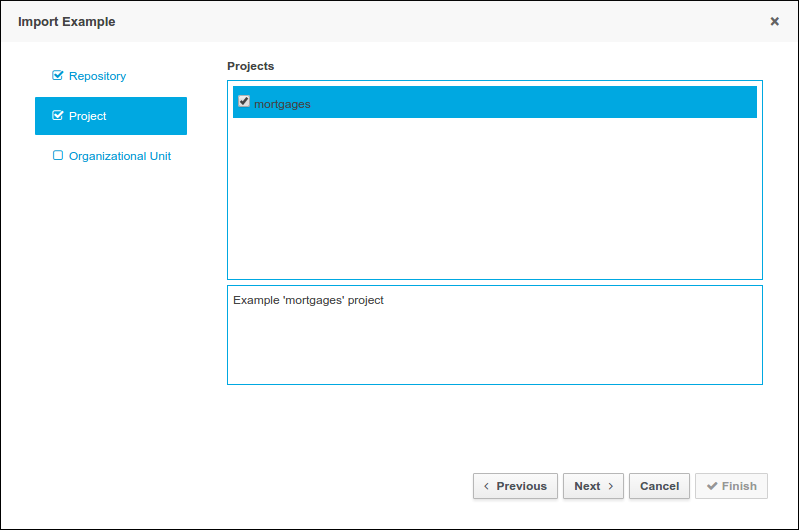
Page 3 of the Wizard allows the User to enter a target Repository name and associate it with an Organizational Unit.

33.46.2.3. Authoring - Pop-ups improvements
All system pop-ups had their UX improved.
The "comment" field is hidden by default.
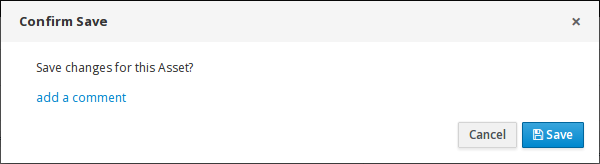
Now, the destination package can be selected when a project file is copied from any package.
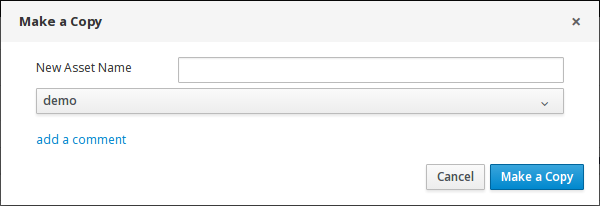
33.46.2.4. Authoring - Project Editor - Reimport button
The "Reimport" button invalidates all cached dependencies, in order to handle scenarios where a specific dependency was updated without having its version modified.
33.46.2.5. Security Management
The User and Group management perspectives released in version 6.4 have been unified into a single perspective which delivers a shared view for managing both users and groups as well as the permissions granted to any of the application roles.
This very new perspective is placed under the Home section in the top menu bar.
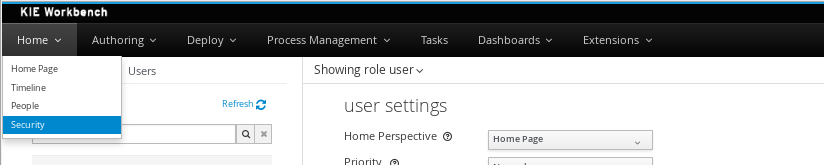
The next screenshot shows how this new perspective looks:
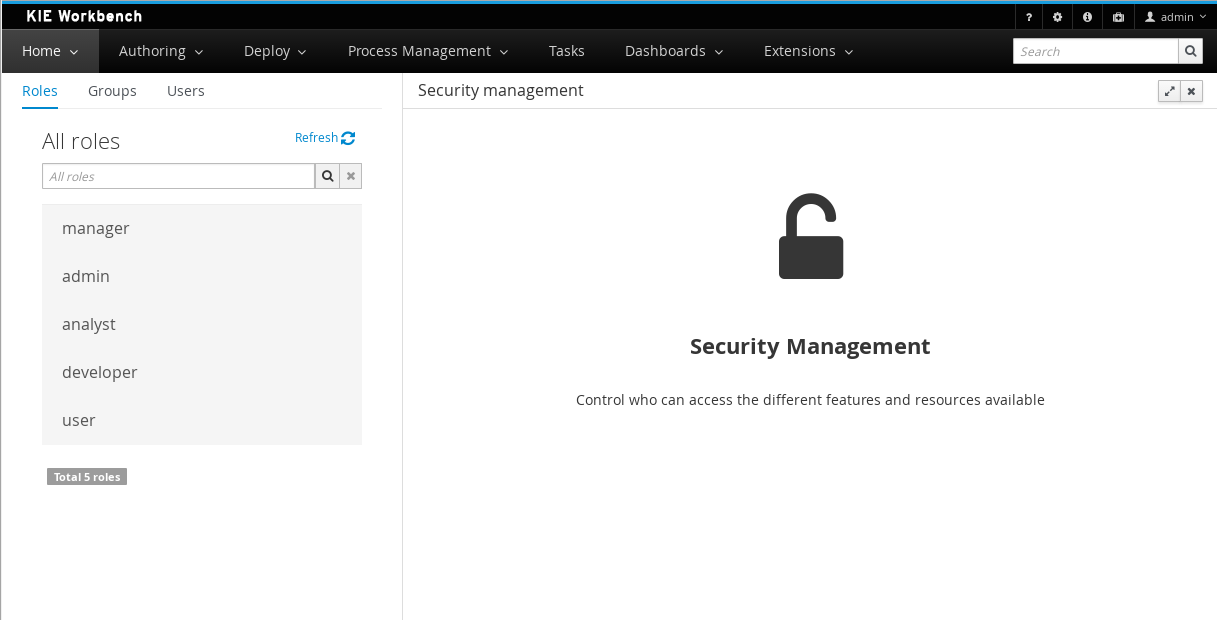
A tabbed pane is shown on the left, allowing the User to select the Roles, Groups or Users tab. After clicking on a Role (or Group) a detailed screen is displayed allowing the user to configure some security settings.
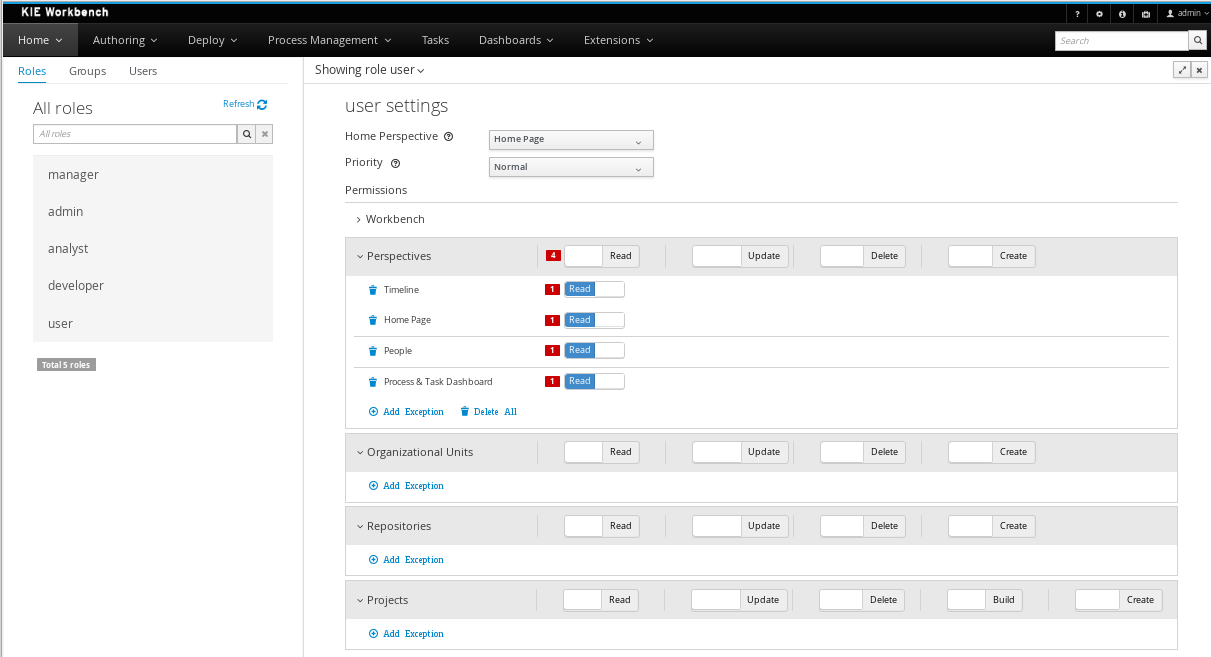
-
Home Perspective: The target perspective where the user is directed after login, which makes it possible to have different home pages per role/group.
-
Priority: Used to determine what settings (home perspective, permissions, …) have precedence for those users with more than one role or group assigned.
-
Permissions: A full ACL (Access Control List) editor for grant/deny permissions over the different resources available in the platform like Perspectives, Organizational Units, Repositories or Projects. Global permissions on top of any of those resource types can be overwritten by means of adding individual exceptions which makes it possible to implement both the grant all deny a few or the deny all grant a few strategies.
33.46.2.6. kie-config-cli has been removed
The command-line tool kie-config-cli.[sh/bat] for managing remote repositories that was present in 6.x has been removed for the following reasons:
-
The security-related operations it provided (
add-role-repo,remove-role-repo,add-role-org-unit,remove-role-org-unit,add-role-project,remove-role-project) have been replaced by more comprehensive Security management feature. -
The operations related to managing deployments (
list-deployment,add-deployment,remove-deployment) no longer make sense, since jBPM Runtime has been removed from workbench. Deployments can still be managed programmatically using Kie Server REST API. -
The remaining operations (
create-org-unit,remove-org-unit,list-org-units,create-repo,remove-repo,list-repo,add-repo-org-unit,remove-repo-org-unit,list-project-details) are available as a part of Knowledge Store REST API.
33.46.2.7. User and Project Admin Pages and Preferences
The workbench now has a new menu item: "Admin". In there, you can find some admin tools, like "Users", "Groups" and "Roles" management, and also general preferences. When a preference is changed there, it will affect all places that depend on it, but only for the logged user.
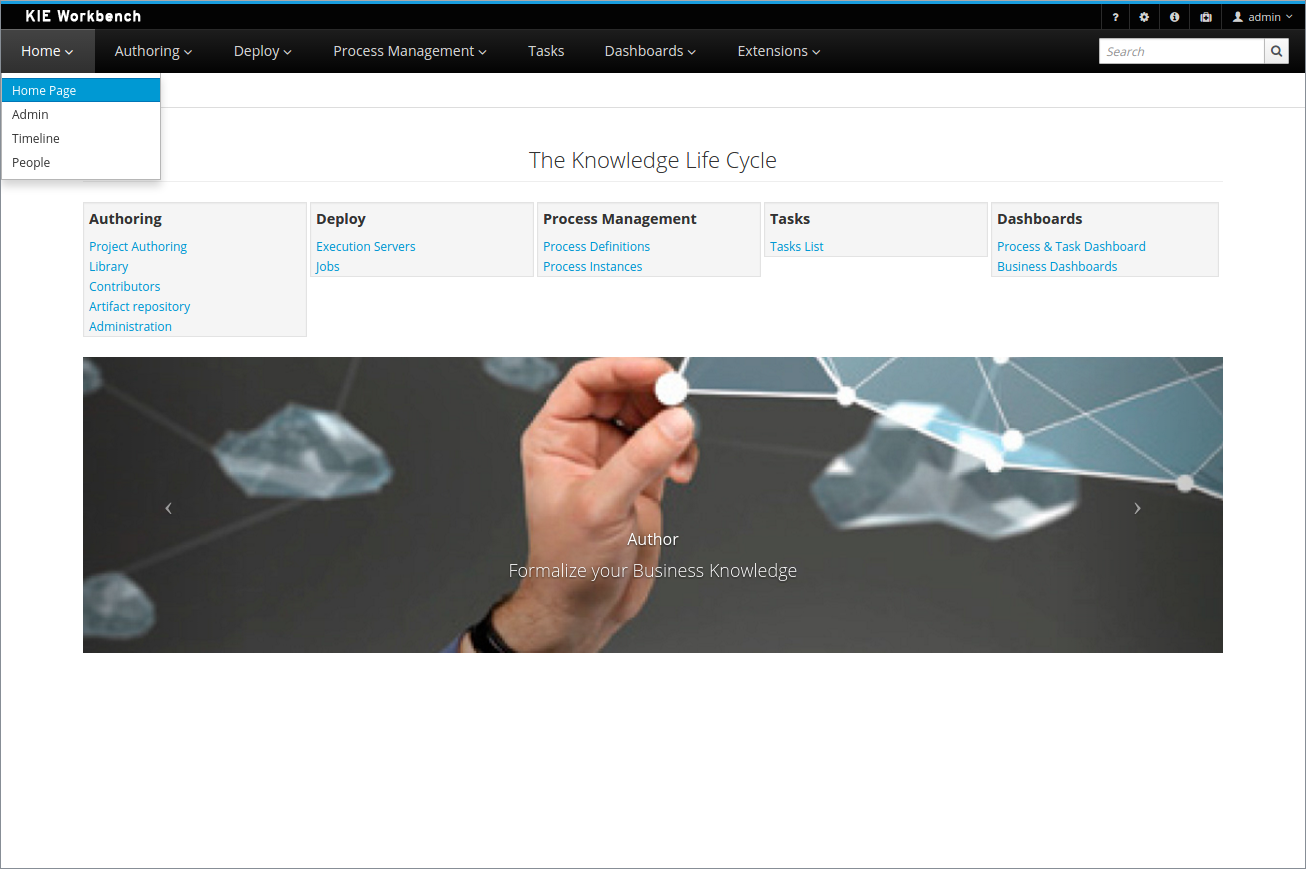
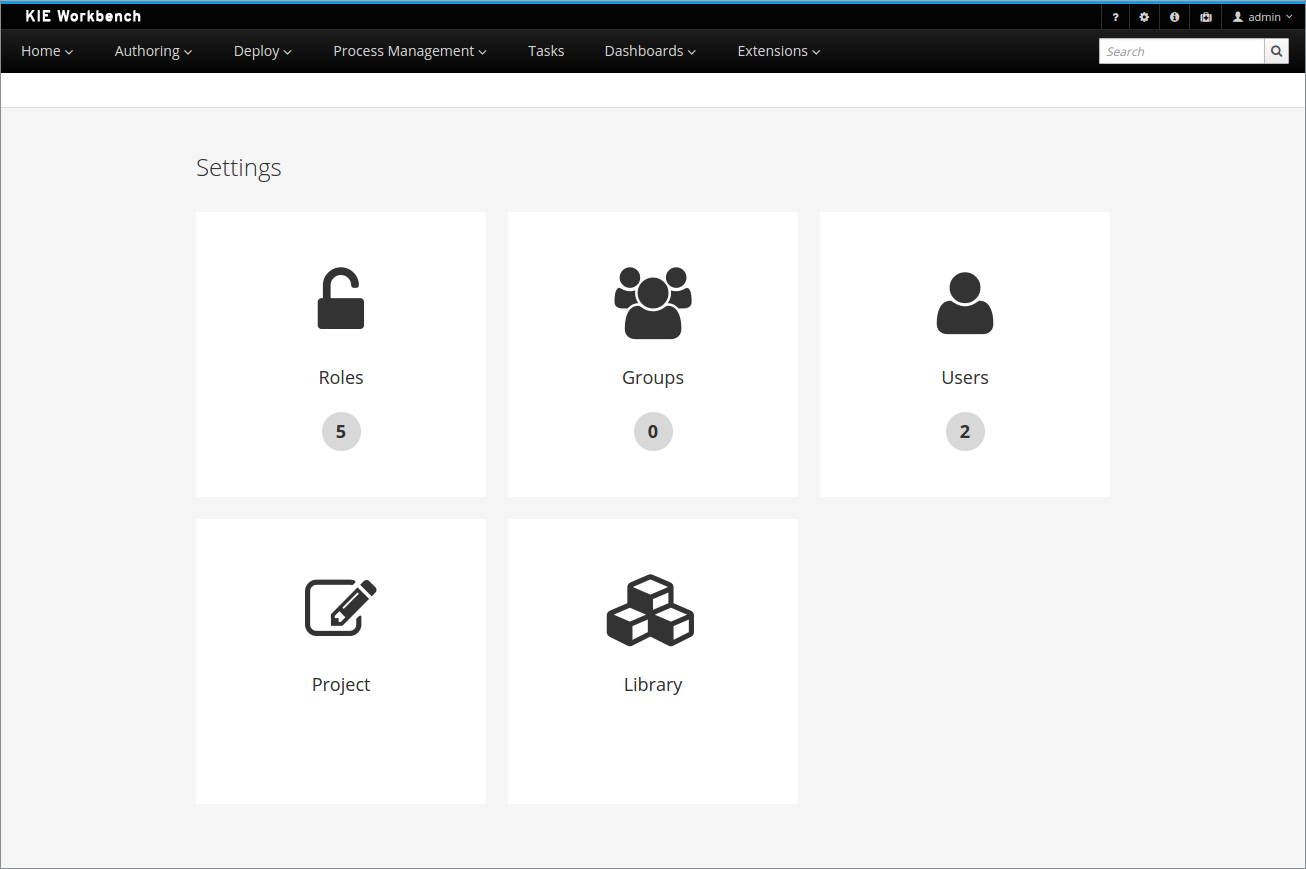
Each project also has its own admin page, with admin tools and preferences. When a preference is changed there, it will affect only that project, and only for the logged user.
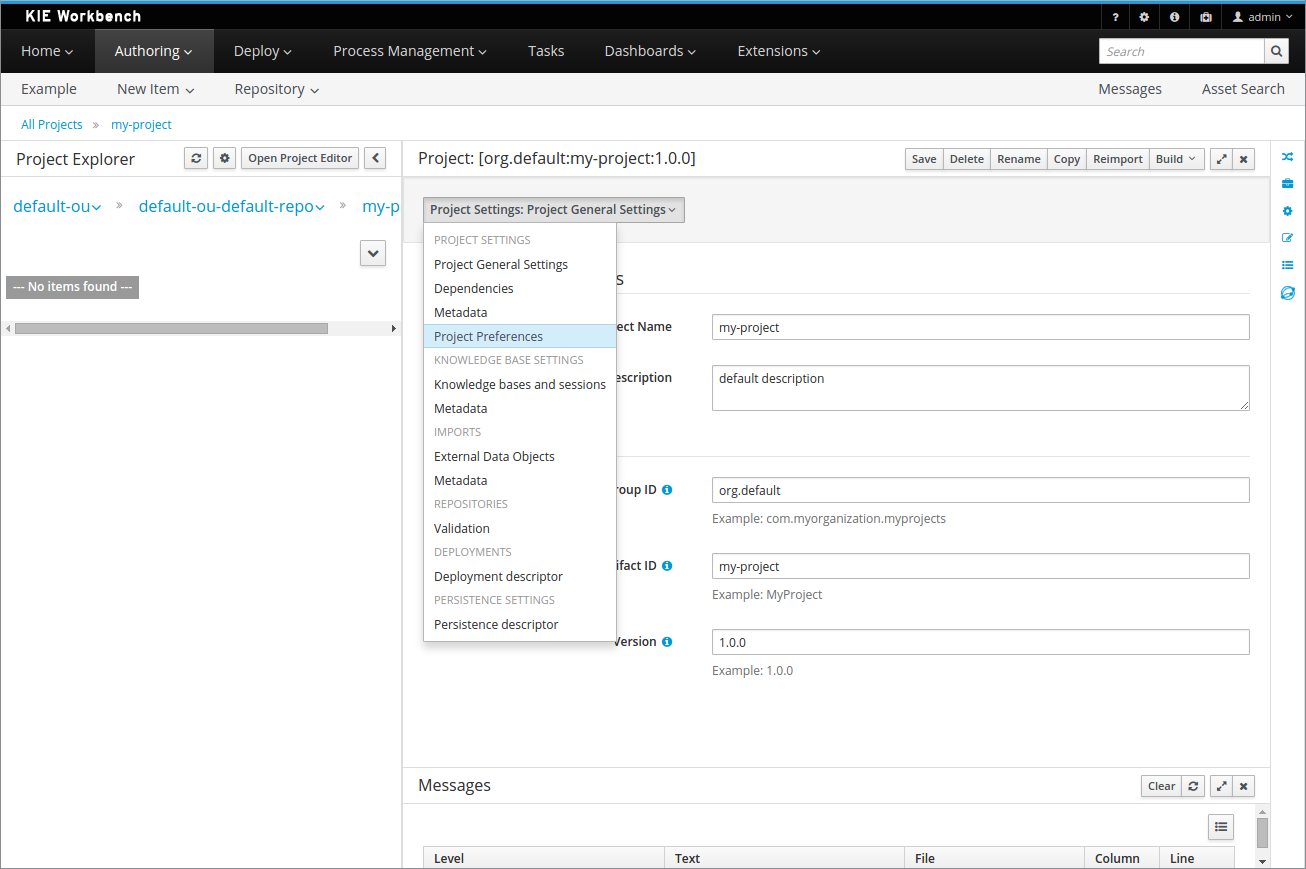
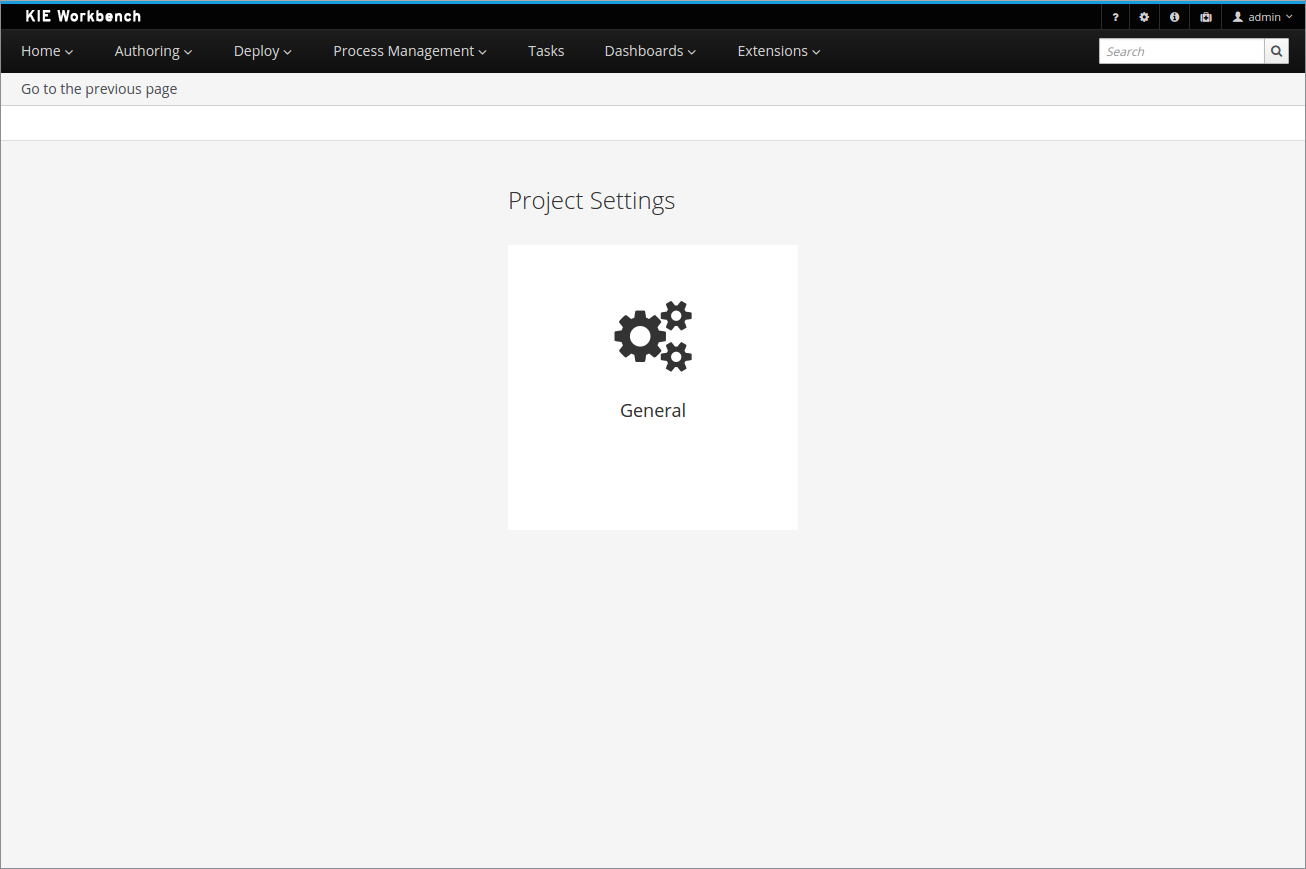
33.46.2.8. GAV conflict check and child GAV edition
It is now possible, for each user, to set the GAV conflict check flag, and also allow or block child GAV edition for all their projects, or specifically for each project.
The configuration can be found inside the admin tool "Project", in case the access is made through the "Admin" menu item. It can also be found by entering the admin tool "General", on the Project admin page.
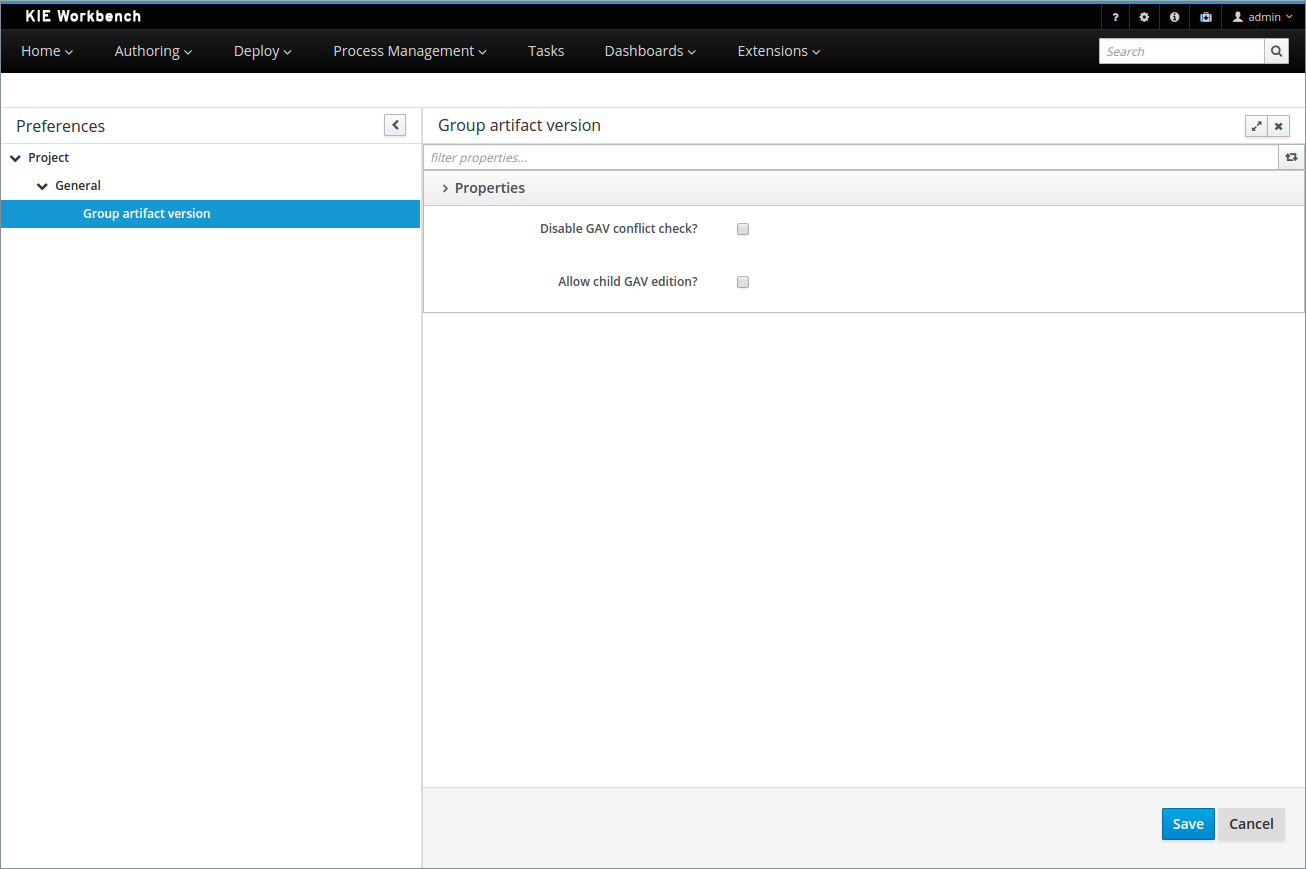
33.46.2.9. Data Source Management
The new data source management system empowers the workbench with the ability of defining data sources and drivers for accessing external databases.
Some of the included functionalities are:
-
A new perspective for managing the data sources:
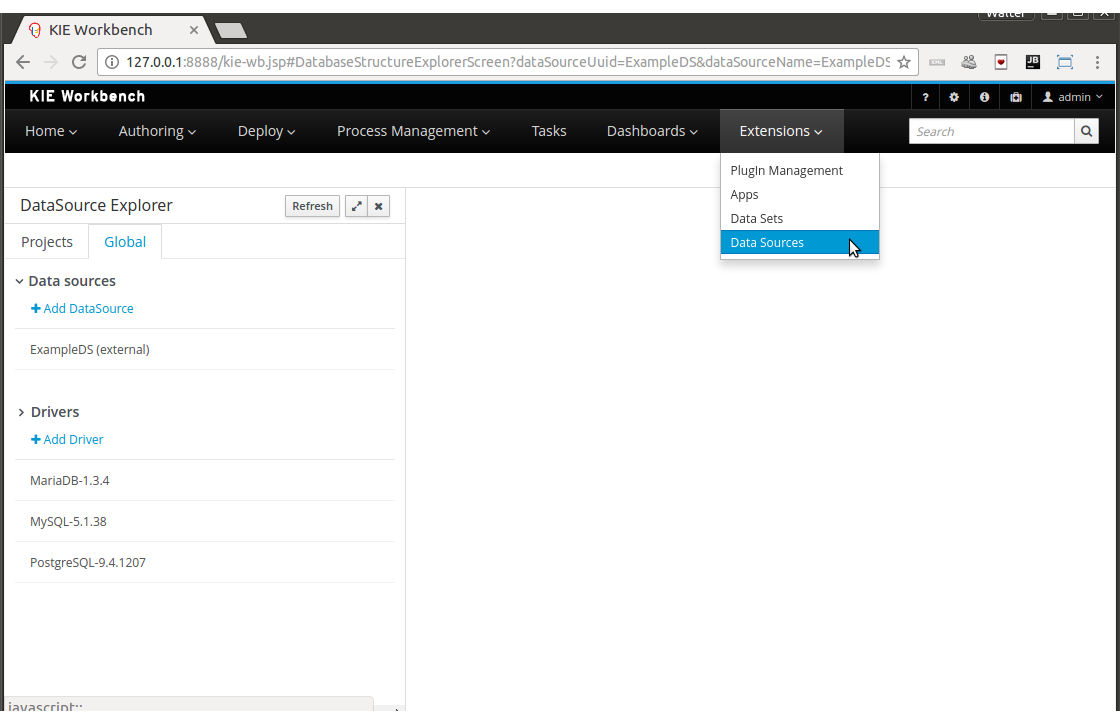
-
A new wizard for guiding the data source creation.
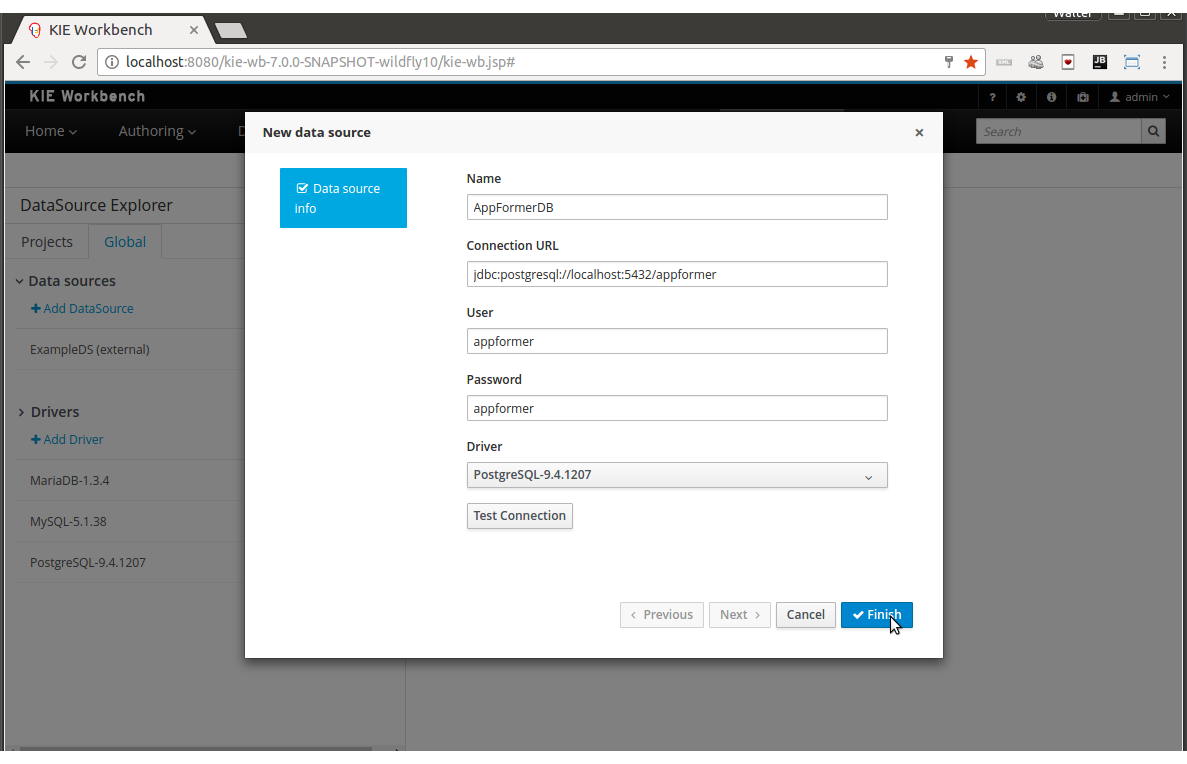
-
A new wizard for guiding the drivers creation.
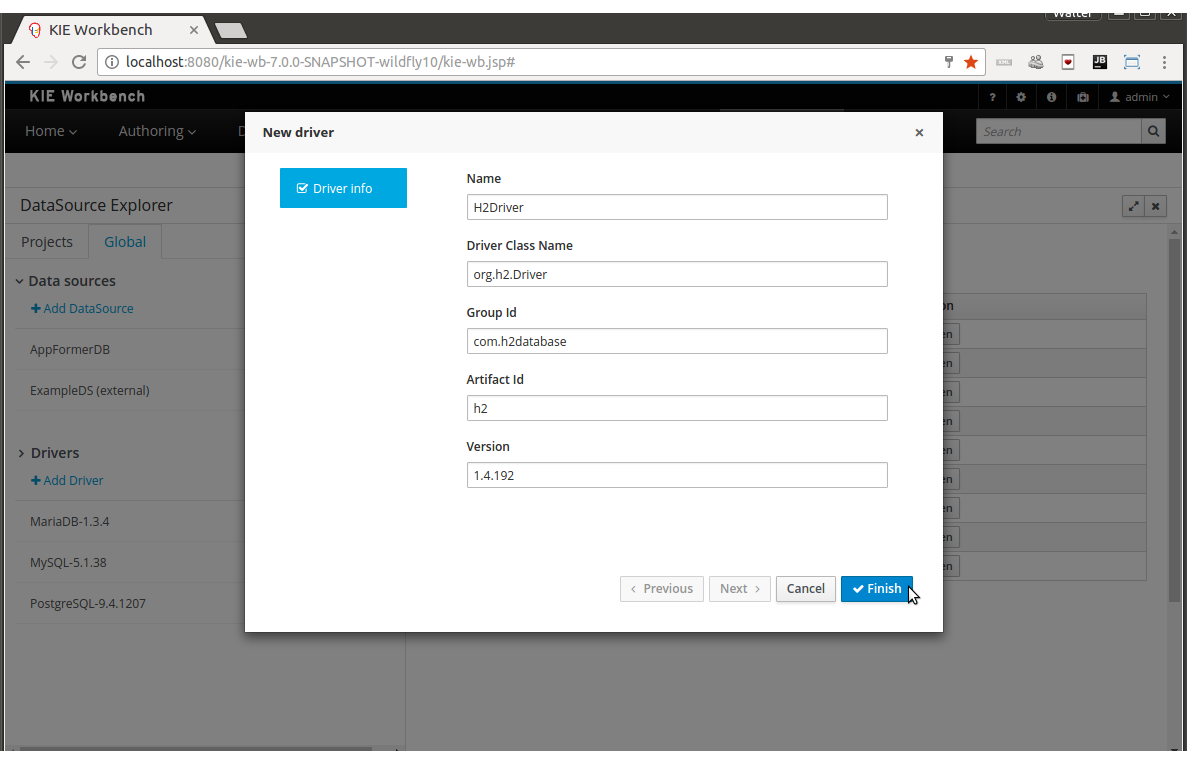
And the ability of browsing the database information for the databases pointed to by the data sources.
-
Available schemas browsing

-
Available tables browsing
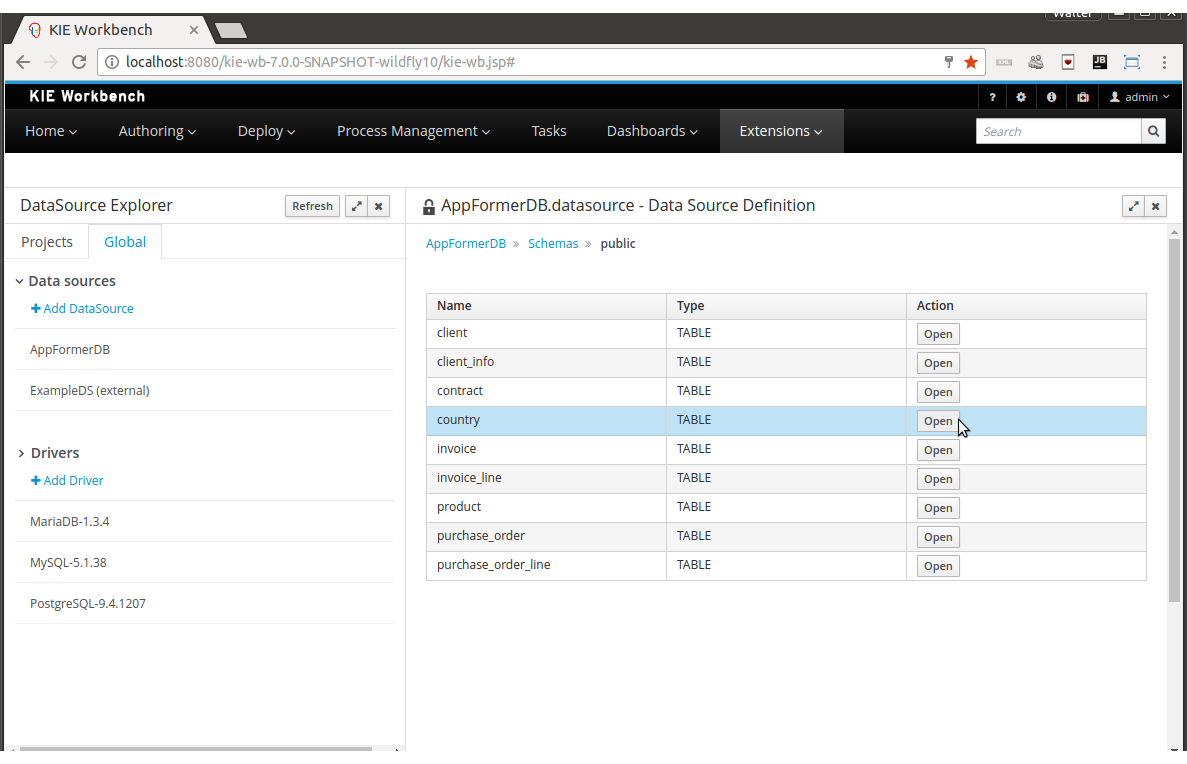
-
Table content browsing
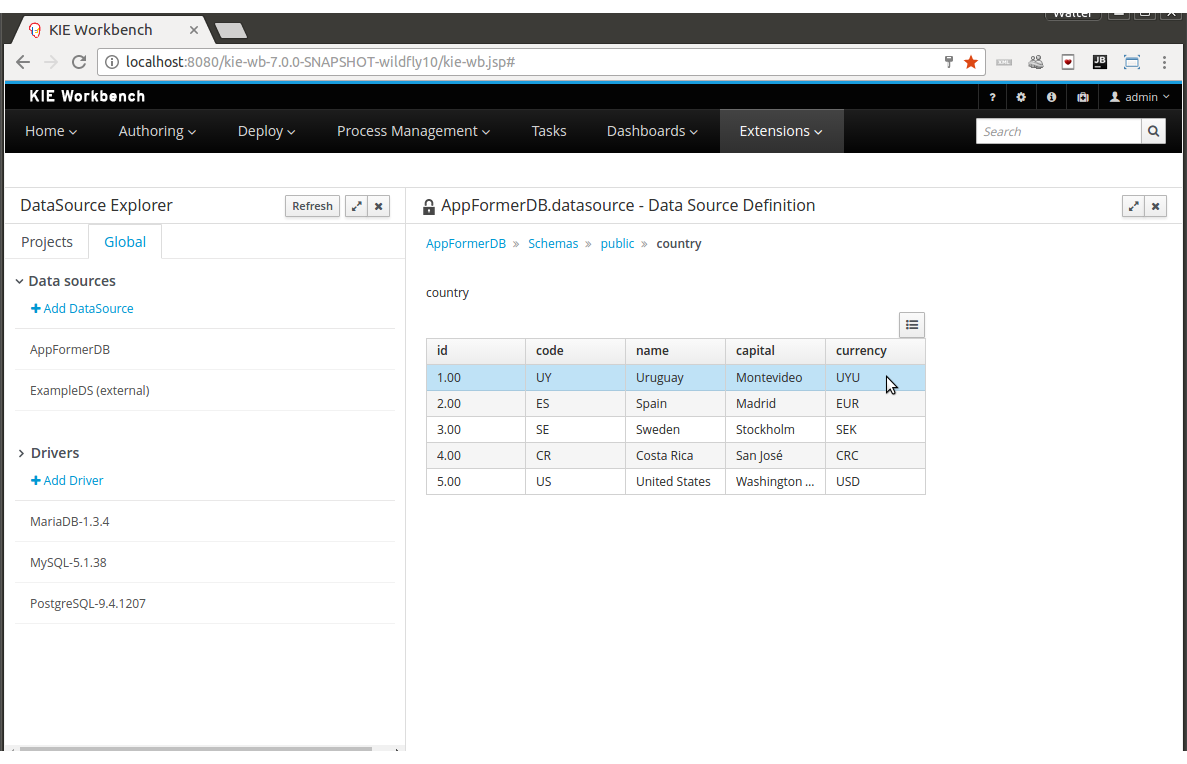
33.46.3. Breaking changes in Kie Server 7.0 from 6.x
33.46.3.1. ServiceResponse XStream marshalling changes
| This release note applies only when directly interfacing with the Kie Server (kie-server) API, not when using the Kie Server Java Client (kie-server-client) API. |
In an effort to be more consistent with JAXB marshalling, XStream marshalling has undergone the following changes:
-
The XML ServiceResponse element’s
responseobject no longer renders with the canonical name. -
XStream now uses
typeandmsgas attributes, not child elements.
For more details, see DROOLS-1509.
33.46.3.2. Simplified Planner REST API
ServiceResponse wrapper removal
ServiceResponse wrapper has been removed from Planner service responses returned by KIE Server.
This allows an easier processing of the responses on the client side.
<solver-instance>
...
<status>SOLVING</status>
<score scoreClass="org.optaplanner.core.api.score.buildin.hardsoft.HardSoftScore">0hard/-10soft</score>
<best-solution class="curriculumcourse.curriculumcourse.CourseSchedule">
...
</best-solution>
</solver-instance>New Planner API overview
Register a solver:
Submit a solution:
Get the best solution:
Terminate a solver:
Dispose a solver: